Tag Archives: cotton

Completed: Vogue 8664

27 Jun

Remember the Sew Bossy Initiative? This is a fun little sewing challenge where you get paired up with a fellow blogger and basically tell them what to sew next – complete with you sending them the fabric, pattern, and anything needed to finish the garment in question. Your sewing buddy will do the same for you.

Vogue 8664 - Birthday Dress

Well, I got paired up with Rachel Pinheiro, and while we were fairly quick about getting the patterns and fabric to each other, it’s taken an entire year for me to actually sew my dress (and poor Rachel, I sent her a pattern that ended up being a no-go, so she’s still trying to decide what to sub in!). On top of that, I’ve actually had this dress completed for over a month! Oops! Well, better late than never, I guess 🙂

Vogue 8664 - Birthday Dress

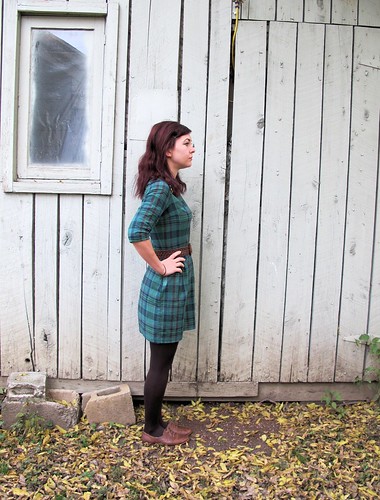
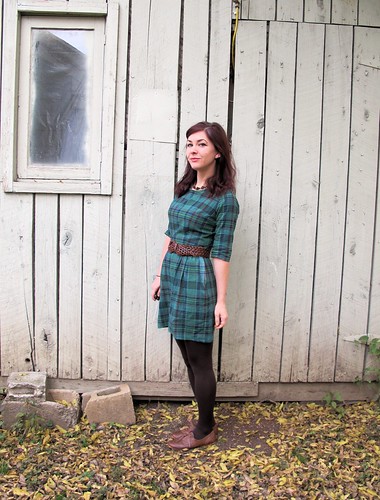
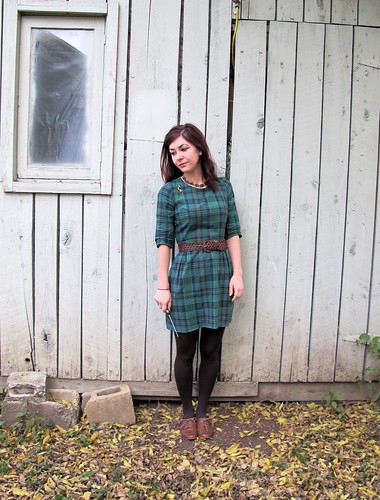
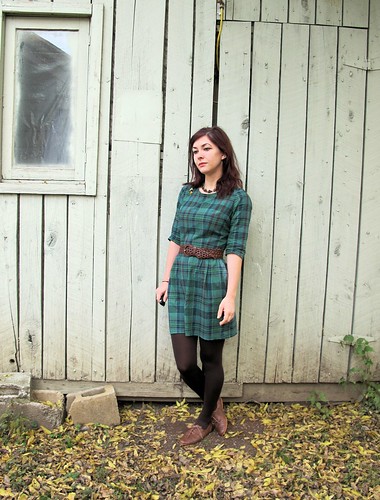
Rachel sent me Vogue 8664 as my pattern for the Sew Bossy. While it’s a gorgeous design, part of the reason why I dragged my feet on sewing it up is because I simply did not like the skirt included. Don’t get me wrong – it’s a pretty, fitted skirt. But I don’t do fitted skirts, they just don’t work with my lifestyle these days (and by “lifestyle,” I mean, I sit on the floor a lot. Ha!). So I sat and considered it, and debated if changing up the skirt would ruin the whole fun of Sew Bossy (since I’m not really letting Rachel boss me at this point). Fortunately (well, unfortunately for Rachel hahah booo), Rachel ended up scrapping the pattern *I* sent her, so we decided it would be fine for me to change out the skirt to make something more suitable for my daily life. As fun at this challenge is – it’s not very fun if I end up with a garment I’m not actually ever going to wear!

Vogue 8664 - Birthday Dress
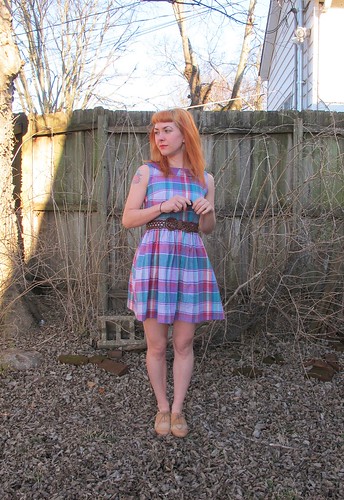
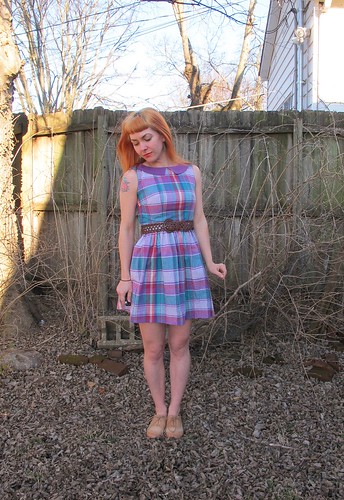
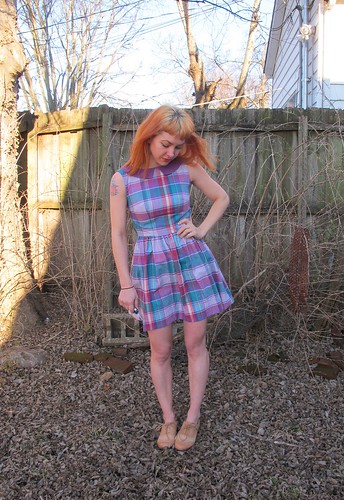
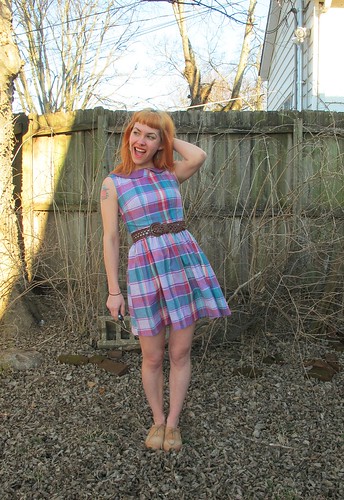
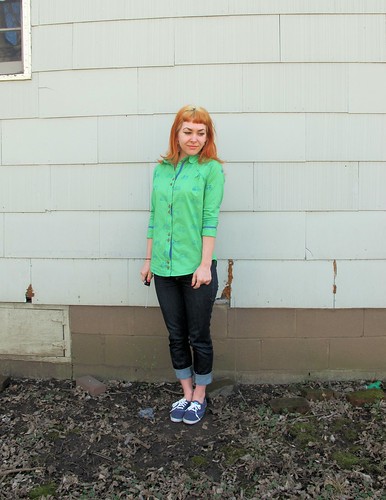
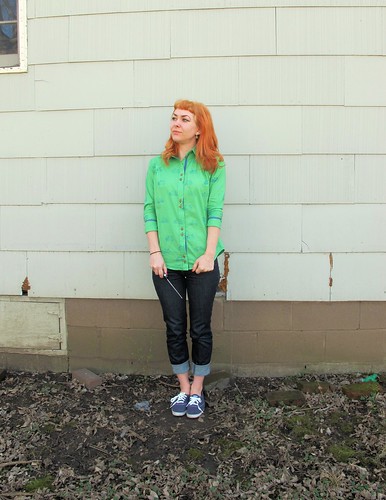
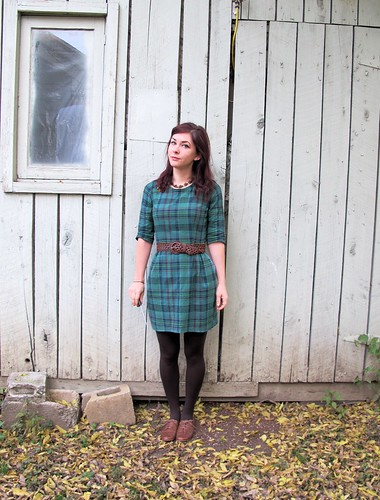
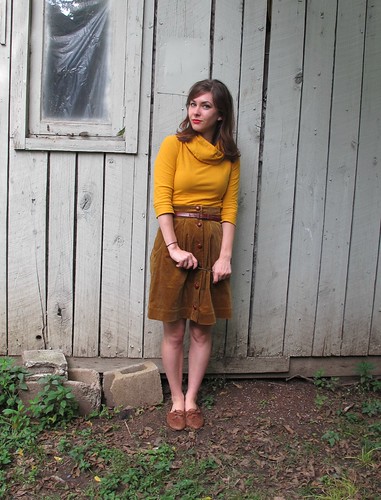
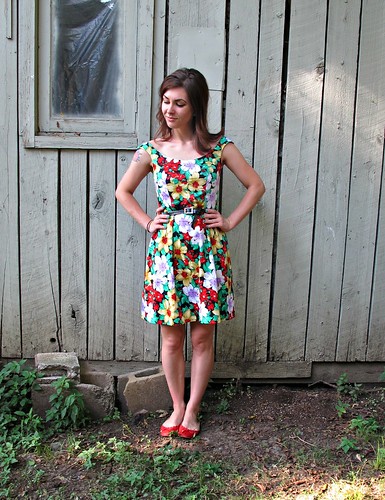
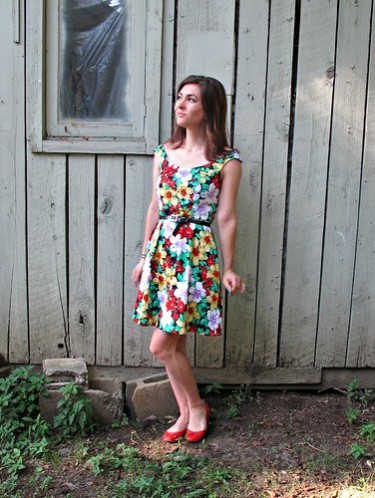
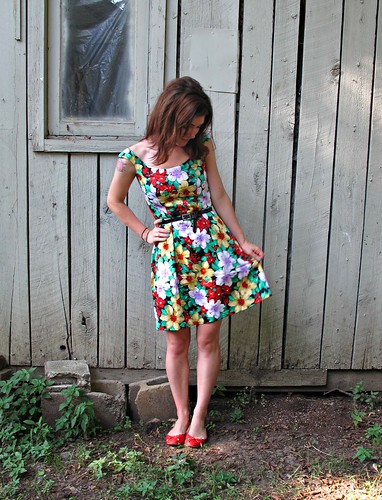
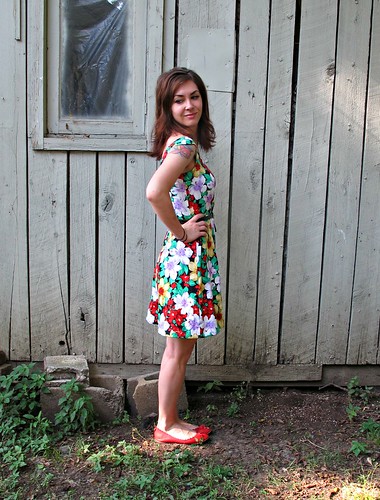
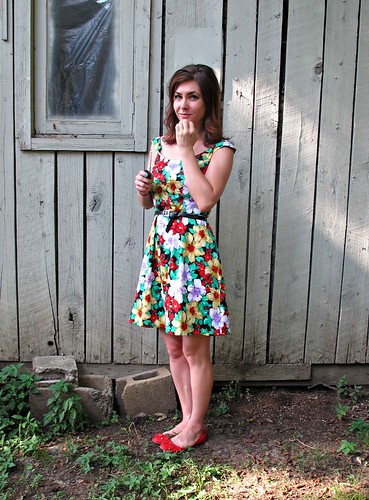
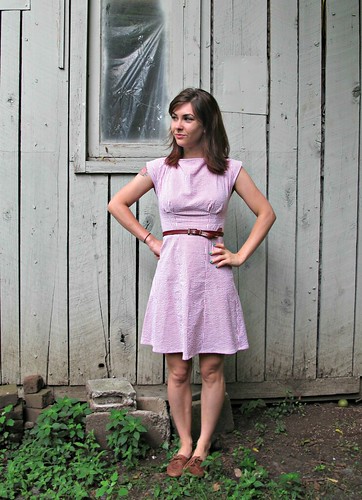
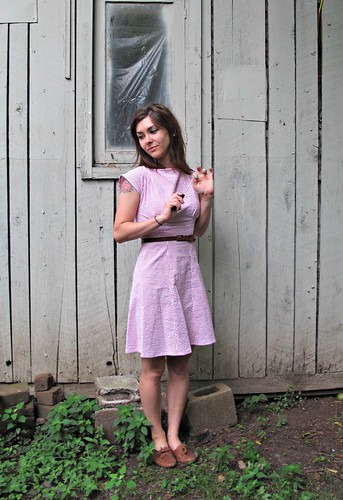
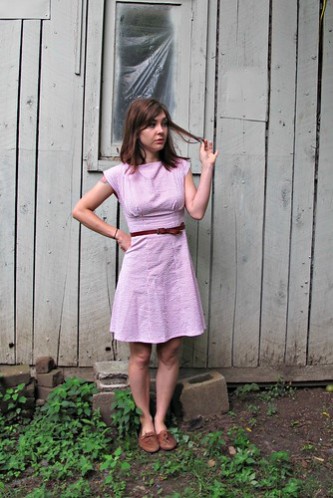
This actually ended up being my birthday dress- which I decided to do about 10 days before I needed it. I don’t even go out for my birthday these days, but man, sometimes it’s nice to just wear a new dress that makes you feel good, you know? And I feel pretty good in this dress!

Vogue 8664 - Birthday Dress
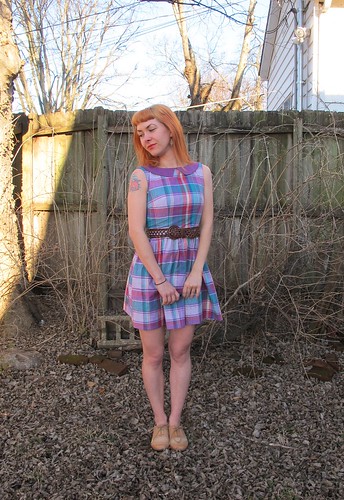
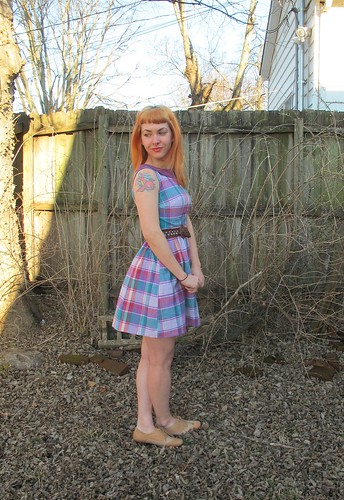
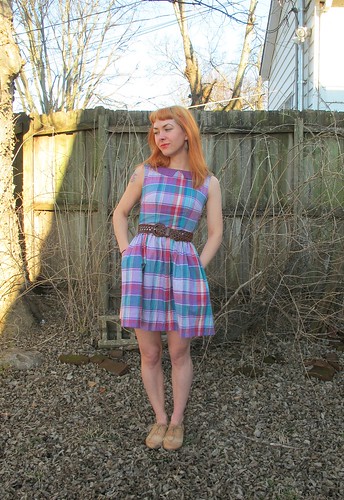
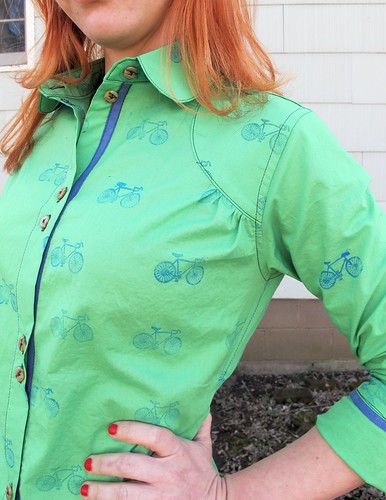
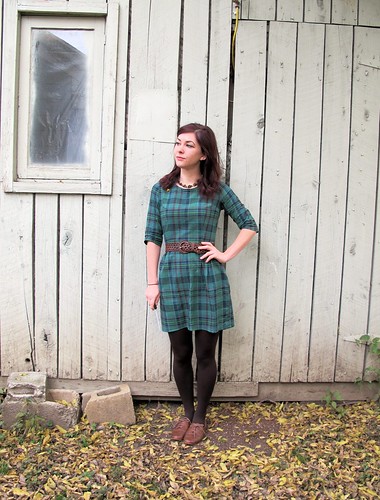
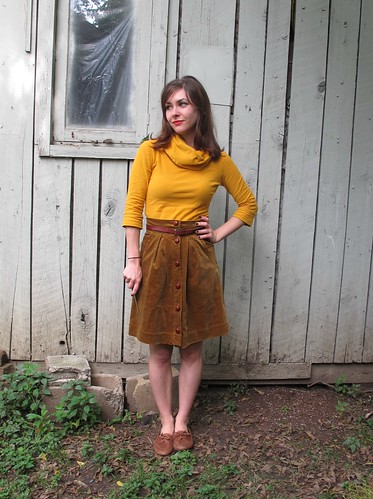
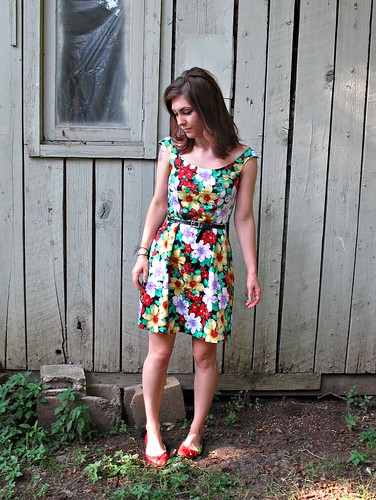
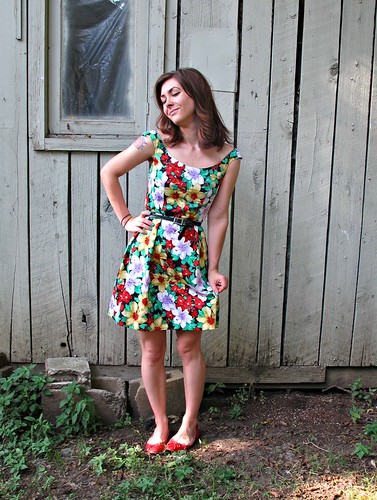
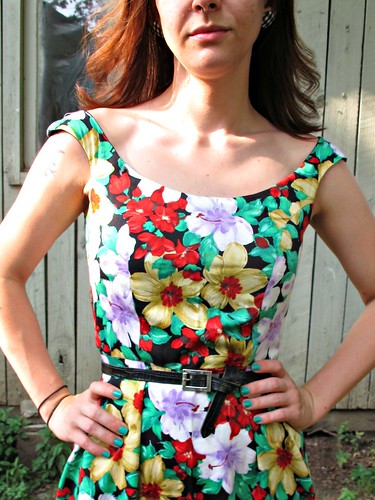
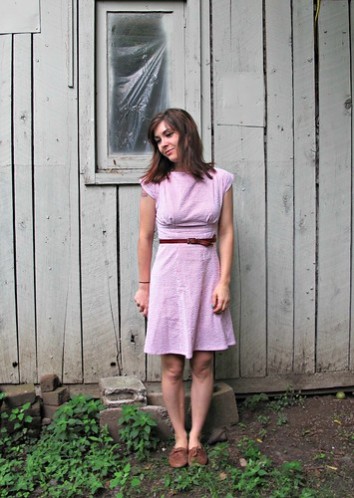
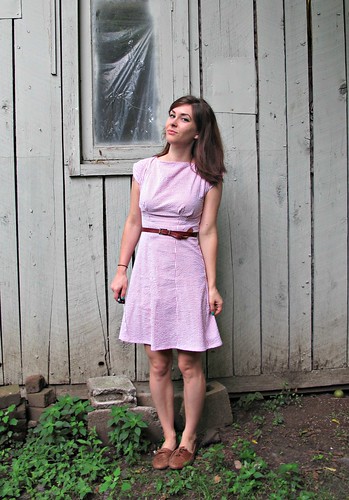
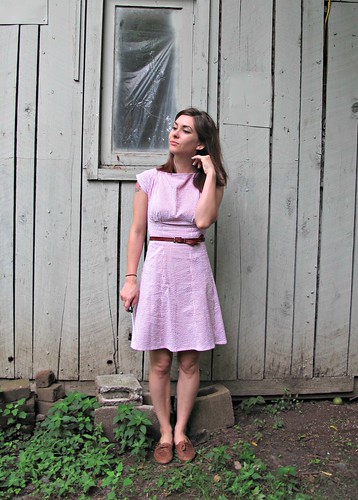
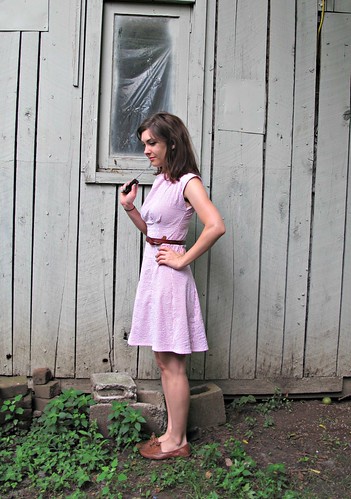
Anyway – back to the Vogue pattern! I cut the size 6, with the B cup pieces (I don’t wear anywhere near a B cup, fyi, that’s just the pattern piece that had the closest finished measurement to my body), and made a muslin of the bodice to check the fit. My fabric is a cotton sateen with a heavy stretch – Rachel bought it in Brazil, isn’t it amaaaazing?! – so I used some old stashed stretch fabric for my muslin. Out of the envelope, everything fit mostly well, except that I did take about 1″ out of the center back (not an uncommon adjustment for me). I debated on whether or not to sew the sleeves, but I’m glad I did in the end, because they’re pretty awesome! They get their shape from two giant darts at the sleeve head; the body of this particular fabric I used also helps 🙂

Vogue 8664 - Birthday Dress
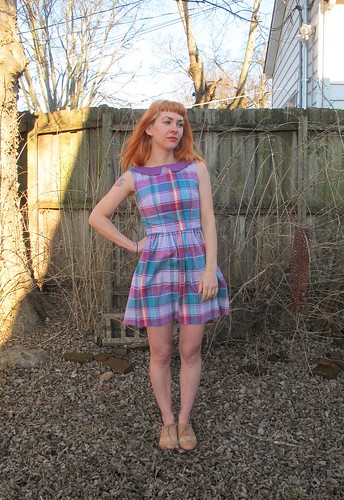
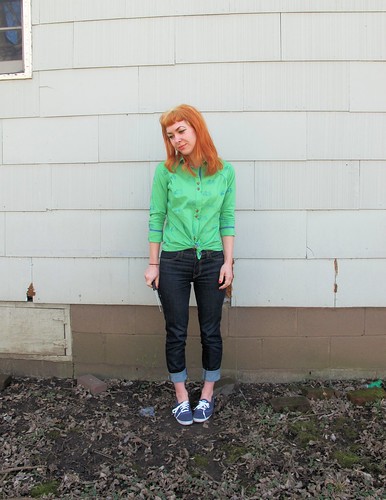
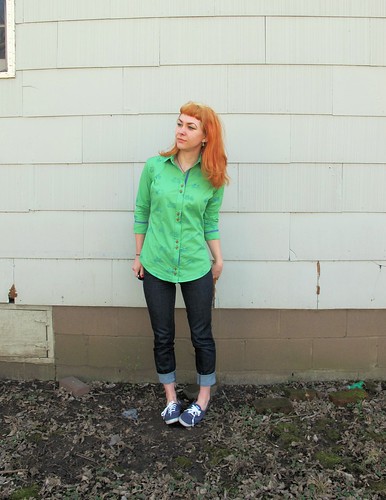
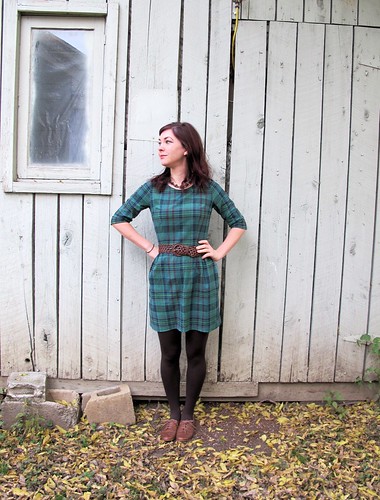
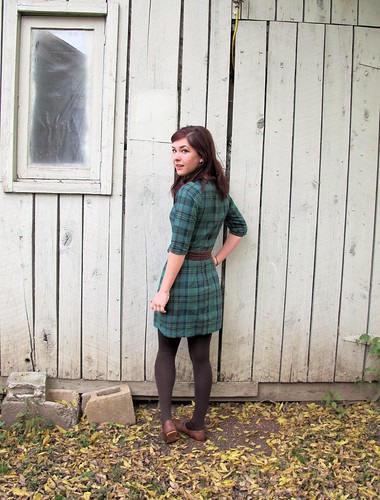
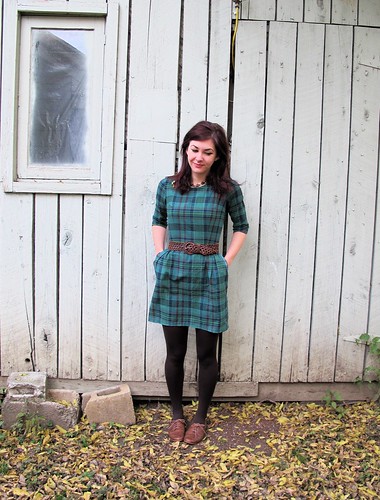
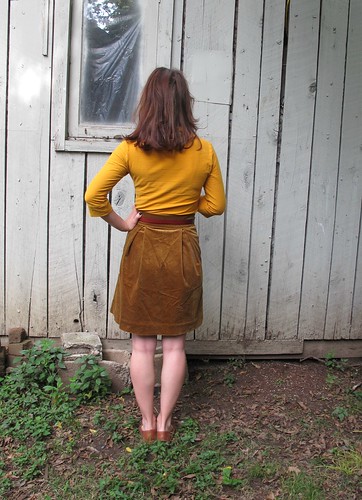
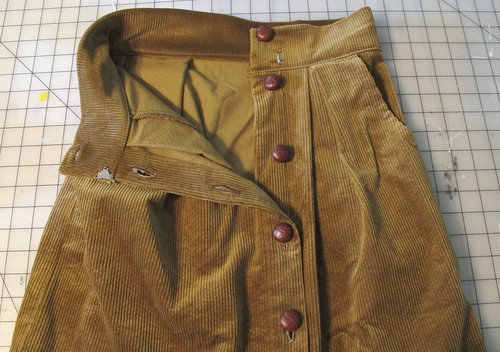
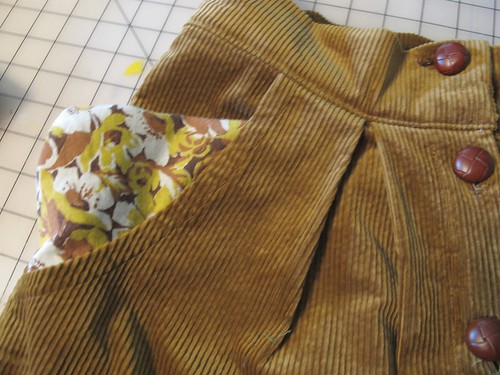
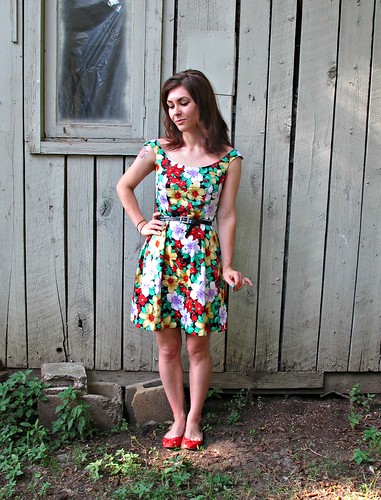
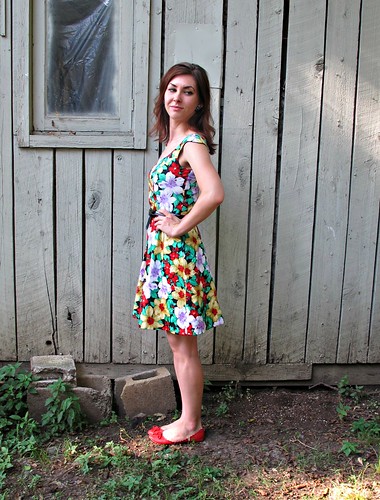
The other major change I made to the pattern was to swap out the skirt for an A-line. I used the skirt from my Belladone pattern – pockets and all – and I think they matched up pretty well. Plus, you know, it’s wearable. For me, anyway 🙂

Vogue 8664 - Birthday Dress
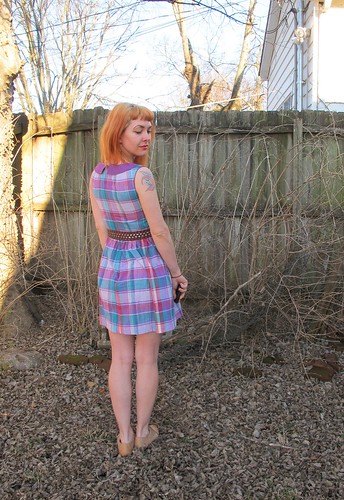
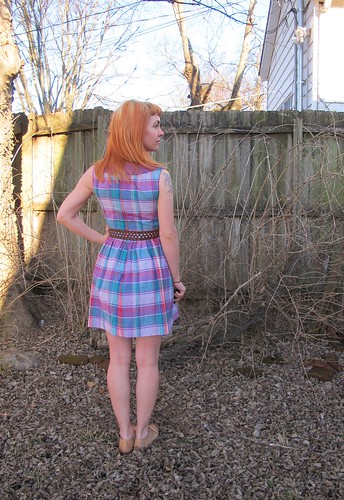
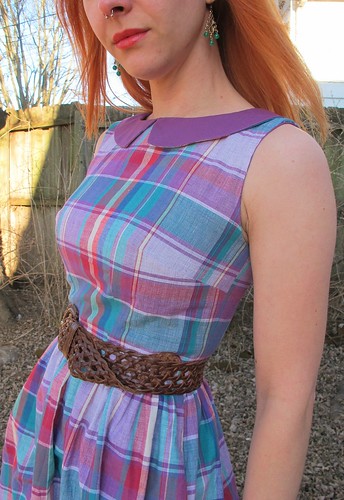
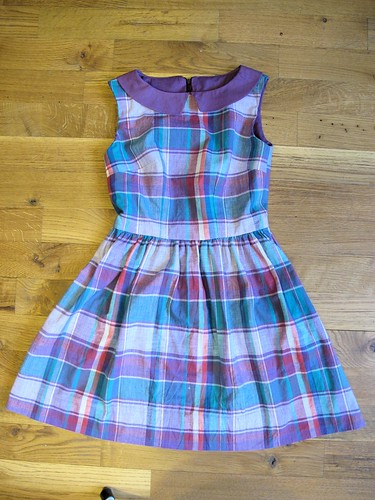
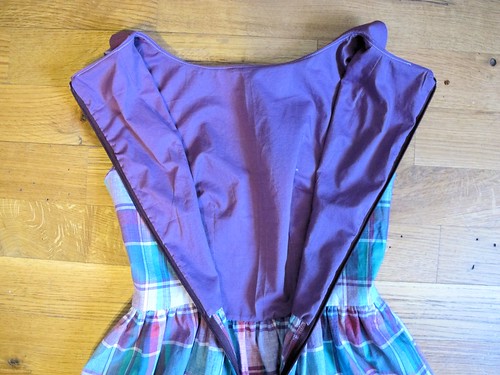
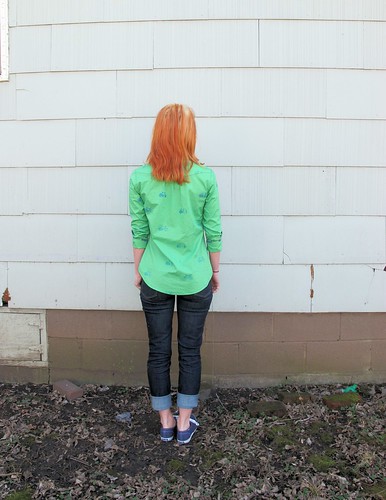
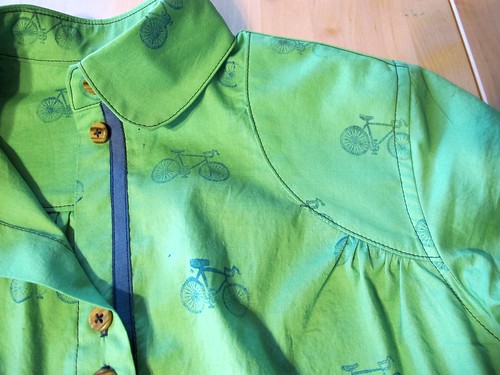
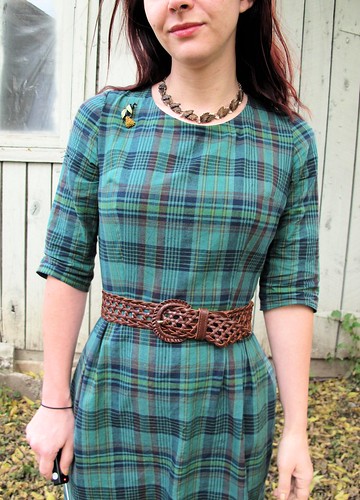
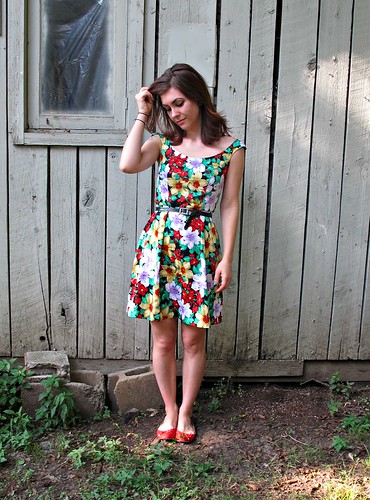
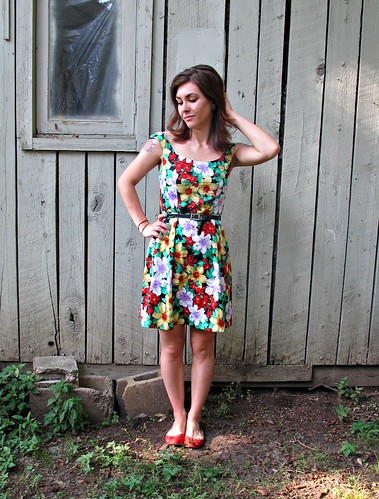
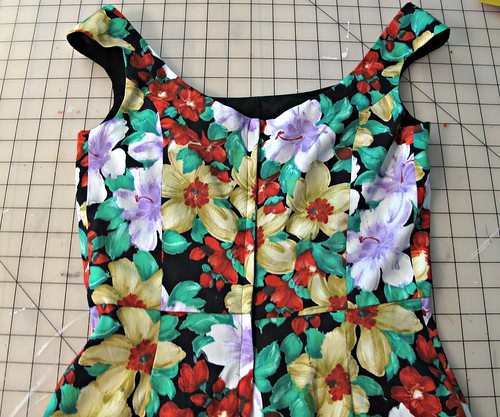
Construction-wise, I made a few changes. The main one was that I did not line the bodice as called for. Rachel sent me enough fabric so I could self-line, but I used up pretty much all that while cutting the skirt and pockets. Anyway, I don’t think I’d like this fabric as self-lining – it’s pretty thick and heavy for a summer dress, two layers would be crazy! Instead, I drafted a facing for the neckline (this was as easy as tracing the edge of the neckline and extending it to 1″ wide for a narrow facing piece, then adding seam allowances). I debated with what to do about the arm holes, since the sleeve doesn’t go all the way around (and thus, this is where that lining really helps). In the end, I bound the arm hole edges with flat bias facing, which covers all the raw edges and also makes the insides look pretty 🙂 You do see topstitching from the outside, but it’s not very noticeable with this fabric.

Vogue 8664 - Birthday Dress
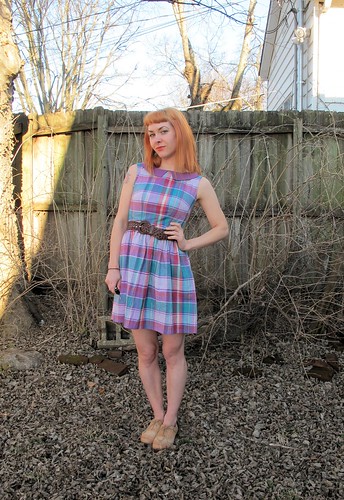
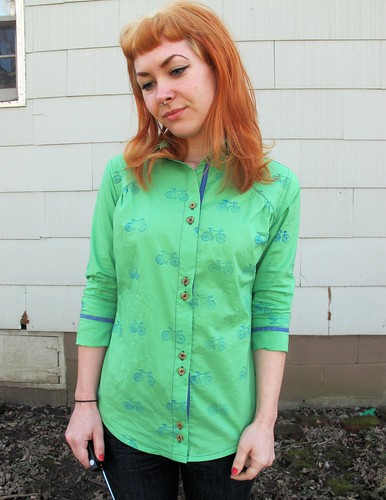
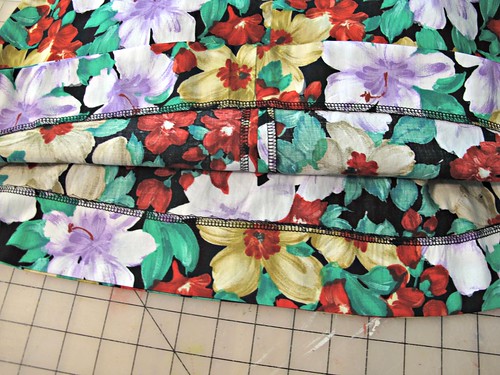
I also changed the midriff to be a contrasting solid color. I actually cut the dress to be all the same self-fabric, but after I sewed everything together… it just looked like a hot mess! Too much pattern being broken up in too many places. Yuck! So I painstakingly ripped out the midriff (which had already been topstiched at this point, ugh) and replaced it with a solid navy sateen that I had in my stash. You probably recognize this fabric because I’ve used it multiple times on multiple garments (including my lace trench, these Maritime shorts and this Belladone. And I STILL have more of this fabric! Man, that shit is awesome).

Vogue 8664 - Birthday Dress
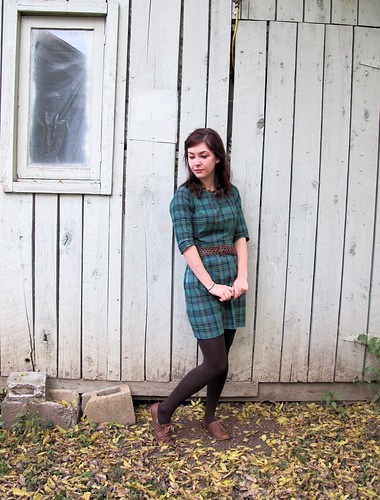
So here’s the major glaring flaw with this dress – the damn waistband seam allowances show from the outside! This happened for a multitude of reasons – mainly, I didn’t interface the outside waistband (i.e., the navy solid). I had already interfaced the feathered waistband, which after I ripped out I put on the inside of the garment, and I didn’t want to re-interface because, fuck you, that shit is expensive. Don’t look at me like that. It might have been ok, except I also didn’t trim my seam allowances, or even attempt to grade them. Why? I don’t know. I have no idea. Anyway, they’re totally visible from the outside and it doesn’t look the greatest, but, whatever. I’m not ripping that shit out again, I can live with it.

Vogue 8664 - Birthday Dress
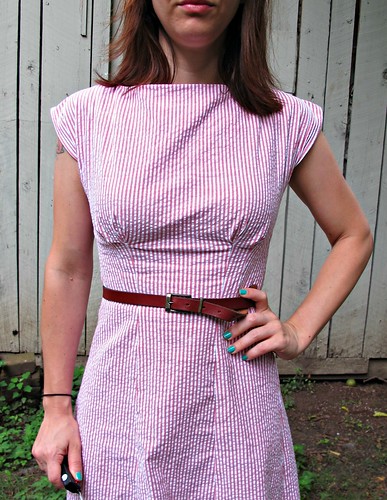
Speaking of interfacing, I have discovered a most brilliant solution for interfacing fabric with a high stretch content – stretch interfacing! Whowouldathunk?! I used this tricoat interfacing from Fashion Sewing Supply (the only place I buy interfacing from; srsly, it’s all amazing). It gives a bit of interfaced support to your fabric without actually compromising the stretch! Which means my waistband still stretches, despite being interfaced. It’s fucking awesome. I used this stuff on the neckline facing as well.

Vogue 8664 - Birthday Dress
As I mentioned before, I made my neckline facing 1″ wide. Generally, facings are closer to 2″-3″ wide. Why so narrow? I wanted to topstitch it down (partially to keep it on the inside of the garment, and partially because of all the topstitching already on the dress), and didn’t need a giant flap of interfacing beyond my topstitching. Even though I topstitched the facing, I also understitched it first – it helps everything roll to the inside and press flat before that final line of stitching.

Vogue 8664 - Birthday Dress
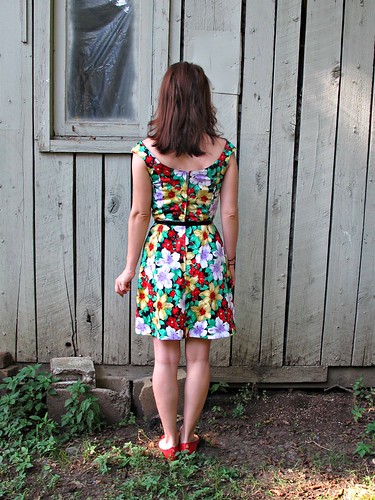
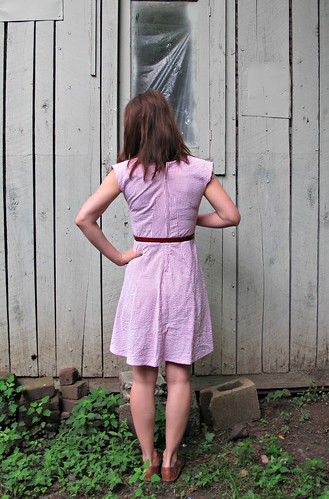
Also topstitched: the lapped zipper, both edges of the midriff band, around the arms (where I sewed down the bias facing), the pocket edges, and the sleeve and skirt hems.

Vogue 8664 - Birthday Dress
I just love the way the neckline facing looks! It’s so dainty!

Vogue 8664 - Birthday Dress
Here is the arm hole facing. It is sewn in the exact same way as I sew bias facing for a sleeveless dress.

Vogue 8664 - Birthday Dress
For garments with very visible seams that need to be matched up across a zipper, you can’t beat a lapped zipper. It makes things sooo much easier to match, as you can see it while you’re sewing (as opposed to an invisible zipper, which is sewn on the wrong side).

Vogue 8664 - Birthday Dress
And that’s it! A bossy birthday dress 🙂 I’m happy to report that I did finish this in time for my birthday – woohoo! Also, these are the last photos I have of my hair this color, fyi. I actually dyed it over the weekend (right after I took these pictures, of course, ugh), and now it’s purple! Stay tuned for that 😉

Consider this a Sew Bossy success! I can’t wait to see what Rachel dreams up for her fabric, because I know whatever she makes is going to be amazing (like everything else she makes, gah). Thanks to Heather Lou for dreaming up this fun challenge, and to Rachel for agreeing to pair up with me!

How bout you? Ever participate (or would you participate) in Sew Bossy? Does it give you a mini heart attack to imagine someone else telling you what to make? Spill!

Completed: Sewaholic Robson, Jr.

21 May

Ever since I made my first trench coat last year (you know… the one in the amazing lace), I’ve been thinking of how to improve on it. Not that the lace coat needed a lot of improving – I mean, not to toot my own horn or anything (toot toot), but it’s pretty brilliant on it’s own. However, I knew there were a few things on the original that could use some updating.

Polkadot Robson made with reversible cotton/poly  from Mood Fabrics

For one, I needed a coat that was a lighter weight. In these transitional spring days (specifically – when I wake up and it’s 50 degrees outside, then suddenly turns 80 by afternoon… I mean, what the fuck, weather?), a lightweight coat is a nice thing to have around. My lace Robson was a little tooo heavy, my Minoru a little too fall-esque (don’t get me wrong, though, I LOVE THAT COAT and I wear it all the time… in the fall) and obviously I can’t wear my big awesome plaid coat right now. Cardigans do work, but I wanted something that would also protect me from the rain (because, let’s be real, wet wool smells like shit).

Polkadot Robson made with reversible cotton/poly  from Mood Fabrics

I knew I wanted to make another Robson – I’ve wanted to make another since, well, right after I finished the first one. It’s just a fun pattern to put together – it’s very detailed, there is a lot of fiddly work involved (with all the bias binding and topstitching), but it comes together sooo well. Plus, it looks super polished and who says I can’t have two trench coats amirite?

Polkadot Robson made with reversible cotton/poly  from Mood Fabrics

I spent several months looking for a good fabric – and to be honest, I initially had my heart set on making a classic tan trench. I’ve always loved the way those look – talk about polished! However, I couldn’t find a good twill fabric – either it had stretch (a personal no-no when it comes to coatmaking), or it was the wrong weight, or the color was off.

This cotton/poly reversible polka dot fabric ended up linked to me via one of Mood Fabric’s sale emails – y’all ever sign up for those? They are, in one word, dangerous. Fabrics for half off! Aiee!! As soon as I saw the fabric and the price ($7 a yard YESSSS), I knew it was meant to be. I bought 3 yards and it ended up on my doorstep a few days later.

Polkadot Robson made with reversible cotton/poly  from Mood Fabrics

Guys. This is basically my DREAM coat. The polka dots make it sooo much more fun than if it had just been a borin ol’ tan coat. I’m so glad I came across this fabric, and that I snapped it up when I did. I admit I was initially afraid it would be a little too lightweight for the structure of a trench – and it is pretty lightweight, it’s not super warm or anything (but, like I said, I don’t need super warmth right now so that’s fine with me!) – but once I got in the facings and the hem, it holds it’s shape pretty well. It has a nice crisp drape and the poly content in the fabric gives it a subtle sheen that I think looks really nice for this sort of garment.

Polkadot Robson made with reversible cotton/poly  from Mood Fabrics

Polkadot Robson made with reversible cotton/poly  from Mood Fabrics

Plus, it’s reversible! Meaning the inside still looks cool as shit, but I didn’t have to line it to make it that way 😀 Yay!

Polkadot Robson made with reversible cotton/poly  from Mood Fabrics

Since I’ve already once talked at length into the making of this coat (well, the lace version… you can see the posts here and here, if you’re curious!), I’ll just go over what I changed for this coat.

Polkadot Robson made with reversible cotton/poly  from Mood Fabrics

I think the biggest/most noticeable change is that it’s much shorter than the pattern is designed to be. I always felt like the lace one was a liiiittle too long on me – and not always the most flattering. The shorter length on the polka dot one is definitely more casual, which I like! To get this one hip length, I actually just put on the lace coat and measured how much to take off to get it where I wanted it, and then added my hem allowance and cut off the bottom of the pattern pieces. I usually use the lengthen/shorten lines (cos, duh, that’s what they’re there for), but I wanted my coat to be slightly more flared and I also felt that the waist length was fine… I just wanted to shorten the length below the waist. I think it worked out pretty well!

Polkadot Robson made with reversible cotton/poly  from Mood Fabrics

I also raised the pockets on my trench – the pockets on the lace one are WAY too low, and I never use them (like, I can barely get my hands in them ahaha). Again, I just put the trench on and measured where I wanted the pockets to hit – I think I raised them close to 2″. They’re about 1″ below the belt looks, which for me was the perfect spot. Now I can actually use my pockets!

Polkadot Robson made with reversible cotton/poly  from Mood Fabrics

One last thing I did was narrow the width of the front storm flaps on this trench – on my lace one, they have a tendency to stick out, and it’s pretty annoying! I wasn’t sure how to fix that, so ultimately I ended up putting on the lace trench (gah, most expensive muslin ever hahaha) and pinning out where there seemed to be excess flap, which I then measured and shaved off the pattern pieces. I think it was something like 1/2″, reduced to nothing – basically, if you look at the pattern piece, it’s where the bottom of the flap curves out by the armhole. After I cut that off, the flaps stay flat like they should.

Polkadot Robson made with reversible cotton/poly  from Mood Fabrics

Polkadot Robson made with reversible cotton/poly  from Mood Fabrics

Other than the above changes, I didn’t do anything else to the pattern. I did size this one down to the 0, so it’s smaller than the lace one (which I’ve lately felt like is a liiiiitle big). Other than that, I made no sizing adjustments and I did not stray from the directions!

Polkadot Robson made with reversible cotton/poly  from Mood Fabrics

I agonized for waaaay longer than I should have over what buttons to use for this coat. Initially, I had picked plain navy buttons – boring! Then I chose some cool cream buttons with a gold ring around the edge, but once they came in, they just looked all sorts of wrong with the coat. Of course, at this point we were pushing deadline, so I didn’t have time to reorder (and THANK GOD Mood returns buttons, because that was like $30 right there haha! More than I spent on the fabric! Whyyy are buttons so expensive?), so I turned to my stash for a solution.

Polkadot Robson made with reversible cotton/poly  from Mood Fabrics

Polkadot Robson made with reversible cotton/poly  from Mood Fabrics

Aren’t they cool, though? I got them from my Mamaw a few years ago – she used to work for a garment factory, and when they ultimately closed down, she came bearing loads of sewing notions. Mostly buttons and huge spools of thread, which my mom and I split. I have several jars of these gold buttons (with two different crests), silver buttons, and leather-wrapped buttons (in brown and black). I think she said they were used on Tommy Hilfiger coats? HA! Thanks for the buttons, I guess, Tommy!

Polkadot Robson made with reversible cotton/poly  from Mood Fabrics

Working with this fabric was pretty easy. I used a Microtex 90/10 needle and tried to be mindful of my pins (since it does like to show pin marks and where you’ve ripped out stitches – although getting it good with the steam iron makes most of the holes disappear). I was a little afraid that the polyester content would make this hard to press, but it played nice with the iron, so that’s good! The only thing that sucked is that it doesn’t ease terribly well, so I have a little bit of puckering at the sleeve caps, oh well!

Polkadot Robson made with reversible cotton/poly  from Mood Fabrics

Polkadot Robson made with reversible cotton/poly  from Mood Fabrics

Since the fabric isn’t too thick (despite being double-faced) and it pressed well, I chose to use the remaining yardage to make bias binding for all the insides. I used the same side I used for the exterior of the coat – I think it gives a nice contrast the wrong side!

Polkadot Robson made with reversible cotton/poly  from Mood Fabrics

Finally (yes, I’m wrapping up here, sorry y’all!), I swapped the tie belt with a gold buckle, to match the buttons. I think it gives the coat a nice final touch, plus, I just love buckles! I shortened the tie drastically and interfaced it for some extra stability.

Polkadot Robson made with reversible cotton/poly  from Mood Fabrics

One thing I want to mention is that I actually waterproofed this bad boy! I used Scotch Gard and, well, just sprayed the everloving shit out of it and left it to dry overnight. I actually finished this coat a couple of weeks ago (the photos were taken the Saturday before Mother’s day), and I’ve been wearing it ever since, due to a random cold snap. I’ve managed to wear it in light drizzle *and* for Bike to Work Day (where there was also a light drizzle), and it’s definitely waterproof! Dunno how well the waterproofing works for torrential downpour or anything like that, but it works for the purposes I intended 🙂 This is my first experience using this stuff, so while I can’t vouch for it in the long-term, I’ll be sure to post an update in a few months 🙂

Polkadot Robson made with reversible cotton/poly  from Mood Fabrics

Polkadot Robson made with reversible cotton/poly  from Mood Fabrics

That’s it! Probably way too long of a post for something I’ve made twice (and already discussed at length), but hopefully this helps some of y’all who may have been on the fence about making this pattern or wanted to make the same changes I did.

Polkadot Robson made with reversible cotton/poly  from Mood Fabrics

Also! Landon took these photos for me – aren’t they nice? We actually shot these in my parent’s back yard, right above the creek that I used to play in as a kid 🙂 That big plot of dirt behind me is actually my dad’s former garden (I say former because he moved everything closer to the house and put it in raised beds), although I think he’s going to plant corn there later this summer. If you think the garden looks huge, it is. It’s fucking gigantic and probably bigger than my house and yes, I’m spoiled with fresh vegetables all summer. Omg I can’t wait for tomato season.

Polkadot Robson made with reversible cotton/poly  from Mood Fabrics

Oh, right, and also – it’s my birthday today! Yay!! I’m 29 – and one year closer to 30 🙂 Think I might treat myself to a new Bernina foot soon, cos, well, I love buying myself presents. Ha!

Bye for now!!

Completed: Chevron’d Ginger Skirt

4 Apr

Here’s another piece that I have seriously been planning for a couple of years – the chevron’d Ginger skirt!

Ginger Skirt - chevrons

Another stupendous idea delayed by lack of fabric – why why whyyyy is it so hard to find a good, 1″ stripe, non-stretch fabric, apparel-weight? Whyyy? I find lots of striped shirting fabrics (too lightweight, stripes too narrow), striped stretch twill (holding out for the lycra-less, pls), striped knit (ok, yes please, but not for this particular project!), or stripes in some kind of weird array of colors. Not to mention the overabundance of home decor striped fabric – but I’ve found I just don’t like all the structure that comes with home decor weight. My ass is not meant for curtains to hang off of it.

Ginger Skirt - chevrons

I was PRETTY FREAKING EXCITED when I found this fabric at last month’s flea. Hiding under a pile of vintage fabrics (all good, I bought nearly all of them lolz) were 4 yards of my dream yellow-and-white-1″-striped-cotton. In a rare unselfish move on my part, I ripped the yardage in half and sent 2 yards to Sunni (who I was doing a great fabric swap with earlier this month and holyyyy shit you guys I cannot wait to start digging into the lovely stuff she sent me!), keeping the other 2 yards for myself and this skirt. And here she is – finally, the striped/chevron’d skirt of my dreams!

Ginger Skirt - chevrons

As I mentioned before, this is the Ginger from Colette Patterns. I made view 3, which gave my striped fabric a nice chevron. I know chevrons are REALLY hip right now (and every time I pass something chevron’d at Target, I groan. A lot.), like to the point of already looking super trendy and dated, but I do like them for clothing. I’d say something like I hope they never go out of style, but I pretty much wear whatever I want regardless, so let’s just say I hope I can continue finding good striped fabric to make my own! Hopefully more frequent than once every couple of years 🙂

Ginger Skirt - chevrons

I’ve made this skirt a few times before, so this definitely ain’t my first rodeo, but I did have to size down since my previous versions don’t fit me anymore (well, maybe the Gazer does. I haven’t pulled that one out of summer storage yet to check). I cut the pieces on a single layer so I could be really accurate with lining up those stripes, and it (mostly)paid off.

Ginger Skirt - chevrons

I even went as far as to center the yellow vertical stripe in the middle of the waistband, so everything would be nice and balanced.

Now that you’ve seen the gorgeous, time to share my shame…

Ginger Skirt - chevrons

Kind of bummed that the chevrons on the side seams don’t match up 😦 I actually think it looks much much better in these photos vs real life (and since I took these photos, I have worn the skirt and been totally ok with the barely-matched-up side seams). Like I said. I did a very careful job of cutting everything out on the single layer, but the way this skirt is shaped means that you either get the fabric on-grain, or the side seams match all the way up to the waistband. One or the other, make your choice! I decided the grain was more important – plus, they kinda sorta match, right? 🙂

The other shame is that dammed invisible zipper! Guysss, inserting an invisible zip into a bias-cut garment isn’t the easiest thing you’ll ever do. I stabilized my seam allowances with 1 1/4″ wide stripes of silk organza cut on the straight grain, and the zipper is ALMOST perfect, but there is a tiny bubble at the bottom. I’m trying to decide if it bothers me enough to rip it out and fix it. Eh. It looks pretty bad in that picture!

Ginger Skirt - chevrons

But, you know, issues aside – it’s a fun skirt! And it’s fun to wear, although I do feel like I’m exposing myself every time I bend over to pick something up. Bias cut rides up all kind weird.

Ginger Skirt - chevrons

Ginger Skirt - chevrons

This fabric was also kind of weird, amazing as it is. When I first grabbed it, it felt like a great bottom weight – slightly stiff, a bit of body, a subtle sheen. After the prewash, however, the fabric majorly softened up and weight-wise, it felt a lot more like quilting cotton. I was hesitant at first, as I wanted a stiffer shape to my skirt, but I’m pretty happy with how the drape of the fabric looks with the bis cut. The only drawback was that those bias sides stretched a loooooot. Like, so much. That’s probably a good part of the reason why the side seams don’t match up so nicely.

Ginger Skirt - chevrons

Ginger Skirt - chevrons

To give the waistband some structure, I interfaced the outside with my normal fusible interfacing, and sewed hair canvas to the facing. While this particular waistband isn’t quite as high as the other views on the pattern – and it’s not shaped, either – I still didn’t want it to crumble when I bent over. Not a good look!

Ginger Skirt - chevrons

Ginger Skirt - chevrons

Oh yeah, I used the bicycle fabric left over from this dress to face the inside of the waistband. It’s a cute little surprise!

Ginger Skirt - chevrons

I also used the last of my yellow lace hem binding for the hem. Side note – the packaging for this stuff (it’s from the 70s) boasts that it’s “Like Pretty Underwear!” which makes me laugh every time.

Ginger Skirt - chevrons

So that’s it! Simple skirt, simple fabric – but I love the results! I guess I’m on a major skirt kick right now; I’ve got anther one cut out waiting for assembly as I type this.

As a side note – the shirt I’m wearing is my button down from this outfit. I LOVE this shit and I’ve worn it soo many times since completing it! The reason why I’m pointing it out, though, is because this is what the shirt looks like after a wash with no ironing – I just shook it out and hung it to dry. It has some subtle wrinkles, but nothing crazy – it kind of reminds me of linen with how the wrinkles just look relaxed and natural. Except it’s cotton! Pretty cool; I love getting away with not ironing my clothes 😉

Completed: The Emery Dress

10 Mar

I am SO LATE to this freaking party – but better late than never, right? 🙂

Emery dress

Behold – it’s an Emery Dress! Sent to me by the lovely Christine Haynes, I was anxious to try out this pattern for myself (have you seen these popping up all over the internet? Everyone’s versions are AMAZING! Some of my favorites – Miss Crayola Creepy, SewTell, The Nerdy Seamstress, By Gum, By Golly!, ShanniLoves, Sew I Thought… ok, I’ll stop now, but you get the idea!). This little lady regularly gets rave reviews on the fit, construction, and overall look, and I think it’s pretty well-deserved.

Emery dress

So, my experience with Emery didn’t go quite as smoothly as everyone else’s – this was the dress that sucked me down the SIX MUSLIN SPIRAL OF DOOM, but once I got that out of the way, the rest of the construction came together easily. Even matching up the plaid was easy, since there aren’t a lot of pieces to contend with (although I totally done goofed mine up… more on that in a minute).

Emery dress

I’ll start with the muslin experience. Since figuring out that I have big back-gaping issues (and since that’s not really something that can be easily tweaked after the pattern pieces have been cut out of the fabric), I always always make a muslin, at least for just the bodice. My muslin for this dress turned out perfect in the front – darts in the correct place, ending at the correct points, perfectly fitting at all key points, yay! – but the back stuck straight out between my shoulder blades. I tried my usual adjustment, and instead of working – it actually made things worse! Thus, I started the muslin spiral: I played with moving around the slash line, I tried adding different amounts, I tried altering the center back seam and I tried adding fucking gigantic darts at the neckline. Those last two attempts were really really awful, by the way – if you tweak the back neckline too hard, you’ll end up throwing off the balance of the front neckline so it pooches out all weird. NOT a good look!

Of course, by the time I realized I couldn’t crack this pattern, I was also 5 muslins in and feeling stubborn enough to refuse giving up. Not to mention, I was getting super desperate and pissy because everyone else seemed to have NO problems whatsoever with fitting this pattern. Look at everyone’s backs – they fit perfectly. This was starting to make me feel like I had a freak body or some shit.

Emery dress

So how did I fix this mystery back pattern? After combing through my fit books and googling everything I could think of, I ended up landing on the narrow back adjustment (this shows something similar to what I did, although I pulled mine from Fit For Real People so it’s slightly different). That did the trick! No gape! I feel like a fitting PRO, y’all!

Emery dress

I think it’s really important to point out that just because *I* had some fitting issues with the back bodice, that doesn’t mean that you should be scared to try this pattern! Like I said, pretty much every other version I’ve seen praises how well it fits straight out of the envelope. Everyone’s body is shaped differently, and it makes me real cringy when I read that someone recommends against a pattern because they had a bad fit experience (unless it’s just a bad fit across the board – which happens, but it’s rare!). Your (or my!) fit experience =/= everyone else’s fit experience, so just keep that in mind! Ok, soapbox rant over!

Emery dress

Anyway, this dress was super simple to whip up after I figured all the fitting shit out. Cutting was a beast; not only did I choose a large scale, unbalanced plaid as my fabric – I only had about 1 3/4 yards, which meant I had to be VERY careful with my layout. Happily, I was able to match up the side seams on the bodice… but check out that skirt seam. I was concentrating so hard on matching up the plaid lines, that I didn’t think to match up the GIANT BLOCKS OF COLOR. Which means the plaid doesn’t match at all on the skirt. Oops! Learn from my mistakes, people 🙂

Emery dress

Because I barely had any fabric, I had to cut some corners on other parts of the dress. I originally wanted to make the collar in the same plaid fabric – but I couldn’t get the pieces to mirror each other, and it looked really stupid on my dressform, so I used my lining fabric (originally cut to be the underside of the collar) on top instead. I think it actually really works this way – makes the dress a little less twee. My lining fabric is the same silky delicious purple cotton batiste that I used with my Victoria Blazer, and I used every single last bit of those scraps!

Emery dress

I also used the batiste for the pockets, because, again, fabric restraints 🙂

Emery dress

I think the biggest/most visible changes I made are the lack of sleeves and the shortened hemline. I cut a good 4″ off this hemline – it really helped with conserving fabric, plus, I just don’t like knee-length hemlines on me! – and then folded up a 2″ hem allowance. I didn’t make any bodice changes to account for the lack of sleeves, I just… didn’t add them! Ha! I waffled with the idea of using plaid bias to close the arm holes, but I ran of of plaid… so the arm holes are just slip-stitched closed. Nothing fancy here!

Emery dress

I’ll admit, when I finally stuck the zipper in this dress and stood in front of the mirror, I thought it looked really unflattering on me! Listen, I am not the type of person to pretend like I think I’m fat (I know I’m not, and I’m not going to fish for compliments either), but something about that gathered skirt + plaid really made me look wider than I am. Even Landon, who never ever sees unflattering things the same way I do, noticed it. I kind of assumed so since I don’t think gathered skirts are very flattering on my shape, but again – everyone else’s Emery’s were soooo cute and flattering! Ugh, Lauren!

I really think adding the belt helps – it separates the bodice from the gathered skirt, which visually makes me look smaller in the waist. Of course, now that I’m looking at these pictures, it looks totally fine! I think it’s one of those things that just looks better in pictures than it does in real life 🙂

Emery dress

That being said, I totally plan on living in this dress all summer. The plaid cotton is lightweight and comfortable, it’s super cute, and I just really love it! Although I’ll probably keep the belt; mostly because that vertical line isn’t matched perfectly (due to the gathers) and it’s making me feel twitchy 😉

Emery dress

Emery dress

(psst, aren’t my earrings so perfect for this dress? I just got them from ChatterBlossom, gahhh, she always has the best stuff!)

Emery dress

Emery dress

Emery dress

This pattern is labeled as an Intermediate, but know that the instructions are very very thorough and super hand-holdy, so I think a confident beginner could easily tackle this shit. Christine also has an extremely detailed Emery Sewalong on her blog with lots and lots of pictures, in case you get stuck. But seriously – you can do this!

Emery dress

If you’re lovin on Emery but haven’t made the jump to purchase, keep an eye on this space – I have a copy to give away later this week!

Also, check it out:

Yay spring!

SPRING IS HAPPENING RIGHT HERE IN MY YARD HOLY SHIT.

Completed: The Flora Dress

5 Mar

Here’s a lovely, floaty warm-weather dress, just in time for another massive cold front! Ha! 🙂

Flora dress

Haha! In all seriousness, let’s welcome the newest member of the By Hand London family – Miss Flora!

Flora dress

Flora is a lovely dress with two bodice options and pleated circle skirt with a straight or hi-lo hem (or, as I like to call it, mullet-hem). I’ve dubbed this a floaty warm-weather dress because that’s specifically what my version is made for, but I imagine this could make a pretty sweet cold-weather dress, too, sewn up in the right fabric (preferably with some kind of crazy awesome contrast lining in the skirt, so it peeks out behind your legs and ooooh!).

Flora dress

My version is the the dipped hem skirt with mock wrap bodice. Man, I love me a good wrap bodice, mock or not.

Flora dress

I did have to make a few changes to get a good fit on the pattern, but nothing that runs outside my ordinary alterations. Let’s get them all out in a pretty list. I started with the size 2/6:
– 3/8″ rounded back adjustment + 5/8″ darts at the upper back
– Lowered the shoulder seams 1″ – also lowered the vertical waist darts 1″ (I also should have lowered those horizontal bust darts too, looking at all the wrinkles on mah side boobs. Oh well, hindsight is 20/20 blah blah)
– 3/8″ tuck out of the front neckline to keep it from gaping

The rounded back adjustment is a new thing for me – I’ve noticed on a lot of my old handmades, there is a weird gaping at the upper back, right under the nape of my neck. It looks STUPID AS SHIT. Apparently I have a ~rounded upper back~ or a Dowager’s Hump, which yes, sounds even worse. I am pretty certain this is in relation to a change in posture, which means I need to start doing yoga or something. Lord.

Flora dress

You know what, though? My upper back no longer has ANY gaping, at least not in this dress! Fuck yeah!

Flora dress

The rest of the dress came together without any additional alterations – even the skirt length is as-printed on the pattern. I know some people really hate this type of hem – that was me, for a long time, and still to some extent (on the really bad ones, YOU KNOW WHICH ONES I’M TALKING ABOUT), but I reeeeally love it on this dress. Combined with the circle skirt, it kind of makes me feel like a princess, without feeling like I look over-the-top. Does that make sense?

Flora dress

It should be noted that, since the back side of the fabric show behind your legs due to the hem line, you probably want to make sure that it doesn’t look totally hiddy. My fabric isn’t super gorgeous on the wrong side, but it’s passable. It looks fine.

Flora dress

Check out that hem sweep! Woohoo!!

Flora dress

I finished the skirt seams with a simple french seam – I think that just looks prettiest on exposed seams like the backside of a mullet skirt. The hem is just a tiny rolled hem, but wouldn’t it be pretty with a strip of lace so it show on the back? Yes, yes it would. Just be forwarned that this hem is looooong and goes on into forever, so if you handsew… you’ll be handsewing into forever, too.

Flora dress

Same with my Georgia dress, I stabilized the neck edges with twill tape to keep it from gaping. I really cannot recommend this step enough when it comes to necklines that have a tendency to droop and gape open – it pulls everything slightly in, and keeps it secure. I can move around all I want and there is no gaping! Yes!

Flora dress

At this point, I kind of feel like it’s my personal life mission to eliminate the gape.

Flora dress

This cotton voile fabric is equal parts weird and amazing, isn’t it? I picked it up from Mood Fabrics with this dress specifically in mind (I also grabbed this navy linen with View A in mind, but floaty won out. And now, the more I look at it, the more that linen might want to be a skirt. Thoughts?).

The Flora was designed to be made up in most any fabric (check out the other versions on the BHL blog if you don’t believe me… as a side note, MAN I am jealous of that cleavage! Dang! Haha!), so I chose to go on the lighter side – lightweight, floaty, almost see-through, you know the drill. What’s interesting about this fabric is that it has all the qualities on voile, with an extra kick of giant embroidered dots scattered everywhere. The dots are slightly thicker than the voile (not, super duper thick like you’d think when you think embroidery… more like the equivalent of a couple extra layers of the voile in thickness), but they don’t affect the drape of this fabric. Also, they’re cotton, so they didn’t do anything crazy when I hit them with my iron. Win!

Flora dress

One more shot of the upper back, bc I’m so proud of myself 🙂 Just a note – in most of these pictures, I’m wearing a strapless bra with my dress. You can see my black bra strap in this picture; that’s cos this came from the set I snapped and sent to BHL after I tested the pattern (just… be thankful I retook them, that’s all I have to say about that!). Anyway, my point is, the straps of the dress are not bra-friendly without a little bit of tweaking. You’ll either need to make bra strap carriers to hold the straps in, or go strapless.

Flora dress

I underlined my bodice in a lightweight cotton batiste, so the inside feels soft and breatheable and delicious. Also, no slippery lining fabric, yay!

Flora dress

Flora dress

And, of course, there’s a hot pink zip in there because why not?

Flora dress

Can’t wait for it to warm up out here so I can wear this bad boy out and about. I’m SO dying to get out of the house and just spend a day lounging around the park on a blanket, eating snoballs. God. Summer, won’t ya hurry up already??

Completed: the Meissa Blouse

28 Feb

I think every sewist has a dream fabric that they’ve spent years searching for in vain. It’s not necessarily a weird combination of prints and colors on a totally inappropriate weave, but whatever the specific end result is, it’s nowhere to be found. I have two – a wide (like 3″ or more) white and navy striped twill, and a bicycle print that is NOT quilting cotton.

Meissa Blouse

I gave up on the stripes, but the bicycle print really haunts me. I’ve seen some cute little stylized bikies (see my Bicycley Belladone for an example), but I was holding out for that literal printed-bike-on-some-lightweight-cotton-in-a-nice-color-combination that didn’t seem to exist. And NO pennyfarthings! I want real bikes, not some super hipster twiddly mustache crap.

Meissa Blouse

I had this particular fabric in mind when I was contacted by Organic Cotton Plus with offers to try out some of their yardage. I’d just been back from snooping at Brooks Brothers, specifically zeroing in on this Bicycle print button-up. Isn’t that shit amazing? Argh! So I thought to myself, “Cool, well I’ll just get a stamp and make my own, yeah? Oh, they don’t have any batiste in good colors… but they do have dye…”

And this, my friends, is how I ended up with two yards of white cotton batiste, emerald green Procion dye and some weird little bag of soda ash. Have I gotten in over my head? Probably.

Meissa Blouse

My first couple of days were preparing the fabric – first, I dyed it in a bucket (for real; I stood at the kitchen sink with a my Kindle on Netflix and squished it around the water while wearing gloves, ha!). I wish I would have used a bit more dye in my mix; the end result color is pretty, but it is lighter than the emerald green I was anticipating. On the flip side, though, the dye took evenly all the way across the fabric, so yay!

After I finished the dye bath and let the fabric dry, I took to stamping the entire yardage with a rubber stamp and fabric paint (I blobbed my paint into a dried-up ink pad to make it easier to use). I thought this part was gonna take forever, but it wasn’t too bad! Since stamping tends to look pretty, well, stamped (i.e., it’s not exact and you won’t get a perfect image transfer every single time), I didn’t follow any straight lines and just kind of stamped around haphazardly. After I cut the pieces, I re-stamped a few that had big gaps. This particular ink is great because you don’t have to heat-set it to keep it from washing out (which is good bc I’d spent long enough prepping the fabric, so one less end task is good in my book!), and the ink itself absorbs into the fabric and is not stiff.

Meissa Blouse

Other than the dye reaction it had (which is I think my fault for not making a strong enough dye bath, oops. Live and learn!), I really enjoyed working with this fabric. The batiste is one of those good ones that feels like there’s silk or something smooth and luscious blended in the fabric, but it is truly 100% cotton (and organic, no less!). Because it is cotton, it presses well, which makes it perfect for shirtmaking. It’s also not super sheer like some batistes – even the virgin white would be fine for a shirt. Always a plus in my book!

Meissa Blouse

The pattern I used is the Meissa Blouse from my beloved Papercut Patterns. I love this pattern because it’s a casual button-up without being an Archer (which I obviously LOOOVE, but hey yo, a girl’s gotta branch out!), ha. The little feminine details – the rounded collar, the shoulder yokes with the little gathers, the double buttons – seemed like a good match for this fabric, and a nice nod to my original inspiration without being a blatant copy.

Meissa Blouse

The pattern instructions make this thing really, really easy. Katie has had lots of praise around the webs for how good they are, and it’s all try! Really basic, really straightforward, and beautiful results. I did change a few things just because I’ve hit my personal shirtmaking stride – I flat-felled every seam (the way the shirt is made, only the side and underarm seams are not enclosed, so it’s not like you have a flat fell a million seams to do this) and I pulled in the waist an additional 1/2″ or so. I also shortened the sleeves by about 1″.

Meissa Blouse

Meissa Blouse

Whatever I did to the sleeve seams now means that I cannot button the cuffs around my wrist – they are WAY too small! Whoops! Oh well, this is totally a summer shirt, and I’ll never wear those sleeves rolled down anyway. Ha!

Meissa Blouse

Meissa Blouse

To keep the shirt from being overwhelmingly green, I added some cotton braid to the inside of the button band (butted up right against the stitching line) and inside the sleeve cuffs.

Meissa Blouse

Meissa Blouse

The sleeve cuff treatment is something I saw on the Brook’s Brothers shirt (seriously… if you have a Brooks Brothers in your area, you should snoop it. Some of the finishing inside the clothes there was pretty awesome!). There was a little piece of petersham ribbon tucked in the seam at the top of the cuff, which shows when you flip up the cuffs. Using that inspiration, I tried to do the same thing with my shirt. It’s a liiiiiittle sloppy because I was experimenting, but I like how it turned out! It even makes me ok with the fact that I can’t use the cuffs 🙂

Meissa Blouse

I’m super happy with all the detailing on the shirt. I used lots of topstitching so it would really stand out.

Meissa Blouse

And hey, check it out – the shirt is long enough to where I can tie the bottom in a knot, like a fashion blogger or some shit.

Meissa Blouse

Meissa Blouse

~So fashun.

Meissa Blouse

I still have quite a bit of the dye & soda ash left over. I’m thinking I may buy a load of silk and sandwash the shit out of it. My friend Elizabeth uses soda ash to prewash her silks into this amazing textured wonderland, so I can’t wait to try that! I will definitely report back with results. First, I gotta find a washing machine, though 😉

Ok, ONE last thing – and I promise this is a good one! Remember The Great British Sewing Bee and how we (we as in Americans, ha) bitched about not having a US version of the show? Well, I was contacted by a Love Productions, who is in the process of producing and casting a pilot for – you guessed it – an American version, called The Sewing Bee! They are currently on the hunt for amateur sewists in the NY, CT & NJ area (although if they get picked up, they will expand to nationwide). I actually ended up talking to one of the producers on the phone and I’m really excited to hear about the plans they have in the works – such as, the show will differ slightly from the UK version in that there will be a different set of contestants and winners every week. One thing that is similar is how they plan on editing – as far as I know, it will be as drama-free as the UK version, which is what I like most about it!

img-227171148-0001
Click here for a bigger version of the flyer

If you’re in the area (or don’t mind traveling and camping out for a couple of weeks, I guess), you should definitely try out for the show! And then report back to me, because I want to see y’all on the teeeveeee!

Pattern Testing: The Sigma Dress

13 Nov

Umm, have you guys seen the new Constellation Collection from Papercut Patterns? Obviously, I’m biased here, but it’s pretty freaking amazing! Katie has really killed it this time, with the release of six fabulous new patterns – including a bomber jacket (which, duh, totally making that). I was lucky enough to test a pattern in this round, so I ended up making the Sigma Dress. Want to see? 🙂

Sigma Dress

The Sigma is a simple dress that can be made up in a variety of views/fabrics to create a different dress each time. What I love best about this pattern is the pure simplicity of it – it can be embellished however you please. Add a sweet detachable collar, sew it up in a fabulous brocade for the holidays, tough it up with an exposed zipper – it’s super versitale! And, I should point out, it’s a great pattern to sew up in a lovely plaid 😉

Sigma Dress

My Sigma has the skirt from variation 2 (small gathers at the waist; kind of hard to see in this fabric, ah!) and a weird mishmash of sleeves from both variations. I reeeeeally wanted this dress to have long sleeves, but I totally borked up the cutting, like, immediately (I blame it on the kidney stone), so I just made the sleeves as long as my fabric would allow me to. Soo, elbow-length it is!

Sigma Dress

I cut the size XXS, based on my measurements, and it was a near-perfect fit straight out of the envelope. I did have to add two small 1/4″ darts at the back neckline because it gaped a little, but that’s a pretty typical measurement for me. I also sewed in a lapped zipper at at 5/8″ seam allowance (these patterns use a 3/8″ seam allowance), to tighten the waist seam and also because I didn’t want to math.

Sigma Dress

Fair warning, this baby is SHORT! This is the actual length you see on me, and I’m 5’2″. Katie and I discussed the length, well, at length (hee, we’re like a mini-focus group), and she ultimately decided to keep the original short length because it’s cute as hell and add lengthen/shorten lines to the skirt so you can get on with your bad self and make it whatever length you want!

Sigma Dress
Sigma Dress

See that strange lightened area around the pocket? Yeeeah, that was where I applied interfacing to the wrong side of the skirt, sewed up the pocket, stuck it on the dressform and realized my stupid fabric was identical right/wrong side and I had used the wrong side as the right side. Meaning, my unbalanced plaid did not match at ALL at the waistline. After mulling over it for a couple of days, I carefully shredded off the interfacing and tried to wash the glue off, but as you can see – a little still remains. It’s not totally noticeable, but it *is* there. Something to keep in mind if you’re making this up in a plaid – make sure you’re using the correct side of the fabric 😉

Sigma Dress

“Wait, did someone say pockets? In this dress??”

Sigma Dress

Yep! Yay for pockets!

Sigma Dress

If you were wondering about my fabric choice, it’s really not anything special – some lightweight cotton plaid I got from a friend (who I think originally bought it at an estate sale). It’s actually a bit toooo lightweight for this dress, as it loves to wrinkle up whenever it has the opportunity. But, you know, that’s the beauty of this pattern – you can make it in practically anything. Anything!

Sigma Dress
Sigma Dress

I also think the neckline is just perfect for showcasing those little choker-esque necklaces that I can never figure out what to pair with.

This was my first experience testing for Katie (although not my first rodeo with her patterns, yeehaw!), and it was a very pleasant experience! I really liked that she had the patterns printed and shipped directly to us, as opposed to sending out PDFs to be printed and assembled at home. For one, I hate printing PDFs (and I don’t even have access to a printer anymore after quitting my office job, sooo it’s not like I could print even if I wanted to. Ok, I could go to a copy shop but you and I both know that’s not gonna happen), and for two, I’m not really sure how accurate they are when it comes to testing purposes. Seems like an easy way to fuck things up, size-wise, in my opinion.

Sooo, now that I’ve waxed poetic about this pattern for an entire post, who else is excited to get their hands on it? Or anything from the new collection? I think the next sewalong we have on the Papercut blog will be for this dress – just because I reeeeeally want to play around with different looks (which you can’t really do with a tester pattern, I mean, not the slicing and hacking type of playing :)). Speaking of which, we have a La Sylphide sewalong going on right now if anyone is keen to join!

Sigma Dress

Right now, through 11/15, you can get 15% off this pattern (or any pattern in the new collection) with free shipping! This is a great opportunity to try out a Papercut Pattern, if you’ve been on the fence before. Not to mention, Katie added a new size so they go up to XL now 🙂 What are you waiting for??

Completed: A Cozy Kelly Skirt

16 Sep

Look at me, I’m like a 1970s Sherwin Williams swatch book all up in hurr.

Corduroy Kelly Skirt

I know I haven’t talked about her much since the denim version came out to play, but OMG I LOVE KELLY. I seriously can’t get enough of this pattern – it’s very simple, but delivers maximum effect!

Corduroy Kelly Skirt

This is my second corduroy Kelly, same difference as the first, although this cord is a much thicker wale with a softer hand. I snatched it up during my trip to NYC – it was part of a swap, although I am a terrible swapper and I don’t remember who it came from 😦 Sonja? I know the majority of the goods came from your stash haha 🙂

Corduroy Kelly Skirt

Anyway, origin aside, this fabric is pretty fabulous! It’s super soft with a fair amount of body, and the color is one of those great browns that goes with everyyyyything (except the new top I made, apparently, which is not the same top I’m wearing in these pictures btw. Oh well haha!). I love corduroys, but sometimes finding a good one that’s pure cotton with no stretch and a nice color can be surprisingly difficult!

Corduroy Kelly Skirt

I can’t speak much on this pattern because obviously I’ve already made/discussed it, but I will tell you what I did differently this time ’round. For one, I used sew-in interfacing instead of my regular fusible… corduroy can be kind of finicky when you press it (specifically – you risk squishing the wales flat and ruining your fabric and WAH), and a quick test of the fusible proved that I would be making a huge mistake. I used muslin as my sew-in – just cut the pieces, basted them to the waistband and button hole placket, and then proceeded as usual.

Corduroy Kelly Skirt

I did topstitch my skirt as directed, but it’s not really noticeable due to the thickness of the fabric. It doesn’t bother me – I like the subtle look – but if you’re planning on making this with a similar fabric and want the topstitching to be visible, you will need to use top stitching thread and the accompanying needle.

Corduroy Kelly Skirt

Obviously, you want to be careful when pressing corduroy – but some stuff does need a good sharp crease, like these pleats and the hem. To do this, I laid a scrap piece of corduroy on my ironing board, right side up, and put my skirt on top of the scrap right down down (this keeps the nap from getting crushed, as the fabric on the bottom provides some support). I used my silk organza press cloth and steamed the beejeezus out of everything, and then used my clapper to hold everything down until it cooled off.

I love that clapper. I always feel like such a fancy-pants when I use it, ha.

Corduroy Kelly Skirt

I also omitted the second button on the waistband – I want to wear this skirt with belts, which I can’t do if there’s a giant button in the way. I put in the top button and added a hook and eye where the second button should be.

Corduroy Kelly Skirt

Here you can see my hook and eye. The skirt in unlined, but it works fine with a slip underneath in the winter, for wearing with tights. Well, the other corduroy one does, anyway, haha.

Corduroy Kelly Skirt

Oh yeah, my buttons were free too! They’re some faux-leather suiting buttons that my Mamaw gave me. She gave me HUNDREDS of them (and my mom took half… but still… that’s a lot of buttons) and I rarely find a change to use them since they’re just really big. But I think they work here! The color looks great with the color of the fabric.

Corduroy Kelly Skirt

I almost forgot – look at this cute pocket lining! It’s a tiny little scrap I got at the flea market. The seller threw it in for free (lord, can I say “free” enough in this post??? FREE FREE FREEEEEEEE) with a few other scraps, after I made a purchase pile. It was just big enough to use to line the pockets. I love those colors, wish I could find a big yardage that looked like it!

Corduroy Kelly Skirt

I guess that it’s! Kind of a boring staple to make, but these kinds of basic pieces get a lot of wear in my life 🙂 Plus, it looks sooo good with my mustard Renfrew, which is always a plus in my book.

Completed: The Bella-Jean Dress

6 Sep

A couple of months ago (gah, has it been that long??), Abby from Bluegingerdoll Patterns hollered at me and asked if I wanted to try and review her maiden pattern, the Billie Jean dress.

Well, y’all know how I feel about reviewing patterns – especially when they are pretty, vintage-inspired silhouettes!

Bella-Jean

So obviously, I said yes.

Bella-Jean

The style lines on this dress are a little difficult to see since I used such a busy print (but isn’t that print amazing?) to make it up, but it’s a very fitted, princess-seamed bodice that falls off the shoulders. The pattern actually has two skirt variations – one, a sexy wiggle skirt with a kick pleat; and two, a full, gathered skirt with in-seam pockets.

Bella-Jean

I ended up swapping the skirt out for an entirely different option, as you can see. While I love both of the skirts included in the pattern, I know that wiggle skirts are not in any way appropriate for my daily life (I need something that I can really move around in – from cycling, to sitting on the floor, to jumping in the bed of my truck to retrieve the coat hanger I keep back there since I seem to lock myself out of the fucking cab EVERY WEEK THESE DAYS, sorry, pls don’t break in my truck. There’s nothing worth stealing in there; seriously, I don’t even have a tape deck. Where was I going with this? Oh.), and gathered skirts just are not very flattering on me. When I don’t find a dress comfortable, I basically just never wear it – and I wanted to wear this dress!

Bella-Jean

Can you guess where that pattern came from? Hint: It’s in the name.

Bella-Jean

If you guessed Belladone, you’d be correct! If you think “Bella-Jean” is the most hilarious, redneck sounding name, let me just assure you that I feel very clever right now.

Bella-Jean

Attaching the skirt to the bodice took a little bit of extra thought, but not much. First, I knew I wanted to leave the pockets off (as I type this, I can hear the collective gasp of sewers around the world sucking in their breath and clutching their pearls as I dared to remove the blessed pocket but forreal, there would have been way way way too much going on with an already busy dress, yeah?), so I just taped the pocket pieces to the front skirt pattern piece to fill the pocket-shaped hole, then cut the pieces out of my fabric. I moved the pleats slightly to get them to match up with the front princess seams, which was as easy as pushing the fold down a few fractions of an inch. Getting the back darts to match the back princess seams was also necessary, although I didn’t realize it until I’d already sewn the skirt to the bodice. Doh! I almost said fuck it and let it be, but it looked reeeally bad, so I unpicked and redistributed. Miraculously, the skirt fits the bodice almost exactly – and by sewing the side seams of the skirt with 1/2″ seam allowance (which is the same seam allowance for the bodice), it was a perfect fit. All the seams match up. Yay!

Bella-Jean

As much as I like to try and make my garments as true as to what the pattern was designed as, sometimes I think ya just gotta make some ~design changes~ so the finished piece fits your lifestyle. And, you know, you actually wear it 😉

Bella-Jean

Now that I’ve gone off on a few tangents, let’s get back to Billie Jean The Bodice!

Bella-Jean

Putting this shit together was DELIGHTFUL. I mean it! I made a little quickie muslin-top (always good to check the fit when you’re trying a new-to-you pattern company – you don’t want to discover far too late that the body type they base their pattern block off is the exact opposite of your body!), but I ended up not needing any changes as it was a perfect fit straight out of the envelope. This is a size 4, and I gotta warn ya – make sure you check those finished measurements before you cut! There is basically NO ease in this pattern, which means a very close fit. Obviously, this is exactly how I like to wear my dresses, so I was pretty chuffed to be able to actually cut the pattern that matched my measurements, without sizing down. But if you need more ease, consider sizing up 🙂

Bella-Jean

Construction-wise, I did not make any changes to the bodice. The instructions are a bit brief, but there are clear diagrams (as well as a full sewalong on Abby’s blog, should you need it!) and the pattern itself is very simple to put together. My only advice is to make sure you stay-stitch that neckline so it doesn’t stretch all crazy out of shape, and don’t be afraid to be aggressive with your clipping and notching on the princess seams to get them to lie flat.

Bella-Jean

The pattern has you insert a lapped zipper, instead of the usual invisible. Y’all know I like me some lapped zips 😉

Bella-Jean

One thing I should point out is that the straps are NOT bra-friendly without a little bit of tweaking. Personally, I just go strapless – I found one that fits my ribcage, so I think it is quite comfortable. However, I know most people don’t feel the same way I do about strapless bras – and that’s ok! But you will need to make some changes to get the straps to work with a bra if that’s the case. Abby has written a tutorial on redrafting the straps so they are cover your bra; alternately, Anna added bra strap carriers to her Billie Jean.

Bella-Jean

It’s hard to tell in the pictures, but the shoulder straps have the cutest little detail where they widen a bit at the top of your shoulder. I think that’s my favorite thing about this dress!

Bella-Jean

I’m a little bummed that I couldn’t get the waist seam to match up perfectly at the zipper – must’ve fudged something up, somewhere. But hey, look at how good those darts match up with the princess seams, yeah? ~Like MAGIC.

Bella-Jean

Isn’t this fabric just gorgeous? I bought it earlier this year from Muna Couture (who also sells lots of amazing fabrics, drool). It is the softest Italian cotton, and the colors are so saturated. I actually bought a SHIT load of this stuff… so this won’t be the last time you see it 😉 My bodice is lined with black cotton batiste and I used a lilac zipper, because.

Bella-Jean

Since the Belladone skirt hits perfect LT-length as is, I added the facing at the bottom. I never really sewed skirt facings before I started dabbling into Deer & Doe, but I really love the way they look!

Bella-Jean

If you love Billie Jean as much as I do, you are gonna shit yourselves when you see Abby’s newest pattern, Mae. Just warning you.

Also, if you were wondering where the remote went for these pictures, the battery died right at the beginning of my shoot. Notice how confused I look in that last picture (which was actually the first picture I took), ha!

Completed: The Anna Dress, 1

19 Aug

Thank you so much, everyone, for your overwhelming support this past week. My recovery is going well (although I’m still not clear to lift anything that weighs more than 10lbs – that includes my CAT! HAHA! Oh well, I’m sure she’s happy about that, anyway), and I’m back to work and back to… sewing!! Yeah!!! Well, sort of. I promised myself I would take it easy (aka: laying, knitting, snoozing) until Friday, per Doctor’s orders, and only then could I get back in the sewing room. Lucky me, I woke up on Friday morning with a fucking cold! So, needless to say, the past few days have been a haze of cold meds and even more snoozin’. I’m functioning, albeit slower than normal.

But hey, look, I have a make to share with y’all today!

Anna Dress - Seersucker

Ok ok, before you flip your shit on me – I finished this dress before the surgery! Haha! I actually wore it to work the Friday prior; it’s just taken me this long to take photos. Speaking of which – if I look a bit extra happy in these photos… cold meds. That is all.

Anna Dress - Seersucker

This is the Anna Dress, from my friends, the babely babes, over at By Hand London. I’m no stranger to the patterns from this line – I can proudly say that I have sewn every single one of ’em, yeah! – but I gotta say… Anna is my favorite. Based on everyone else’s gushing about this particular pattern (here is where I was planning on linking my favorite Annas, but again, cold meds. If you made it, linky up in the comments pls!), I’m not alone. Anna is a WINNER!

Anna Dress - Seersucker

Am I allowed to tell y’all that I actually saw this dress waaaaay before I was announced to the hoardes of blog readers? Truth! Elisalex showed me a sneaky peeky while she was in Nashville back in May! I have been dying to get my hands on the pattern ever since! I love my short version, but I am SO EXCITED to try out that thigh-high split, peeps.

Anna Dress - Seersucker

I opted for a very simple version for my wearable muslin, in a classic seersucker from Mood. This is one of my last pieces of fabric from the NY stash, btw. I’ve held out on making this up because it’s a stretch cotton, and we don’t play well together. But I think stretch cotton works fine with this type of dress, as long as you’re ok with how the bodice looks in a slightly structured fabric. I like it!

Anna Dress - Seersucker

My Anna is the short version, with the slash neckline. I cut the size 2/6 and shortened the skirt about 5″. I found that the back was rather large on me – I just pinched out the excess along the zipper line. Oh, I also put in a lapped zipper because I didn’t have any invisibles on hand. Sue me!

Anna Dress - Seersucker

Since my fabric is stretchy, I stabilized the neckline facing with a bit of non-stretch cotton. To do this, I just cut a second facing piece from the cotton, sewed it to the seersucker facing (as you would a sew-in interfacing) and applied the facing as normal. This keeps the neckline nice and smooth and secure!

Anna Dress - Seersucker

The pattern itself was an absolute delight to put together. There’s a reason why this pattern has so many fangirls – especially considering how short a time it’s actually been available on the sewing market. There aren’t a lot of pieces, and what is there is super simple to put together. I think this would make a great beginner pattern, whether you’re a beginner at sewing or a beginner with a a certain type of fabric (meaning: yes, you should make this up in silk!)

Anna Dress - Seersucker

I should probably tell you that I already have a couple more versions planned. Better get used to this dress! Ha!

Anna Dress - Seersucker

Oh, one more thing before I tear outta here… our giveaway winner!

wins2

There were 230 entries in all (accounting for duplicates), and you ALL made me hungry (special shoutout goes to Marchelle who linked me to this lemon cookie recipe from Martha Stewart… I will have y’all know, I made this yesterday and they are delicious aaand I’ve already eaten about half of them, ha!). Random Number Generator sayssss-

wins1

Louise is the winner of the Sweet Dress Book! Yay!!

Um, will someone kindly tell me what spotted dick is, though? Here in America, that means something TOTALLY different and I’m afraid to google it…