Tag Archives: fitting

Tutorial: Adjusting Crotch Depth (OAL2018)

5 Jun

Good morning, everyone!

In light of the official start to the OAL2018, I wanted to share a little tutorial for a very common pants adjustment – adjusting crotch depth. Even if you are not participating in the OAL, I hope you will find this useful! As I mentioned, this is a very common adjustment (at least half of my students in every Sew Your Own Jeans workshop that I teach ends up needing to make this adjustment!) that is a lot easier than it sounds.

This is the only pants-fitting post I’ll be doing for this OAL – most other adjustments can be done after the pants are basted at the side seams. If you have more pants-fitting needs, I absolutely recommend getting a copy of Pants for Real People (which is where the image below is from) – it is a fantastic resource that is full of valuable information and my top reference book when I’m fitting pants! Another post to check out is the Common Fitting Adjustments in the Lander Sewalong!

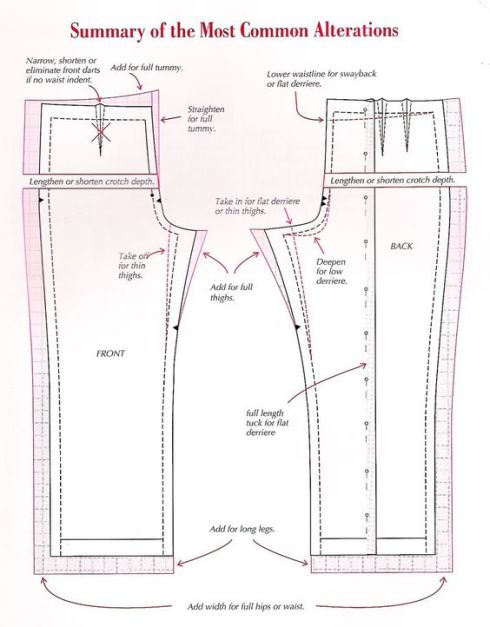
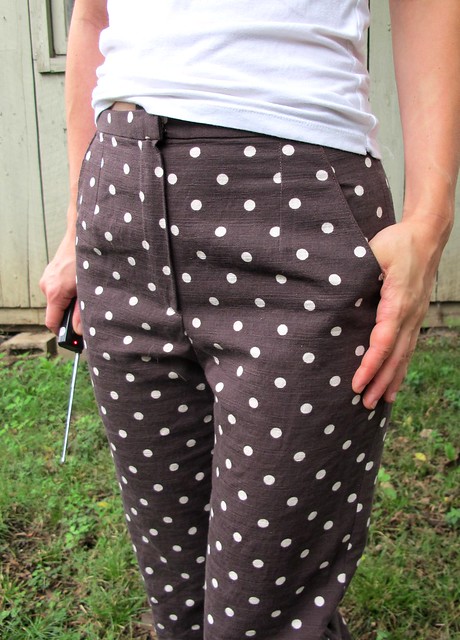
Common Pants Fit Adjustments – From Pants for Real People

So what does it mean to adjust crotch depth? The depth (versus the length, which runs from front waist to back waist) is the distance from your waist to the bottom of your crotch – i.e., the determining factor between a drop crotch and cameltoe. If you’ve ever had a wedgie, your depth is too short. Pants crotch hanging WAY lower than your actual crotch? Your depth is too long.

Since we are all special little sewing snowflakes (sewflakes?), all of our bodies are different – even in ways that aren’t super visible. Which means that not every single pants draft is going to fit every single person flawlessly – it’s just not possible. Personally, I have found that I have a slightly shorter crotch depth and generally need to make this adjustment with nearly every single pair of pants I sew. It’s not a hard adjustment to make, but if you’ve never seen is done before, it can be a little difficult to wrap your head around. Hopefully this tutorial will give you some insight on how to do it!

OAL2018: Shorten Front Crotch

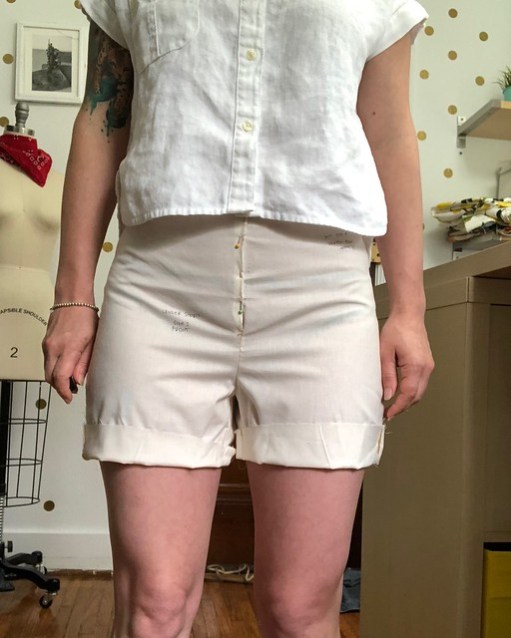
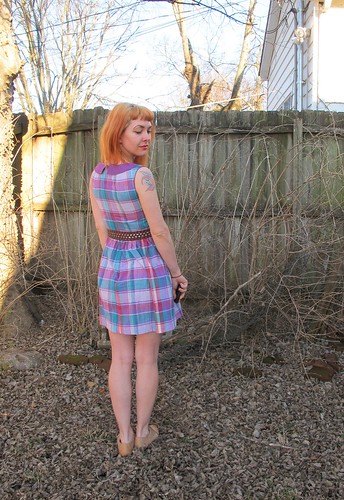
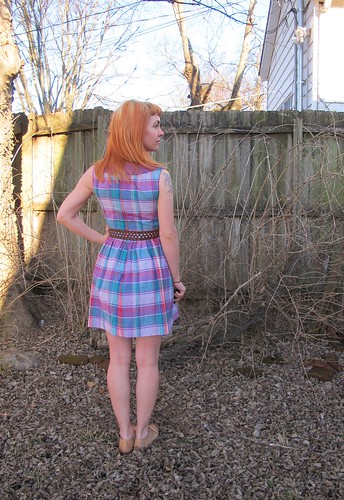
First, you’ll want to make a muslin of your pants (or at the very least – a shorts version of the pants). Sew the front and back as instructed. You don’t need to include the whole fly setup (unless you want to practice sewing it!) or waistband (unless you anticipate needing to change it to a curved waistband). Pin the fly shut and move around a bit. Don’t freak out over wrinkles – muslin wrinkles like crazy (mine are extra bad because I pulled these out of my rag pile, true story) and doesn’t have as much “give” as your regular fabric. Feel where the crotch is in relation to your body – is it hanging too low and causing extra folds due to excess length? Is it all up in your business and giving you cameltoe?

OAL2018: Shorten Front Crotch

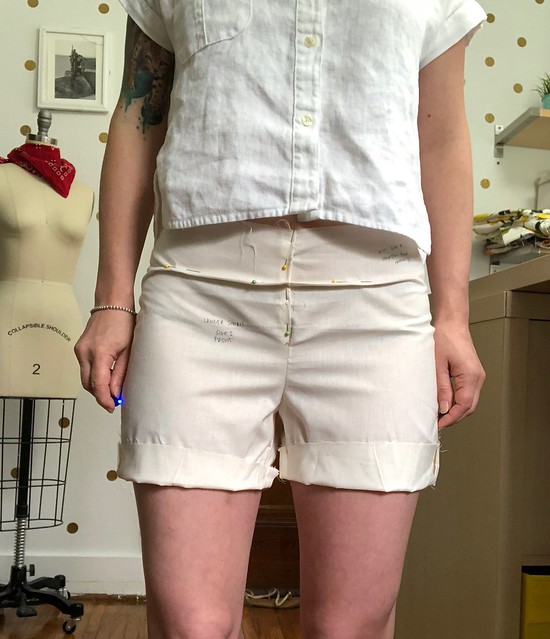
For a low-hanging crotch, pinch out the excess somewhere along the depth and pin it until it feels right. DO NOT OVERPIN – you don’t want to give yourself cameltoe (learn from my mistakes, people). Walk around, make sure you can sit, and let them settle a little. Likely, you won’t need to make a massive adjustment here – between 1/4″ – 1/2″ is most common. Little tiny fractions make a big difference when it comes to fit!

If your problem is the opposite and you need to add length, the easiest way to do this is to slice across the front of the pants and insert a strip of fabric (I just pin this, although you can sew it in, too). Pull down the bottom portion until the crotch feels like it is in the correct spot, then pin to the fabric strip.

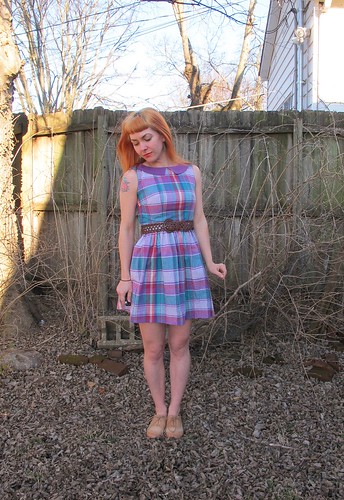
I realize you likely cannot see a difference between those two photos (I mean… I definitely can’t haha). Like I said – it’s a small adjustment, and not always visible. But you can feel it!

OAL2018: Shorten Front Crotch

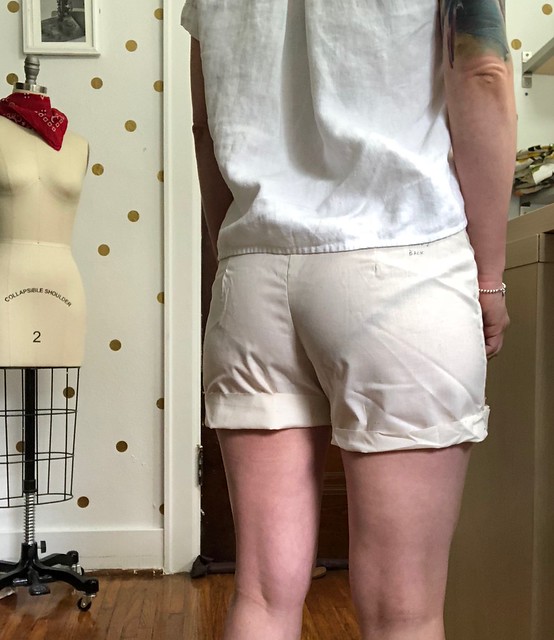
Check the back to be sure there aren’t any depth adjustments needed. I’d say that maybe 1 out of every 15-20 students of mine need to actually adjust the back – it’s usually all in the front. If you do need to adjust the back, do so the same way you adjusted the front. Mine looks fine, so I left it as is.

OAL2018: Shorten Front Crotch

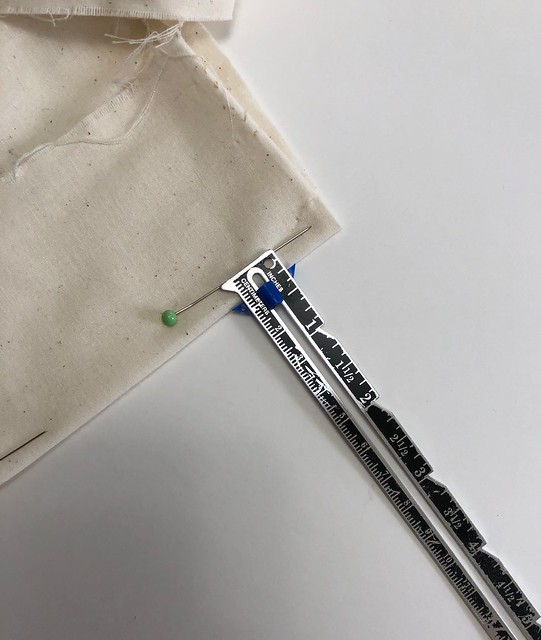
Now take your muslin off, and measure the distance from pin to fold – or the additional length added by the strip of fabric. If you are only adjusting the front, then only measure at center front. If you are adjusting front + back, measure at the side as well as the center front and center back. This is how much you need to either add or remove from the depth.

OAL2018: Shorten Front Crotch

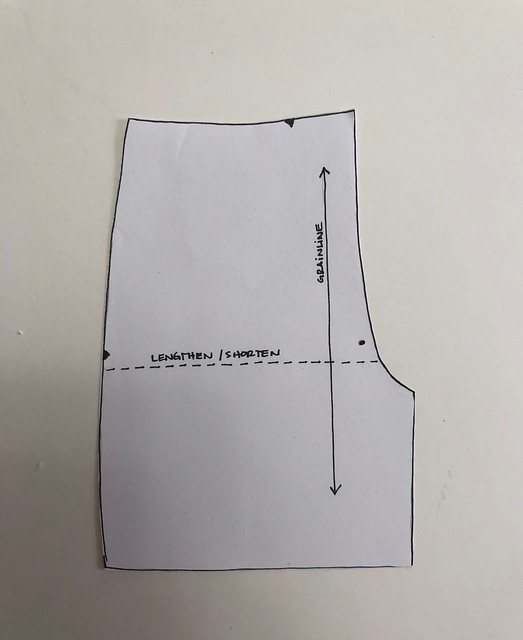
Now how to translate this to your pattern? Easy! Your pattern piece should have a lengthen/shorten line that cuts across the fly (if it doesn’t – first of all, SHAME ON THAT PATTERNMAKER, but second, it’s easy to just add it somewhere in that general area nbd). If you are only shortening the front crotch, you will cut along that line from center front *just* to the side seam. Do not cut through the side seam – you want to leave a hinge. If you are also adjusting the back, cut straight across from edge to edge.

OAL2018: Shorten Front Crotch

To lengthen, spread the pieces apart until the center front matches the measurement you took, and then fill the gap with paper and tape closed. If you are only lengthening the front, it should fade to nothing at the side seam.

OAL2018: Shorten Front Crotch

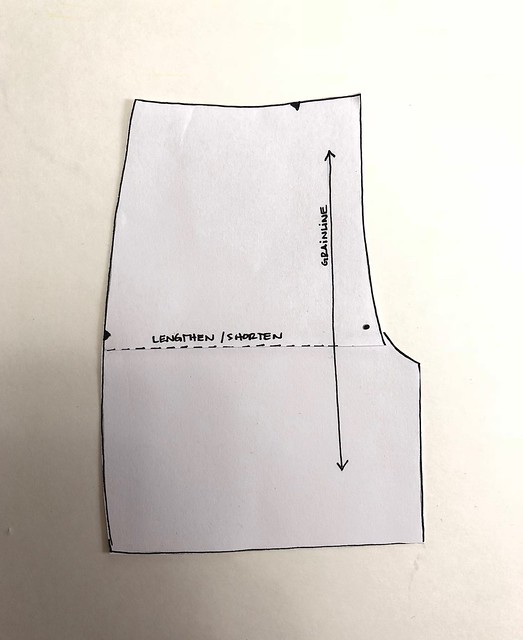
To shorten, overlap the pieces until the center front is overlapped by the amount you measured. Again, if you are only adjusting the front, it should fade to nothing at the side seams/hinge.

If you need to adjust all the way around to the back, you’ll want to walk your pattern pieces to make sure that the side seams still match after making your adjustment.

Finally, redraw any wonky links or curves (such as the crotch curve if you overlapped – just smooth the curve) and straighten the grainline if necessary. You will also want to shorten or length your fly pieces (shield, facing, etc) the same amount so that they match up when you sew them together. I strongly advise making another muslin as this point to be sure that they changes didn’t wonk something up. You do you, though!

And that’s it! Like I said, a really easy adjustment that can make a world of difference in how your pants fit and feel. This is definitely the most common adjustment I see in my Sew Your Own Jeans workshops, so I wanted to share it here too!

Completed: Ultimate Trousers

14 Aug

Hey look, here I am again – with another pair of polka dotted trousers! Are you surprised? Would you be surprised to know that I have another pair of dotty trousers sitting on my sewing table as we type speak? Do you think I have a problem? I’ve never considered myself a polka dot trouser kind of girl, but these sewing numbers don’t lie!

Sew Over It Ultimate Trousers

This polka dot cotton sateen is actually an old spoil from the Mood Fabrics flagship store in NYC, which I bought while I was there in March. I knew I wanted to make pants with it – what pattern specifically, I couldn’t tell you, but pants for sure! I love using cotton sateen for pants as it’s usually a good weight with a nice, heavy stretch, and the colors are always so lovely and saturated. Plus – polka dots! Yesss!!

Sew Over It Ultimate Trousers

The pattern I eventually ended up using is the Ultimate Trousers from Sew Over it. I actually tested this pattern ‘way back when earlier this year, to help get it ready for it’s print debut. I was on a pretty tight deadline during testing, which meant that I didn’t end up with a finished garment – just a muslin and a loooot of notes. This is actually pretty typical for me as a tester; I don’t always finish the pattern to the effect that it warrants a blog post! Once I got everything back to Lisa, I put the pattern on the backburner since the summer heat was starting to ramp up and I couldn’t handle the thought of wearing pants in this kind of humidity.

Anyway, we’ve got promises of cooler weather lurking on the horizon, which means it’s PANTSSS TIMEEEEE! Yay!

Sew Over It Ultimate Trousers

I did make a few changes to the pattern, both for fitting and general style. Let’s go over the fitting stuff first. Every time I make trousers, I end up doing the same adjustments across the board, especially if the pattern doesn’t include a front zip fly. I realize that trousers are kind of a scary subject for a lot of sewers, so I’m going to show y’all what I do in my fitting and hopefully that’ll shed some light on the whole matter (and even more hopefully – prove that they really aren’t so scary to fit!).

I don’t have muslin photos of this particular pattern, but I do have muslin photos from my archives (super unflattering muslin photos, I might add! Ha!) back when I made the Colette Clovers. Different patterns, but the concept is similar.

 photo CIMG0016.jpg
See all those horizontal wrinkles allll over my damn crotch? This is an indication that the crotch is way too long for me – so it’s wrinkling. The easiest way to fix this is to pinch out the excess into a long horizontal line, and transfer that to your pattern piece with slashing and taping. I’m petite, and while my torso is a pretty standard length, my crotch length is on the short side. So this is an adjustment that I have to make with *most* trouser/pant patterns. The amount can vary depending on the pattern – obviously the Clovers needed a lot taken out, and the Ultimate Trousers didn’t take much (and I just made a pattern the other day that I had to remove 2″ from!) But it’s a common adjustment for me, and this is what it looks like.

 photo CIMG0006-1.jpg
Same muslin, back view – see how tight the ass is? Like, not even flattering tight, just imma-bust-outta-here-like-a-jailbreak tight. This is fixed by adding a wedge to the back crotch depth pattern piece. How much you add will depend on how much room you need (the Ultimate Trousers didn’t need any, but the Clovers clearly needed a lot), but you can easily hack this alteration by just cutting a bigger size right there at the back crotch (this picture from Sunni’s Trouser Sewalong shows where to add length – right in that blue circle).

clover close-up
Here’s a pair of Clovers where I fixed the length issue, but now there’s some weird puffiness around, well, my crotch. Isn’t that flattering! You guys, this particular fit issue took me a LONG time to figure out because it seemed so weird – but it’s really not. Basically, my crotch requires a different shaped crotch curve than what is drafted for most patterns. I’m a J shape, and the majority of patterns I sew are an L shape. This is a stupid easy adjustment – you literally just redraw the curve, and once you’ve done it on one pattern, you can trace that curve to every pattern thereafter. For the first pattern, you’ll have to eyeball it (or find a pair of pants that fits and copy that crotch curve) and adjust until you get it right, which might take a couple tries. Once I figured that out – what it looked like, how to fix it – that really opened the floodgates of trouser making for me. Also, you should read this post on the Fashion Incubator.

Sew Over It Ultimate Trousers
Here is my front pattern piece with the adjusted crotch shape – I’ve already redrawn and cut my piece out, but I put it back on the table so you could see the difference in the curves. For whatever reason, I don’t need quite as aggressive a crotch curve when I’m making pants that have a front fly – it’s just trousers with a smooth front (especially if it’s sewn in a stretch woven).

You can also see where I tucked out the length horizontally. I didn’t take a photo of the back piece, but I sliced that length to hinge, and the side front has the same removal of length with it tapering to nothing at the center back/crotch, if that makes sense.

So yep, those are my pants adjustments! I know they might seem confusing, and to be honest – I learned all this when I was going through my Clover saga a few years ago (never got those pants to fit right, but I sure learned a lot in the process!). It was a LOT of trial and error, but hopefully my notes will help a least a few people go through less trial and error 🙂 As you can see, there aren’t a whole lot of adjustments needed to get a good fit on pants – but they all work together, and each one affects the other (and they are all adjustments that need to be made BEFORE cutting your fabric, which is why a muslin is SO essential when making pants!). For more fitting help, I strongly recommend investing in a copy of Pants for Real People, which is basically a pants-fitting Bible. So much good information in there, I use that book often!

Ok, now that THAT’S out of the way – let’s go back to talking about this pattern, and the style adjustments I made!

Sew Over It Ultimate Trousers

This pattern is designed to be worn cropped (or as shorts), with a faced waistline. I have learned that I really don’t care for faced waistlines, so I decided to add a waistband to my pants. I didn’t draft a waistband – I just used the facing pieces and flipped them to the top as waistband pieces (and cut two, so I could face the waistband, as you do). I think, for me, these are a little more wearable with a proper waistband. For interfacing, I used tricot fusible, which I looove because it stabilizes the fabric but doesn’t compromise the stretch of the fabric (which is what makes the darn pants so comfy to begin with!).

Sew Over It Ultimate Trousers

I also kept the length on the longer side, which means I can wear them full-length in the winter (with cool socks!) or fold them up to make them cropped. This length is straight out of the pattern, by the way – I didn’t shorten anything, and I’m 5’2″. Just fyi!

Sew Over It Ultimate Trousers

The one major design change I made to this pattern was to sew it in a stretch woven, as opposed to the firm woven (non-stretch) that the pattern calls for. For one, my muslin was a firm woven and I plain just didn’t like the way they felt! They were too restrictive! I like wearing stretch woven pants, ok. Also, it’s hard to find a good pants-weight print that isn’t a stretch woven, so there’s that. I think these are fine in the stretch fabric, although I should probably go back and size them down a little because I think the legs look kind of loose. I was trying to avoid the stovepipe legs look, just to try something different, but I think these do need a little less ease. These are a size 8, by the way!

Sew Over It Ultimate Trousers

So that’s it! Thanks Lisa (and the Sew Over It team!) for letting me test this pattern, and being so patient with me taking months to make a finished wearable garment 🙂 Londoners, if you’re still afraid to tackle the trousers, there is a whole class for making these (with tea and cakes, omg I wish I was in London) if you still wanna try them!

Those of y’all scared to try trousers – what are your thoughts? Do you think the process looks any easier? Are you going to throw caution to the wind and try anyway? Y’all – pants are fun!

* Oh yeah, and I cut my hair! I hope you like it! Well, I guess it doesn’t matter if you don’t like it – it’s not like I can stick it back on my head lololol

Completed: The Emery Dress

10 Mar

I am SO LATE to this freaking party – but better late than never, right? 🙂

Emery dress

Behold – it’s an Emery Dress! Sent to me by the lovely Christine Haynes, I was anxious to try out this pattern for myself (have you seen these popping up all over the internet? Everyone’s versions are AMAZING! Some of my favorites – Miss Crayola Creepy, SewTell, The Nerdy Seamstress, By Gum, By Golly!, ShanniLoves, Sew I Thought… ok, I’ll stop now, but you get the idea!). This little lady regularly gets rave reviews on the fit, construction, and overall look, and I think it’s pretty well-deserved.

Emery dress

So, my experience with Emery didn’t go quite as smoothly as everyone else’s – this was the dress that sucked me down the SIX MUSLIN SPIRAL OF DOOM, but once I got that out of the way, the rest of the construction came together easily. Even matching up the plaid was easy, since there aren’t a lot of pieces to contend with (although I totally done goofed mine up… more on that in a minute).

Emery dress

I’ll start with the muslin experience. Since figuring out that I have big back-gaping issues (and since that’s not really something that can be easily tweaked after the pattern pieces have been cut out of the fabric), I always always make a muslin, at least for just the bodice. My muslin for this dress turned out perfect in the front – darts in the correct place, ending at the correct points, perfectly fitting at all key points, yay! – but the back stuck straight out between my shoulder blades. I tried my usual adjustment, and instead of working – it actually made things worse! Thus, I started the muslin spiral: I played with moving around the slash line, I tried adding different amounts, I tried altering the center back seam and I tried adding fucking gigantic darts at the neckline. Those last two attempts were really really awful, by the way – if you tweak the back neckline too hard, you’ll end up throwing off the balance of the front neckline so it pooches out all weird. NOT a good look!

Of course, by the time I realized I couldn’t crack this pattern, I was also 5 muslins in and feeling stubborn enough to refuse giving up. Not to mention, I was getting super desperate and pissy because everyone else seemed to have NO problems whatsoever with fitting this pattern. Look at everyone’s backs – they fit perfectly. This was starting to make me feel like I had a freak body or some shit.

Emery dress

So how did I fix this mystery back pattern? After combing through my fit books and googling everything I could think of, I ended up landing on the narrow back adjustment (this shows something similar to what I did, although I pulled mine from Fit For Real People so it’s slightly different). That did the trick! No gape! I feel like a fitting PRO, y’all!

Emery dress

I think it’s really important to point out that just because *I* had some fitting issues with the back bodice, that doesn’t mean that you should be scared to try this pattern! Like I said, pretty much every other version I’ve seen praises how well it fits straight out of the envelope. Everyone’s body is shaped differently, and it makes me real cringy when I read that someone recommends against a pattern because they had a bad fit experience (unless it’s just a bad fit across the board – which happens, but it’s rare!). Your (or my!) fit experience =/= everyone else’s fit experience, so just keep that in mind! Ok, soapbox rant over!

Emery dress

Anyway, this dress was super simple to whip up after I figured all the fitting shit out. Cutting was a beast; not only did I choose a large scale, unbalanced plaid as my fabric – I only had about 1 3/4 yards, which meant I had to be VERY careful with my layout. Happily, I was able to match up the side seams on the bodice… but check out that skirt seam. I was concentrating so hard on matching up the plaid lines, that I didn’t think to match up the GIANT BLOCKS OF COLOR. Which means the plaid doesn’t match at all on the skirt. Oops! Learn from my mistakes, people 🙂

Emery dress

Because I barely had any fabric, I had to cut some corners on other parts of the dress. I originally wanted to make the collar in the same plaid fabric – but I couldn’t get the pieces to mirror each other, and it looked really stupid on my dressform, so I used my lining fabric (originally cut to be the underside of the collar) on top instead. I think it actually really works this way – makes the dress a little less twee. My lining fabric is the same silky delicious purple cotton batiste that I used with my Victoria Blazer, and I used every single last bit of those scraps!

Emery dress

I also used the batiste for the pockets, because, again, fabric restraints 🙂

Emery dress

I think the biggest/most visible changes I made are the lack of sleeves and the shortened hemline. I cut a good 4″ off this hemline – it really helped with conserving fabric, plus, I just don’t like knee-length hemlines on me! – and then folded up a 2″ hem allowance. I didn’t make any bodice changes to account for the lack of sleeves, I just… didn’t add them! Ha! I waffled with the idea of using plaid bias to close the arm holes, but I ran of of plaid… so the arm holes are just slip-stitched closed. Nothing fancy here!

Emery dress

I’ll admit, when I finally stuck the zipper in this dress and stood in front of the mirror, I thought it looked really unflattering on me! Listen, I am not the type of person to pretend like I think I’m fat (I know I’m not, and I’m not going to fish for compliments either), but something about that gathered skirt + plaid really made me look wider than I am. Even Landon, who never ever sees unflattering things the same way I do, noticed it. I kind of assumed so since I don’t think gathered skirts are very flattering on my shape, but again – everyone else’s Emery’s were soooo cute and flattering! Ugh, Lauren!

I really think adding the belt helps – it separates the bodice from the gathered skirt, which visually makes me look smaller in the waist. Of course, now that I’m looking at these pictures, it looks totally fine! I think it’s one of those things that just looks better in pictures than it does in real life 🙂

Emery dress

That being said, I totally plan on living in this dress all summer. The plaid cotton is lightweight and comfortable, it’s super cute, and I just really love it! Although I’ll probably keep the belt; mostly because that vertical line isn’t matched perfectly (due to the gathers) and it’s making me feel twitchy 😉

Emery dress

Emery dress

(psst, aren’t my earrings so perfect for this dress? I just got them from ChatterBlossom, gahhh, she always has the best stuff!)

Emery dress

Emery dress

Emery dress

This pattern is labeled as an Intermediate, but know that the instructions are very very thorough and super hand-holdy, so I think a confident beginner could easily tackle this shit. Christine also has an extremely detailed Emery Sewalong on her blog with lots and lots of pictures, in case you get stuck. But seriously – you can do this!

Emery dress

If you’re lovin on Emery but haven’t made the jump to purchase, keep an eye on this space – I have a copy to give away later this week!

Also, check it out:

Yay spring!

SPRING IS HAPPENING RIGHT HERE IN MY YARD HOLY SHIT.