Thurlow Sew-Along: Attaching the Waistband

7 Nov

Holy shit, do y’all even realize what is going on today.


FINAL COUNTDOWN PANTS PARTY TIME.

Ha! But in all seriousness… we’re just a few steps away from being finished! Let’s get excited, yeah? 🙂


Today we are attaching the waistband, steps 15-19. You should have a semi-finished pair of pants at this point, all major seams sewn except the back extension. We will get to that today!

wb1
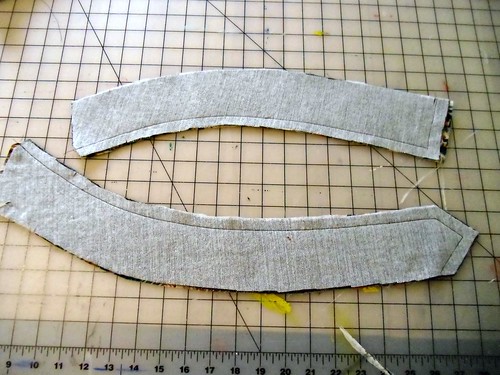
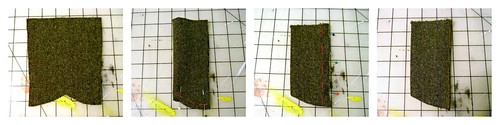
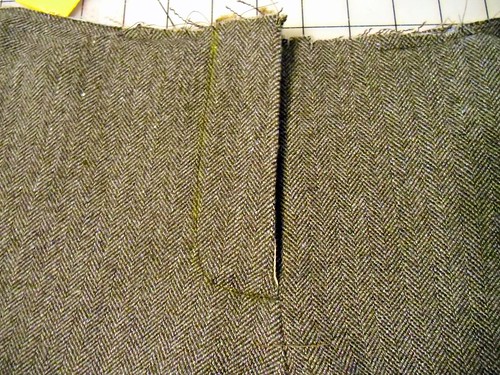
You should have two waistband pieces – a right side (with one square end) and a left side (with one pointed end) – cut in both your regular fabric and your lining fabric, and one set should be interfaced (I opted to interface the side with my fashion fabric, as it needed a bit more structure. Do what works best with your particular fabric, though!). Stack both left pieces together and both right pieces together, and sew along the top edge – the un-notched, concave curve – and the center front (the aforementioned square/pointed ends).

wb2
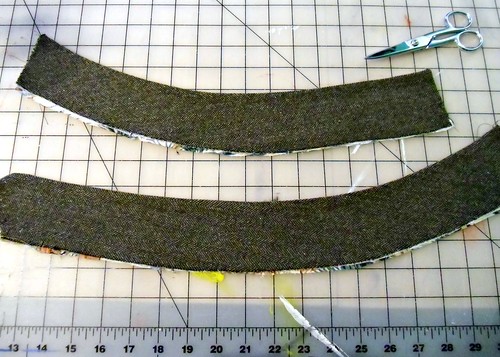
Trim, grade, and understitch the seam allowance.

wb3
You won’t be able to understitch all the way into the center front sections – that’s ok! Just understitch as far as you can 🙂

wb4
Open up your waistband pieces, and start pinning the main fabric side to the top of your pants, right sides together. Don’t worry about the lining at this point. Go all the way around, center front to center back (and yep, back extension is still open. We’re getting there!). Sew this seam.

wb5
Trim your seam allowances.

wb6
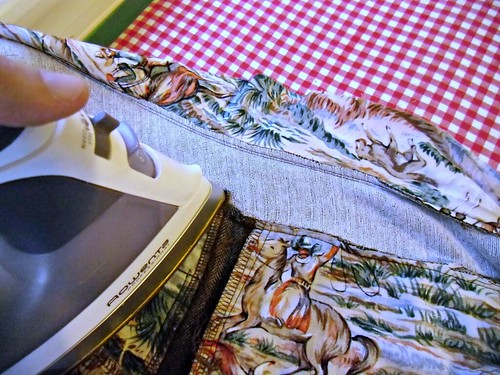
And press everything up toward the waistband.

wb7
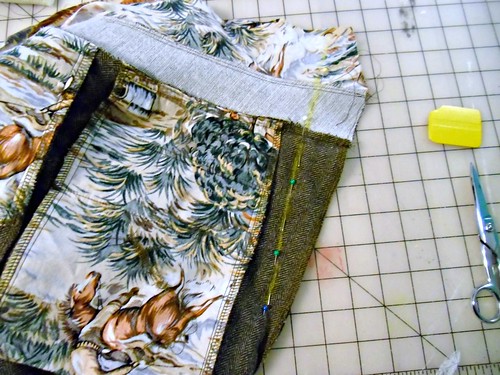
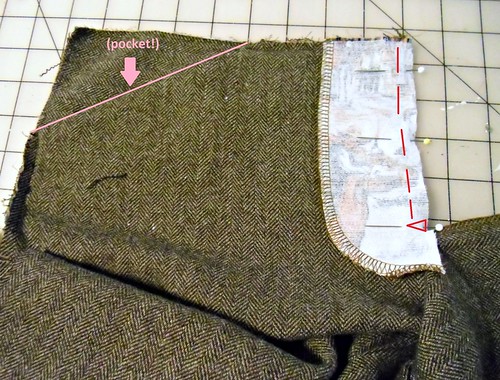
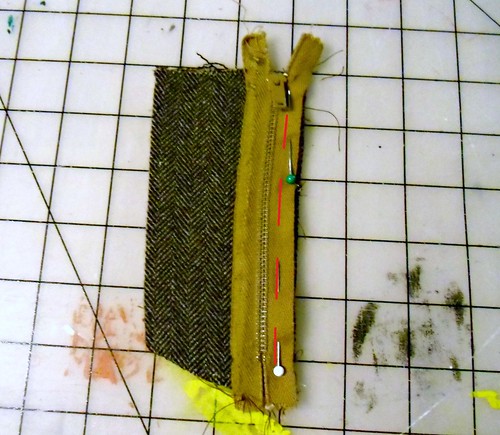
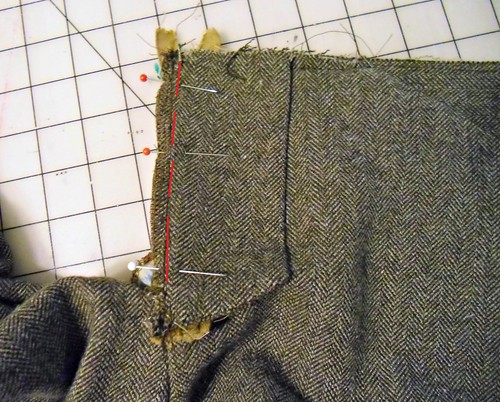
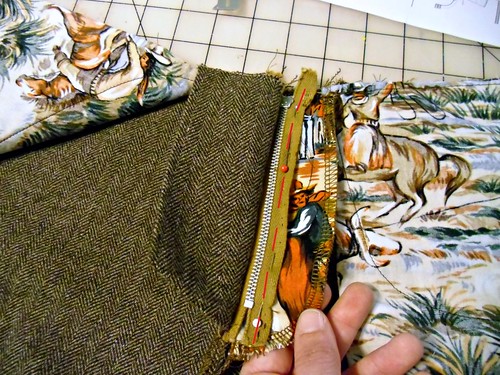
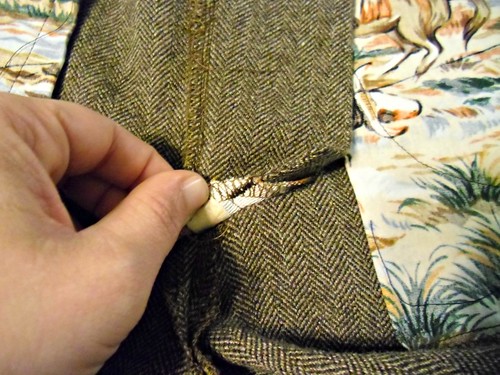
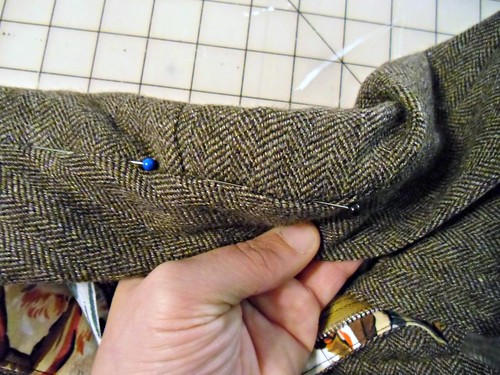
Now for that pesky back extension! See my pretty, bright pattern markings? We are going to sew right over that. Pin along the marked line, all the way up through the waistband. I know, the marking doesn’t extend that far but do the best you can. The instructions indicate that you should baste first, check the fit, and then sew your permanent seam. However, if you already made a muslin, you don’t need to worry about basting first – unless you really want to fine-tune the fit. Personally, I always baste first. Even after multiple muslins 🙂
Be very careful to ensure that all your seams are aligned when you sew up the center back seam! If one side of your waistband is wider than the other, it will result in one side that has a little peek of lining popping out. So double-check before and after you sew!

wb8
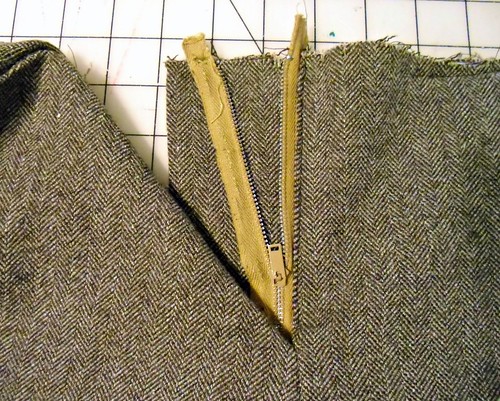
Press open the center back extension. Those giant seam allowances are supposed to hang around – later, you can adjust the waist of your pants, making it bigger or smaller as needed 🙂

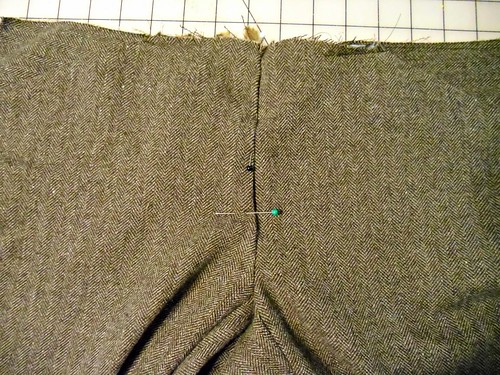
Sooo… pinning the waistband. Fair warning: this part is a bit fiddly and you will probably end up hating me for making you slog through it. I know, it sucks! But it’s better than unpicking a bunch of stitches, or having a janky looking waistband. Spend a little extra time up front making sure everything is lined up, and it will save you hours of banging your head against the wall when you realize that your third waistband attempt looks even worse than the first one.

wb9
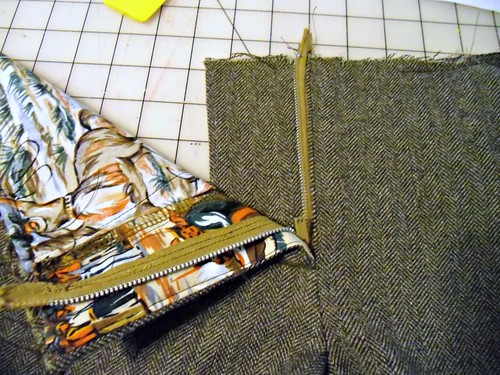
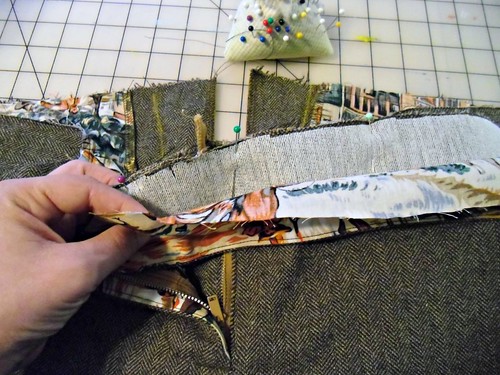
Start with your lining all spread out and hogging the spotlight inside your pants.

wb10
Fold the lining under to the inside until the fold is covering the stitching underneath by about 1/8″-1/4″.

wb11
Now flip the waistband over and pin through the front, right in the middle of the ditch between your pants and your waistband.

wb12
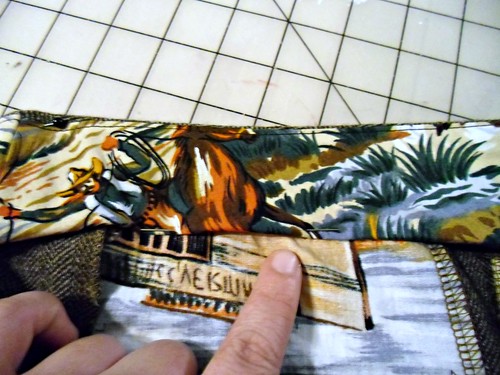
When you flip the waistband back over to the lining side, the pin should just be catching the lining. The fold underneath the pin should be no more than 1/4″ – anything more than that will just look sloppy.

wb14
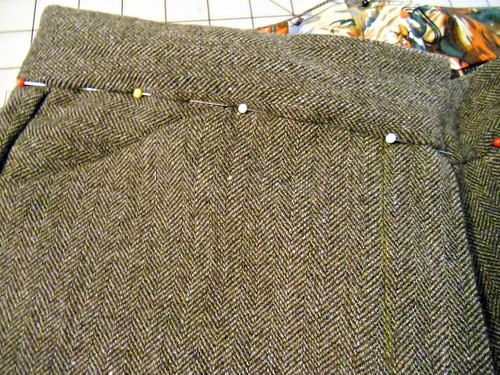
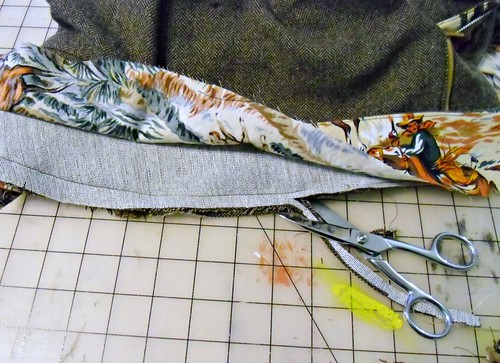
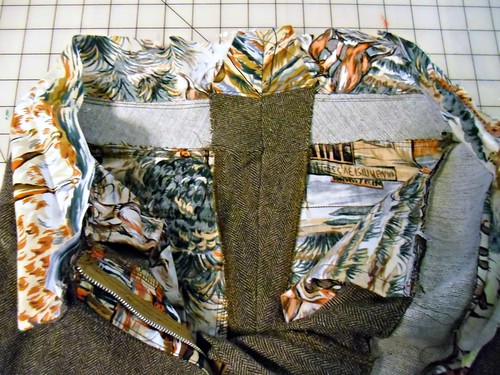
Repeat all the way around the pants, skipping the 3″ or so section of lining that covers the back extension. We aren’t going to stitch that part down, so just leave it open.

wb13
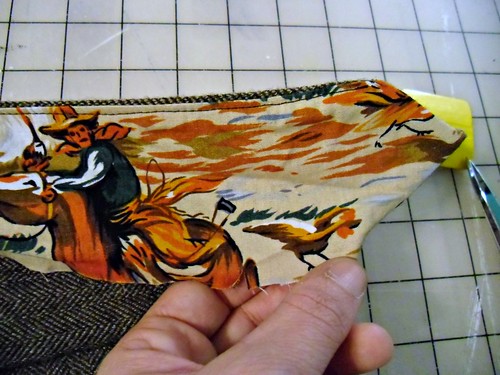
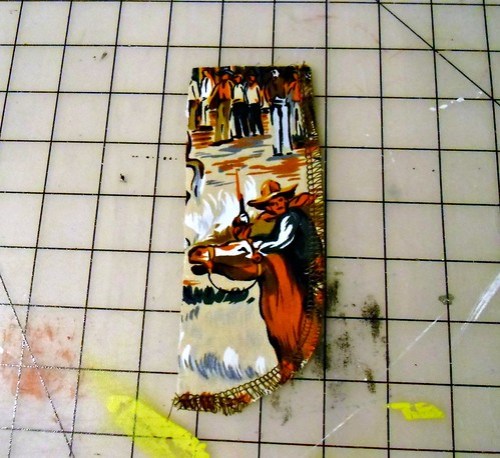
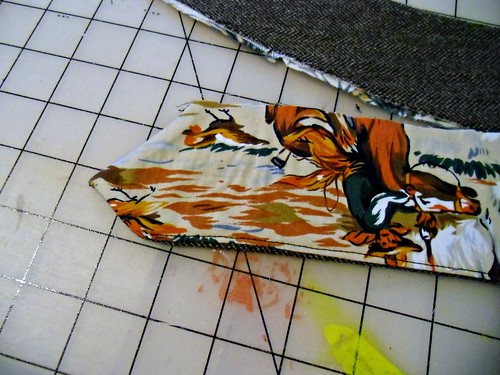
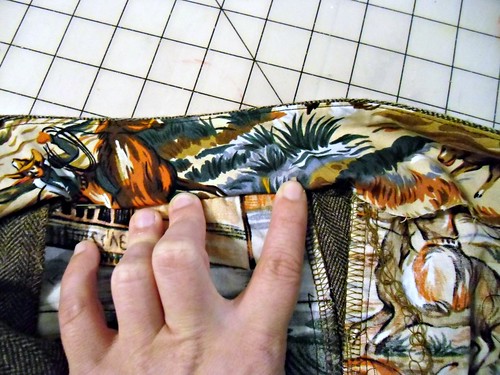
STOP PRESS. Are those chickens?? SHUT THE FUCK UP.

ahem.

wb15
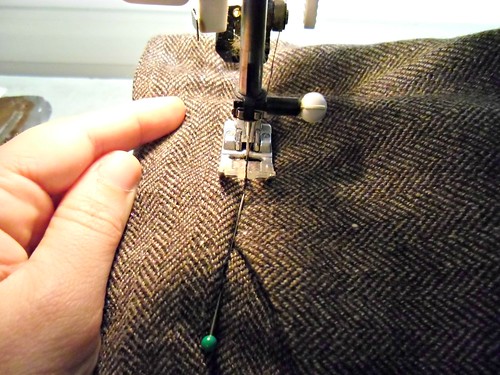
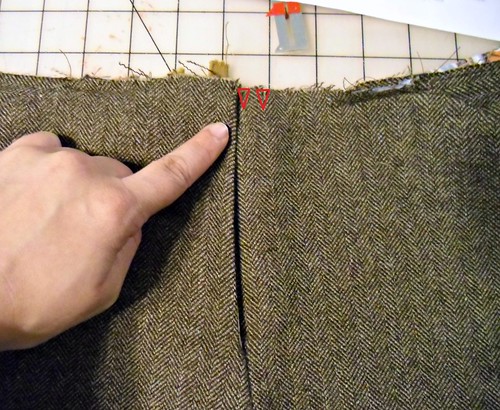
With your sewing machine, stitch all the way around the lining, exactly in the little waistband/pants ditch that you pinned into. This is called stitching in the ditch. Yes, I know. It’s so clever.
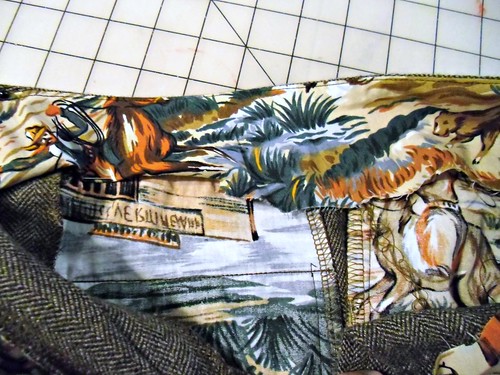
Again, don’t worry about the section with the back extension is. Just skip over it and continue stitching in the ditch.

wb16
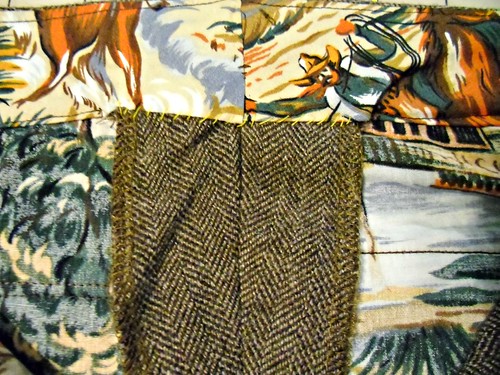
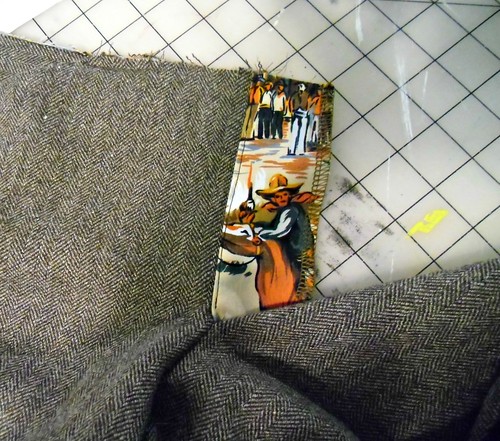
Afterwards, you can tack down the lining over the extension. The instructions call for just a few stitches worth of tacks, but I like to slipstitch mine down all the way so I know it’s not going anywhere. And also, I used yellow thread, because yellow is delightful.

wb17
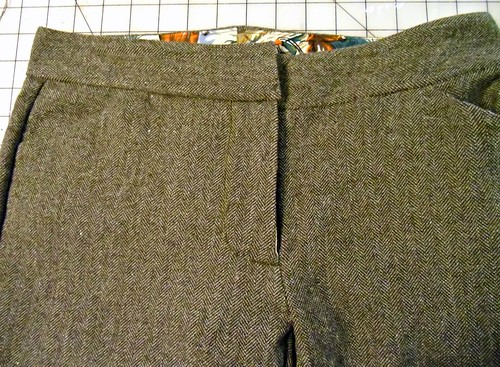
Give the waistband a good steam press, both inside and out.

That’s all! That wasn’t so hard, huh? 🙂
Expect a wrap-up post in a couple of days – belt loops, buttons, and hemming. And then PANTS PARTY 2012, YO.

Thurlow Sew-Along: Sewing the Fly Zipper

5 Nov


Today, we are inserting the zipper into our pants and making the fanciest of flys – with a facing and a fly extension! FANCY Y’ALL. This is my personal favorite part of the pants-process – when they actually turn into pants, and not just 4 giant pieces of fabric flapping around the sewing room 🙂

We will be sewing steps 9-13. I know it sounds like a lot of ground to cover, but this should actually go a bit faster than the welt pockets – plus, you only have to sew one zipper, not two!

Here is your background music for this task. It seems fitting, although I’m guessing Danzig’s fly isn’t exactly the same fly we are dealing with today 😛

Steps 7-8 should already be completed at this point, FYI!

f1
Take your interfaced fly facing (piece 11) and finish the curved edge.
Sidenote: The pattern placement wasn’t intentional when I cut this piece out, but HAHAHAHA dude is totally going to be lurking the inside of my pants!

f2
Sew the facing to the right front, right sides together, stopping at the notch.

f3
Trim & grade the seam allowances, understitch, and press the facing to the wrong side.

f4
Get your fly extension (piece 10) and fold in half along the fold line, right sides together, and sew along the bottom. Trim seam allowances, turn right side out and press. Sew and finish the long side.

f5
Place your zipper over the long finished edge of the fly extension, face up, with the zipper stop matching the notch. Sew. If your zipper is longer than 4″ (and really – where the hell does one find a 4″ zipper?), go ahead and match up the end with the notch and let the zipper excess hang off the top. We’ll cut it off when we get to the waistband attachment.
Sorry that the left side of my zipper tape looks all chewed up, it is. We got in a fight.

f6
Sew the zipper to the left pants front, face down, stopping at the notch. You can sew directly over your previous stitching line, to make things a little easier!

f7
Turn the facing to the back and edgestitch close to the zipper teeth.

f8
Now this might be a little hard to see, so bear with me here! Zip the whole thing closed, and then pull your right front over to the left from until the fly facing seamline is matched up with the second notch on the left front. At this point, I like to pin the whole thing closed so it doesn’t try to get sneaky when I push everything under the sewing machine.

f9
Flip your pants over; the right (un-attached) side of the zipper should be lined up with the fly facing. Pin the two of them together as shown, being careful not to catch anything else in your pins – no pants front, no fly extension. Just the facing and the zipper tape! As you can see, the zipper tape won’t go all the way to the edge – that’s ok! It’ll end up somewhere in the middle.

Go ahead and sew the zipper tape to the fly facing, using two lines of stitching.

f10
Flip the pants back over – it’s time to draw the stitching line for your fly! Yeeeeahh!!
Keeping the pants pinned close, locate the zipper stop and mark it (I used a pin, but you can also use chalk or whatev). This isn’t totally necessary, but you do want to be careful that you don’t try to sew through the stop – it could break a needle (“Wah” you say) or throw off the timing of your machine (“FUCK” you say). So watch out!

f11
I like to start at the top and work my way down when marking my fly line (I know Tasia’s is the opposite, so do whatever you want, yo!). Measure 1.5″ from the center in a straight line, curving the line as you reach your marking for the zipper stop. Bring the line under the zipper stop to ensure that you don’t sew over it.

f12
Here is my fly all marked up.
Don’t you love my BRIGHT ASS NEON YELLOW marking!? Liz sent me a couple pieces of this marking wax and a brand new box of hook&eyes, after I lameted about accidentally throwing mine away right after I bought them in Chicago. It was completely unexpected and totally amazing of her to do, but what else do you expect from someone who brings macarons to a sewing meet-up? 🙂 Thank you again, Liz!

ANYWAY, topstitch right over your markings, directly through the pants front and fly facing. Leave the fly extension out of this – you do want the zipper to actually work, no? 🙂

f13
Since the poor extension feels lonely, give her a couple of tacks to the facing so they can still hang out. You can do this by hand, or the lazy way like me – with a tiny zigzag on your machine 🙂 This picture was surprisingly hard to take; look at the diagram in the instructions if you need more elaboration on where to stitch.

f14
And that’s it! You should have a beautiful fly zipper, with a gorgeous fly facing and an outstanding fly extension.

f15
Doesn’t that look professional as fuck?

Go ahead and sew up your side seams as indicated in step 14. We only have a few more steps left!

Thurlow Sew-Along: Welt Pockets

2 Nov

Moving on to the next part of our sew-along – the Dreaded Double-Welt Pockets

\
AHHHHHHHHHHH!!!

I will admit, this part gave me some serious hair-pulling when I first attempted it because the instructions run on the sparse side. Don’t worry, though – I took LOTS of pictures and even ran a few through my beloved Microsoft Paint, so hopefully y’alls first attempts will be a much smoother process 🙂 The procedure itself it fairly simple, it’s just very precise. If the idea of welts is still terrifying – make a test welt pocket on some of your leftover scraps! No shame!!


Today we will be sewing steps 4-6.

Before you do ANYTHING with these pieces, take a moment to ensure that you have transferred all your pattern markings and notches to the fabric pieces. Like I said, welts are very precise, so the markings for this step are pretty critical. With that being said, the slash lines for the welt pocket should be transferred to the right side of your pieces; everything else should go on the wrong side.

If you have not already done so, go ahead and sew up your back darts and press them toward the center back (or, as Tasia writes: “centre.” Ehhheheehehe how cute, I wish I was Canadian sometimes lol)

WP2
Take your back pocket facing (piece 13) and finish the long edges with your preferred method of seam finishing.

WP3
Place the facing on the back pocket lining (14), both with right sides up, matching the notches. It took me a bit of head-scratching to figure this part out – see how the notches aren’t exactly centered on the sides of the facing, but rather creep up in one direction? The notches should be closest to the top of the lining (the end with the single notch). It’s hard to explain this without the ability to flail my arms around, so hopefully this picture makes a bit of sense!
You are going to edgestitch this piece down, in the same manner that you edgestitched the front pocket facings. Again, this piece’s job is to act as a little curtain for your welt pocket windows.

WP4
Speaking of welts… take your interfaced welt pieces and fold them in half, wrong sides together. Press and baste the long edges closed.

IT IS TIME.

WP5
The welts start out on the right side of your back trouser pieces (so yeah, I sure hope you transferred that marking to the right side!). The welt gets placed along the pocket line, with the raw (ie, non-folded) edge just exactly butting up against it.

WP6
Here it is with both welts pinned down. I highlighted my pocket line in pink so you can see exactly where it is.

WP7
There should be a notch at either end of both welt pieces. These indicate where you will start and stop stitching.

WP8
Stitch down the center(e) of each welt, starting at one notch and ending at the second. Don’t forget to backstitch!

WP9
Grab your pocket lining, and place it face down, upside-down over the bottom welt, matching the raw edges. Sew the lining to the welt only, being careful not to catch the pants back in your stitches.

WP10
Finish the raw edge.

WP11
Ok, time to cut into those pants and set the welts free! Cut straight down your slash line (disregard that it looks like someone chewed on mine!), stopping about 1/4″ from the end of your stitching lines. From the end of your cutting line (the marked X) to the end of your stitching line (circled), you want to cut at an angle, connecting the two.

WP12
Here is a better picture. Be careful not to cut too far, but don’t be timid and not cut deep enough – you want to end exactly at the stitching line. This would be a good time to practice on those scraps 🙂
Do this to both welt pockets, top and bottom, on either end.

WP13
Grab your pocket lining and pull it through the hole until it’s on the wrong side of your pants back.

WP14
I like to give my welts a quick press at this point, just to make sure I’ve clipped far enough and that everything is looking good so far.

WP15
Flip the pants back over, right side facing up. Fold over one side to expose the end of the welts. See the little triangle there? We are going to stitch that down to the welts, exactly on the indicated stitching line.

WP16
When sewing the triangle down, a few things to keep in mind: keep the welts butted together. You can hand-baste the welts closed if you are having trouble with this. Also, you want to get as close to the edge as possible, without actually catching non-triangle fabric. Use a zipper foot, and hand-baste the triangle in place before you start sewing, to ensure that it won’t move when you’re at the machine.

WP17

WP18
Now take that bad boy over to the iron & give ‘er a good press!!

See? Hard part over! Now to turn those welts into pockets and not ass-windows.

WP19
Pull the top (aka, notched end) of the lining toward the top of your pants back, folding at the fold line. All the right sides should be encased in the pocket and you should be looking at the wrong side of the fabric.

WP20
See the top welt stitching line? We are going to sew right on top of the welt only, to make sure that our pocket doesn’t have secret back fat pocket space.

WP21
Be sure to catch only the welt & the lining. Again – the pants back isn’t invited to this party! SORRY.

WP22
Now sew up the sides of your pocket, and finish the edges.

WP23
Then baste the top of the pocket lining to the pants back.

WP24
Ta da! Beautiful, functional, double-welt pockets!

Now that wasn’t so hard, was it? 🙂
If you’re caught up to speed, go ahead & complete steps 7 & 8. Next week: the fly & all it’s fly-glory, woohoo.

I’m Creepin’ All Over Your ‘Nets

1 Nov

Just dropping in to alert y’all of a couple guest posts that some of my favorite bloggers have been kind enough to dedicate to meeee.

First up, I’ve got a little Q&A with Joanne over at Stitch and Witter about my handmade style:
Guest post on Stitch and Witter!

Super fun stuff, and I’m so honored to join the ranks of all the other lovely ladies who have been interviewed! Here’s my interview if you care to know more about my handmade style 🙂

Second up, this is kind of old news (and I’m taking full responsibility of being a Shitty Blogger right now, ok), but I also had a guest post over on Lucky Lucille and this one is all about the Peony and it’s mysterious bust darts:
Guest post on Lucky Lucille!
A few people have already told me they found it very helpful, so do click over if you’re having trouble fitting your bust on this dress (or any dress with a similar dart setup, for that matter – I won’t judge you :)).

As a side kind-of-unrelated-but-not-really note, I just want to announce that today I paid off my credit card and I’m officially debt-free! AND FUCK YES I FEEL PRETTY AWESOME ABOUT IT AND I AM TOTALLY PUMPING MY FIST RIGHT NOW.

It took about a year, and it was pretty fucking shitty – remember when I said I wasn’t going to let myself buy new fabric in 2012 (with a couple of exceptions)? Well, now you know why. But it’s paid off – and I’m ahead of schedule, even, considering my goal date was 12/21/12 (yes. The end of the world). I’ve already blasted this all over the web & I’m sure people are real sick of hearing about it at this point – but I’m just so excited! And it’s totally relevant to this blog since I no longer need to take commissioned projects (which frees up time for LT-sewing), and I can actually spend money on sewing things that don’t come from the flea market. So yay!

To keep this sewing-relevant, this is what I wore last night for the Trick-Or-Treaters:
FACT: Skeleton pajamas always come in handy.
Me-made, of course 🙂 I drew the template and stencilled it on a plain black sweatsuit. Everyone needs a skeleton costume, yes?

NO! Bad Vogue!

31 Oct

Soooooo Vogue just released their fall/winter sewing patterns. (Un?)Forunately, they aren’t too bad this time around. Not a lot of snark here; these are actually pretty boring & blah and ughh I almost didn’t bother posting because I was just so fucking underwhelmed. Seriously – even Koos van den Akker appears to have left the crazy at home this time. But, I dunno, it’s a slow day & the requests have started trickling in so I’ll just consider this my Treat to y’all. No tricks, please!

One thing that stuck out to me this go-round was the sheer amount of unnecessarily frivolous patterns.

V8858
Vogue 8858
Such as… oh, I don’t know, this flamingo flamenco skirt?

V8850
Vogue 8850
Or this vintage repro – while beautiful, I just don’t see a modern woman waltzing around the office with a giant slab of fabric hanging off her waist like a forgotten napkin. Or am I just being a bitter old hag here? Maybe it’s the cheap shiny satin, but this pattern is getting the serious side-eye from me right now.

V8853
Vogue 8853
A flowy ruffled blouse with a matching flowy ruffled caplet in the same eye-bleedingly busy print? SIGN ME UP.

V8846
Vogue 8846
Or perhaps you fancy a dress with a built-in cape? It is Halloween, after all.

V1335
Vogue 1335
Buzz Lightyear, to the rescue!

V8868
Vogue 8868
I know everyone is freaking out over the fascinators, and I’m not going to rain on your parade for fear y’all are gonna eat me alive.
All I am gonna say is, it looks like the black-eyed children have finally found a way to be invited into your home (spooky link alert, FYI!)

V1334
Vogue 1334
Nothing earth-shattering here, only the most unflattering outfit I think I’ve ever seen.

V1332
Vogue 1332
REAL TALK: This straight-up looks like a vagina.

V8855
Vogue 8855
Wonderful pocket place y’all got there!

V8867
Vogue 8867
They finally did away with the randumb giant leaves this time, and instead settled on using decapitated arms.

V8869
Vogue 8869
“BLIIIINDED BY THE LIGHT- WRAPPED UP LIKE A DOUCHE, ANOTHER BONER IN THE NIGHT~”

More Vogue WTF:
Part 1
Part 2
Part 3
Part 4

A Day at the Flea – October 2012

30 Oct

Lord have mercy, the flea market was GOOD to me this month. I’m almost embarrassed by the excess, although I keep telling myself I’m saving money & keeping trash out of landfills. Right? Right!? Humor me here.

Anyway, I went on Saturday with my best-flea-market-buddy-ever, Lauren (and you should definitely go lurk her blog if you enjoy being jealous of beautiful white crocheted lace dresses, because, hot damn). My first mistake was forgetting that October was the “big” month for this flea market. I don’t know what people have against November & December, but for whatever reason, they choose October as their month go to Christmas shopping. The place was PACKED – lots of slow-moving old folks with their dogs in covered baby strollers (sidenote: why? Why wouldn’t you just leave your dog at home? I DO NOT UNDERSTAND). On the flip side, it meant that all the sellers brought out their big guns this month… and we made out like bandits.

Today's flea market haul
Here’s a shitty Instagram pictures of my haul, minus the clothes I bought (oh yes… there are clothes).

40s velvet party dress
This is the very first thing I bought – like, within 15 minutes of getting there. Isn’t she a beaut! I’m pretty sure this is from the 40s/early 50s. I (unsuccessfully)tried to lighten the image; it’s a lovely forest green velvet. The buttons are mother-of-pearl with gold edges. This will definitely be my Christmas dress 🙂

40s rayon day dress
The second dress is a navy day dress from the 40s. I’m not totally sure of the fabric content, but I’m thinking rayon. Sidenote- the seller & I bickered over the age of this dress. She said it was late 30s, I said early 40s. She said she knew her vintage, I said I know my sewing patterns. Later when I was hemming it up (don’t worry – the original hem is still there, I didn’t cut anything off :)), I found a tag on the inside of the skirt that dates it to 1940. I guess that’s kind of a compromise, huh?
Ps – I know it looks totally ugly on the hanger, here’s an action shot of it on me 🙂

Butterick 2153
Simplicity 1999
I also got some patterns. Aren’t these darling? The seller remembered me from last month & saved me a box!

I came across that giant box of zippers right before we left. As in, “Let’s lurk this last shed and then go home, I’m cold.” The seller and I haggled a bit on the price, then settled on $15 for the whole box, plus whatever else I wanted to stuff in there. I added a few scraps of fabric, giant covered buttons, and a purse pattern that Lauren was eyeballing. I wasn’t sure if I got a good deal or not, I just grabbed the box & hi-tailed it home.

Zippers!
I know it doesn’t look like much, but there are 83 zippers here! Almost all of them are 22″ (some longer), and they are about 50/50 nylon and metal. Every color of the rainbow! That comes out to about $.18 per zipper, so yeah, I reckon I got a good deal 😉 Add that to the giant bag of metal zippers I scored a few months ago; I’m pretty sure I’ll never need to buy another zipper again trololol

You’re probably wondering what my second mistake was.
My second mistake was going back the next day.

with my mom & niece :)
This time, I went with my parents & niece Caroline, who is the sassiest little sass that ever sassed.

true
I would have bought this if it wasn’t $10.

OMG
I discovered that I was a designer in a past life.

haul #2
And here’s haul #2, combined with some stuff my parents bought. Aren’t those side tables amazing?

I missed one of my regular sellers the first go-round, so I was interested to see if he still had anything for me (I usually get my patterns from him):
Vogue Couturier pattern
OH! Ok!

Simplicity 5016

Modes Royale 1415

Sewing Booklets

Pres Kloth !!
(yes, the “kloth” is in there and yes I plan on using it)

Zipper patterns!
Change purse gloves!? DED.

Sewing books via Dept of Agriculture
I actually have no need for these (you should see my collection of fitting books), I was just amused that they were from the US Department of Agriculture. So randumb haha!

Hollywood 1482
I found this pattern at a different booth. I was really excited about it – it was only $1 – until I realized that some idiot piece of shit waste of life SEALED THE ENTIRE THING UP IN CONTACT PAPER. S/he had arranged it in some weird cardboard shadow box with a bunch of sewing notions (not cool vintage sewing notions… like, shit from Joann’s) and plastic-wrapped the whole thing closed. I only wanted the pattern, so the seller punched the front out and gave it to me lol. I was able to rip the top open very carefully with a razorblade, and the envelope contains one pattern piece & the instructions. So boo 😦 Oh well, at least the artwork is pretty enough to display.

I also bought more clothes!
blanket skirt
50s wool skirt that feels like a blanket.

50s party dress
50s party dress that fits me perfectly (and yes… that is a bird shit stain on the collar lol. I need to clean it!)
This dress was only $5. Hold onto your hats – there is a significant amount of fading down one side of the dress, all the way to the hem. Those spots have been lightened to purple. Hence why it was so cheap. I’m not sure what I’m going to do with it – the sun damage isn’t terribly noticeable when worn (the seller suggested I wear it in the dark haha), but you can still see it. I thought about dying it, but I really like the color as-is. So idk yet. But for $5 – I couldn’t leave it behind!

square dancing dress
This square dancing dress was also $5. I’m not sure of it’s age – it’s handmade, at any rate – but it fits and that skirt is super twirly. MINE.

70s wooden shoes
I also found these beat-up 70s wooden platform sandals for $5.

All in all, a good 2 day haul – and I spent way less than $100 total!

And just to keep this related to all things blog~
outfit!
I’m wearing the blanket skirt today – it goes perfectly with my Chuck sweater 😉

Thurlow Sew-Along: Sewing the Front Pockets

29 Oct

Ok folks! D-Day has arrived, time to get workin’ on some trousers!

A quick note: You’ll notice that I didn’t post a sew-along schedule. This is because I am not sure how frequent (or infrequent) the posts need to be! I plan on working each full step per post, with a few days thrown in between so everyone can get their pants rolling, but do let me know if you’re feeling like everything is moving too fast and you need a minute to catch your breath 🙂 Of course, these posts will always be here for future sew-alongers! So please don’t feel like you have to rush through to appease the Thurlow Gods 🙂


Today we are sewing the front pockets of our trousers, sections 2-3.

We start with the pocket facing and pocket piece – 7 & 8.
FP1
Finish the curved edges of both pieces, as shown.
If you have not already decided how you would like to finish your raw edges, consider this your kick in the butt! As you can see, I serged mine (what can I say – I’m a lazy seamstress at heart), but no worries if you don’t have a serger. Sunni has a whole mess of seam finishes right here and any of these will work. Personally, I think those bound seams look super yummy. Do what you want, though!

FP2
Grab your front pocket lining – piece 9 – and lay your pocket piece & facing on top, with the right sides all facing up and the weird notches & crannies all matching.

FP3
We are going to stitch these pieces down to the pocket lining, veryyyy close to the edge, as indicated by the dashed lines. The whole point of this is so when we put the pocket lining in the pants, you will only see the facing pieces from the outside.
Also: horse butt.

FP4
Grab a trouser front and lay it out, right side facing up.

FP5
Place your pocket lining over the trouser front, right sides together, matching the diagonal line. Stitch all the way across with a regular 5/8″ seam allowance.

FP6
Trim, grade, and understitch this seam.

FP7
Flip the whole thing back and give is a good press. If you would like, you can topstitch the pocket at this point.
What we are looking at now is the WRONG side of the trouser front, with the right side of the pocket lining facing up.

FP8
Pick up the loose end of the pocket lining…

FP9
And fold it along the fold line (this should be indicated by notches), matching the edges at the opposite side.

FP10
Sew the bottom of the pocket lining only, as indicated by the red dashes. Finish this seam.

FP11

FP12
Baste pocket edges along the top and side.

If your pocket has a little bit of ~body to it, that’s ok! It’s not supposed to lie completely flat 🙂

You should end up with something like this.
FP13
Yay! A pocket!

FP14
Yay! A pocket facing!

Now that wasn’t so hard, eh? 🙂

We’ll start on the welt pockets in a few days (dun dun DUN!). If you have any questions, do let me know & I’ll do my best to answer 🙂

Thurlow Sew-Along: Adjusting the Pockets

23 Oct

This is gonna be short & sweet!

When I sewed up my first pair of Thurlows, the only complaint was that the back pockets weren’t deep enough to accomodate my phone or wallet. Which, I mean, back pockets pretty much ONLY exist for a phone or wallet as far as I’m concerned.

Original Thurlow pocket
Can we all just step back for a second and have a moment of silence for this tragedy that is unfolding.

Original Thurlow pocket
Measuring the pockets shows that they are only about 2.5″ deep. If this is all gravy in your world, do solider on with the unaltered pattern. If not, I hope you saved a bit of tissue because we have pattern pieces to slash and tape!

Modified Thurlow pocket
Here is my modified pattern piece. What you want to do is add length both above and below the fold line, to ensure that the pocket still folds up properly once we stick in the pants (hurr durrr). This is pretty easy – just slash a straight line above the fold line, tape in a gob of tissue paper (or you can use regular paper, IDGAF. I use tissue since I have tons on hand & it makes everything easy to fold back up!) and then repeat below the aforementioned fold line. To fit my iPhone, I added 2.5″ to each slash.

Modified Thurlow pocket
When you’re done hacking, fold the tissue on the fold line (notice that the bottom matches up to the top notch – not the top of the tissue). This is how deep your pocket will be. My phone fits, yay!

Modified Thurlow pocket
And here is an action shot, courtesy of my second pair of Thurlows.

If your muslins are ready, go ahead and cut your fabric – you did prewash… right?! 😉 If you are planning on making your trousers in a plaid or striped fabric and fancy a bit of bias-cut on the welts & waistband (because YAY for not having to match those parts!), Liz has a great tutorial on altering pattern pieces for a bias grainline. For the actual matching at the side seams and everywhere else, Check out Tasia’s tutorial for matching plaids. If you are smart & opted for a solid, non-directional fabric – lucky you! You can just follow the cutting layout included in the pattern 🙂

We will start sewing on Monday!

Completed: The Chuck Sweater

18 Oct

I may not have been sewing much lately, but I *have* been knitting up a storm! Allow me to introduce Chuck, my fourth sweater.

Chuck Sweater
Ok, this picture is actually kind of useless – I just like the way the light is shining all over my face like I’m some kind of Heavenly Being or something lol

But seriously:
Chuck Sweater
PRETTY FREAKIN STOKED ABOUT THIS LIL’ GUY

This is Chuck, by Andi Satterlund. Also, holy shit I need to stop knitting Andi patterns, or else she is going to think I’m some weird creepy pattern stalker. For real, though, I love her stuff – the shaping is perfect for my body, and I love how everything is knit in one piece. I actually don’t know how to seam up a sweater at this point!

Oh, the skirt is also me-made! It’s pretty old (like, pre-blog days), so I don’t remember what pattern I used. Maybe Vogue 8603? IDEK.
Chuck Sweater
This was knit with absolutely no alterations – although I did need to go down a couple of needle sizes, to a 6. The yarn is good ol’ Cascade 220 (another thing I need to branch away from), it’s a really lovely heathered red with bits of gold & bright blue floating around. I actually bought this yarn in Chicago; Tasha helped me pick it out. I love it, it’s such a nice shade of red!

Chuck Sweater
The pattern itself was super easy to follow, and it knit up SO FAST. Seriously – I started this on 9/20, and ended on Monday. Less than a month! It didn’t hurt that the pattern is almost entirely stockinette, except for the cables in the front. And since it’s knit in the round, that’s just row after row of knit stitches. Really mindless, the perfect kind of project to talk through 🙂

Chuck Sweater
I’ve had people ask me about how I get so much knitting done – I knit in little pieces every day 🙂 Mostly on my lunch break at work (I get an hour!), and then I also meet up twice a week with other knitters for an hour or so. Which, by the way – if you’re a Nashville knitter (or crochet-er, I don’t judge) and want to join our meet-ups, shoot me an email & I’ll pass on the deets. I love meeting other knitters and talking about YARN. God, I’m such an old lady. Ha.

Chuck Sweater
This is the best picture you get of the back. Sorry, but backs are boring.

Chuck Sweater
I did have a bit of a misstep with the cables – I turned a couple the wrong way and didn’t realize it under several rows later. Ugh!! I knew the messed-up cables would bother me to no end, so I took a deep breath and googled a solution…

That will teach me not to miss-cross my cables
… which involved ripping WAY THE FUCK DOWN and then knitting everything back up. I’m not going to lie, it was pretty terrifying. I was able to fix everything, as you can see, but the end result had some weird loose yarn pulling in the back, and giant gaps in the front. This is pretty common when fixing cables, the only thing you can really do is pull the yarn around and hope it blocks out. Spoiler: most of it did. I did end up stitching a couple of holes closed with yarn – and the inside has a spot where there is still loose yarn – but it looks ok from the outside. You can hardly tell that any cable surgery happened!

Chuck Sweater
The finished sweater is pretty short (at least an inch above my belly button), but it looks great over dresses & high-waisted pants 🙂

Chuck Sweater
This picture shows the color best. It has so much depth, love it!

So what’s next? I like to always have a project on my needles (it gives me something to look forward to in the middle of the day :D), so I’ve already cast on my next sweater – this will be the Central Park Hoodie.
Never enough sweaters
This yarn is Ella Rae superwash. You should be proud of me, for breaking free of the chains that bind.

Here is my Ravelry page for Chuck, if you’re interested!

Chuck Sweater
I’m so glad it’s finally sweater weather!!

What I Do When I’m Not Blogging

17 Oct

Just in case you were wondering where I’ve been all week…

I was making bear costumes.

Bear costume
Of course I tried one on and took pictures. It’s a teddy bear costume. Anyone who pretends like they don’t try on the weird stuff they sew for other people is absolutely full of shit.

Bear costume

I know you are just totally jealous right now, so calm yourself.

This is Simplicity 2853. No, it’s not for me – it’s a commissioned sewing job (hence the sudden radio silence – gotta get the work done before I can play again!). I actually made three of these, all in this incredibly soft, cushy, fleecy fur. That shit was a BITCH to cut out because it loooved shedding; I think I spent more time sweeping teddy bear fur off the floor (and onto the cat) than I did anything else. At any rate, I’m 99% done – just need to finish the arm/leg hems & sew the ears on the last one. THEN IT’S PARTY TIME.

Oh! We also managed to explore the attic over the weekend!

Today we are exploring our creepy attic.
Sorry for the Instagram picture, but look at my twisty chimney! I don’t know about y’all but that is COOL AS SHIT.

Sadly, the attic was pretty much empty… although we did find this chair.
Chair we found in the attic
It has no legs (probably took them off to get it in the attic & then they disappeared over the years), but other than that it’s in pretty good shape!

Chair we found in the attic
Here’s the side. Anyone know what you’d call this style of chair? I thought it was a barrel chair, but those have arms… and this one doesn’t.

Wallpaper scrap matches the chair
The other cool thing we found up there were little scraps of wallpaper that perfectly match the chair.

Attic opening - wallpaper
One of the openings to the attic still has wallpaper in the space between the real ceiling & the dropped ceiling. I know, I know – this photo looks like a nightmare. But isn’t the wallpaper crazy? And they even wallpapered the ceiling! God, this house must’ve been tacky as shit lol.

I also finished knitting my red sweater! It’s still blocking, though, so more on that later.

SEW-ALONGERS: The Mood Fabrics discount is still on for a few more days! Use the code LLADYBIRD to get 10% apparel fabric (for more info, check my blog post on fabrics)

I’ll be back later with more blog posts that are actually relevant to your interests.
Bear costume
Stay cool, y’all.