Tag Archives: fitting and alterations

Completed: Ultimate Trousers

14 Aug

Hey look, here I am again – with another pair of polka dotted trousers! Are you surprised? Would you be surprised to know that I have another pair of dotty trousers sitting on my sewing table as we type speak? Do you think I have a problem? I’ve never considered myself a polka dot trouser kind of girl, but these sewing numbers don’t lie!

Sew Over It Ultimate Trousers

This polka dot cotton sateen is actually an old spoil from the Mood Fabrics flagship store in NYC, which I bought while I was there in March. I knew I wanted to make pants with it – what pattern specifically, I couldn’t tell you, but pants for sure! I love using cotton sateen for pants as it’s usually a good weight with a nice, heavy stretch, and the colors are always so lovely and saturated. Plus – polka dots! Yesss!!

Sew Over It Ultimate Trousers

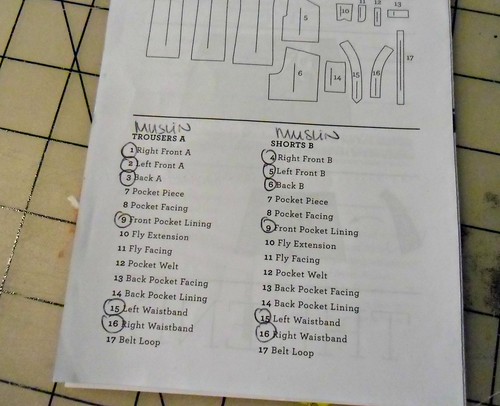
The pattern I eventually ended up using is the Ultimate Trousers from Sew Over it. I actually tested this pattern ‘way back when earlier this year, to help get it ready for it’s print debut. I was on a pretty tight deadline during testing, which meant that I didn’t end up with a finished garment – just a muslin and a loooot of notes. This is actually pretty typical for me as a tester; I don’t always finish the pattern to the effect that it warrants a blog post! Once I got everything back to Lisa, I put the pattern on the backburner since the summer heat was starting to ramp up and I couldn’t handle the thought of wearing pants in this kind of humidity.

Anyway, we’ve got promises of cooler weather lurking on the horizon, which means it’s PANTSSS TIMEEEEE! Yay!

Sew Over It Ultimate Trousers

I did make a few changes to the pattern, both for fitting and general style. Let’s go over the fitting stuff first. Every time I make trousers, I end up doing the same adjustments across the board, especially if the pattern doesn’t include a front zip fly. I realize that trousers are kind of a scary subject for a lot of sewers, so I’m going to show y’all what I do in my fitting and hopefully that’ll shed some light on the whole matter (and even more hopefully – prove that they really aren’t so scary to fit!).

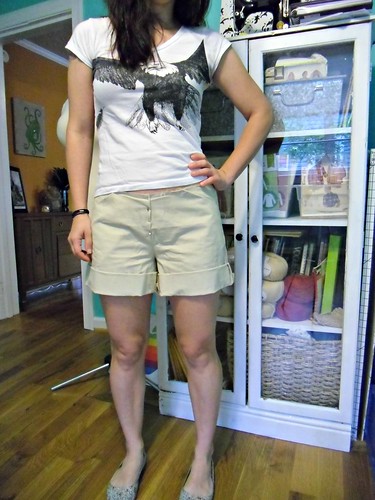
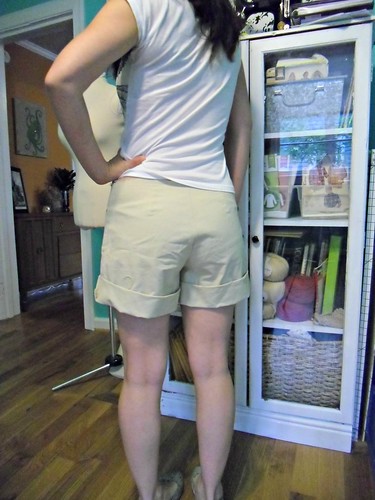
I don’t have muslin photos of this particular pattern, but I do have muslin photos from my archives (super unflattering muslin photos, I might add! Ha!) back when I made the Colette Clovers. Different patterns, but the concept is similar.

 photo CIMG0016.jpg
See all those horizontal wrinkles allll over my damn crotch? This is an indication that the crotch is way too long for me – so it’s wrinkling. The easiest way to fix this is to pinch out the excess into a long horizontal line, and transfer that to your pattern piece with slashing and taping. I’m petite, and while my torso is a pretty standard length, my crotch length is on the short side. So this is an adjustment that I have to make with *most* trouser/pant patterns. The amount can vary depending on the pattern – obviously the Clovers needed a lot taken out, and the Ultimate Trousers didn’t take much (and I just made a pattern the other day that I had to remove 2″ from!) But it’s a common adjustment for me, and this is what it looks like.

 photo CIMG0006-1.jpg
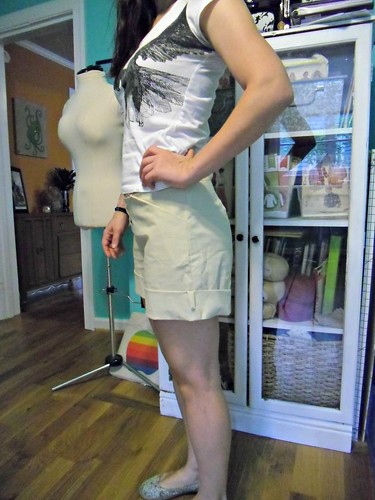
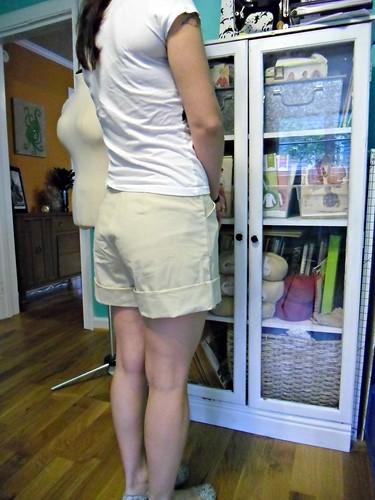
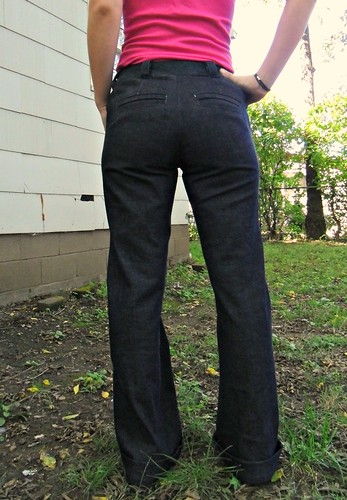
Same muslin, back view – see how tight the ass is? Like, not even flattering tight, just imma-bust-outta-here-like-a-jailbreak tight. This is fixed by adding a wedge to the back crotch depth pattern piece. How much you add will depend on how much room you need (the Ultimate Trousers didn’t need any, but the Clovers clearly needed a lot), but you can easily hack this alteration by just cutting a bigger size right there at the back crotch (this picture from Sunni’s Trouser Sewalong shows where to add length – right in that blue circle).

clover close-up
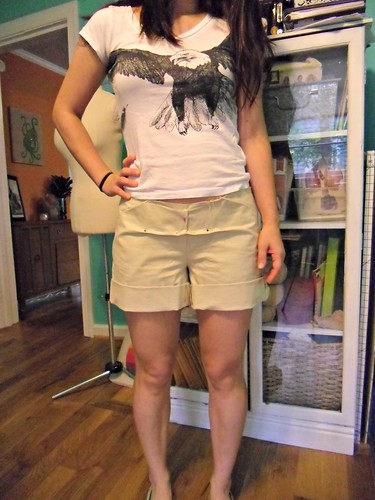
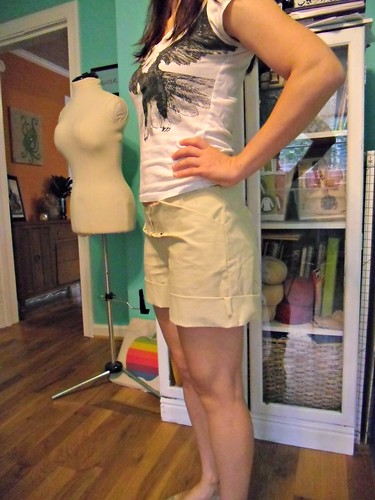
Here’s a pair of Clovers where I fixed the length issue, but now there’s some weird puffiness around, well, my crotch. Isn’t that flattering! You guys, this particular fit issue took me a LONG time to figure out because it seemed so weird – but it’s really not. Basically, my crotch requires a different shaped crotch curve than what is drafted for most patterns. I’m a J shape, and the majority of patterns I sew are an L shape. This is a stupid easy adjustment – you literally just redraw the curve, and once you’ve done it on one pattern, you can trace that curve to every pattern thereafter. For the first pattern, you’ll have to eyeball it (or find a pair of pants that fits and copy that crotch curve) and adjust until you get it right, which might take a couple tries. Once I figured that out – what it looked like, how to fix it – that really opened the floodgates of trouser making for me. Also, you should read this post on the Fashion Incubator.

Sew Over It Ultimate Trousers
Here is my front pattern piece with the adjusted crotch shape – I’ve already redrawn and cut my piece out, but I put it back on the table so you could see the difference in the curves. For whatever reason, I don’t need quite as aggressive a crotch curve when I’m making pants that have a front fly – it’s just trousers with a smooth front (especially if it’s sewn in a stretch woven).

You can also see where I tucked out the length horizontally. I didn’t take a photo of the back piece, but I sliced that length to hinge, and the side front has the same removal of length with it tapering to nothing at the center back/crotch, if that makes sense.

So yep, those are my pants adjustments! I know they might seem confusing, and to be honest – I learned all this when I was going through my Clover saga a few years ago (never got those pants to fit right, but I sure learned a lot in the process!). It was a LOT of trial and error, but hopefully my notes will help a least a few people go through less trial and error 🙂 As you can see, there aren’t a whole lot of adjustments needed to get a good fit on pants – but they all work together, and each one affects the other (and they are all adjustments that need to be made BEFORE cutting your fabric, which is why a muslin is SO essential when making pants!). For more fitting help, I strongly recommend investing in a copy of Pants for Real People, which is basically a pants-fitting Bible. So much good information in there, I use that book often!

Ok, now that THAT’S out of the way – let’s go back to talking about this pattern, and the style adjustments I made!

Sew Over It Ultimate Trousers

This pattern is designed to be worn cropped (or as shorts), with a faced waistline. I have learned that I really don’t care for faced waistlines, so I decided to add a waistband to my pants. I didn’t draft a waistband – I just used the facing pieces and flipped them to the top as waistband pieces (and cut two, so I could face the waistband, as you do). I think, for me, these are a little more wearable with a proper waistband. For interfacing, I used tricot fusible, which I looove because it stabilizes the fabric but doesn’t compromise the stretch of the fabric (which is what makes the darn pants so comfy to begin with!).

Sew Over It Ultimate Trousers

I also kept the length on the longer side, which means I can wear them full-length in the winter (with cool socks!) or fold them up to make them cropped. This length is straight out of the pattern, by the way – I didn’t shorten anything, and I’m 5’2″. Just fyi!

Sew Over It Ultimate Trousers

The one major design change I made to this pattern was to sew it in a stretch woven, as opposed to the firm woven (non-stretch) that the pattern calls for. For one, my muslin was a firm woven and I plain just didn’t like the way they felt! They were too restrictive! I like wearing stretch woven pants, ok. Also, it’s hard to find a good pants-weight print that isn’t a stretch woven, so there’s that. I think these are fine in the stretch fabric, although I should probably go back and size them down a little because I think the legs look kind of loose. I was trying to avoid the stovepipe legs look, just to try something different, but I think these do need a little less ease. These are a size 8, by the way!

Sew Over It Ultimate Trousers

So that’s it! Thanks Lisa (and the Sew Over It team!) for letting me test this pattern, and being so patient with me taking months to make a finished wearable garment 🙂 Londoners, if you’re still afraid to tackle the trousers, there is a whole class for making these (with tea and cakes, omg I wish I was in London) if you still wanna try them!

Those of y’all scared to try trousers – what are your thoughts? Do you think the process looks any easier? Are you going to throw caution to the wind and try anyway? Y’all – pants are fun!

* Oh yeah, and I cut my hair! I hope you like it! Well, I guess it doesn’t matter if you don’t like it – it’s not like I can stick it back on my head lololol

Completed: Peter and the Wolf Pants

21 Jun

So I’ve been sitting on this pattern for a couple of months now – Katie sent these to me as a surprise spring gift. An awesome surprise, I might add. Who doesn’t love getting surprise patterns in the mail, amirite!

Anyway, my immediate first thought was to make these up in a light polka dotted denim. Doesn’t that sound like it would be amazingly cute?! Unfortunately, I couldn’t source the right fabric – this pattern calls for fabric with a little bit of stretch, and I couldn’t find any sort of stretch bottomweight that also included polka dots (I know there are lighter-weight fabrics out there, but in my experience, their thinness requires either 1. Commando or 2. Thongs, neither of which I’m comfortable with rocking. TMI? Whatever.). I remembered this polka dot DIY post from Portia and I figured, hey, I’ll just get light denim and make my own polka dots, yeah?

Peter & The Wolf Pants

But, you know, I was seduced by all the pretty dark denim at Mood Fabrics. OH WELL. This stuff is from Theory and it is amazeballs. Nice and dark, robust without being super heavy, and just the right amount of stretch.

Btw, you’ve probably figured out that I did eventually end up with polka dot bottoms – in the form of shorts. Hey, it works!

Anyway, let’s talk about these pants!

Peter & The Wolf Pants

This is the Peter & the Wolf pants from Papercut Patterns. The way these pants are cut is really unique – in addition to side and inseams, there are seams straight down the middle of the front and back legs, as well as some interesting pocket/yoke action and the cutest little scalloped hems. As you can see here, they definitely do emphasize the hips, but that’s what I like about them!

Peter & The Wolf Pants

I cut a size XS, although in retrospect, I really should have gone down another size to the XXS. I had to do a LOT of alterations to get these to fit the way I like, and I made some easily-avoidable mistakes along the way. Pretty much EVERY SINGLE PROBLEM could have been eliminated if I had made a muslin first. Why didn’t I make a muslin first? I dunno, I guess I was feeling ~cocky with how good those Rite of Spring shorts fit me straight out of the package.

So, LESSON 1: Make a muslin. ALWAYS MAKE A MUSLIN.

Here is why this is so important, why I keep knocking this into your heads and why I should listen to my own damn advice:
– I tried these on right before I put in the zipper, and the sizing was MUCH too big through the waist and the legs. Normally, that’s not toooo bad of an issue because one can just take in the side seams (I do this all the time, u guise), but the way the pockets are placed means there isn’t a lot of side seam to take in before you start cutting into pocket territory. I couldn’t pull from the center seams because I’d already done all that topstitching and I’m ssssooooo laaaazzzzyyyy. I sat and thought about it for an evening, and ultimately decided to remove the majority of the excess from the BACK of the pants, rather than equally distributed between the front and the back. It worked, and my pockets are still there – yay! – and you can’t tell too much that the front is bigger than the back (unless you’re really studying where that side seam hits), except one glaring error…
– The front scallops now ride toward the inside of my ankles, instead of being centered in the middle of my leg 😦 Believe me, I tried really hard to fix this, but ultimately it’s just a matter of physics… the front is twisting, since it’s wider than the back. It’s not too terrible since they both pull about the same amount, so it looks intentional. But you and I, we know the real truth.
– The crotch curve was wrong for my shape and it looked like I was hiding packets of ketchup down the front of my pants at the crotch. WOOF. Please don’t take this to mean the crotch curve was bad across the board – I just mean it didn’t work for my specific shape (obviously it’s good for some people – look at the model on the envelope!). We all have different crotch curve shapes (how many more times can I say the word “crotch” here?) and mine is apparently a pretty pronounced J – something I learned when I was sewing the Colette Clovers. Fortunately, redrawing a curve is super easy – even on mostly-assembled pants, I mean, you’re basically just creating a new seamline – and that eliminated most of my issues in that one area. If this sounds confusing and slightly terrifying, it’s not! There is TONS of information on Google, as well as in various pants-fitting books.
– I also should have slightly shortened the crotch depth. Not even by much – just a little pinch of fabric (you can see where it’s puffing out a little. STOP STARING.). Unfortunately, I can’t fix this now as it’s something that needs to be adjusted to the flat pattern before cutting. #1 reason why you should make a muslin first. Womp womp.

I know this sounds like a lot of issues, but I just want to stress that all of them could have been EASILY solved if I’d just made a damn muslin first! ARGHGHHGHGH.

Peter & The Wolf Pants

Well, at least I remembered to shorten the inseam before cutting my fabric; the original inseam is over 29″ and I needed something much shorter, plus I wanted them to be cropped. I love the length!

Peter & The Wolf Pants

My yoke seams don’t perfectly match up due to all the side seam that I had to cut off, but at least I preserved the pockets!

Peter & The Wolf Pants

I subbed out the invisible zipper for a lapped zipper. I really think an invisible zipper would look best, but I was concerned that I would have trouble with the bulk of the denim+invisible zipper. A lapped zipper doesn’t look terrible, although I wouldn’t necessarily say it looks great, either.

Peter & The Wolf Pants

Look how good the butt fits, though! I should also point out here that I widened the waistband so it would cover my navel – this was easy, instead of cutting 1 waistband and folding it in half, I cut two and sewed them together at the top. Next time, I will opt for a curved waistband instead (this one is straight), as I find the straight doesn’t hug my curves as well. Just a personal preference!

Peter & The Wolf Pants

Peter & The Wolf Pants

Personal fitting woes aside, these are REALLY cute. I love all the topstitching, it really highlights the cool yoke and pocket detailing.

Peter & The Wolf Pants

Peter & The Wolf Pants

For sitting through this giant long post, here are some pictures of me swatting away the skeeters.

Peter & The Wolf Pants
HAHAHAHAHA

In all seriousness, though! I know this post sounded like a big Debbie Downer review, but I do really love these pants! Slim-fit, stretch pants like these can require a bit of tweaking to get the fit right (remember the everyone’s personal saga with the Colette Clovers?), but it’s worth it in the end, as you can crank these out over and over once the fitting adjustments are done. Which is what I plan on doing – wool cigarette pants for winter, please! Hey, maybe I’ll even find some dotty fabric 😉

Peter & The Wolf Pants

PS – My top is McCall’s 4488, an old make from last year.

Thurlow Sew-Along: Muslin Party!

4 Oct


It’s time to get crackin’ on some muslins! Whoooohooo… who’s excited!? Anyone? Anyone?

I will admit – making a muslin isn’t exactly the most exciting way to spend your precious sewing time. However, it is pretty necessary to ensure that you get a good fit, especially with something like trousers or shorts where you can’t just sew a wider seam allowance to get rid of the problem. Lots of pattern alterations involve the flat pattern before the fabric is cut, and it is crucial that you figure this out before you cut into your real fabric & then despair that the crotch is too long. Long crotches are pretty tragic, imo. So let’s get muslinin’, y’all.

First, figure out what size you are going to be sewing up. Here is the back of the Thurlow envelope. These pants don’t have too much ease in them, but it IS there. If you like that, that’s totally fine – just cut the size recommended. If you want something a little more form-fitting, I recommend checking out the finished measurements & basing your size off of those. PROTIP: the finished waist measurement doesn’t actually hit your high waist, as in the smallest part of your torso. These actually hit right at the belly button, so that would be where you need to measure if you are going by the finished dimensions. My measurements put me between a 4 and a 6, but I cut a 0 (since right at my belly button is 29″) and added some room at the butt and I got a great fit. Trace your pattern if you are unsure what size to cut, you can always make another muslin!

Thurlow Muslin - necessary pattern pieces
The Thurlow has a lot of pattern pieces, but let’s not get ahead of ourselves – we only need a few for a proper muslin! I have circled the ones you’ll need to cut out. The pocket lining pieces ARE necessary (since they fill the void where the pocket slash is on the front pieces), but don’t worry about the facings. If you are making trousers, you can go all out & muslin the full lengths, or you can be lazy like me & just make shorts 😉

It is a good idea to mark on your muslin where the welt pockets will sit – you don’t have to sew the actual pockets, unless you are just REALLY feeling it – in case you determine you need to move them. Don’t worry about the zipper, you can just pin the front closed.

I was going to compile a list of pants-fitting resources, but it looks like Tasia beat me to it. So, just to reiterate (and mostly because I don’t feel like I’m doing anything if I just direct you to her blog), here are some of my personal faves:
Pants fitting basics, via the Coletterie
Pants fitting cheat-sheet, via the Coletterie
Common pants alterations, via Sunni of A Fashionable Stitch
Crotch depth via Sunni of A Fashionable Stitch
Crotch length via Sunni of A Fashionable Stitch
Knee & hem adjustments via Sunni of A Fashionable Stitch
Fullness & waistlines via Sunni of A Fashionable Stitch
Special alterations for pants via Texas A&Ms Extension program
The Anatomy of a camel toe via the Fashion Incubator
Colette Clover pants via meeee. Haha! The comments in this post are actually quite great, lots of helpful info & resources.

Books:
The Perfect Fit (actually, I think all of y’all should buy this book – regardless of whether or not you are making pants)
Pants for Real People

WHEW that’s a lot of links! Don’t tell me you don’t suddenly feel armed & prepared!

So here’s the fun part… I’m going to show you *my* Thurlow muslin! This is actually the muslin I made in the ‘way beginning, and no, I have no idea why I still had it stashed (I even moved across town during this time!). But, whatever, I guess it came in handy :B Also, fair warning: these are pretty unflattering.

Thurlow Muslin
Here you can see I’ve got some weird excess fabric in the front of my shorts. This is the crotch depth, and it clearly needs to be shortened (I’m petite, so it makes sense that I have a short crotch, I guess haha).

Thurlow Muslin
Side view is ok, apart from that itty bitty FUPA the shorts give me.

Thurlow Muslin
Oh god, what is going ON in the back!?

Thurlow Muslin
As my ass appears to be eating directly into my shorts, it would seem I need to add some room back there.

Thurlow Muslin
To fix the crotch depth, I simply pinned out the excess fabric & tapered it to the sides. Doesn’t it look much better?

Thurlow Muslin
Here’s a side view

To fix my butt issue, I extended the back crotch length on my pattern piece to a size 4, tapering down the leg.

Thurlow Jeans
And here’s the finished result of that. No more perma-wedgie, yay!

Well, that turned into a super heavy post! Do let me know if you have any questions & I’ll do my best to answer. Feel free to post your muslins in the Flickr Group and let’s help each other!

Next week, we are gonna talk fabric. FUCK YES.