I actually finished this project months ago – like, as in, 2017. Took the photos in mid-November, and then started this blog draft at the end of that month. I have no idea why I never finished writing it up, but… better late than never, I suppose?
At any rate, despite my apparent reluctance to post this project, I am actually pretty happy and excited about it! I love me a good denim jacket, and have always considered it a wardrobe staple for the way I dress. My style has changed a lot over the years – in my teens I was ~punk rock~ (insert hysterical laughter in hindsight yere), in my 20s I was really into vintage, and now I tend to dress just pretty boring overall (I like to think I look “classic,” but let’s be real – it’s boring AF, whatever, don’t care). With all those style changes, the humble denim jacket has always held a special place in my heart and a leading role in my wardrobe.
I think it’s safe to say that there are lots of people who feel the same way as I do about the versatility of a denim jacket, however, it’s been hard to find a sewing pattern that includes all the features you see in one (such as the welt pockets, or a sleeve placket). I have made the Staci Jean jacket in the past, but it wasn’t quite up to par – the fit was more generous than what I prefer, and it really bothered me that it didn’t have actual pockets. I ended up not getting a lot of wear out of that jacket and later donating it.
The Hampton Jean Jacket is a great pattern that includes all the features I like in a jean jacket – those welt pockets, functional in-panel pockets with a top flap, a two-piece sleeve with a placket and cuff, and front and back yokes. Sewn up in a denim fabric with contrast topstitching and metal jeans buttons, it’s almost indistinguishable from the RTW versions you see in stores (almost, but just a little bit better – because it’s handmade by meeeee 🙂 haha). I love that someone took the time to create this pattern, and y’all, it’s a good one. Not that the Style Arc Staci jacket is a bad one, but it’s very basic and lacking compared to this one. This was exactly the type of pattern I have been looking for to fill this hole in my wardrobe.
I bought my denim at Mood Fabrics when I was in NYC last year – specifically for this jacket (sometimes I buy for specific projects, sometimes I just stash… but in this case, it was indeed for this pattern). I wanted something that was a good weight for a jacket, although not too heavy, and with little to no stretch. I found this piece in the denim section of Mood (on the bottom floor) and I just love the dark indigo wash. I originally thought about distressing and bleaching the fabric, but ended up just sticking with what you see here (apparently you are supposed to distress before topstitching… so yeah, that wasn’t happening). As with all denims, this fabric should soften and fade as it is washed and worn, which I’m looking forward to seeing. In the meantime, I do like the way it looks now, too!
The pattern looks complicated, but it’s pretty easy to follow. Sewing a jean jacket is pretty similar to sewing jeans – minus the obvious difference between the two articles of clothing (like, you don’t sew a fly front in the jacket and you don’t set a sleeve in jeans.. or maybe you do, I ain’t here to judge your life), just a lot of flat felled seams and topstitching. Y’all know I fucking LOVE making jeans, but I also have way too many pairs as it is, so this was a nice way to get that jeans-making experience without adding yet another pair to my wardrobe. Instead, I managed to fill a gap at the same time! I love it when that happens!
I waffled for a bit on what size to cut – my measurements are closer to a 2, but I ended up making the size 0 after comparing the finished measurements to an existing RTW denim jacket I own and like the fit of. I wanted this one to be a slim fit that looks great both opened and closed (I rarely ever wear my denim jacket buttoned unless I’m like, actually cold or something, however, I needed to make sure there was enough space to close it if it came down to it!). My only complaint about the sizing is how the sleeve length is measured – for whatever reason, it’s measured from the top of the shoulder to the bottom, instead of at the underarm. This led me to originally believe that the sleeve was something crazy like 5″ too long, and I actually altered the pattern and nearly cut it before I thought to actually compare the pattern piece to a different sleeve pattern piece. I was under the impression that the standard is to measure from the underarm to wrist (like what is basically your arm inseam), but now I’m second-guessing myself and thinking maybe I’m the nutty one? Thoughts?
Anyway, like I said – this pattern is really easy to follow. It’s obvious that a lot of thought when into the instructions; they are clear, easy to understand and follow, and the diagrams are beautifully done. There is also a sewalong on the blog if you do happen to get stuck, although it seems like it’s basically a photographed copy of the instructions (i.e., no additional information or tips, just the exact same instructions except with photographs to guide you). I found the sizing to be accurate and the pieces fit well together. I don’t know much about Alina Design Company, however, this was a very pleasant first experience so I am happy about that!
For sewing, not much different than sewing jeans. I used a 90/14 denim needle, navy all purpose polyester thread to construct, and a lightweight topstitching thread for all the topstitching – Mara 70 from Wawak, which Jennifer introduced me to a couple years ago during one of our jeans workshops. It’s heavier than regular all-purpose thread – which is 100wt – but not as heavy as traditional topstitching thread – which is typically around 30wt. It still looks nice and thick so your stitches really stand out, but it’s not so thick that it causes your machine to jam or nest, and it is very easy to thread through a standard needle. If you’ve been having issues with topstitching thread, I really recommend trying this weight!
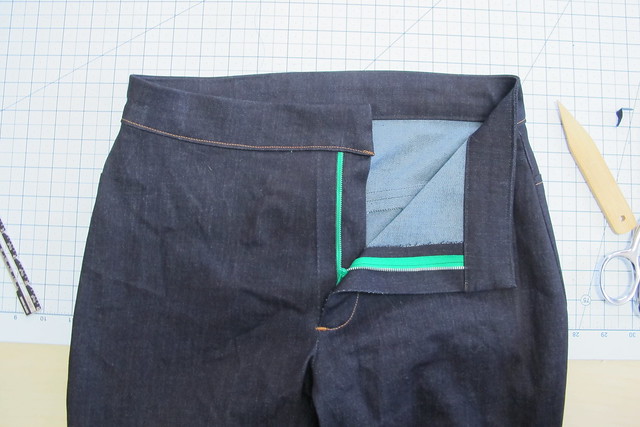
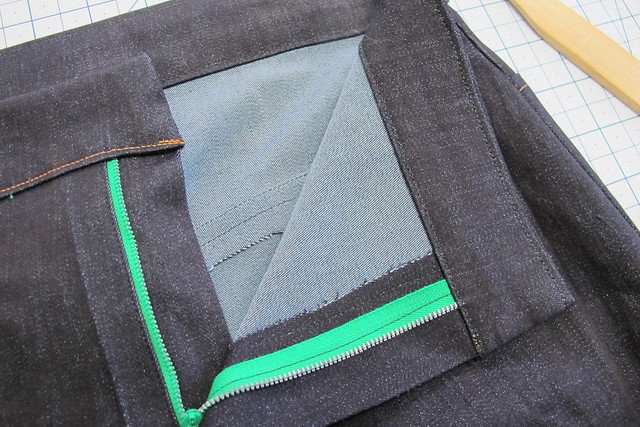
I tried to finish most of my seams with flat-felled seams, but a few (such as the front yoke seam and the armscye seam) had to be serged and topstitched for a mock flat-fell. My RTW denim jacket is like this – a combination of flat-felled and mock flat-felled, and this is all explained in the instructions as well. I washed and dried the denim on the hottest setting a few times before cutting, and have washed it more than necessary since finishing to get it to soften up a little bit more. I know it’ll fade with time, I just want to speed that time up 🙂
My only complaint with the pattern is that I think it is lacking some necessary interfacing. There is interfacing at the button placket, sleeve cuff, and bottom band – and that’s it. No interfacing at the in-panel pockets or flaps (which have buttons and button holes, so they *should* be interfaced – at least with a little square where the aforementioned buttons and button holes are), or on the back tabs where, again, there are button holes. I was able to add these in before closing up those areas, but I am a little surprised that they were included with the instructions, especially considering how in-depth the entire pattern is as a whole. One thing I did like was that the collar is not interfaced – you might need to do that if you are using a lighter weight fabric, but for this denim, the weight of the 2 layers of fabric was plenty. I love the way the collar sits!
Anyway, the jacket turned out pretty fucking awesome – if I do say so myself. I think the sleeves could stand to be shortened about 1″, but I usually wear my jacket sleeves rolled up anyway so I’m not terribly concerned about it. The length is perfect for wearing with pants, not so much dresses and skirts (perhaps with something that has a lower waist, but I think the long length paired with a high waist looks unbalanced and a little sloppy – at least on me!). That being said, I already made a second version that is cropped – specifically to wear with dresses and skirts – so watch this space for that!
*Note: The fabrics used in this project were provided to me by Mood Fabrics, in exchange for my participation in the Mood Sewing Network.
Ok, so, apologies in advance for posting a really boring sweatshirt today, but, I feel like this post is warranted for two reasons – really awesome fabric, and a previously overlooked version of a pattern.
Honestly, this might be my new favorite fabric at Mood (up there in the ranks with their Bamboo Jersey and Organic Cotton twill). AND they have plenty of colors still in stock (although as of this posting, currently sold out of this particular green – sorry!)! It’s a Christmas Miracle!
In all seriousness, though, I wanted to really focus on the fabric for this post. I promise it’s a really good one and worth the praise! I found this Moss Bamboo and Cotton Stretch Fleece on the Mood Fabric’s website a few months ago, via swatch (I always take advantage of my free swatches and usually end up throwing random stuff in my cart before I place my order! I have discovered some REALLY cool fabrics that way that I might have otherwise overlooked). I’m not even kidding when I say it’s one of my new favorite fabrics – they have loads of colorways and it’s nice and wide (60″) so you need less yardage.
The fabric is comprised of 66% bamboo, 28% cotton, and 6% spandex. That little bit of spandex is essential for giving the fabric a great stretch with a fabulous recovery. Plus, I really love bamboo fabrics – they are soft, easy to wash and wear, and they are antimicrobial so they have fantastic stink-reducing properties!
This fabric is considered a sweatshirt fleece, meaning it is has one side that is nice and smooth and the opposite side is soft and brushed. Unlike your typical sweatshirt fleece, it’s a slightly lighter weight with a softer drape. It is also a 4 way stretch, which, WEIRDLY (don’t ask me why, I couldn’t tell you) has more stretch along the grain rather than the crossgrain (if I recall, 40% at the cross grain and something like 80% along the grain). It’s soft (did I mention that it’s soft? Because it is FUCKING SOFT), it snaps back into shape, and it comes in a nice array of colors – what isn’t there to love?
This sweatshirt is actually the second garment I made using this fleece – my first garment was a pair of black Virginia leggings. I don’t have any photos of those – let’s be real, they are black leggings and basically impossible to photograph – but I wear them ALL THE TIME (here is a photo on my Instagram – I’d already been wearing them for 3 days at that point haha). Think of your favorite fleece leggings or tights – and then just imagine them in bamboo instead of poly (so no stink and no pilling). Because of the spandex, the fabric doesn’t bag out – meaning no baggy knees or butts. Also, in retrospect – they look pretty much the same as the pants I am wearing (the Cecilia Pant from Elizabeth Suzann – aka my MAGIC PANTS seriously you guys these pants are magical), so maybe I should have just worn the leggings for this photo!
So anyway, about this project! After my success with the leggings, I bought 2 more yards of this hunter green colorway without a real idea of what I wanted to make with it. I knew I wanted a sweatshirt, but a plain sweatshirt seemed like such a cop-out. So I went with the Sewaholic Fraser Sweatshirt.
I will be completely honest – I did NOT like this particular view of the Fraser when I first saw it (or, to be even more honest – any subsequent versions that I’ve seen since). I dunno, the super contrast yoke just looks unflatteringly Western to me (and I typically love me some Western wear) – very costume-y, very Wonder Woman. I had no intentions of ever sewing up that version (I do like the other versions – you can see the one I made with a collar here), but weirdly, I thought of it when I was trying to decide what to do with this fleece. I thought it might look good with the contrast just being the wrong fuzzy side of the fabric, so the color still matched but there would be some subtle texture differences (again, just like my version with the collar). I’m actually pretty pleased with the end result – it’s still a nice sweatshirt but with a little more interest… and it doesn’t look costume-y. And I have worn it every day this week, no lie, so obviously it’s a massive success in my book haha.
I made a size 0 and slimmed down the hips (Sewaholic Patterns are designed for pear-shaped women, and I’ve found I don’t need the extra room down there). I also cut this on the lengthwise grain, instead of the crossgrain – remember when I said the fabric had more stretch on the lengthwise grain? I think it would work either way, but I wanted a reeeeeally stretchy, comfy sweatshirt! Shortened the sleeves about 1″… they are still slightly long, but in my experience it’s better to keep them long and allow for a little more shrinkage, then re-hem if necessary. I have waaaay too much bracelet-length sleeves as a result of not being aware of this for the first half of my sewing career haha.
I did have to pay careful attention to the stitching at the center front V, as well as matching the sleeve contrast seam to the bodice contrast seam – for those, I based first on my sewing machine (much easier to take the stitches out if you mess it up) before using my serger. I used the single needle chainstitch on my coverstitch machine to topstitch the contrast, to give it a little more dimension. Other than that, a very quick and easy sew! I did notice the the fleece flattens when you press it, but it’s easy to fluff back up with your fingers.
Anyway, that’s all for this one! A simple project, but also a big gushy heart-eyes love song about some amazing fabric! Now, quick, y’all need to buy it before I snap up the rest of this stuff! 🙂
** Note: The fabric used for this post was provided to me by Mood Fabrics, in exchange for my participation in the Mood Sewing Network. All opinions are my own!
It’s that time of the year again – when we start our spring sewing in a desperate attempt to hurry the warm weather up. And by we, I mean me.
While it’s still a little warm here – not quite shorts and tank tops warm, but no-socks warm – I know that we’ll get at least one more cold snap before the temperatures steadily start rising. So while my wardrobe needs to maintain a bit of coverage, I’m using lighter colors and designs that look decidedly more spring than my standard black and grey winter wear.
Like giant tropical leaves. Now THAT is a spring statement, amirite
As the title of this post says, this shirt is the Archer button up from Grainline Studio. But wait, there’s more! I ordered my fabric from Sprout Patterns, meaning I got to choose the fabric design as well!
I feel like most people are pretty familiar with Sprout Patterns at this point, but in case you aren’t – owned by Spoonflower (beloved on-demand printer of fabrics, wallpapers, and more) – Sprout offers the same on-demand fabric printing but with the additional twist of also printing your pattern pieces directly on the fabric. This not only makes cutting a breeze (no giant flat table space needed – just sit at your couch and cut along the solid lines), but it also gives you total control over pattern placement without the additional brainbending. There are a few catches to this service – one, you are limited to the patterns they have on their site; two, you are also limited to the types of fabrics they offer; and three, having the pattern printed on your fabric does not leave room for flat pattern adjustments – but overall, I think the pros absolutely outweigh the cons.
I’ve heard of this service before – both through blogs and website ads, and also because one of my students at at Workroom Social class actually works for Spoonflower (!!!) – but I hadn’t actually tried the service until now. This year, I’m cooking up some fun plans with Spout pattern and Spoonflower (Spoiler: It’s a class. More info at the end of this post!!), so they offered to send me one to try out!
The Archer shirt works in a variety of fabrics, with the most common/easiest ones being the Basic Cotton Ultra and the Kona Cotton Ultra. While the cottons are definitely great, I love being difficult and asked if I could instead try the Polyester Chiffon. I really love this style of shirt in a soft, drapey fabric and I REALLY loved the idea of the cutting being way easier since the pieces are printed on the fabric. I made a size 2, View B (with the butt ruffle, because, butts) printed on Spoonflower’s Polyester Chiffon. The design is Monstera Leaves. You do have the ability to create your own design, but I’ve learned over time that I am decidedly NOT a fabric designer and would rather use something already made by someone who knows what they are doing. I chose this design because I liked the predominantly dark colors over a white background – it feels breezy without actually being super see-thru – and, of course, who doesn’t love some big ass tropical leaves?
Some notes about this fabric:
Polyester is not something that gets a lot of praise in the sewing community, present company included. To be completely honest, I generally HATE the stuff. Hard to wear, hard to sew, sweaty pit dump USA, etc etc. I gave this one a chance because, one, there were no other options for sheer drapey fabric (no silk!); and, two, I thought the sheer chiffon would offset the fact that poly doesn’t really breathe. I am happy to report that my hunches were right, and I actually really enjoyed working with – and now wearing! – this fabric. It’s a great quality poly, feels very nice against the skin, and while I can’t yet report on its heat-retaining properties (it just ain’t hot enough here yet, y’all), I can say that it’s been really pleasant to wear on our warmer days. It also took really well to pressing, so no problems there.
I told you this shirt is chiffon, and it is. I should also tell you that I’m only wearing a bra underneath it – no cami. It’s only slightly see-thru, and even then mostly shadows. This chiffon is slightly thicker than some chiffons I’ve tried – almost like a double chiffon – and the dark colors also help with preventing a peepshow. Not having to wear a cami under this really helps me feel, you know, ~breezy~.
Chiffon can be tricky to work with, as it is very lightweight and VERY shifty. My first combat against this was to get the pattern via Sprout, which saved me the drama of worrying about whether I was cutting the pattern pieces on grain. Since the fabric has the pattern pieces printed directly on it, cutting is WAY easier – seriously, you can just sit on the couch and cut it with scissors like you’re making a paper snowflake (this was me, in case you were wondering). My other combat for dealing with the chiffon was to soak the entire yardage in a gelatine mixture before cutting, which stiffened up the fabric to more of an organza weight/hand, making it much easier to cut and sew. I talked about using a gelatine mixture in this blog post (and here is the method I used on the Threads website), and ugh you guys it is is a LIFESAVER. Made the fabric soooo much easier to manage, and it washed right out when I was finished with the shirt (machine wash cold, normal dry). If you want to try a tricky pattern like this in a tricky fabric, I really encourage this method – it was one of the easiest experiences I’ve ever had with chiffon! Like, even my sleeve plackets look amazing. Super stoked.
Anyway, I LOVE how this turned out! The soft, drapey fabric – the shape of the shirt – and the leaves offering a bit of modesty so I can continue to be immodest 😛 This shirt looks equally good with the sleeves rolled up or left down, with the front buttoned or unbuttoned (ok, I guess THEN I’d wear that cami), or even knotted into a crop.
Some additional sewing notes:
I used French seams to construct the shirt, 1/4″ for each pass (for a total of a 1/2″ seam allowance). Since the fabric is so sheer, I like how the visible seams look this way.
I used black thread for constructing and topstitching, and a new 70/10 microtex needle for this lightweight fabric.
For interfacing, I made a few test swatches (there is plenty of extra fabric around the perimeters of your pattern pieces that is ideal for this use) to determine what would work best. I ended up using this lightweight woven fusible interfacing (from Workroom Social), which was a perfect match for the chiffon – it offers enough support for the collar and buttons, but it is light enough that it doesn’t interfere with the drape of the chiffon. And since is it white, it brightens up the white background of the fabric without looking super obvious. I also considered interfacing the back of the yoke for this same reason (since the yoke is a double layer of fabric), but I found that I actually preferred the look of the 2 layers so I left them as-is.
Like I said, this chiffon pressed without a problem. I use a gravity feed iron (affiliate link) with a shoe, which works the same as using a press cloth. This allows me to press at a high heat without melting my fabric or giving it a weird shine. I definitely do not recommend trying to sew a shirt like this in a fabric that won’t hold a press, however, this fabric didn’t give me any issues!
Buttons are just plain black plastic buttons from my local fabric store. Nothing fancy there!
Ok, so here’s the fun part! I was sent this fabric + pattern by Sprout patterns, in preparation for a workshop that I will be teaching at Spoonflower! Here are the details:
Spoonflower presents the 2018 Sprout Sew-Along with Lauren Taylor (also known as Lladybird)! With the help of Lauren and her sewing expertise, students will be led through the construction of a Grainline Studios’ Archer Button Up from start to finish using their custom printed Sprout Pattern. Our intimate class setting ensures all students the chance to get one-on-one instruction from Lauren as we tackle this wardrobe staple. This class is sure to build your confidence in garment construction! We hope you can join us!
Class fee includes the printed Archer button-up, and there is an early bird discount for those who register before March 3! The workshop is April 6 – April 8, and will be held at Spoonflower Greenhouse in Durham, NC. If you’ve been wanting to tackle this pattern but feel a little overwhelmed with the steps, this is a great opportunity to have a little bit of guidance and hand-holding for your first go! While we will be sewing exclusively with the Kona Cotton Ultra for this class (just because we gotta speed everyone along so we actually finish in two days!), it will give you the skills you need to try this pattern later with a more complicated fabric – such as the polyester chiffon 😛
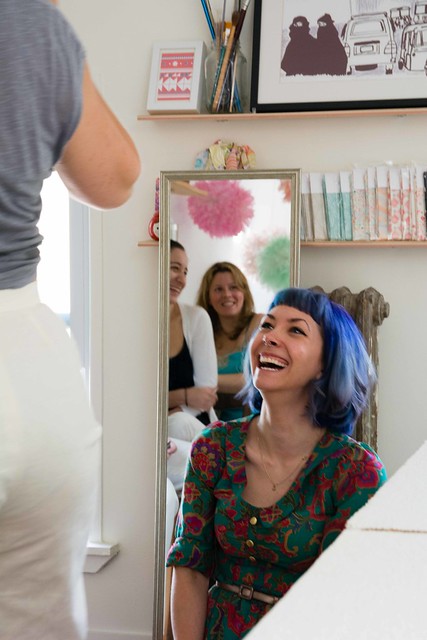
A side note about the sunglasses – it was very bright outside and I thought I would pretend like I was a fAsHuN bLoGgEr. Suffice to say, I am not happy with how these pictures turned out (and I had to delete more than half of them because it bothered me that you could see the tripod in my lenses haha) but I also don’t care enough to retake them. No more sunglasses photos for me. It weirds me out that you can’t see my eyes. Oh well, you live and learn!
**Note: The fabric for this shirt was given to me by Spoonflower, in preparation for my workshop with them in April! Will I see you there? 🙂
It just occurred to me yesterday that I never shared my Ginger Jeans that I made for my upcoming workshops! Fortunately, we had a weirdly sunny + 70° (look at how cool I am, I figured out the keyboard shortcut for making a degree sign lolz) day yesterday, so I jumped outside to take some photos! These aren’t the best – it was windy as hell, and for some reason I decided to take photos where I’d have to straddle over a fucking hole in the ground – but you know what, it works, and I’m moving on. I say this often, and it often bears repeating – no one comes to this blog for the stunning photography amirite.
Anyway.
These are my new jeans! I’ve made soooo many pairs of these Ginger Jeans that they don’t necessarily warrant their own post at this point (I mean, there are only so many times you can keep repeating the same pattern with no changes and expect people to find the information riveting haha), however, I did want to talk about this particular pair as I finally had a chance to make them in a new-to-me denim!
This denim is a super stretch denim from Robert Kaufman (FYI that’s an affiliate link). As I mentioned in my samples post, I chose this denim specifically because it was affordable, easy to source, and is great quality that is comparable to Cone Mills. I made all my workshop samples out of this denim – Robert Kaufman was generous enough to send me a couple bolts of the fabric; enough for 11 samples plus some extra so I could make a pair for myself! It’s an 8.6oz stretch denim, which is a hair lighter than most of the Cone Mills that people buy (I personally prefer the lighter weight, I find it more comfortable!). It’s also suuuuuper stretchy, which I love! Absolutely perfect for this jeans pattern.
Since this denim is indigo dyed, it is imperative that you prewash your fabric multiple times before cutting into it. It will shrink quite a bit, plus it bleeds a LOT! I only washed my samples once in cold water, and we all ended up with blue hands during class (true story; I went on a date immediately after the first night of my Nashville class and he totally called me out on that shit about halfway through haha). For these jeans, I washed + dried the denim three times before I cut it – twice with very hot water, and once with cold. This cut down significantly on the amount of bleed that I got, although they still bleed a tiny bit (not enough to damage, say, the upholstery in my car – but I do still notice a blue tint on my fingernails). Every single indigo-dyed denim I’ve used (especiallyyyy Cone Mills, oh god) does this, btw, but just be aware of it. Don’t carry a white purse, save your white undies for a different pair of pants, and for the love of god do not wash these in a load with anything but black fabric.
That being said, cutting down on the bleed does not actually fade the color. These are still super dark, even with all that hot washing.
Anyway, I made these a little over a month ago, and wore them on that first day of class so my students could see the ~jeans in action~. I’m happy to report that this fabric holds its shape really well – I’ve only washed these once since I made them (and even then it was mostly to try to bleed out more indigo, ha), and in these photos you are seeing them after about 4 days of wearing. No baggy knees or baggy butt! I still have a little bit of tightness at the calf, however, I have noticed with my more frequently-worn Gingers (i.e., the older ones) that over time the fabric will stretch and settle. I’m going to wear these a bit more and see if that happens with this fabric, before I slice up the calf and add more room on future pairs.
I also made the top I’m wearing, by the way! It’s a Grainline StudioHemlock Tee (which is free if you join their newsletter). I used a beautiful striped rayon knit from Finch, which I bought when I was there last year for a workshop.
For these particular jeans, I used the same notions that we offer students in my workshops (copper topstiching thread, matching rivets and buttons). Combined with the fabric and pattern, you can literally see what your finished jeans will look like.
BTW, I still hate setting rivets. I’m getting better at it, but I still hate it. I considered getting a special die for my snap setter, but then I realized I couldn’t drag it along to workshops (that thing is cast iron and it weighs a LOT), so what’s the point? I generally prefer the look of bartacks over rivets, anyway.
I won’t go into detail about fitting these; but you can read my Ginger Jeans tag to see previous posts about what fitting changes I have made to these jeans over time. Spoiler: It took many, many pairs with lots of tiny changes (and I’m still making changes!). Fitting is a journey, and a lot of things just aren’t clear until you’ve worn your garment around for a few days.
Flat-felled seams on the inside, quilting cotton pockets (1-2 fat quarters is all you need!), and of course a shitty little thread nest in there #honestsewing
In other news – I just had some more classes listed! You can see all my upcoming classes here on my class page, but for those who are just browsing – here are the new ones added:
March 24-25 / Jeans Making Intensive / Workroom Social, Brooklyn, NY (head’s up – we will be making a Workroom Social exclusive jeans pattern for this class! I am so excited about this one!)
August 18-19 / Jeans Making Intensive / Workroom Social, Brooklyn, NY (again, this one is using a Workroom Social pattern 😀 )
September 26-30 / Jeans & Wardrobe Basics Retreat / A Gathering of Stitches, Biddeford, ME (this one is a littttle different as we are focusing on wardrobe basics! There will be jeans-making, but there are also a couple extra days to make additional basics! Or, if you’ve already tackled jeans and wanted to try something else – such as a tshirt or button-up – bring it on!)
I have a few more classes in the works that haven’t been confirmed/listed yet (West Coast, I’m looking at you!), but I will share those as soon as I can! Other than that, pretty booked up for 2018! If you are a local shop who would like to discuss dates for 2019, please get in touch with me via email. If you are a person who wants me to come teach in your city, I encourage you to reach out to your local shop and tell them you’d like to see them host my jeans workshop 🙂
Ok, that’s all for this post! Happy Friday, y’all!
I know. It’s a new year and my first finished project is workout wear. I actually meant to post this in January but I’ve fallen out of habit with blogging. And on that note… taking blog photos, apparently. Because, yikes. I’m sorry these are so bad, but not sorry enough to reshoot them haha.
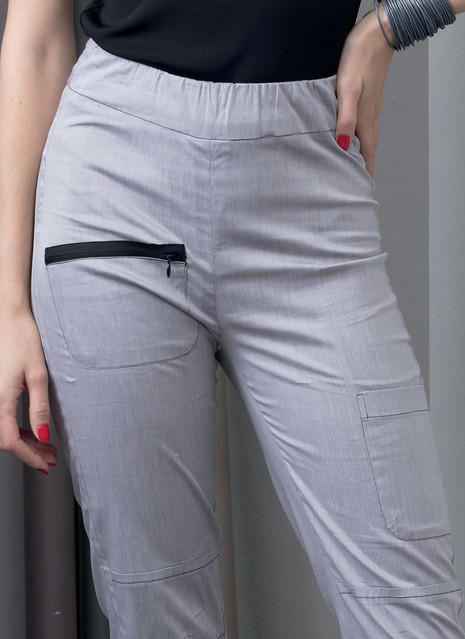
In addition to being predictable and basic (lol workout gear in January amirite), making workout clothes isn’t necessarily my favorite thing to sew – but it sure beats buying them! I’ve found that I prefer my gear to be neutrals like grey and black (but really, anything but pink. ANYTHING. Why are all women’s workout clothes pink, anyway??) and I love having a zippered pocket to hold my phone while I run. Both of these can be difficult to find – and if you do find them, they can be quite expensive! I don’t think sewing necessarily saves you money, however, exercise gear can definitely be the exception to this. Each of these pieces cost a fraction of what you would pay in a shop! And I had complete control of the fabric and fit – meaning, yes, I can wear all grey while I exercise mwahahaa
This post contains 3 pieces – a long sleeved, a tank with a built-in sports bra, and leggings for running and yoga.
<
I’ll start with the long sleeved pullover! This was a desperate need in my closet – I have very few workout tops to begin with (I prefer to exercise in just bottoms + a sports bra, as I generally am either doing hot yoga or running in the heat!), and absolutely none with any sleeves! While I do have a fleece hoodie, I wanted something lightweight that would be good for exercising when it is too cold for sleeveless but too warm for the hoodie.
I fucking LOVE this fabric and I was so happy to find it (and buy the last of it… ha! Sorry, not sorry). This cool star print is a polyester/bamboo wicking fabric from Moodfabrics.com. The wrong side is white, and the whole thing has a texture that is really similar to a pique. It’s lightweight and breathable, and the perfect light layering piece.
The pattern I used is the Surf to Summit Top from Fehr Trade. I wanted something raglan with a half zip (so, like a cross between a tshirt and a hoodie), so this pattern was perfect! I made a size XXS based on my measurements, but I think I could have stood to go up a size as it is quite tight and there are a bunch of drag lines. Not sure if this was a sizing error on my part, or something I messed up with the construction – or perhaps my fabric wasn’t stretchy enough? The shirt is definitely still wearable but, yeah, notes for next time!
Construction-wise – I sewed this on my serger (save for the parts with the zipper, which were done on a regular sewing machine), and used my new coverstitch machine to mock flatlock all the seams and hems for a sporty look. Protip – don’t make the mistake I did and try to flatlock the underarm seams. Giant PITA and it doesn’t look great. On the flip, you can’t really see it and I’ve learned my lesson haha. This was one of the first projects I made with my coverstitch so there are sections where the tension is super wonky – I was learning as I went!
The teal zipper was unintentional – basically all I had in my stash – but I actually quite like the contrast! I still have a bit of this fabric left so I might make it into a tank. I fuckin love me some star prints, can you tell? ha!
The second piece I made is the Pneuma Tank from Papercut Patterns, which is a sports bra with an attached tank top and cool strapping detail. I’ve made the bra version before, but not the tank. I used this heathered wicking and anti microbial performance jersey for the outer, and black max-dri anti microbial performance jersey for the sports bra. I also lined my sports bra with black power mesh, for additional support (I should note, I don’t require much support and tend to be fine with lightweight, single layer sports bras like this. If you need more support, this probably isn’t the pattern for you. At least not for something like running or jumping around). The elastic edges and black bra strapping were sourced from my stash.
I love this tank, but again, I have noted improvements for my next version. For one – I think I got a little overzealous with shortening the straps and now they are too short, making the neckline a bit too high. I am probably going to cut those off and replace them because the shortness makes them borderline uncomfortable. I also think my main fabric (the grey) has a little too much body for this design. The sides flare out at the bottom, which I’m not crazy about. According to the product photo on the website, they definitely used a softer, more drapey fabric so I will try that next time. I do like the design for yoga – there’s a lot of opportunity for airflow, and the shirt stays in place when you bend over. I also think it would be really awesome to wear as a regular tank top, but I might make the bra a little less flattening 😛
Again, I made this with my serger and hemmed with my coverstitch. I used my regular sewing machine to apply the elastic.
Finally, I made some new leggings for running and yoga! These are my favorite; I love everything about them and have worn them for nearly every workout since I finished this (except when they are still in the wash haha). I used another max-dri performance fabric from Mood Fabrics for this – I bought several colorways for my stash, and I love it! I ESPECIALLY love that it’s not see-through when you stretch it. I added a zipper to the back so I can carry my phone when I’m running. The pattern is the Pacific Leggings from Sewaholic Patterns. I’ve made this pattern a few times before – both the full length leggings and shorts (only blogged about the shorts, though)- and they are so great for exercising. The zippered pocket is big enough to hold my phone, the fit is spot on, and I love the seaming details. There are options in this pattern for doing some cool colorblocking, but, in case you haven’t noticed – I am plain, plain, plain these days! (I like to say that my plain clothes provide a neutral backdrop for my ~colorful personality~ haha).
To highlight the seaming, I mock flatlocked the seams with my coverstitch (and, again, sewed the leggings on my serger except for the fiddly bits like inserting the zipper and elastic, which I did on my sewing machine). It took some trial and error with the tension and needle size – lots of imperfect parts to the stitching – so don’t look too close! They are totally wearable, though, and I love them! The mock flatlock adds a nice layer of strength without compromising stretchiness, and it keeps the seams really flat so you don’t get chafed (lol jk I definitely don’t run long/far enough for chafing to be an issue :P).
Anyway, that’s it for these pieces! Standard, basic pieces in boring-ass colors THAT MAKE MY HEART SING. Look! Even my running shoes are grey (do you have any idea how hard those were to find?? Ugh, seriously haha). Sometimes, making your own stuff doesn’t necessarily mean including all the colors and prints – and that’s ok!
*Note: The fabrics used in this post were provided to me by Mood Fabrics, in exchange for my participation in the Mood Sewing Network. All opinions are my own!
Well I was planning on posting a sewing project today, but Vogue just released their newest seasonal offering of sewing patterns and I actually have opinions for once! Yay! I swear, the last several offerings have been very… vanilla. Which is great for them, but not so great for snarky posts. Hence why these tend to be so infrequent. It’s hard to poke fun when there’s nothing to poke fun at 🙂
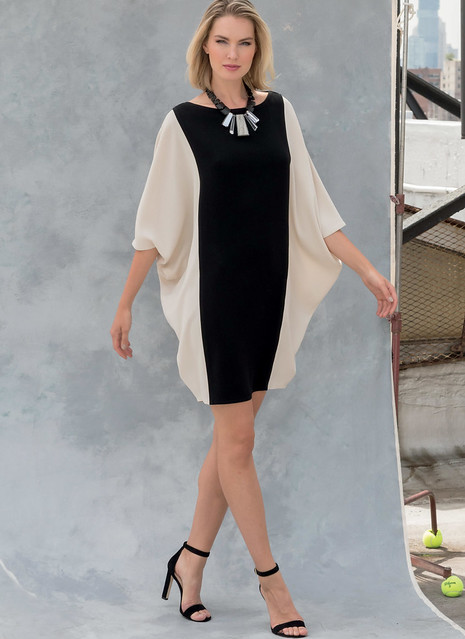
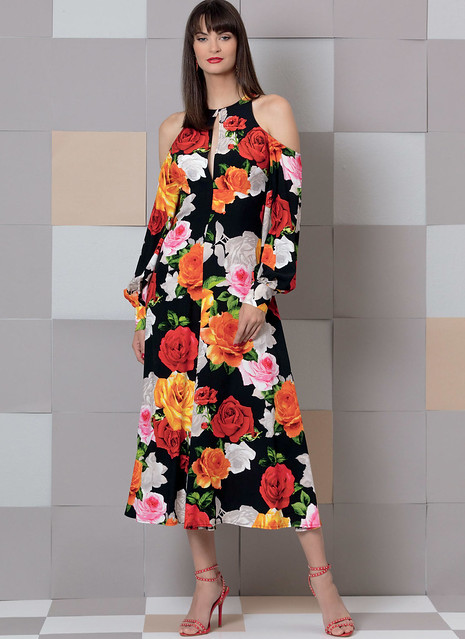
As a side note: I know I am going to get a lot of backlash for this, but I cannot wait until this cold shoulder look goes out of style. It just reminds me of this fucking Replicant shirt I used to own when I was in highschool:
Yeah, I thought those little tiny shoulder slits were suuuper cool. Also, the shirt was very sparkly haha.
Ok, moving on!
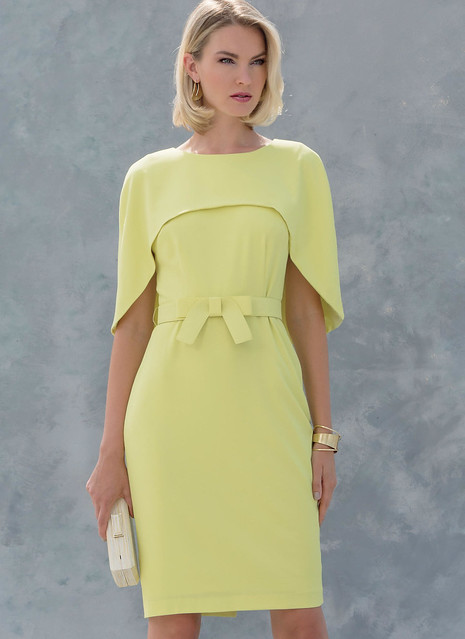
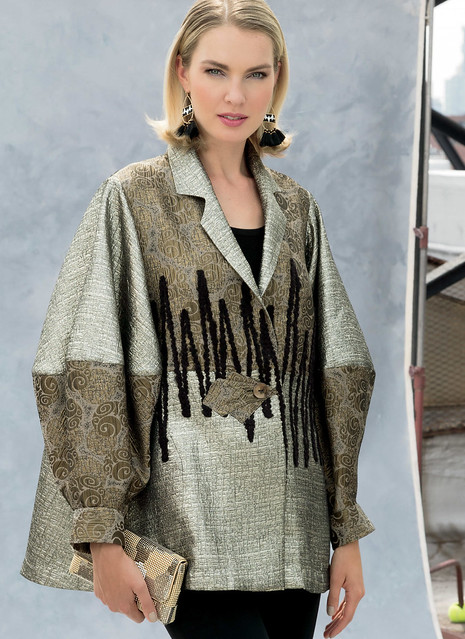
Vogue 1575
Ok, for real I actually like these pieces separate. But together, they look too art teacher chic. And not, like, fun art teacher chic but like… frumpy grumpy art teacher who doesn’t allow actual artistic expression and maybe even took over finishing your project for you because she was such a fucking control freak about it. That kind of art teacher. Anyone else have one of those? Just me?
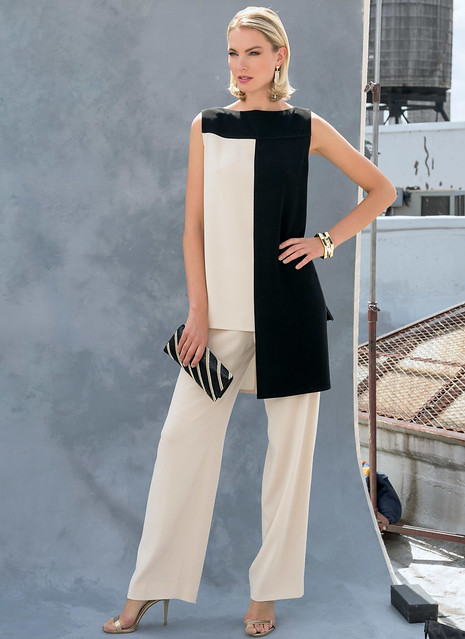
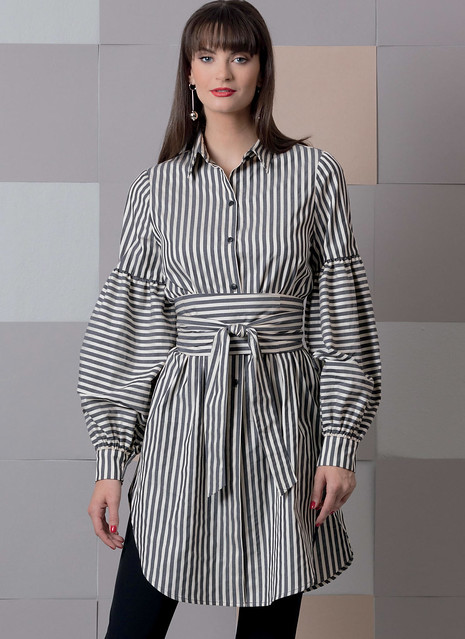
Vogue 9304 / Kathryn Brenne
I don’t even know where to start with these. The front yoke just looks like she’s wearing her pants backwards, especially combined with those weird-ass pockets. The real kicker is how they are sewn on – the corners are loose, left to flap casually in the breeze.
Good morning, everyone! As I mentioned in my year end post (as well as on Instagram a few times!) – I bought a Coverstitch machine in October! Specifically, a Janome CoverPro 2000CPX, which I purchased from Craft South here in Nashville. Now that I’ve had a couple of months to play with the machine and learn more about it, it’s time for a review post! Get a cup of tea, this one is long.
The Janome CoverPro 2000CPX is a 4 thread coverstitch that can accommodate up to 3 needles. It has minimal differences from the 1000CPX, which I also considered buying – basically, it’s a little easier to thread. There is also a 2 needle 2000CPX, but I wanted the 3 needle.
I chose this particular brand for 2 reasons – first of all, Janome tends to get very high praise for their coverstitch machines. This machine is pretty popular and gets great reviews across the board. It’s inexpensive (but not cheap), easy to thread, and provides a nice variety of stitches. Full disclosure for reason #2 – I work at Craft South, and I got a very generous employee discount with this machine purchase. This also swayed my decision, however, I was considering this machine before I even started working at Craft South (and I’m not gonna lie – knowing I’d get a discount on it was part of the reason why I agreed to work there, haha). While I did purchase this machine with my own money, it was discounted.
Why a coverstitch machine? Y’all. I have wanted one of these since 2007, no exaggeration. I put it on my wishlist every single year, and every year I convince myself that it’s a frivolous purchase. Since buying this machine and using it, I have learned that it does do more than just hem – however, it’s still an expensive machine that only does a few things. I ultimately decided to buy this machine because I do occasional alterations + fitting for clients, plus I got that discount, so it made sense for me to own one. However, it took me 10 years to decide to buy one. Don’t feel bad if you are still in twin needle mode when you hem your knits!
One question that I get a lot is – what is the difference between a coverstitch machine and a serger? Basically, a serger is used for creating + finishing seams – it has a knife blade that cuts the excess fabric so threads can wrap around the edge. It is great for knits as the stitches stretch with the fabric. A coverstitch does not seam, it only finishes. You can use it for hemming, attaching binding or foldover elastic, or creating decorative stitches (but not creating the actual seams). It is also ideal for knits, as the stitches stretch. If you are deciding between the 2 machines, I find a serger to be more useful for the most part. If you are debating on getting one of those 2-in-1 serger/coverstitch combos… don’t. They are a pain to use (you have to pretty much disassemble them each time you want to switch between machines) and cost the same as having 2 separate machines. Unless space is a big issue, get 2 separate machines.
All right, that all out of the way – let’s talk about the machine!
Here is the machine in all it’s glory. Yay!
One of the features it includes is a free arm (so you can sew small things in the round, like the hem of a sleeve). This is the free arm. I don’t know why but this is very hilarious to me, it’s so tiny!
When you open the coverstitch, it’s pretty clean and empty on the inside. There is only 1 looper to thread, and it’s very, very easy. Like, threading a sewing machine easy (not like threading a serger).
One of the nice features of this machine is that the looper has a tab to pull it out so you can more easily thread it (unlike some sergers where you have to use tweezers to weasel the thread in the looper hole under the needle plate, lord, I’m getting the sweats just thinking about that shit lol). This one pops out, so you can thread it and pop it back in.
The inside of the machine shows all the different stitch types that are available – two and three thread overlock, and a chainstitch. Since the machine has 3 needles, it means you have more options in terms of stitch width and needle position (something I didn’t consider when I purchased the machine but I’m pretty stoked about now!).
There’s also a diagram on how to thread the machine. See what I mean? Fucking easy.
Using the machine was definitely a steep learning curve for me – my serger (a Babylock Imagine) does automatic tension adjustments, so I don’t have a lot of experience with manually adjusting tension to correct my stitches (that serger is awesome btw, I’ve had it for nearly 10 years and I swear to god if it broke I would buy another one in a heartbeat haha). There are needle tension dials on this serger, plus looper tension, PLUS another switch that goes from “soft” to “tight.” The user manual is very brief, but my understanding is that soft is ideal for your lightweight fabrics and single/double layers that experience fabric curling and tunneling. The tight is for heavier fabrics, multiple layers (such as flatlocking or applying binding), especially if you are prone to skipped stitches. You can also adjust the tension on the needles for tunneling and skipped stitches.
Something else I have noticed with this machine is that it prefers a heavier needle if I am sewing through multiple layers (again, flatlocking or binding, or using a heavy fabric). It really does best with a 90/14. If you experience skipped stitches, I would recommend changing to a heavier needle and see if that helps.
One thing to keep in mind when using this machine is that you have to knot your threads or they will unravel the second you look at them. Once you are finished sewing, you pull the needle threads to the back and knot them by hand. I didn’t realize this at first and could not understand why my hems were coming unraveled so quickly haha.
Here are the stitch options, front and back. From left to right: – Binding: 2 needles + looper. I used a binding attachment for this! There are several size options of attachments, mine is the wider one (42mm-12mm). The finished binding is roughly 3/8″ wide. You cut strips of binding (this example is a woven, but it is AWESOME for knits) or use foldover elastic, feed them into the attachment and the machine wraps it around your fabric and stitches it in one go! It’s super fast and fun, but that shit was a steep learning curve. Also, that attachment is not cheap. Again, I got mine at a discount, but it was still a bit eye-wateringly expensive, just FYI. – Chainstitch: Single needle + looper. This can be used to baste (apparently, since it’s easy to pull out. Jury is still out on that one in my experience tho), or hem jeans (look at your RTW jeans! The hem is chainstitched!). What I use it for is single-needle topstitching on knits, like on a neckline. It looks really clean and neat – but unlike a regular sewing machine, it also stretches! – 3 needle coverstitch: 3 needles + looper. This creates a nice, stretchy hem for knits. Another thing you can use this stitch for is a mock flatlock. Serge your seams as normal, then stitch over them with the 3 needle coverstitch, with the needles on the wrong side of your garment (so the looper side ends up on the right side). It functions just like a flatlock – reasonably flat (non-irritating), strong, stretchy, and looks cool! – 2 needle coverstitch: 2 needles + looper. You have several options for this stitch, since there are 3 places to put your 2 needles. Narrow or wide (shown above is wide), left or right. I have found that I prefer the wide for hemming, and the narrow with both needles to the left when using my binding attachment. You can also use this to do a mock flatlock, but I think the 3 needle version looks better.
So far, I’ve used my machine to make loads of underwear and tank tops. The binding attachment is perfect for finishing all the edges very quickly (again, you can either use strips of knit fabric or foldover elastic) while still keeping them stretchy like you’d get with regular lingerie elastic. The 3 thread coverstitch is awesome for activewear and creating flatlock seams that don’t rub or chafe and also look super professional. And, of course, I love using the 2 or 3 thread coverstitch for hemming my knits!
If you’re interested in seeing how the binder on this machine works, I have made it a highlighted story on my Instagram (computer users, I think you have to be on the actual app to view it). It’s pretty awesome! I will write a more in-depth post on using the binder, stay tuned for that.
So, do you need a coverstitch machine? Honestly, I can’t answer that question for you – it depends on how much you sew, your budget, and the amount of space you have to store one. Since I do this work professionally (and also sell these machines at the shop!), it made sense for me to own one. This machine does do a great hem on knits, but there is certainly a learning curve involved and it’s pretty expensive considering it only does a handful of functions. I also really really REALLY love that binding attachment; it’s great for finishing edges on underwear and activewear. However, a regular machine can also apply binding – albeit not as quickly and not with quite the same finish.
In regards to the learning curve – well, there is one. It took me several days of playing around with the machine, testing different stitches, settings and fabrics, before I felt like I really had a good handle on how the machine works. The only way to get past the learning curve is by PRACTICE. No amount of blog posts, YouTube videos, internet research, or telling everyone how scared you are of your machine is going to magically make it suddenly easy to understand. Get a glass of wine, put on some Duran Duran, and get to know your machine. Learn what works, what doesn’t work, try different needles and tension settings, rip out your stitches, make mistakes, learn from those mistakes, and take a lot of notes because I guarantee you won’t remember half this shit the next day. Like parallel parking a car for the first time, yes it’s a hot mess in the beginning. But eventually you get past fear and start working in autopilot. And also, for the record, I am an excellent parallel parker (after many, many years of practice lol).
If you are considering this machine, my advice NOT to buy this online (even if it’s cheaper). Your local shop will be able to show you how to use the machine and answer questions and troubleshooting you may have. I also am real big into supporting your local shop, and keeping them in business 🙂 If you don’t have a local shop that sells Janome – and this post swayed your decision to a yes – you can buy one from me at Craft South 🙂 We ship to anywhere in the US for free and offer a discount below the MSRP you see on Janome’s website. There are no affiliate links in this post, however, I do receive a commission for every machine sale I make through our shop. FYI!
Whew! Ok, I think that’s a long enough post so I’m gonna wrap this up. Did I miss anything about this machine that you still have a burning question for? Do you have a coverstitch machine? Are you gonna buy one now? 😉
As I mentioned in my last post, I have a few workshops already lined up for the first few months of 2018 😀 I was hoping to include my sample jeans in this post, but I’ll be completely honest with you – this post ended up WAY longer than I was anticipating, so I am going to split my FO into a separate post. For this entry, I just want to talk about my upcoming workshops!
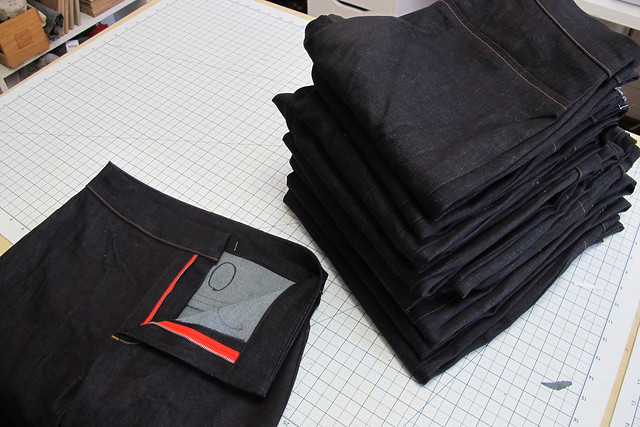
If you follow my Instagram, you may have noticed the madness when I decided to sew 11 pairs of jeans in mid-December. If that’s not crazy enough for ya, I finished all 11 pairs in LESS THAN A WEEK. Yea!! There’s a reason why my sewing industry friends call me Speedy 🙂
You’re also probably wondering why I made 11 pairs of jeans in the first place? Especially after announcing over and over that I have plenty of pants and I don’t actually need more (I’m gonna keep making pants anyway, sorry!). These jeans are actually samples for my upcoming Jeans Workshops!
When I first started teaching sewing back in 2014, the first place to bring me in was Workroom Social in Brooklyn, NY. There are a lot of reasons why I love working at Workroom Social and have continued to teach there over the years. Jennifer is incredibly brilliant businesswoman and teacher, plus we work super well together. One of the things she does in her workshops that I thought was SO CLEVER is to have all the sizes of the pattern made up in advance of the weekend, so that students can try the samples on. This helps them not only choose the correct size to start, but also gives the ability to do basic fitting adjustments without the need to make a muslin. I have always loved this idea and I think it’s one of many things that really sets Workroom Social apart from other sewing workshops.
Toward the end of 2017, I started thinking about what kinds of workshops I wanted to offer in 2018. I have gotten a lot of requests to bring my jeans workshops to other cities, but I was lacking the samples (I realize you can totally offer this workshop without the samples, but y’all – once I’d tried it, I didn’t want to do anything else haha). After some internal debate – as well as a few conversations with Jennifer about my plans (I wanted her blessing before I did anything – I am not in the business of stepping on anyone’s toes here, y’all) – I decided to bite the bullet and make up my own batch of Ginger Jeans samples. This ended up working out perfectly because Workroom Social is moving toward offering a different pattern for future jeans classes (something that is a bit more size-inclusive than the Ginger because, as I’m sure you know, there are plenty of people who fall outside the max size range in that pattern), so I can continue to offer workshops that feature this specific pattern without being in competition with other workshops that I teach.
Having already worked with these samples for the past couple of years, I had some ideas on how I wanted to improve my own set when it came time to make them: – Fabric: Hey, here’s a surprise for you – I didn’t use Cone Mills Denim to make my samples. I know this denim is the holy grail for sewing jeans – and for good reason, it’s a really wonderful fabric! However, it can sometimes be difficult for the average home sewist to source, and somewhat cost prohibitive depending on where you source it from (especially when you consider that you first pair of jeans may end as a wearable muslin). This was fine at Workroom Social because they were able to obtain rolls of the denim to provide to students as a kit, but y’all – I live in a small 2 bedroom house with limited storage, and I travel for my workshops. I ain’t about to buy stock in heavy-ass denim and schlep that shit around in a suitcase lol. Furthermore, Cone Mills just closed its White Oak plant at the end of 2017, which could potentially make the denim even harder to source in the future (or they move production offshore, or someone buys the plant to continue operating it – who knows? But I don’t want to bank on “maybe.”). So, with all that in mind – I wanted to make my samples out of a fabric that was easier for the average home sewist to obtain. – Washed vs Unwashed: Plain and simple, denim feels and fits differently when it’s washed. It is softer and has more stretch. I wanted my samples to be out of washed denim, to better mimic what the finished pair would feel like. – Familiarity with all sizes: Ok, this was NOT something I anticipated up front, but in hindsight this was a nice perk! Sewing every single size gave me a very hand-on experience with how they differ and how each one fits together. I don’t know if there is another person (other than Heather herself, obviously!) who has literally sewn every size in this pattern – but I have! Everything from fitting the pattern pieces on the fabric, to how the notches match up, even the differences in size grade. It was a surprisingly enlightening experience for me. As much as I’ve sewn this pattern up before and taught this class soo many times, y’all. I KNOW this pattern now. Like in a really creepy way almost haha.
So anyway, here are the details on my new samples:
– The denim I used is Robert Kaufman Super Stretch denim! At 8.6 oz, it’s on the lighter weight side – but in my experience, a lot of people actually prefer this over heavier denim (especially for very fitted jeans like the Gingers) – it makes for a more comfortable pair of pants that feel almost like leggings. Of course, using a heavier denim and/or one with less stretch is as easy as adjusting your seam allowances to accommodate, but this particular fabric is a great starting point. The fabric costs around $15/yard and is super accessible – most fabric stores carry Robert Kaufman! And as someone who has long used Robert Kaufman fabrics, I love their quality and the company has been so easy to work with. I’m pretty excited about this!
– The denim is washed one time, to remove the sizing and soften everything up. I was hoping this would also remove the indigo bleed, but it only did so a bit – it looks like 2-3 washes is the magic number (based on my personal sample pair). I love my students but idk y’all, I wasn’t about to sit and wash 30 yards of denim multiple times. You hands will be slightly tinted blue. Don’t wear white underwear and bring hand sanitizer lol.
– Each sample is sewn using the key pieces necessary for fit – front and back legs, yoke, full fly (zipper, shield, etc), and waistband. There are no pockets, no seam finishes (or hems), and there is only topstitching where necessary for fit. Furthermore, the waistband is uninterfaced, except where the button would go – this is what I prefer in my jeans, and it gives students the chance to see what that feels like when they try on the pair, so they can decide for themselves whether they want to interface their waistbands. Personally, I find it way more comfortable! I also left off the buttons – students simply pin the waistband shut when they try on the sample.
– The pattern is the Ginger Jeans pattern from Closet Case Patterns, available in sizes 0-20. My samples are View B, the high-waisted, skinny leg version.
– As a fun side note, each pair of jeans has a different colored zipper. I knew that giant box of 75+ vintage zippers in weird colors that I bought at the flea market AGES ago would eventually come in handy! 😉
To get everything sewn up in a timely fashion, I had to set things in stages. Due to the number of pairs and them all being different sizes (in all the same fabric, no less), I was unable to batch sew these like one would in production. I literally sewed each pair one at a time. I found that the fastest way to do this was to cut everything first (again, individually) and batch all the pieces together with the size clearly marked. Then, starting with the largest size and working my way down – I sewed each pair of jeans from start to finish. For fun, I timed myself – the first pair took 52 minutes, but by the time I sewed that last pair I was actually down to 32 minutes!
And then I got really into it and a little time-lapse video of myself sewing one of the pairs of jeans. Because I am a huge nerd.
I also totally broke my sewing machine during this process. At some point, I sewed over a zipper (a nylon zipper, I might add) and hit it at juuuust the right angle that it snapped the needle and everything went completely haywire. I had somehow managed to completely jack up the timing – my needle was hitting the needle threader on it’s way up, and not picking up the bobbin thread. I am lucky that we have an incredible sewing machine dealer + repairshop in the area, so I brought it to him and he was able to get everything fixed and back to normal by the next morning! I can’t even tell y’all how much I love my dealer – highly recommend them if you are in Nashville and shopping for a Bernina!
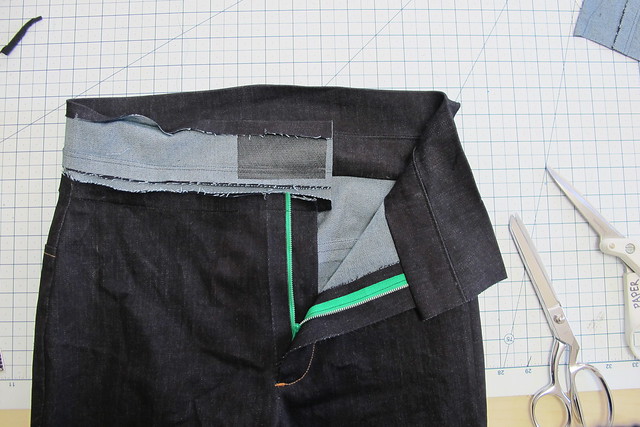
Ok one last nerdy thing! Doing the same sewing process over and over (and over and over) actually gave me some wonderful insight for finishing the waistband! In the past, I (and probably most of y’all) have attached it the waistband from the right side, then turned the facing (inside) to the inside and pinned it, then topstitched from the outside. This is unnecessarily fussy and I don’t know about you, but I always end up with a little section of facing that didn’t get stitched down. Jennifer had mentioned a few times in the past to flip and attach the facing first, then topstitch from the outside – which I’ve done before with other garments when it’s in the round, but I couldn’t get a clean finish right at the zipper opening. Well, y’all – 11 pairs later, I’ve definitely got it down! So here’s a mini tutorial:
Assemble your waistband as normal (sew the waistband to the facing along the top and understitch one side), then press the seam allowance of the WAISTBAND (the side that is not understitched) under to the inside. I press about a scant less than the seam allowance – so a 5/8″ seam allowance gets pressed a little between 1/2″ and 5/8″ (this allows the waistband to fully cover your stitching). Sew the facing to the top of your jeans, with the right side of the facing against the inside of the pants, like so. It will look totally wrong at this point. Trust.
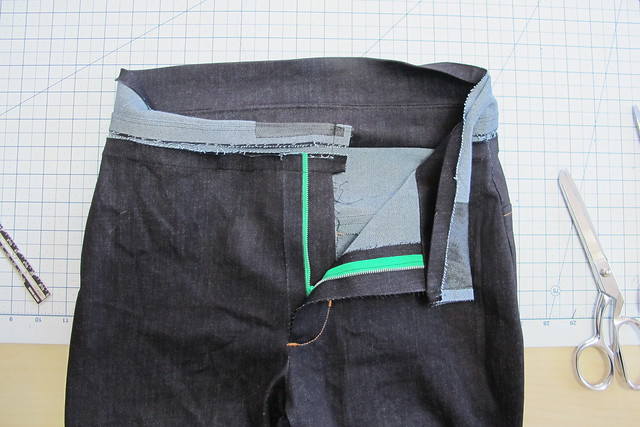
Now fold the short ends of your waistband in half, with right sides facing, and the connecting line of stitching (not the understitching) right along the top of the fold. Sew across the short end to close.
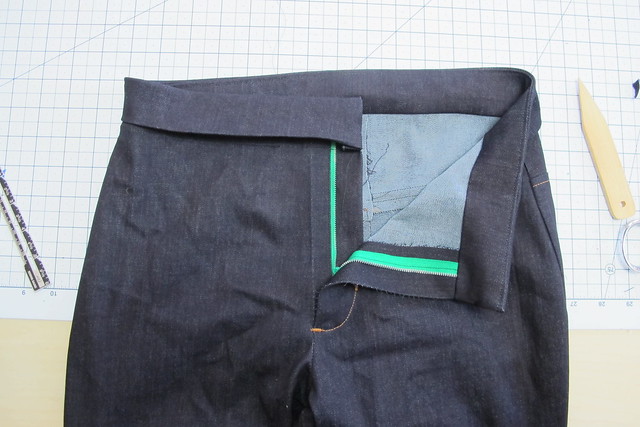
When you turn the ends right side out, the waistband should fall right into place, covering the seam allowances.
Then you just pin everything down and topstitch! Since the facing was already attached, you don’t have to worry about catching it in your topstitching 🙂 Here’s another hint – start at the center back, that way your backstitching gets covered by the belt loop.
So now I want to talk about my classes! Jeans Making has been pretty popular and I am excited to take this class ~on the road~ since I realize that not everyone can come up to NYC to take a sewing class (and also, I’m selfish and I like to travel haha). I have taught this class several times at Workroom Social, and learned a lot about teaching these workshops – what works, what doesn’t work, and what I might want to change for my own classes (very little- like I said, Jennifer is VERY good at what she does! There’s a reason why I keep working with her, she is amazing and the classes at Workroom Social are wonderful!).
The main thing that Workroom Social focuses on in their classes – and I focus on as well – is the overall experience of the class. Yes, you are there to learn and we want you to learn as much as you can and feel empowered by your knowledge! But even beyond that – we want you to have FUN in the class. Based on what my students tell me, this is not always the case – which kind of makes me sad, and also explains why there are lots of people who get scared off from sewing after a single class. I always strive to give my students the very best experience, and give them my full undivided attention during the entirety of the class. This is why I rarely have photos from classes (unless someone else took them), or post on social media during my classes – I’m not using my phone in class because I want to be 100% involved with my students. I am also a firm believer in that there is no “right” or “wrong” way to do something – you do whatever works! Sewing isn’t like baking, it’s like cooking – whatever gets you the result you want is the “right” way to do it. My classes are less about doing things perfectly and more about having a good time, learning a lot, and actually finishing your project. Then when you go home and make that next pair of jeans – that’s when you can work on the perfection side!
One other thing about my classes that may be a little different – I don’t try to keep students at the same pace the entire time. If that means I have to repeat myself 10 times during a class, that’s ok (seriously, you’re not going to fluster or bother me haha)! I realize that everyone learns differently and operates at various speeds, and I don’t want to punish half the class for being at a different speed. Faster students can blaze ahead and not be bored, and the slower students aren’t stressed about keeping up. I find this to be a very positive overall experience, both in terms of people actually learning shit and also keeping the vibes of the class high.
The only thing I changed with my solo jeans classes is the time involved. Classes at Workroom Social are 2 full days. While you can definitely finish a pair of jeans in that time – I’ve had classes wrap up as early as 3 hours before the end time before – it can also be a little rushed sometimes. Workroom Social also speeds things up by having the patterns pre-traced and cut, and also providing lunch in the studio. After some thinking, I realized the fitting/cutting portion was really the big roadblock here – so for my classes, I am moving that to its own half day. This makes my classes 2.5 days, but those extra hours make a big difference (plus it makes things a little easier if you’re traveling to take the class – you can fly in that morning). Students have 4 hours to try on the samples, choose their size, cut or trace their patterns, make basic fitting adjustments if needed, and then cut and mark their fabric! Next two days go straight into sewing, with a little extra time built in so it’s not as rushed – and you can chat! Or take a break! Finish early? Cool, I’ll do some demos or talk about what shit you want (jeans-related or not)! Or we can drink and hang out and celebrate! I don’t care, we are here to have fun!
Oh yeah, one last thing – if you fall outside the size range of the Ginger Jeans pattern, that is ok! The Ames Jeans pattern from Cashmerette is available in sizes 12-28 and for two different body types (apple or pear fit). While I do not have samples available in this pattern, you can absolutely use it to take my classes and get you a pair of jeans that fits YOU. In other news, I cannot tell you how excited I am that Jenny released this pattern. I may or may not have fangirled for like 2 weeks straight haha.
Ok I swear I’m wrapping up! Here are my upcoming classes through the beginning of May (you can also see these on my Classes Page 🙂 )
Jeans Making Sewing Intensive March 24th – 25th Workroom Social / Brooklyn, NY
Pfft y’all didn’t think I leaving Workroom Social, did you? THEY CAN NEVER GET RID OF ME 🙂 This 2 day workshop in beautiful Brooklyn is all about jean-making – rumor has it we will be sewing a custom Workroom Social jeans pattern in this class 🙂
Ginger Jeans Workshop April 27th – 29th SOLD OUT // May 1st – 3rd Stitch Sew Shop / Alexandria, VA
Two dates for this one! Choose either Friday – Sunday (Update: The weekend is now sold out!) or Tuesday – Thursdsay (maaaaybe you are thinking about going to the Sheep and Wool Festival that weekend? ;)). This is another one of my 2.5 day workshops where we will make Ginger Jeans!
If you are a shop who would like to host me for a Jeans Workshop, please get in touch! I still have a little bit of availability for the second half of 2018 🙂 I am especially interested in teaching on the west coast or in the UK!
If you read this entire post and you’re still somehow still here – if we ever meet irl, I totally owe you a drink haha!
Ok, I’ll be back soon to discuss my jeans made with the Robert Kaufman fabric! Have a great day, everyone!
I literally said this last year, and I’ll say it again: I can’t believe this year is over! It’s amazing how much faster time goes by the older you get.
This was definitely another slow sewing year for me. There was a lot of shit that happened this year (some good, some not good) that affected my time and energy in relation to sewing. I’m still slowly working on updating and replacing key pieces in my wardrobe, repairing and altering ones that need it, and trying to be more mindful about what fabric I’m buying and what I’m making with it (my suitcases flying home from NYC are getting lighter and smaller with each trip haha!). I think this is pretty apparent with my favorite and not-favorites from 2017! To see everything I made this year, you can always Lurk my Closet.
UGH I LOVE THIS PIECE SO MUCH. It’s the perfect transitional jacket for spring and fall, and the color goes with almost everything in my wardrobe. I wore this jacket so, so, so much, and got loads of compliments every single time. It was a joy to make and even more fun to wear!
I’m so glad that I finally bit the bullet and did this! Re-lining a coat isn’t high up on my list of favorite things to sew – in some ways, I think it’s actually easier to make one from scratch rather than tear out the old and sew in a new one. However, I really loved this jacket and I’m so happy that I can continue to wear it again! And yes, I DO love wearing green jackets… why do you ask? 🙂
I feel so fancy when I wear these PJs! Spending a lot of dough on fabric to sleep in probably isn’t what most people would do, but there’s something to be said about pampering yourself even when you’re lounging around. One thing I especially appreciate about these PJs is that they work well as separates in every day wear, too! I don’t think I’d go as far as to wear them together out in public, but either the top or the shorts do well paired with something else. I wore the top a few times with jean shorts; next summer I want to make an outfit with the shorts!
TBH, probably my favorite thing I made this year. I LOVE WEARING THIS DRESS. It’s so comfortable – the loose fit and breathable rayon make it perfect for summer, and it’s drapey enough that I don’t look completely shapeless underneath. I wore this dress on a lot of first dates and everyone loved it. But especially meeeee.
This was about the time I decided there was no problem with me owning several shirtdresses in the same shade of blue. This Kalle dress is the closest I’ll get to having anything that works with a capsule wardrobe. I like how well it works both on it’s own or paired with other pieces (different shoes, accessories, etc), and that it’s plain enough so people don’t notice right away that you keep wearing the same dress (or maybe they do and they are too polite to say anything).
Yay! This might be my favorite handknit sweater to date (until I finish the one I’m currently working on… time will tell!). I loved every single part of making it, and I’m so happy with the quality of my finishing. It’s another great transitional garment, since it’s knit with a cotton yarn. While it sucks that the fabric grows as I wear it, it does easily shrink back up with a wash + dry. And now I know to check that with future cotton sweater knitting!
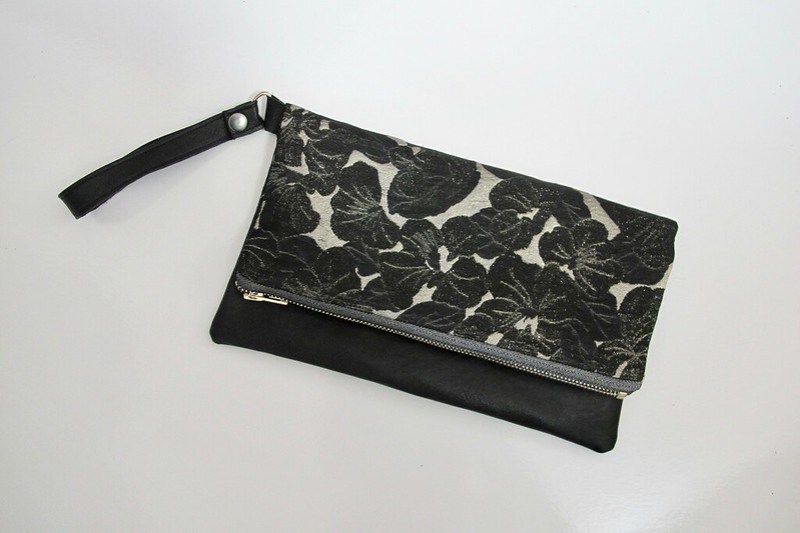
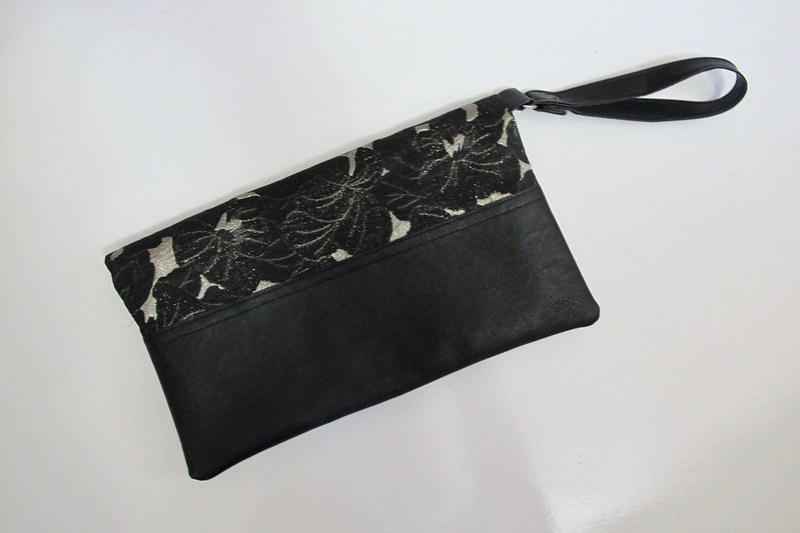
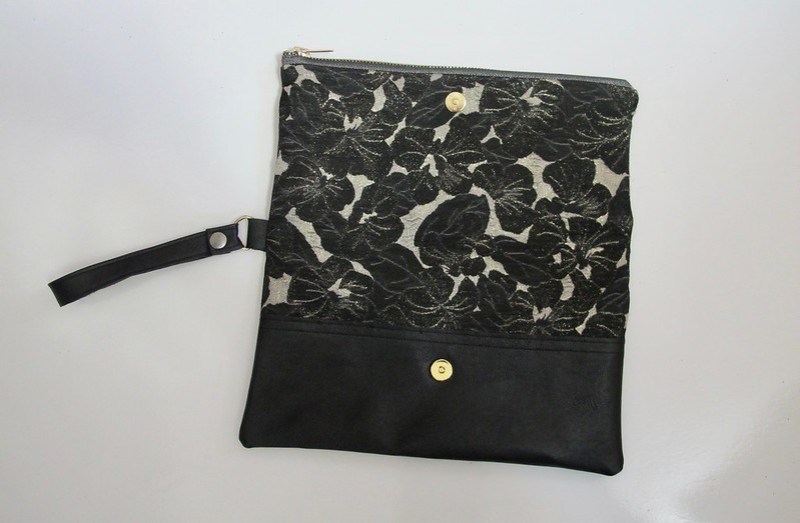
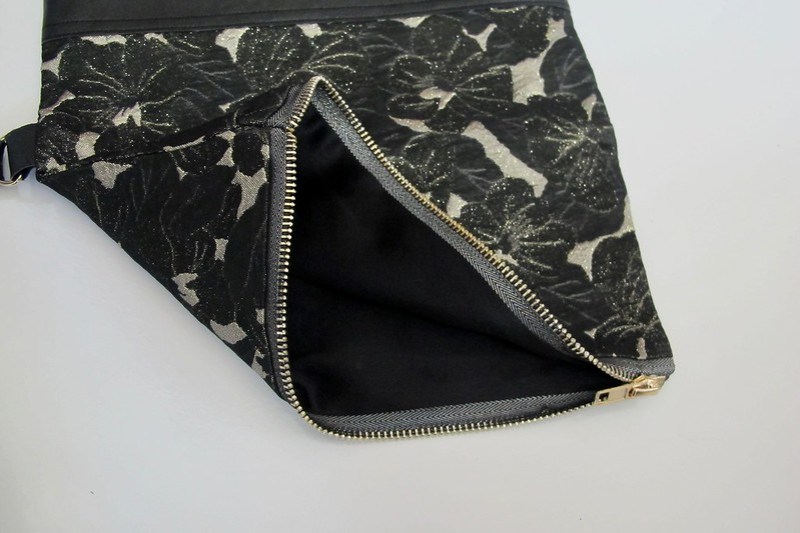
I did not realize how much I needed a bag like this until I finished it! It has been super useful for carrying supplies to and from Craft South. I prefer this bag over other tote bags as I like the structure and the included pockets. I don’t feel like the bottom is going to bust open and drop my laptop on the sidewalk (which would be terrible).
I like this top in theory, but I never wore it. Mostly because the neckline gape when I bend over, and you can literally see my belly button. Which means I have to wear a tank under it, and nope. Barely wore this.
Ugh this one pains me because I LOVE it and I ADORE the fabric but it really doesn’t go with much in my closet! I think I’d get more use out of it if it were cropped, then I could wear it with dresses (the current length is just long enough that it looks weird with dresses). I may cut it shorter and see if that makes me wear it more. Or make another bra out of it – my Lemon Watson bra made with those scraps gets worn quite frequently!
Love the top, don’t love the fabric. I want to make it again in a better (read: more breathable) fabric and get rid of this poly one. As a side note, that bra I also made is AWESOME. It has been fantastic for working out, and I’ve also worn it as a swimsuit top (with my black bottoms) while kayaking this past summer!
***
I’m so glad I took more time off this year from blogging! It might not seem like very much, but pretty much ever since I started this blog I have been aiming for 1 post a week – sometimes more. In the past, I’d feel guilty about skipping a week, which is stupid because there is no one holding me to any sort of deadline. I definitely don’t feel that way about my Instagram, which I tend to be more active on. As with last year, I didn’t post everything I made this year – some stuff was just kind of redundant, or didn’t warrant a post – but a lot of it gets posted there if you are interested!
Rather than blogging (which, sadly, doesn’t pay my bills haha), I focused more on teaching this year! I am really happy with how far that got me throughout the year – I taught several workshops in Brooklyn NY, Leesburg VA, and also here in Nashville! I also taught a TON of classes at Craft South in Nashville, smaller/less expensive project-based classes that were finished in an evening. I averaged 2-3 per month, and we’ve got plenty more on the calendar for 2018 if you are local or visiting and want to take a sewing class – including a Sew Your Own Jeans Workshop in January!
Also related to sewing, I got connected with a local talent agency here in Nashville and now I occasionally freelance as a on-site tailor for photoshoots and commercials. It’s not a very consistent gig – not everyone has the budget to bring a tailor in for the day – but it is really really really awesome when I can get them. I’ve worked with a handful of big corporate names and celebrities, and also met some super cool people that way!
Job-wise, I’m still working the same 2 main jobs that I had last year – a personal assistant (not sewing related, but still pretty awesome), and the Education Coordinator for Craft South. Both jobs now allow me to work 100% from home, which I LOVE. I’d like to take a working vacation at some point, since I’m not tied down to being in a specific place or even time frame to perform my job (as long as I can bring my laptop and access the internet, I can get my work done). I also worked a little bit for Elizabeth Suzann on an as-needed basis this last quarter, to help them get caught up on orders before the Christmas season. It’s amazing how much that company has grown by leaps and bounds since I started there only a few years ago, and I just love having the opportunity to go in there. I averaged about 5-6 garments per 3 hour session each time I was there, not bad!
Some highlights from this year:
– I was fortunate enough to travel out of the country twice this year – my first trip was in January, and I went to Egypt for 10 days! Y’all, that was without question my favorite vacation I’ve ever taken, and I did it all by myself! I had an incredible time and got to know some really amazing people, including the very fun and extremely generous couple I stayed with, and a reader who met up with me a couple times and showed me around Cairo! Here is my recap of that trip if you are interested!
– I also went to Belize this year, in June, with my best friend! No blog post for that one – it was a personal trip, and to TBH I was drinking rum pretty much the entire time (helloooo we were on vacation!), but I had a blast and I’m so happy that I got to go!
– I moved this year! Yes, again!! I loved that little apartment that I was in, but I was offered a really amazing house in an even more amazing neighborhood for not much more than I was already paying. My new house is walking distance to Craft South, and it is the sweetest little 1935 stone cottage. Oh, and did I mention that I have my own laundry facilities, (giant) yard, and driveway!? Three things that apartment was sorely lacking 🙂 I’ve been here since June and I love it so much! Studio tour coming soon – this one might be my favorite yet!
– My best friend and life partner got married in July, and I was thrilled to be her Maid of Honor. I also made my dress for that, which you can see here!
– I finally got to meet *MY* sewing hero, Gertie! She is just as pretty and delightful in person as you’d expect 🙂 And I talked her into coming back to Nashville to teach at Craft South in 2018! We’ve got her for a one day circle skirt class AND a weekend workshop – cannot wait!
– In addition to all the workshops that I taught, I also assisted two classes, which was really fun! Both were for bra-making with Amy of Cloth Habit, who is such a great person to work with (and as the person who coordinates all the workshops for a fabric store, I can also say that she was the EASIEST instructor to work with in terms of getting everything planned, from a shop perspective. Amy is delightful!). We taught together at Craft South in September, and then again for Camp Workroom Social in October with Allyson Dykhuizen (who is also incredibly fun to work with and has the most splendid positive energy of anyone I’ve ever met!). It’s really nice to be the assistant of a class and let someone else to all the heavy lifting (although I do love running my own classes, too!). And speaking of bra making – Amy is coming back to Nashville in 2018 to teach the class again! Seriously, y’all should just look at the upcoming weekend workshops at Craft South for 2018 because we have so much fun stuff planned!
– After 10 years of putting it on my Christmas list, I finally bought myself a Coverstitch machine – a Janome Coverpro 2000cpx. We are still getting used to each other, but I am very happy with my purchase! I will be writing a review post about it in January, stay tuned 🙂
***
On a more somber note, 2017 was also the year that my dad passed away. He battled colon cancer for 4 years, and the entire time he stayed strong and optimistic. After our big scare in September 2016 (where he ended up on life support for a week), he never quite bounced back the way he had done so many times before. His younger brother, Kenny, also suffered from cancer and died at the beginning of February this year. I think that was the last straw for my dad, he didn’t hold on for much longer after that. Losing a parent was an incredibly traumatic experience that has absolutely changed me as a person. I struggled a lot with my grief + feelings this year, especially in those months immediately after. I couldn’t understand why I felt sad, why I basically lost my will to do anything. I spent a really long time feeling sorry for myself this year. It’s been an uphill battle dealing with everything – I see both a therapist and a grief counselor now, and that has been helpful. Living alone + being single has also presented its own challenges, mainly in that it’s very easy for me to isolate myself, which is not the healthiest thing for me to do right now. I am making efforts to get out more and meet and interact with people, but it can be really hard sometimes.
The rest of my family is doing ok. My mom is completely heartbroken, but she’s taking small steps to take care of herself. My brother Matt ended up moving across the country; he’s in Portland, OR now. My other brother Mikil has really stepped up to help and be the man of the household as much as possible. I don’t know where we’ll be at this point next year – but I told my mom we should consider going somewhere exotic for Christmas in 2018, and just treat ourselves proper.
Anyway, all to say that it’s been a hard year, one of the hardest for me yet. I miss my dad so much, and while I get around in my day to day life pretty normally for the most part, I still think everything sucks a lot of the time. It really pains me to think that he won’t be there for my next milestones, or even to see what I’m doing right now. He would have loved this house so much, and he would have thought what I’ve done with my year was so cool. I’m so thankful that we had him for as long as we did, and I’m so proud to be the daughter of such an amazing man. My dad was truly one in a million.
***
So what does 2018 hold? Well, I hope it’s better than 2017 was! My last absolutely horrible year was in 2006, so I am really counting on another bad year not happening for at least a decade. 2018 needs to cut me a fucking break already!
I would like to expand into more teaching – especially jeans-making (whole post about that coming up!) – and I’d like to go on at least one fun / non-work trip (or, as I mentioned – working vacation. Just something that I’ve planned for myself without any outside obligations!). I would also like to get into doing short tutorial videos – I think it would be fun! I inherited my dad’s GoPro camera (my mom says it’s “on loan” but let’s be real, she’s never getting that thing back lol) and have been playing around with iMovie. I am taking content suggestions, so let me know if there is something you would like to see!
Anyway, I think that’s pretty much it for this year. I hope everyone has a fabulous and safe holiday! Here’s to a beautiful 2018!
As I mentioned in my last post, I also made a clutch to go with my dress, using leftover scraps of fabric!
As silly as it sounds, this is something that I have been needing – particularly for this dress, but also in general. See, I own a very nice leather purse – but it’s brown, and it’s a decent-sized handbag (it is actually quite small as far as most handbags go, but it’s bigger than one would need for an evening out). I have been wanting a black bag in a smaller size, something big enough to just hold the essentials (wallet, keys, lipstick, gum, phone). While I normally find clutches pretty silly (you mean I have to HOLD my purse wtf), I think they are fine for evening wear. Gives me something to do with my hands that isn’t smoking a cigarette 😛
Anyway, I decided to make a small bag after I cut my dress and realized I had quite a bit of yardage left over – both with the outer and the lining. I also chose to use this opportunity to try out the fabric cutting function on my Cricut Maker!
Using the Maker to cut my purse was pretty straightforward. I looked through the available projects on the app and decided to make Simplicity 8028, which is a simple clutch with a zippered top. After purchasing, I changed out to a rotary blade on the Cricut and started loading up my fabric mats.
In addition to cutting, the Cricut Maker also marks your pattern pieces using a water soluble marking pen (both the actual pattern markings and it also numbers the pieces so you know which one is which). The notches are cut in outward triangles (the old school way). One thing I didn’t notice until after the fact is that the screen before you start the project labels all your mats with pieces + fabric (i.e., “Mat #2 will cut pieces 2 and 3 out of lining fabric” or whatever). This is not anywhere in the app once you start the project, so I would recommend writing them down so you know which piece gets cut from which fabric. I was losing my MIND trying to figure out which fabric to load on which mat and ended up cutting a few pieces from the wrong fabric (fortunately, I had enough to re-cut). Learn from my mistakes!
FYI, I was unable to use the pattern marker with my fabric, since it is so dark (it’s one of those light blue marking pens). This was not a huge problem – the pieces are basic shapes, and the app actually shows you them on a gridded mat so you can easily figure out where, say, the strap marking is based on the size of the pattern piece + the measurements on the mat behind it.
After everything was cut, I downloaded the PDF instructions and sewed up my bag! That part was pretty easy. If you’ve sewn up any sort of zippered pouch, this bag goes together in a similar way. It took me about 45 minutes to sew, start to finish!
I debated on using the other side of the fabric for this clutch, but in the end – I decided the predominantly black side would work better with the rest of my dresses, should I need a black clutch for any of them. The leather piece + wrist strap is leftover from my Pulmuu skirt kit, and the bag is lined with black silk charmeuse.
The clutch is basically a long rectangle pouch with a zipper at one end, that folds in half and closes with a magnetic snap. The snap, zipper, and gold D ring were all sourced from my local fabric store.
The pattern calls for a swivel hook to be sewn into the wrist strap, so you can remove it if you want a plain clutch. While I loved that idea, I couldn’t find a swivel hook in the correct size (my fabric store only had really big ones in stock, plus, the were silver and I wanted gold). So instead I used my industrial snap setter to put a snap in the wrist strap; now it just snaps on or off. Easy!
Overall, I think it turned out quite nice! It’s the perfect size for the handful of things I need to carry when I go out, and easy to hold (it also fits in the giant pocket of my faux jaguar coat, so that’s pretty rad haha). Not to mention, it feels good to use the last scraps of something – especially when it’s an expensive fabric!
Ok friends, that’s all for this project! I will be back in a couple of days with my year in review post 🙂
** Note: Cricut generously sent me the Cricut Maker machine + a bunch of supplies at no cost to me, in exchange for writing about my experience. All opinions are my own! Also, FYI, this blog post contains affiliate links. That is all!