Fall/Winter 2015 Sewing Plans

18 Sep

Well, I don’t know about where y’all are, but down here the temperatures have slooowly started dropping at night, which means I can finally start planning my fall/winter sewing without feeling like a total lunatic. I love this time of year – the change in seasons is a nice shift from the blistering heat (I feel the same way once spring rolls around, too, for opposite reasons. Change is good!), and, man, I love winter clothes. I love sewing winter clothes! Yay for wooly long sleeves and cozy necklines!

I don’t have a lot in the plans for this season – I want to focus on basic pieces that can be mixed and matched. I like the idea of having a more minimalistic approach to the way I dress – I already do this when I travel, and I’m working on dragging it into my every day life. I recently realized that I don’t really care if people see me wearing the same thing two days in a row. If it bothers then, that’s their problem, not mine. I want to spend my sewing time working on fitting and fine finishes and enjoying the entire process – not rushing to get to the next project. If that means making less as a whole, fine with me!

DRESSES:

sway dress
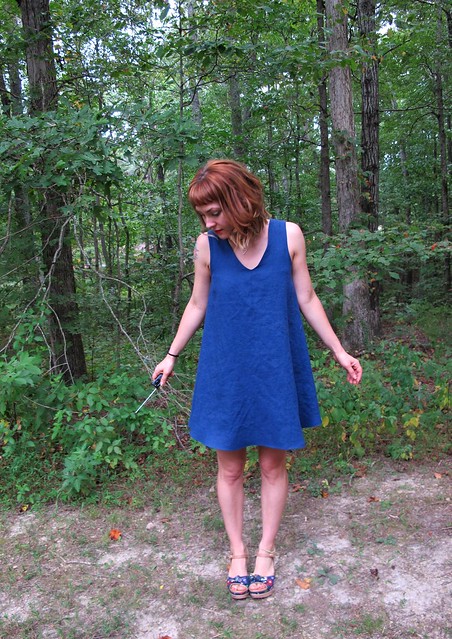
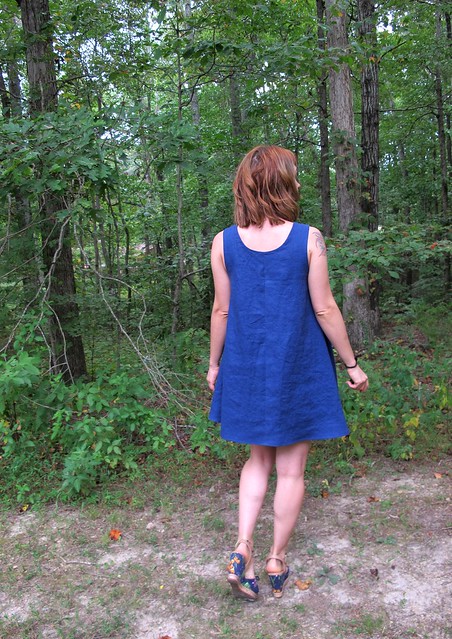
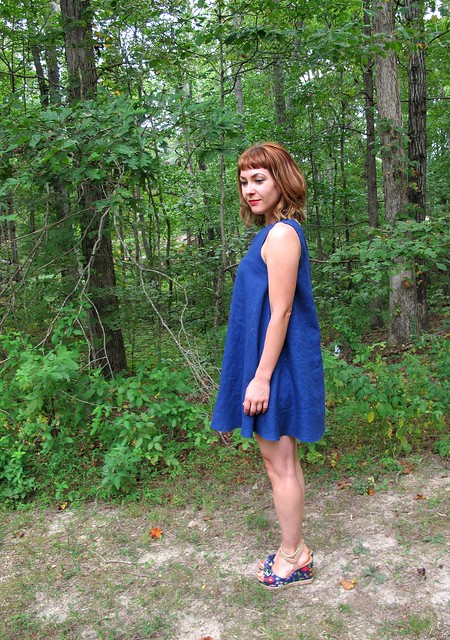
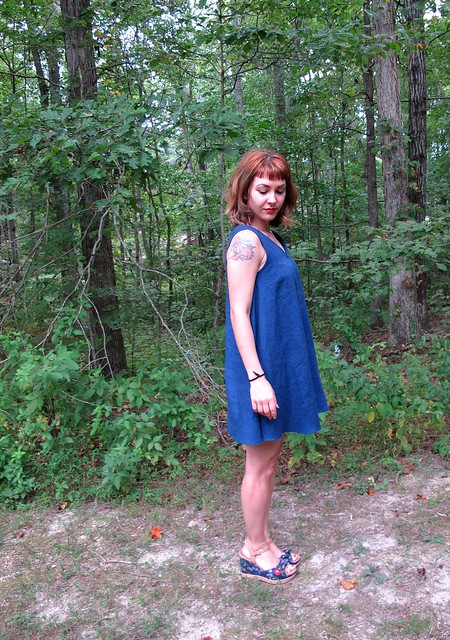
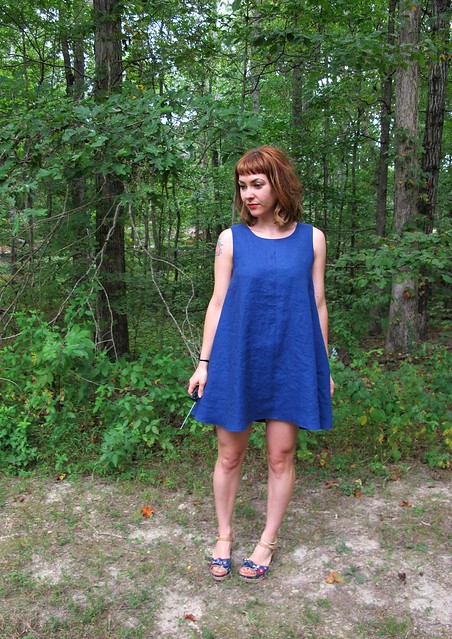
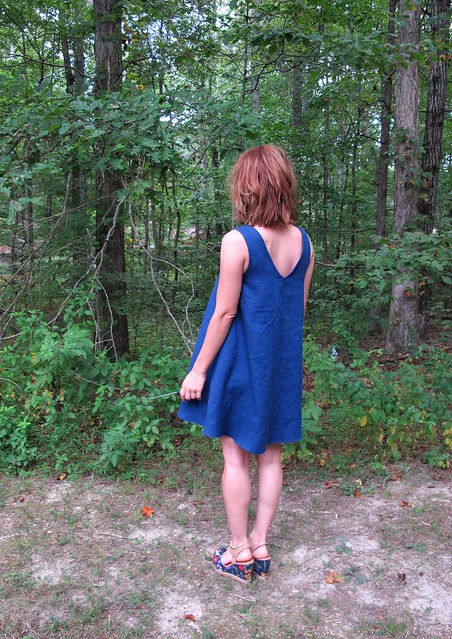
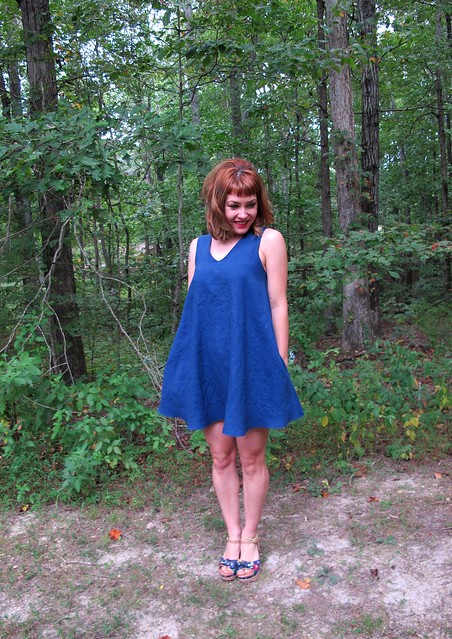
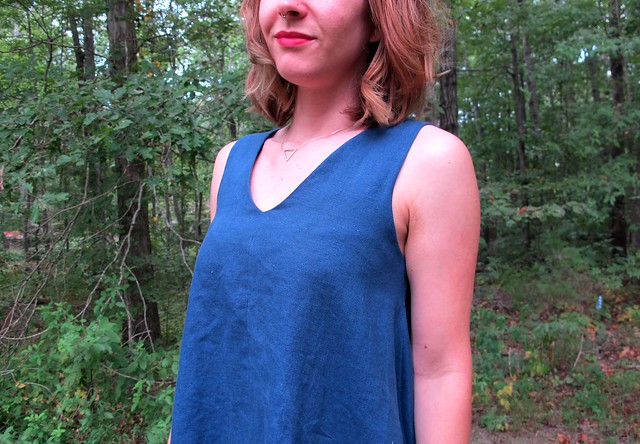
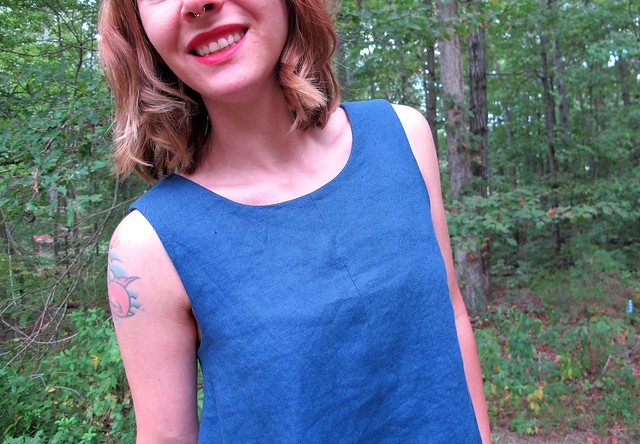
Papercut Patterns Sway Dress

Ah! I made this fun tent dress in a summery linen, but I really would love to make a winter version as well. I have a really nice black boiled wool that I think would suit the pattern nicely. It would be so cozy with black tights and a long sleeved turtleneck.

Emerald Wool Jersey Lady Skater

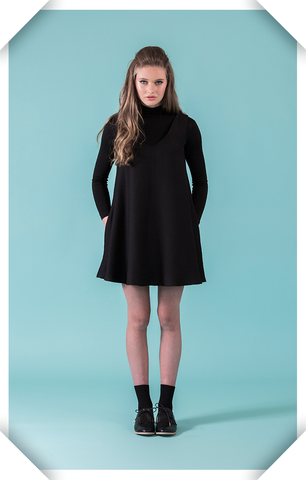
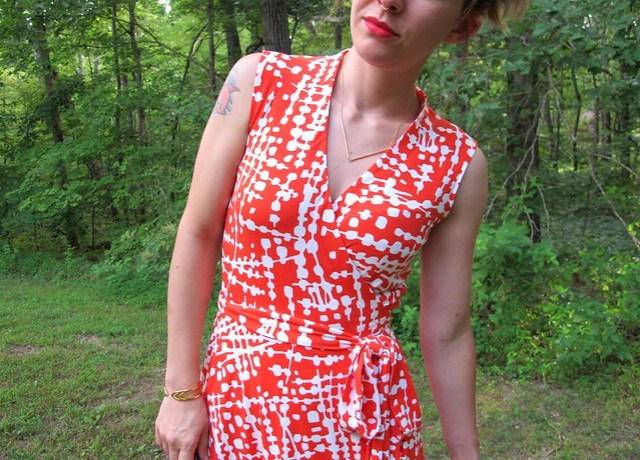
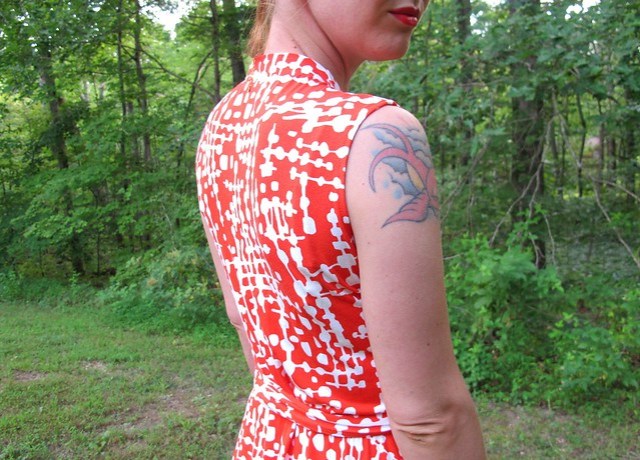
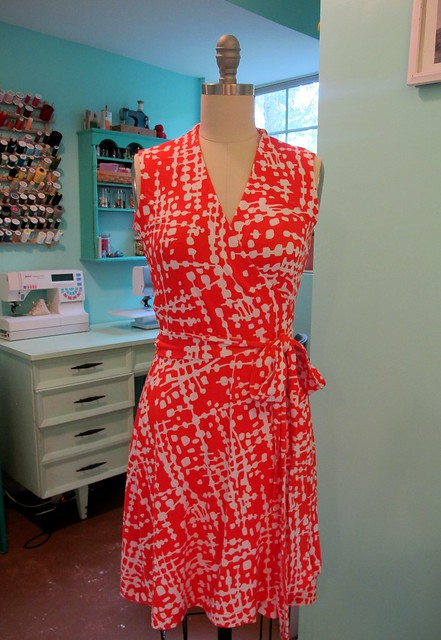
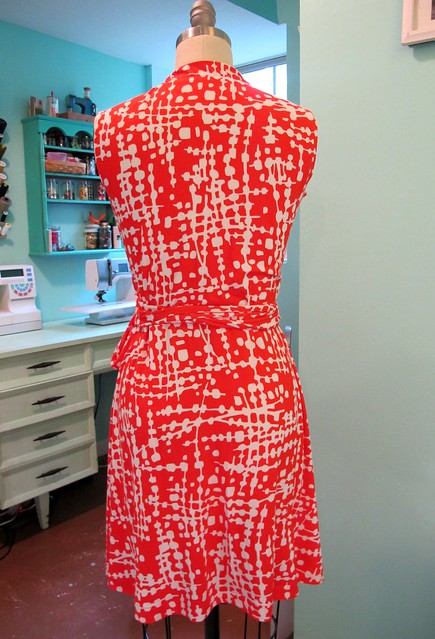
Kitschy Coo Lady Skater dress

I make this dress every year, and there’s a good reason why – it’s an awesome dress! The scooped neckline with long sleeves and slightly flared skirt is basically my perfect dress. And it’s made for knit fabrics, so it’s super comfy as well. I have a rad star knit from Lillestoff (which I can’t seem to find on the website now, wah) that I want to use for those one. And maybe make another with a cowl neck (like my ikat print Lady Skater from last year). The green one above is made with an emerald wool knit, which is pretty awesome too. Lady Skaters rock!!

BOTTOMS:

guise pants
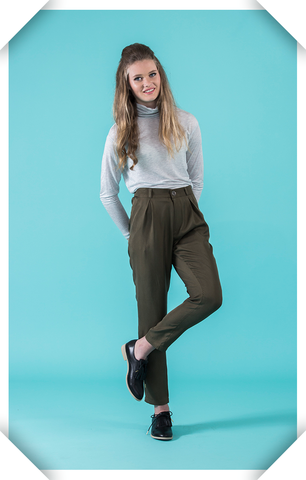
Papercut Patterns Guise Pants

MAN. Ever since this collection was released, I knew I needed me some of these pants. My friend Carla gave me the pattern as an early birthday gift, so now I have no excuse! I’ve spent most of the summer looking for the perfect black flanneled twill to make these out of, and I think I’ve found it. Cozy black pants will be mineeee!

Ginger Jeans

Closet Case Files Ginger skinny jeans

I can always use more jeans in my wardrobe! The Ginger jeans that I made last year are still going strong and wearing well, but it would be nice to have a few more pairs. I bought one of the denim kits waaaay back when at the beginning of the year, so I am really excited to use that stuff for my next pair!

style 1559 Style 1559

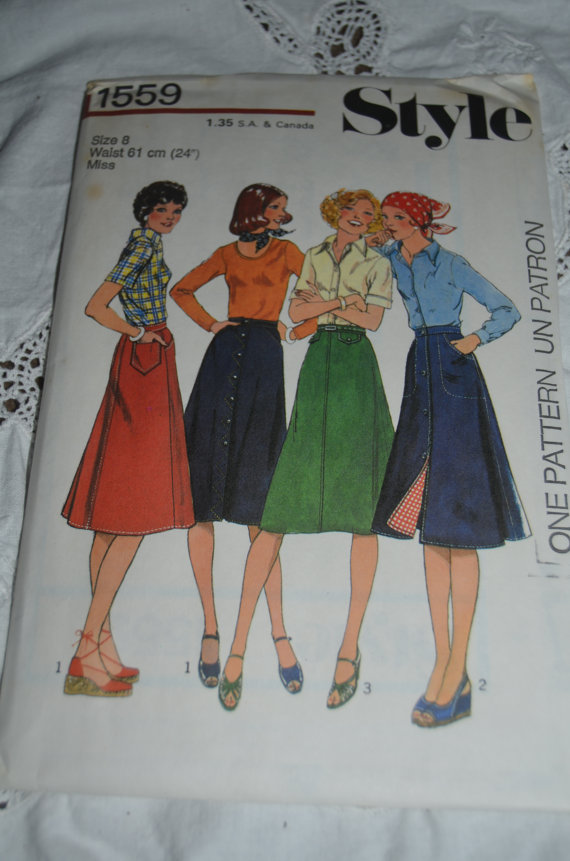
Fuck yeah, there needs to be a 70s-style skirt in my wardrobe! Wouldn’t this be great in denim, with jeans topstitching and cut to a mini length? Wellllll, spoiler alert… I’ve actually already finished the skirt as of this writing (lolz), but it’s part of my ~fall plans~ so I’m including it here anyway dammit 😛

TSHIRTS:

Seriously, though - how cute are the illustrations on these @vvvesta patterns?? 😍✂️😍

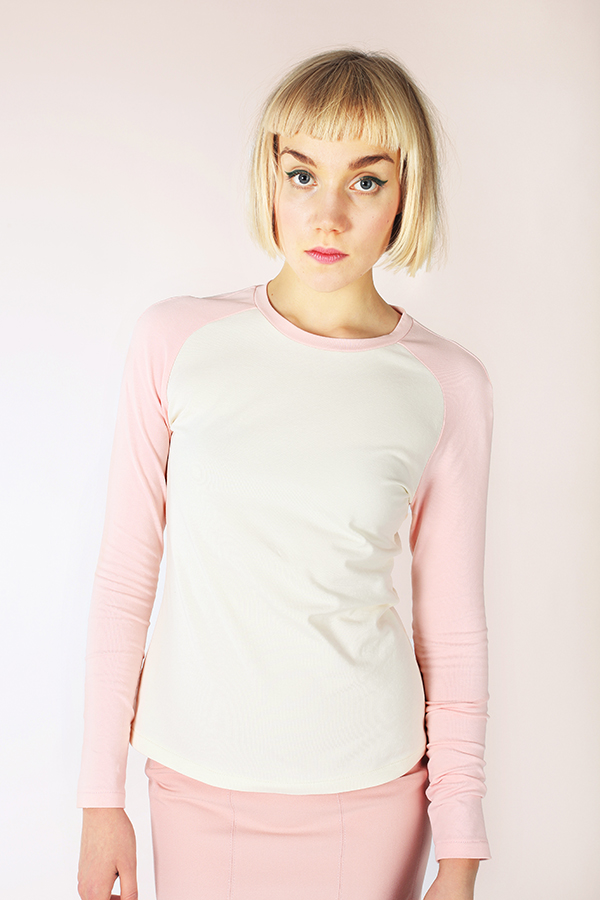
Vesta Patterns Grail Tshirt

I always need more long sleeve tshirts! Really excited to try the Grail pattern – this one is drafted based on 3 different body shapes. I have a couple patterns to play with, and I promise to report back once I’ve made them up! Could be a nice staple for winter. And, as always, I have more Renfrews (especially the cowl neck!) and Plantains planned as well. Can’t ever have too many tshirts!

Geneva Raglan

Named Clothing Geneva Raglan Tee

I also want to make some raglans – specifically, the Geneva looks pretty neat! The raglan seam is a bit different than what you typically see on a raglan – I have a similar vintage tshirt that I really like the fit of, so I’m hoping I can knock it off with this. For fabric, I got a bunch of swatches of the awesome merino wools from The Fabric Store – just have to narrow down my selection to something budget-friendly! Those things add up fast! haha!

OUTERWEAR:

waver jacket Papercut Patterns Waver Jacket
I have SLOWLY been building up the supplies for this one! I ordered my coating a few months ago – this Dark Navy Aztec Print from Mood Fabrics, plus a matching navy silk charmeuse lining. And, of course, faux fur for the hood because yesssss. I am really excited about this little jacket! I think it’s gonna turn out really cool 🙂

STACIE-JACKET 
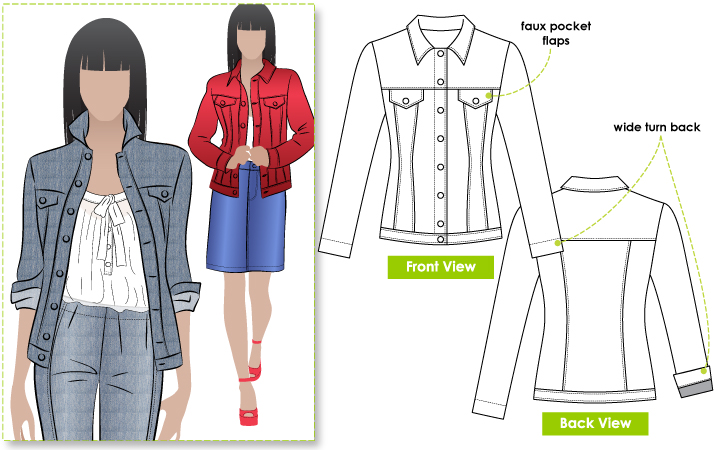
StyleArc Stacie Jean Jacket

I’ve been meaning to replace my sad old Gap jean jacket for YEARS now, but it’s been really hard to find one that I like (or a sewing pattern for one!). I just discovered this pattern, and it’s almost like this shit was made for me. Such a nice design, and all the finished versions I’ve lurked look super legit. This one is probably going to take some extra finesse for me to work through, as the instructions are pretty freaking sparse, but I think I can manage it if I make up a muslin first. For my final jacket, I have a nice piece of denim from Imogene + Willie that I’m hoping I have enough of.

oslo cardigan
Colette Patterns Oslo cardigan

Is this considered a Colette Pattern or a Seamwork Pattern? Either way – cardi! Yay!! I have a couple of fabrics I’d like to make this in – a soft grey/black slubbed double cloth and a cozy mushroom wool sweater knit (purchased from Mood Fabrics, but I can’t find it on their site now!). Perfect for lounging on the couch, or running outside to chase the pig.
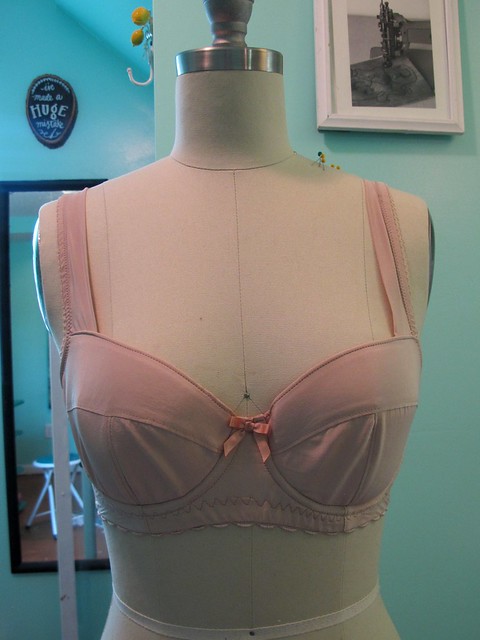
INTIMATES:

carolyn pajamas

Closet Case Files Carolyn Pajamas

Oh yes – more pajamas! I love my linen pair, so of course I need a flannel pair for winter. My mom always buys me flannel pajamas for Christmas, but they never really fit quite right (the crotch is always way too low, or the legs are too long, or something else is wrong). So I’d rather make my own! I haven’t found a good source for cotton flannel fabric – any suggestions? Looking for something that isn’t super cutesy and preferably around $18/yard or less.

fifi

Tilly & the Buttons Fifi Camisole

A silk cami seems kind of silly for winter, but hear me out on this one! I always wear tanks under my sweaters – one, so I can strip down layers if I get too hot; and two, because it’s easier to wash a tank rather than a whole sweater. Rather than run to Target and buy some flimsy little knit tanks, though, I’d love to make some slinky bias-cut silk Fifis. Ooh la la!

KNITTING:

graphite

Graphite Sweater

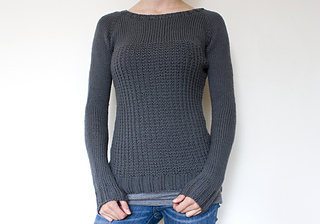
This is kind of cheating, since I started this sweater at the beginning of the year (yeesh!). It went into UFO status for a few months, but I’m ready to finish it up and get to wearing it! Just need to knit the sleeves and the neck binding, and it will be done!

down east

DownEast Sweater

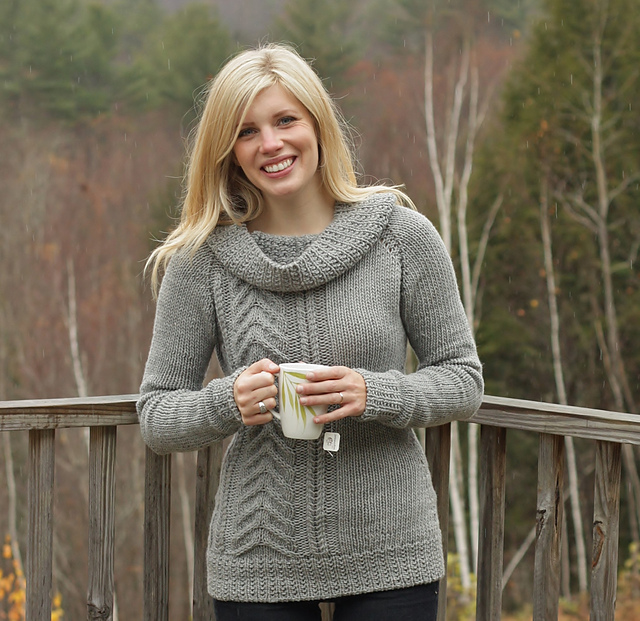
Then onto a big, squishy, bulky sweater! I already bought the yarn for this one, so there’s no turning back now. Ha!


Whew! Looking at all that seems like a lot – but you know I’m up for the challenge 😀 What about you? What’s on your sewing plate for the upcoming season?
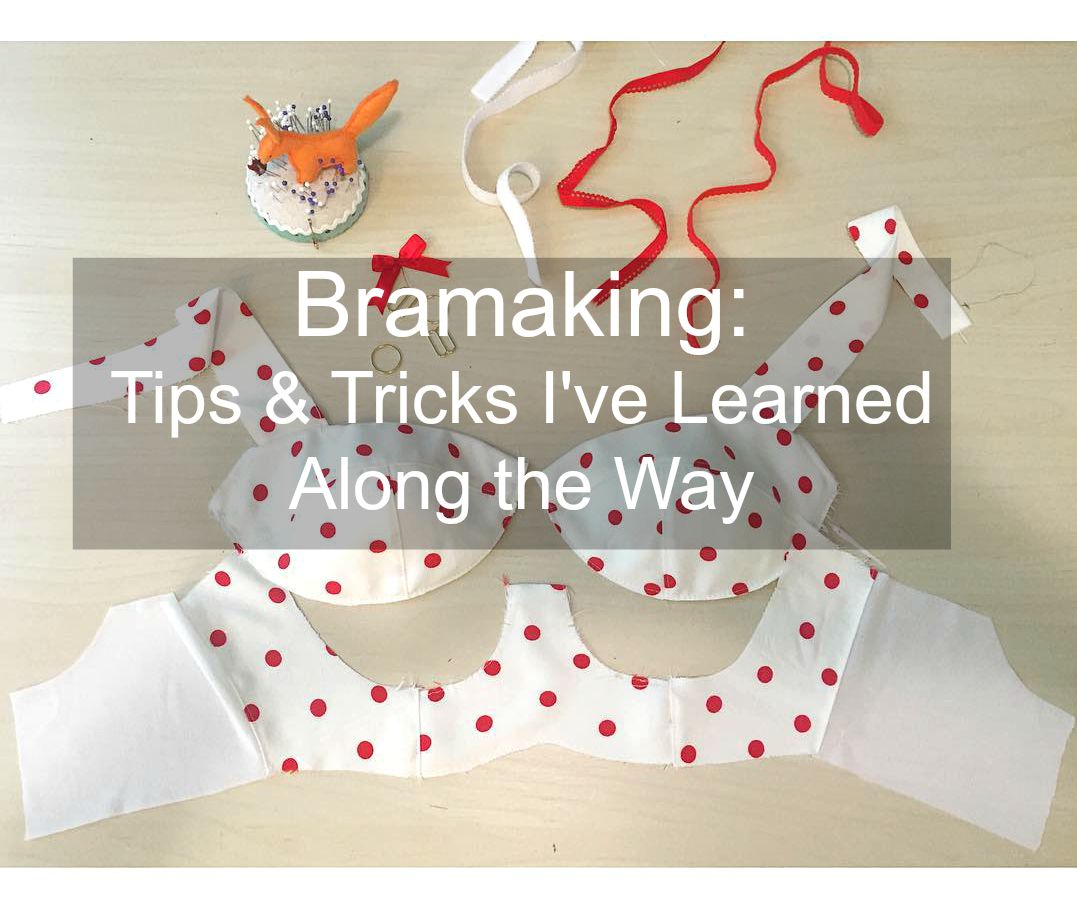
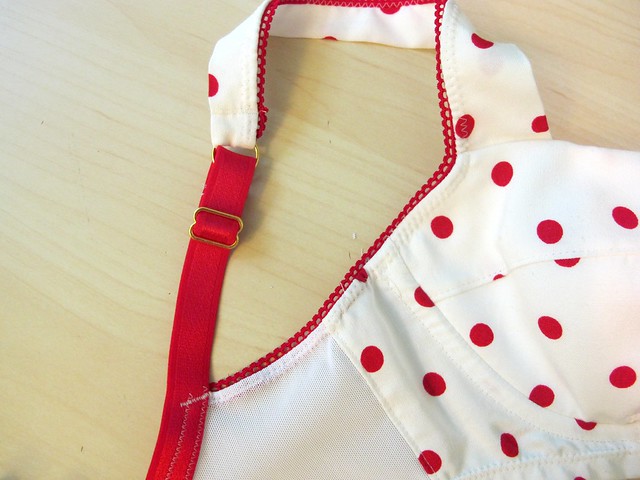
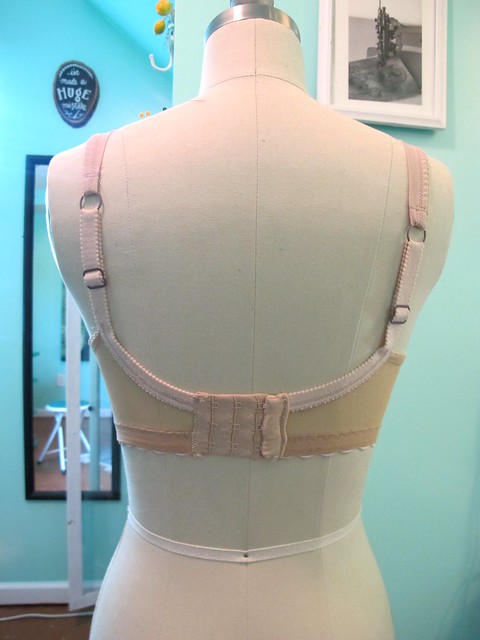
 

Completed: Blue Lace Watson Bra

15 Sep

I’ve almost got my lingerie drawer in it’s happy place. Almost. Just a couple more bras on my list and then we are good!

Navy Lace Watson soft bra - front

I REALLY like these Watson soft bras! I think they are so pretty, and also oh-so-comfy. I’m not the sort of person who really finds bras uncomfortable – even underwired bras – as I like the feeling of support above all else. However, you can’t deny how comfy this soft bra is! It’s a good bra for lounging around the house on a lazy Sunday (which is exactly what I do most weekends) or even sick days (which is exactly the case today. Wah!). And while I have a few comfy Watson bras already in my bra drawer, I certainly don’t have one that is this pretty!

This is definitely the prettiest bra I’ve ever made. Just look at it!

Navy Lace Watson soft bra - close up

Always up for learning new finishing techniques, I wanted to try a few things with this lace bra. For one, I wanted to try an all-over lace band that incorporates the beautiful scallops at the bottom edge, instead of a picot elastic edge. All the bra patterns I’ve sewn thus far have been drafted for the elastic edge, but I see so many pretty RTW lace bras that use the scalloped edge and I was determined to try it out for myself. I also used the scallops on the edge of the cups, and experimented with a different way of finishing the scalloped edge of the cups. More on that in a second, though, because I want to talk about the lace that I used first.

I mean, the lace definitely makes the bra. I received this lace from the Tailor Made Shop on Etsy, right when Ying first opened up her shop back in June. It’s taken me this long to sew it up because I really wasn’t sure what to do with it – even the flat yardage is really really pretty. It took me a couple of months to decide how to cut the lace and use the scallops, and figure out how to finish everything so that the bra wouldn’t be too flimsy and would wear well. I’m glad I took my time with this, because I’m super happy with how it turned out.

Tailor Made has a lot of beautiful laces that are all suitable for bra making, as well as a selection of elastics, rings and sliders, underwire channeling – pretty much anything you need to make a bra. There are also kits, which I haven’t tried yet, but I’m really loving the color combinations that Ying has come up with. A lot of new stuff has been added since I first looked at the shop, and it’s all pretty awesome! I can confidently say that the quality of the stuff I received is really nice, and the prices are super reasonable. BTW, there’s a discount code at this bottom of this post – so either read on, or scroll to the bottom if you’re feeling antsy 🙂

Navy Lace Watson soft bra - back

Anyway, back to my lace (and bra in general)! I used the Navy & Silver stretch lace for the entire bra – cups, cradle, band – and cut it so that the scallops ran along the bottom of the band and cradle, and the inside of the cups (as drafted, the pattern piece for the cups is a bit too curved for lace scallops, but there is a tutorial on the Cloth Habit site about modifying your pattern piece to have a straight edge). The lace is pretty flimsy on it’s own, so I underlined every single piece with soft navy powermesh (I bought this when I was in Philly at the beginning of the year. It’s a bit less firm than I like for my bands, but it’s great for underlining to add some stability! And the color match is perfect for this lace). The cradle is lined with two layers of powermesh, going in opposite directions (the pattern calls for that areas to be first with no stretch, which I usually use tricot lining for that, but I didn’t have any in navy, so I tried the powermesh. Works pretty well! There’s a small amount of give, but it’s still pretty firm). The straps are made with this lovely floral picot edge elastic (didn’t get a good picture of them, but it has a faint embroidered floral design in the center and a picot edge on both long sides. It’s really pretty!), and I have white matte enamel rings and sliders as well. The rest of the supplies came out of my personal stash. Rather than try to match the navy lace, I just used white findings for everything and I think it looks really nice.

Navy Lace Watson soft bra - front flat

Navy Lace Watson soft bra - front flat close up

One thing that I really like about this lace is that the topstitching I did just sinks right in. You can’t even really see it, which makes the whole bra look really clean. And I love those tiny scallops! They’re so pretty. Cutting the lace to accommodate the scallops about did my head in, but it was totally worth it.

Navy Lace Watson soft bra - sewn elastic trim for scallops

So, here’s a little how-to on how I got the bottom scallop to work. With most bra patterns, they have you sew the elastic to the right side of the bra, then trim the fabric and turn the elastic to the inside, and topstitch (this is why you would use a picot edge; one side peeks out). This is a great finish, obviously, but turning back the elastic would mean turning back the scallops, so I lurked on some RTW bras at Victoria’s Secret and realized that they just sew the elastic directly the inside of the bra with two lines of zigzag stitching. Because my lace is underlined with powermesh, I cut the pieces to go all the way past the scallops, as shown, and then sewed the elastic to the inside of the bra with two lines of parallel zigzag stitching. I positioned the elastic so that the edge lined up with the innermost point of the scallop.

Navy Lace Watson soft bra - removing powernet from scallops

Then I used my applique scissors to trim the powermesh up to the elastic, leaving the scallops intact.

Navy Lace Watson soft bra - finished bottom elastic trim for scallops

Ta da! Here it is from the inside. Really easy! As a side note, my wide non-picot elastic is from, I think, Sew Sassy. I ordered a bunch of stuff from the site a few months ago, and was a bit underwhelmed with the quality of the majority of it. I don’t remember what this particular elastic was labeled as (either strapping or band elastic, I reckon), but it’s really ugly and I figured I’d never use it. However, it is perfect for this use here that I have discovered. Yay for stash hoarding! Haha!

Navy Lace Watson soft bra - back flat

For the cups, the scallop edge needs to be stabilized so that it doesn’t stretch out of shape over time. Also, since I underlined the cup with the powermesh, I needed something there anyway to keep the two edges together. I’ve used clear elastic in the past, which works okay, but it doesn’t look that great from the inside and it tends to bunch up a little. So I tried something new – I used the selvage edge from my powermesh as a replacement for the clear elastic. It’s really soft – way softer than clear elastic – and it still has a good amount of stretch. It’s also a perfect color match for the mesh, obviously, so it’s almost unnoticeable. It gives stability, but it doesn’t pull or bunch at all. I LOVE how it turned out. Don’t care if this is the wrong way to make a bra – I’m doing this with all my cup scallop edges!

Navy Lace Watson soft bra - inside flat

Navy Lace Watson soft bra - super artsy inside

Here are some more inside shots. I serged all my raw edges with a 3 thread overlock, so the inside is super clean.

If you want to see what this bra looks like on a real person, click here for a somewhat unflattering picture angle. Again, please don’t pin this image or anything! Posting this strictly for science purposes.

Now! If you love my Watson and want to try out Tailor Made Shop, you can use the code LLADYBIRD for 10% off! This code is good through 9/30/15, so get it while you can! Yay for discounts!

Navy Lace Watson soft bra - side front

One a completely unrelated note – WORKROOM SOCIAL is officially moving to a bigger space next month! Besides being exciting in itself, this also means that my Weekend Pants Making Intensive has a couple more spaces open! If you missed the chance to register when it was last announced, you still have an opportunity now. The class is November 7-8 and includes the pattern, use of machines and tools (you bring your own fabric and notions), and snacks, a catered lunch and cocktails on both days. You can read more about it on the registration page, or in this blog post. This class sells out pretty fast, so act now or forever hold your peace 🙂 There are also some spots left for our Garment District shopping trip the day before (11/6), which is a nice addition to the pants class where you can check out the Garment District, learn about fabrics that are suitable for pants, and even buy the fabric that you will use in class.

Note: The blue stretch lace, white strapping, and rings and sliders were provided to me free of charge from Tailor Made Shop, in exchange for a blog post mention. All other supplies were purchased by me, and all opinions are all mineeee!

Completed: Red Cotton Twill Thurlows

11 Sep

I’m pretty sure I’ve added “make red shorts” to my summer sewing list for at least the past couple of years. I had a really awesome high-waisted pair that I made a few years ago and wore the hell out of (red shorts go with everything, don’t ya know), but eventually they got too big and I sold them off. I’ve been meaning to replace them for years, but never got around to it – partly because I couldn’t find a good fabric that I liked, but mostly because I kept getting distracted by the new & shiny.

Sooo, this post is dedicated to those red shorts. I finally made some! Although they’re nothing like the OGs – no high waist, no pleats, none of those – but they’re red, and that’s the most important part.

Red cotton twill Thurlows

Red cotton twill Thurlows

I’m going to keep this (relatively, for me) brief, because nothing about this project is new information as far as my blog is concerned. I used the Sewaholic Thurlow trousers as my pattern. This is a really, really fantastic pants pattern and I’ve made it up numerous times – from jeans to red skinnies to shorts to more shorts to MORE SHORTS. (+ even more that I did not link because, well, that’ll be enough for now). I even had a Thurlow Sewalong on this here blog like, a thousand years ago! I loooveeeeeee me some Thurlows! They are beautifully drafted, have an awesome butt-fit, and they look really nice and professional when they are sewn up. Thurlows win.

That being said, I’ve talked about the Thurlows a LOT on this blog. It’s kind of hard to keep waxing poetic about something you’ve already publicly loved on to the point of it becoming embarrassing PDA, so I’m going to refrain in this post. Nothing new about this project. I made my usual size with my usual adjustments (for more details on that, see one of the many MANY posts I’ve written about this pattern hahaha) and followed the instructions. Yawn.

Red cotton twill Thurlows

Red cotton twill Thurlows

Even my fabric choice doesn’t really offer much in terms of exciting and new. I used an Organic Cotton twill from Mood Fabrics – it’s the same fabric I used last year to make my tie-less Miette skirt. I had just enough to squeeze out a lil’ pair of shorts, so, awesome! I love using this twill to make Thurlows (yeah, even fabric choice isn’t a first – I’ve made this pattern using the deep wine color before, too hahaha), as it holds it’s shape really well and is comfortable to wear. It also washes and wears beautifully, which is, well, pretty important too. The only thing that sucks about this fabric is that it tends to sell out pretty quickly on the website!

Red cotton twill Thurlows

Red cotton twill Thurlows

Red cotton twill Thurlows

To make up for an unexciting pattern review – here’s an ~exciting~ photoshoot! Well, this isn’t nearly so much exciting as it is just different from the mess of trees I usually have going on in my photos (which I ain’t complaining about one bit, because I can – and will – stare at those trees all day long. They are so beautiful!). Landon and I took a hike a couple of weeks ago, in search of this waterfall, and we ended up taking these photos just because the scenery was so awe-inspiring. My hair is a rat’s nest of a mess and these were taken with his phone – but I like them! I don’t normally go for photo-shooty type pictures on this blog (I personally don’t think artsy photos do a good job of showing details. Also, I abhor the idea of having to leave my house to take pictures for a blog haha), but I’ve posted about this pattern a zillion times, so I think it’s ok if you can’t see every little detail.

Red cotton twill Thurlows

What’s exciting about these pictures is that, even though we were hiking to get to this point – it’s not like we hiked very far, or even had to drive anywhere to begin the journey. We started out in our backyard and traveled through the neighbor’s yard to find this spot (I should add – our neighbor has repeatedly invited us to explore and enjoy his land. He’s the one who told us about the waterfall in the first place). So, while this isn’t literally in my backyard – it’s close enough! We only had to walk about 30 minutes. Yeah, neighbor has a LOT of land hahaha. Way more than our puny-by-comparison 5 acres!

Red cotton twill Thurlows

Red cotton twill Thurlows

God, I love living in the country 😀

And because this is still at sewing blog, here at Thurlow short gut photos:

Red cotton twill Thurlows

Red cotton twill Thurlows

Red cotton twill Thurlows

Red cotton twill Thurlows

Red cotton twill Thurlows

Oh, I did change up what pieces I cut from the lining. The waistband and fly facing are self-lined (instead of using contrasting lining fabric); only the pockets are cut with lining. I did this because I always felt like the lining showed from the right side, which I wasn’t a fan of. I guess this may not work for really heavyweight fabrics, but it was fine with the cotton twill. Everything else stayed pretty much the same. Also, I dunno why my fly shield doesn’t cover the bottom of my zipper, but, oh well. Finally, I have come to accept the fact that I use this striped cotton for pretty much all my pocket linings, and I will not apologize for that. It makes a really good pocket lining hahaha.

Red cotton twill Thurlows

That’s all for today! I have a few more projects that are patiently awaiting a post (I told y’all, I’m behind), and then it’s on to sewing for the next season! I’ve been writing out my plans and gathering supplies, and I’m really looking forward to switching gears for the cozy. Another thing I’m looking forward to is seeing what this area looks like when the leaves start changing. I am pretty sure it’s gonna be insanely gorgeous 😀

Made Up: Stretch & Sew Bikini

8 Sep

You know, for someone who doesn’t go swimming very frequently (or sunbathing, for that matter, as evidenced by these photos. Eh, what can I say – as an ex-smoker, I’m trying to be careful with my skin these days!), I sure do make more than my share of bathing suits. They are really fun and satisfying to sew up, though! I try to quell that urge by making undergarments instead, but sometimes you just wanna make something that gets shown off!

Paisley print Stretch & Sew Bikini - front

For our short trip to Cancun last week, I thought I would make another bathing suit to drag along – partially so I wouldn’t be stuck trying to wriggle into something damp on the second day (yeesh! I hate that!), and partially because, dammit, I wanted something new and sunshine-y to take on vacation! When Karen announced the Made-Up Initiative – which is currently funded at 248%, btw, because we are all awesome – I decided to set those plans into action and pledged to make the damn swimsuit.

Paisley print Stretch & Sew Bikini - side

Paisley print Stretch & Sew Bikini - sideI reckon there’s something about announcing intentions that causes them to immediately go awry, but, yeah, this was totally the Swimsuit That Almost Didn’t Happen. True story, if I hadn’t already made a big stinkin’ pledge, I probably would have put this project to sleep early on. I really hate the idea of not seeing something through, though, so I soldiered on and stuck it out. Happily, the end result was this lil’ paisley dream! Yay!

My first attempt was with a completely different pattern, McCall’s 4330 – a string bikini straight outta the 1970s. The pattern called for wovens, but I thought I could adapt it with a stretch knit. It actually mostly worked, except, I tried on the top about halfway through and realized that I DO NOT LIKE the way I look in a string bikini! Eep! Too little coverage, well, everywhere. I know that’s the whole point of a string bikini, but I was not feeling it. I considered giving up at this point.

Instead, I dug around in my stash and found this copy of Stretch & Sew 1390, which is for a cute little halter-style bikini that is, again, straight outta the 1970s. I liked that it offered more coverage – both top and bottom – than the string bikini, and I liked that it was actually sized and drafted for swimsuit knits. I’d never sewn with a Stretch & Sew pattern, but I have definitely noticed the cult following that these patterns get, which is always a good sign in my opinion. I traced off my size (you have to do this with these patterns; the instructions are printed on the nested pieces. Sort of a pain, since it means the instructions are on a GIANT sheet of paper, but kind of nice in the sense that you are forced to keep all the sizes!), made a mock-up of the bikini top, and then prepared to cut in my actual swimsuit fabric – when I realized that I had nowhere near enough yardage to do this. I was using leftovers from a previous suit – bikinis are so tiny and they barely take any fabric, so this usually isn’t a problem. However, this suit has few seams & looong halter-tie straps, which means it *does* require more yardage, which I didn’t have. At this point, we were less than 2 weeks out from departure. Again, I considered giving up. Dun dun dun!

Paisley print Stretch & Sew Bikini - front close up

Spoiler alert! I found an awesome paisley swimsuit fabric at The Fabric Fairy, immediately ordered it, and it was at my house within a week. Since I’d already worked out all my fitting adjustments before ordering the fabric, that meant I was able to get right into sewing once I received everything. The whole suit was made up in an evening session. Pretty awesome! And I actually like this fabric a lot more than anything I was trying to pull out of my stash, so double win for me!

Paisley print Stretch & Sew Bikini - back

Paisley print Stretch & Sew Bikini - back close up

The pattern is well-drafted and very simple to assemble – there aren’t a whole lot of seams, and the instructions are clear and easy to follow. The bikini top is self-lined, with the outside shaping created by soft gathers, and the inside has a few darts. The straps tie behind the neck, halter-style, and the bottom is encased with wide elastic all the way around and closes with a swimsuit hook. The bottoms are just your standard bikini bottoms, lined in swimsuit lining and edges finished with elastic.

My original tracing and mock-up trusted the sizing of the pattern, which ended up with it being much too big. I ended up cutting the bikini in the size A cup and shortening the elastic for the midriff by about 3″ (I imagine most anyone would have to make this adjustment, as they just have you cut it to 27″ for all sizes and I’m sure there are plenty of people who are either bigger or smaller than that!). For the bottoms, I just kept cutting the size down until they finally fit me. They were really huge – which I prefer negative ease with my swimsuit bottoms (so they don’t look like a saggy diaper when wet!), and these were quite the opposite. I think I ended up going down about 3 sizes to get the fit that I wanted.

Paisley print Stretch & Sew Bikini - bikini top on dressform

I followed the instructions pretty closely as written, except that I topstitched the bottom band of the bikini top to avoid doing any handstitching, and I sewed the elastic in the bikini bottoms a little differently. Most of this was made on my sewing machine with a zigzag stitch, except finishing the edges of the bottoms before attaching the elastic – I serged those edges first, so they’d look clean on the inside. Oh! I also added really thin swimsuit cups to the bikini top, sandwiched between the outer fabric and the lining. They are super thin, so they don’t really add any padding – just eliminate any nipping that could potentially happen haha.

Paisley print Stretch & Sew Bikini - bikini top

Top of the swimsuit, flat. The elastic goes all the way around the ribcage, which makes for a very secure top (you just need to make sure that it’s the right circumference for your ribcage, since it closes with a hook and doesn’t tie).

Paisley print Stretch & Sew Bikini - self lining

Darts on the inside/self lining of the bikini top.

Paisley print Stretch & Sew Bikini - bikini bottoms

Bikini bottoms!

Paisley print Stretch & Sew Bikini - side back

No matter how many swimsuits I make, I will admit that I always feel a tiny bit stressed when I wear them out for the first time! Will it hold up? Is something going to go surprise see-through on me? What if the fabric sucks and bleeds color all out into the water? Thankfully, this one didn’t give me any problems and I really enjoyed wearing it during my vacation! I think the paisley fabric is so pretty and it makes me happy to look at it 🙂 I’m glad that I stuck this one through and ended up with a fun little swimsuit as a result!

Did you pledge for The Made-Up Initiative? How is your pledge coming along? The deadline is in 2 days!

Completed: The Sway Dress

3 Sep

Y’all, this heat is making me do crazy things this year. As in, I made a tent dress. Out of LINEN. I’ll just let that one soak in for a minute.

Papercut Patterns Sway dress - front

I doubt it’s the most flattering thing I could be putting on my body, but you know what? Fuck it. This shit is BEYOND COMFY.

Papercut Patterns Sway dress - front

Papercut Patterns Sway dress - front

Katie sent me this pattern, the Sway dress, right after the launch of her most recent collection, Chameleon. While I loooove the way it’s styled on the envelope (especially that winter version with the turtleneck! Ahhh it looks so chic and cozy!), I was pretty sure there was no way in hell I’d be putting this kind of tent shape over my body. My waist, the world has to know that I have a waist!!!1!

Then I turned 30, then it got really hot, and then Katie is basically like my mom because she knew better before I even realized it for myself.

Papercut Patterns Sway dress - side

Papercut Patterns Sway dress - side

If this dress looks like it took 2 hours to put together, that’s because it did. It was super fast, super easy, and a really satisfying project to work on. The pattern is extremely simple – front, back, facings, and then pockets. That’s it! No darts, no tricky seamlines, no closures. I cut the size XXS with no alterations, and made this up in an afternoon. The directions are clear and straightforward, and I really like that the facings are all-in-one, so that the arm holes and neckline are all encased at the same time and everything stays in place really well. it’s a nice, clean finish, and it looks really good from both the outside and the inside. Letting the dress hang for 24 hours to stretch out the bias was the most time-consuming part of the whole sewing process, but even leveling the hem wasn’t that bad.

Papercut Patterns Sway dress - front

Papercut Patterns Sway dress - back

AND, because the dress only really fits at the shoulders and falls loose everywhere else – it’s totally reversible! You can wear the front to the back, or vice versa. Say what now?! I was originally Team V-neck, but after wearing the dress around a bit, I actually like the v in the back.

Papercut Patterns Sway dress - pockets

Since the dress is already totes appropriate for hot weather, I went the extra mile and made it out of some dark blue heavyweight linen to keep things extra cool and breezy. I really did not know what to expect with this linen – I’ve bitched and moaned before about how much I don’t like linen for it’s shifty nature and constant wrinkles – but this particular linen is a lot more tame than most of the ones I’ve sewn with. Because it’s so heavy, it’s not as prone to shifting around or wrinkling (while I did take these photos before wearing it around, I have since worn it for a full day and even with a couple hours of driving involved, it barely wrinkled at all). It does still fray like mad, so I made sure to finish all my seams with the serger and that solved that problem. This is the kind of linen that would get me sewing with the fiber on the regular – and now that I’m looking at the Mood Fabrics website, it looks like they added more colors! Yay!

Papercut Patterns Sway dress - neckline

Papercut Patterns Sway dress - necklineThe only part where I deviated from the pattern was to cut the pockets out of a lightweight china silk, instead of the heavy linen. I’m sure the linen would have been fine, but I like how light and not-bulky the silk pockets are. Plus, they feel gooood on my hands!

One thing I will change for future makes of this pattern is to raise the arm holes, because they are pretty low on me! It might just be because I’m petite, but I was showing a little bit of bra when I first tried on the dress. I took in the underarm seam just a bit, which helped a lot, but I do need to be careful of which bra I wear with this dress because it definitely can and will still show at my underarms. I think raising the underarm about 1/2″ will take care of that. Also, if you plan on making this pattern – watch the length! I did not adjust the length whatsoever and it’s preeeeeeetty short on me (I’m 5’2″). Like, if I raise my arms too high… y’all are gonna see some cheeks. No, seriously, I tested that shit in front of a mirror. The struggle is real.

That being said, I love the micro-mini length combined with the exaggerated tent shape. I especially want to put this into action in a cozy black wool, and wear it with black tights.

Papercut Patterns Sway dress - detail

Papercut Patterns Sway dress - detail

Inside guts. It’s a simple dress, so really not much to see here!

Papercut Patterns Sway dress - twirl

I’m still not 100% that this is the best look for my body (I’m sure there is someone out there who thinks I’m trying to hide a pregnancy), but I am 100% in that this dress is SUPER comfortable and perfect for the summer heat!

As a side note – I’m off to Cancun, Mexico this weekend! Gonna lay poolside with my bae and drink something with an umbrella sticking out of it (wearing my new Made Up bikini, naturally! Yay for finishing by my self-imposed deadline!). Cannot even wait. Suffice to say, this blog will be pretty quiet for the next few days. This girl needs a vacation!

Note: The fabric for this dress was purchased with my allowance for the Mood Sewing Network. Pattern was given to me as a gift. All comments on this blog post are just, like, my opinion, man.

Completed: Basic Ribbed Socks

1 Sep

I finished these socks a while back – at the end of May, to be specific – and I just realized that I never got around to posting them. Whoops! Better late than never!

Handknit red socksEver since I finished my first pair of socks, I knew I wanted to try again and improve on what I had learned. The biggest issue I had with the first pair was my yarn selection. Since I used an alpaca blend (and before you tell I should have asked the yarn store for yarn suggestions- I did! That was what they said was best for sock-making, for some ungodly reason), the socks tend to slouch and stretch out of shape, and I never liked the little fuzzy halo of fibers that is typical with alpaca. I wanted to try with an easier pattern – one without lace – and a better sock yarn. And here is the result! I think they turned out pretty nice 🙂 Handknit red socksOh, about that random pig in these photos. Ha! That is our pet piggy and her name is Kevin Pancho. Yes, Kevin is a girl (we were under the assumption that we had a boy pig, and then she ended up being a girl whoops hahaha). She’s a potbelly and still just a baby, but she will eventually get pretty big. Before you ask – we have no plans on eating her, she’s just a pet (I mean, unless doomsday comes around and we all start starving to death or some shit. Then, Kevin will be a Food.).

Handknit red socksAnyway, back to my socks (with some random piggy butt)! I used this Basic Ribbed Socks pattern, which is one of those free patterns on Ravelry that apparently everyone has tried (ok, not everyone, but 6k+ people can’t be wrong amirite). It’s a basic, easy sock pattern, knit with fingering weight yarn and constructed from the cuff down. The majority of the knitting is done with a 3×1 ribbing, which keeps the sock from slouching as much, and is a little more interesting than your standard 1×1 ribbing. Because the socks aren’t ridiculously tall, I was able to knit them out of a single ball of yarn. Which means they were quite economical to make! Handknit red socksI knit these for the size 6, which is pretty close to my shoe size (I generally wear a women’s 6.5). The socks fit perfectly, and they are super comfortable! They stay up pretty well, as promised, and the lightweight yarn means that they aren’t too thick to wear with shoes (which isn’t something I’m doing right now, but I’m sure I will be happy for that option come winter!).

For yarn, I used Cascade 220 Fingering. Again, I only had to buy one ball to knit both socks – and I still have a little yarn butt left over. I bought the yarn while I was in Philly for Maddie’s Bramaking class, ‘way back in January, on my evening ladydate with the wonderful Andrea. Andrea took me to her favorite yarn store, Loop Yarn, and this was my yarn souvenir for the trip. I chose this yarn based on the suggestion of the woman working there, and I am extremely happy with how it worked up. I use Cascade 220 worsted weight for a lot of my knitting projects, and while this was my first try with the fingering weight, it’s just as nice as the worsted. Easy to knit and looks good when finished. As you can see in these pictures, it does pill a little with frequent wear (I wear these socks a lot! I even brought them to Peru with me 🙂 ), but, they are socks. Whateverrrr.

I also bought metal DPNs to knit these socks; I was using bamboo before because I like how it grips, but those tiny little needles snapped like crazy on me. The metal ones don’t break (or, I guess, they haven’t broken yet haha), but I have bent them a little bit. As with my first pair of fingering weight socks, I used a size 0. So yeah, teeny little needles!

Handknit red socksHandknit red socksI really enjoyed working with this pattern. It is simple and relatively mindless (so, good for bringing to knitting night, or watching tv, or whatever), and the socks knit up pretty quickly. Turning the heel was fun and magical, and I didn’t feel like I was doing too much endless repetition with all that circular ribbing. I think it’s too soon to say that this will be my TNT sock pattern, however, it’s definitely a contender! I will totally knit this pattern again.

Handknit red socksHandknit red socksHandknit red socksI’m already working on my next pair of socks. Socks are great little portable projects that pack up small and are easy to bust out for a couple of rows at a time. They are especially awesome for traveling, since you aren’t lugging around a bunch of pieces or a big sack of yarn (and if you finish one sock, you can wear it! Yay!). That being said, I also love knitting sweaters, so don’t expect that to go away anytime soon. I haven’t knit as much as I used to in years past – not having a dedicated hour-long lunch break to commit to knitting will do that – but I’m making an effort to get at least a few rows done a couple times a week. Not even because I want to make progress (well, I do, but that’s not the #1 reason), but mostly because it’s an awesome stress-reliever. And it keeps me from falling asleep on the couch hahaha. Handknit red socksI’m including this last picture because Landon and I were arguing about which ~scenic~ spot to take photos. He said the cinderblock was stupid and ugly, I said the deck was even stupider and uglier (sorry, deck.). So you tell me – who was right? Personally, I think Kevin really made the pictures worth looking at 🙂

Bramaking: Tips & Tricks I’ve Learned Along the Way

28 Aug

bra making

Since I started my bra making adventure nearly a year ago (woah, has it really been that long??), I’ve picked up a few tips along the way, as well as figured out a handful of shortcuts myself. This post has been a long time coming, and I’m not really sure why it’s taken me ages to get it all written out – but better late than never, yeah? 🙂 I certainly don’t claim to be an expert on lingerie making (I’ll leave that title to people like Norma, Maddie, and Amy), but I’ve made enough to figure out a general idea of what does and doesn’t work, as well as navigate the really confusing parts that can confuse a beginner (like me!). Anyway, I hope some of y’all novice and afraid-to-dive-in-just-yet bra makers find this useful!

The first thing I want to address in this post is all those weird little notions and bits that you need to collect in order to make a proper bra. There are tons of places where you can basically pay someone to source all that stuff for you (kits I’ve used and loved: Bra Makers Supply, Grey’s Fabrics, Blackbird Fabrics. Obviously there are TONS more out there, those are just the ones I’ve personally tried!), which is pretty awesome and definitely what I recommend for at least your first couple of bras. The only thing I found confusing with the kits (at first, anyway) was that they don’t really tell you which elastic is for what. Further, while the pattern will tell you what materials to buy – it can be hard to visualize how everything goes together if you haven’t actually sewn up a bra before. I know I had a hard time wrapping my head around all that info at first! So I’ve made a couple ~findings guides~ of some of the more popular bra patterns, pointing to each notion so you can get an idea of where they go on the finished bra. I know some of these labels are a bit “No shit, Sherlock” (such as where the hook & eye go – haha!), but, whatever. No finding left behind blah blah blah.

bramaking - boylston findings guide

Boylston bra pattern // my polkadot Boylston bra

bramaking - marlborough findings guide

Marlborough bra pattern // my floral/lace Marlborough bra

bramaking - watson findings guide

Watson soft bra & bikini pattern // my #starwatch Watson bra

Some additional notes on elastics:

  • Kit sizes: You may have noticed that some kits come in sizes Small and Large. This took me a while to completely understand – but the difference in kit sizes have nothing to do with the amount of fabric included (or, maybe they do, but it’s not something I’ve noticed). It’s more so whether you need the wider elastics and 3 row hook & eye, or narrower elastics and 2 row hook & eye. *Generally* speaking, sizes D and above require the large kit, and sizes C and below use a small kit. That being said, it’s up to your personal preferences – I wear a DD, but I’m perfectly comfortable in a small kit (keep in mind that I’m a small DD, so a small kit won’t really work for the super blessed/endowed. My ~ideal kit~ has the narrower elastics, 1/2″-5/8″ strapping, and 3 row hook & eye). Some people prefer the look of the narrower elastics, and some people like the security of the wider findings. Your bra, your choice 🙂 But anyway, point being – when in doubt of kit size, choose based on your cup size!
  • Elastic width: Most patterns will include this information with the fabric/elastic requirements. Generally speaking, you want the wider elastic for the bottom band (so, depending on cup size – this is usually 1/2″ to 3/4″) and the narrower elastic for the underarm and/or top of the cup (that’s the 3/8″ to 1/2″, sometimes 1/4″). Like I said, I like the narrower elastics personally for me, but feel free to play around with widths if you aren’t feeling the pattern suggestion. The pattern you sew will be drafted for that width of elastic and hook & eye, so if you change the width too much, you’ll need to adjust accordingly.
  • Type of elastic: Ideally, you want to use plush-back elastic for all your lingerie sewing. This type of elastic has a wrong side that is slightly fuzzy (hence the name) and is intended to be soft against the skin. Of course, you can use any pretty lace edged elastic and/or stretch lace, but bear in mind that anything without the plush back may not be super comfortable to wear.
  • Bra strapping / rings & sliders : This is going to sound really fucking obvious, but make sure you buy the right rings & sliders to correspond with your strapping! I did not even think of this when I was going crazy buying bra notions, but those suckers need to match in width or they’ll look stupid (or be too tight to slide). Same as with the elastics, strap width is determined by cup size. Wider straps will give you more support, so if you’re rockin’ the DD and up, you probably don’t want to use 3/8″ strapping.

And while we’re talking about kits, the fabric can also be a little confusing! What pattern piece gets cut out of which fabric?

  • Main fabric: Totally dependent on bra pattern, of course, but generally you’ll cut the cups, bridge and frame out of the main fabric. The grainline on the pattern indicates the direction of greatest stretch on the fabric. Give the fabric a pull to figure out what that is. It might not be the same as what we consider to be the grainline when sewing normal clothes.
  • Lining fabric (tricot): For most patterns, this is used the stabilize the bridge. You can also use lining fabric to line the cups, if you so desire.
  • Powernet: Use this to cut your back band. You can also line with powernet, if your main fabric is a little bit too stretchy for the pattern. You can *also* use powernet to line the bridge, if you don’t have lining fabric on hand. Powernet is awesome!
  • Lace: Usually just the upper cup of the pattern. If you want to cut the entire cup, you may need to line or stabilize it (with the lining or powernet) if it’s too stretchy. For any flatlining, I like to temporarily baste the pieces together with a spray adhesive and then handle them as one (a tip I learned from Maddie).

Now I’m going to share with you my favorite PROTIPS for actually assembling the whole thing together. bramaking - pinning curvesPROTIP #1: Pinning

I know, the urge to pin the everloving shit out of every single piece runs strong and true. But bramaking is a little different, and you gotta fight those urges. Especially when you are sewing a convex curve to a concave curve, it’s actually easier to do if you don’t have to navigate an army of pins along the way. I pin the beginning and end of the seam, and any notches/seamlines that need to match. Also, try sewing with the bigger piece (the convex curve) on the bottom layer. The feed dogs of your sewing machine will help ease it in to the smaller curve.

bramaking - securing stitch
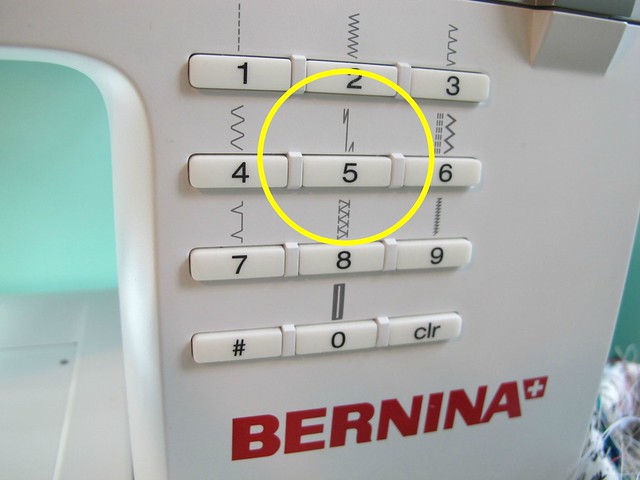
PROTIP #2: Starting & stopping, part 1

One of the things I find the most difficult about sewing lingerie is beginning and ending those teeny little pieces with their itty bitty seam allowances. It’s hard enough trying to cram everything under the foot and get it going without having the machine eat it, but then you have to worry about backtacking each end as well. And this really isn’t a step you can’t skip, because you don’t want your seams to unravel when you start handling them. My solution is to use the “securing stitch.” This might have a different name, depending on your machine (and those of y’all who are using mechanical machines – sorry! You can’t sit with us). Essentially, it automatically backtacks a few stitches at both the beginning and end of each seam. Every machine is different, so you may want to pull our your user manual for this one – but on my Bernina, to backtack the end, you just hit the reverse button and it does it automatically (the beginning starts the seam with a backtack). It’s been a total lifesaver for me and my seams are always secure as a result. bramaking - needle down
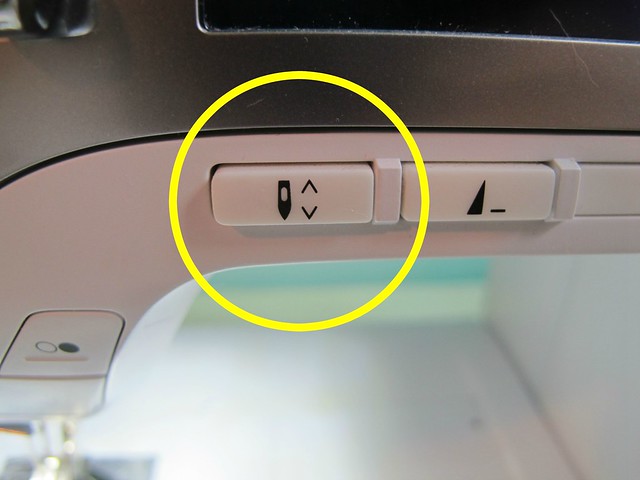
PROTIP #3: Starting & stopping, part 2

Another thing to use if your machine has the capabilities (again, those of y’all with the mechanical machines – YOU CAN’T SIT WITH US) (just kidding ilu use the handwheel for this) – the needle down button! OMG this is forreal the #1 reason why I own a computerized machine. I just hit this button before I start sewing, and every time I take my foot off the pedal, the needle automatically goes down and stays there. It’s brilliant for readjusting layers or turning corners, and you stitch line won’t go wonky from stopping in the middle. I actually use this button for most of my sewing, not just exclusively to bramaking.

bramaking - starting the seam
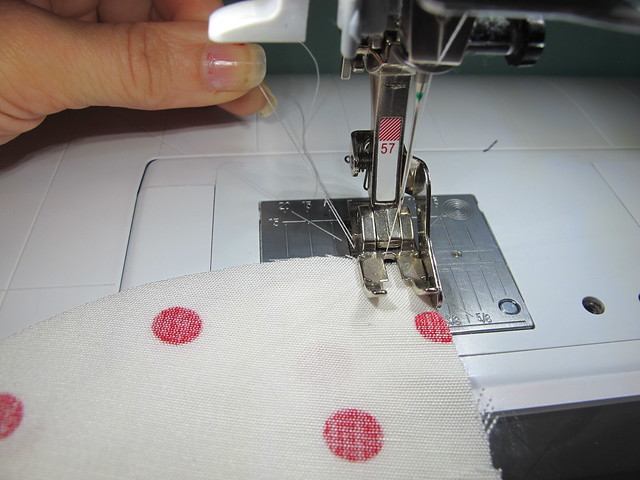
PROTIP #4: Starting & stopping, part 3

Back on the subject of tiny seam allowances and hungry feed dogs. The easiest way to keep your fabric from getting sucked down into the machine at the beginning of a seam is to grab both thread tails and *gently* pull as you start sewing the first couple of stitches. This is especially important if you’re using the securing stitch – once it’s done securing, you can let the tails go and sew on with your life. Don’t pull the tails too hard, just gently guide them to prevent the fabric from getting jammed down into the machine, and make sure you catch the tails for both the bobbin and the needle (for some reason, it looks like I’m only holding one in the above picture, wtf). This is a good tip for working with slinky fabrics, too, even if you’re not making a bra.

bramaking - 1/4PROTIP #5: Keeping 1/4″ seam allowances

Most lingerie patterns have teeny little 1/4″ seam allowances, which can be kind of hard to keep consistent. Unfortunately, you REALLY can’t fudge this one because it can drastically alter the size of the finished bra if you’re not careful. My solution to this was to buy a special foot with a 1/4″ guide. It is the best thing ever. It’s also useful for topstitching (especially jeans!) and making the most adorable and perfect little 1/4″ French seams.

bramaking - using 1/4
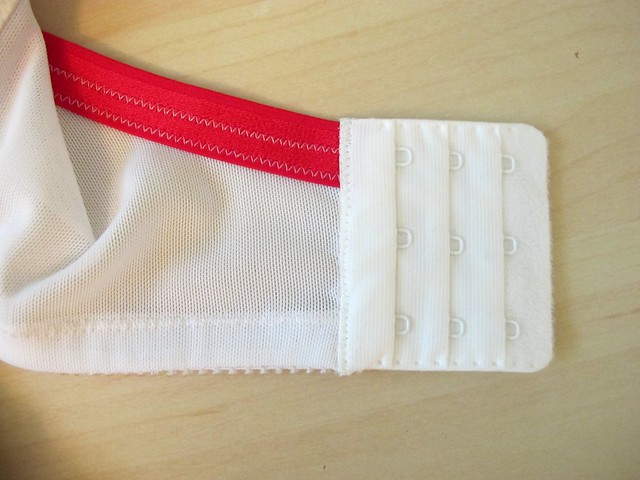
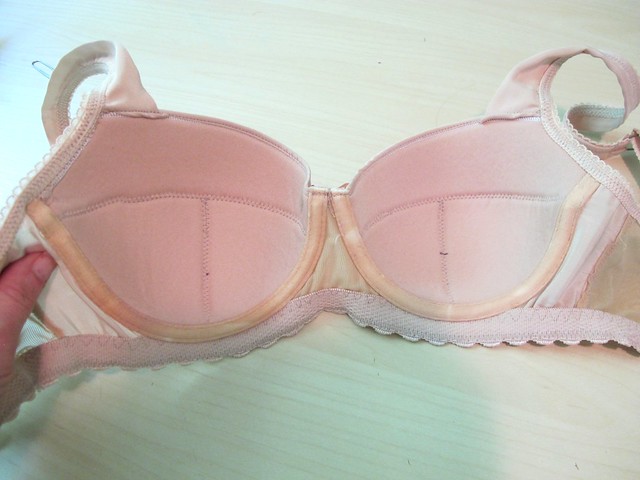
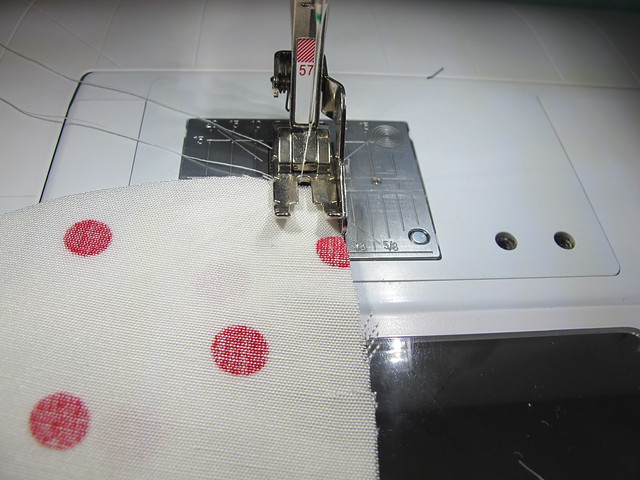
Here it is in action. The dull blade runs against the raw edge of the fabric, keeping the needle exactly 1/4″ from the edge. bramaking - 1/4
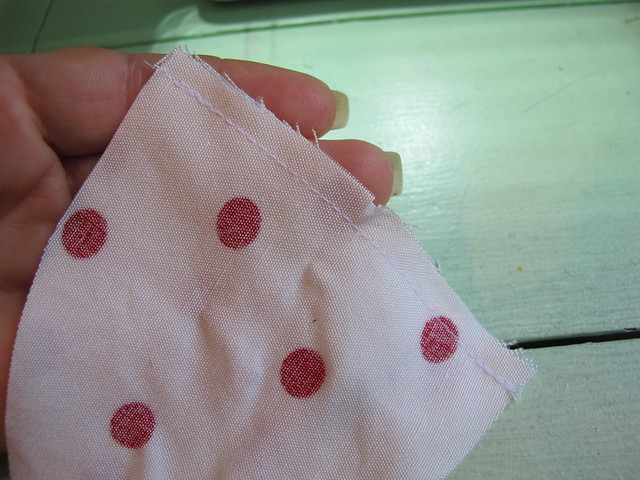
And here is my finished seam. Ah! Perfectly 1/4″ from the edge, every time. Ooh, see my backtacking, too? Thanks, securing stitch!

bramaking- edgestitching foot
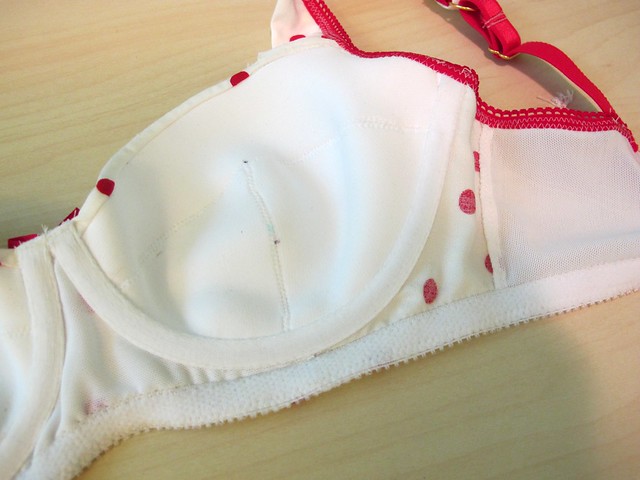
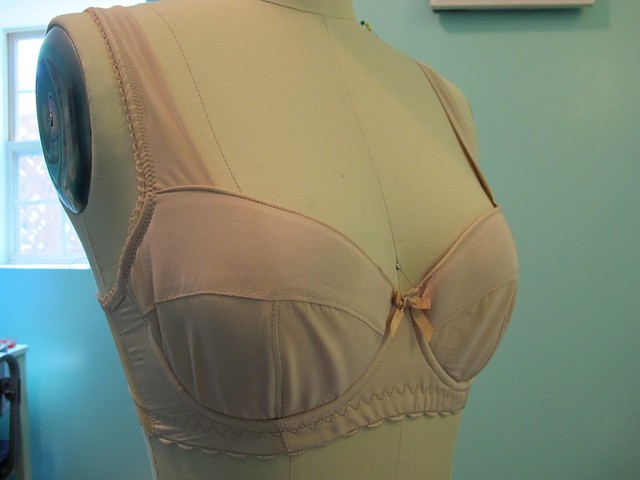
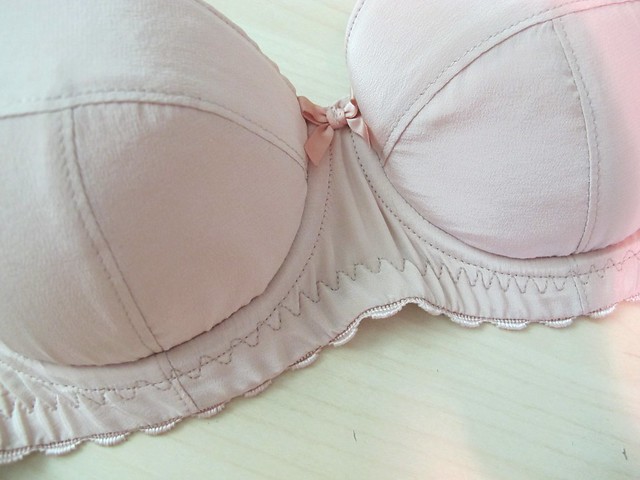
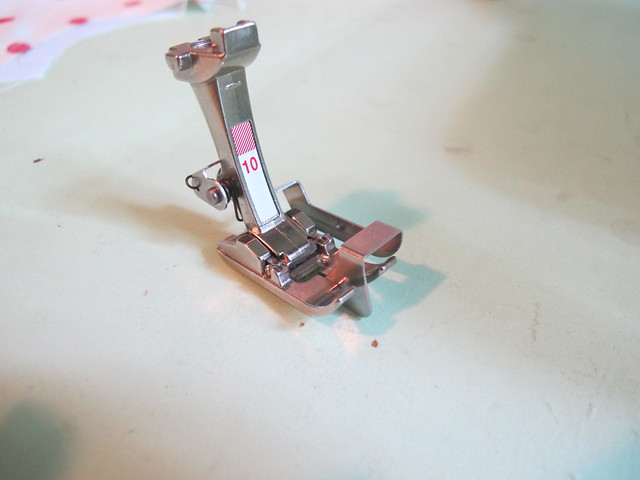
PROTIP #6: Perfect topstitching This is my secret weapon for topstitching, lingerie or not. It’s a special foot and it’s called the edgestitching foot. Besides the 1/4″ foot, it’s the best thing ever. You can also use it to understitch and stitch in the ditch, with little to no tears of frustration and/or wonky stitch lines.bramaking - edgestitching/topstitching
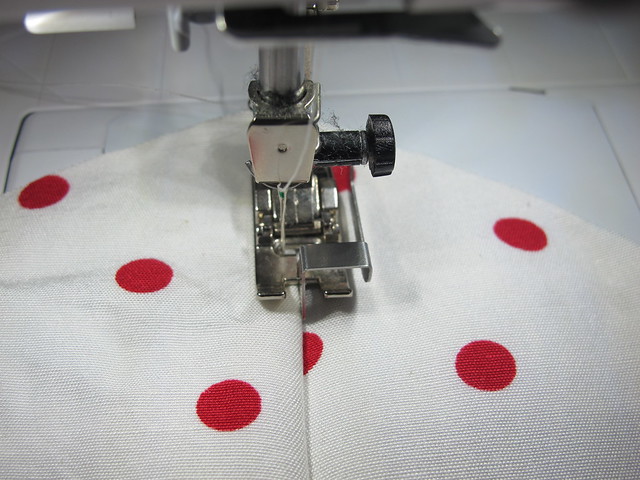
Here it is in action. The dull blade goes right in the center, and you can move the needle either right or left as needed. If you keep the blade against your seamline and move the needle all the way to one side, you’ll end up with a perfect 1/8″ topstitching line. I find this easier than trying to line up part of my foot with the seamline; for whatever reason, shit always goes wonky when I try to do that.

bramaking - topstitched seamHere is the finished topstitching. One thing to note – I don’t backtack my topstitching if it’s going to intersect with another piece. I only backtack construction seams (otherwise they’ll pull apart at the ends). Since I use a different stitch for each of these steps, that means I can keep my settings saved for each step and just flip between stitches. Which is super handy, because that means I don’t need to re-enter all my preferences each time I move from constructing to topstitching. I use stitch #1 for topstitching (with a slightly longer stitch length and the needle moved all the way to one side), and stitch #5 for constructing.
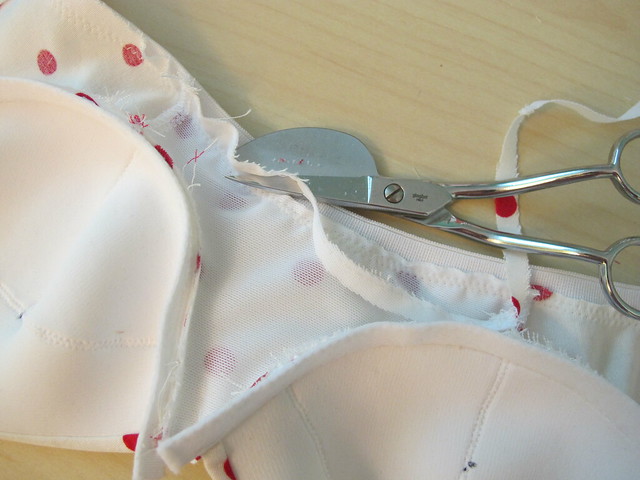
 bramaking - duckbill/applique shearsPROTIP #7: Trimming
Always trim seam allowances before flipping down elastic for the final topstitching. Some patterns tell you to do this, some don’t. I find it looks a lot cleaner (and it easier to handle in general) if the seam allowances aren’t flapping around while you’re trying to finagle a good zigzag topstitch. I also like to trim my seam allowances under the wire casing as well. You can use any ol’ scissors to do this, but I like using duckbill applique scissors. The way they are constructed makes trimming down seam allowances almost foolproof and you’re less likely to cut a hole in the seam allowance that you’re trying to avoid. These scissors are awesome for non-bra things, too (I bought them looong before I got into sewing lingerie) – coat making, grading seam allowances, applique. They also look kind of crazy and I like that a lot.

Ok, I think that’s enough for one post! I hope y’all find these tips useful and that it encourages you to start that bra making journey if you were considering it! To me, it’s one of those learning experiences that seems really intimidating until you actually start doing it – kind of like learning how to drive a standard transmission (and just like driving a standard, once you learn – it’s REALLY hard to stop doing it! Well, for me, anyway. I think it’s fun!).

I know I only just grazed the surface with these tips here, so – what are your best tips for sewing lingerie?

Completed: Striped Linen Hawthorn Dress

24 Aug

Same as with Simplicity 6266 (which, by the way – when I first published that post – I had the pattern # all kinds of wrong and have since been corrected and updated the blog post – if you were trying to find the pattern and couldn’t, maybe try again with the correct number! Just FYI!), the Colette Patterns Hawthorn is one of those patterns that I LOVE to wear and swore I’d make a million more of… then never actually did. It’s the sweetest little pattern – a very feminine shirt dress with an interesting collar and a beautiful, swirly skirt – and I get loads of compliments whenever I wear any of my other versions (especially the Chambray version – which I wear at least once a week in the summer because it’s soooo good). Alas, it’s been over a year since I did anything with the pattern, despite it being in my pile of “patterns to make next” for, well, over a year. Whoops.

This year, I have been all about settling down, sewing-wise, and making repeats of things I know I love (instead of constantly being distracted by the new and shiny). So I made a Hawthorn.

Striped Linen/Cotton HawthornI think it turned out pretty good! We had a few harrowing moments there for a bit, but it all worked out in the end. Yay for the TNT and knowing what works! Striped Linen/Cotton Hawthorn

I’ve already talked quite a bit about this pattern, considering that I’ve made it three times (see: Sweet Cherry Hawthorn, Organic Cotton Sateen Hawthorn, and the aforementioned Chambray Hawthorn WHICH IS THE BEST ONE BTW). I cut my usual/adjusted size, and mostly followed the instructions as they are written. All harrowing moments were due to fabric, not pattern.

Striped Linen/Cotton HawthornStriped Linen/Cotton Hawthorn

The fabric is another piece that I bought from Elizabeth; the striped cotton/linen blend (at least, I think there is cotton in there – it doesn’t wrinkle as much as 100% linen tends to do) was from her SS15 collection, which is currently no longer available (but, btw, FW15 LAUNCHES TODAY EEEE). I’ve seen some makes using this fabric – in the same brown/black/white colors (Kelly’s Southport dress!) and in a blue/white/black colorway (Sewaholic’s Cambie dress!) – so if this stuff looks familiar, well, it’s making the rounds!

As a side note – not that this really matters, but I know I’ve mentioned before that I’ve gotten some pieces gratis as part of an ES destash, but this particular piece was one that I paid for. Granted, I got it for wholesale price – but it wasn’t free :). Elizabeth isn’t in the fabric business at all (I only get to buy as part of an employee perk, basically), so I don’t think it matters, but I thought I’d mention it anyway!

Striped Linen/Cotton HawthornI originally bought my little piece to make a woven tshirt – like, maybe a Scout or something – so I only bought about 1.5 yards. I decided it would be better as a dress, but it took me a long time to decide on which pattern to use. The Hawthorn was a good choice, except that I didn’t have quite enough fabric and had to do some creative piecing to get all the pieces to fit and to get the stripes to mostly match (all I can say is, I did my best). Check out that photo of the back – see the center back seam that I added? Yes. I also pieced the top of the back bodice, right along the black stripes. You can’t see that shit at all because I matched it up pretty well, and the stripes make the seam lines disappear. But it is there! Striped Linen/Cotton Hawthorn

I had NO IDEA how to cut the collar with the stripes, so I just kind of winged it. Surprisingly, the stripes match up kind of cool with the bodice stripes. I didn’t plan that whatsoever, and I was somewhat concerned I’d have a hot mess of a bodice on my hands once I added the collar and the stripes started going every which way, but I really like how it turned out. It actually looks intentional.

Striped Linen/Cotton HawthornHere’s the back again. Can you see my piecing? On the right hand side (the side where my tattoo is), the very first batch of stripes – the bottom black stripe is where the seamline is. On the left side (opposite of tattoo), the second batch of stripes – the seamline is in the top black stripe. Can you see it now? Can you UNSEE it now? (sorry about that) I honestly thought this dress was a goner about halfway through cutting it and realizing that I didn’t have enough fabric, but thank god for stripes making seamlines invisible. Yay! The stripe-matching worked out pretty well, but I did have one big snafu that kind of sucked… Striped Linen/Cotton Hawthorn

Whatever the hell is going on with the waistline here, that’s what. I’m not really sure how I managed to cut those stripes so they’d suck THAT bad, but it looks like I’m wearing a bow right over some part of my intestine. How dainty! Except it actually looks pretty stupid. Thankfully, as you’ve probably (not)noticed from the pictures – a belt covers it quite well, so that’s my solution. It does mean that I can’t really wear the dress without a belt, but I am pro-belt at this point in my life, so I’m not terribly concerned about that.

Some more photos:
Striped Linen/Cotton HawthornStriped Linen/Cotton Hawthorn

The linen is SO soft, with a slight little drape that’s just lovely. It’s really comfortable to wear in the heat. Because of the drape, the bodice is a little softer and less structured than my other Hawthorns, which is a nice change. This also meant that I needed to let the skirt hang for something like 48 hours to get all the bias settle before hemming (and it was crazy uneven before I evened it out).

Striped Linen/Cotton HawthornThe inside is very simple – stitched and serged (this fabric sheds like a mofo, so finishing the edges with a serge was very necessary). I serged the facing edges so they’d have less bulk, and finished the arm holes with polka dot bias binding because it’s a little thinner and less bulky (and easier to work with, since it sheds less) than the linen. Stripe-matching the facings was probably a little bit of overkill on my end. Whatever 🙂 Striped Linen/Cotton Hawthorn
The buttons are just black shirting buttons I had in my stash. I originally wanted to use wooden buttons, but black ended up looking best with the fabric. Instead of putting a button at the waistline, I used a hook and eye. This makes the area nice and smooth so it’s more comfortable to wear a belt.

Striped Linen/Cotton Hawthorn

Making this up definitely reminded me of why I love this pattern so much! It’s really beautiful and feels good to wear. A similar look would be the new Sewaholic Nicola dress, which has that same V-neck with collar, but it’s designed for a drapier fabric, thanks to all the soft gathers, and looks quite a bit more 70s. I’d love to try this pattern (talking about Hawthorn now, but I want to try Nicola too!) with long sleeves, sewn up in a plaid, for a cozy winter version. That, too, has been on my list for waaaay too long. Maybe this winter I’ll actually get around to making it 🙂

Completed: Boylston Bras; Take 2 & 3

21 Aug

More bras this week! Yay!

Boylston Bra Starting with the prettier one, even though I actually made it second. For both of these bras, I used the Boylston Bra pattern. Guys, I really really love this pattern. I love how it comes together, I love the pretty details (like the fabric strap!), I love that the fabric requirements are so easy to work with (very little fabric, very stable fabric, foam cups, etc), and I just love the shape it gives! It’s a very pretty bra and the pattern is so good. This polka dot bra was the result of a pretty good stash-bust, apart from the foam. Since this pattern is designed for firm woven fabrics – especially with the addition of the foam cups – that means you can make it out of pretty much anything. Sooo I’ve been going kind of crazy with my fabric scraps! I especially thought that this sweet polka dot rayon (the same fabric I used to make my Simplicity mock-wrap dress that I posted last week) would be extra adorable as a bra.

All I had to do was order foam – I had nude and black in stash (from Bra Maker’s Supply, because their stuff is the best). Unfortunately, the Sweet Cups store (the US version of Bra Maker’s Supply) didn’t have any white (see what I mean about limited selection? Wah!), and I wanted white. I bought it from this Etsy shop, which is apparently in the process of closing now 😦 I’m not really sure what “spacer foam” is, but it works pretty well for a bra. It’s a little stretchier than the stuff at Bra Maker’s Supply, and slightly thinner as well (it’s not as cushiony). I read somewhere that you can buy this by the yard at places like Spandex House in the Garment District, so I will probably stock up when I’m there in November. But even 1/4 yard is TONS of foam, especially if you are making teeny little bra cups like what I require hahaha. Heyo, silver lining! Boylston Bra

Other than the foam, this whole project was a de-stash. All the elastics and underwire channeling are from the Garment District, I think, and the strapping is leftover from my red bra kit (there wasn’t enough elastic included to make full straps when I was using it to make a red bra, so I had to buy red strapping. But that’s fine because the amount they gave me is perfect for fabric straps! Yay!). I know the pattern doesn’t call for a bow in the center, but I like the bows! This particular bow was ripped off of a retired RTW bra. Ha!

Boylston Bra Here’s the back. I used a firm white powermesh (also from the stash) for the back band. I like the mix of white and red elastics and trims. I’m getting better about mixing and matching my lingerie trims, I think.

Not much else to say about this one. Here are some detail shots: Boylston Bra

Boylston Bra Boylston Bra

Boylston Bra UGH at those black dots in the cups! Those are my notch markings for assembling the cups – I used a ballpoint pin (I think I got that tip from Cloth Habit) to mark the notches, since you can’t really clip the notches and my usual fabric markers and chalk don’t really write well on foam. Except, I forgot that ballpoint pin is FOREVER and I somehow managed to mark both sides. So that’s pretty lame, but, whatever. Can’t do anything about it now except acknowledge the lesson and move on with my bra making! Boylston Bra

Boylston Bra If you’d like to see a photo of what the bra looks like on an actual person, click this link. I’m not embedding it into the post (or uploading it to Flickr for that matter, yeesh) to cut down on the number of people who see me in a bra, as well as spare any eyes that don’t want to see that sort of thing (um, hi mom! :)). But I acknowledge that it’s really hard to see how a bra fits if it’s not actually on a person – and my dressform doesn’t really fill it out correctly. And those floating ghost bra pics just don’t cut it (plus they are a pain to make haha!). So pleeease do me a solid and don’t post that photo around the internet or pin it on Pinterest or anything like that 🙂 Posting only for science purposes 🙂 Love y’all! OK, MOVING ON. Boylston Bra

Here’s the other bra I made, using the same Boylston pattern. Nude bras are a SERIOUS hole in my summer wardrobe – er, lingerie drawer. I have a couple, but I always need more. I wear a lot of light/sheer colors in the hot weather! So I really need to make more flesh-colored bras to wear under my clothes, so I can rotate them and let them rest from time to time. This particular make is pretty boring and looks downright sickly on my dressform (don’t hold your breath about me modeling a shot of this one because, eeew), but let’s rejoice that I made it nonetheless! I know it doesn’t look very filled out on this dressform, but I promise it fits me just fine and the cups don’t wrinkle like that.

Boylston Bra Another stash-busting bra, I used silk crepe scraps to make up the outside, and my beloved nude bra cup foam + nude power mesh for the innards. The silk crepe is the same stuff I used for the neck binding of this SJ sweater – which was given to me as a scrap bust, so it’s like, extra extra free. And as sickly as the color looks, it’s pretty close to my skin (did you not click that picture link? I mean. No one is complimenting my ~rosy glow~ over here hahaha). So it works quite well for what I need it to do! Boylston Bra

I had someone ask me about the strap assembly – the fabric straps are made with a piece of fabric folded in half and then picot elastic attached to the outside edge to finish it. There is a little bit of elastic at the back, with rings and sliders. The fabric straps are pretty stable in their own right and work quite well, although these particular straps (and not any other Boylston bra I made, for some odd reason) are a tiny bit too long for me. I shortened the elastic as much as possible and they’re still a little more than what I need, so I really need to just dissemble the strap where the ring is attached and shorten the fabric strap by an inch or so. You know, at some point in my life. Maybe tomorrow.

Boylston Bra Again, all the little bits and pieces that make up this bra were from my stash. The sliders and bow were taken off another retired RTW bra. The sliders don’t exactly match, but they “go” well enough. Boylston Bra

Again with the perma-ballpoint marks! Argh! I made this bra before I made the dotted one – and cut them both at the same time. This was the bra I realized the error of my ways on, unfortunately. I also dyed that channeling, all by myself. I used coffee this time, which gives a much less yellow beige than tea does. It doesn’t quite match the rest of the beige of the bra, but it’s close enough for me.

Boylston Bra I tried using the 3 point zigzag stitch for the bottom elastic of this bra. I don’t like the way it looks at all – it’s too busy, especially where it intersects with the underwire channeling. I much prefer a standard zigzag set a little wider (like what you see on the polka dot bra). Also, I know that the elastic is super wrinkled and bunchy looking when it’s flat, but it smooths out really nicely when I’m wearing it. That being said, I definitely pulled the elastic too taut when I was applying it – something I was able to fix with my next bra, the polka dot one. You really only need to stretch the elastic ever so slightly under the cups and at the bridge when applying it – mostly so it’ll turn to the wrong side more easily and look smooth. Not look like the hot mess I have going on here. Boylston Bra

One of my favorite parts about this pattern is being able to add a cute little picot edge at the sides. I love the way it looks!

Boylston Bra

Ok, I think that’s it! I’ve got a few more ideas for this pattern, so I hope you’re not sick of seeing a million renditions of it just yet! Up next, I want to try making some lace versions – I have a couple of gorgeous pieces from the Tailor Made shop that I’ve been waaay too scared to use, but i think it’s time to bite the bullet and woman up a bit! I also want to experiment with changing the straps – maybe leaving off the fabric strap and using elastic (either removeable or sewn on) in it’s place. I wonder if this pattern would work as a strapless? Would it be as simple as smoothing down the top of the cup, adding some boning to the side seams and possibly rubber elastic at the top of the cup? What do you think?

As a side note, I wanted to share an update with my Made Up pledge. My first rendition of a swimsuit was a HOT MESS (not so much the pattern or the construction – more like, I wanted a string bikini and I absolutely hateeeee the way I look in them! Definitely should have done some sneaky try-before-you-DIY shopping for that one, it would have saved me a bit of headache), and I was all set to try pattern #2 when I realized that I don’t have enough fabric 😦 I made an emergency order for a piece of really cool swimsuit fabric, but it doesn’t appear to have shipped out yet. We leave 2 weeks from today, so hopefully it’ll get here soon!

Completed: The Summer DVF Wrap Dress

17 Aug

What? Did you think I was going to make it an entire year without busting out this pattern? Ha ha! Forget about it!

Vogue 1610 // DVF(No idea why I’m standing pigeon-toed in this photo, eh.)

ANYWAY. If you’ve been following my blog for a while now, you’ll know that I loveeeee me some knit wrap dress action. Specifically, some Diane Von Fürstenberg knit wrap dress action. I just think she makes the prettiest dresses and I can’t get enough of them (and by “them,” I mean “knock-offs”) in my closet! I have a few that I made last year – The Wearable Muslin, The Silk Jersey and The Chic Black Wool. And now, here’s #4: The Bold Graphic Print. Just in time for the last few weeks of summer! Vogue 1610 // DVF

I have an original copy of Vogue 1610, which is a (vintage) Vogue American Designer pattern (this one featuring Diane Von Fürstenberg, obviously). I found it – in my size, no less – at an estate sale for around $1 a few years ago. It’s a beautiful pattern that really lends itself well to all the hacking and modifying I’ve put it through. It’s certainly a bummer that Vogue won’t re-release this pattern for the modern sewist – and before you start pointing fingers, this has nothing to do with Vogue and everything to do with DVF not renewing the license. I’m pretty sure the McCall Pattern Company wants to re-release some DVF love just as much as you want to buy it (I mean, can you imagine how much $$ they’d make? Who can say no to that?), but it’s not really up to them to decide. Seems like the designer just doesn’t want her name on sewing patterns anymore 😦 DIANE, WHYYYY.

Anyway, back to my dress!

Vogue 1610 // DVFVogue 1610 // DVF

Taking a cue from the black wool version, I kept the original bodice from the pattern and changed out the skirt for a simple wrap skirt (specifically, I used Tilly’s Miette skirt and just made it so the wrap is in the front). I added 1″ to the overlap, so I’d have a little bit of fabric to fold back and topstitch. I like the gathered skirt that the pattern is drafted for, but I wanted this version to be a little more sleek. I originally planned this dress to include small cap sleeves – I was going to take them off my Lady Skater dress pattern – but when I tried the dress on sans sleeves, I really liked the way it looked so I kept it as-is.

Vogue 1610 // DVFI also kept a slightly longer skirt length (I know, I know… nothing about “practically knee-length” qualifies as “long,” but considering I’ve basically been exposing ass cheeks all summer, this is long for me), again, something I liked when I tried it on during construction. Vogue 1610 // DVF

Vogue 1610 // DVFI also tried something different with the front band. Normally, I sew it on like how you finish the neckline of a tshirt – stretching the band so that it fits snugly against the bust when worn. However, I lurked in on some actual DVF wrap dresses while I was in Harrod’s last year in London, and noticed that they finish their necklines a little differently. No knit bands to be found anywhere – most of them use a binding or a facing. I was keen to try this myself, so that’s what I did. I cut the band as usual and interfaced it with a lightweight knit fusible (so it has a little bit of structure, but it’s still quite stretchy). I finished one edge, sewed the facing to the outside of the garment, flipped it to the inside and understitched, and then topstitched 1″ away from the edge on the outside. I was 100% certain that I’d fucked up the dress beyond repair at that point – the back had some puckers and everything just looked kind of strange – but it all sorted itself out once I put it on and my body stretched it into shape. The addition of the interfacing gives the neckline a little bit of height, almost – especially around the neck itself. The facing is much smoother and sleeker than any band. And I can pull the dress apart a little and show some 1970s ~natural cleavage~ if I feel so inclined. Yeehaw! Vogue 1610 // DVF

Vogue 1610 // DVFNot really much else to report on construction – much of the same old, same old. I used my serger to construct, my Bernina (+ walking foot // ballpoint needle) to topstitch. For the arm holes, I just serged them and turned the hem under and topstitched with a straight stitch. So easy! I think I finished this whole thing in less than 3 hours. Vogue 1610 // DVF

Isn’t the fabric so good? When I saw it on Mood Fabrics recently, it immediately screamed WRAP DRESS and it knew it had to be mine. Sometimes, I find buying knit fabric online to be a bit of a gamble – you can’t really tell weight/hand/stretch recovery (not to mention color) from a photo and description, and occasionally I end up with stuff that wasn’t at all what I was expecting. This fabric definitely exceeded my expectations – it’s so beautiful! Very dense with a good stretch (and an awesome recovery; I wore this all day last week and it didn’t bag out at all), and the color is super saturated. It’s a little on the heavy side – but not bulky. It feels very fluid and luxurious. I wish all knits were like this. This stuff is awesome! Also, the color is “poppy” which I kept seeing as “poppy,” so, like, there’s that.

Vogue 1610 // DVFHere’s a shot of the inside. Super clean finish, yay! Vogue 1610 // DVFI think the color and style of this dress will be good for transitioning into the fall months here – where we want to pretend like it’s tall boot and wool hat weather, but it’s actually still 90+ degrees. Which means I can wear this and look cool, but still be cool. Also, I am not ready for summer to end just yet – I have a few more projects left to finish!

Note: The fabric for this dress was purchased with my allowance for the Mood Sewing Network. All comments on this blog post are just, like, my opinion, man.