Tag Archives: bikini

Made Up: Stretch & Sew Bikini

8 Sep

You know, for someone who doesn’t go swimming very frequently (or sunbathing, for that matter, as evidenced by these photos. Eh, what can I say – as an ex-smoker, I’m trying to be careful with my skin these days!), I sure do make more than my share of bathing suits. They are really fun and satisfying to sew up, though! I try to quell that urge by making undergarments instead, but sometimes you just wanna make something that gets shown off!

Paisley print Stretch & Sew Bikini - front

For our short trip to Cancun last week, I thought I would make another bathing suit to drag along – partially so I wouldn’t be stuck trying to wriggle into something damp on the second day (yeesh! I hate that!), and partially because, dammit, I wanted something new and sunshine-y to take on vacation! When Karen announced the Made-Up Initiative – which is currently funded at 248%, btw, because we are all awesome – I decided to set those plans into action and pledged to make the damn swimsuit.

Paisley print Stretch & Sew Bikini - side

Paisley print Stretch & Sew Bikini - side
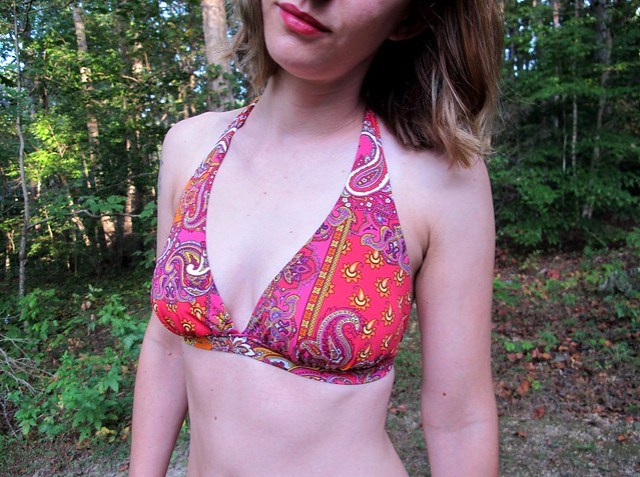
I reckon there’s something about announcing intentions that causes them to immediately go awry, but, yeah, this was totally the Swimsuit That Almost Didn’t Happen. True story, if I hadn’t already made a big stinkin’ pledge, I probably would have put this project to sleep early on. I really hate the idea of not seeing something through, though, so I soldiered on and stuck it out. Happily, the end result was this lil’ paisley dream! Yay!

My first attempt was with a completely different pattern, McCall’s 4330 – a string bikini straight outta the 1970s. The pattern called for wovens, but I thought I could adapt it with a stretch knit. It actually mostly worked, except, I tried on the top about halfway through and realized that I DO NOT LIKE the way I look in a string bikini! Eep! Too little coverage, well, everywhere. I know that’s the whole point of a string bikini, but I was not feeling it. I considered giving up at this point.

Instead, I dug around in my stash and found this copy of Stretch & Sew 1390, which is for a cute little halter-style bikini that is, again, straight outta the 1970s. I liked that it offered more coverage – both top and bottom – than the string bikini, and I liked that it was actually sized and drafted for swimsuit knits. I’d never sewn with a Stretch & Sew pattern, but I have definitely noticed the cult following that these patterns get, which is always a good sign in my opinion. I traced off my size (you have to do this with these patterns; the instructions are printed on the nested pieces. Sort of a pain, since it means the instructions are on a GIANT sheet of paper, but kind of nice in the sense that you are forced to keep all the sizes!), made a mock-up of the bikini top, and then prepared to cut in my actual swimsuit fabric – when I realized that I had nowhere near enough yardage to do this. I was using leftovers from a previous suit – bikinis are so tiny and they barely take any fabric, so this usually isn’t a problem. However, this suit has few seams & looong halter-tie straps, which means it *does* require more yardage, which I didn’t have. At this point, we were less than 2 weeks out from departure. Again, I considered giving up. Dun dun dun!

Paisley print Stretch & Sew Bikini - front close up

Spoiler alert! I found an awesome paisley swimsuit fabric at The Fabric Fairy, immediately ordered it, and it was at my house within a week. Since I’d already worked out all my fitting adjustments before ordering the fabric, that meant I was able to get right into sewing once I received everything. The whole suit was made up in an evening session. Pretty awesome! And I actually like this fabric a lot more than anything I was trying to pull out of my stash, so double win for me!

Paisley print Stretch & Sew Bikini - back

Paisley print Stretch & Sew Bikini - back close up

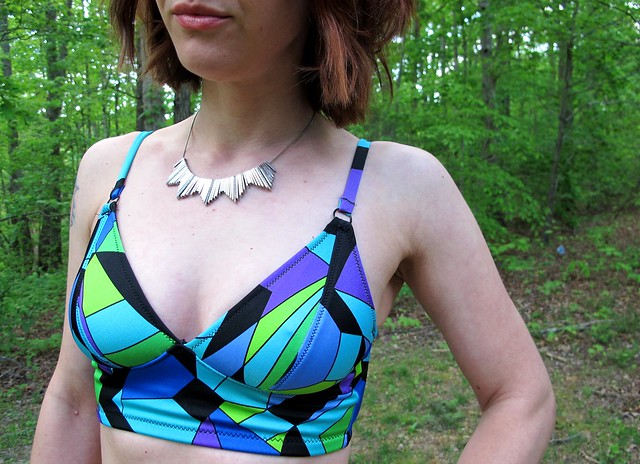
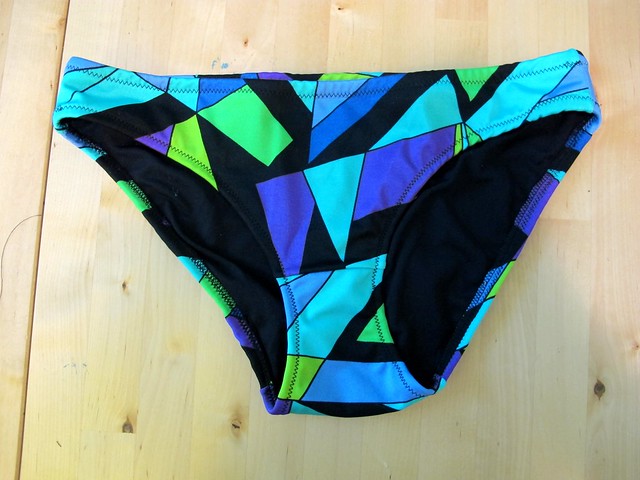
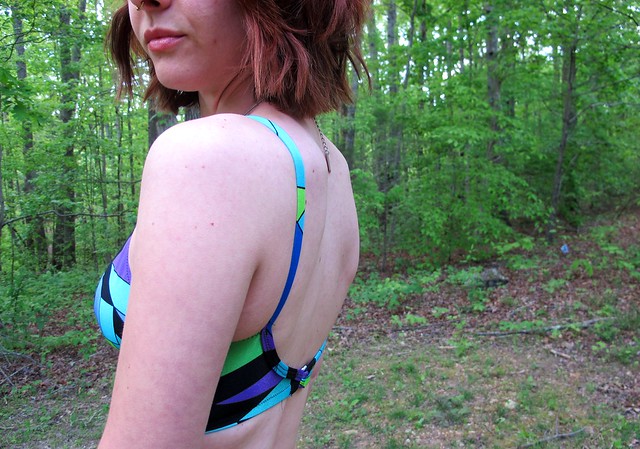
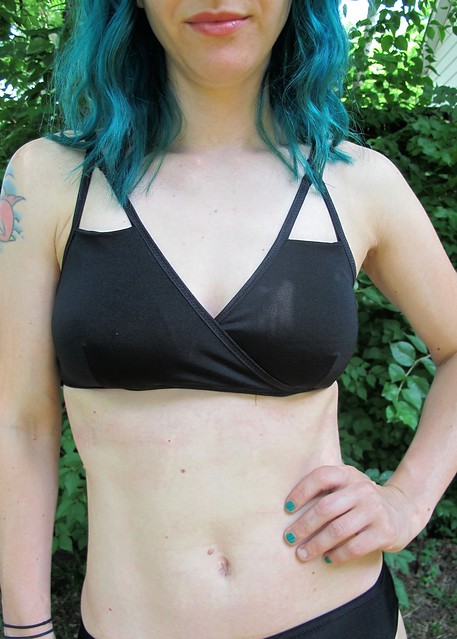
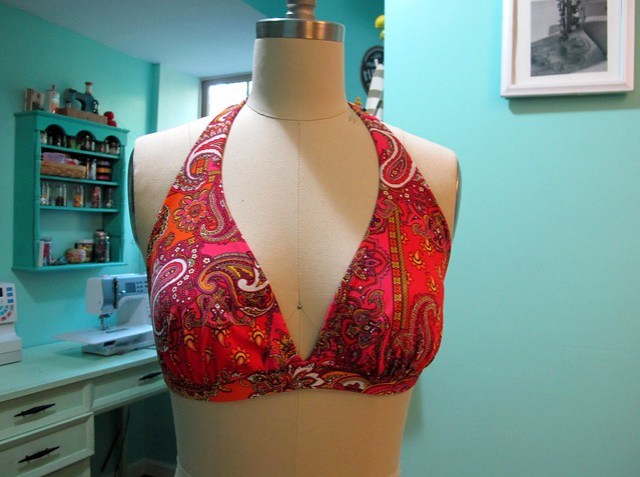
The pattern is well-drafted and very simple to assemble – there aren’t a whole lot of seams, and the instructions are clear and easy to follow. The bikini top is self-lined, with the outside shaping created by soft gathers, and the inside has a few darts. The straps tie behind the neck, halter-style, and the bottom is encased with wide elastic all the way around and closes with a swimsuit hook. The bottoms are just your standard bikini bottoms, lined in swimsuit lining and edges finished with elastic.

My original tracing and mock-up trusted the sizing of the pattern, which ended up with it being much too big. I ended up cutting the bikini in the size A cup and shortening the elastic for the midriff by about 3″ (I imagine most anyone would have to make this adjustment, as they just have you cut it to 27″ for all sizes and I’m sure there are plenty of people who are either bigger or smaller than that!). For the bottoms, I just kept cutting the size down until they finally fit me. They were really huge – which I prefer negative ease with my swimsuit bottoms (so they don’t look like a saggy diaper when wet!), and these were quite the opposite. I think I ended up going down about 3 sizes to get the fit that I wanted.

Paisley print Stretch & Sew Bikini - bikini top on dressform

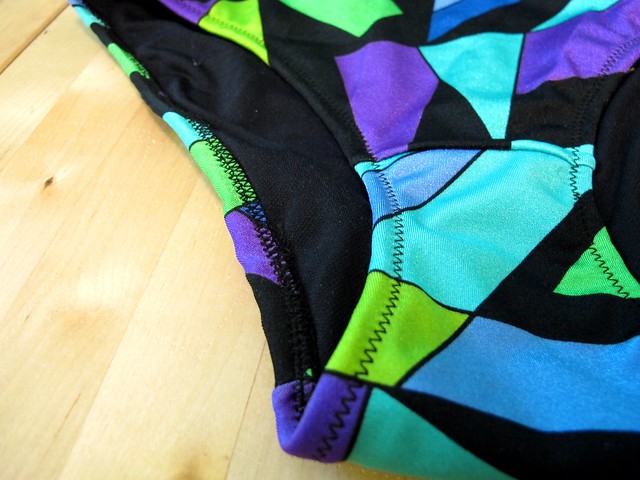
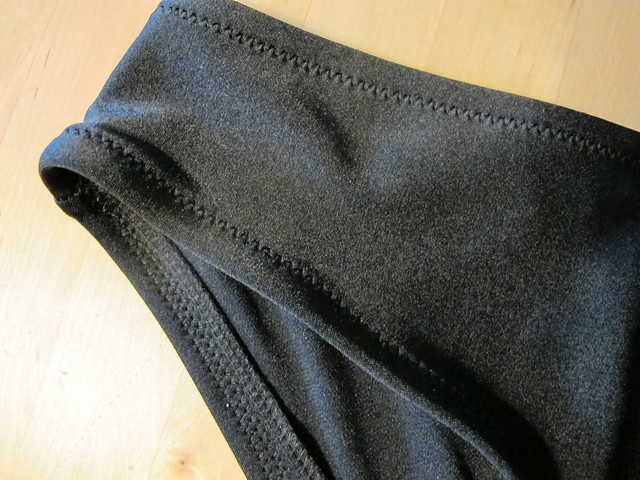
I followed the instructions pretty closely as written, except that I topstitched the bottom band of the bikini top to avoid doing any handstitching, and I sewed the elastic in the bikini bottoms a little differently. Most of this was made on my sewing machine with a zigzag stitch, except finishing the edges of the bottoms before attaching the elastic – I serged those edges first, so they’d look clean on the inside. Oh! I also added really thin swimsuit cups to the bikini top, sandwiched between the outer fabric and the lining. They are super thin, so they don’t really add any padding – just eliminate any nipping that could potentially happen haha.

Paisley print Stretch & Sew Bikini - bikini top

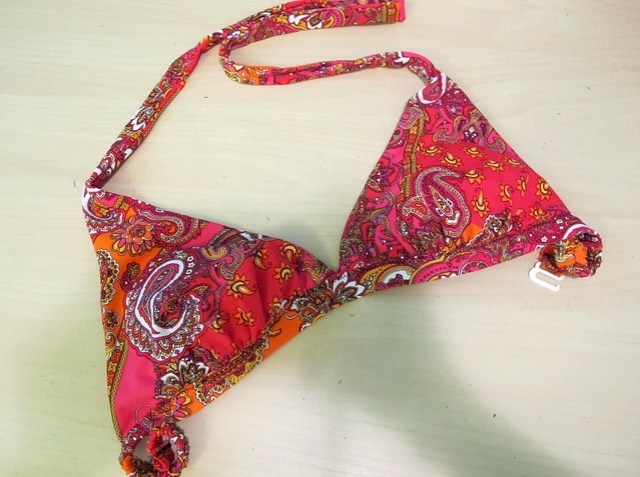
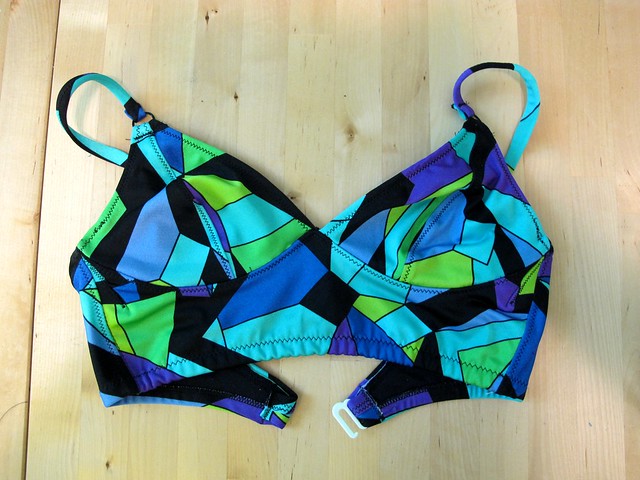
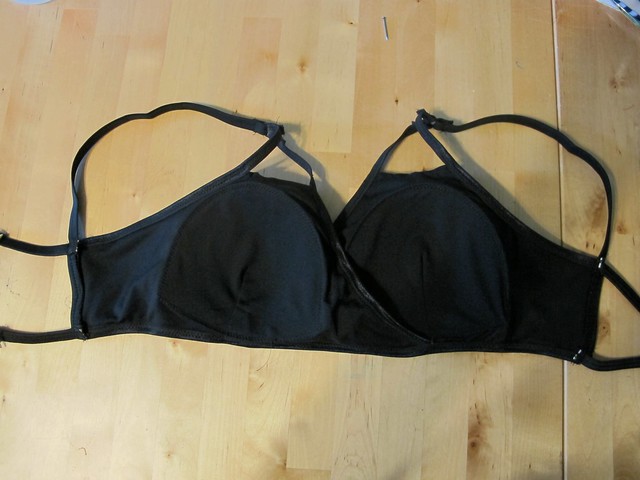
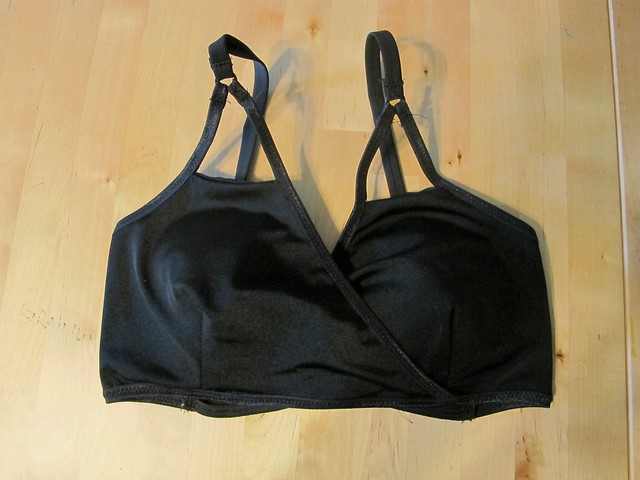
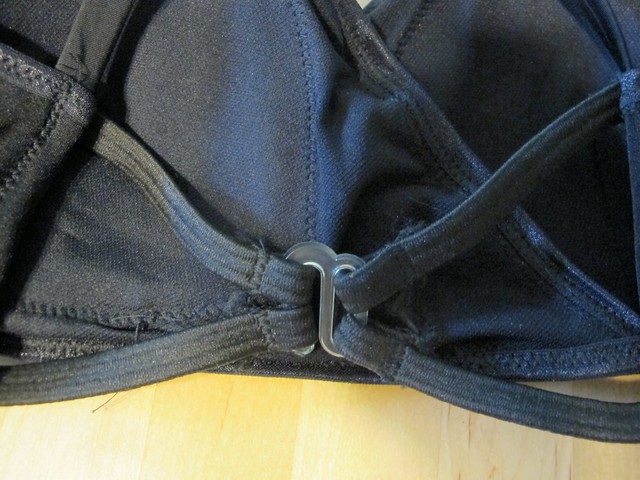
Top of the swimsuit, flat. The elastic goes all the way around the ribcage, which makes for a very secure top (you just need to make sure that it’s the right circumference for your ribcage, since it closes with a hook and doesn’t tie).

Paisley print Stretch & Sew Bikini - self lining

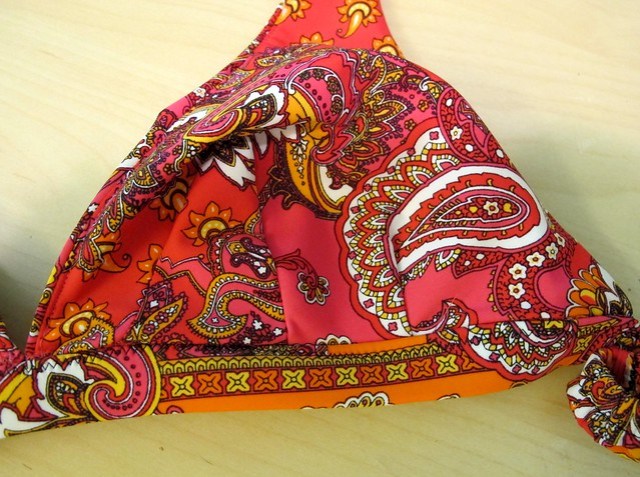
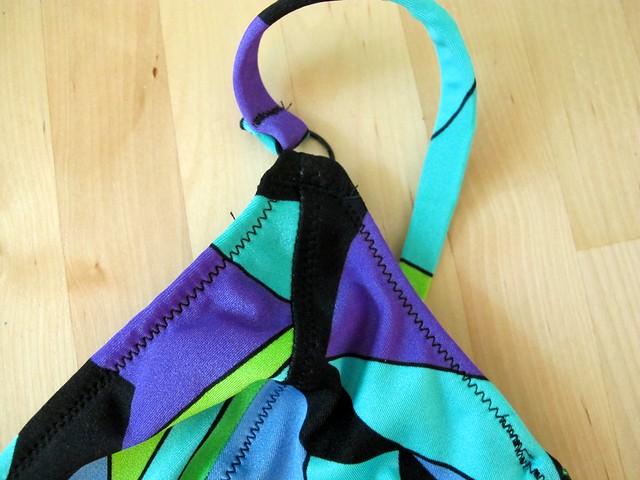
Darts on the inside/self lining of the bikini top.
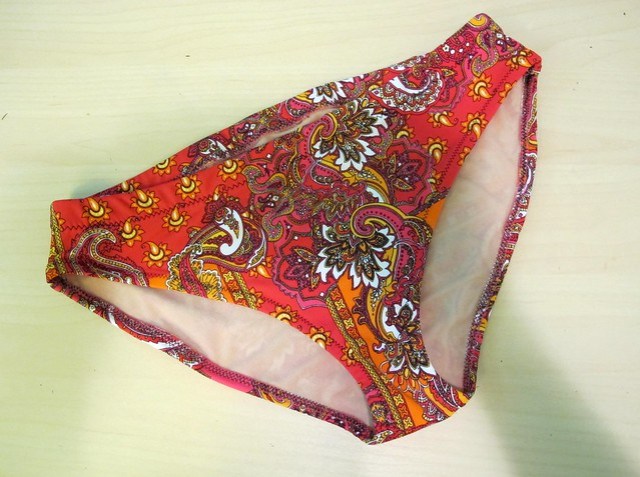
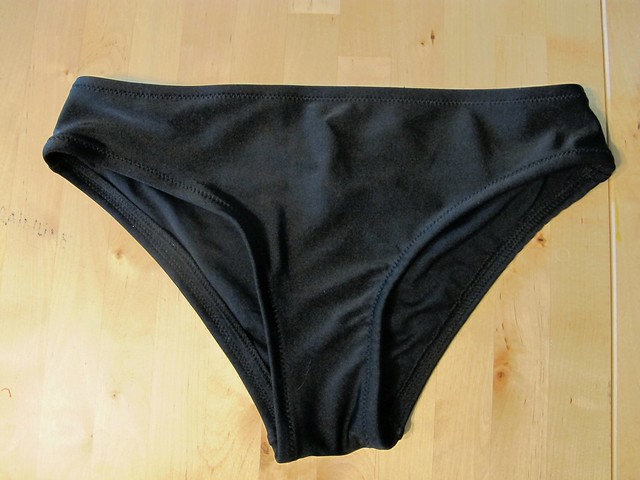
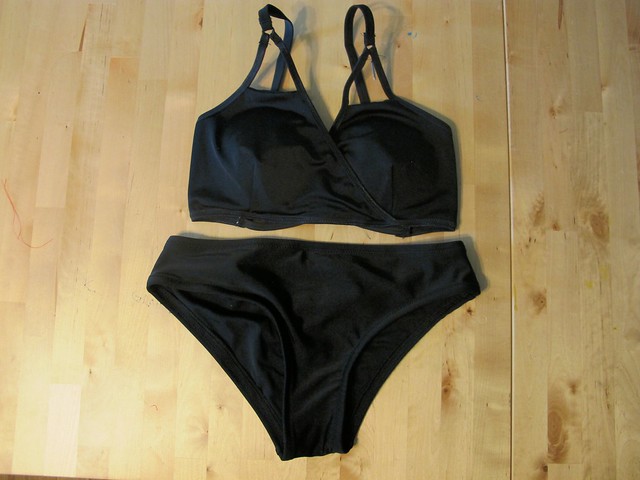
Paisley print Stretch & Sew Bikini - bikini bottoms

Bikini bottoms!

Paisley print Stretch & Sew Bikini - side back

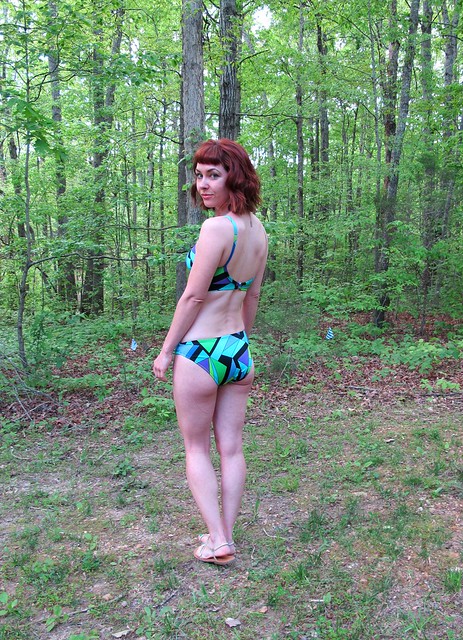
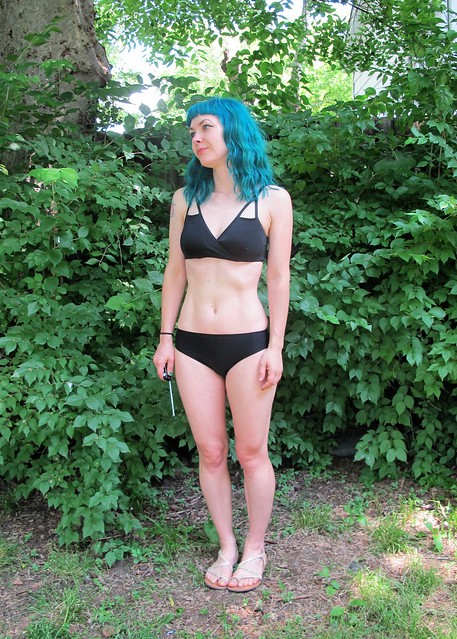
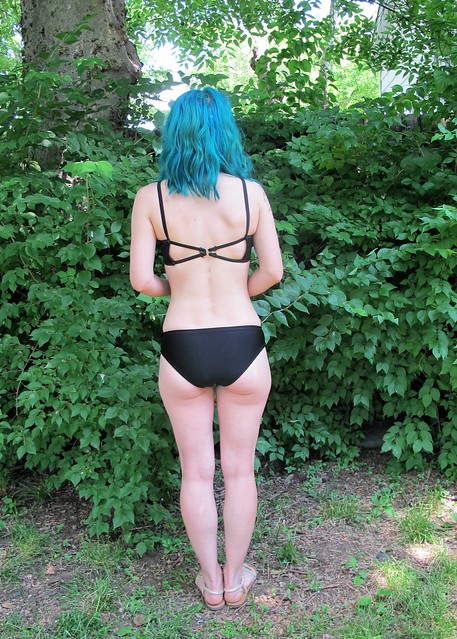
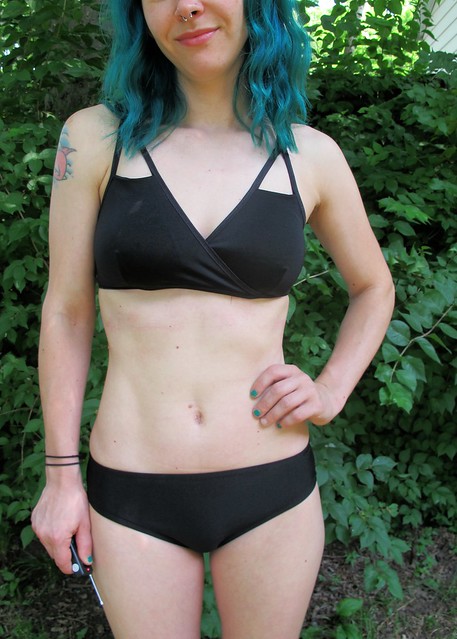
No matter how many swimsuits I make, I will admit that I always feel a tiny bit stressed when I wear them out for the first time! Will it hold up? Is something going to go surprise see-through on me? What if the fabric sucks and bleeds color all out into the water? Thankfully, this one didn’t give me any problems and I really enjoyed wearing it during my vacation! I think the paisley fabric is so pretty and it makes me happy to look at it 🙂 I’m glad that I stuck this one through and ended up with a fun little swimsuit as a result!

Did you pledge for The Made-Up Initiative? How is your pledge coming along? The deadline is in 2 days!

Completed: The Watson Bikini

11 May

I don’t know about where y’all are, but swimsuit season is BASICALLY upon us over here. Sure, they haven’t opened the pools – yet (that always happens on Memorial Day weekend, coincidentally right around my birthday as well. Pool parties every year for this kid!) – but it’s only a matter of time. Plus, I want to be ready when the water is warm – and not be scrambling to finish something the night before I hit the pool. Last-minute sewing is for people who work well under pressure. Which is not me.

Watson Bikini

So, anyway, I made a bikini! Yeah!!!

Watson Bikini

If this pattern looks familiar, it’s because I’ve made it before (not to mention it’s made some ROUNDS ’round the internet). It’s not a swimsuit pattern, per se – it’s actually a lingerie pattern. This here is the Watson Bra & Bikini pattern from Cloth Habit, modified into the swimsuit you see here. And yes, I realize that these pictures basically mean y’all are seeing me in lingerie. Whatever.

Watson Bikini

Watson Bikini

I have made this pattern before a couple of times (see one and two), so I knew I was good with the fit and I had strong feelings that this pattern would work equally well as swimwear with a few modifications. It was just a matter of finding a good swimwear lycra and figuring out how to stabilize that cradle in a way that wouldn’t deteriorate in chlorine and salt water.

Watson Bikini

Watson Bikini

Since I’ve gone into detail about the making of this pattern before, I won’t talk too much about the sizing or construction outside of making it into swimwear. I sewed my regular size – the 30D – and the fit was good except a did have a bit of gaping right between the side of the cup and the underarm. I think it has more to do with my elastic application – it might not have been stretched enough – but it was on both sides so I dunno. It may have been due to the stretch of my fabric, but the rest of the top fits great and the 4 way stretch is similar to the millskin I used for my first Watson. Anyway, I fixed it by taking in a dart and topstitching it down (at this point, the swimsuit was complete so there was nooo way I was unpicking all that shit haha). Not the most elegant solution, but the print is super busy so you can’t really see it, plus it’s right at my armpit. If anyone is looking and notices that shit, we’ve got bigger problems on our hands.

Other than that, the fit was good! I add a little bit of extra to the bottoms – about 1/2″ extended out from the back for more butt coverage, and about 1/2″ extended at the top to make them slightly higher. They’re still a little cheeky, but I think it’s pretty cute 🙂

Watson Bikini

Like I said, there were a couple of things that needed to be addressed in order to convert this into proper swimwear. For one, I knew it needed lining (maybe you wear unlined swimsuits, but I don’t!). I cut an extra of every piece out of swimsuit lining, and was able to origami it so that there aren’t any raw edges, except where the cups meet the band. Couldn’t figure that one out, so I just serged the seam. I also needed to change out aaaall that elastic to be swimsuit elastic- the picot and lace edges elastics that you use in lingerie are beautiful, but they aren’t made to hold up to salt water and chlorine (not to mention, they totally make that shit look like a bra). This was easy – I used braided swimsuit elastic and attached it opposite of how you attach lingerie elastic. Meaning, you sew the first swipe on the inside of the garment (I used my serger, but you can zigzag this), and then fold it one more time and zigzag topstitch. I did this everywhere except at the top of the cups, where I sewed it as you normally would for a bra (hadn’t thought that far ahead, whoops).

Watson Bikini

Watson Bikini

Watson Bikini

The strapping at the back band also totally stumped me for about a month. In the pattern, the top of the back band is finished with strapping that extends to go over your shoulders. It’s beautiful, but it’s not really good for swimwear (again, can’t stand up to the elements/chemicals, and – again, looks like lingerie). Of course, you can just finish the top edge with elastic the same way you finish all the other edges – but I liked the look of the strapping, plus, I have a feeling it’s sewn that way to help with the fit. After a bit of thought, I decided to do elastic covered straps and apply them the same way that the strapping is done on a regular bra. I used Ada Spragg’s tutorial on making elastic swimsuit straps (GIRL THANK YOU SO MUCH FOR THIS SHIT), and they turned out pretty nice! I left off the adjustable sliders since the elastic was so thick, but I did keep the little O-rings at the top.

The only downside is that I wasn’t quite precise with my seam allowances, so one strap has a tendency to twist (I’m pretty sure that’s from the elastic inside trying to roll up). It’s annoying, but not enough to make me unpick and start over. We’ll see how I feel after I get back from the beach 😛

Watson Bikini

Watson Bikini

Another thing that needed to be addressed was changing out the hook and eye for something that looks, you know, not like a bra. I used a swimsuit hook and eye – I know it doesn’t match, but it’s all I had on hand and anyway, you can’t really see it when it’s on – and just adjusted the back to fit the hook. I did this after the swimsuit was assembled, but before I attached the straps. There’s a tutorial on how to do this over at Cloth Habit, it’s for a bra, but same concept. For the opposite side, I just folded over the edge and sewed it down to make a tunnel for the hook to go through. Easy!

Watson Bikini

Finally, I had to figure out a way to stabilize the cradle while still making this thing hold up in water. For most lingerie patterns, this might not be a problem – but with this particular pattern, the cradle (the part of the band that attaches to the cups) needs to be stabilized so it does not stretch. The pattern has you use lightweight tricot, but I wasn’t sure if that would deteriorate over time. Instead, I cut two pieces of heavy powermesh running in opposite directions, and stacked them on top of each other with the swimsuit lycra on top and the lining on the bottom. Powermesh is water-friendly (well, so I’ve been told!) and it does a pretty good job of keeping everything stable.

Watson Bikini

The rest of the bikini was as straightforward as making lingerie. All pieces are cut from swimsuit lyrcra and swimsuit lining (other than the powermesh to stablize the cradle), and I included lots of zigzag topstitching to give it a sporty look.

In case you were wondering, my swimsuit lycra is from Spandex House in NYC. I bought it while I was in the Garment District in March. My lining is also from Spandex House, and the elastics I used are from Joann’s. I think the bra rings came off an old bra, and I don’t remember where the swimsuit hook is from. Other than using the serger to attach the elastic, I sewed everything on my sewing machine. Even with me stopping and researching and scratching my head, this shit only took a couple of hours to make. And just like that – I’m ready for the beach! Yay!

Oh, and how ’bout that AWESOME necklace I’m wearing?? I can’t take credit for choosing that – its from Rocksbox, which is a new online service where you rent 3 pieces of jewelry every month, chosen for you by a stylist. You can swap out the jewelry as much as you like during the month, and any pieces you buy are discounted. I’ve been trying it for about a month and it’s really fun – and definitely got me wearing jewelry that I otherwise neverrrr would have picked up. I was given a couple of months free by the company to try it out, but I’m seriously thinking of maintaining the account afterwards because I like this shit waaaay more than I thought I would! It’s only $19 a month, the shipping is free both ways, and I’ve received (and bought :I) some really cool pieces! So there’s that. Anyway, bringing this up now because you can use the code lladybirdxoxo and try your first month of Rocksbox for freeeeee. Who doesn’t like free, amirite? Also, SHINY.

Watson Bikini

Can’t wait to try this bad boy out in the water when we go to the beach in a couple of weeks! Also bonus for having a suit that no one else will be wearing (I used to buy aaaall my suits at Target. Do you know how many Target swimsuits run up and down Santa Rosa Beach? Do you know how many of those said swimsuits look better on the other person than they do on me? The shame.). I have tons more of this lycra – the minimum cut was 1 yard and you really only need like 1/4 yard to make a bikini – so I’m already trying to justify having a fleet of geometric swimsuits. We’ll see!

Completed: More Bras!

23 Feb

You may have heard that the south was hit with a particularly bad ice storm last week. Nashville was coated with a few inches of solid ice, that kept melting in the sun and refreezing overnight, turning all our roads and interstates into some scary-ass ice rinks for the majority of the week. Since we’re not really equipped to deal with that kind of weather (the last time we had an ice storm anything like this was over 20 years ago – it normally just melts the next day and it’s not an issue), that means that most people spent the week stuck inside their house. And by “most people,” I’m specifically talking about myself. I gotta say – it was pretty nice to have nearly a whole snow week! I wasted the first day by being sick (wah), and the remainder of the days it was really hard to get my ass off the couch because our house is REALLY freaking cold (I’m wearing a fleece robe over my clothes and sitting by a space heater as I type this. I love my old house, but man, they are drafty!). I did want to take advantage of all the free time I had from being home for most of the week, so I made a couple of bras. Bra making is great for cold weather sewing, mostly because you don’t have to strip down often for fitting. Really, just once, and that’s when the bra is finished.

I made 2 bras, but I actually have 3 to show y’all. The first one is one that I finished at the end of 2014 (yay!); I’ve had the photos for ages but I never bothered to post it because it seemed like a pretty boring post on it’s own. For each of these bras, I used a fabric+findings kit to assemble them – so hopefully this will help those of y’all who are still trying to figure out what kit works best for which pattern.

Red Marlborough Bra

Bra #1 is this sexy little red lace number. This is the Marlborough bra, and the fabric is from a kit from Bra Maker’s Supply (the lace is something I picked up in London; Bra Maker’s Supply doesn’t include lace with their kits). This is the second bra I have ever made, and while I did have a few learning curves with this one, I really learned a LOT.

Red Marlborough Bra

Red Marlborough Bra

I really love the kits from Bra Maker’s Supply – they are a good price (less than $30 USD) and the materials are pretty nice quality. I’m not super crazy about the fabric, but it looks nice when it’s sewn up (I like to use the side that isn’t shiny, so it looks less costume-y). The only thing I’ve had a problem with is that they don’t indicate what elastic is for what part of the bra – it’s kind of assumed that you already know. For this bra, I mixed up the lace edge elastic with the underarm elastic, whoops. So now the underarms are lacy, and the top of the lace… isn’t. I doubt any of y’all would have even noticed that if I hadn’t pointed it out, but, it is what it is. It’s not uncomfortable or itchy, at least.

I made this bra exactly the same way as I sewed my black Marlborough, except I left off the clear elastic and lining on the lace (I used the underarm elastic at the top of the lace, to stabilize it). I only made a couple minor fitting changes to the pattern, based on what Norma and I talked about while I was in Paris (scooping about 1/4″ off the bottom of the bridge and adding about 1/4″ to the edge of the upper cup, also moving the straps out about 1/2″). When I finished the bra, I put it on – and it was COMPLETELY unwearable. The back straps were so far apart, they were riding up the back of my armpits. Really really uncomfortable. So I threw the bra in the corner and ignored it for about 3 weeks while I debated what to do. The bra was already finished at this point – underwires inserted, hook and eye sewn in, everything – and I didn’t want to trash it after putting all that work and money into it. This here is the downside of bra making. You can’t really fit-as-you-go.

Spoiler alert: I fixed it and it’s now wearable. I had to unpick the entire back, but I made it work. What I ended up doing was unpicking all the stitching and elastic from the back band, all the way to the frame, and then removed the back band. I measured the pattern band against the band of my favorite bra, and redrew the back curve to match the RTW one. This ended up making the back band bigger as well – so I’m not sure the bra size anymore, since it’s bigger than the 30D I originally cut. Doesn’t matter, though, because whatever the size it is – it fits ME. Anyway, I recut the back pieces in power net and reattached them to the frame, pieced the elastic (since what was attached to the bra was now too short for the band – fortunately, the kits give you more than enough elastic so this was not an issue), and reattached the hook and eye. The bra now fits really well. The band is big enough – it was a smidge too tight before – and the straps are in the right spot. I’m really glad that I took the extra 2+ hours out to rip out and fix the bra, because now I have a wearable red bra!

Red Marlborough Bra

Here it is on me. This the only floaty ghost bra picture you get in this post, fyi. And only because I did this one agessss ago, ha. You actually see a bit more nipple in real life, but I was feeling modest so I pushed them out of the way. You’re welcome, I guess.

This is the bra that I showed Maddie when I was in Philly for the bra making class. I wanted her to see my fitting changes and tell me if there was anything else I need to tweak. Thankfully, the bra looks pretty good – so I’ve got the go-ahead to keep cutting this size, with my new back band piece and all that.

Soooo, here’s the next Marlborough that I made over the snow week!

Black and nude Marlborough Bra

No fitting changes to this bra, just fabric changes (and a different kit). I really like that red bra, but I REALLY LOVE this one! I think it turned out sooo pretty! And, while I’m not the kind of person to sit here and wax poetic about my boobs or anything (I mean, they’re boobs, there’s nothing any more special about mine than, say, yours), this bra makes them look really really good. Gives them a nice lift and shape. I’m so happy with it!

Black and nude Marlborough Bra

I used one of the kits from Grey’s Fabric to make this one up (I don’t see it on the stock page anymore, but it was black and nude). These have the same duoplex fabric as the kits from Bra Maker’s Supply, but unlike BMS – they also include the lace, underwires, and enough strap elastic (you don’t get enough with Bra Maker’s Supply, fyi! Make sure you buy extra if you order from them). I did change out the ribbon decoration to a black one – and sewed a little rhinestone button in the middle, BECAUSE IT’S ADORABLE – but everything came with the kit. I like that.

Black and nude Marlborough Bra

The major difference between this bra and the red one is the lace – the red lace is very stable, so it doesn’t stretch. The black lace here is a stretch lace that I did not stabilize. That alone made the biggest difference in the fit.

Black and nude Marlborough Bra

I’m just including this picture because Amelia looks like a deer caught in headlights hahaha

Black and nude Marlborough Bra

I’m really happy that this lace had a scalloped edge, so I could use that in the bra. I think it’s really pretty! I stabilized the scalloped edge with a piece of clear elastic – this wasn’t included in the kit, but I have tons of it on hand, so not a big deal. All the findings are the same nude color; the only black is the lace and the power net (and the bow I made – I thought it looked better than the nude bow).

Black and nude Marlborough Bra

Black and nude Marlborough Bra

Now that I’m feeling pretty good about the fit, I’ve started experimenting with finishing the seams. I used a 3 thread overlock for this one – at the advice of all my favorite bra makers, basically. You just have to be careful with 1/4″ seams; you don’t want to accidentally cut too much off (I know you can disable the knife blade, but me, I like to live on the edge). Oh, and you can see the little nude bow that I didn’t use! Maybe for my next bra.

Finally, I also made another Watson bra!

Green and White Watson Bra

I LOVE this one so much! I talked myself into buying that kit one day (I don’t know why, but I was convinced that I needed a green bra – like, who doesn’t need a green bra?); the nude/black kit was actually bought at the same time so I could get free shipping, ha. I used one of the lace Watson kits (the one I bought appears to be sold out, but this one is similar).

Green and White Watson Bra

I admit – when I first received the kit, I was completely confused. The lace only has a minor amount of mechanical stretch – i.e., no spandex – and there was a TON of powermesh. I wasn’t sure if the bra would even fit, considering the blue Watson I made used a very stretchy material. I sat on this one for awhile because I wasn’t sure how to proceed, but I think I nailed it.

The cups and bridge are obviously cut from lace, with what little stretch there is going in the direction it’s supposed to. The bridge is also stabilized with the included lining from the kit. All the lace is lined with powermesh, and the back band is only power mesh (so it gets the stretch it needs). I’m really pleased to report that it fits very very well. The rigidity of the lace gives it quite a bit more support than the stretchier bra has, so that’s nice. Plus, it almost looks like a real piece of clothing now (I mean, not lingerie haha), with all the lace and shit. Now I’m wondering if this pattern would work with a bias-cut woven fabric for the cups and frame – that’s about the amount of stretch you get with this lace+mesh. Might be something to experiment with later!

Green and White Watson Bra

All the trim is white; pretty much the only green is the mesh. You can see that I used the picot lace elastic for the upper cups on this one, as well as the underarms. This kit only came with one trim, instead of two. I finished all the seams with the 3 thread overlock, same size and everything as with my last one.

Green and White Watson Bra

Green and White Watson Bra

I took a tip from Maddie’s bra making class and used a new method to cut this sucker out. First I used Sulky Temporary Spray Adhesive (that links to the exact one I use; but any temporary spray adhesive suitable for crafting/sewing should work), then I used a teeny tiny rotary cutter to cut all the pieces (this isn’t the exact one I used, but it’s close enough – 28mm Olfa Rotary Cutter. I got it in the bra making class I took). The spray adhesive held everything together while I sewed it, which was extremely helpful – especially when basting the lining to the cradle fabric. No wrinkles there, yay!

Green and White Watson Bra

Then I made the matching undies with the leftover! Didn’t realize the lace was supposed to be used for the front part (it’s in the project description now, but it wasn’t there when I bought it), so I just made the whole thing from powermesh. I used the wider elastic for the waist, and the decorative for the legs. These are okay; I need to practice more pulling the elastic because it’s not quite stretched enough. But it works well enough.

Anyway, that’s it! I love all these kit options for bras, because it saves me the headache of trying to source all the matching supplies myself (plus, I’m such a sucker for a good kit. Especially when it comes in it’s own box and everything is individually bagged; makes me so happy!). Now that I’ve used a few of the kits and gotten a general idea of what elastic to use in which part (and what it looks like, etc), I feel a lot more confident to buy all the supplies myself and not have to rely on a kit. That being said, I love the kits and I am looking forward to some new color options for sure!

Out of all the kits, I’m not sure if I have a favorite. I love the Bra Maker’s Supply ones because they’re really good and basic – everything is dyed the same color and it matches perfectly. The Grey’s Fabric kits are nice because they have a nice range of colors and they’re not just one solid color, plus, I like the pretty strap elastic and picot edged stuff too. I really love the hardware that comes with the kits from Blackbird fabrics, however, I think I prefer the more rigid lace + powermesh for a Watson, as opposed to the super stretchy millskin. Just a personal preference! The millskin almost feels like a swimsuit. If you’re trying to decide which kit to buy from where, I think it really boils down to your color preferences and how much the shipping will cost. There are lots of options, and they’re all really great!

Ok, I think I’ve done enough bra and boob talking for today! What’s your favorite bra out of these 3? Are you ready to start making your own now? Is there another kit option I should be looking into? I want to try the Merckwaerdigh kits next, I really love the color and pattern options!

Completed: The Watson Bra & Bikini Set

19 Jan

Hey look! I made another bra! And matching undies!!

Watson Bra

I’m loving my Marlborough bras so so much (yes, plural. I actually have two now, but I’ll save #2 for another post – this post is all about Watson), but I was really intrigued by the new Watson Bra pattern from Cloth Habit. Instead of a low movement fabric, this baby is sewn up in a fabric with lots of stretch. The cups are higher and more modest and there is no underwire. What really got my attention was the longline option, as well as the included bikini bottom pattern. SHUT UP AND TAKE MY MONEY!

Watson Bra

Since I’m still pretty new to this whole new world of lingerie, I let the pattern hold my hand when choosing a size and following the instructions. I measured to a 30D (to recap, in case there is anyone new here, I usually wear a 28DD), which fits pretty spot-on. Which is good, because other than hold the little cups up to my boobs while I was sewing them – I wasn’t able to actually try the thing on until I was completely finished with it. Talk about a bummer if that hadn’t worked out! Thankfully, the fit is pretty good. One cup has a tiny bit of sideboob action going on – but that breast is also slightly bigger, so I’m at the point now where I’m trying to decide if it’s worth tweaking the fit for a really custom bra. I’m pretty happy with the fit of the band – it’s nice and tight, like I like it, but it’s also very comfortable.

Watson Bra

The pattern has you cut the cups and cradle in a stretch fabric, the band in power mesh, and then the cradle is lined with a non-stretch to stabilize. Lining that section was obviously a little difficult for me – and I ended up getting quite a few folds as a result. Wah. For my next make, I am going to try fusing my stabilizer to see if that helps. It’s not the end of the world with these folds – but of course I’m always looking to improve.

Watson Bra

The bra includes standard bra hardware – hooks and eyes, adjustable straps, and decorative elastic. I do like that about the pattern, because it makes it look a lot less like some kind of soft training bra that a pre-teen would wear, and more like… a cute bra without underwires, I guess.

Watson Bra

Because of the needed stretch fabric, this bra doesn’t require the same sort of fitting that a structured bra would command (such as the Marlborough). It’s very soft and forgiving. The pattern is rated as being pretty easy and a great way to introduce beginners to bra-making. That being said – while I didn’t find the bra necessarily difficult to make, I do think that the Marlborough was easier to sew! Mostly because that lycra was stretching and sliding all over the place, and getting the cups in just so required quite a bit of precision. Still, it only took me a couple of hours to make, so that should count for something.

The instructions are pretty good! I might be biased – because I’ve already made two bras, I have my copy of Demystifying Bra Fitting and Construction on stand-by, and I’ve had enough bra-making conversations to know at least a little of what I’m talking about – but I found them very easy to follow along with. One part that was missing was determining strap length, but it’s my understanding that the pattern was updated with directions on how to do this (I personally just cut two 18″ straps. Worked perfectly! They are adjustable, after all). There were a few minor parts of the pattern that I changed based on preference – such as trimming the excess fabric before topstitching the elastic to the wrong side – but what’s included with the pattern is great as-is. There’s a lot of helpful info for choosing fabrics and trims, and tips for stitch settings when choosing your zigzag stitch. Also, there is currently an entire Watson Bra sewalong happening at Cloth Habit right now, so there’s that if you need even MORE hand-holding!

Watson Bra

Here’s an inside shot. As you can see, I did not finish my seams – just left ’em raw. It seems to work fine for my other bras, anyway. In the future, I’d love to learn how to properly finish my seams – or even line the whole thing – but I really want to nail down fit and technique before I start going too far down the deep end.

Watson Bra

Watson Bra

Rather than try to source all the materials and notions myself, I decided to splurge on a Watson kit from Blackbird Fabrics. The kit includes everything you need – 4 way stretch lycra, matching powermesh, elastics and trims, metal strap rings and sliders (stupidly, that was my favorite part haha. THEY LOOK SO GOOD), even the aforementioned cradle stabilizer and cotton knit for the crotch lining (for the undies, obviously). There’s enough in the kit to make both the bra and the matching bikini, and you can choose if you want a kit for the standard band or the longline. Since my boobs run on the small side, I’d reckon I could probably make 2 or even 3 bras with how much fabric I have left over (and maybe even a little bit of trim!). This color set is sapphire blue with black trims – and it’s soo beautiful! I can’t wait to see what other color combos Caroline comes up with.

Watson Bra

Watson Bra

Here’s the matching underwear – sorry it looks so unimpressive haha. I cut the XS based on my hip measurement (I was very apprehensive about this, as I normally wear a small), and the fit is pretty good. I think the butt area needs… something. Maybe I didn’t stretch the elastic enough. I feel like it makes my butt look flat, but Landon tells me I’m being ridiculous. Either way, they’re pretty comfy. I wore them all day yesterday and didn’t get a wedgie, which is awesome haha.

Since these posts are somewhat useless to me without a live model wearing the goods (if you want THAT, go holler at Heather Lou), here’s another floating bra photo for your consideration:

Watson Bra

For a non-underwired bra, it’s surprisingly supportive! I also wore this all day yesterday (with the matching bikini, bc, duh), and it’s really really comfortable. Way more comfortable than those Bambi bras I made. And it’s REALLY cute on – I am thinking that with a couple minor tweaks to the strapping and back hook, this would make a fabulous bathing suit pattern. I just need to figure out how to stabilize that cradle – it has to stay rigid, and I think the stuff I’m using isn’t really water-friendly (and definitely wouldn’t hold up in chlorine or salt water). Any suggestions or ideas?

Also, it’s not lost on me that I would consider making a bathing suit from this pattern, but can’t bear to show my skin with the bra in this blog post. Oh well.

Watson Bra

Watson Bra

Bra making is SO MUCH FUN, you guys! Good thing that happens to be a hole in my wardrobe, because I really love making them and I definitely want to do more! I’m really looking forward to the Bra Making Workshop in Philly next weekend – I have sooo much to learn, and I know Maddie is going to be an amazing teacher!

Completed: The Soma Swimsuit, V1

4 Jun

As promised, I’ve written up a couple of posts about the new Soma Swimsuit from Papercut Patterns. I was a tester for this pattern, so I’ve actually had this finished and completed for quite some time now! While I initially agreed to test just the cross-over bikini variation, I ultimately ended up sewing BOTH bikinis because they are just so damn fun to make! In this post, though, I’ll be going over the first version – the black cross-over bikini.

Soma Swimsuit - v1

A note on pattern testing – it’s come to my attention that there has been a bit of discussion and debate about what exactly goes on for pattern testing, and what us testers get out of it. Some people have speculated that we are paid off to promote the designs, which could NOT be farther from the truth! Seriously, I WISH I was getting paid to to this – but I’m totally not. Pretty much all I get out of testing is a copy of the beta pattern, hopefully a copy of the finished pattern once it’s gone to print (not all companies offer this for testers but I think it’s a really nice gesture, personally), and a chance to see the pattern before anyone else. That’s it! Sometimes companies will give me fabric for testing – which I will always disclose if that’s the case – but for the most part, I am on the hook for providing my own fabric and notions. It is not required – or even requested – for me to post about the finished patterns, I just do it because I like what I make and I want to share it! I know some of the debate was about the same bloggers doing the testing, and while I can’t speak for the pattern designers, I will say that I have worked with the same designers for multiple testings, and it’s my assumption that they like to stick with the same people because they know they will get relatively consistent results, especially when it comes to sizing (it’s easier to tell if your size whatever has something wrong with the grade if you have that same person testing the same size for you consistently, if that makes sense).

I personally test my patterns the same way I sew a normal pattern – make a muslin if needed, do any alterations for fit that are necessary, and change the construction steps if I think it makes more sense to do so (and sometimes that ends up in the finished pattern – such as the lining method for the Flora dress, some of that was my feedback 🙂 ). I provide very detailed and honest feedback (VERY! Like to the point of maybe even being annoying 😛 haha), and I always meet the relatively short deadline. I would like to assume that’s why companies continue to reach out to me for testing, however, I’m recently aware that there are probably also people who use my feedback strictly for promotional purposes. If I offer good feedback and I don’t see translate to the finished pattern, that’s my sign that they probably don’t actually want my feedback and I just don’t work for with company anymore. Further, I don’t always blog my finished test makes (sometimes I only have time to do a fit muslin and tear the instructions a new asshole), so if anyone is contacting me in hopes of getting a sales boost from a finished project, they may be in for a rude awakening hahah 🙂

I’m so sorry if anyone got the wrong idea when it comes to pattern testing; the unglamorous truth is that we have a quick turnaround to check out the fit and instructions of the pattern and provide as much feedback as we can before the release. That’s it! Obviously I’d love to earn money doing this (ahh, who woulnd’t??), but the pattern barter is fine with me for now. I like helping my friends and giving them feedback so they can put out an even better product. Any other questions about testing from a tester’s perspective? Holler at me in the comments!

Ok, now that that’s off my chest – swimsuit time!

Soma Swimsuit - v1

Like I mentioned earlier, this is the Soma Swimsuit from Papercut Patterns, version 1. I’m afraid I went the boring route for this one – I had black swimsuit fabric & lining on hand (destashed from a friend’s supply, so I’m not sure where it originally came from) with the intention of making a black bikini, and I liked Katie’s version in the promo photos soo much that I decided to blatantly copy it because I have no shame.

Soma Swimsuit - v1

This swimsuit includes a lining, regular elastic, fold over elastic, and little bra notions (hooks, rings, and bra strapping). While I did have the fabric and lining on hand, I had to venture out to the fabric store to buy everything else. I was able to find almost everything I needed at Joann; however, be aware that they have a VERY limited selection of colors in these notions. Basically, they only have black and white – and their fold over elastic is expensive as shit, btw. I recently discovered Peakbloom as a wonderful source for FOE- seriously, look at all the prints and coloursssss omg – but I have yet to actually purchase anything from them. If you’re stuck in a FOE desert and need something other than black or white, definitely give them a look!

Soma Swimsuit - v1

The only thing I could not find at Joann was bra strapping. I actually didn’t even realize that’s a thing that exists! It’s not exactly the same thing as elastic – it’s sturdier, it doesn’t stretch as much, and it just looks more polished. After making this swimsuit, I did eventually find it at Joann’s (it’s in the section where you buy trim by the yard), but it only comes in white. For my bathing suit, I took a more creative approach and bought a bunch of $1 elastic headbands from Walmart (the kind that feel like they’re made from bra strapping, hahaha) and cut those apart to use. They probably aren’t ideal – they are starting to fray where I cut them and it looks kind of bad – but it’s a good option in a pinch.

Soma Swimsuit - v1

Another notion I used that is not listed in the instructions is bra cups! I don’t know about y’all, but I absolutely abhor the idea of nipping at the beach, so a little extra coverage was a must. While the insertion of bra cups is not included in the instructions for the swimsuit, it was pretty easy to figure out. After sewing the darts, I placed the lining over the bra cups in the correct position and smooshed the cups down flat. I sewed around the entire cup with a zigzag stitch to secure it, and then assembled the bikini top as instructed. That’s it! It was really easy and YAY NO NIPPING!

Soma Swimsuit - v1

Oh, and in case you were curious – my bra cups are cut from old swimwear. I pick up tops at the thrift store when they’re on sale for $1, and I cut the cups out. It’s cheaper than buying new cups (which I’ve found can run as high as $8 a pair, ouch), it recycles the old cups, *and* I’m 100% sure they are swimwear appropriate since I literally cut them out of swimwear.

Soma Swimsuit - v1

This was my second attempt at sewing fold over elastic (my first attempt is now buried in the trash, ha)(first attempt was not this swimsuit, btw, it was a few months ago) and I think I did a pretty ok job, all things considered! I was originally trying to sew the elastic in one fell swoop – which seems to be the way most people instruct you to attach it. The instructions for this suit instead have you sew it on in two gos – once with the elastic flat, and once with it folded over itself (on top of the first stitching). It takes a tiny bit longer since you are essentially sewing the same seam spot, but it actually goes faster since you don’t have to worry about your fabric sneaking out of the elastic. Which is AWESOME. Consider me a FOE convert – this stuff is fun!

Soma Swimsuit - v1

The swimsuit bottoms just have plain ol’ elastic encased in the legs (just like the Bombshell swimsuit). I used black because that’s what I had on hand. I love the high cut of the back leg – cheeky! 🙂

Soma Swimsuit - v1

The instructions on this pattern are really great, by the way! From attaching the elastic (both plain and FOE), to dealing with the bra straps, everything is very clearly written out and has helpful illustrations. I especially like how the lining is attached to the fabric – the bottoms have some pretty clever attaching so there are no exposed seams. Everything is attached flat, similar to underlining, which means you don’t deal with a lot of fabric shift.

For sizing, I chose the XXS, which is my normal size for Papercut Patterns. I didn’t have to make any alterations for fit – this is exactly how the pattern is drafted, both the top and the bottom. For fit reference, I generally wear a 28DD in bra and a S in underwear.

Here are some close-ups of the construction:

Soma Swimsuit - v1

I know these don’t look lined, but I promise they are. My lining is black, so it matches the outside fabric 😉

Soma Swimsuit - v1

Almost this entire bikini was sewn on my sewing machine, btw. I did use my serger to construct the main seams of the bottoms, as well as for finishing all the edges when attaching the lining to the shell, but that’s just bc it’s faster! All the finishing was done with a zigzag stitch. You can ABSOLUTELY make this on a standard sewing machine – I (mostly)did!

Soma Swimsuit - v1

Soma Swimsuit - v1

Soma Swimsuit, v2

Soma Swimsuit - v1

I’ve had a few people ask me about the support on this bathing suit, and I’m afraid I can’t really give you a good answer as I don’t personally need a lot of support for my lil’ boobs. I’d venture to guess that it probably gives about the same as a string bikini – it’ll keep the girls in place, but you prefer a lot of lift this probably isn’t the pattern for you. As far as adjusting the cups for a bigger size, again, no idea! This size fit me straight out of the envelope.

Now, if you want to talk about whether or not this guy is suitable (lolz) for actual swimming – I can vouch for that! While I did take these photos way before I actually got in the ocean (in retrospect, probably should have waited… I’m not quite as pale anymore! SORRY FOR MY WHITENESS Y’ALL), I wore this suit twice while in Florida, both times in the ocean. I’m not a crazy swimmer or anything – more of a jump in the waves and bob around on a float kinda girl – but I had no issues with the suit falling open or anything like that. It’s comfortable *and* cute! What more could you ask for?

Soma Swimsuit - v1

I guess that’s it for now! Big thumbs up to Papercut for offering up such a great pattern – I’m so excited to see everyone’s versions that come out of this!

A couple things before I sign off here –

– Please give a warm welcome to my newest sponsor, Indie Stitches! Caitlan has a gorgeous little shop full of some of the best handpicked indie patterns – and she’s currently offering 10% off all purchases through June! Use the code LLADYBIRD to claim yo’ discount!
– As a side note, whenever my sponsors offer a discount to my readers, you can find it by hovering over the badge in my sidebar. If there is a discount offered, it will show in a white box if you hover your mouse over it. Just an fyi 🙂
– Lookeeeee me, I got my first ~magazine spread~! My favorite machine needle company, Schmetz, has a free online magazine Inspired to Sew and I’M IN THE JUNE ISSUE. A whole two-page spread, woohoo!! You can download the free issue featuring moi here. Let me know what you think!
– Also, I’m apparently in a recent issue of All You magazine as well. Nothing super exciting – it’s just a photo and quote about my experience with Healthcare Bluebook (that shit is awesome, btw. Saved my ass when I was stressing over a kidney stone+no insurance last year!). If any of y’all see my mug in there, pleaseeeee let me know! I’m dying to know what part of my conversation they quoted haha 🙂

Ok, that’s all! Stay tuned later this week for version 2 of the Soma Swimsuit! :DDD