Good morning, V1419 Sewalongers – and Happy Muslin Day! Yes, today is all about the muslin – a very important part of coat construction (some of y’all make refer to it as a toile, same difference!). After all, you don’t want to spend all this time and money making a coat that doesn’t fit once it’s finished… do you? (if the answer to that is no, then, um… do you want to share some of your spare time and money with?? haha!)
Some notes & thoughts:
– I started with the size 8, which seems to fit pretty well right out of the envelope! The small bit of pulling you see under the bust is not noticeable in real life (and, god, these pictures are awful. I took them three times and these are the best you’re gonna get. Something about shooting a *white* muslin is just… ugh. And yes, I even tried against a not-white background. No dice, looked worse. Deal with this.), and some of the wrinkles were actually pressed into the muslin. I think that, overall, this looks good, and I will be making no further adjustments other than shortening the length and the sleeves. Thoughts?
– Notice when I said I made a size 8? That’s at least 1-2 sizes bigger than what I usually cut in Vogue patterns – this lady runs a little snug! For what it’s worth, my body measurements correspond very closely to the size measurements for the 8 (I’m about 1/2″ bigger all around). If you’re hung up on sizing, I suggest start with the size that works for your measurements and make a mock to see what direction to take the fitting. I know this goes against everything I’ve ever told y’all about using the finished measurements to start, but maybe Vogue has been hearing our cries about the extra ease? 🙂
– I used a medium weight muslin to make this mock-up, and it’s a bit more drapey than the fabric that I chose. This is fine, as I’ve tried on the original and I like the way the dramatic shape looks on me – but if you’re still debating whether or not to use a drapey fabric, try making the muslin with a fabric that has a similar hand to get a feel for how you like it.
– When trying on your muslin, make sure you are wearing the same types of clothing you plan on wearing with the finished coat – for me, that’s a long sleeve tshirt and jeans. If you try this on with a lightweight tank top, for example, the fit will be totally different (and, um, might not work with a big sweater!). Speaking of big sweaters – this style of coat is NOT the thing to wear with your giant chunky knit warmest wool pullover. It’s supposed to be very sleek and fitted – the type of fabulous coat that you would wear over a cocktail dress. If you have your heart set on making this an every day winter coat to wear over multiple layers, you may want to consider sizing up to accommodate the extra bulk.
– Need to make some adjustments? Not a big deal! While this pattern does not have traditional style lines, it *does* mark the bust apex and waistline, so that will give you a general idea where to add your adjustments. Due to the time restraints we have for this sewalong, we will not be covering flat pattern adjustments. A few people have asked whether or not this particular pattern can handle a FBA (full bust adjustment) – and the answer is yes! You’ll need to first remove the lower skirt portion of the coat, as well as the sleeves, make your FBA (I like to use the method explained in Fit for Real People)… then rotate out the dart you create to retain the original lines of the pattern, and reattach the sleeves and skirt (smoothing and blending your lines as needed). Don’t know how to rotate out a dart? Here are some links that you may find useful: The Mahogany Stylist, Vicki Kate Makes, The Sewaholic Blog (with extra links!). Alternately, there are zillions of tutorials online of how to do a FBA/rotate a dart – just Google and pick your favorite!
– For length adjustments – you can actually just hack it right off the bottom of the sleeve/length. Which is exactly what I plan on doing, fyi.
– If you’re one size in your bust and another at the waist, you can grade the sizes together to get a better fit. There’s a brief write-up on how to do this here on my blog, but essientally you’re just drawing a line to connect size x to size y to seamlessly blend between the two.
Finally – we have an Offical V1419 Coat Sewalong Flickr Group! Whoop whoop! The group is open, so please feel free to join and upload your photos to share with everyone – fabric selections, muslins, anything V1419 coat related! Additionally, there are forums if you need to ask questions or advice on fitting or selecting fabric. Meg & I will be manning the group and forums as needed, but please feel free to jump in and help if you see a question that you know the answer to! 🙂
Oh, and don’t forget the Mood Fabrics discount code, if you haven’t already purchased your fabric. “lladybird1013” is good through 10/13/14 for 10% off your order (not including PV codes or dress forms). If you missed the V1419 fabric selection post, you can see it here.
Don’t forget to read up on Meg’s muslin post over at the McCall blog! How is everyone’s muslins coming along?
Well well, 3 posts in one week! That doesn’t happen too often, huh? Hopefully y’all aren’t tooooo sick of hearing from me, because I have lots to say apparently!
Starting with yet ANOTHER muslin post. Forreal, tho, y’all were so helpful in my last muslin post, that I’m sticking my hand back in the cookie jar again. A little help, yes yes?
First things first, you probably noticed that this coat looks entirely different – that’s because it’s a different pattern altogether! I ended up scrapping the original Vogue pattern plan – a shame, because I really wanted to use it (it was a gift from a reader, and I like to make use of awesome things, see), but there’s no point in trying to make something work that needs, well, that much work. Especially considering all the modifications I’d have to make beyond just sizing – including drafting a new lining, facing, and undercollar. No, no thank you.
So I dug around in my stash and pulled out Vogue 7666, which happens to actually be in my size. And to make things extra exciting, this pattern has all sorts of fun goodies in the instructions for creating a beautiful hand-tailored coat – things like separate lining pieces, instructions for padstitching, a marked roll line, etc. Fun!
I made up a quickie muslin and here are the pictures! Based on everyone’s suggestions, I am wearing this muslin with a sweater underneath, and I slipped some shoulder pads in the muslin as well. The shoulder pads may be on the large size, I dunno, they were in my stash.
I think it fits much better than the first, off the bat. Look, the arm holes are normal!
I can’t tell if the shoulders need to be narrowed a little, though?
Back and sides look ok.
I know the back looks a little loose, but I honestly can’t go much smaller without making the coat difficult to move around in.
Also, ignore that weird shit going on at the bottom half – there will be a back vent there, but I didn’t bother sewing it in the muslin, ha.
I know the collar and lapels are kind of weird and pointy, but I like them! Keep in mind that they will be a little bit smaller – the 5/8″ seam allowance is there, and once I get the facing installed there will be notches and topstitching and all that.
I also need button help! What would you choose? I really love these black glass buttons from Mood Fabrics – one, two, three or four?
Or do you have a better suggestion? My only requirements are that they are black (sorry, but I think anything other than black is just going to look off with my fabric choice), 1″ with shank, and they reeeeally need to be $3.50 or less because I need 8! Again, you can see my fabric and pattern in this Instagram picture.
Sooo, to sum up: coat muslin #2, y/n? See any fitting changes I need to address before I start slicing in to my beautiful coating?
I’m afraid I don’t have a finished object to show y’all today. For exactly one week now, I’ve been dealing with a kidney stone that will NOT leave my body. Seriously, I’ve had these before and they generally pass within a day or two, but these little shits have made a home inside me, I guess, and no amount of water (or other weird home remedy, yes, I drank the olive oil and lemon juice, eww) will expel them. I hate peeing into a screen, I hate taking painkillers, and I hate this little segment of my life right now. I missed half a week of work last week, and get up to go to the bathroom about every twenty minutes on average. Shit blows.
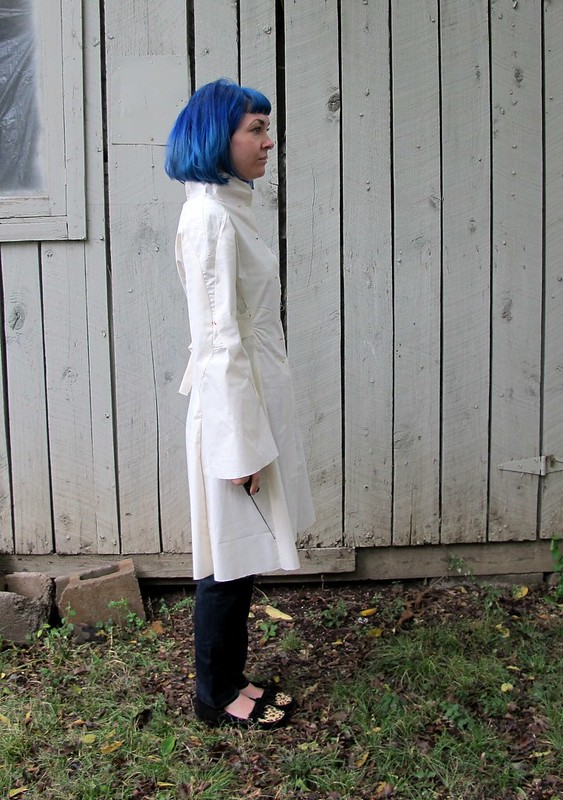
Anyway, enough about me and my TMI, let’s talk more about… me! While I didn’t make anything finished, I did finish the muslin for my Vogue coat! Let’s have a look see.
To be honest, I’m a little underwhelmed. It’s just so… meh. But then again, it’s a coat muslin made with a patchwork of different muslin fabrics, two different sleeves, and I’m not wearing a sweater under it. I was, but I took it off for the pictures because I don’t know why. I guess I wanted to make sure that it still looked good when it was loose. It’s not like I always wear a sweater 24/7, this is Tennessee we are talking about here.
I can’t tell if it really looks ok or if I’m just delusional. Help me.
My pattern was a size too big to start, so I sewed most seams with a 3/4″ seam allowance and I think that really helped with pulling in the fit. It still looks a little loose, but this is also lightweight muslin and not a heavy coating.
The underarms, though. Yikes. Need to raise that quite a bit.
So, more about those sleeves. The right side is the original pattern piece. It’s terrible. I actually left it on so we could laugh at it together. The left sleeve is a two piece sleeve from my Fabiani coat (whyyy can’t I just wear that this winter? Wish it still fit 😥 ). I definitely like the two piece better, but it needs some tweaking as it’s a bit tight when I have on a bulky underlayer. I sewed it with the same 3/4″ seam allowance, so I think the normal 5/8″ will be fine.
Ahaha! See how bad the underarms are? Granted, that’s the shitty sleeve, where the problem was actually worse.. but still. It’s bad either way.
Speaking of the original sleeve, this is why it’s so bad. It is a straight line from underarm to wrist – no tapering whatsoever. So the cuff, you can see straight to the elbow. Who thought that was a good idea?! God, it’s so terrible.
Anyway, I’m still on the fence about this, although I will say that leaving it alone overnight on my dressform (which, if you were wondering, is almost entirely what I use the dressform now these days. Putting shit on it so I can decide if I hate it the next day) gave me a ~fresh eye~. I guess I just want to make sure I’m not off my rocker here.
To recap, the fabric I’m using is this black and white checkered coating (which I’m almost having second thoughts about because, ughhh princess seams) and I haven’t settled on a lining, but I’m leaning heavily toward tango red. Also haven’t picked buttons (lolol I’m a hot mess), but I’m thinking toggles would be FUN.
Soo, what do you think? Vogue 2765, yea or nay? See any other fitting issues I failed to mention (beyond the underarms)? Want to sew a coat along with me (I’m going the “barely tailored” route)? Have any well-wishes you’d like to share with a lady who needs to exorcise this demonkidney stone? I’m all ears!
It’s time to get crackin’ on some muslins! Whoooohooo… who’s excited!? Anyone? Anyone?
I will admit – making a muslin isn’t exactly the most exciting way to spend your precious sewing time. However, it is pretty necessary to ensure that you get a good fit, especially with something like trousers or shorts where you can’t just sew a wider seam allowance to get rid of the problem. Lots of pattern alterations involve the flat pattern before the fabric is cut, and it is crucial that you figure this out before you cut into your real fabric & then despair that the crotch is too long. Long crotches are pretty tragic, imo. So let’s get muslinin’, y’all.
First, figure out what size you are going to be sewing up. Here is the back of the Thurlow envelope. These pants don’t have too much ease in them, but it IS there. If you like that, that’s totally fine – just cut the size recommended. If you want something a little more form-fitting, I recommend checking out the finished measurements & basing your size off of those. PROTIP: the finished waist measurement doesn’t actually hit your high waist, as in the smallest part of your torso. These actually hit right at the belly button, so that would be where you need to measure if you are going by the finished dimensions. My measurements put me between a 4 and a 6, but I cut a 0 (since right at my belly button is 29″) and added some room at the butt and I got a great fit. Trace your pattern if you are unsure what size to cut, you can always make another muslin!
The Thurlow has a lot of pattern pieces, but let’s not get ahead of ourselves – we only need a few for a proper muslin! I have circled the ones you’ll need to cut out. The pocket lining pieces ARE necessary (since they fill the void where the pocket slash is on the front pieces), but don’t worry about the facings. If you are making trousers, you can go all out & muslin the full lengths, or you can be lazy like me & just make shorts 😉
It is a good idea to mark on your muslin where the welt pockets will sit – you don’t have to sew the actual pockets, unless you are just REALLY feeling it – in case you determine you need to move them. Don’t worry about the zipper, you can just pin the front closed.
Books: The Perfect Fit (actually, I think all of y’all should buy this book – regardless of whether or not you are making pants) Pants for Real People
WHEW that’s a lot of links! Don’t tell me you don’t suddenly feel armed & prepared!
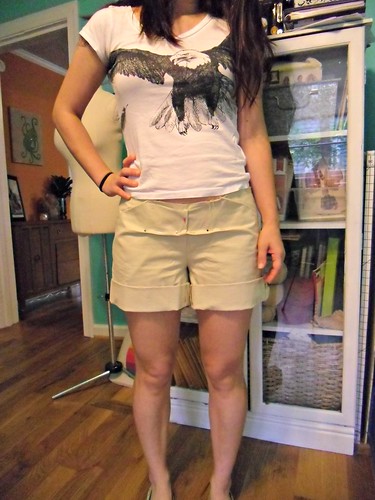
So here’s the fun part… I’m going to show you *my* Thurlow muslin! This is actually the muslin I made in the ‘way beginning, and no, I have no idea why I still had it stashed (I even moved across town during this time!). But, whatever, I guess it came in handy :B Also, fair warning: these are pretty unflattering.
Here you can see I’ve got some weird excess fabric in the front of my shorts. This is the crotch depth, and it clearly needs to be shortened (I’m petite, so it makes sense that I have a short crotch, I guess haha).
Side view is ok, apart from that itty bitty FUPA the shorts give me.
Oh god, what is going ON in the back!?
As my ass appears to be eating directly into my shorts, it would seem I need to add some room back there.
To fix the crotch depth, I simply pinned out the excess fabric & tapered it to the sides. Doesn’t it look much better?
And here’s the finished result of that. No more perma-wedgie, yay!
Well, that turned into a super heavy post! Do let me know if you have any questions & I’ll do my best to answer. Feel free to post your muslins in the Flickr Group and let’s help each other!
I’m putting a temporary hold on the majority of my projects so I can concentrate on sewing up my birthday dress – I have a little over a month, so time should not be an issue here. I don’t even have plans for my birthday yet (it’s on a Monday lol) but I like to have a dress anyway!
I’m sewing up the Bombshell Dress, following the Craftsy course. I have this lovely floral cotton that I plan to make it up in… well, assuming I have enough fabric (don’t worry, I have a back-up plan!) 🙂 I have stressed WAY too much about the fit of this pattern, but after countless muslins, I have the fit down & I’m ready to start constructing the actual dress. Yay!
A little word about working with this pattern – the cups of this bustier top are drafted for a B cup. Not only that, they are made to be a little on the revealing side. They are small. If you are anything larger than a B, you are going to want to redraft the cups – and it is going to be a giant pain in the ass, sry2say. But it’s totally doable and it’s totally worth it, promise.
For my pattern, I initially cut out the second smallest size (I think it’s a 6?), based on the waist measurement. For the record, I wear a 32DD so I have a fairly small ribcage in comparison to a rather prominent bust. I knew I was going to have to make some adjustments but I had no idea there were going to be so many!
Here are the size 6 pattern pieces, thread-traced all lovely:
And here are my pieces after I made a million adjustments:
I also had to adjust the rest of the bodice pieces:
My adjustments are the black marker lines – basically, completely different pattern pieces! ARGH.
I do have some fit tips for those large-bust-with-small-ribcage ladies, however!
First of all… if you have access to a dressform, make use of it! To get those proportions, you need to put on a well-fitting bra & pad it out. Use your favorite bra – you can always take it back when you’re finished fitting.
Style lines are EXTREMELY helpful with fitting – they give you a nice roadmap for where your pieces need to hit & where your seamlines should be. I know they make tape for this purpose, but I didn’t have any on hand… I used some (neon yellow)twill tape I had in my stash, and just pinned it into place. I can’t even tell you how much easier it made fitting that muslin (this was muslin #3 at this point – first one was pinned to my body – a disaster -, second was pinned on the form without the style lines – also a disaster).
The twill tape pulled down a little on the left cup, but you get the idea.
My other major tip for fitting this muslin is to cut GIANT seam allowances. Depending on how much room you need to add to those lil cups, you are going to want a minimum of 2″ SA to play with (preferably closer to 3″ or even 4″ though). This will save you the effort of cutting out a zillion little bodice pieces (and thread tracing all of them, argh) when you realize you don’t have enough seam allowance to cover the bust.
I ended up making several muslins – I think 4 complete (bust & midriff), and 2 more of just the bust cups. And yes… all of them were thread-traced and had the grainlines marked and everything lol. Took forever! In addition to all the size changes, I raised the top of the pieces by about 5/8″ to get all the seam lines to match up. I think this is something that most larger-busted gals are going to have to do, so just a word of warning.
I don’t want to frighten anyone away from trying this pattern, however! I really learned a LOT fitting the bodice, and I feel really confident with the finished muslin. I absolutely recommend this course if this kind of fitting is something you want to explore more in-depth. I think the fitting sections alone are worth the price of the course 🙂
Ok, with all that blab… let’s see the finished muslin, yes?
I don’t plan on wearing this dress with a bra – and it fits great without, but I didn’t want to take bra-less pictures to post on the internet! I don’t think we’re that close, yet 😉
As a side note, my sweater is almost finished – I blocked it over the weekend!
Just need to stabilize the button bands & sew on the buttons 🙂
Welcome to 2012, everyone! Did you make any resolutions for the new year? I only made one, forreal-legit resolution, and I actually made it just now (as opposed to pre-2012): I have decided to enter the world of adulthood & start using proper capitalization on this blog. No real reason in particular except that it makes it easier to read. So there you go – my Christmas gift to y’all!
Another goal for 2012 started running through my mind last night while I was working on my coat muslin:
Dear Lauren,
You are not allowed to buy anymore fabric this year until you cull that stash under control.
Love,
Lauren.
EXCEPTIONS (ah, but isn’t there always an exception?): January & July, my amazing local fabric store has a 40%-50% off sale on all fabrics. I generally use this opportunity to stock up for the upcoming season, and to pick up fabrics that I know I will use but are normally a bit cost-prohibitive (such as silk organza, and extra yardages of rayon lining to, er, hoard). So I’ll allow myself to buy stock-up fabric during these sales, and also a piece or two for funsies. Another exception is anything that involves my mega-cheap fabric scores – flea markets, yard sales, thrift stores, donations, etc. I mean, they’re practically paying me to take this stuff! I’d be a fool to not grab it and go, amirite?
Speak of the fabric sale, I already hit that shit up yesterday (first day!) and picked up a rather modest pile (considering my usual history of how much I tend to spend…):
The top two don’t count; they are shirting fabrics for Landon’s Negroni. More on that when I make a muslin!
That black under the plaid flannel is dark-wash denim with a slight stretch (for another pair of wide-legged trousers), the stripey is jersey knit with navy & white stripes, the white is boring old cotton batiste (for lining summer dresses), the shiny blue is silk shantung (actually from Mood fabrics), the green is Bemberg rayon lining for my coat (yes! I went with green!), and the big blob at the bottom is my coating fabric from Mood.
Speaking of my coat – have some muslin pictures!
This is actually my second muslin – the first muslin was almost workable, but needed a little bit of tweaking. This is what I ended up with:
– Remove 1/4″ from top & bottom sleeve side seams
– Reduce sleeve head ease (appx 7/8″ at peak)
– Taper lapel 1/2″
– Shift button position
– Shorten back belt 3/4″ on each end
– Remove 5/8″ from center back seam
– Remove 3/4″ from side back seam
– Raise underarm seam 1″
– Reduce shoulder width 5/8″
I think I’m pretty happy with the fit! Tell me what you think, fitting princesses & princes.
The underarm seam was the most confusing adjustment I made. Clearly there was something wrong with the first muslin, as I couldn’t move my arms at all without the entire coat joining the parade. I checked several fitting books, but none of them mentioned the actual armhole unless they were referring to a sleeveless top. I finally determined that the armhole was too low (which makes sense, as the pattern is a slight bit too large for me), and raising it 1″ pretty much eliminated the problem.
the lapels were also a little too wide around the neckline which resulted in some gaping. I pinched out the excess and re-smoothed the lines. There is still a small amount of gape but I want to be able to wad a scarf in there so I’m ok with it.
The back in cinched in via the belt, which is a design feature i loooove. Check out my mismatched sleeve caps – I put one in before I realized it needed to be reduced.
Side looks okay.
What do we think about the overall length? I folded back the sleeves the suggested 2″, but I think they are a smidge too long (like, no more than 1/2″). I like the coat length, although I realize now that I hemmed it 2″ and the pattern calls for 3″. So – current length or 1″ shorter? Eh?
Transferring the fitting adjustments was a PAIN IN THE REAR. This coat has separate pieces for everything – coat, lining, and interfacing! So every adjustment was transferred three times. And I will just (wo)man up and say right now that I did it all to the pattern tissue – no tracing. Whoever owned the pattern before me wrote all over it and made their own fitting adjustments, so I didn’t see much of a point in preservation. I will include my fitting notes should someone obtain this pattern after me, and they can re-add the stuff I cut off. Or something. Don’t be mad!
Anyway, I’m pretty happy with the overall fit of the coat! I think everything looks good & I’m ready to cut straight into the coating fabric. I have my (green!)lining & I picked up some giant covered buttons. Oh, and 3 yards of 72″ horsehair interfacing. Hopefully I won’t need to buy interfacing again until 2013 😉
continuing my saga with the clover, here is muslin #3. yes, i made a second muslin and no, there are no pictures because i made them in brown fabric & you couldn’t see ANYTHING except the fact that i was wearing shorts (shorts muslin ftw!).
i have stopped hyperventilating about using up my stretch fabric in a thousand muslins, as i had a fabric epiphany the other morning & realized i had an entire stack of this awful polyester that i can’t seem to get rid of for some reason. there is just the right amount of stretch, and several yards of it – which, if i remember correctly, cost me something like $5 for the whole stack at a thrift store. why i have kept it for so long, i can’t tell you, except that obviously fabric hoarding *does* have it’s benefits 🙂 so anyway, i’ve got plenty of fabric to keep making muslins. yay!
to be frank, the only thing keeping me cranking these out is knowing that once i get it perfect, i can use this pattern over & over… and also as a block for other pants-fitting needs.
i don’t think i’ve quite reached the wearing point yet, but i know i’m close. what do y’all think? so far i have shorted the front crotch by 1 1/4″ (I KNOW. and it looks like i need to shorten it more!), added approx 3/8″ FBA, and lengthed the back crotch an extra 1/2″. oh, and i tapered the legs about 1/4″ down the sides. excuse the lumps at the hips – that will be smoothed out in the final pattern.
i may take the waist in a smidge more as it’s the smallest bit too loose
i still get a little excess when i stand a certain way… not sure if that’s something that can be adjusted out, or if it’s just the nature of wearing tight-fitting pants like these.
excuse the panty lines, but hey – the fit looks good back here, no? can i also add that i think it’s hilarious that i need a FBA top & bottom? hahahaha
these were originally going to be a ~wearable muslin~ but i don’t think i’m quite there yet. i do see a light at the end of the tunnel, though!
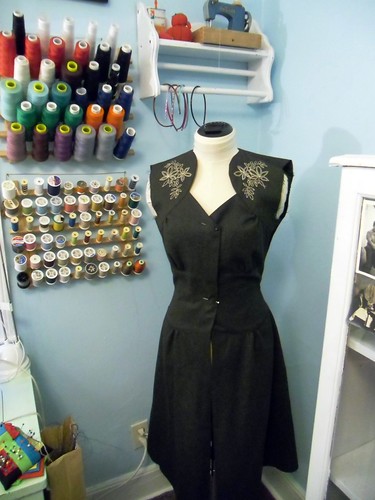
in other news, here’s a sneak peak at another project i’m working on:
ceylon in green wool. it’s been on the backburner for a week or so because i decided to hand embroider the yoke on a whim. i like the way it’s looking, though!
internet, i know we are close, but we are about to get real close with this post.
starting with my butt.
i just finished up my clover muslin, and i need help with the fitting! help! help!
there are lots of wrinkles at the crotch & sides, and the butt is straining. the waist & legs fit great, as do the hips (minus the butt area). i’m thinking i need a swayback adjustment, which is just confusing me because i’ve *never* had swayback issues with clothing – both patterns & ready to wear. huh.
here, have some more pictures.
this does not show in the pictures, but there is a small pool of excess fabric at my lower back.
what do y’all think? swayback or something else?
also, if it’s a swayback, how much am i supposed to add/remove? the diagrams on the coletterie are great, but all they say are slash and spread. need some guidance here, plz.
on a related note, the fabric for these pants is a mostly-decent stretch poplin i bought from fabric mart for something like $2/yard. it is kinda sorta see-through, which means future pants will be underlined – not a problem, since the pattern called for about 2x as much fabric than actually used wtf. also, no love for fabric mart – i had some problems with my post office, which resulted in the package being returned to sender (ok, i put the wrong zip code on the address because i am forgetful), and when i emailed fabric mart for a solution, it took them nearly a week to get back to me. in the meantime, the post office found the package, corrected the address, and had it shipped to me in less than 24 hours. i am not planning on ordering from fabric mart again.
enough about fabric mart, let’s talk about my pants!
hi everyone, i finished my coat over the long weekend!
then i discovered my camera is jacked up, the flash doesn’t work, and it’s been gross and rainy and gray. soo no pictures, sry sux 2 b u, etc etc.
i’ll get some up as soon as i can!
in the meantime, i’m working on my newest dress – vogue 9668.
i cut a 6 for the bust size and an 8 for the waist and hip. spent most of my saturday chopping the tissue up to allow for a full bust adjustment. i would link y’all to an online tutorial, since FBAs really are a lifesaver (and they are kinda fun, if you are into chopping up pattern tissue and retaping it a zillion times), but it looks like my favorite one was deleted 😦 i consulted my copies of fit for real people (aka the book my roommate saw laying on the counter and laughed at me for buying it, bc the clothes on the front are so awful) and the perfect fit (bc… idk, i guess i like having multiple fitting books or something).
this is what my pattern piece looks like now:
i need to shorten that side dart just a pinch, but i wasn’t in the mood.
my muslin is finished and it fits perfectly!
i only made a muslin of the bodice bc, honestly, the bottom is a bias circle skirt and that doesn’t really require fitting.
oh, and that’s not really muslin, it’s some horrible 60s green and white polyester monstrosity. and it is wrong-side-out, bc i drew my pattern markings (IN SHARPIE HEH HEH goddd i’m such a rule breaker) on the right side and just flipped the pieces over and ughh whatever have another picture:
looks good, y/y?
i’m waiting to cut out my fabric pieces. i need to stay the neckline with silk organza, but the tutorial i am following says it needs to be done before i actually cut out the bodice.
in the meantime, i went to the store on my lunch break and bought a bunch of skinny headbands, so i’m gonna spend my (possibly snowy? ew)evening making some cute little bow headbands a la casey brown.
I’m so excited to finally announce my 2024 workshop dates!!
I currently offer two workshops, let’s talk about them! (Scroll to the end of this post if you just wanna get to the dates, or holler at my WORKSHOPS page!)
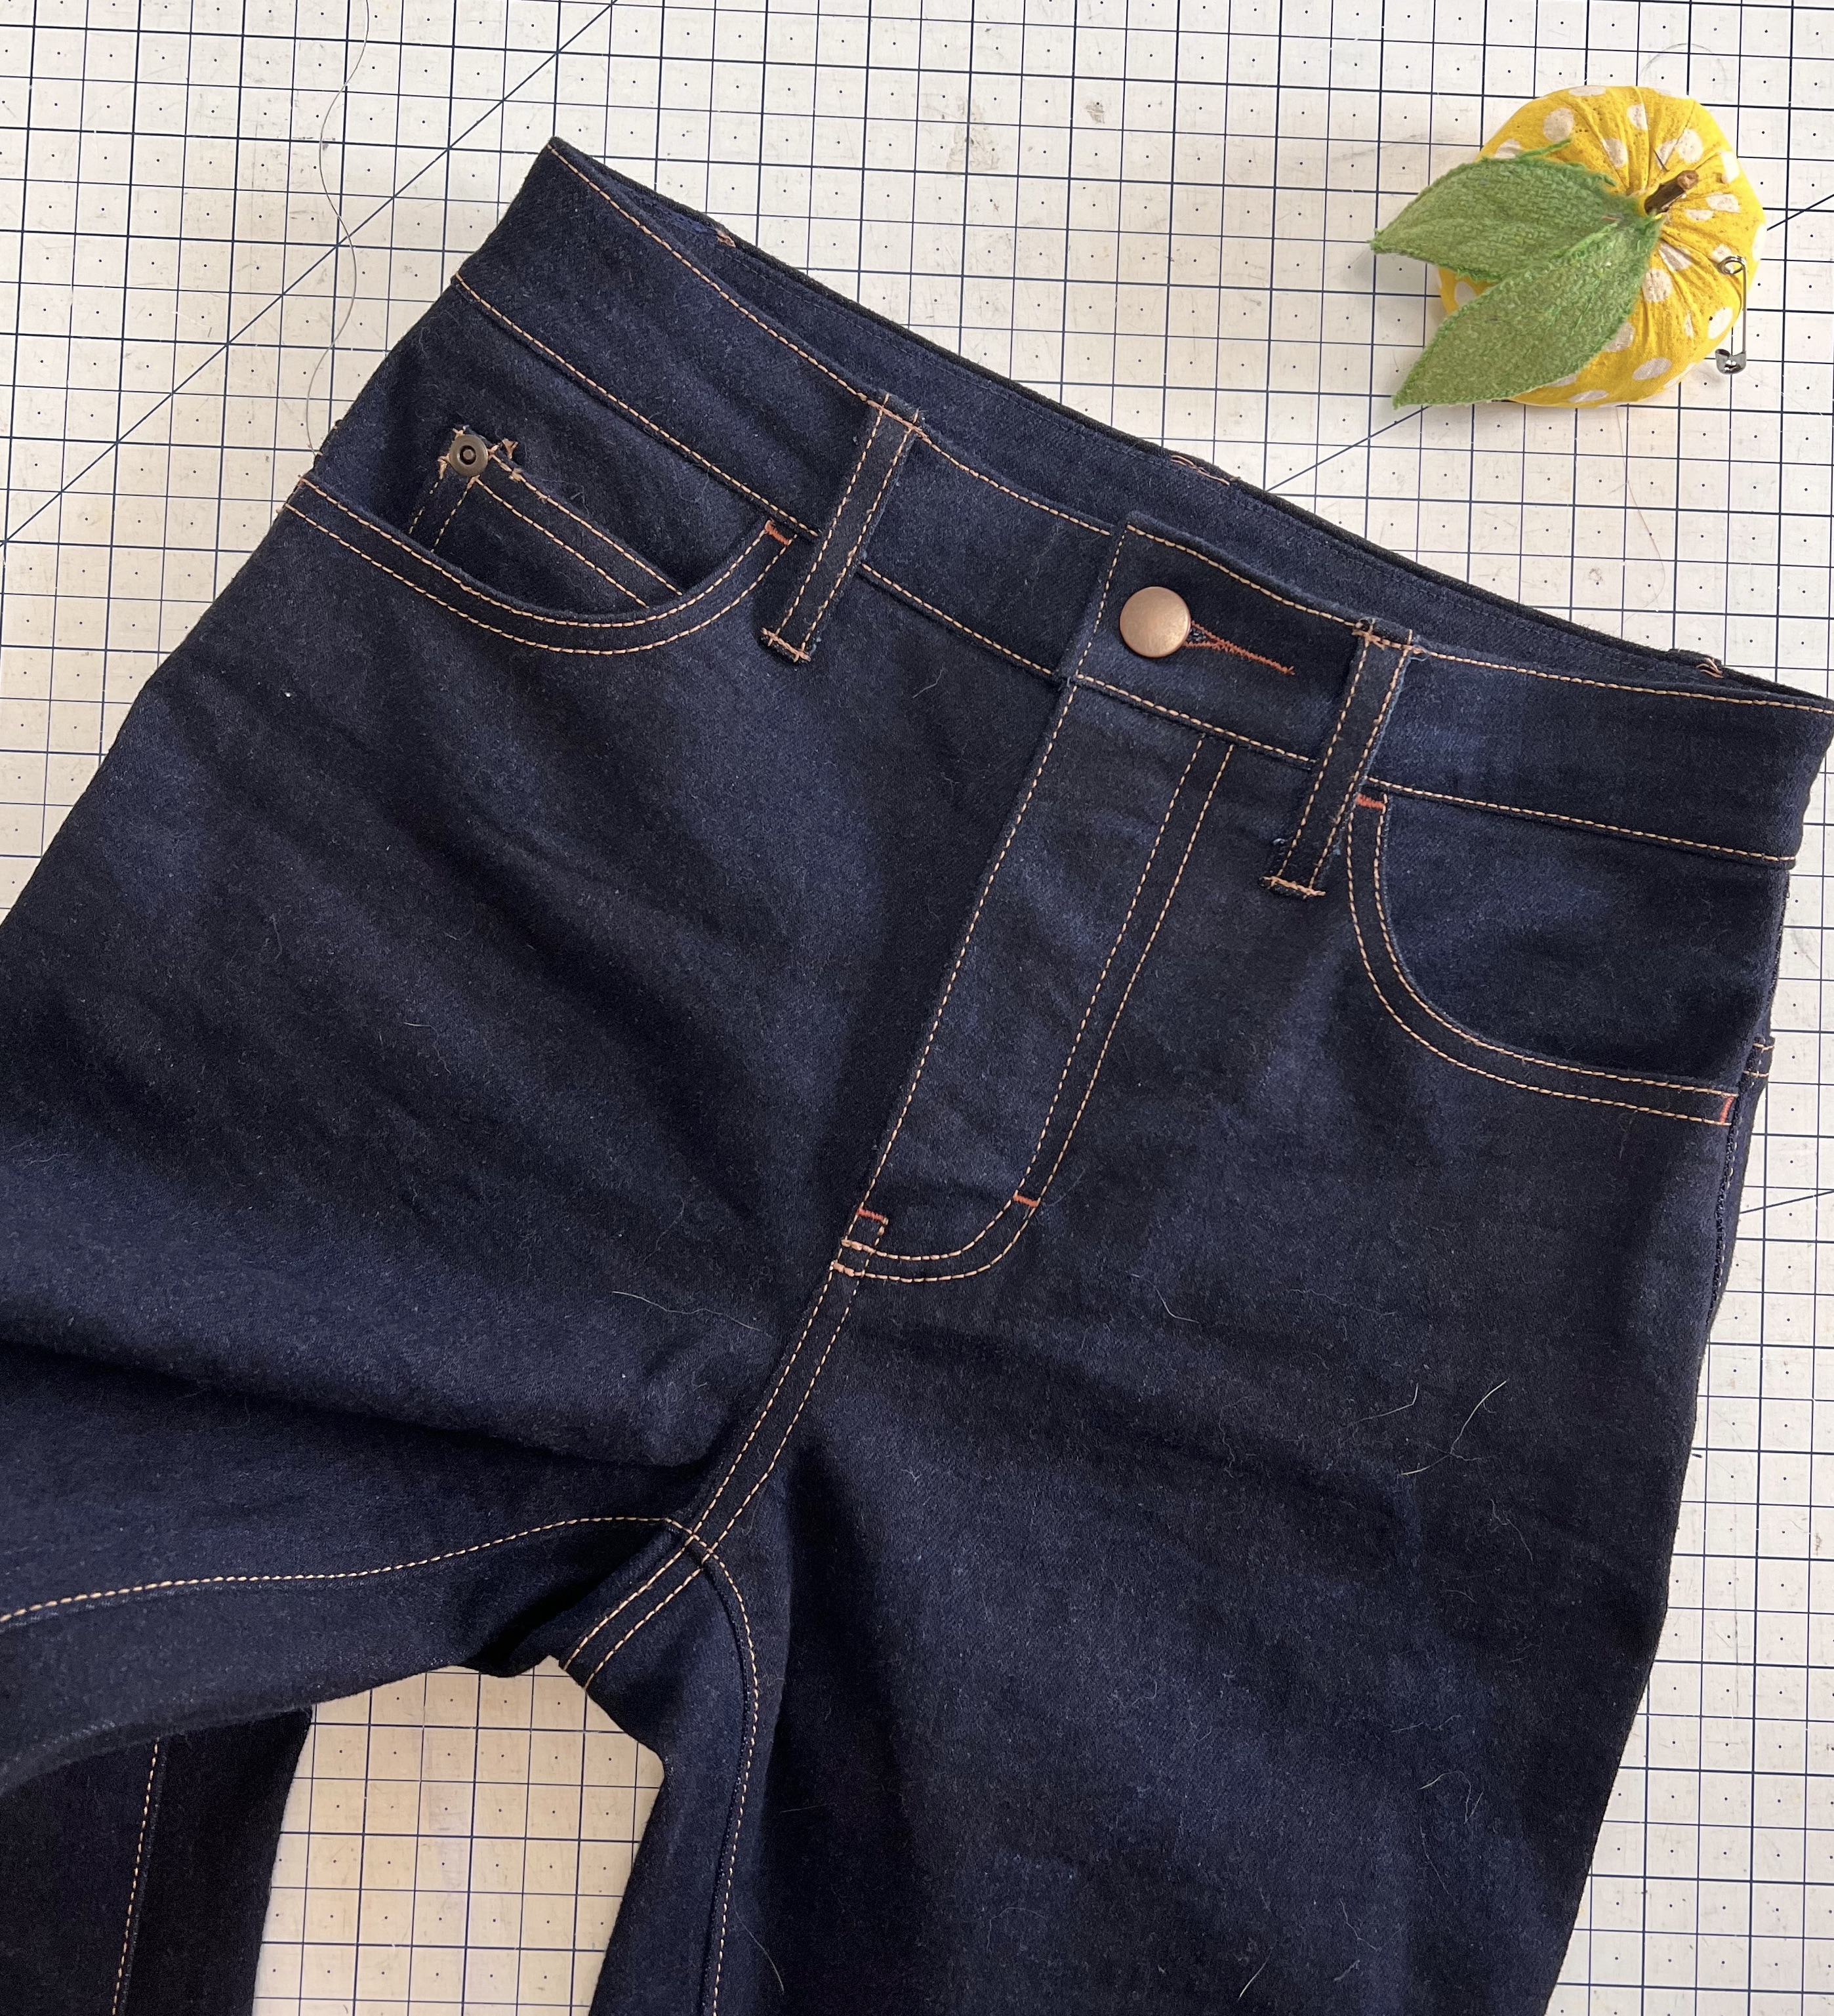
👖SEW YOUR OWN JEANS WEEKEND WORKSHOP👖
Ready to be your own personal denim designer? Join me for a 2 1/2 day workshop and I’ll show you all the secrets to sew up the jeans of your dreams! We will kick off the weekend with a half day to fit and cut – there will be samples you can try on to determine your size and any fit adjustments. Saturday and Sunday will be dedicated to sewing, and we will go over aaaaaall the details – front pockets, zip fly, killer topstitching, secure bartacks, serged seam finishes, creating and attaching a waistband, hardware installation, and stress-free buttonholes (yep, those exist!). Students can expect a fun, energetic, and fast-paced environment that focuses on learning and creating. You will leave with not only a new pair of jeans, but also the knowledge and empowerment to make more on your own!
✨JEANS WORKSHOP FAQS✨
What can I expect to learn in this workshop?
My Sew Your Own Jeans Weekend workshop primarily focuses on construction – you will learn all the details that go into making a pair of jeans, including order of construction, seam finishes, topstitching, inserting a fly zipper, attaching a waistband, and loads and loads (and loads) of little tips, tricks and best practices sprinkled throughout the weekend (seriously, so many little tips!). The knowledge you obtain isn’t just jeans-specific – you can use what you learned to apply toward all sorts of future sewing adventures (Denim jackets!! Rad pants! Skirts! Dresses! Bags! Your possibilities are endless!). You will leave with a great pair of jeans, plus the confidence to go home and make more!
Does this workshop cover fit?
We will go over fit, although this is not a fit-focused workshop. The first half day is devoted to choosing our size (including trying on samples!), adjusting our preferred fit, and preparing our fabric for sewing (cutting, marking, etc). We *will* go over minor fitting adjustments as needed for each individual body. We will *not* spend a long time fussing over fit, nor can I guarantee that your first pair will be ~the most perfectly fitting pair of pants you’ve ever worn~. There simply is not enough time in class to allow for us to make multiple muslins for a perfect fit – and to be completely honest, this is hard to obtain without wearing the pants around for a few days to really get an idea of what needs to be adjusted. I don’t say this to discourage you, but rather, to set the expectation of what you will get out of your weekend. We will tweak the fuck outta your pants throughout the weekend (if it needs it – most students find they get a great fit right out of the envelope! #magicpants) and you will leave with something lovely and wearable that I promise you’ll be proud of. Should you need future adjustments, you will be armed with the knowledge to make it happen!
Is this class suitable for plus sized sewists?
Hell yeah! The Closet Core Ginger Jeans pattern is available in sizes 0-32 (up to a 63″ hip). Need a bigger size than that? Holler at me and I’ll get it sorted. This class caters to EVERY size, no butts left behind!
I’m a dude / don’t wear lady pants, can I take your class?
Hell yeah you can! The Ginger jeans pattern can be adapted with minor tweaks for more androgynous fit, or we can adapt a men’s jeans pattern for you. Please contact me in ADVANCE of the workshop so that I can be sure we’ve got the perfect pattern ready for you!
What experience level should I be at in order to take this workshop?
Beginners, rejoice: You don’t need to be a sewing superstar with years of experience under your belt to take this class. The prerequisites for class are that you should be comfortable threading and operating a sewing machine, and have experience sewing at least one sewing pattern. That’s it, that’s all you need to take this class!
If you are a very experienced sewist with lots and lots of sewing (and maybe even jeans making!) under your belt, I still believe you will learn a lot in this workshop! I have had a vast array of skill levels in my classes – from the total beginner to the seasoned professional – and everyone leaves with more knowledge than they came with.
**For all skill levels** Please note that this workshop moves really fucking fast. 20 hours of instruction sounds like a lot, until you realize that I talk through most of it and our actual sewing time is quite limited! You will feel like an absolute warrior when the weekend is over, and also very very tired. If you are a very timid or slow sewist, I encourage you to practice working quickly and confidently to prepare for class.
I don’t like that pattern, can I use a different one? Can I modify it?
I hate to be a fun sponge, but we really don’t have time in class to make huge design changes to the pattern or try to work with something entirely different. That being said, there is a downloadable pattern for the Ginger Mid-Rise Jeans that you are welcome to bring to class. We can make additional small fit tweaks as needed, but plan on saving the major changes and additional patterns for your home sewing practice!
Will you ever offer this workshop as an online class?
Probably not! I don’t wanna do online classes! Sorry!
🪡ALTER + REPAIR YOUR GARMENTS 1 DAY WORKSHOP🧵
What about those garments that aren’t quite right? Whether they need basic adjustments or a full-on overhaul, we all have pieces that we want to keep but don’t necessarily want to wear. Garment alterations are a truly empowering way to level up your own sewing skills and expand your wardrobe options. This one day workshop is a fantastic opportunity to dip your toes into the world of alterations and garment repairs, while having a knowledgable teacher on hand to throw around ideas, show you the ropes, and get you out of any trouble that might arise! Students will work on garments of their choosing, meaning you won’t be stuck learning techniques that you aren’t interested in. Bring those pieces have been languishing in your closet – whether handmade or RTW, vintage or new – and let’s elevate them into pieces that give you real joy!
⚡️ALTERATIONS WORKSHOP FAQS⚡️
What can I expect to learn in this workshop?
My Alter + Repair Your Garments workshop is an absolute wildcard in terms of what you learn – that’s entirely up to you, the student! Since you will be bringing your own pieces to work on, it’s really a matter of what do YOU want to learn? In general, students can expect to learn a variety of basic alteration techniques such as pin fitting a garment, transferring the fit adjustments for sewing, techniques for successful seam ripping, and how to make adjustments and repairs to your particular garments.
Does this workshop cover fit?
Yep, that’s kind of the whole point of alterations! 🙂
Please note that this is a fitting class that focuses entirely on COMPLETED garments only. We do not work with muslins, or handle flat-pattern adjustments (this is likely something already offered by your local sewing shop!). We fit for style, for comfort, for wearability. You will learn new fit techniques and be able to see fit from a different perspective, which will aid you will your personal fitting quest!
What experience level should I be at in order to take this workshop?
This is a truly “all skill levels are welcome” sort of class. Since we work at a slower pace, there is plenty of opportunity for help with the beginner students, and more advanced students will not be bored. Students will get loads of one-on-one time, as well as a healthy of amount of self-guided sewing. For this reason, I do recommend that students have *some* sewing experience taking this class – you should know how to use a sewing machine and understand basic clothing construction (including how to press) – as you will get a lot more out of the experience.
The thought of doing alterations makes me want to die, why the hell should I take this class?
Hey, I get it – alterations are a bit unpopular in the sewing world. Hemming someone else’s pants for free ~just because you know how to sew~ is not how any of us want to spend our free time! And maybe you don’t want to work as a tailor, that’s understandable! But beyond boring pants-hemming, there are so many other benefits to understanding how to execute successful alterations. You will be able to fit and wear clothes that have alluded your body in the past. Your handmade items with weird issues that you didn’t notice during muslin (or maybe you skipped the muslin, you little rule-breaker!) can be rectified. Your understanding of fit, and how to execute it, will explode. You will learn interesting things about clothing construction that can be applied to your own handmades. Alterations are the most sustainable way to sew, and quite a bit faster than making an entire garment from scratch (I like to refer to it as “micro-sewing” 😉). And let me tell you – just because you know *how* to do something, doesn’t mean you *have* to do it for someone else. And that includes hemming pants. You can absolutely be smug about it when you tell people no 😘
🗓️ 2024 WORKSHOP DATES 🗓️
So, about my workshop dates! Next year is going to be a little different from previous years. I’ve scaled back my travel a lot (by choice; I’m tired and I’d like to focus more on my freelance alterations business) which means I’ll only be offering one jeans workshop per shop for the calendar year. So if you aren’t able to get in this year, you’ll have to wait until 2025! For this reason, I recommend signing up as early as possible, as my workshops tend to sell out!
Additionally, based on student response, I’ve added a couple weekends of Alterations workshops that are not connected to a Jeans workshop (scandalous!). My Alterations workshop has been suuuuper popular, and especially so in a couple particular cities. So if you’ve been trying to get in one at Pintuck & Purl or Stitch Sew Shop and have been stuck on the waitlist, I would recommend checking out those options as there are finally more of them (hooray!).
More information is available on my WORKSHOPS page. Please note that while dates are confirmed, not all workshops are listed yet! I have included links where the listings are active and currently accepting registration. For all other workshops, you will want to visit the website of the hosting shop for information on when the class will be active, and how to sign up.
Alter + Repair Your Garments December 5, 2024 Stitch Sew Shop / Alexandria, VA
Sew Your Own Jeans Weekend Workshop December 6 – 8, 2024 Stitch Sew Shop / Alexandria, VA
A note on locations: I know that there are plenty of requested cities that ultimately did not make this list. Please know that I took all suggestions seriously and I reached out to a lot of shops! However, a lot of them aren’t able to host for many reasons – or they just didn’t respond to my inquiry. If you’d like me to come to your town, my best advice is to talk to your local shop/studio and tell them you are interested in taking my workshop! My success rate in scheduling a workshop is far higher when a potential student expresses interest, as opposed to me emailing out of the blue. For 2024, though, I am fully booked and no longer accepting any more dates.
⚡️👖🧵🪡✨
This last year was such a blast, and I’m looking forward to 2024! Slingin’ denim, ripping into all the clothes, working wardrobe miracles, touching endless butts… I love what I do so, so much! Will you be joining me next year?