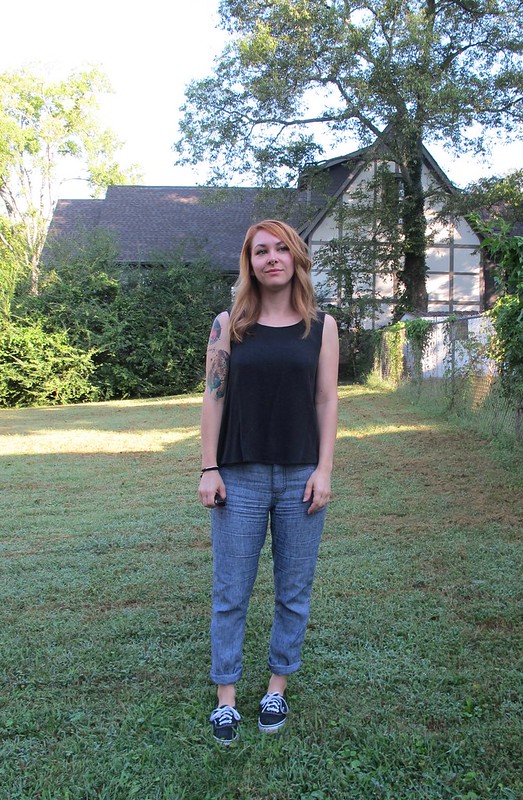
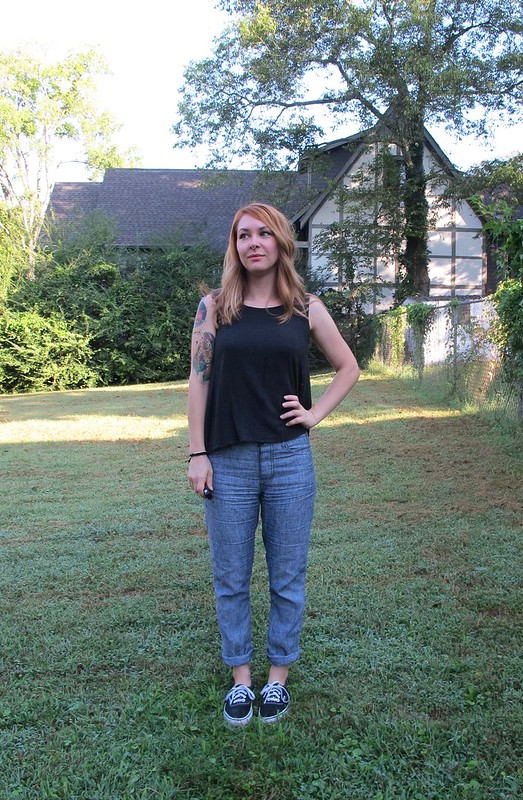
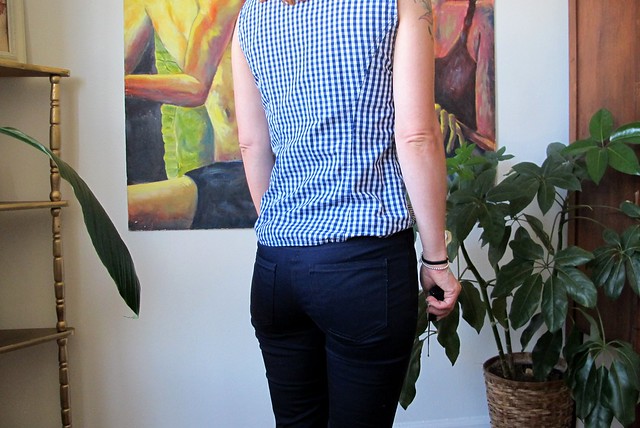
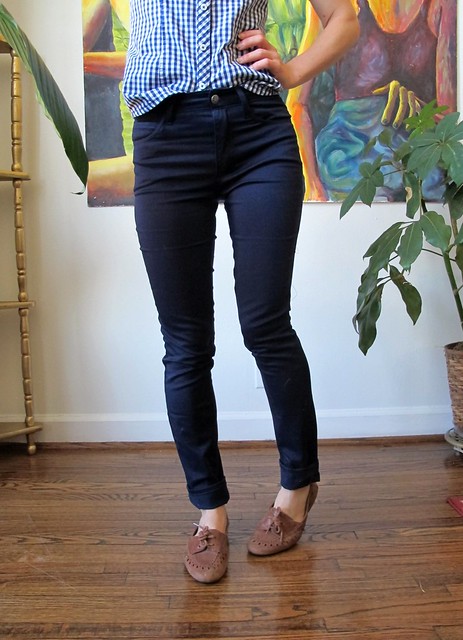
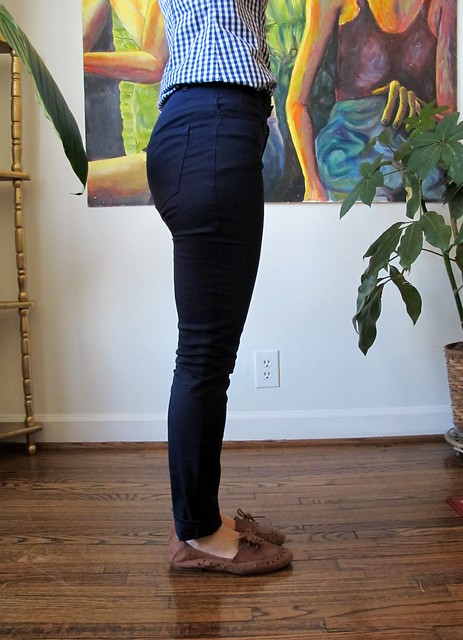
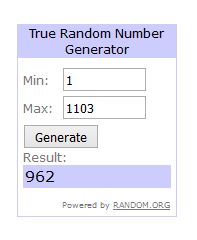
Fun fact: I am wearing this same outfit as I type this blog post. Don’t be fooled, though, I took these photos months ago! I don’t know what my deal is, but for whatever reason I’ve become the sort of “blogger” (I am putting this in quotes because I think I’ve maybe written 6 posts this entire year lol) who takes photos and then… hoards them? Whatever.
Anyway, here’s a new pair of jeans to share! I think I’ve made enough pairs of Ginger Jeans to probably warrant never needing to post them again – students always ask me how many I think I’ve made, and the answer is I actually don’t know! I’ve lost count! – but I feel weirdly guilty about all the blog neglect this year, so I’m posting for the sake of posting something and keeping the ol’ stomping ground alive.
Also my hair looks really good in these photos, so there’s that. Gotta take those small victories wherever you find them!
Even though I’ve made tons of jeans, I recently reached a point in my wardrobe where I realized I was in pretty dire need of some wearable bottoms. My wardrobe goes through a lot of shifts and purges – things don’t turn out the way I envisioned, the fabric or fit is weird (let me tell you right now that no matter how much you sew or even use TNT patterns, you will never be immune to making these mistakes from time to time!), it’s a strange color or style I don’t actually wear, my weight has fluctuated and it doesn’t fit anymore, or I’ve worn them so much they are wearing out and need to be replaced. The last 2 reasons have really hit hard this year, when it came down to me owning 1 pair of (very poorly fitted) shorts and maybe 2 pairs of jeans. So I’ve been on a pants and shorts making binge which has been quite fruitful!
I used 3 different jeans patterns to really round out my pants wardrobe, so stay tuned for the other 2! Today, I want to talk about the Gingers!
If you’ve followed me for any amount of time, you probably know I have a mad love affair with this pattern. It’s one of my TNTs (tried’n’true), and like I said, I’ve sewn it so many times that I’ve literally lost count of how many pairs have passed through my sewing machine. I don’t know if it’s my favorite because it’s actually the best, or if it is just familiar. I do like the style and the fit works quite well for my body, though! It also helps that this is the pattern that I use for my Sew Your Own Jeans weekend workshops, so I feel like I truly know this pattern like I know the back of my hand.
I haven’t made this pattern since the end of 2017, and while I love that pair and still wear them regularly, I can see that they definitely have an end date – they are starting to wear very thin in some places, and the lycra is losing its elasticity. I think they still have quite a bit of life left to live, however, I think it’s always good to secure your back-up plan before it’s needed!
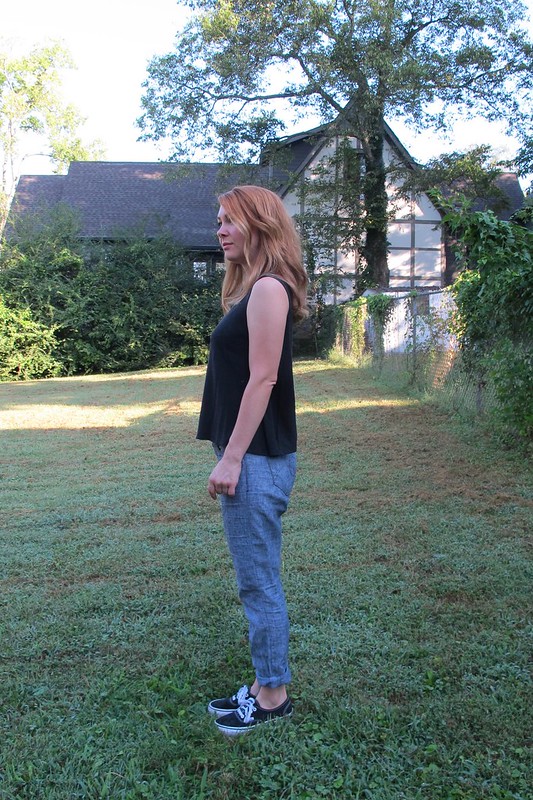
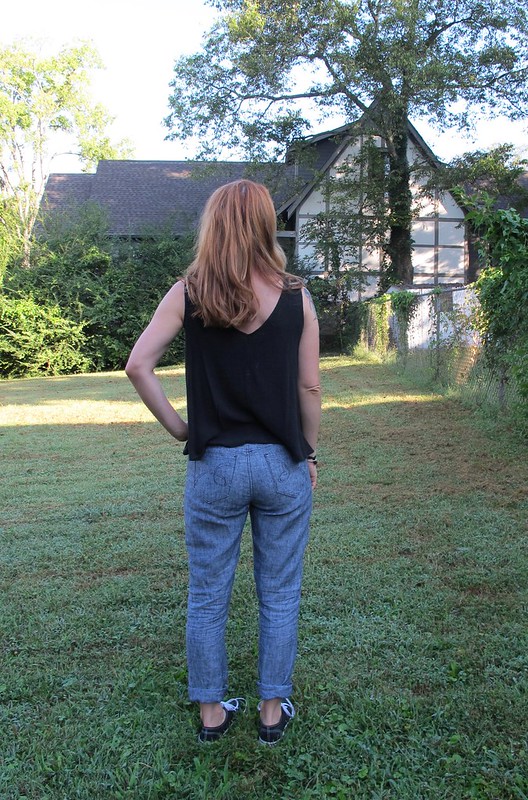
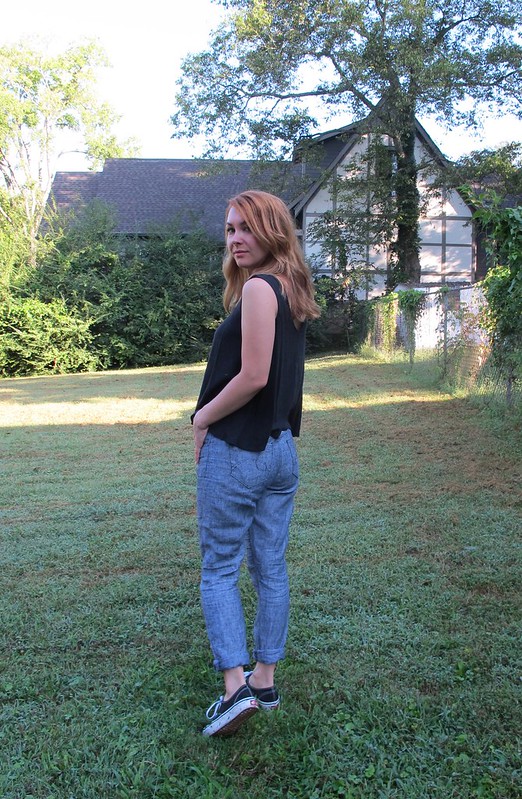
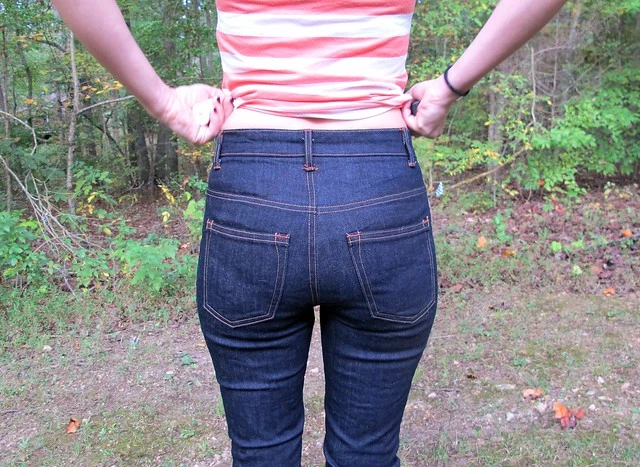
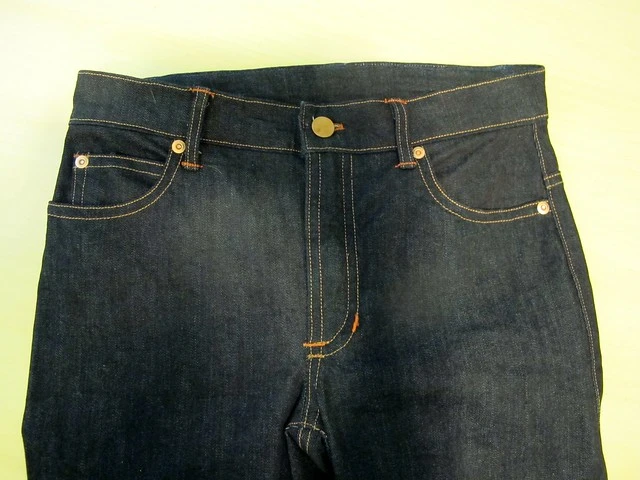
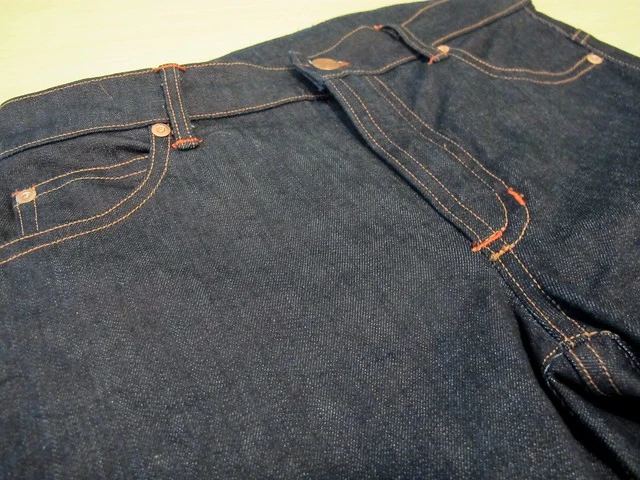
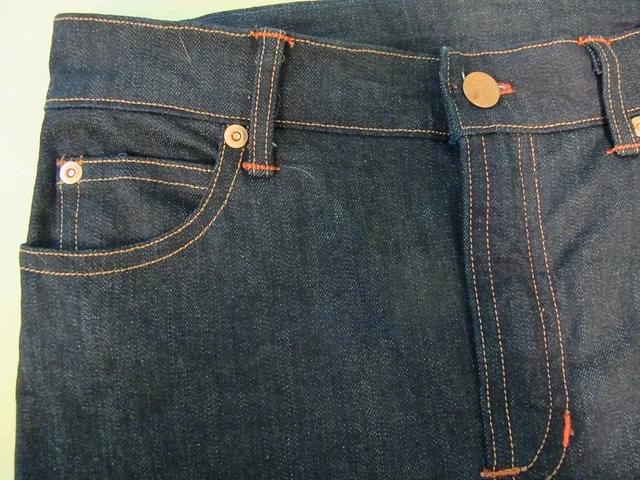
My fabric is a wonderful stretch denim that I purchased from Crafty Gemini back in August when I was in Florida for a sewing retreat. Usually whatever shop hosting my class will carry the specific denim that I recommend (this one from Robert Kaufman!), however, some shops like to source their own and that is also fine! In this case, Vanessa was able to get her hands on some very nice, dark indigo US-made stretch denim, which everyone in the retreat used. I was kind of jealous of how nice their pants were turning out so I decided to get a couple of yards for myself, too! This denim is just as stretchy as the RK, but a little heavier – maybe a 9 or 10oz. The color is nice and dark but I haven’t noticed as much dye rub-off as I tend to see with the RK denim.
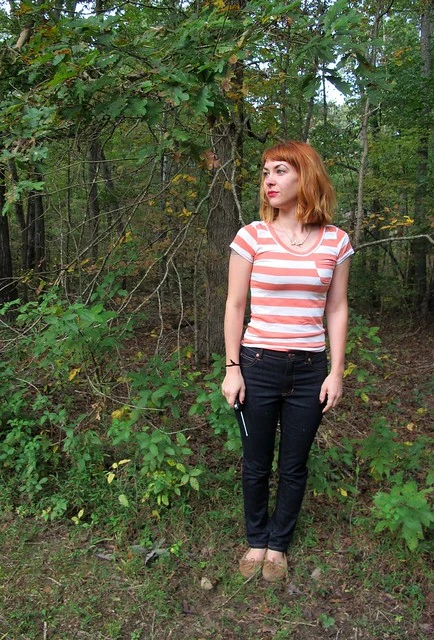
I decided to go up a size in these jeans, which turned out to be a mistake. As I mentioned, my weight has gone up a bit this past year – mainly in my hips – so I’m sizing my new makes appropriately, and while I could squeeze into those 2’s if I really put my mind to it, I wanted some jeans that were a little less… painted on. Unfortunately, these ended up way too big so I should have just stuck with the 2’s! They look great now, but I did have to size down the side seams, and after taking these photos I also took in the waistband and center back a bit more. I think the issue is that 1. I’m exactly in between sizes with Closet Case Patterns (a little bigger than the 2, and a little smaller than the 4); and 2. My denim is very stretchy (about 25% stretch, the same as the Robert Kaufman that I usually use) which typically warrants sizing down, not up. Anyway, it was a fun experient and it all worked out in the end so I’m not mad about it, just making a mental note for next time!
Other than the sizing stuff, I did not make any other changes to this pattern. I added 1″ to the calf (ages and ages ago), but otherwise I get a pretty good fit out of the envelope, so that is nice and easy!
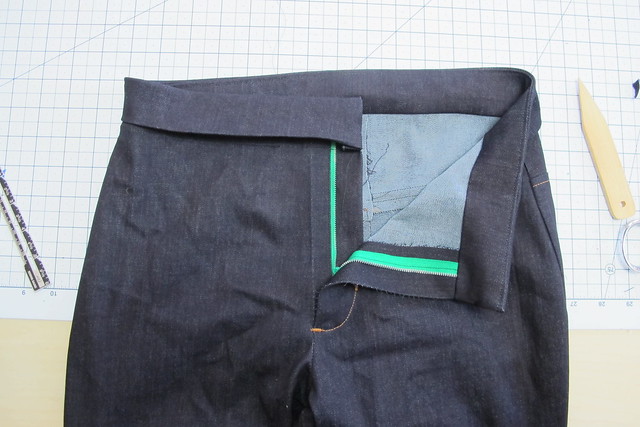
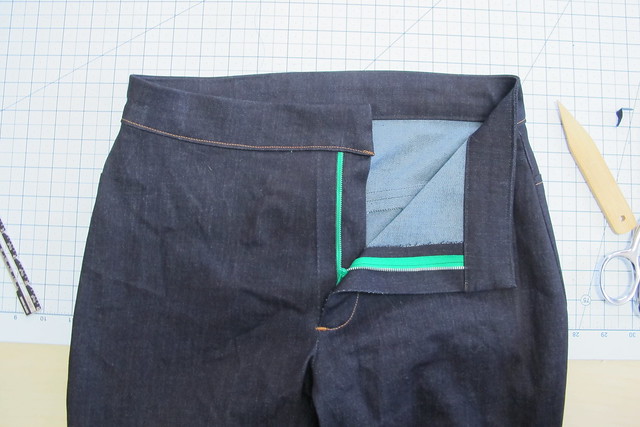
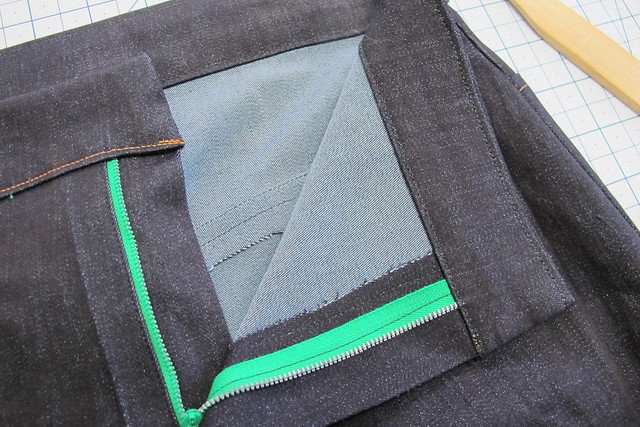
I did change the front pockets to be actual pockets, and not a pocket stay. I am fully aware that I am the minority in this thought process, but I HATE HATE HATE those pocket stays! I find them rigid, uncomfortable (which is all kinds of wrong when you’re wearing stretch denim, I mean wtf) and they make the fly area incredibly bulky. I know people loooove their pocket stays so please don’t @ me with your defense, just stating my personal choice here! Free-hanging pockets FTW! I have no issue tucking my pockets back in if it means I can eat a plate of nachos and not feel like I need to unbutton my pants! Fight me!
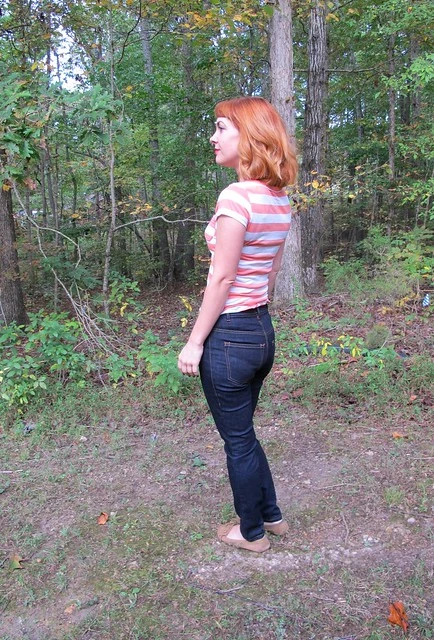
For some fun customization, I used contrasting thread to do my bar tacks, and stitched this cute little emoji patch on the butt pocket. Mostly because it makes me laugh, but also because I love any excuse to tell people I have “a heart on” lulz omg.
I also do not use the back pocket markings as suggested in the pattern, because in my experience they are too low and kind of unflattering! I think a high-waisted jean needs a high pocket, so I always place mine a little higher. In my Sew Your Own Jeans workshops, I custom place these on each booty (oh yeah I bet you didn’t know that fee included a nice hand down your pants!). For me when I’m sewing alone, though, it requires a lot of basting, trying on in the mirror, removing pants and unpicking stitches, rebasting, putting pants back on again, repeat ad nauseum. Fortunately I’m at a point where I have a general idea of where the pockets should be placed with just a good confident eyeballing, but my point is that you too can have good pocket placement, even if you don’t have the luxury of a second person to help you! Just be prepared to take your pants off a LOT and also maybe consider taking photos of your butt (why is this starting to sound like a Tinder conversation… ?).
I left the jeans unhemmed, because I’ve learned over the years that no matter how much you pre wash your denim (this one was 3x!), the length will continue to shrink in length over several more washes. I used to just hem my jeans on the long side, but these days I don’t bother hemming at all and just wear them rolled for a few months until I feel like they’ve gotten their shrink out. These are hemmed as of this posting, but were not as of the photographs.
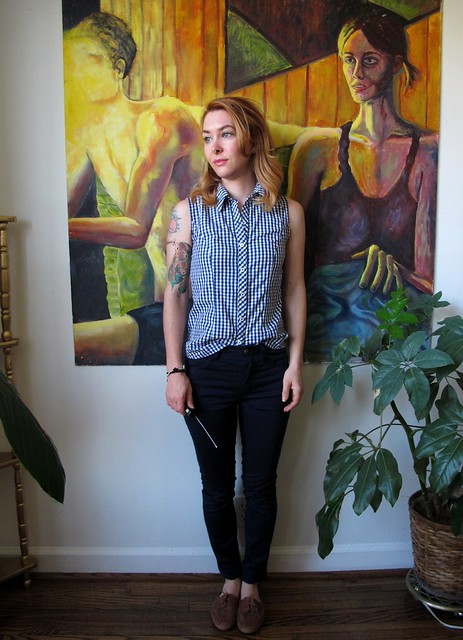
Oh, I also made my top! It’s a True Bias Nikko Top, made with some really fun chartreuse knit that I bought at Fancy Tiger Crafts when I was there in June! I was very drawn to the color, but wasn’t sure how it would look on me – it took a lot of convincing from Bob, and then another few months of me staring at it on my shelf wondering if I had made a mistake. Honestly, though, I LOVE how it looks on me! I think it really works well with my skin tone and hair color, and it’s also a color that just makes me happy! So, Bob was right and I stand corrected!
Ok, I’m wrapping up this long-ass post with a photo of me + Amelia. Don’t be fooled by the bitchface, she loves me and was purring very loud during this photo haha.
Friends, readers, and random people who just dropped in via an interesting Google suggestion – I’m happy to announce that my 2020 dates are finalized and I’m ready to announce my ~2020 workshop tour~! Yay!
I’m trying something a little different this year and announcing everything at once, rather than as they are listed and available for registration. Last year, it felt like a lot of people missed out on signing up because the seats would sell out before I even had a chance to announce them! I also felt like I was posting WAY too much about workshop stuff, which I completely understand can be super annoying for those who are not interested in ever signing up for one! My hope is that this burst of dates (as opposed to the slow trickle last year) will allow everyone interested to plan in advance, and be informed when the seats are available to sign up for.
Please note that not all the classes are listed as of this posting (I will update as they are!). I strongly recommend that you follow the shop hosting the workshop, to be notified when the class is listed so you can sign up quickly and hopefully secure a seat! I will update my classes page as workshops as listed, however, I cannot guarantee they won’t be sold out by that point (this happened quite frequently last year!).
All dates and links are listed on my WORKSHOPS page, as well as in this post. For more information, including pricing, please visit the shop’s website or send them an email!
A few notes and frequently asked questions about my workshops:
– These are the ONLY workshops that I am offering for 2020! I am completely booked! Once they are sold out, they are sold out (i.e., I will not be adding additional dates) so I encourage you to sign up ASAP!
– For my jeans classes, we will be sewing the Ginger Jeans from Closet Case Patterns. This pattern is a high-waisted, stretch denim jeans pattern that is available in sizes 0-20. Plus sized? Girl, I got you! You can make the Cashmerette Ames Jeans, which is available in sizes 12-28 and includes options for both an apple shaped torso or pear! Dudes or Non-Binary, i.e., don’t wanna wear girl pants? Yo, I got you too! You can make either the Quadra or the Fulford jeans pattern from Thread Theory. Jeans for everyone!
– “I don’t wear high-rise jeans – will we have the option to make this change in class?: If you are interested in sewing a mid-rise jean, there is a Mid-Rise Ginger jeans pattern available for purchase on the Closet Case Patterns website that you are welcome to use instead. Additionally, there is a Flared Leg add-on if you don’t do skinny! Unfortunately, there is not enough time in class to make drastic changes to our patterns, especially with adjusting the rise, outside of minor fitting issues. It is definitely something that we can go over in class, though, so you can apply the changes to all your future jeans!
– Required Skill Level: You don’t need to be a Sewing Master to tackle this class, however, you absolutely need to have experience using a sewing machine and following a sewing pattern. All skill levels are welcome!
DECEMBER
Sew Your Own Jeans Weekend Workshop
December 4 – 6, 2020 Sew With Sonia, Menlo Park, CA
Whew! I was going to share a pair of my own recently finished Ginger Jeans, but I think that’s enough for this post! Actually I have 3 pairs of finished jeans so stay tuned for a ~Jeans Extravaganza~ here on this blog shortly! In the meantime – who’s taking a workshop next year?! I am so excited!!
Note: All photos in this post were taken at my workshop at Blackbird Fabrics this past April!
As someone who specializes in teaching Sew Your Own Jeans Weekend Workshops, I’m admittedly not the best at trying out new jeans patterns when they get released. Part of this is due to budget restraints (both monetary and in the sense of “ok Lauren just how many pairs of jeans do you really need?), part due to style choices (like, not gonna sew flared pants. I’m sorry. Maybe that will change in the future), and part is just because I know it’s a losing battle to try to keep up with everything as it gets released. That being said, I do enjoy seeing new things that are being released – especially when they cater to different styles and sizes! – and I’m especially receptive to anything that fulfills a personal style need in my own wardrobe.
I’ve been looking for a couple years now for a good non-stretch jeans pattern that will easily transition into shorts. Specifically, I wanted a shorts pattern that looked like – well, cut-off mom jeans. You know what I’m talking about – the super high waist, the tiny little back yoke, and the slight flare at the bottom of the leg. Bonus if the front pocket bags hang out! I’ve seen these all over the world – both in real life and on fashion blogs – and I haven’t found a sewing pattern that quite mimics it and is also readily available (i.e., not a vintage Calvin Klein pattern that costs $$$).
But, here they are! And I love them!
These are the Dawn Jeans from Megan Nielsen patterns – the mom jean pattern that I have been waiting for! With an ultra-high rise and four leg options (slim, straight, wide, and shorts), these are made with non-stretch denim and look like your classic jeans from the 70s/80s. They have all the features that make you think of jeans (including the option for a button or a zip fly) and a couple of different inseam choices so you can go long/tall, normal, or cropped. I loved this pattern as soon as it was released but it look me a little while to get around to making them. I’m glad I did though because this is definitely a new favorite for me!
I made the size 4, based on my hip and waist measurements, and chose the regular inseam (for the record, I am a little over 5’2″ and have a 28″-29″ inseam) and the slim leg. I find Megan Nielsen patterns to fit me pretty accurately right out of the envelope, so I threw caution to the wind and cut this shit straight out of my denim without making a test version first. There are NO adjustments to the pattern – this is exactly how it is drafted. Like I said, MN tends to work really well for me and you can see just how good they look! It’s like magic!
Also, I took a lot of photos so you’ll just have to suffer through them. Sorry.
My fabric is a medium weight Cone Mills denim that has been sitting my stash for probably about 3 years now. I’m sorry to say that I have absolutely no idea what weight it is, but it started out fairly rigid and has softened up with multiple washings. I like that it’s a medium blue color, instead of the dark wash that most shops carry. This was given to me by Jennifer at Workroom Social when I was up there to teach a workshop (again, a few years ago) so I’m not sure where it can be purchased now!
I had just enough to eek these jeans out (seriously, I think I had mere fumes of fabric left over by the time I was done cutting haha) and I’m so happy it worked out!
I used some quilting cotton that was in my stash to make the pocket bags. The topstitching thread is Mara 70, which is THE BEST topstitching thread imo. It is thick so you get the nice look of topstitching, but not as thick as the stuff that most fabric stores carry (which I find most home sewing machines don’t like at all). I keep loads of it in my stash and highly recommend all the shops I teach at to carry it for my workshops! If you have issues with topstitching thread in your machine, seriously, try this stuff! It’ll change your life! FYI the classic coppery color is #448 😉
All other notions – the rivets, the button, even the leather back patch – are raided from my stash. This was a very economical make for me, ha!
For construction, I followed the directions rather than use my own methods. Most of it is pretty similar, although the fly construction is completely different. Many of sewing patterns (including Ginger) use a “fold-over” fly construction which is really simple to do (and SUPER simple to teach!) but not necessarily how it is sewn in ready to wear. The construction for this fly is where you sew the facing on (rather than it be cut with the front leg and folded back), which is the RTW method. This is also the method we use on the Claryville Jeans with Workroom Social (hopefully to be released soon!). It can be a bit confusing if you’re not used to it but it does admittedly have a nicer finish, I think! I found Megan’s directions to be pretty straight-forward and easy to decipher.
There are also instructions on how to make your own button hole (rather than use the automatic one on your machine), which I tried for this pair! Honestly, my machine doesn’t really have issues sewing button holes on any of my jeans but it was fun to try something different!
Overall, I am extremely happy with the fit and the general proportions of everything – I was initially a little concerned that the back pockets were too high, but after some wearing around + a very enthusiastic discussion on Instagram I have come to terms with my mom-butt. Since the fabric is non-stretch, it does start out quite tight (I wouldn’t say that it is necessarily uncomfortable, but it is restrictive especially in comparison to how stretch jeans feel!) but loosens up over the course of the day. These photos were taken after a couple of days wear, and you can see that they are still pretty slim-fitting.
My only beef with the pattern is the size of the front pockets. They are HUGE and super deep! I know people love having big pockets but these are unnecessarily giant – like, they go nearly halfway down my thigh. And since the pants are so tight, it’s not like you can really stash anything in them without it being super lumpy and/or uncomfortable. Because they are so deep, they are kind of useless – anything you put in them travels way over yonder and then is almost impossible to get out without doing some kind of weird pocket dance. I don’t use my front pockets much so this doesn’t super bother me for this pair, but I’ll be making them quite a bit more shallow on future pairs (except for my shorts, which obviously need some pockets hanging out of the front so I look like the hussy that I am).
Hm, what else? I guess that’s it! I’ve been holding these photos in my queue for a month or so now – as evidenced by the fact that they were taken in my old studio, and I moved about 3 weeks ago! My new yard is much more private (i.e., fenced, not on a corner lot, and I don’t have an upstairs neighbor who works from home all day!) so I am hoping I can get back to doing photos outside once I’m back in the States. In the meantime, I’m Vancouver-bound! See y’all laters!
I actually finished this project months ago – like, as in, 2017. Took the photos in mid-November, and then started this blog draft at the end of that month. I have no idea why I never finished writing it up, but… better late than never, I suppose?
At any rate, despite my apparent reluctance to post this project, I am actually pretty happy and excited about it! I love me a good denim jacket, and have always considered it a wardrobe staple for the way I dress. My style has changed a lot over the years – in my teens I was ~punk rock~ (insert hysterical laughter in hindsight yere), in my 20s I was really into vintage, and now I tend to dress just pretty boring overall (I like to think I look “classic,” but let’s be real – it’s boring AF, whatever, don’t care). With all those style changes, the humble denim jacket has always held a special place in my heart and a leading role in my wardrobe.
I think it’s safe to say that there are lots of people who feel the same way as I do about the versatility of a denim jacket, however, it’s been hard to find a sewing pattern that includes all the features you see in one (such as the welt pockets, or a sleeve placket). I have made the Staci Jean jacket in the past, but it wasn’t quite up to par – the fit was more generous than what I prefer, and it really bothered me that it didn’t have actual pockets. I ended up not getting a lot of wear out of that jacket and later donating it.
The Hampton Jean Jacket is a great pattern that includes all the features I like in a jean jacket – those welt pockets, functional in-panel pockets with a top flap, a two-piece sleeve with a placket and cuff, and front and back yokes. Sewn up in a denim fabric with contrast topstitching and metal jeans buttons, it’s almost indistinguishable from the RTW versions you see in stores (almost, but just a little bit better – because it’s handmade by meeeee 🙂 haha). I love that someone took the time to create this pattern, and y’all, it’s a good one. Not that the Style Arc Staci jacket is a bad one, but it’s very basic and lacking compared to this one. This was exactly the type of pattern I have been looking for to fill this hole in my wardrobe.
I bought my denim at Mood Fabrics when I was in NYC last year – specifically for this jacket (sometimes I buy for specific projects, sometimes I just stash… but in this case, it was indeed for this pattern). I wanted something that was a good weight for a jacket, although not too heavy, and with little to no stretch. I found this piece in the denim section of Mood (on the bottom floor) and I just love the dark indigo wash. I originally thought about distressing and bleaching the fabric, but ended up just sticking with what you see here (apparently you are supposed to distress before topstitching… so yeah, that wasn’t happening). As with all denims, this fabric should soften and fade as it is washed and worn, which I’m looking forward to seeing. In the meantime, I do like the way it looks now, too!
The pattern looks complicated, but it’s pretty easy to follow. Sewing a jean jacket is pretty similar to sewing jeans – minus the obvious difference between the two articles of clothing (like, you don’t sew a fly front in the jacket and you don’t set a sleeve in jeans.. or maybe you do, I ain’t here to judge your life), just a lot of flat felled seams and topstitching. Y’all know I fucking LOVE making jeans, but I also have way too many pairs as it is, so this was a nice way to get that jeans-making experience without adding yet another pair to my wardrobe. Instead, I managed to fill a gap at the same time! I love it when that happens!
I waffled for a bit on what size to cut – my measurements are closer to a 2, but I ended up making the size 0 after comparing the finished measurements to an existing RTW denim jacket I own and like the fit of. I wanted this one to be a slim fit that looks great both opened and closed (I rarely ever wear my denim jacket buttoned unless I’m like, actually cold or something, however, I needed to make sure there was enough space to close it if it came down to it!). My only complaint about the sizing is how the sleeve length is measured – for whatever reason, it’s measured from the top of the shoulder to the bottom, instead of at the underarm. This led me to originally believe that the sleeve was something crazy like 5″ too long, and I actually altered the pattern and nearly cut it before I thought to actually compare the pattern piece to a different sleeve pattern piece. I was under the impression that the standard is to measure from the underarm to wrist (like what is basically your arm inseam), but now I’m second-guessing myself and thinking maybe I’m the nutty one? Thoughts?
Anyway, like I said – this pattern is really easy to follow. It’s obvious that a lot of thought when into the instructions; they are clear, easy to understand and follow, and the diagrams are beautifully done. There is also a sewalong on the blog if you do happen to get stuck, although it seems like it’s basically a photographed copy of the instructions (i.e., no additional information or tips, just the exact same instructions except with photographs to guide you). I found the sizing to be accurate and the pieces fit well together. I don’t know much about Alina Design Company, however, this was a very pleasant first experience so I am happy about that!
For sewing, not much different than sewing jeans. I used a 90/14 denim needle, navy all purpose polyester thread to construct, and a lightweight topstitching thread for all the topstitching – Mara 70 from Wawak, which Jennifer introduced me to a couple years ago during one of our jeans workshops. It’s heavier than regular all-purpose thread – which is 100wt – but not as heavy as traditional topstitching thread – which is typically around 30wt. It still looks nice and thick so your stitches really stand out, but it’s not so thick that it causes your machine to jam or nest, and it is very easy to thread through a standard needle. If you’ve been having issues with topstitching thread, I really recommend trying this weight!
I tried to finish most of my seams with flat-felled seams, but a few (such as the front yoke seam and the armscye seam) had to be serged and topstitched for a mock flat-fell. My RTW denim jacket is like this – a combination of flat-felled and mock flat-felled, and this is all explained in the instructions as well. I washed and dried the denim on the hottest setting a few times before cutting, and have washed it more than necessary since finishing to get it to soften up a little bit more. I know it’ll fade with time, I just want to speed that time up 🙂
My only complaint with the pattern is that I think it is lacking some necessary interfacing. There is interfacing at the button placket, sleeve cuff, and bottom band – and that’s it. No interfacing at the in-panel pockets or flaps (which have buttons and button holes, so they *should* be interfaced – at least with a little square where the aforementioned buttons and button holes are), or on the back tabs where, again, there are button holes. I was able to add these in before closing up those areas, but I am a little surprised that they were included with the instructions, especially considering how in-depth the entire pattern is as a whole. One thing I did like was that the collar is not interfaced – you might need to do that if you are using a lighter weight fabric, but for this denim, the weight of the 2 layers of fabric was plenty. I love the way the collar sits!
Anyway, the jacket turned out pretty fucking awesome – if I do say so myself. I think the sleeves could stand to be shortened about 1″, but I usually wear my jacket sleeves rolled up anyway so I’m not terribly concerned about it. The length is perfect for wearing with pants, not so much dresses and skirts (perhaps with something that has a lower waist, but I think the long length paired with a high waist looks unbalanced and a little sloppy – at least on me!). That being said, I already made a second version that is cropped – specifically to wear with dresses and skirts – so watch this space for that!
*Note: The fabrics used in this project were provided to me by Mood Fabrics, in exchange for my participation in the Mood Sewing Network.
It just occurred to me yesterday that I never shared my Ginger Jeans that I made for my upcoming workshops! Fortunately, we had a weirdly sunny + 70° (look at how cool I am, I figured out the keyboard shortcut for making a degree sign lolz) day yesterday, so I jumped outside to take some photos! These aren’t the best – it was windy as hell, and for some reason I decided to take photos where I’d have to straddle over a fucking hole in the ground – but you know what, it works, and I’m moving on. I say this often, and it often bears repeating – no one comes to this blog for the stunning photography amirite.
Anyway.
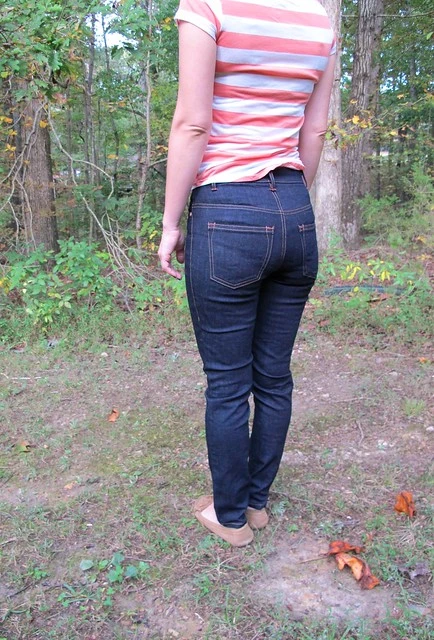
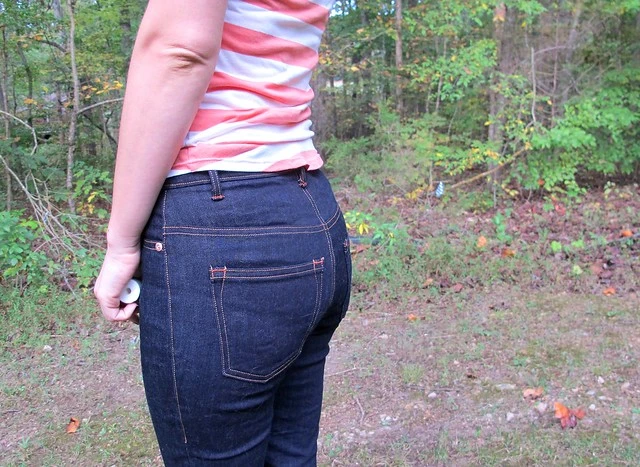
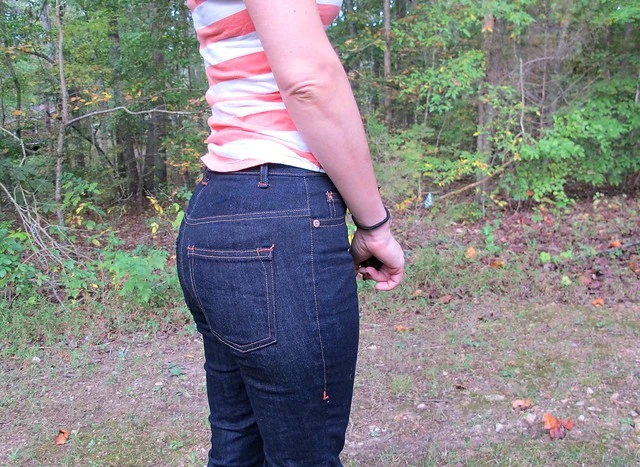
These are my new jeans! I’ve made soooo many pairs of these Ginger Jeans that they don’t necessarily warrant their own post at this point (I mean, there are only so many times you can keep repeating the same pattern with no changes and expect people to find the information riveting haha), however, I did want to talk about this particular pair as I finally had a chance to make them in a new-to-me denim!
This denim is a super stretch denim from Robert Kaufman (FYI that’s an affiliate link). As I mentioned in my samples post, I chose this denim specifically because it was affordable, easy to source, and is great quality that is comparable to Cone Mills. I made all my workshop samples out of this denim – Robert Kaufman was generous enough to send me a couple bolts of the fabric; enough for 11 samples plus some extra so I could make a pair for myself! It’s an 8.6oz stretch denim, which is a hair lighter than most of the Cone Mills that people buy (I personally prefer the lighter weight, I find it more comfortable!). It’s also suuuuuper stretchy, which I love! Absolutely perfect for this jeans pattern.
Since this denim is indigo dyed, it is imperative that you prewash your fabric multiple times before cutting into it. It will shrink quite a bit, plus it bleeds a LOT! I only washed my samples once in cold water, and we all ended up with blue hands during class (true story; I went on a date immediately after the first night of my Nashville class and he totally called me out on that shit about halfway through haha). For these jeans, I washed + dried the denim three times before I cut it – twice with very hot water, and once with cold. This cut down significantly on the amount of bleed that I got, although they still bleed a tiny bit (not enough to damage, say, the upholstery in my car – but I do still notice a blue tint on my fingernails). Every single indigo-dyed denim I’ve used (especiallyyyy Cone Mills, oh god) does this, btw, but just be aware of it. Don’t carry a white purse, save your white undies for a different pair of pants, and for the love of god do not wash these in a load with anything but black fabric.
That being said, cutting down on the bleed does not actually fade the color. These are still super dark, even with all that hot washing.
Anyway, I made these a little over a month ago, and wore them on that first day of class so my students could see the ~jeans in action~. I’m happy to report that this fabric holds its shape really well – I’ve only washed these once since I made them (and even then it was mostly to try to bleed out more indigo, ha), and in these photos you are seeing them after about 4 days of wearing. No baggy knees or baggy butt! I still have a little bit of tightness at the calf, however, I have noticed with my more frequently-worn Gingers (i.e., the older ones) that over time the fabric will stretch and settle. I’m going to wear these a bit more and see if that happens with this fabric, before I slice up the calf and add more room on future pairs.
I also made the top I’m wearing, by the way! It’s a Grainline StudioHemlock Tee (which is free if you join their newsletter). I used a beautiful striped rayon knit from Finch, which I bought when I was there last year for a workshop.
For these particular jeans, I used the same notions that we offer students in my workshops (copper topstiching thread, matching rivets and buttons). Combined with the fabric and pattern, you can literally see what your finished jeans will look like.
BTW, I still hate setting rivets. I’m getting better at it, but I still hate it. I considered getting a special die for my snap setter, but then I realized I couldn’t drag it along to workshops (that thing is cast iron and it weighs a LOT), so what’s the point? I generally prefer the look of bartacks over rivets, anyway.
I won’t go into detail about fitting these; but you can read my Ginger Jeans tag to see previous posts about what fitting changes I have made to these jeans over time. Spoiler: It took many, many pairs with lots of tiny changes (and I’m still making changes!). Fitting is a journey, and a lot of things just aren’t clear until you’ve worn your garment around for a few days.
Flat-felled seams on the inside, quilting cotton pockets (1-2 fat quarters is all you need!), and of course a shitty little thread nest in there #honestsewing
In other news – I just had some more classes listed! You can see all my upcoming classes here on my class page, but for those who are just browsing – here are the new ones added:
March 24-25 / Jeans Making Intensive / Workroom Social, Brooklyn, NY (head’s up – we will be making a Workroom Social exclusive jeans pattern for this class! I am so excited about this one!)
August 18-19 / Jeans Making Intensive / Workroom Social, Brooklyn, NY (again, this one is using a Workroom Social pattern 😀 )
September 26-30 / Jeans & Wardrobe Basics Retreat / A Gathering of Stitches, Biddeford, ME (this one is a littttle different as we are focusing on wardrobe basics! There will be jeans-making, but there are also a couple extra days to make additional basics! Or, if you’ve already tackled jeans and wanted to try something else – such as a tshirt or button-up – bring it on!)
I have a few more classes in the works that haven’t been confirmed/listed yet (West Coast, I’m looking at you!), but I will share those as soon as I can! Other than that, pretty booked up for 2018! If you are a local shop who would like to discuss dates for 2019, please get in touch with me via email. If you are a person who wants me to come teach in your city, I encourage you to reach out to your local shop and tell them you’d like to see them host my jeans workshop 🙂
Ok, that’s all for this post! Happy Friday, y’all!
As I mentioned in my last post, I have a few workshops already lined up for the first few months of 2018 😀 I was hoping to include my sample jeans in this post, but I’ll be completely honest with you – this post ended up WAY longer than I was anticipating, so I am going to split my FO into a separate post. For this entry, I just want to talk about my upcoming workshops!
If you follow my Instagram, you may have noticed the madness when I decided to sew 11 pairs of jeans in mid-December. If that’s not crazy enough for ya, I finished all 11 pairs in LESS THAN A WEEK. Yea!! There’s a reason why my sewing industry friends call me Speedy 🙂
You’re also probably wondering why I made 11 pairs of jeans in the first place? Especially after announcing over and over that I have plenty of pants and I don’t actually need more (I’m gonna keep making pants anyway, sorry!). These jeans are actually samples for my upcoming Jeans Workshops!
When I first started teaching sewing back in 2014, the first place to bring me in was Workroom Social in Brooklyn, NY. There are a lot of reasons why I love working at Workroom Social and have continued to teach there over the years. Jennifer is incredibly brilliant businesswoman and teacher, plus we work super well together. One of the things she does in her workshops that I thought was SO CLEVER is to have all the sizes of the pattern made up in advance of the weekend, so that students can try the samples on. This helps them not only choose the correct size to start, but also gives the ability to do basic fitting adjustments without the need to make a muslin. I have always loved this idea and I think it’s one of many things that really sets Workroom Social apart from other sewing workshops.
Toward the end of 2017, I started thinking about what kinds of workshops I wanted to offer in 2018. I have gotten a lot of requests to bring my jeans workshops to other cities, but I was lacking the samples (I realize you can totally offer this workshop without the samples, but y’all – once I’d tried it, I didn’t want to do anything else haha). After some internal debate – as well as a few conversations with Jennifer about my plans (I wanted her blessing before I did anything – I am not in the business of stepping on anyone’s toes here, y’all) – I decided to bite the bullet and make up my own batch of Ginger Jeans samples. This ended up working out perfectly because Workroom Social is moving toward offering a different pattern for future jeans classes (something that is a bit more size-inclusive than the Ginger because, as I’m sure you know, there are plenty of people who fall outside the max size range in that pattern), so I can continue to offer workshops that feature this specific pattern without being in competition with other workshops that I teach.
Having already worked with these samples for the past couple of years, I had some ideas on how I wanted to improve my own set when it came time to make them: – Fabric: Hey, here’s a surprise for you – I didn’t use Cone Mills Denim to make my samples. I know this denim is the holy grail for sewing jeans – and for good reason, it’s a really wonderful fabric! However, it can sometimes be difficult for the average home sewist to source, and somewhat cost prohibitive depending on where you source it from (especially when you consider that you first pair of jeans may end as a wearable muslin). This was fine at Workroom Social because they were able to obtain rolls of the denim to provide to students as a kit, but y’all – I live in a small 2 bedroom house with limited storage, and I travel for my workshops. I ain’t about to buy stock in heavy-ass denim and schlep that shit around in a suitcase lol. Furthermore, Cone Mills just closed its White Oak plant at the end of 2017, which could potentially make the denim even harder to source in the future (or they move production offshore, or someone buys the plant to continue operating it – who knows? But I don’t want to bank on “maybe.”). So, with all that in mind – I wanted to make my samples out of a fabric that was easier for the average home sewist to obtain. – Washed vs Unwashed: Plain and simple, denim feels and fits differently when it’s washed. It is softer and has more stretch. I wanted my samples to be out of washed denim, to better mimic what the finished pair would feel like. – Familiarity with all sizes: Ok, this was NOT something I anticipated up front, but in hindsight this was a nice perk! Sewing every single size gave me a very hand-on experience with how they differ and how each one fits together. I don’t know if there is another person (other than Heather herself, obviously!) who has literally sewn every size in this pattern – but I have! Everything from fitting the pattern pieces on the fabric, to how the notches match up, even the differences in size grade. It was a surprisingly enlightening experience for me. As much as I’ve sewn this pattern up before and taught this class soo many times, y’all. I KNOW this pattern now. Like in a really creepy way almost haha.
So anyway, here are the details on my new samples:
– The denim I used is Robert Kaufman Super Stretch denim! At 8.6 oz, it’s on the lighter weight side – but in my experience, a lot of people actually prefer this over heavier denim (especially for very fitted jeans like the Gingers) – it makes for a more comfortable pair of pants that feel almost like leggings. Of course, using a heavier denim and/or one with less stretch is as easy as adjusting your seam allowances to accommodate, but this particular fabric is a great starting point. The fabric costs around $15/yard and is super accessible – most fabric stores carry Robert Kaufman! And as someone who has long used Robert Kaufman fabrics, I love their quality and the company has been so easy to work with. I’m pretty excited about this!
– The denim is washed one time, to remove the sizing and soften everything up. I was hoping this would also remove the indigo bleed, but it only did so a bit – it looks like 2-3 washes is the magic number (based on my personal sample pair). I love my students but idk y’all, I wasn’t about to sit and wash 30 yards of denim multiple times. You hands will be slightly tinted blue. Don’t wear white underwear and bring hand sanitizer lol.
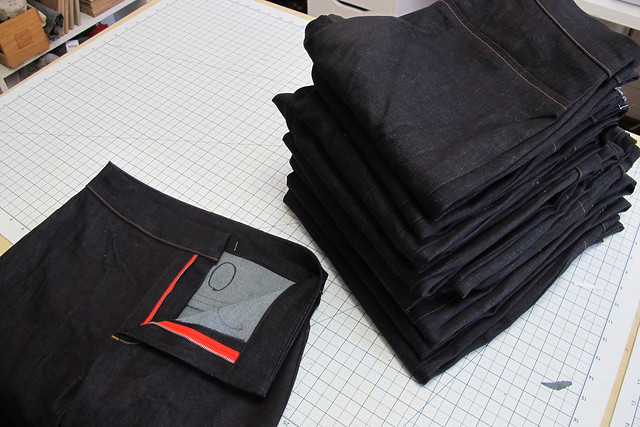
– Each sample is sewn using the key pieces necessary for fit – front and back legs, yoke, full fly (zipper, shield, etc), and waistband. There are no pockets, no seam finishes (or hems), and there is only topstitching where necessary for fit. Furthermore, the waistband is uninterfaced, except where the button would go – this is what I prefer in my jeans, and it gives students the chance to see what that feels like when they try on the pair, so they can decide for themselves whether they want to interface their waistbands. Personally, I find it way more comfortable! I also left off the buttons – students simply pin the waistband shut when they try on the sample.
– The pattern is the Ginger Jeans pattern from Closet Case Patterns, available in sizes 0-20. My samples are View B, the high-waisted, skinny leg version.
– As a fun side note, each pair of jeans has a different colored zipper. I knew that giant box of 75+ vintage zippers in weird colors that I bought at the flea market AGES ago would eventually come in handy! 😉
To get everything sewn up in a timely fashion, I had to set things in stages. Due to the number of pairs and them all being different sizes (in all the same fabric, no less), I was unable to batch sew these like one would in production. I literally sewed each pair one at a time. I found that the fastest way to do this was to cut everything first (again, individually) and batch all the pieces together with the size clearly marked. Then, starting with the largest size and working my way down – I sewed each pair of jeans from start to finish. For fun, I timed myself – the first pair took 52 minutes, but by the time I sewed that last pair I was actually down to 32 minutes!
And then I got really into it and a little time-lapse video of myself sewing one of the pairs of jeans. Because I am a huge nerd.
I also totally broke my sewing machine during this process. At some point, I sewed over a zipper (a nylon zipper, I might add) and hit it at juuuust the right angle that it snapped the needle and everything went completely haywire. I had somehow managed to completely jack up the timing – my needle was hitting the needle threader on it’s way up, and not picking up the bobbin thread. I am lucky that we have an incredible sewing machine dealer + repairshop in the area, so I brought it to him and he was able to get everything fixed and back to normal by the next morning! I can’t even tell y’all how much I love my dealer – highly recommend them if you are in Nashville and shopping for a Bernina!
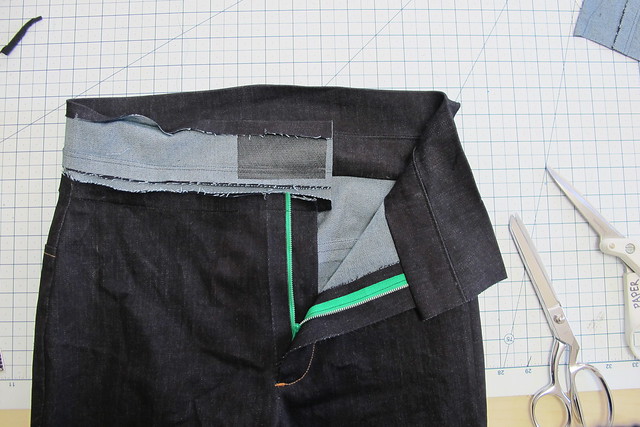
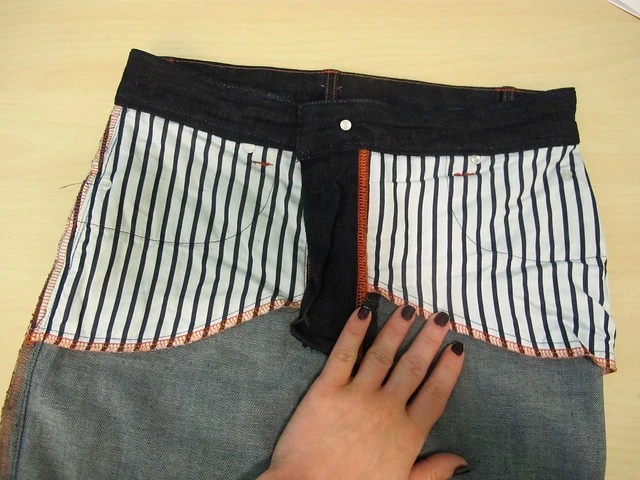
Ok one last nerdy thing! Doing the same sewing process over and over (and over and over) actually gave me some wonderful insight for finishing the waistband! In the past, I (and probably most of y’all) have attached it the waistband from the right side, then turned the facing (inside) to the inside and pinned it, then topstitched from the outside. This is unnecessarily fussy and I don’t know about you, but I always end up with a little section of facing that didn’t get stitched down. Jennifer had mentioned a few times in the past to flip and attach the facing first, then topstitch from the outside – which I’ve done before with other garments when it’s in the round, but I couldn’t get a clean finish right at the zipper opening. Well, y’all – 11 pairs later, I’ve definitely got it down! So here’s a mini tutorial:
Assemble your waistband as normal (sew the waistband to the facing along the top and understitch one side), then press the seam allowance of the WAISTBAND (the side that is not understitched) under to the inside. I press about a scant less than the seam allowance – so a 5/8″ seam allowance gets pressed a little between 1/2″ and 5/8″ (this allows the waistband to fully cover your stitching). Sew the facing to the top of your jeans, with the right side of the facing against the inside of the pants, like so. It will look totally wrong at this point. Trust.
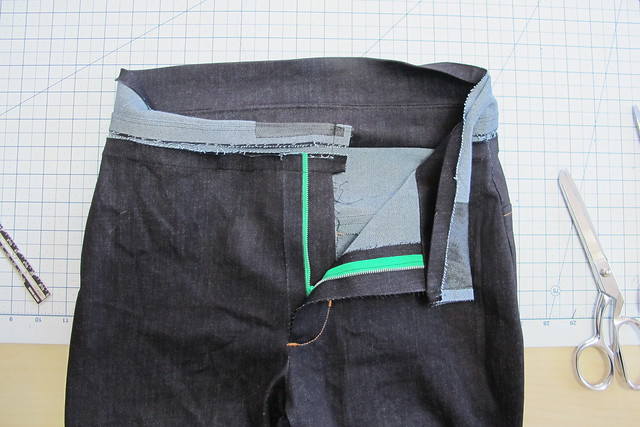
Now fold the short ends of your waistband in half, with right sides facing, and the connecting line of stitching (not the understitching) right along the top of the fold. Sew across the short end to close.
When you turn the ends right side out, the waistband should fall right into place, covering the seam allowances.
Then you just pin everything down and topstitch! Since the facing was already attached, you don’t have to worry about catching it in your topstitching 🙂 Here’s another hint – start at the center back, that way your backstitching gets covered by the belt loop.
So now I want to talk about my classes! Jeans Making has been pretty popular and I am excited to take this class ~on the road~ since I realize that not everyone can come up to NYC to take a sewing class (and also, I’m selfish and I like to travel haha). I have taught this class several times at Workroom Social, and learned a lot about teaching these workshops – what works, what doesn’t work, and what I might want to change for my own classes (very little- like I said, Jennifer is VERY good at what she does! There’s a reason why I keep working with her, she is amazing and the classes at Workroom Social are wonderful!).
The main thing that Workroom Social focuses on in their classes – and I focus on as well – is the overall experience of the class. Yes, you are there to learn and we want you to learn as much as you can and feel empowered by your knowledge! But even beyond that – we want you to have FUN in the class. Based on what my students tell me, this is not always the case – which kind of makes me sad, and also explains why there are lots of people who get scared off from sewing after a single class. I always strive to give my students the very best experience, and give them my full undivided attention during the entirety of the class. This is why I rarely have photos from classes (unless someone else took them), or post on social media during my classes – I’m not using my phone in class because I want to be 100% involved with my students. I am also a firm believer in that there is no “right” or “wrong” way to do something – you do whatever works! Sewing isn’t like baking, it’s like cooking – whatever gets you the result you want is the “right” way to do it. My classes are less about doing things perfectly and more about having a good time, learning a lot, and actually finishing your project. Then when you go home and make that next pair of jeans – that’s when you can work on the perfection side!
One other thing about my classes that may be a little different – I don’t try to keep students at the same pace the entire time. If that means I have to repeat myself 10 times during a class, that’s ok (seriously, you’re not going to fluster or bother me haha)! I realize that everyone learns differently and operates at various speeds, and I don’t want to punish half the class for being at a different speed. Faster students can blaze ahead and not be bored, and the slower students aren’t stressed about keeping up. I find this to be a very positive overall experience, both in terms of people actually learning shit and also keeping the vibes of the class high.
The only thing I changed with my solo jeans classes is the time involved. Classes at Workroom Social are 2 full days. While you can definitely finish a pair of jeans in that time – I’ve had classes wrap up as early as 3 hours before the end time before – it can also be a little rushed sometimes. Workroom Social also speeds things up by having the patterns pre-traced and cut, and also providing lunch in the studio. After some thinking, I realized the fitting/cutting portion was really the big roadblock here – so for my classes, I am moving that to its own half day. This makes my classes 2.5 days, but those extra hours make a big difference (plus it makes things a little easier if you’re traveling to take the class – you can fly in that morning). Students have 4 hours to try on the samples, choose their size, cut or trace their patterns, make basic fitting adjustments if needed, and then cut and mark their fabric! Next two days go straight into sewing, with a little extra time built in so it’s not as rushed – and you can chat! Or take a break! Finish early? Cool, I’ll do some demos or talk about what shit you want (jeans-related or not)! Or we can drink and hang out and celebrate! I don’t care, we are here to have fun!
Oh yeah, one last thing – if you fall outside the size range of the Ginger Jeans pattern, that is ok! The Ames Jeans pattern from Cashmerette is available in sizes 12-28 and for two different body types (apple or pear fit). While I do not have samples available in this pattern, you can absolutely use it to take my classes and get you a pair of jeans that fits YOU. In other news, I cannot tell you how excited I am that Jenny released this pattern. I may or may not have fangirled for like 2 weeks straight haha.
Ok I swear I’m wrapping up! Here are my upcoming classes through the beginning of May (you can also see these on my Classes Page 🙂 )
Jeans Making Sewing Intensive March 24th – 25th Workroom Social / Brooklyn, NY
Pfft y’all didn’t think I leaving Workroom Social, did you? THEY CAN NEVER GET RID OF ME 🙂 This 2 day workshop in beautiful Brooklyn is all about jean-making – rumor has it we will be sewing a custom Workroom Social jeans pattern in this class 🙂
Ginger Jeans Workshop April 27th – 29th SOLD OUT // May 1st – 3rd Stitch Sew Shop / Alexandria, VA
Two dates for this one! Choose either Friday – Sunday (Update: The weekend is now sold out!) or Tuesday – Thursdsay (maaaaybe you are thinking about going to the Sheep and Wool Festival that weekend? ;)). This is another one of my 2.5 day workshops where we will make Ginger Jeans!
If you are a shop who would like to host me for a Jeans Workshop, please get in touch! I still have a little bit of availability for the second half of 2018 🙂 I am especially interested in teaching on the west coast or in the UK!
If you read this entire post and you’re still somehow still here – if we ever meet irl, I totally owe you a drink haha!
Ok, I’ll be back soon to discuss my jeans made with the Robert Kaufman fabric! Have a great day, everyone!
In case you forgot, I still really love making pants.
I’ve had to slow my roll a bit lately because I ended up with waaaay more pairs of pants that I can seriously, feasibly wear during the course of winter (I never wear pants in the summer – unless I’m on an airplane or in a movie theater, where it’s always fucking freezing – and I’m really impressed with people who can manage it. Too damn hot!), and I sorely missed sewing them. I can get a little bit of a fix when I run a Jeans Workshop, but it’s not the saaaaaame, you know?
Anyway, it appears I’ve gone up a size this year, so a lot of my old clothes don’t fit right. So, lucky me – I get to make new ones! Starting with pants, because, again, first love.
I’ve mentioned before that I’m a die hard when it comes to super tight, stretchy pants. I have loved that style ever since I first discovered it as a teenager (back when I learned how to use the sewing machine because I couldn’t find pants in that skinny cut – everything was flared at the time), and stuck with it over the decades. But I like branching out and trying new looks from time to time, such as this boyfriend jeans trend. The biggest upside to this look is that you don’t have to worry about stretch percentage when shopping for fabric – which is awesome and opens a whole WORLD of possibilities! Any fabric can be pants fabric if you put your mind to it!
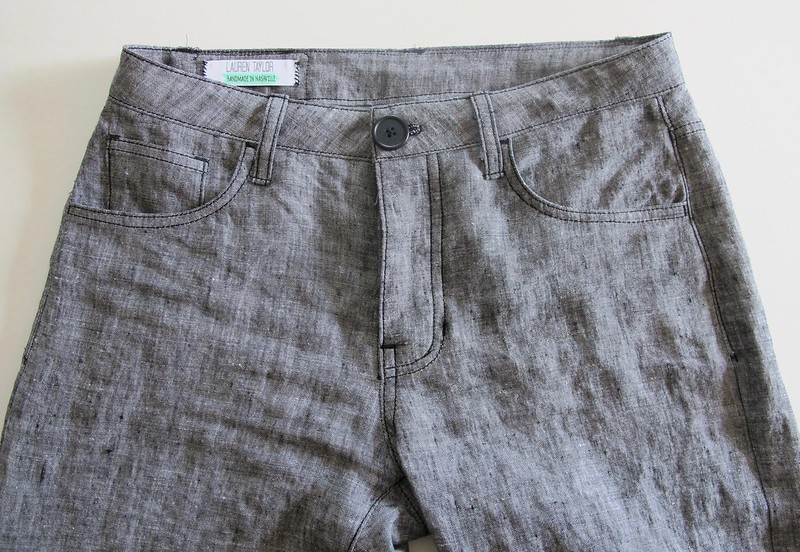
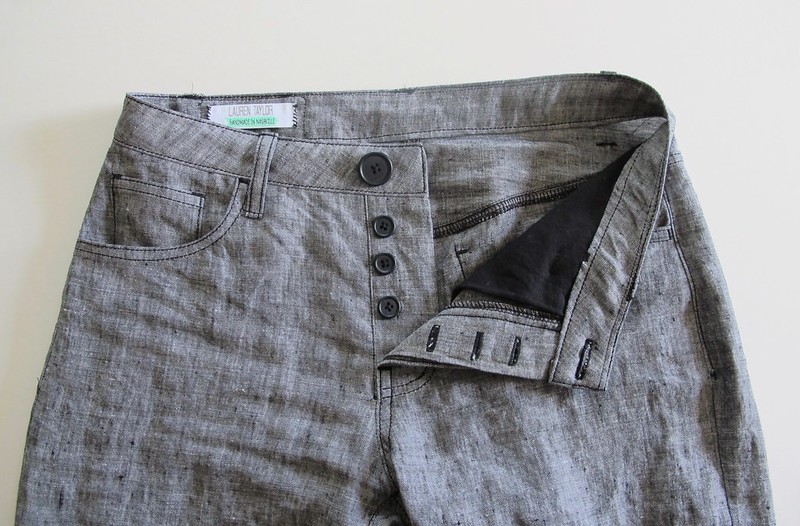
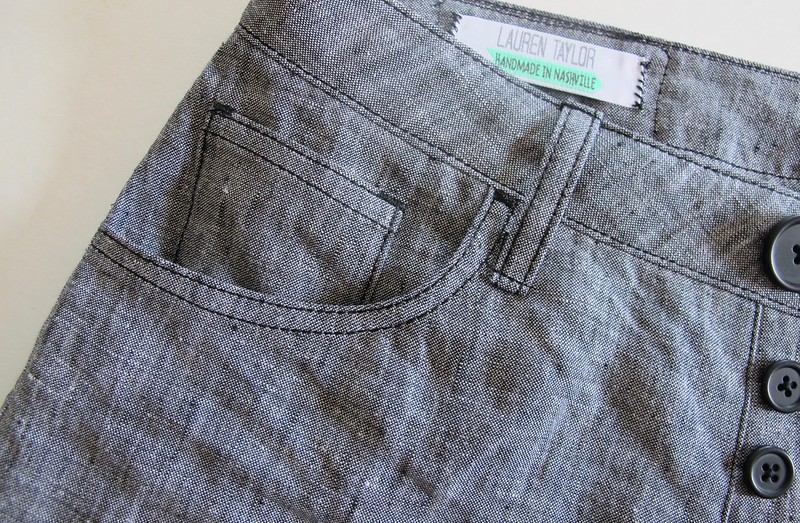
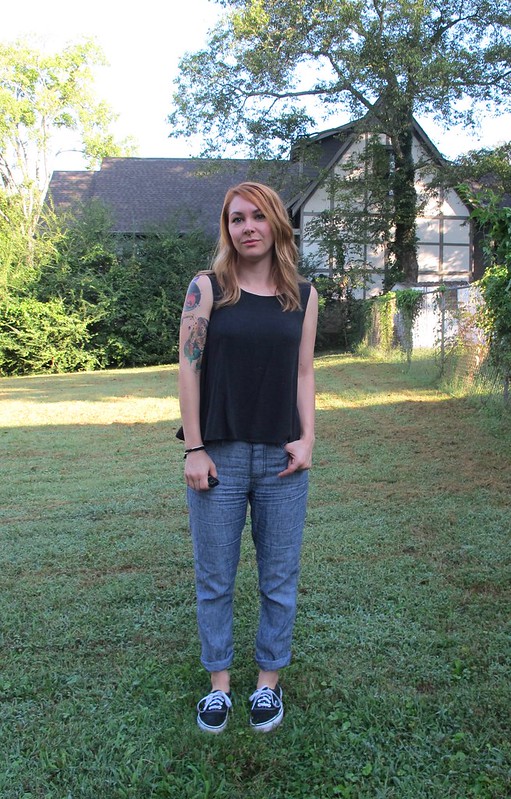
This is my second go at the Morgan Boyfriend Jeans pattern from Closet Case Patterns (you can see my first pair, made of cotton twill, in this blog post). I re-traced the pattern to a size 4, since the size 2 I originally made was too small. These were still on the snug side when I first put them on, but thankfully the fabric has relaxed and I think the fit looks pretty good now.
The fabric! I actually used linen to make these – a beautiful marled gray-and-white bottomweight 100% linen that I picked up at my local fabric shop, Textile Fabrics, during one of their big sales. This was a huge remnant – I think I paid $20 for 3 yards. This fabric is usually around $20 for a single yard, so I definitely got a good price on this piece! It was pretty stiff when I first took it home, but after several washings it is thankfully starting to soften up. The fabric is not very thick – it’s more of a medium weight than a heavy weight – but it’s not see through, and it has enough of a heft that it doesn’t really wrinkle very much. In these photos, I have been wearing these pants for about 2 months – washed, machine dried and unironed. I’m really happy with the quality of this fabric, it’s really the perfect weight and thickness for a good pair of pants!
I also made my shirt, by the way! The pattern is the Sway Dress from Papercut Patterns, shortened to shirt length and sewn with a very lightweight raw silk that I bought in Egypt. I was 100% influenced by the Marlena Tank and wanted to make something similar. Mine is a lot more flared than the original inspiration- which is perfect in this drapey silk (seriously, I’ve never seen a raw silk this thin and drapey and omg I love it so much). I changed the construction of the top to mimic that of the Elizabeth Suzann – swapped out the facings for topstitched bias facings, and used French seams. I’ve probably sewn a thousand of those Marlena tanks, no lie, so putting this one together was like second nature (but not as fun on a non-industrial machine, ha!).
Anyway, back to my pants!
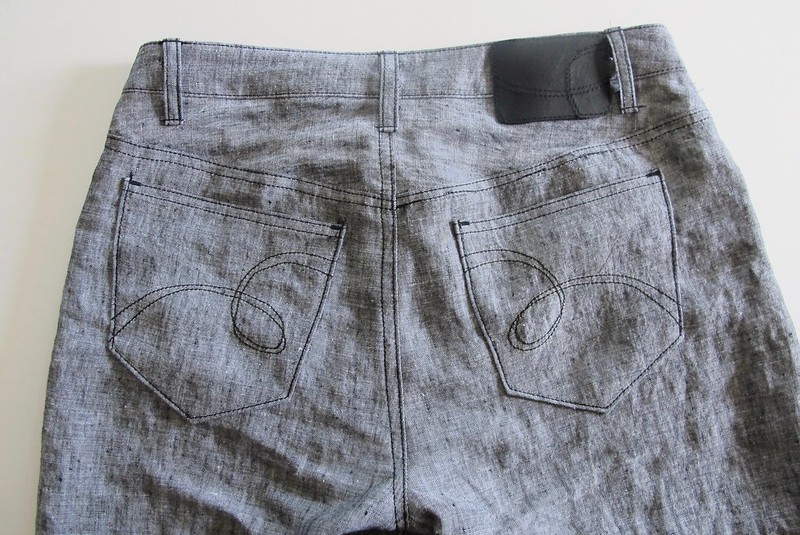
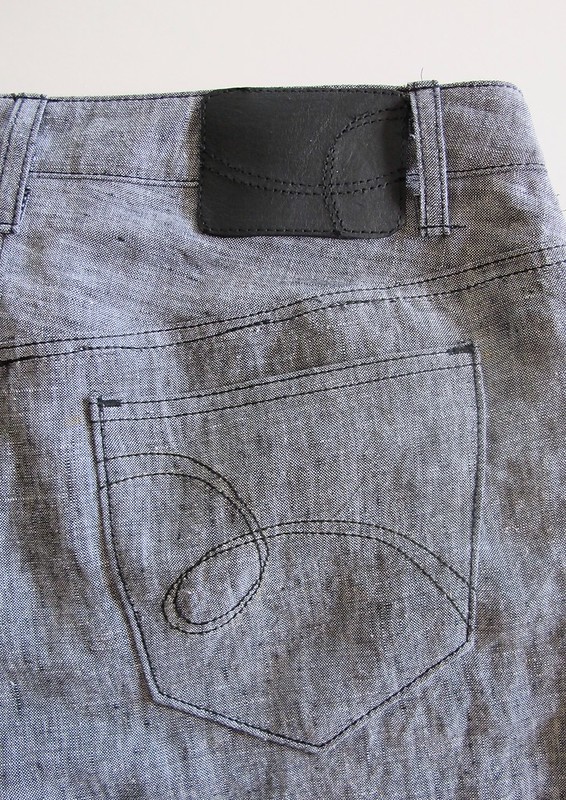
I had a lot of fun planning and sewing these! The black buttons are also from Textile Fabrics (and they were stupid expensive because they were ~imported from Italy~ ugh I mean come on), and the pocket lining is some black linen I had in my stash. I used black thread with a triple stitch for the topstitching, and thread bartacks in place of rivets. Rather than flat fell the seams, they are just serged and topstitched.
The back is my favorite part! I topstitched the pockets with some fun little swirlies, which I then mimicked on the leather waistband patch. It looks very designer to me. I’m a designer, you guys.
That’s all for this one! I will admit, I didn’t get to wear these as much as I had anticipated because it’s been soooo hot here, but they’ve finally had their place in the spotlight these past couple of weeks. I have the hems rolled up in these pictures, but I’ve been wearing them full length lately. They are hemmed slightly long; I wanted to make sure they were washed enough to get the shrink out before I hemmed them to the proper length. Seeing as I’ve washed and dried them probably a dozen times since finishing them, I should probably go ahead and re-hem. Maybe. Ha!
One last thing, I have ONE MORE jeans workshop for 2017, and it’s coming soooon!! I’ll be going back to Brooklyn to teach the Jeans Making Intensive in November and I can’t wait!
Gah, it has been WAY too long since I made a pair of pants – according to my blog, that last pair was published in a February! LAME, TIME TO RECTIFY IMMEDIATELY.
Also, damn, my hair has gotten long since then. It seems to grow soo slowly until you look back and realize you’ve really gained some inches over the months, yay.
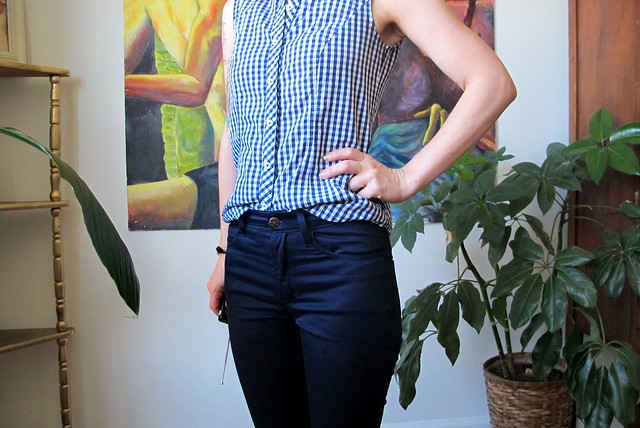
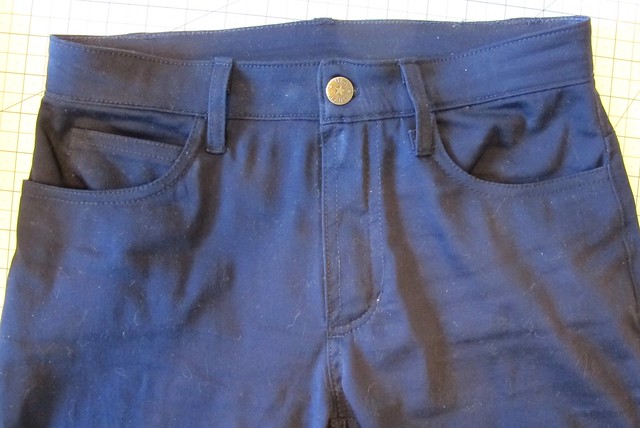
Anyway, Ginger Jeans! Again! I love this pattern so much, it’s definitely my pants TNT. The style is so classic, I can make a million pairs and have no one be the wiser that I’ve been wearing the same pattern for 6 months straight. I’m still tweaking the leg fit, but I really think the waist/hip fit is nailed down solid. And I love how it looks in different fabrics. While I primarily make this pattern up in denim, I’ve really wanted to try more colorful stretch twills. And here we are with that!
Sorry in advance for the terribly quality of these photos. Navy is almost as difficult to shoot as black, who would have thought!?
Anyway, I bought this navy stretch cotton twill from Mood Fabrics, back when I was in the NYC storefront in March – specifically with the intention of making myself some sweet pants out of the yardage. It’s a good stretch bottomweight for the kind of pants I like to wear – a lighter bottom weight (it’s still technically bottom weight, however, it’s about the lightest you can get away with – if that makes sense!) with a really good, solid amount of stretch. I have learned that I don’t like wearing really heavy fabric as pants – just don’t care at all for the way it feels. Maybe I’m sliding quickly into knit-fabrics-for-every-garment fabric territory, but I really like lightweight, super stretchy fabrics on my booty. Since that’s so freaking DIFFICULT to find with denim (get the right weight, and you lose out on recovery. Get the good recovery, and it’s like wearing raw denim in terms of stiffness, ew), cotton twill is where it’s AT. Bonus if that shit is colorful. I like colorful things.
This cotton twill seems to be a lot more along the lines of a cotton sateen, to be honest -it’s pretty shiny, for one. I rather like the effect – I think it looks a little more luxe than just a normal pair of pants – but as you can see, it highlights EVERY SINGLE wrinkle that shows up. It makes these pants look a lot more ill-fitting than they actually are… not that anyone would notice, except someone else who sews/fits, but it is what it is. I ain’t worried about it. Coupled with the fact that I like to wear my pants as skintight as if they are basically painted on, it’s pretty much wrinkle-city up in here. That’s ok, though. I will live.
I wanted to improve on the fit of my last pair – the full calf adjustment has been good in terms of allowing room for my calves and reducing the amount of knee wrinkles, however, I wasn’t happy with how wide the ankle ended up as a result. This is part of the reason why I’ve been reluctant to make this pattern again until now – that, and it’s been way too hot to wear pants for the past few months 🙂 Anyway, I have that Ginger Jeans Intensive at Workroom Social this week, so I wanted to make the pattern before I left just to brush on the construction. Which meant that I also had to figure out the leg situation. Boo.
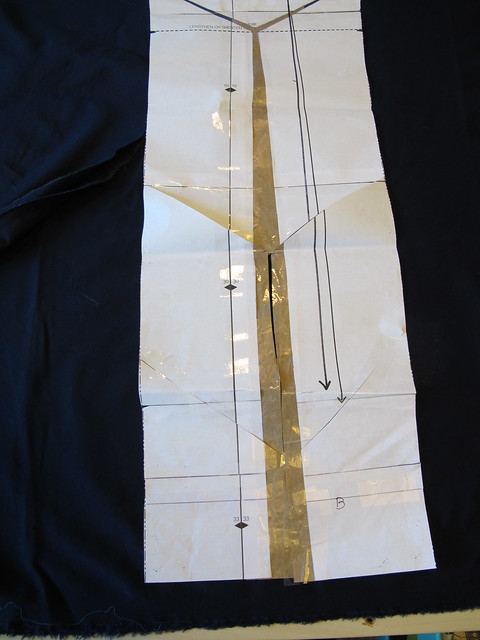
Ultimately, I figured that since the full calf adjustment was kind of the same concept as a full bust adjustment – i.e., you slash and spread to add width to a certain part of your pattern – then reducing the circumference of the ankle would basically be the opposite of that, like a small bust adjustment.
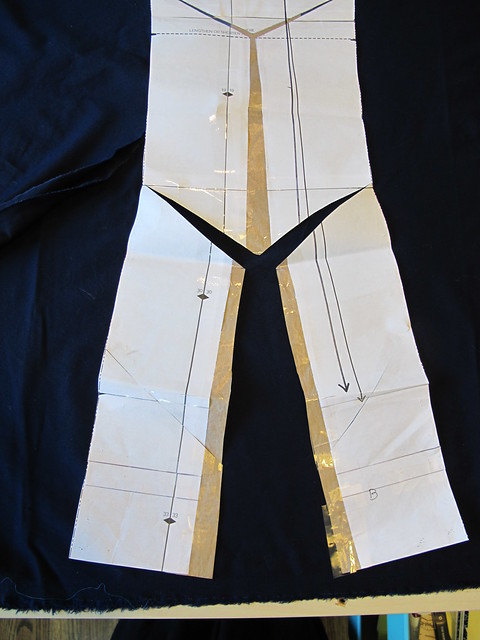
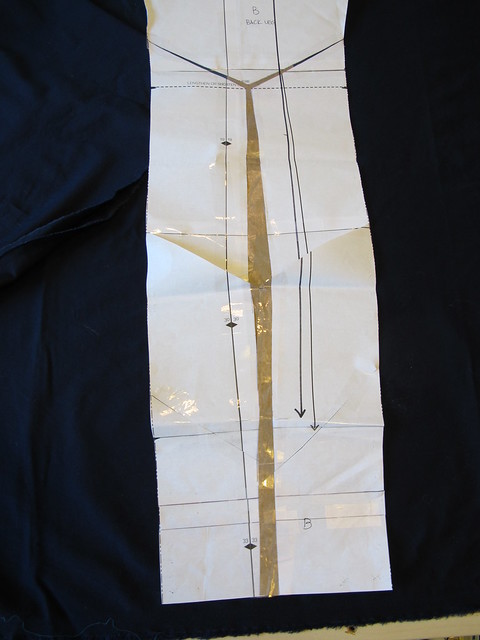
Here is my pattern piece after adding that extra room for my calves. As you can see, quite a bit of width was added at the ankle – 1 1/8″, to be exact. I wanted to reduce that amount without actually reducing the calf width, and also maintain the grainline of the pattern so the fabric wouldn’t twist and go all haywire (this is why you can’t just… shave down the side seams to remove the width. I tried that on the jeans with a basting stitch and it was just AWFUL. Did not work at all).
My Y-shaped slash and spread worked to add that width, so I did another Y-shaped slash right around where my calf starts to taper back into “normal width” category, using the super scientific method of holding the pattern piece up to my body and drawing wild lines on the paper with a pencil. (btw, that second slash line was my first try – and I realized it was way too low, so I taped it back together haha)
Instead of spreading, I overlapped the pieces together so that the original pattern paper (without my brown craft paper addition) butted up as normal right at the ankle. As you can see, it makes a very gradual curve to the side seams – they bellow out a little where the extra width is needed, and then gently curve back to their normal width tapering to nothing at the ankle. I also straightened the grainline, after I took the photo. Sorry bout that.
I had no idea if this was going to work – this is how I do my pattern adjustments (if I can’t find the answer in a book, anyway): mulling over the issue for a few months, doing some wild slashing that seems legit, and then cutting them off into shorts if it doesn’t work 🙂 Fortunately, it worked! I still have the room I need for my calves, but the ankle is fitted as it should be. And I ended up with pants instead of having to cut them into shorts, so woohoo me:)
The only other change I made to these pants, in terms of construction, was how I applied the topstitching. I usually use topstitching thread – whether matching or in a contrast color – but I didn’t have any of that on hand when I made these pants (to be frank, I barely had ANY navy thread at all during this phase. I did have a bunch of bobbins filled with navy thread, which is what I used as my main thread hahaha AND MIRACULOUSLY HAD ENOUGH YAY). Instead, I used normal polyester thread – just whatever you’d use to, I dunno, assemble a garment – and set my machine to sew on the Triple Stitch. The Triple Stitch automatically lengthens your stitch just a few mm, and then sews over the same stitch a couple of times – which results in a nice, thick, dense stitch. It looks great for topstiching and solves the problem of not having the proper thread. I actually like it better than using topstitching thread, as you are less likely to get thread nests on the underside of your fabric! The only downside is that it is a giant ass bitch to unpick, so definitely be really really sure of what you’re sewing 🙂
Anyway, I used the Triple Stitch to topstitch all my seams – including the flat-felled seams. To keep my lines even and consistent, I used my edgestitching foot to get that 1/8″ from the seamline, and then my 1/4″ foot for the second pass. The bartacks are just teensy little zigzag/satin stitch blobs, using the same navy as the topstitching. I didn’t add any rivets or contrasty anything to these pants – I wanted them to be plain and a little sleek. The pocketing is the same striped cotton I use for pretty much all my pocketing – I bought a shitload of that yardage ages ago at Mood Fabrics, and it’s like the gift that keeps on giving forever haha 🙂 I kept the longer length, just so these don’t end up being super high-waters after a couple of washes, but they look good cuffed, too 🙂
I have only had a chance to wear these once since finishing them, so I can’t 100% comment on the recovery of the stretch fabric – but at the end of the day on their inaugural wear, they stayed pretty tight and did not bag out. I’m interested to see how long they keep their shape before bagging happens, but so far so good, I think!
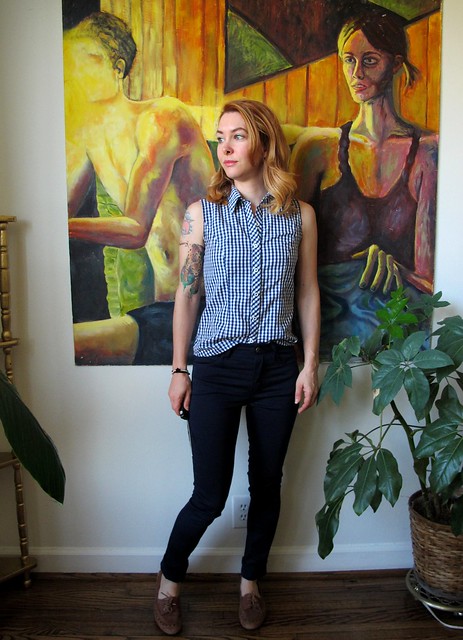
** Note: The fabrics used to make these pants were provided to me by Mood Fabrics, as part of my participation in the Mood Sewing Network. In case you were curious, the gingham for that shirt is also from Mood Fabrics 🙂 it’s Butterick 5526 !
Well, it’s finally too cold to take photos outdoors.
Hello, wall!
Anyway, I made another pair of Ginger jeans – and finally used up my second piece of the Cone Mills denim I’ve been hoarding since I bought it last year (FYI, in my last post it was brought to my attention that Threadbare Fabrics also sells Cone Mills denim by the yard. I haven’t ordered from them yet – but it made it much easier to cut into my precious stash knowing that I could get more of the stuff. Yay!). This is the lighter weight of the two denims I received in my kit; I think it’s a 10oz. It’s thinner and a little stretchier than what I used in my previous pair, and I like it a lot more. Actually, it’s almost identical to the denim I used in my very first pair of Gingers – same color and everything. I realize I essentially made two pairs of the same pants, but that first pair is starting to show it’s age (saying that I wear them a LOT is a huge understatement), so I am just thinking I’m ahead of the curve for once.
I was originally saving this denim to make a pair of flares – either using the Ginger jeans flare expansion add-on (um, btw, how genius is that idea?!) or the new Birkin flares that everyone is obsessing over, but in the end I just decided to remake my ol’ TNT (especially since the fabric on the first pair is a bit subpar quality, and one of these days I might have an unfortunate butt-rip happen. Hopefully not in public. I am wearing cute underwear at all times just in case, though). Like I said, I can reorder more of the Cone Mills, so perhaps there will be flares in my future. Just not this pair. No ragrets.
I wanted to improve on my last pair – they’re ok, but the bunching at the knee really bothered me way too much. I tried to research what the issue was – some people suggested that I might have knock-knees which is causing the bunching, but I’m pretty sure that’s not the case (I definitely don’t look like I have knock-knees, anyway). One of the comments in my last jeans post suggested checking out Cation Designs as she has a few posts on pants fitting. I usually refer to my pants-fitting bible, Pants for Real People, as it has never steered me wrong. However, this particular fit issue wasn’t covered in the book (I think it’s a product of tight/stretchy jeans, which they certainly don’t show any of in the book hahaha), so it was good to have a back-up resource! And this post in particular is FANTASTIC – plus, I think I found my solution! Yay! The #10 Hyperextended Calf alteration sounded like what I was dealing with – the calves of my tight pants are always REALLY tight, which then causes them to ride up and bunch at the knee (I have muscular calves, so this makes sense!). I did this alteration to my jeans pattern, adding 1 1/8″ to the calf (this was just a wild guess; I wasn’t about to slash up a pair of pants to figure out the exact amount I needed). It worked pretty well, but I think I could stand to add even a little more width. How they are now, though, is pretty magical -they only bunch a little, and I think that’s just from moving around. I don’t have giant folds of denim hanging around my knee. It is AWESOME. However, I am not a huge fan of how big it makes the ankle – I can deal with this pair, but on my next pair I would like to figure out a way to keep the tightess at the ankle while still allowing some room in the calf. Anyone have suggestions? Just tapering the ankle at the side and inseams doesn’t work, FYI. haha.
Other than that one alteration, not a lot of changes to this pair. I added the length back and then removed about 2.5″ – I wanted them to be long enough to pool a little at the ankle. I used my original Ginger pattern – the one before it was updated with a pocket stay – and sewed the size 2 instead of the 4. Topstitching and all that is pretty simple – one color of jeans topstitching thread. I did add an X to one leg in lieu of a bartack. Kind of a riff on the + on my I+W jeans haha. What, they’re made of the same denim!
This silk cami is something I made ages ago and completely forgot to photograph for my blog! It’s a Ruby Slip that I modified to include gathers at the bust and silk bias finishing on the edges and straps, and then shortened to cami length. I made this slip a couple of years ago out of some really amazing 4ply silk, and I love how it looks so it was only natural to use it for a cami pattern.
The silk I used is a really wonderful new silk from Organic Cotton Plus, called Peace Silk. I really love OCP and I’ve been happy with all the fabrics I’ve received from them, and this silk is pretty fantastic too. It’s a wonderful lightweight, organic silk, with a feel similar to a thicker china silk or a less crepey crepe de chine. Really easy to work with, and feels amaaaazing after a wash in the machine. It’s called Peace Silk because it’s produced in a way that does not kill the silk worm and instead allows it to emerge from the cocoon first. While I definitely have no problem eating meat or wearing animal fibers, I thought that was a pretty neat solution! Plus, the name just makes me happy 🙂
That’s about all I have left to talk about, so here’s a bunch of pictures of my butt:
And some flat jeans shots:
Everything was constructed on my Pfaff 7570, and topstitching was done on my Bernina 350PE. I used regular black poly thread for piecing, and Gutterman jeans topstitching thread for the topstitching. The aqua serging thread is just a fun color that matched my pocketing (which I got from the free fabric pile at A Gathering of Stitches because GOD it’s beautiful!) and my zipper (from the Garment District!). I wanted to add rivets, but they need to be trimmed down and I apparently don’t own wire cutters anymore, womp womp.
Overall: A+ jeans, would sew again (and I will – I have enough Cone Mills left to make a couple pairs of jorts! HA HA HA IT NEVER ENDS).
In closing, two things:
One, here is my Calvin Klein ~modeling~ shot. Can’t you see people just banging down my door to be a jeans model? Gah.
Two, the Spiegel 60609 winner! Yay! First of all, I cannot BELIEVE how many entries that giveaway got – over 1,100! That’s definitely the biggest one I’ve ever hosted on this blog (and I guess y’all agree with me that one should never say no to a free sewing machine, amirite). Thank you for blowing up my email last week and making me feel super duper popular haha. I enjoyed reading everyone’s comments – and yes, I read every single one of them! – but there can only be one winner:
Congratulations, thefilling!! I want to also mention that this comment filled me with delight – although, what is exactly is a snapback hat? (Can I see a picture? Can you tell me more about this cheeseburger print? We have a lot to discuss, dude) We will be in touch to get your new 60609 out to you ASAP 😀 😀 😀 Happy belated Valentine’s Day!
If you’re still trying to holler at the 60609, watch this space – I have some upcoming projects and tutorials that use the machine so you can see it in ~action~. And if you don’t care about the 60609, well, I hope you at least find the content interesting 🙂
I’ve been swimming through muslin hell this whole week (crazy me decided to even make a SECOND MUSLIN to verify all my changes, wtf who am I turning into amirite), but fortunately, I have an old make from pre-Maine that I can share with y’all! Jeans! Yay!
Remember when we were all scrambling around to buy those fancy Cone Mills Denim kits with our Ginger Jeans earlier this year (and last year too, for that matter)? I’m so happy that I made space in my budget for one, because Cone Mills denim is awesome. It’s the same denim they used to make Imogene + Willie jeans (which I can personally vouch for as I own 2 pairs – they wear really well and hold their shape beautifully, which means I never need to wash them in order to shrink ’em back down at the end of the day), and although the kit wasn’t cheap – it is certainly cheaper than buying the actual jeans. By the way, if you’re thinking, “Where the hell is this kit so I can buy one???” I’m sorry to be the one to tell you that they were on limited pre-order, and have been sold out for a while now 😦 Hopefully there will be more where that came from!
EDIT I have just been informed that Threadbare Fabrics sells Cone Mills Denim! Yay!! I apologize in advance for those who end up emptying their bank accounts after reading this post 🙂
Anyway, the point of that somewhat sales-y sounding paragraph was to say that I finally used one of the pieces of my denim for this pair of pants. I received the kit way back in April and have been anxious to sew it up, but I wanted to wait until it was actually something closer to pants-season before I got too excited.
Also, just a head’s up before we delve too far into this post – sorry in advance for all the weird bobble-head shots. I didn’t realize my camera was tilted so much, and I don’t care enough to retake the photos. Also, there be VPL in most of these pictures. Not sorry about that! Deal with it!
The denim itself is what really counts when it comes to a good pair of jeans. You want a material that is a good medium weight (not too light, but also not too heavy) and if it has stretch, an awesome recovery. The single thing that’s plagued me the most when it comes to making my own pants is finding material with a good recovery! I hate having my pants bag out by the end of the day – it’s annoying enough for every day life, and utterly useless if you’re traveling and don’t have access for a quick wash (or just plain don’t own a washer and dryer, which was totally my situation up until we moved this year!). Plus, washing denim too much can fade out the color and cause the fibers to break down faster. I like my jeans to be a really deep, dark indigo blue, so fading isn’t my first choice. Figuring out fabric recovery is really difficult to do without actually wearing the fabric – which means you have to sew it first. So whenever someone gives me a head’s up on some good stretch bottomweight, I tend to snap it up without hesitation. I knew the Cone Mills denim was good stuff, so I’m glad I was able to get my hands on some before it sold out.
Having made this pattern numerous times made me feel confident enough to break into my mega-expensive denim for the pair you see here. I knew I already had the fit pretty good, so I could focus more on visual details with this version. That being said, there are a few changes to this pair that aren’t evident in my previous makes.
The biggest change is that I went up one size, to a 4. While I like the fit of the 2 (all my other Gingers are 2s, fyi!), I’ve gained a little bit of weight over the summer and I got this weird paranoia that I was in denial about my size. Those 2s are great and super comfortable, but the legs are so tight that they look painted on. I was horrified at the thought of people thinking I was trying to squeeze into a too-small size, so I went up to the next size. I think the 4 definitely fits better, but the are a little different. Namely – those wrinkles at the knee. What is the deal with those? The calves aren’t too tight (they are looser than the tightness on my 2s, and my 2s don’t wrinkle like that), so that’s not the issue. Maybe they’re too loose at the knee and need to be taken in a bit? Thoughts? Btw, the wrinkles look worse in photos than they do in real life!
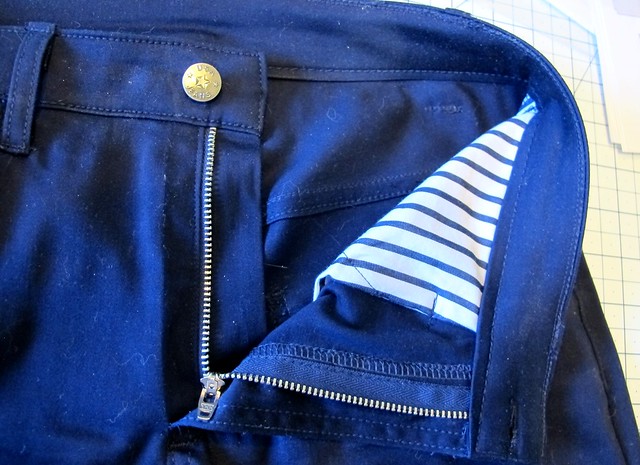
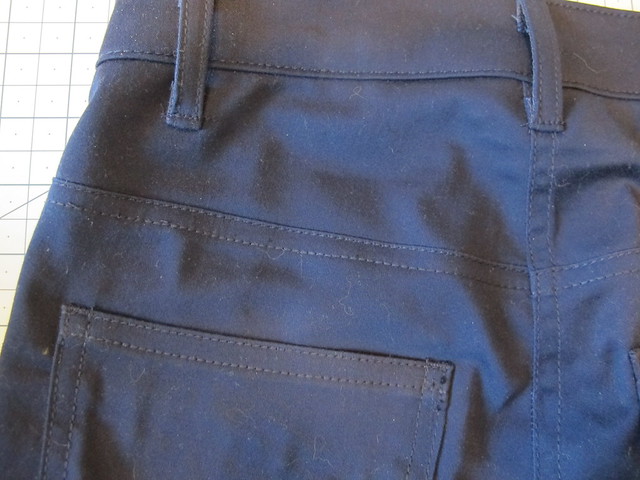
Since I was going up one size and I don’t trace, I had to reprint the pattern. I know Heather updated the Ginger jeans pattern at some point last year, and I had both an original version (that I got when it was first released) and an updated version (that came with my purchased denim kit). I printed the new version so I could try it and compare to the original one. I don’t recall exactly what changes were made to the jeans, but there are some slight differences in the rise and the shaping around the crotch and hips. The waist is definitely a lot higher than it is in the original version – and this was after I shortened the crotch. The major difference in the updated version is the pocket bags – instead of normal jeans pocket bags, there is a drafted pocket stay (also called an instant tummy tuck).
With a pocket stay, the pocket bags go all the way across the front into the fly. This helps pull everything in and give you a smooth line in the front (hence the tummy tuck name). I wasn’t sure if it would be comfortable, but I tried it anyway and I’m glad that I did! I don’t care about smooth lines or whatever (I mean, c’mon, I’m basically always rocking dem VPLs. Death to thongs!), but what I do love is that the pockets stay in place when you pull your pants on. You know how tight pants always have to get the pockets shoved back down after you go to the bathroom? Not with these babies! Plus, since the pocketing isn’t folded over anywhere, there isn’t a weird bump at the coin pocket. I never was a fan of that.
Damn, shoulda pressed those insides before taking the photo. That fly shield wrinkle looks awful.
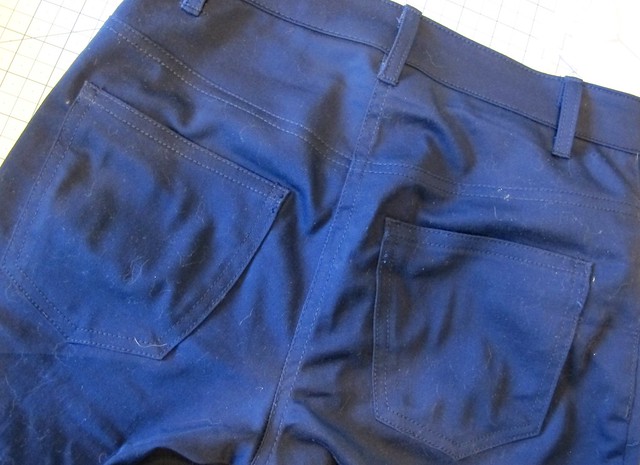
All the topstitching and jeans-y details are what really made these fun to sew up! I just love the way jeans topstitching thread looks when sewn up against denim, so good. I kept my I+W jeans on hand and used their stitching colors as inspiration for this pair (here’s an old post where I took close-ups of the jeans right after I bought them, if you’re curious). The kits came with the zipper, button, rivets, copper topstitching thread and denim needles. However, you can buy all that stuff individually as well – Taylor Tailor has most of it in his supply shop for really reasonable prices. I did buy the orange topstitching thread from Taylor Tailor, which I think looks awesome next to the gold topstitching.
Now that I’ve overloaded you with pictures of my butt and crotch, here are some flat jeans shots.
As you can see, I used the orange topstitching thread pretty sparingly – just for the bartacks and belt loops. I can’t say I thought of this myself, as I pulled the inspo straight from my I+W jeans. They also use a third topstitching color in the second line of stitching, which is not something I did with this pair. Also note that the I+W jeans don’t use rivets, but I did use them here. I love hammering those things in and I think they really finish off the jeans nicely. I just kept them on the front pockets and coin pocket – I don’t like the look of rivets on the back pockets.
Again, using my I+W jeans as inspiration – I flat-felled only the back yoke seam, and serged + topstiched the leg seams (this will make it way easier to take in the legs if I need to, so yay!). I used orange thread in my serger, which mimics the orange bartacks. I LOVE the way it looks!
Whew! Sorry about all that cat hair!
This is my absolute favorite little detail of these pants – the side leg bartack is a little L for Lauren 🙂 On my I+W jeans, they have a little + sign on one leg in place of a bartack, and I thought, hey I can do that with an L. It’s only on one side, and it’s quite subtle unless you already know it’s there.
Welp, that ended up being a super long post! Do you see now why I love making jeans so much? All the little details are so fun and make the end result look extremely professional. Not to mention, all the customization options – from fit, to denim, to topstitching details. I’m so glad Heather released the Ginger pattern and I’m even happier than we were able to get some of that fancy-ass denim to make it up with! I still have one more piece for one more pair of jeans – and I’m thinking I might do the low-rise version next. Could be fun!