
I have a well-documented love for the Ginger Jeans pattern. In fact, I love making (and wearing!) this pattern so much, that I just stopped posting about it. After you finish the 10th pair of pants, it just feeling way too fucking redundant to keep posting the same pattern praise over and over again. Needless to say, I have a lot of pairs of these pants, and more in the works for next winter. No shame about that, but also, no blog posts. You are welcome in advance.
With that being said, I loooove making pants and I found myself very intrigued with the Morgan Boyfriend Jeans pattern, which is also from Closet Case Patterns. I loved the idea of being able to make pants with a non-stretch fabric – truly, it opens up an enormous world of pants-possibilities that I hadn’t been able to consider in the past. Plus, I could keep making pants but pretend like they were like, totally different. Mostly, though, I wanted some non-stretch twill pants. I love the Organic Cotton Twill that Mood Fabrics sells (and yes, I’ve made pants with it before! And shorts!) and I know from experience that it’s a great fabric that wears and washes super well. I had about 1.5 yards leftover from my Organic Cotton Twill Kelly Anorak, so I decided to make the pattern as a sort of wearable muslin.
Truth be told, I actually got the Morgan Jeans pattern for Christmas last year. My little brother bought it for me (at my request) and while I was PUMPED to sew it up, it’s been languishing in my sewing room ever since. Every time I pulled it out of the envelope and tried to creep on the size chart, I just got overwhelmed and confused. I don’t know why this particular size chart buggered me out more than any other size chart in the history of ever – but that’s my excuse! See, I’m technically between sizes in Closet Case Patterns (I’m about 1/2″ bigger than the size 2, and a 1/2″ smaller than the 4). In my pants-making experience with this company, the size 2 fits pretty well, and the 4 is waaaay too big. However, this pattern suggests that you size up if you’re between sizes – and I kept having flashbacks of my size 4 Gingers that needed a LOT of tweaking to get a good fit, as they were just too big. I chatted with Heather about it when I saw her in DC, and she suggested going with the 2, so I took her advice and did just that.
Y’all, I’m so glad I had a moment of craziness and decided to trace my pattern – I generally DO NOT trace my patterns, but the sizing question was giving me major pause and I thought I would be pretty sad if I ended up cutting the wrong one. Which is exactly what I did, because the size 2 is definitely too small! Oh well, live and learn!
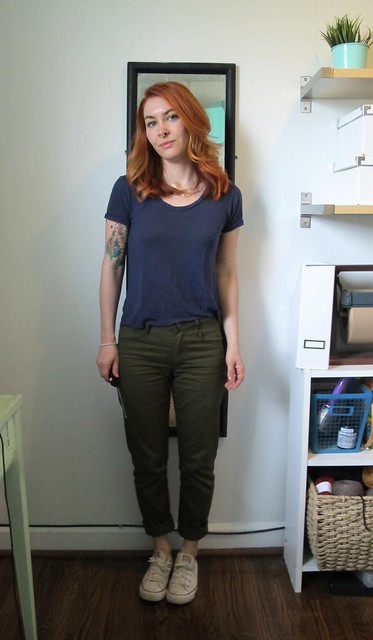
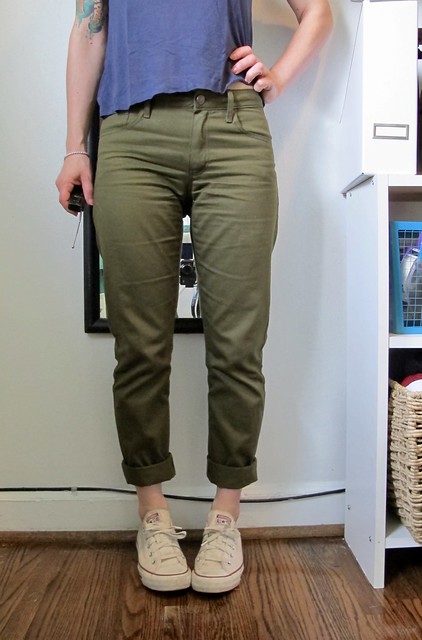
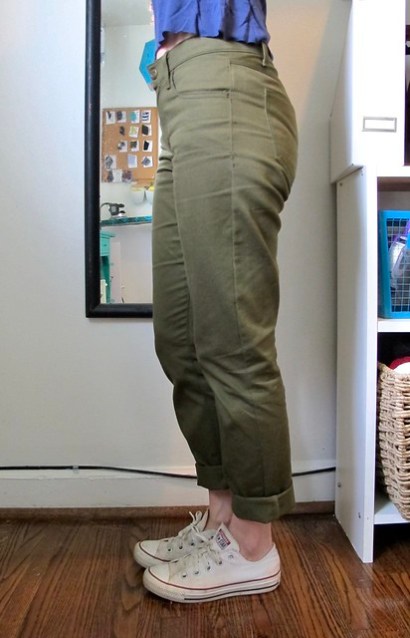
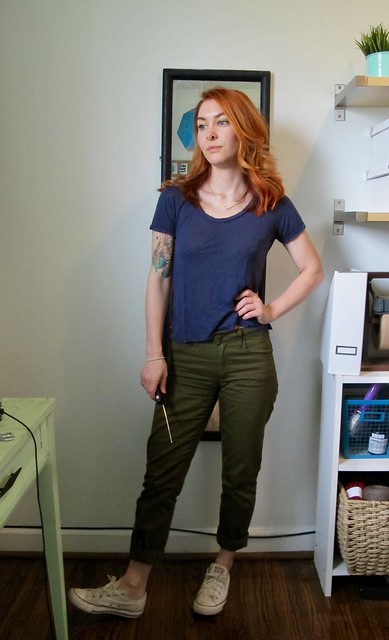
With that being said – these pants I am modeling are the original size 2 that I made, so I did make them work. I had to let out the leg seams (basically the side seams from as close to the waistband as I could get, all the way to about the knee area) as much as my seam allowances allowed (it’s hard to tell now since they’re all finished, but I didn’t cut any fabric off when I serged as I was anticipating this, so, I’d reckon those seam allowances are probably about 1/4″ now). They were still pretty tight, but fortunately, woven fabrics like this tend to ease and relax throughout the course of the day. TBH, I don’t think I can ever put these pants in the drier because I don’t want them to shrink back up! (A far cry from me in my early 20s – when I’d walk around the house pantsless all day and only put on my pants literally right before I left to party, so they’d be as tight as possible haha!) But with the seam allowances let out, and the fabric all relaxed and happy – the fit on these is pretty much perfect! So no complaints on this pair – and I’m so so happy I was able to salvage them, as shit got a little hairy for a minute there – but I definitely will need to size up to a 4 for my next pair.
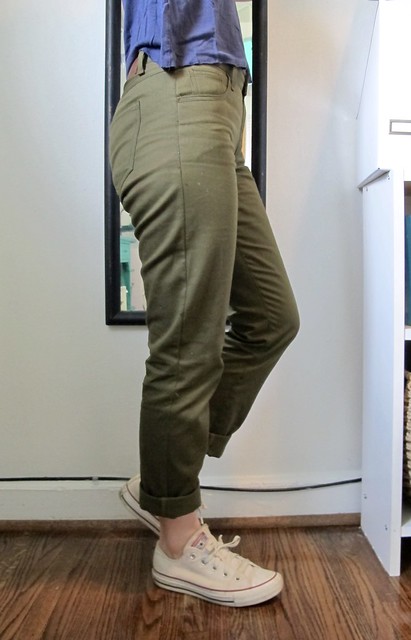
Other than the sizing snafu, I am pretty pleased with the overall fit of these pants! I will be the first to admit that they may not be the most flattering thing I could put on my ass – but I think that’s kind of the case with a relaxed fit pant like this, regardless? And they are also a little tight, still, so sizing up on the next pair will probably help with that too.
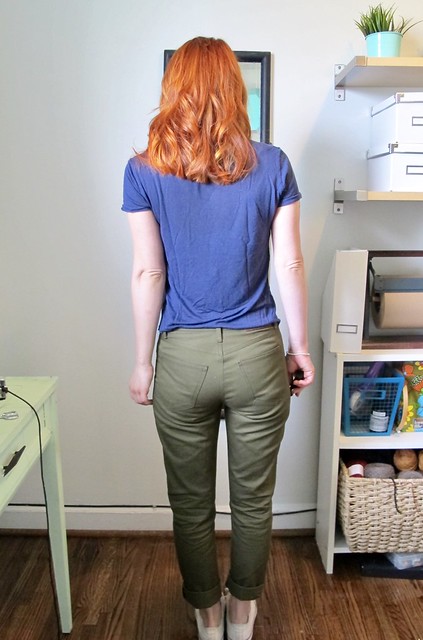
I did not make any adjustments to the pattern – including not futzing with the rise. I usually shorten the rise as I have a bit of a short crotch, but I wanted to see how these fit out of the envelope. And again, I think it’s pretty good! Since they’re more of a relaxed fit than the tight Gingers, my calves fit in the legs just fine. FYI the inseam of these is pretty long – I think I measured it at about 32″ (I don’t know why that wasn’t included in the finished measurements, but there ya go), which is a good 4″ longer than what my lil’ legs require. Since the legs are straight, though, you can just cut off the excess length – which is what I did! These are hemmed to be a normal full-length, by the way, I just have them rolled for the pictures because that’s how I’ve been wearing them!
And speaking of wearing them – I took these photos on day 3 of wearing these pants, so they are pretty relaxed! And that also explains all the wear wrinkles. Whatever! It’s cotton, it’s gonna wrinkle!
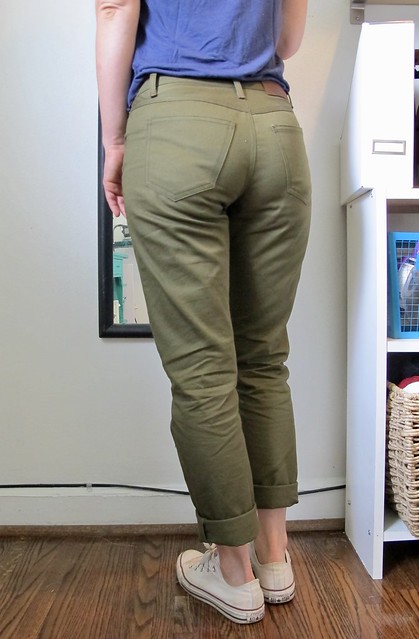
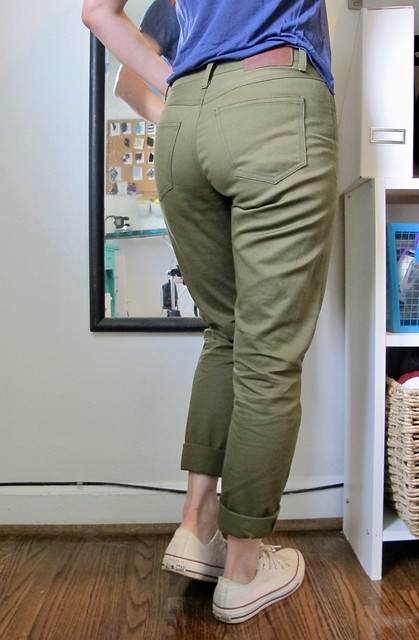
My favorite part about making pants is all the fun detailing you get to play with! Topstitching, contrast bartacks, fun pockets – yes please!
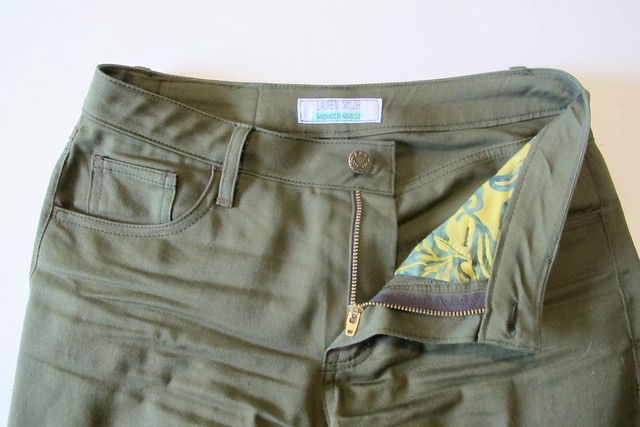
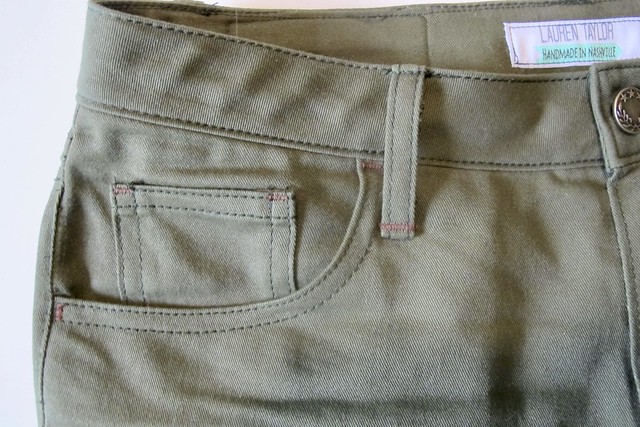
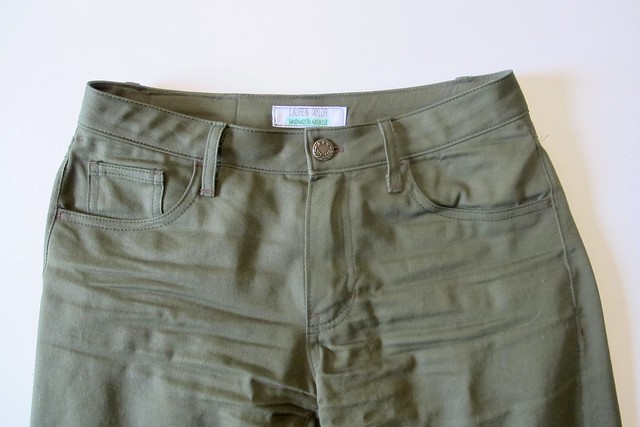
For these, I used a darker olive all-purpose thread with the triple stitch (I think it looks nicer than using topstitching thread – although it is a BITCH to unpick, so be warned if you decide to go that route!), and brown thread for the bartacks. The pocket lining is a batik fat quarter that I bought at Loose Threads, a quilt shop that I stumbled upon at random while in Harriman, TN a few weeks ago for the Barkley Marathons. I was not actively seeking a fabric store (honestly, we were just looking for coffee), but I saw the words “Quilt Shop” and we had to make a quick detour. There isn’t much that I can buy in a quilt shop – still haven’t caught the quilting bug, ha! – but I can stash some fat quarters as they are the perfect size and weight for pocket linings!
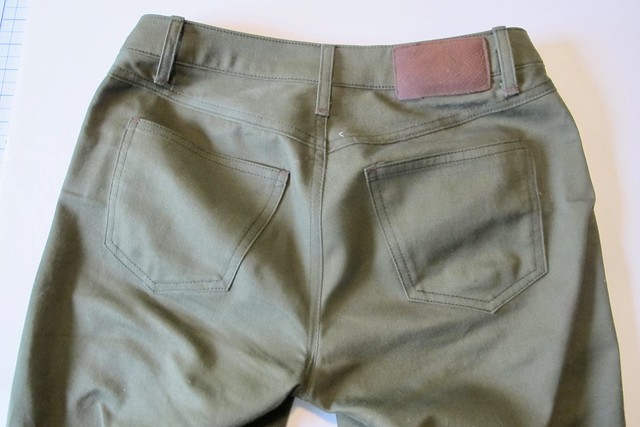
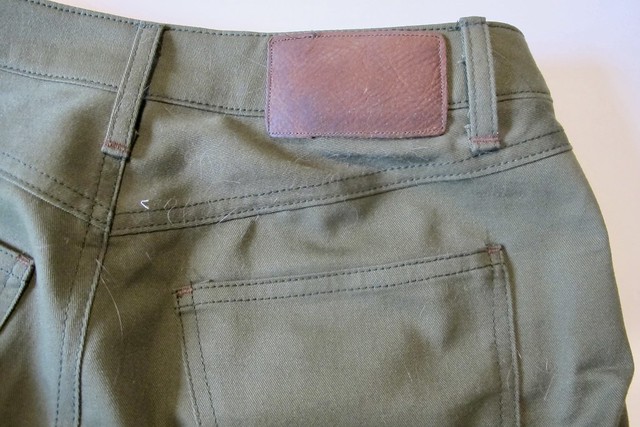
I skipped the back pocket topstitching as I wanted to keep these reasonably plain, but added a leather back patch like the instructions suggest. This leather was pulled out of my box of leather scraps – I’m not entirely sure where it originally came from, but it’s fairly thick. I had used this same leather to make luggage tags for my suitcases (yes I am a big dork), and that square was a leftover piece from the center cut-out. Since my machine had no problem going through the 2 layers to make the tags, I knew it would be fine with a single layer + the cotton twill. I didn’t even change the needle for this – just went to town and it turned out fine.
Anyway, that’s all for now! Have you tried this pants pattern yet? What is your take on the boyfriend jeans (whether they are secretly made for females or you actually steal your *real* boyfriend’s jeans… tell me about that too)?
*Note: The main fabric used in this post was provided to me by Mood Fabrics, in exchange for my participation in the Mood Sewing Network.


I am inscribing because of the language you choose to use to express yourself.
Great! I’d love to know the choice of medium you plan on using.
Hahahaha!
These look great. I also hate to give up on a wearable muslin! I’ve made a Morgan mock up but the butt looked weird and I got stuck on how to fix it. I’ll take another look soon. It took me about three pairs of Gingers before I felt I really nailed the fit. I’m so impatient sometimes!
I hear ya on that – I’m impatient too with my projects! But I sew SO much (and so quickly) that I’m forcing myself to slow down – trace the patterns, make a muslin, rip out mistakes, etc – because otherwise I have too much at the rate I’m going! Obviously I really love the stuff that I make, but I also love the process that it takes to get to that point – so I am making myself slow down and enjoy it 🙂 Or, at least, that’s what I say when I’m working my third muslin or tracing a neverending pattern haha!
Thanks for blogging these – I’ve been thinking of buying the pattern. They look a good shape – glad to have sizing up advice!
I love them and definitely recommend them (I love my stretch jeans too but YAY for not having to find stretch fabric to make these!), but absolutely you will want to size up if you want a looser fit! That pattern is not lying when they say they are slim-fit, ha! 🙂
Very interesting post. Love to read about the proces you went through. When I make a pants pattern for the first time and am in doubt about the fit, I cut the legs first, but dubbel the side seam allowance and don’t bother about the front pockets. (no front pockets). Like this it is easier to fit and you should have enough room for adjustments. After that I will cut and sew the waistband.
Btw, very impressed with your topstitching!
That’s a great tip for fitting and I will definitely try that in the future 🙂 And thank you! I gotta give all the topstitching credit to the feet I use (edgestitch foot at 1/8″ for the first pass, then 1/4″ foot for the second pass) – that’s my secret 🙂
I enjoyed reading about your awesome Morgan jeans! I just made my first Morgan muslin a few weeks ago. My jeans sag so much under the butt that I could carry Amelia in the excess (sure she would luv that). Overall the sizing is pretty much on point I think. I was between sizes (larger than yours), made the larger size and have to take it in about 1/4″. Don’t think I can salvage the muslin, but it took me 3 pairs of struggling with the Ginger jeans to get the fit right. The effort was worth it. I chucked when you asked if we wore our boyfriend’s jeans. I could fit 2 of me in my husband’s pants. I think that I will make my own,thank you.
Oh man, struggling through multiple muslins for anything is never fun, but it’s especially frustrating with pants, i think. I agree that it’s worth the effort, though! And yes, Amelia has been uncharacteristically snuggly lately – so I wouldn’t be surprised if she wanted to snuggle in your butt excess HAHA! 🙂
Isn’t it great when you can save a wearable muslin?! Great workmanship. I look forward to reading all about your next pair of Morgan’s.
Thank you! And yes, salvaging a wearable muslin always makes me feel like a sewing wizard 😀
Love the pants, and that color is the best! I’ve thought about this pattern, cause like you I liked the idea of a non stretch fabric. But I’m not sure I’d make them at least not for awhile, I made a pair of Gingers last fall and loved making them, but they take a lot of time, and with a one year old daughter and an Etsy shop to sew for I just don’t have enough personal sewing time to take on jeans right now. But I love reading about others pant making adventures so thank you for sharing!
Haha I have the opposite problem as you do – I love making pants so much, they are so fast and fulfilling, that I have to stop myself from making more than I can realistically wear! I hope you get more personal sewing time soon! 🙂
They look great. I have a pattern from Angela Wolf and even have her Craftsy class to make them and I’m terrified. What if the denim has more stretch than the muslin, what if I lose or gain weight before I’m finished, what if, what if, …you get it. Oh and BTW, what are “boyfriend” jeans. I see them in all the catalogs and I have absolutely no idea. I’m built like Marilyn Monroe only in a size 16 vs.14 like she was. All curves everywhere. Would a boyfriend cut work for me or am I imprisoned in my mom jeans?
Boyfriend jeans means they are cut a little less for women’s curves than your typical woman’s jeans. They are supposed to look like you took them from a dude – with a straight cut and a looser fit. I think this style would look good on a curvier body, but that’s also a matter of personal preference! Some people don’t like wearing a loose cut (me, up until very recently), so you might not like it even if it looks good. Maybe go to a shop that sells them and try them on to get an idea?
Your pants worked out and look great Thank goodness for seam allowances! I’m trying to trace patterns now, too. I’ve ruined quite a few patterns by either cutting the wrong size or making bad fitting changes. Which is OK with a two dollar pattern but not so much with pricey Indies!
Seriously! I never traced before because it seemed like such a waste of time (and sometimes I still think it is haha), but I feel like my size is starting to fluctuate – and also my ease preferences are changing – so it makes sense to preserve all the sizes in case I need to change it! Plus, I sew so quickly, I’m trying to look for ways to SLOW THE FUCK DOWN on my projects, thus, tracing! ha!
Your topstitching is so perfect it scares me!
haha, thank you!
Cute! I made stretch twill Ginger jeans and I’m so glad I have non-denim pants to work into my rotation every once in a while. I love my Morgan jeans so I would love to have a twill pair (probably in olive too – I might copy you!)
Do it! I am pleasantly surprised at how versatile the color has been for my wardrobe – it’s about as neutral as denim, but I can wear it with my denim jacket and not look like I have on a Canadian Tuxedo haha
Is it just me or is anyone else going crazy because the fly seems to be skewed waaaay to the left? Is that a result of the pattern or just the way they pull on you? Inquiring, and OCD, minds want to know!
Ha! I didn’t notice that, but I see what you are saying. The fly does look skewed! It’s definitely in the center – you can see that the CF is at the middle(esp when the pants are flat). Maybe it’s a trick of the camera or the way I’m standing? So weird haha
Hi, thanks for writing about your beautiful morgan jeans.I like the colour and the fit on you. I´ve made the ginger over and over again, but never give morgan a try. But after reading about it, think that would be my next project.
I think you’ll like them! They are a nice change from the Gingers 🙂
Unpicking triple stitch is the worst. I just got a new seam ripper so I can finally unpick the yoke of my Gingers ( from March!) and snug them up the center back to finish them.
Omg seriously! I love triple stitch topstitching, but unpicking it is like a dagger into my heart haha
They look awesome Lauren! Did you do the button fly?
~Robyn
Omg I can’t believe I forgot to mention that in the post! haha! I didn’t do the button fly – I used a zipper fly instead. I just used the shield pieces from the Ginger pants, and followed those instructions. I felt like a button fly would be weird on twill pants haha
So great to see you post about these! I’ve been struggling with Morgan muslins for several weeks now. I have one wearable muslin that works because the twill has a bit of stretch, but had incredible issues with the front crotch curve–and I think it’s still not 100% right–but after 6 muslins last night I feel like I cracked it. 😀 Hoping to sew up a non-stretch wearable muslin today. I definitely want to have a well-fitted non stretch jean, so I’m fighting on.
Ouch! That’s a painful amount of muslins, but I think it’ll be worth it in the end! Good on you for persevering through it! 🙂
These look great! I have been wanting to try making jeans for awhile now and am afraid of the multiple layers I must sew through. What machine do you use for sewing your jeans?
I have a Bernina 350 and a Pfaff 7570, and I use both to make my jeans. I honestly haven’t had a problem with any machine to make jeans – as long as you use a big enough needle, and go through slowly when doing several layers, most any machine should be able to handle it 🙂
I’ve made three – one in a light weight denim, one in a heavier denim (both from one of her Morgan kits sold around the time of the pattern release) and one in an extremely light weight white denim for summer (for those, I used the pocket stay design from the Gingers in a nude fabric in the front and the pockets in the back to hide panties).
I actually prefer the fit to that of the Ginger – though they have their place!- because it is more relaxed. The close fit of the Ginger stretch is a little too vavoom for this middle aged momma! (I can wear jeans to work, but the Gingers just don’t feel appropriate.)
It took four hours of baste, test, unpick, and repeat to get that back crotch seam exaaaactly right but now that it is, I can’t wait to make another pair. I have this idea to use one of the decorative stitches on my Bernina for the bar tacks and pocket stitching…
Heather’s tutorial on jeans fitting is the best I’ve found, her illustrations are very informative.
They suit you amazingly ❤
(^.^) Toll Handmade !!!!!!!great handmade!!!
I know I’m supposed to talk about the pants and all, but your hair looks really gorgeous in these pictures.