Tag Archives: dress

Completed: The Hawthorn Dress

26 Jul

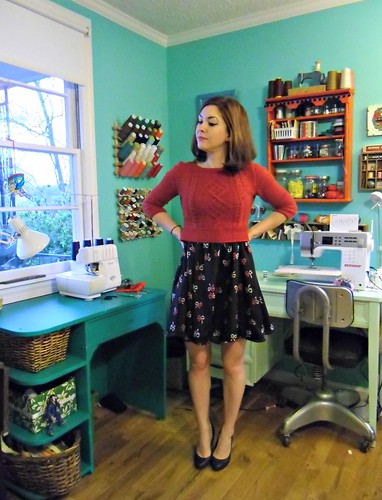
Ok, before I go any further, let me just address the elephant in that room that is my hair in these pictures.

Hawthorn Dress

This is what happens when you put your hair up in Heidi braids (or, as much of a Heidi braid as I can manage with my length – or lack thereof) and leave them for 24 hours straight (yep, I even slept in ’em). When I took them down the next morning, my hair was a glorious lion’s mane according to the mirror. Looking back at these pictures… err, maybe not so much. Lying-ass mirror.

Hawthorn Dress

Another thing I should point out is that I’ve basically given up on trying to hide the camera remote.

deal with it

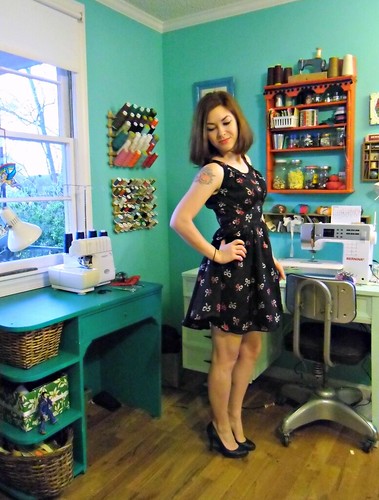
With all that out of the way – let’s talk about my dress!

Hawthorn Dress

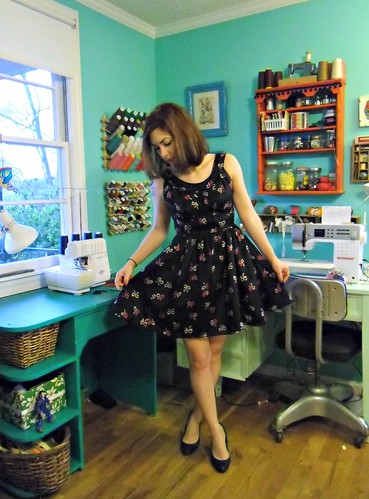
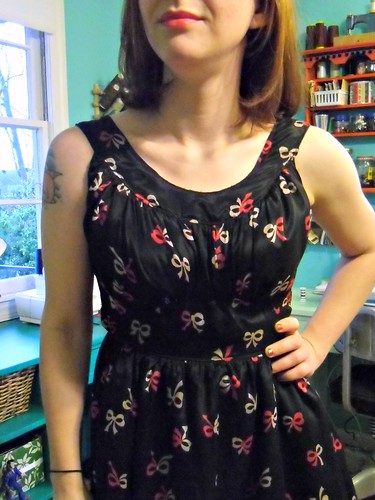
This is the Hawthorn from Colette Patterns. GUYS, I LOVE THIS PATTERN. I love it so much, I’ve already planned two more versions.

Hawthorn Dress

I always always love the patterns that come from Colette – even if the shape of the garment isn’t specifically something I would wear (the Laurel falls in this category, although seeing everyone’s versions pop up during that epic contest has really made me reconsider what I think I can’t wear!), the styling of the photoshoots is just lovely. Of course, this is something I would absolutely wear – I love me a good shirtwaist, and this one has some pretty and unique details that set it apart from other shirtwaist patterns.

Hawthorn Dress

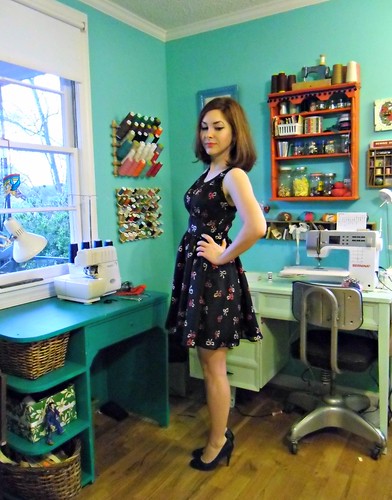
For my dress, I cut a size 0 based on the finished measurements. I did not make a muslin – just a quick tissue-fit to make sure everything looked right. For future dresses, I may shave a bit off the side seams as the waist is about 1/2″ too big. It fits fine in these photos, but that’s because I moved the buttons to compensate for the width. A quickie fix for sure, but definitely not want to want to do with every Hawthorn I make!

Hawthorn Dress

I also took about 4″ off the hem. It originally hit me at knee-length, but I like my dresses shorter 😉

Hawthorn Dress

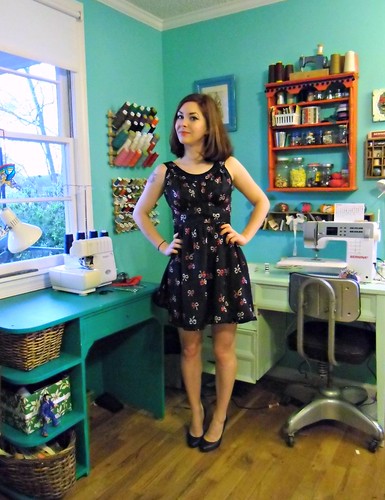
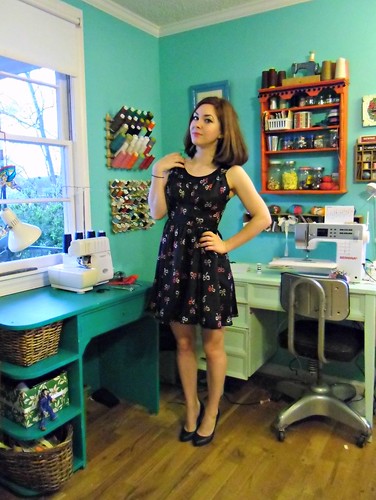
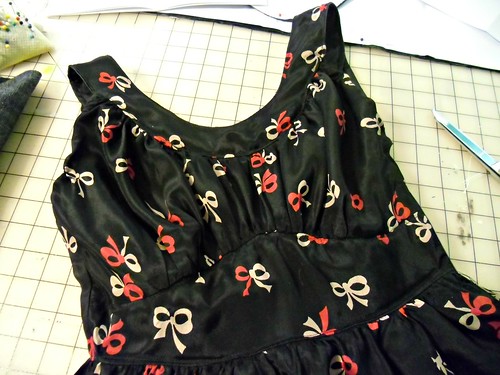
I also changed the button position at the waist, as I plan on wearing this dress with a belt so I don’t want a button right by the waistline seam. I raised the lowest bodice button just a smidge, omitted the top skirt button, and slightly raised the next-highest skirt button to compensate for the gap. Hope that makes sense! I also added a hook and eye closure at the waistline to keep things smooth.

Hawthorn Dress

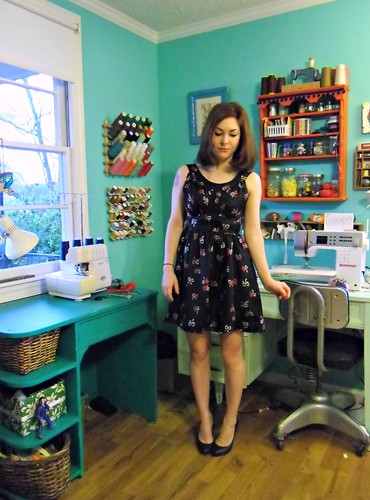
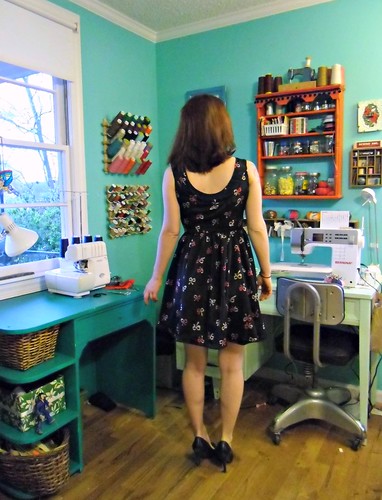
The only thing I don’t absolutely loooove about this dress is the bust darts – or, rather, the bust dart puckers. Yeesh! I tried to smooth them out as best I could, but my fabric must have a bit of poly in it because I was getting a bit of shine whenever I pressed them, in a most inappropriate place. Restitching the dart tips helped a little, but you can see they still need a little bit of work.

Hawthorn Dress

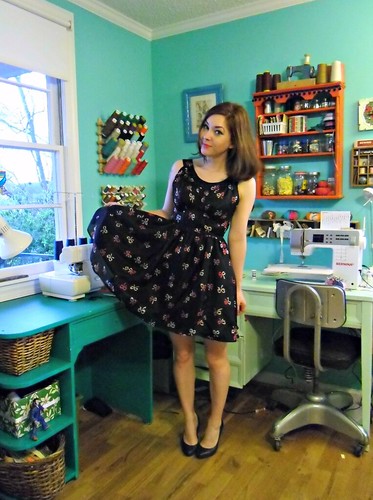
I just LOVE this fabric and I think it’s perfect for a dress called Hawthorn 🙂 Funny, I picked this up at my local fabric store during their biannual sale – it was in the remnants sections and heavily marked down (I think I paid $8 for a little over 2 yards). I had no idea what I was going to do with it, but I bought it anyway – I mean, it has embroidered cherries on it! Later that week, Sarai contacted me and asked if I wanted to see pictures of the newest Colette pattern before it was released to the masses, and as soon as I downloaded those pictures, I knew I had found the perfect match.

Hawthorn Dress

My buttons are from the flea market and I have been hoarding them for ages. They are sparkly!

Hawthorn Dress

I love the tiny collar, but I will warn you that it was a bear to get to lay right – with the layers of the collar and the facing and the dress, that’s a lot of bulk! I understitched as much as I could, as well as tacked the facing down at the shoulder seams and back neck darts. This seemed to help, although my next go will involve some aggressive grading as well.

Hawthorn Dress

Anyway, I’m really happy with this dress and how it turned out! I can’t wait to try a sleeved version (won’t this look incredible in plaid?? Oh GOD, I love plaid), or maybe even redraft the collar for a more peter pan style. Lots of possibilities here!

As a side note – I’m QUITE a bit late to the party here, but I’ve recently joined Kollabora and I can’t get enough of it! It has totally filled the Craftster-shaped hole in my heart, and then some 🙂 Who else is on Kollabora? Let’s be friends!


Completed: The Lady Skater Dress

22 Jul

PATTERN TOUR WITH LOGO

About a month ago, Amanda contacted me and asked if I’d like to participate in her Lady Skater Pattern Tour, to promote this awesome new pattern that she had just released. At first, I wasn’t sure if I would be able to participate – my fabric funds are currently pretty tight right now, and YES IT SUCKS – but after chatting for a hot minute (with me flapping my arms and squawking about how much I was dying to sew the pattern up), Amanda offered to send me some yardage from her shop, Kitschy Coo.

Lady Skater Dress

Specificially, this ice blue tiger knit. HOLY SHIT, right?!

Lady Skater Dress

I’m really not trying to be cocky here, but I’m fairly confident that I have the best dress in the world now. For real.

Lady Skater Dress

I’m supposed to talk about the pattern, so let’s discuss that first! This is the Lady Skater Dress pattern – a basic knit dress pattern that opens itself up to a world of customizations, and it’s EASY. It’s so easy, y’all. If you’ve never sewn a knit before, this is a great pattern to use for toe-dipping.

Lady Skater Dress

Let me put it this way – whenever I sew up a new pattern (especially if I’m testing), I keep a notebook on hand to write myself little notes. Stuff like adjustments on size or construction, whatever I can think of that will help other people who are sewing the same pattern. When I sewed this dress, I literally did not make ANY notes. The instructions cover every single thing that I would have already said – even down to creative cutting layouts to make the most of your fabric yardage. If that’s not a sign of a well-written pattern, I don’t know what is 🙂

Lady Skater Dress

My dress is a size 2, which corresponds perfectly with my measurements. I made absolutely no changes to the sizing – this is how it fit straight out of the envelopeerrr, printer ;). I did shorten the length a little, but that’s just a personal preference. The skirt should hit about at your knees, if you keep it at the length as printed.

Lady Skater Dress

Like I said, the instructions on this dress are pretty fabulous. Amanda has you stabilize both the shoulder seams and the waistline seam with clear elastic – something I’ve never done before. I’ve used twill tape (topstitched down with a twin needle), and fusible interfacing (which, obviously, doesn’t require sewing on, so it’s invisible), so I was interested to see how this worked out. First of all, I should mention that I didn’t have any clear elastic on hand, nor could I be arsed to buy any. SOWWY. I used regular ol’ polyester elastic, 1/4″ wide, and followed the same instructions for the clear. You basically sew the elastic on right along the seam allowance, so when it comes time to sew your pieces together, they are permanently attached along the seam.

Lady Skater Dress

Here is my waist seam. You can’t see it from the inside, but guys – it works. My fabric is a bit heavy, but the waist seam stays exactly where it should (instead of sagging and being sad and droopy). I should also point out that I took these pictures after wearing the dress all day. Nice, yeah? 😉

Lady Skater Dress

I love the skirt on this dress! It has a nice flare, but it’s not so huge that it eats up too much fabric, or creates difficulties when navigating the world on a windy day.

Lady Skater Dress

The only thing I’m not crazy about are the wrinkles on the back. There are instructions on the pattern to eliminate this, but I’d already sewn my top and bottom together and I couldn’t be arsed to unpick the serging (yep, sorry, lazy LT). I may try to fix it on the next go-round, but honestly? It’s the back of the dress. I’m not looking at it, therefore, I’m not sure if I really care 😛

Lady Skater Dress

I decided early on that I wanted something contrasty for my neck and arm bands. Initially, I wanted black, but I didn’t have anything suitable in my stash. This polka dot knit is from Mood, and it’s a pretty perfect match, yeah? I tend to shy away from mixing prints, but I don’t think this is too busy at all!

Lady Skater Dress

I think it’s funny that I somehow managed to match the tigers at the back waist seam (trust me… that was unintentional, haha!). Wish it would have worked out for the front, too. Oh well!

Lady Skater Dress

Srsly, tho: TIGERS.

Lady Skater Dress

Lady Skater Dress

Lady Skater Dress

Sorry for the picture overload, I am really enjoying the macro setting on my new camera, haha!! My topstitching was done with a double needle, and white wooly nylon thread in the bobbin.

So, like, you know what’s better than white tiger knit fabric?

Lady Skater Dress

MATCHING WHITE TIGER SHOESSSSSSSSSSS!!!

IS THIS A MATCH MADE IN HEAVEN OR WHAT?!

Lady Skater Dress

The Lady Skater is TOTALLY my new TNT knit pattern. I can’t wait to make multiples upon multiples upon multiples of this lil guy 😀

Thanks again, Amanda, for letting me join this pattern tour and also for the ACE fabric!!

Completed: The Simone Dress

19 Jul

Can we talk about Victory Patterns today?

Simone Dress

Specifically, let’s talk about the Simone.

Simone Dress

This is new for me in two ways – a new pattern company (well, new to me) and a new shape. Seriously, guys, I do NOT wear these loose-fitting dresses… I feel like my body gets swallowed up in the fabric and I lose my waistline, which just isn’t a good look for me. But I’ve been wanting to try this pattern since it was first released… I’m not even ashamed to admit that 100% of the reason was because the girl modeling this shit is a fucking BABE. For real. Go have a look and try to tell me otherwise. I’ll wait for you to come back.

Simone Dress

I don’t think this dress pulls me quite that far into babe-ville, personally – it’s still not totally the best shape for me – but I’m surprised at just how much I like it!

Simone Dress

For my Simone, I cut the size 2 and decided to add piping and a couple pops of contrast. Originally, I had the whole front yoke purple (like the racerback), but after I finished sewing the piping on, I pinned everything together, stood in front of the mirror… and realized how weird it looked. Like I was wearing a big, purple bib. I think the contrast yoke is a good look (the version of the top has a contrast yoke), but not with my particular fabric choices. So I ripped that shit out and made my yoke in the same fabric as my main fabric, with a contrast placket, racerback, neck binding and piping.

Simone Dress

I did have to make a couple of modifications to the pattern – namely, the original length of the shoulder straps and racerback was much too long, making the armholes sit too low (like exposing a good 1″ or more of of bra too low). Since I’d already sewn on the armhole binding at that point and I didn’t feel like ripping it out (so sorry, so lazy), I pinched out about 5/8″ at the shoulder seam and another 5/8″ out of the center of the racerback. Honestly, I should have considered these adjustments BEFORE I cut my fabric – I’m petite and I generally have to shorten those areas – but my quick fixes worked just fine, I think.

Simone Dress

The only drawback was that I now had a weird seam right across the middle of the racerback. I covered it with a little tube of my main fabric. Done and done!

Simone Dress

I also shortened the back of the hi-lo hem – it was a little too long on me, almost hitting my ankles. I did not shorten the front of the dress; that is the original length.

Simone Dress

I will admit, I didn’t care much for this dress while I was sewing it. I think it’s mostly my fabric choice, but this reeeeally looks like pajamas to me. And something about the shape of the tab reminded me too much of a tiny tie, which was throwing me off. It wasn’t until I completely finished the dress and put it on that I decided I liked it. Actually, scratch that – I LOVE it. I don’t even care if it makes me look sorta preggers from the side. This shit is COMFY and it feels amazing to wear during this heat wave.

Simone Dress

I do think the instructions on this pattern were a bit lacking, and definitely earn it that “intermediate” mark. The diagrams were mostly helpful, but there were a few that made absolutely no sense to me at all. Some of the wording was a little off, and there were a couple steps that were completely missing (such as sewing the button on the tab to anchor it down. At least… I think you’re supposed to sew a button there, or at least invisibly tack it down??). The hardest part was deciphering the pleating instructions – the diagrams showed them sewn in one direction, but the photos showed the opposite.

Simone Dress

Still, with that being said… this dress took a couple afternoons to sew. It’s not hard and you can always hit up another resource if you get stuck.

Simone Dress

Shoulda topstitched that armhole binding in purple, but I didn’t. Oh well.

Simone Dress

Isn’t this fabric fun, though? It’s another design from my new favorite new-heard-of-’em-before-Mood designer, Thakoon. Just like my previous piece of Thakoon loveliness, this stuff is super soft, super drapey, and feels like pure love on my skin. It is a little bit on the translucent side, but as long as I wear nude colored underthings, it doesn’t seem to be too noticeable.

Simone Dress

I used a gorgeous purple sateen to sew all the contrast. This one is soft and lightweight with a rich color and no stretch. I used the wrong (aka non-shiny) side to sew the tab, the neck binding and the racerback, and the shiny side to make the piping. Looking at the fabric as one piece, the two sides are quite different… but when looking at the dress as a whole, you can’t really distinguish much between sides. Oh well!

Simone Dress

This is just a random button from my stash. I thought it looked good!

Also, JUST IN CASE YOU WERE WONDERING…

Simone Dress

This dress looks awesome belted!

Simone Dress

I know so many of y’all are probably groaning so hard at my love affair with belts on everything (sorry, not sorry), but I’m actually really surprised at how well the shape looks with a cinched belt. It totally changes up the look!

Simone Dress

Personally, I plan on embracing the dress as-is, in all it’s flowy goodness… but for those of you who have been hesitant to try this pattern due to the volume at the waist, perhaps you can consider this as a solution!

Simone Dress

I can’t wait to try more patterns from this company! I already have the Lola (which, sadly, is going to have to wait until the weather cools down a bit!), but I’m also loving the Nicola too.

Who else loves Victory Patterns? Let’s fawn over them together!

Completed: Some Fabulous Silk Birds

17 Jul

I am just going to preface this post with a warning: This is my VERY favorite thing I’ve ever made. Forget everything else up to this point. This here, this is the winner.

Also, I tried REALLY hard to cull down the number of pictures, but there are still a lot. Sorry, not sorry.

Marc Jacobs Birds

I initially saw this fabric on the Mood Fabrics Instagram (which, if you’re not lurking that – WHY NOT, THEY POST THE BEST FABRICS!!). Isn’t it fabulous? I immediately called the store and had them set aside 4 yards for me. When I finally had it shipped all the way to Nashville, I was amazed at just how wonderful it was in person. The designer is Marc Jacobs, and it’s a soft silk Georgette with a gorgeous drape and some incredibly saturated color.

Of course, I had no idea what I was going to do with 4 yards of bird silk Georgette. I hoarded it for about 2 months, while plotting and planning.

Marc Jacobs Birds

I had a Sewing Epiphany while on the way to work one morning (does anyone else have those? Aren’t they so awesome?) and realized that the print would work perfectly with a 40s style dress – and the drapiness of the silk would be a 100% match for McCall’s 6113. Yes, the same pattern I used for last month’s Mood dress. What can I say – I love this pattern, and I want to make a million of it’s babies.

Marc Jacobs Birds

Since this was my first time sewing with silk Georgette, I spent a few weeks devising a game plan and learning all I could about this fabric before slicing into my yardage. Georgette – or, at least, this Georgette – is on the sheer side, so it was going to need some sort of underlayer to keep things opaque. I didn’t want to underline the dress and compromise the flow of the fabric, so I decided to make a slip to wear underneath. Bonus: this is quite handy on a windy day! Already tested that theory 😛

Marc Jacobs Birds

I used french seams to construct the entire dress, except at a few sections where it was impossible to sew them – such as the curved yokes. For those parts, I pinked the seams to keep them from fraying. I also stabilized the fabric underneath the yokes with a piece of black silk organza. Since the Georgette is so lightweight and that area gets so much stress, I wanted to give it as much support as possible. I also found the use of my walking foot quite helpful while assembling the dress – it kept the layers from shifting (and me from crying tears of frustration).

Marc Jacobs Birds

Despite having made this dress twice already (my red wool crepe version, plus a boring ol’ muslin), I still encountered some construction challenges unrelated to the fabric. For one, the sleeves gave me HELL when I was trying to set them in. I don’t even understand how it happened – they eased in perfectly with the crepe, but for some reason, it just didn’t work with the Georgette without including a lot of unwanted puckers. I was stumped and let the dress simmer for a few days on my dressform. I even considered leaving it sleeveless, no lie.

Marc Jacobs Birds

Fortunately, I remembered that Casey posted a tutorial on excess sleeve ease on her blog a couple years ago, so I followed the instructions for redrawing the sleeve cap and crossed my fingers.

Marc Jacobs Birds

I am happy to say that it worked! I’m so glad I was able to figure it out – the sleeves really make the dress!!

Marc Jacobs Birds

Marc Jacobs Birds

Marc Jacobs Birds

I just think this pattern is SO PERFECT for such a bright print! Isn’t it beautiful?

Marc Jacobs Birds

I even got super fancy and put a (non-functional) fancy button where the front of the dress fastens.

Marc Jacobs Birds

Marc Jacobs Birds

Marc Jacobs Birds

Marc Jacobs Birds

Now, let’s talk about my slip! I am going to post pictures which I realize is essentially me in my underwear, so bear with me here.

Silk Slip

I’m not going to lie – like 99.9% of the reason why I decided to go with the matching slip was so I’d have a chance to get my hands on some 4-ply Silk Crepe. I’ve heard some amazing stories about the stuff, but never had a chance to try it for myself. It tends to run on the expensive side (truth, this silk crepe cost more than the silk Georgette!), but a slip doesn’t require a whoooole lot of yardage, so I sucked it up and put in my order. I didn’t know what to expect when the package arrived at my door.

Silk Slip

People. This stuff is INCREDIBLE. Throw out any mean thoughts you had about silk and focus on the 4-ply. It’s not at all slippery – even when I was cutting bias pieces, the fabric stayed put. It’s nice and robust and opaque, and it feels amazing against the skin. It presses beautifully and sews like a dream. I was extremely skeptical before I properly introduced myself, but I really think it deserves the hype.

Silk Slip

To make the slip, I used the free Ruby Slip pattern. I spent a lot of time redrafting shit to get it to fit right, and it was kind of a nightmare and I kind of almost gave up (no hate on the pattern itself – I’m just VERY particular about how my slips fit!). I started with the size 8, made a lot a lot a lot of changes, and I’m just going to list them here:
– The original bodice was very small, so I added a 1/2″ FBA using the sew-along tutorial. Truth, I tried to get away with not doing this (I wear a DD cup, but let’s be real here – the only thing “big” about my boobs is the proportion, not the actual size, kwim? I could totally fit into like a C cup if the band was small enough), but my first muslin informed me otherwise.
– I then redrafted the bodice to include a center front seam and underbust gathers, following this tutorial.
– My second muslin showed that now the bodice was too big at the center front, and the gathers were sitting in such a weird place… I looked like I had puffy nipples. So awesome, except not. I wish I could tell y’all I did some mathematical pattern drafting magic and fixed it, but honestly I pinned that fucker to my dress form and manipulated it until I had a decent fit. I pinned out a chunk of the center front seam, redistributed the gathers, and chopped about 1″ width off the back midriff. I readjusted the side seams of the skirt (that shit fit almost perfect with no adjustments, thank god) and crossed my fingers.
– Since the new back midriff was slightly (I’m talking 1/2″ or less) smaller than the skirt, I cut that piece on the bias and carefully eased the two pieces together. I think the result is pretty good – it fits my small back, and the bias makes it easy to pull on and off!
– I also cut about 5 1/2″ off the hem of the skirt. It was long, and I need this slip to be shorter than my skirts!

Silk Slip

Silk Slip

Finally, I added some beautiful lace around the top and the hem, and a little self-made bow in the middle of the bodice. The straps are just satin ribbon outfitted with strap adjusters and rings – very easy to put together.

Marc Jacobs Birds

Now, here’s the real question: I still have like a yard (maybe more) of this bird fabric left. WHAT SHOULD I DO WITH IT?

Completed: Deer & Doe’s Bleuet Dress

3 Jul

One thing that I love so much about the sewing community is the neverending supply of fresh patterns, made by small-beans businesses. I find them soo much better than the offerings from the Big 4 – the style lines are more unique, the instructions are easier to follow, and there tends to be a HELLUVA lot less ease in the finished pieces (ask me about Simplicity’s “close-fitting” dresses with 4″ of bodice ease. No, wait, don’t. I’m getting all ragey just thinking about it).

Bleuet Dress

This is the Bleuet Dress by Deer & Doe, a sweet pattern company based in France. (Actually, Google tells me that Bleuet translates to Blueberry – but I like the French word, it sounds FANCY. Also note that I took 2 years of French in high school and I need Google Translate to tell me the word for blueberry. Bitch pls) (Also, I was just informed that Blueberry only applies to Canadian French, not French French. The things I learn on this blog! :)). Deer & Doe is a fairly new pattern company – the first set of patterns were released only in French, but now they offer English translations and I’ve been ALL UP ON THAT. I should probably also point out that the English translations were done by Anna, which means that they are actually concise and easy to read and understand, as though they were actually written in English to begin with. Nice!

Also, these patterns are ADORABLE. Like, um, why do I not own this? Or this? Or this jacket SWEET JESUS TAKE THE WHEEL.

Bleuet Dress

So, I really love this dress. Like, a lot.

Bleuet Dress

I bought this fabric in NY, at one of the random tiny shops in the Garment District (Fabrics for Less? Chic Fabrics? Halp.). I was originally drawn to it because, well, that colorway is pretty fucking awesome. I thought it would look totally ace as a shirtdress. Of course, I didn’t bother to actually check the fabric before buying 3 whole yards of it (I’m going to blame that on being starstruck at the presence of Sonja and Oona, as well as on a total fabric high), but IF I HAD BOTHERED, I would have noticed that the seersuckery-ness of the fabric actually meant that it had LOADS of stretch. Which, I mean, there’s nothing wrong with that sort of fabric if it’s your jam or whatever, but I’ve learned my lesson and I tend to stay away from woven fabrics that incorporate a lot of stretch.

That’s part of the reason I delayed cutting into this for soo long. I had the perfect pattern in mind and everything – plus I’ve been hoarding these purple buttons I got at the flea market months ago – but it was cut to my current size, and this fabric has enough stretch the necessitate sizing down. Add that to matching up all those checks (what was I THINKING?) and fugeddaboutit.

Bleuet Dress

This Deer & Doe pattern seemed like the perfect match – the princess seams allowed me to cut the sides on the bias (less plaid-matching, yay!), as well as making it easy to fit as I sewed. I cut the very smallest size, the 34 (ok, I lied, I actually TRACED it. Can you believe that shit?! Hell must have frozen over), and combined with the stretch of the fabric, the dress fit almost perfectly from the get-go. I had to let out a tiny bit of seam allowances at the bust, but other than that – perfect.

This pattern is rated “Advanced,” but I think a very confident beginner could easily tackle it. The instructions are good, there are lots of diagrams, and the pieces are pretty easy to figure out on their own. Make sure you use the right weight fabric, though – mine is a bit too flimsy, as you can see. A shirt dress like this really needs a fabric with a bit of body to give the dress structure – even a quilting cotton would work here.

Bleuet Dress

My line-matching is… ok. I got the front lined up beautifully, but the sides are less than perfect. Somehow, I didn’t think to double check those – I was just excited that the bias on the sides meant that I didn’t have to match them at the princess seams. LOLLLL.

Bleuet Dress

Anyway, this side is worse than the other. Oh well!

Bleuet Dress

I LOVE THE BACK THO. Look at that cute little bow!!! Ack, it’s so sweet!!

Bleuet Dress

You probably noticed that my dress has a placket, while the pattern doesn’t call for one. Actually, it’s a mock-placket 🙂 I had the dress almost entirely assembled – everything but the buttons – and when I put it on, it just looked wrong. I couldn’t figure out why it looked so weird, so I set it aside for a couple of days and considered my options. Eventually, I realized that the stripes matching across the front meant that there was a big ol’ uninterrupted chunk of lines going right down my center. I don’t think this necessarily looks bad across the board – but in this small/busy print, it just seemed unfinished. I considered adding bias tape to the center front, or even rick-rack, but a quick Google of “vintage plaid shirtwaist” gave me my aha moment when I saw all the bias plackets. That’s it!

Since my dress was mostly assembled at that point, I fixed it the cheater way. I cut a bias strip of my plaid, folded the raw edges to the inside, and topstitched that little shit right on top of where the buttons would go. It’s only on the outside layer – the under (where the buttons sit) is still the straight plaid. Considering I can’t wear this unless it’s buttoned all the way up to the collar (my fabric is reeeal flimsy; it droops all sad-like), it’s not really a big deal. And it instantly made the dress look SO MUCH BETTER.

Bleuet Dress

I also omitted the sleeves. I had every intention of adding them, but there was just too much plaid going on. I finished the insides of the arm holes with black self-made bias tape. Easy!

Bleuet Dress

The pattern calls for you to face the hem, but I did not because my fabric was being really obnoxious. In retrospect, I may go back and face it anyway with something non-stretch, like a cotton batiste, because it’s obvious that it needs a little bit of structure, at least where the buttons are.

Also, sorry for the lack of flat shots! It slipped my mind until literally just now, oops! Speaking of taking pictures – I bought a new camera over the weekend! It’s a Canon G12, and I’ve been having a lot of fun learning how to use it! These pictures were taken on my old camera, but you should see some stuffs with the new camera next week 😀

Anyway, I love my finished dress – but next time, I will make it in a firm woven fabric. If I want stretch, I’ll buy some fucking jersey knit.

Bleuet Dress

I guess that’s it. My office gave me a 4 day weekend, so I’m off to go celebrate America and Hot Chicken and sticking it to the man or whatev.

Have a great weekend!

Completed: 40s Wool Crepe Wrap Dress

12 Jun

I know, this dress looks strikingly similar to the 40s wrap dress that Peter made for his identical cousin Cathy earlier this month, not to mention I’ve already dabbled in wool crepe for summer wear, as well as a full 40s wool crepe dress. Yeesh. Ya think it’s possible for me to branch out a little here? Nuh uh, no way. Not me.

Red Wool Crepe 40s Dress

I actually bought this fabric ‘way back when I was visiting Mood Fabrics in NY. I’m sure y’all are sick of hearing about it at this point, but heyyyy I’ll be working through that stash for at least the next couple of months. Just so we’re clear.

Anyway, fabric. As I mentioned before, I wasn’t planning on buying any wool crepe – but again, Carolyn talked me into it. She’s SUCH a good enabler! This wool crepe is actually a bit thinner and drapier than most wool crepes I’ve come across, making it a good weight for a smart summer dress (oh god, did I really just describe a dress as “smart”? I am totally stuck on this 40s thing…). With Carolyn’s advice, I underlined the entire dress in a lightweight cotton batiste, to combat the slight sheerness and make the dress more comfortable to wear in the heat.

McCall 6113

I used McCall’s 6113 to make this dress up. Isn’t the pattern gorgeous!? A friend found it (along with an entire paper grocery bag full of patterns – ranging from the 40s to the 80s, all in my size. I MEAN COME ON, WHAT ARE THE ODDS) in her attic, and gifted the whole stash to meee! Yes!! The pieces are intact, but unfortunately… the instructions are not. Wah wah. Thankfully, I’ve made a few wrap dresses in my day, not to mention I feel fairly confident in my assemblage skills, so I decided to give it a go.

McCall 6113 - pattern piece

… this is what I found when I pulled the pieces out. Not only is everything labeled (thank you, printed patterns!), but there are construction notes printed ON the pattern sheet, AND the notches are numbered in the order that things go together. PRAISE THE LORD. Although, in all honesty… I probably could have put this together without the help. But MAN, it was nice to eliminate most of the guesswork!

Red Wool Crepe 40s Dress

Despite the pattern being in my size, I did have to make a few adjustments to get everything to fit nicely (I generally like to go down a size or two – sometimes more – since I find most patterns tend to have more ease than I prefer to wear. Yep, even vintage patterns. What gives; am I just in denial of my size or something??), mainly in the form of taking in the side seams and shortening the shoulders, as well as hacking about 5″ off the length. I made a muslin for fit, but it ended up also giving me a great idea of how the pattern was put together so I had less guesswork with my wool crepe. Which is good, since wool crepe can be a sneaky little bitch when it comes to ripping out stitches.

Red Wool Crepe 40s Dress

In hindsight, wool crepe is definitely a little on the bulky side for the gathers in this dress. I’m afraid I look a bit boxy at the waistline here 😦 Oh well!

Red Wool Crepe 40s Dress

I do love the little tucks in the back 🙂

Red Wool Crepe 40s Dress

And the curved hem at the overlap.

Red Wool Crepe 40s Dress

I don’t know what’s going on with this picture, I just thought it was funny. ~Maybe she’s born with it, maybe it’s Maybelline~

Red Wool Crepe 40s Dress

Oh, did you notice my pretty embroidery? This all happened entirely on a whim – I finished the dress, put it on and looked in the mirror, and it just looked… red. Overwhelmingly red, and plain! I decided to add a small punch of (neutral)color by embroidering the shoulder detail. The embroidery is from the Hoop Love Vintage Transfers Flickr Group, and it’s all just a basic back stitch with french knots in the middle of the flowers. Ha, that sound so easy but it seriously took me about 6 hours to do. Embroidery is definitely a time-suck!

Red Wool Crepe 40s Dress

Here you can see the underlined inside, as well as the series of snaps and hooks that hold the dress together.

Red Wool Crepe 40s Dress

And there it is closed!

Red Wool Crepe 40s Dress

How many of you will groan if I finish this post with something like, “WELL I GUESS THAT WRAPS IT UP!!”

Sorry.
Not sorry.

Completed: A Hawaiian Lonsdale

13 May

I actually had this finished a couple of weeks ago, but it’s taken me this long to post since I had to get a special bra to wear with it. And by “special,” I mean strapless. I don’t know why I’m talking about my bra right now, let’s talk about this dress instead!

Lonsdale

This is the Sewaholic Lonsdale dress. REAL TALK: When this pattern first came out, I had absolutely no intention of sewing it up as I assumed it would be mega unflattering on me. Not because of the bra issue, like most people pointed out – I have no problems with wearing a strapless bra, it’s like a staple in my lingerie wardrobe (and yay that I finally have one that fits!) – but because the bodice doesn’t have any darts, which I figured wouldn’t work with a large bust. Also, this pattern eats up a lot of fabric and I just wasn’t feeling it. So no Londsale for me, at least not while everyone else was snapping them up.

Lonsdale

While I was in NY, we had a mini sewing stuff swap (which I’m REALLY sad I missed out on dumping into… I will have to come back with a suitcase full of patterns and we can do it again, ok?? Hmm plane tickets appear to be cheap right now…) and Sonja added this to the pool, encouraging me to try it. So I snapped it up and found this fabric the next day… it’s from Chic Fabrics, and it was $5 a yard. HELLS YES. Lonsdale, comin my way!

Lonsdale

As I was trying it on (no muslin, and not really even a tissue fit… I just based my size off the finished measurements and started cutting), I realized that this dress is SUPER cute and flattering. A bodice with no gathers or bust darts, who woulda thunk?

Lonsdale

I also totally get why everyone keeps freaking out over the skirt, it’s really flattering!

Lonsdale

(Not really sure what I’m doing here… smelling the breeze, maybe?)

This is a size 0, by the way. I did not make any alterations to the pattern, except my zipper insertion (lapped instead of centered) and I cut something crazy like 5″ off the hem. I like my skirts to hit above my knee.

Lonsdale

Sorry for the shit picture and my sad little droopy bow, but isn’t the back cute?? I LOOOOVE that the straps are adjustable, since I can never seem to get them right on the first/second/eighth try. Now I don’t have to worry, whoop whoop.

Lonsdale

I definitely want to make a couple more of these – or even just Lonsdale skirts, gawd – as I can see myself wearing these aaaall summer. I think you could probably reduce the amount of fabric needed, too, with some careful planning. Part of the bulk of fabric yardage comes from the bodice being double-layered (you can see the second layer a little bit in my close-ups, as my fabric is slightly sheer), and the ties are one big long piece that goes into forever. I think this could be REALLY fun with the lining being a contrasting fabric – you’d see the contrast in the ties and around the neckline.

Lonsdale

Here’s a terrible close-up. Sorry! The sun was REALLY bright and I don’t do that whole wait-until-it-gets-less-bright patience thing very well 😉

Lonsdale

Lonsdale

If you’ve been holding out on this pattern because of the large bust issue, maybe this will sway ya 😉 It swayed me, anyway!

Can’t wait to bust this shit out on my vacation! LONSDALE 4 LIFE.

Review: eShakti, revisited

8 May

Here be another product review for eShakti.com. I wasn’t 100% thrilled with the first dress they sent me (honestly, it ended up getting donated because I just COULD NOT deal with those arm holes), so after they contacted me, I decided to give them a second chance.

For those of you who don’t know, eShakti is an online shop that sells a variety of cute lady clothes (not just dresses, there are skirts and blouses floating around there as well) in sizes 0-36, as well as offers inexpensive customizations for your size and certain style options (such as adding sleeves, shortening the hemline, etc). The prices are reasonable, and it’s definitely a good option if you normally have problems fitting into straight sizes, since you can adjust the measurements to correspond with *your* body.

Eshakti dress

This is the contrast poplin trim dress (unavailable now, sorry!). After the deal with the last dress, I was careful to choose something that-
1. Could easily be adjusted at the shoulders;
2. Was 100% cotton
This one fit the bill, and it was pretty cute, so I requested it and it was promptly shipped to me. I’m just going to say this now – I’ve been waiting to photograph this dress for a couple of months now. Why hasn’t it made it to the blog sooner?

Eshakti dress

UM. DO YOU SEE HOW SHORT IT IS?

I KNOW I just made like short short short BUTTCHEEK shorts, but shorts and a full-skirted dress are two entirely different beasts, if you will. I just can’t feel comfortable in a big skirt that only needs the slightest gust of wind to expose even more leg, you know? So I had to wait, and figure out my undergarment situation. And also buy a new bra – you can’t tell too much in these pictures because I’m wearing a strapless, but the straps are pushed way more toward the center than a standard bra. This means you cannot wear a bra with straps with this dress – the straps end up side-by-side. I needed a new strapless bra anyway, but man.

Eshakti dress

Anyway, back to the dress! It IS pretty cute – I love the nauticalness, and it looks equally good with bright yellow (or even brown!). It has pockets, as evidenced by me not taking my hands out of them at all. The quality is acceptable – nothing terrible, but nothing groundbreaking either. The back has elastic to accommodate more sizes (which honestly, kind of drives me crazy. If this is made-to-size, then why do you need elastic?). You can’t really see in these pictures, but there are some sweet tucks and covered buttons at the bodice. CUTE.

Eshakti dress

Eshakti dress

I do NOT understand how this dress came out so short, to be honest. I’m 5’2″ – I don’t think I’ve ever had an issue with a dress being too short on me. On my last dress, I requested that the hemline hit above the knee – and it’s knee-length on me (figures). So for this round, I chose “short dress.” And woohoooeeeooo is this dude short!

Eshakti dress

So what do you do with a too-short dress that can’t be let out at the hemline and cannot have length added (thank, stripes!)?

Eshakti dress

You make matching bloomers and pretend like it’s a playsuit set!

(Oh god, this picture is probably going to end up in sooo many Flickr spank-banks, ughh, the things I do for you guys haha)

Colette Madeline bloomers

Remember these? These are the Madeleine mini-bloomers, a free download from Colette patterns. Yep, free! I love these things and I knew they would go perfectly under this dress – the skirt is full enough where the bloomers don’t add bulk, and they’re cute enough where I don’t mind a wind situation now.

I used a remnant from my local fabric store, and pretty navy/red ribbon to tie it in with the dress.

Colette Madeline bloomers

I love the way the elastic looks at the waistline – and it’s sooo comfortable. Like wearing pajamas. I totally wear these are pajamas, btw.

Colette Madeline bloomers

Pretty sweet, huh?

Eshakti dress

I’m still not totally sure on my feels for eShakti at this time. They definitely need to add a skirt length measurement in the dress descriptions, because that would help when determining how much to shorten or lengthen if you are customizing. At least the sizing is much better this time – which I consider a personal victory with the size of my bust vs ribcage. So yay for that, I guess!

~*~Disclosure: I was not financially compensated for this post, although I did receive a sample to review & keep. All opinions on this product are my own.

Completed: A Bow-Print Silk Chantilly

11 Apr

Here you go, folks – the reason why I’ve been absent (well, completed-project-posts-wise) for like a week and a half:

Silk Chantilly

I made the mistake of sewing a silk dress. Can you say WOOF? Because… woof. So much woof.

Silk Chantilly

This is the Chantilly, by Colette Patterns. Secret time – I got this pattern as a birthday gift last year and this is the first time I’ve sewn up the dang thing. Honestly, I was a little put off by the amount of fabric needed (both fabric AND lining, mind you!), especially since this is the type of dress that really needs a floaty voile or silk to really work. As some of you may know, I was on a really really strict budget for almost all of last year, and my fabric buying options were *very* limited. So, hence, the reason this pattern sat for so long. Bc forreal – this is a gorgeous dress, and it needs to be made up a million times, y/y?

Silk Chantilly

Of course you can’t see the detail too well, because it’s black – sorry! That’s probably a good thing, because I really hacked this one up and some of the construction is a little embarrassing. Silk is hard to sew, yo – and it didn’t help that I didn’t even bother to give a muslin a chance, which would have solved some of my fitting issues before I was dealing with a fabric that floated away every time I sneezed.

Silk Chantilly

I sewed this up in a straight size 2, except the waist seam was sewn with a 3/4″ seam allowance instead of the standard 5/8″. This is version 1, without pockets. I actually started with version 2, put the neckline/shoulder yoke thing together… and realized that my silk was so sheer, you could see directly through it to the WHITE interfacing on the back of the lining. Of course, I didn’t notice this until after I’d already clipped, trimmed, graded and understitched the thing, UGH. I actually threw it in the corner of the sewing room (where the Bad pattern pieces go to sit in time-out until I can decide what to do with them) and finished the dress while I contemplated what to do. I didn’t have enough bow fabric to cut a second yoke, and the silk was so delicate, even the finest microtex needle left holes after unpicking. I ended up very very carefully unpicking all my stitching (srsly this took like an hour to do), cutting a new underlining with the seam allowances trimmed down to 1/4″ to match, and then putting everything back together.

Silk Chantilly

Fortunately, my mistake was spotted before I dealt with the midriff – since it is also interfaced, we could have had 2 disastuhs on hand. But I remembered to underline it, so yay me! I also just want to take a moment here to brag about my new interfacing revelation – I found a digital steam press at the flea market last month (similar to this one, although my model is slightly older) for $30. Did you click that link and see how much those fuckers cost? (don’t worry, I don’t have affiliate linking or anything like that, ok!) YEAH BUDDY. I bought the shit outta that thing. AND IT IS AMAZING. You just put your fabric and interfacing on the board, close it, and thirty seconds later it is PERFECTLY fused, without you fussing over it with a hot iron. Plus, the board is much bigger than an iron, so it covers much more fusing ground at once. I am in love, and I shall never go back.

Silk Chantilly

I should probably stop and talk about the fabric for a sec – this is the fancy bow print silk that I picked up from Fabrics for Less in NY. It’s Betsey Johnson! Actually, I don’t care much for her clothes – too much price for too much polyester, yeeck – but her fabric prints are always fun. And hey, since this is Betsey Johnson silk, does that mean I can now say I have a Betsey Johnson dress? Huh huh?

Silk Chantilly

Real talk, tho – this fabric was a BITCH to sew. It was exactly like what sewing butterfly wings must be like – just really really hard to get under control. It was worth it in the end, but oh god I need a silk break. My lining is a plain black rayon from Mood – it’s not Bemberg, it’s much heavier than that. Honestly, I was a little disappointed at first because I wanted the floaty bemberg to go with the floaty silk, but having dealt with the silk… I’m glad the rayon I ended up with had more body. It was MUCH easier to sew, and it gives the skirt some foof. Yay!

Silk Chantilly

Here’s another foofy skirt picture, because of reasons.

Silk Chantilly

Isn’t the bow print delightful, though? Ah, I just love it! I was rushing to finish this dress because I plan to wear it for my friend Colleen‘s wedding on Saturday, so I’m glad that’s done!

Silk Chantilly

I can’t even tell you how glad I am that I FINALLY finished this. Seriously, the agony of construction made me start to hate it toward the end. I seriously considered throwing the whole thing in The Corner and leaving it until I had my head back together, but I was too invested in the beautiful fabric. Which, by the way, going back to the yardage needed for this dress… I squeezed mine out of 3 yards of 45″ fabric. Check those layouts before you make a big silk splurge!

As a bonus – the skirt looks totally fabulous with my Chuck sweater, yeah? 🙂

Silk Chantilly

Silk Chantilly

Completed: The Wild Side of Butterick 5078

27 Mar

Apologies in advance for the lame post title. This dress, though, is NOT lame. Unless you think leopard is lame, and if that’s the case – I’m afraid we can’t be friends at this point, so you need to GTFO, bye.

Leopard Knit Dress
This is my third (!!!) make of Butterick 5078 – and likely not my last, although it probably should be for right now. I love this pattern, although I’ve had to make a few modifications to get it exactly where I want it – shortening the skirt, eliminating the waist runching, and streamlining the sewing process. It appears to work well with a variety of fabrics, from slinky to ones with lots of body. Now that’s a versatile pattern, yeah?
(ooh I just noticed how crooked that picture is. My tripod doesn’t stand straight, so I usually have to straighten them in editing… and I guess I didn’t straighten that one enough. Sorry! I’m also not fixing it, mwahaha)

Leopard Knit Dress
My fabric is a lovely knit ponte from Mood fabrics – it has a nice heft and body to it (unlike the rayon jersey I used for my slinky 5078), as well as a good amount of stretch, even though it’s also quite stable. This fabric was a joy to work with, especially when it came time for my twin needle topstitching. Usually I have to play around with the tension and stitch length to get a good smooth stitch without that weird bump down the middle, but with this stuff the stitches just sank right in. It also presses really well – which yeah, pressing a knit seems kind of weird, but I like to press my hems before I topstitch as I find it makes it easier to sew. And while it’s nice and cozy, I also think it’ll be totally suitable for warmer months.

Leopard Knit Dress
As I mentioned before, I switched up the construction order for this to makes things easier. I basically just sewed everything flat, and then swooped up the side seams at the very end. This is what I love so much about knits – having those open side seams means it’s really easy to suck everything if you need to size it down a little. Which I ended up doing, since the super stretch of the fabric made the dress too big originally. I also narrowed the width of the midriff section, as the skirt is very heavy and the weight was pulling it down.

Leopard Knit Dress
Also, I wasn’t thinking when I bought this stuff (well I was thinking, but more along the lines of “OOH LEOPARD OOH SEXY DRESS LET ME WRAP MYSELF IN THIS HERE BOLT OF FABRIC), and I only bought a yard and a half. It would’ve been enough if the bodice wasn’t cut on the bias. Whoops! I spent foreeeeever trying different cutting layouts to get this to fit on my piece of fabric. In the end, I shortened the sleeves to elbow-length, took an additional 2” off the skirt, and now the bodice back has a seam (it’s supposed to be cut on the fold – can you see that seam tho? It kind of looks, oh, camouflaged trololol).

Leopard Knit Dress
Sewing the actual dress took barely any time at all, though. Seriously. It took me 45 minutes to stitch the thing together.

Leopard Knit Dress
Leopard Knit Dress
Here it is without the belt. You all know I’ve been on a major belt kick lately, but this looks pretty good sans belt, too!

Leopard Knit Dress
Consider me a ponte convert! Special thanks to Carolyn, she dragged me to the section I would have otherwise ignored. Now I wish I had one of everything that was in there, gah.

Leopard Knit Dress
Man, I love leopard print. It really goes with everything… expect maybe more leopard print. I probably shouldn’t wear my leopard coat with this, eh?