2013: A Year in Review

30 Dec

I can’t believe we’re coming up on the end of 2013! I hate sounding like an old fart, but where has this year gone? I feel like we barely reached summer and then it was suddenly Christmas! Whaaat! Anyway, I wanted to do a little round-up of 2013, because I just love reading this sort of thing. First things first, let’s look at all the garments I made –

2013... in a nutshell

I just counted those up and it would seem that I made over 86 projects/garments this year… that’s not counting the handful of double-garment posts (like when I’d make a tshirt to go with my new shorts), anything that didn’t make it to the blog (not much, but a few tshirts and leggings because, eh, boring), and stuff I made at my job that wasn’t for meeeee and therefore didn’t count.

Still… dang. That’s a lot.

If you don’t recognize anything from the last collage – it’s pieces I made for the Papercut Collective! I try to keep that stuff separate, as I figure if you wanted to see what I was making with Papercut, you’d follow that blog. Right? Right. Too much crossposting drives me nuts, haha.

Anyway, I tried to make everything up in a cute pie chart with percentages, but I apparently forgot how to count and I cannot be bothered to try again. I also would love to link y’all to every single one of the 86+ garments I made this year, but again – nope. However, you can totally lurk my closet and find every single one of my makes in there!

So what did 2013 entail for me? Let’s talk about some highlights, and… lolights (that’s not the word I want, is it?). In no particular order:

– I joined the Mood Sewing Network and my entire 2013 has been filled with the most wonderful fabrics and lots of new learning experiences – both in fabrics and garments (remember the silk Anna maxi? GOD can the weather get warm again already?!)
– I went to both NYC and Chicago and had a wonderful time in each city, with some of the most amazing people. I’ll definitely be back to both in 2014!
– I knit 8 sweaters and only one of them was a fail.
I made a bathing suit! And it held up to swimming in the Gulf of Mexico! Yes! I’m so proud of that little bugger, you have no idea.
– Another successful year of Me Made May! I had a lot of fun finding new ways to wear my handmades, but I will admit that taking daily pictures got a little trying. And May is such a long month! Whatever, I’m looking forward to it again in 2014 🙂
– I found the sweetest kitten under my house and rehomed him with my brother and sister-in-law! Theodore has been renamed Mr. Kitten and he’s sooo big and handsome now – look!
My favorite crawl space kitten is all grown up now  @ttamdude
(just the cat. Although, baby brother Matt is single too. Ladiesss~)
– 2013 has basically been the year that I had to remake my entire wardrobe due to weight loss giving me a complete change in size. I got tired of feeling sad every time I opened my closet and stared at all those beautiful clothes that no longer fit, so I started selling them on Etsy. Thanks to everyone who bought something – I’m so happy to know that those pieces have a loving home, and I was also able to pay some medical bills with the money I made! As a side note, I added a few more winter pieces to my Etsy shop over the weekend, so feel free to take a look. Everything is priced to moooove!
– I wrote this post on Sewing and Time Management and it ballooned into my most popular post by far. I still get emails and comments on that post on a regular basis – I had no idea so many people would find that sort of information useful and applicable to their own lives! Feels really good to know that I can give back to the sewing community that I love so much, even if it’s a weird kind of giving back that’s just writing up a post 🙂
– I’ve had my Bernina for a full year now and I’m happy to say that we are just as in love as we were on day 1! I love discovering new things about my machine, and even the high cost of feet and bobbins hasn’t put me off from feeling good about the investment that I made. People ask me sewing machine advice all the time, and while I think buying a machine is a very personal choice based on budget and preferences – if you have the budget for a Bernina, DO IT. You won’t regret it 🙂

One elephant in the room that I need to address is my current employment. At last mention, I had just quit my job to pursue a career as a seamstress. I’m sorry to say that particular stint did not work out – we actually parted ways a couple of weeks ago. There were several things leading up to it, but the general gist was that we simply did not work well together. With as much sewing knowledge as I brought with me, I still had a lot to learn – learning how to use an industrial machine (scary at first! But of course now I miss it, ha!), learning how to sew without instructions or pattern markings, learning how to properly do alterations (I did learn, and I also learned something even more important, which is that I still fucking hate doing alterations, ahah), as well as re-learning basically everything I know about sewing. Everything that came out of Muna’s shop was sewn in a more RTW manner – i.e., linings were entirely inserted by machine, for example, whereas the ones I do are applied by hand. Which makes sense, considering you have to really push stuff out quickly to be able to make any sort of profit. But there was a problem where I wasn’t learning fast enough, because there wasn’t enough time to teach me, and what I did learn was not taught in a way that I could quickly grasp it (I’m a kinesthetic learner, plus I’m one of those annoying people who asks lots and lots of questions. Looooots of questions). The end result was that we were not happy working together, and the combined stress of everything (new job, whooooole big change for the first time in years, problems with personal time management, etc) was making me very sick. Probably even caused that kidney stone, to be honest! So we made the mutual decision to part ways a couple of weeks ago. It sucks that it didn’t work out, but I’m glad I gave it a shot and tried something new – and got out of a job that I needed to get out of (and I’m pretty sure my old bosses agree 🙂 the girl who replaced me is really great and they’re very happy with her!). I still consider Muna to be a dear friend and a wonderful person who I look up to. We just didn’t work well together, that’s all 🙂 And honestly, I think the timing came out quite nicely because I had plenty of days off to spend with my dad at the hospital, when he and my mom needed me the most.

I have some other employment opportunities lined up for 2014, which I’m very excited about. I probably sound like a broken record at this point because I talk about it aaaalll the time, but one thing I’m really excited to pursue in this new year is teaching! I will finally have the opportunity – i.e., downtime – to do so, and I’ve been making plans and sending emails and chatting with all sorts of people who have given me some wonderful advice! I’m still working out details as far as trying to get together group classes, but if you’re in the Nashville area and are interested in private lessons (or want to arrange a group lesson with some friends) – email me and let’s talk! I’d love to share my knowledge with you and help you improve your skills! Non-Nashvillians… do you think Skype sewing lessons would ever be a thing? Ha 🙂

Ok, sorry about the tangent, let’s get back to the year round-up!

My favorite things I made this year (this was soo hard to narrow down, all my handmades are like my little bayybies ok)
Orange Minoru
Nard-Dog Minoru
I wear this shit ALL THE TIME. All the time! It is a lightweight jacket, so I can’t wear it when it gets toooo cold… but that’s like 2 weeks out of the entire winter here. I love this jacket, it goes with everything, I feel cute and pulled together, and it has a hood!

Lace Trench
Lace Trench Coat
I can’t say I wear this one quite as much as the Minoru, just because it’s kind of a weird coat weight. But I love it so much and I loved working on it. It’s definitely a statement piece that I get a lot of compliments on every time I wear it – and a lot of surprised gasps when I smile and answer, “I made it.” 🙂

Belladone Dress
Stripey Belladone dress
Such a simple dress, but it really is the perfect Saturday dress! I probably wore this shit once a week at the height of the summer because it was just SO easy and comfortable! The cutout design at the back and the simple stripes make this dress ideal – I can ~jazz it up~ with some fun shoes and accessories or a belt, but it also looks good enough on it’s own!

Marc Jacobs Birds
Fabulous Silk Birds
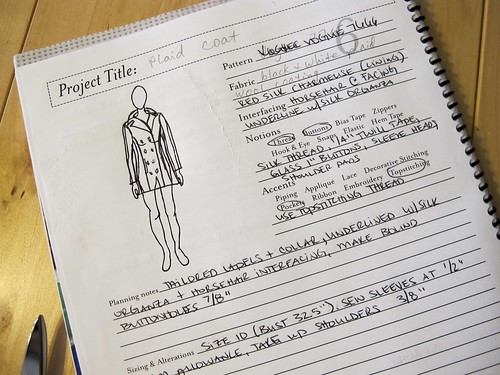
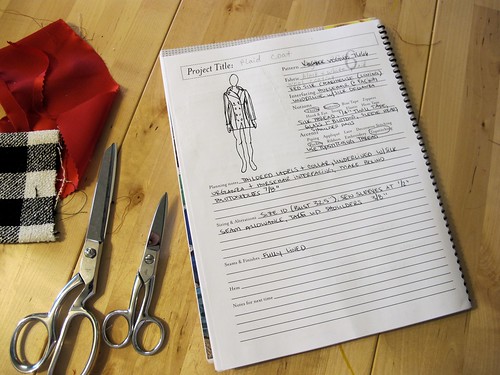
My labor of love for 2013 (other than the coat, which I’m still working on… I might possibly be finished by the end of the year, but you’ll have to wait until January to see heh heh heh!). I poured so much time and research into this dress – from fitting, to learning how to deal with the fabric, to finishing, to making the matching slip. It’s one of those dresses that I know I can pull on and feel fabulous in, even if I’m having a day where I hate everything in my closet. I’d love to make more of these in a solid fabric, although let’s be honest – the bird fabric is the best part 🙂

Audrey in Unst
Audrey in Unst
My first knit with fingering-weight! This was kind of a big deal for me – not just a first with the fingering weight, but it was a pattern that was a bit hard to read (for me, anyway, as I tend to take everything quite literally and need things spelled out), and I also swapped out the yarn weight and added fit modifications. Happily, it all worked out and I just love how the sweater ended up!

Lumberjack Archer; Ponte Leggings
Lumberjack Archer
This one is kind of a surprise me to – but I wear these pieces so much! Those ponte pants, man. I can’t get enough of them. And I love the Archer, definitely planning on more of those in 2014!

Well, that was a long post! All in all, I think 2013 was a good year! A bit trying at times – I’ve had more health problems this year than probably every before, not to mention other setbacks – but I feel so much stronger and better as a person, and more willing to take chances now that I know a fail doesn’t necessarily mean the end of the world. I don’t have any specific resolutions for 2014 – except that I want to be fearless.

WHAT THE FUUUUCK omg omg omg

Here’s to a bright and beautiful 2014!

Giveaway: Vintage Patterns from She’ll Make You Flip

26 Dec

First up, a big thanks for all your comments on my last post. The outpouring of support I received was much-needed and absolutely appreciated. The good news: Dad made it home for Christmas! That alone was by far the best part of the day 🙂 so thanks again, everyone, for your prayers and positive thoughts. Love you all!

Dad's finally home! Best Christmas present ever

Now, I don’t know about y’all, but for me, the day after Christmas means I’m doing two things:
1. Laying on the middle of the floor, basking in the glow of all my gifts surrounding me in a circle; and/or
2. Sitting at the computer, trying to frantically spend my Christmas money before it burns a hole through my wallet

While I can’t help you with #1 (I mean, if you were bad, that’s totally your fault and no one is feeling sorry for you today), I can help you with #2. Or, rather, She’ll Make You Flip sure can!

She’ll Make You Flip is a shop that specializes in sewing patterns – vintage patterns from the 20s-70s, and modern out of print patterns. They will also occasionally offer a smattering of sewing magazines, embroidery and needlework transfers, fabrics, laces and trims as they become available. Honestly, I probably have enough vintage patterns in my stash to bury myself in should I need to, but that doesn’t stop me from browsing the offerings in this shop and playing pick-the-best, which is my favorite game by the way.

m4118
McCall 4118

m4115
McCall 4115
Like these two WWII era shirtwaist dresses. GET IN MY LIFE, Y’ALL.

m4448
McCall 4448
Two piece 1940s dress? Check.

m7646
McCall 7646
Late 40s classy lady dress with fancy detailing at the bodice? You got it!

v5630
Vogue 5630
Ok, I’ll drag myself out of the 40s but first get a load of this – ! That zig-zag colorblocking is amazing.

m3151
McCall 3151
I love love love the strong shoulders on this 30s career jacket. I don’t say this too often, but that shit is smart as fuck.

s3708
Simplicity 3708
1950s more your bag? No worries, I got ya! Check out this shirtwaist – quite a bit different from the 1940s models above, yeah?

m8484
McCall 8484
This little collared dress is just asking to be made up in a fun striped cotton.

m8646
McCall 8646
This swing coat is just killing me – look at the lady on the right with the popped collar. She’s so smug, and yet I don’t blame her one bit.

b5655
Butterick 5655
I think this casual little 60s dress looks like the comfiest thing ever.

m5603
McCall 5603
Or one could be the opposite of comfy in this, but look fierce as all get out.

s5900
Simplicity 5900
I’m suddenly dying to channel my inner Elizabeth Taylor with this incredible caftan.

m3246
McCall 3246
Or just go all-out hippy with this fabulous maxi dress. Look at that thing! That’s a dress that’s begging to be lived in all summer long.

m4182
McCall 4182
But what I’m honestly, REALLY loving most are these 70s FOOTIE PAJAMAS. YOU GUYS. I WANT THESE SO BAD I CAN’T BREATHE.

Now that I’ve gotten you all excited, I have a present for one of you! She’ll Make You Flip has generously offered a $25 store credit to one lucky winner! Yay! To enter, all you need to do is visit the shop and leave a comment letting me know what pattern you’d choose if you’re the winner. That’s it! This giveaway is open WORLDWIDE and I will close the entries at Wednesday, 1/1/14 at 8AM CST.
GIVEAWAY IS NOW CLOSED

If you’ve already found your dream pattern and can’t bear the thought of it becoming the One That Got Away, you can use the coupon code LLADYBIRD20 to get 20% off your purchase through the end of 2013. Yes! Go spend that Christmas money before it sets itself on fire!

Good luck!

Tailoring the Vogue Coat, pt 2

23 Dec

Man. Tailoring. It is always (always!) worth the extra cost and effort, but lord I always forget how much extra effort is actually involved. I’ve been plugging along on my coat since I last posted my progress, so here’s what I’ve been up to in the meantime!

I finally got the padstitching on the lapels done. That alone took the longest – not because padstitching takes forever, necessarily (well, I guess it depends on the size of the lapels), but because I kept putting it off for as long as possible. I was not looking forward to how long it would take. Guys – when I finally sat down and made myself do it, I finished both lapels in like 45 minutes. I’m such a baby, haha! Fortunately, while I was putting off the padstitching, I was not sitting idle – I skipped ahead of the instructions, and assembled the coat back (minus the tailoring) and lining, so that should save me some time now.

Now, I totally could have skipped the padstitching – it’s not 100% necessary, although it will 100% of the time make your coat look sooo much nicer. RTW coats do NOT have this sort of tailoring in them, and they obviously get away with it because people still buy them. But look at what a difference it makes:

Vogue Coat - Tailoring

If you can’t tell, the padstitched lapel is on the left (the side that overlaps), and the one that hasn’t been padstitched is on the right (the underlap). Do you see how flat the non is in comparison to the one with stitching? It’s pretty incredible!

Vogue Coat - Tailoring

LOOK AT THAT ROLL LINE, JUST LOOK AT IT.

Padstitching, in a nutshell, is basically just sewing diagonal stitches in straight lines (eventually forming a bunch of chevrons) using silk thread, so the hair canvas adheres to the coating fabric. You don’t sew all the way through the fabric – just pick up a little nip here and there to keep things connected. You hold the fabric+canvas over your fingers so it is encouraged to roll while you sew, and then when you’re finished, you steam the shit outta that sucker so it is hold it’s shape. Again, time consuming and not totally necessary, but it really is the difference between “Hey, I made a coat” and “~*Hey I tailored a fucking coat are you so impressed*~”. I mean, I’m impressed with myself and I haven’t even finished the thing yet!

After I finished the Dreaded Lapels, I focused my attention on the collar.

Vogue Coat - Tailoring

First, I sewed the two under collar pieces together. These are cut on the bias, so they will stretch and sit correctly underneath the upper collar. They are also cut slightly smaller than the upper collar, so the seam will roll to the underside and you won’t see it. That’s the plan, anyway.

Vogue Coat - Tailoring

To sew the interfacing pieces together (remember, they need to be on the bias so I can’t cut them on the fold), I removed all seam allowances and zig-zagged the pieces together at the center, secured with a piece of seam binding. I then marked my roll line and, I know, it looks really shitty. Sorry about that.

Vogue Coat - Tailoring

As with the lapels, I marked the padstitching lines with my trusty Sharpie. Above the roll line gets heavy padstitching (1/4″ tall, spaced 1/4″ apart) and below the roll line is more lightly padstitched (1/2″ tall, spaced 1/2″ apart). This will help the collar to stand so it looks nice and full and not sad and flat.

Vogue Coat - Tailoring

After I finished padstitching, I wrapped the collar around my tailor’s ham and, again, steamed the shit out of it. So qt, so pro.

Vogue Coat - Tailoring

I drafted a back stay, although my pattern doesn’t call for it. It’s always a good thing to include, though – it’ll reduce the strain on the coat back from moving your arms around/hugging people, and thus give your coat a longer lifespan. Plus, you can use cheapie muslin and I love me some cheaping out.

By the way, I use the term “draft” veryyyy loosely. I pinned my back and side back pieces together (so they would be one continuous piece with no seams) and marked 8″ below the neckline and 3″ below the armhole, then used my curved ruler to connect the two lines.

Vogue Coat - Tailoring

The resulting piece (cut on the fold, because, again, no seamlines) is the back stay. I pinked the bottom edge so there wouldn’t be a sharp line on the outside of my coat. Real talk: this is the only reason why I own pinking shears at all. For tailoring. I’m not even kidding about that a little bit.

Vogue Coat - Tailoring

The back stay then lays on top of the coat back and is basted to the arm holes, side seams, neckline, and shoulder edges. The bottom just kind of flaps free in the breeze. And that’s all there is to it!

Vogue Coat - Tailoring

I also stabilized my shoulder seams with twill tape – no real reason, except that my Tailoring book (lol why the fuck is that listed at $65 what is this madness) said it was a good idea so I just went along with it. It should reduce the strain at the shoulders, which is good because this coat is starting to get a little heavy!

Vogue Coat - Tailoring

Finally, I catch-stitched down all my seams on the coating fabric, catching only the underlining. Honestly, I should have done this as I sewed each piece – I really had to reach up under the back stay to get some of those seams sewn down – but I wasn’t thinking about it at the time. Catch-stitching down the seam allowances is one of those weird optional steps that isn’t necessarily bad if you skip it (like I was planning to), but it does help keep everything in place on the inside, thus prolonging the life of your coat. And, I mean, it’s sort of relaxing. I really love to catch stitch, what can I say?

So there’s that! I’m mostly done with the fiddly tailoring at this point – I still have the sleeves to deal with, but they shouldn’t be too bad. Since I’ve already assembled the lining, it’s really now just a matter of putting everything together.

My original plan was to have this finished by Christmas, but I’m now shifting that to a (hopeful) NYE completion date. Construction hasn’t necessarily been dragging- I just haven’t been home at all to work on it! My dad ended up in the hospital last Monday, where they discovered that his colon was completely blocked due to cancer, so they wheeled him into emergency surgery on Tuesday and cut out 30% of that shit (pun intended). They also removed a bunch of lymph nodes and tested those – turns out that stuff is cancer-free, which is AWESOME – but he does have spots on his liver that will require him to go through chemo. Scary, scary shit, man. Fortunately, my dad has been a total trooper and by Wednesday morning he was walking up and down the halls like a champion. Things are good now – he finally passed gas yesterday (lol @ us being excited about my dad farting, considering he regularly likes to stink us out), and we’re hoping he can be home in time for Christmas. Fingers crossed! Although, to be honest, I’ll totally spend Christmas in that tiny hospital room if I have to!

I don’t like to discuss my personal life here much, this being a sewing blog and all, but my dad is a pretty inspiring/amazing dude. He regularly runs ultra marathons – 50-100+ miles at a time, up a mountain, sleeping in the bushes, that’s all normal for him. I laugh when someone corrects me for saying 500k (“Oh, you mean 5k, silly.” “No, dipshit, I meant 500k. He ran 314 miles.”) when I brag about his racing. And dude is fast – he regularly smokes out all the little 25 year olds who run the same races. Not bad for a 54 year old who looks like Santa! Not to be a total sap, but getting to spend the last week with my family (despite the less-than-ideal circumstances) and knowing that my dad is going to be a-ok is literally the best Christmas present I could have ever asked for. I’m just so thankful.
❤️❤️

Anyway, I hope everyone has a Merry Christmas! I’m hoping to get in some much-needed sewing time – my machine has been idle for way too long 🙂

Christmas Wishies – 2013 Edition

16 Dec

I reckon I’m a little late to the game this year with my wishlist (honestly, I’ve been having a bit of a bummer month so I haven’t really felt much of the ~Christmas spirit~ if ya know what I mean. Not a sob story, just statin’ facts!), but better late than never! There’s sooo much good stuff out there this year that I’ve got eye on; the hunt is almost as fun for me as actually receiving something! Take a look…

THE PATTERNS:

portsidecover
Ever since Jen released the Portside Travel Set, I’ve been dying to make my own! I don’t know what the deal is, but something about having matching luggage just makes me so, so happy. I would make mine in this striped cotton twill with accents of organic cotton twill. Well, that’s a safe version – have you seen some of the awesome twills on Mood Fabrics, lately?? Check out this
crazy Art Deco print and this paisley twill.

One thing I really want to explore this next year is trying some new pattern companies! I love the indie offerings we all obsess over, with their lovely packaging and clear instructions, but I also really want to try something that’s a little less spoon-fed, just to stretch my sewing muscles. I have heard a lot about Marfy Patterns, over the years and even through some blog comment encouragement, and I’ve been casually browsing the offerings and really falling in love with some of the patterns! Check them out –

2758_01
Marfy 2758, the glam coat dress.

M3015
Marfy 3015, the pintucked Redingote coat

M2240
Marfy 2240, the ruffly-collared riding coat

Aren’t they beautiful?? True, I’ve been put off by Marfy for many years (the patterns don’t include instructions, seam allowances, multi-sizes, etc), and part of me is slightly concerned that the smallest size is a little too big for me (I should be wearing a size 40 according to their size chart). But, I want to try them! 2014, let’s make it my year!

Another pattern company I’ve been lurking on lately is Stylearc. Some seriously cool, seriously fashion-forward (lolz, like I’m a fashion-forward kind of dresser. WHATEVS). They’re pretty expensive when you factor in shipping, but they reviews are pretty much raves across the board. And there are definitely some styles I don’t see anywhereeeee else. Check them out:

ALISHA-DRESS
The Alisha Dress, a beautiful lace sheath with a matching slip pattern. Like I need more excuses to get my lace on.

ZIGGI-JACKET
The Ziggi Jacket. GUYS IT’S A MOTO JACKET, GUYS I WANT IT.

STACIE-JACKET
The Stacie Jean Jacket. Gah, I’m dying over this one. I love denim jackets but I can neverrrr find one that fits the way I like. I altered an old one I had laying around, but the construction is subpar at best and, honestly, I want to just make one. This pattern looks fabulous.

S3514
I really love these 1940s dresses, like Simplicity 3514. I don’t even care how twee they are – I’d even go the extra mile and make it SUPER TWEE with some Marc Jacobs daisy print fabric because, yes.

M7399
I also love this jacket pattern, McCall 7319 (what is it with me and jackets lately? IT’S NOT EVEN THAT COLD HERE). I could totally see this made up in a lovely charcoal alpaca wool, lined with a plaid wool (!!!) flannel.

THE FABRIC:
FS12614
I was recently gifted the Aubépine dress from Deer & Doe and I’ve been having a lot of fun looking through my fabric options! Wouldn’t it look lovely in this Marc Jacobs dotted cotton/silk?

FC22718-f
Another contender is this floral cotton silk voile. A bit summery for sure, but could easily be layered up for the current season.

302721
Wouldn’t this floral velveteen be perfect for a pair of Chataigne winter shorts? Also in my lurk: mink solid velvet. YUM.

303135
Love this leopard stretch cotton twill, I can imagine it made into a pair of skinny stretch jeans. Just need to find me some new boots!

303069
Soo, I reckon y’all have seen By Hand London’s newest pattern, the Georgia dress, yes? I have a copy burning a hole in my pattern cabinet, and I’m DYING to make it up, but I haven’t settled on a good fabric yet. Something glittery or brocade-y (or even sequin-y, for the masochist sewist in me) is high on my list for a fun party dress. Then I discovered this stretch buffalo plaid. Amazing! I need all the plaids, all of them.

300376
I’m really digging this Marc Jacobs star cotton fabric. Couldn’t you see this made up in a woven skater dress?

303887
Mood actually has this navy zigzag sweater knit in several other color combos, but the blue is my favorite. The perfect little knit wiggle dress!

FP19600
I also can’t get enough of all the gorgeous special occasion fabric I have been seeing lately. Like this Carolina Herrera rose brocade

303524
And this Italian metallic brocade

FS12610
And ESPECIALLY this Oscar de la Renta polka dot silk taffeta. bleeechhhhh get in my life!

vichy_square
Gingham jersey? SHUT THE FRONT DOOR.

THE OTHERS:
rooster
Still obsessing over Jamie’s jewelry. I recently got this peacock necklace, but that doesn’t stop me from checking out the other goodz she has available. Love this Rooster necklace! You know I would totally turn wearing that into a neverending dirty joke 😉

Simflex1
Why don’t I have one of these expanding sewing gauge doohickeys?

71-FhaIYk2L._SL1500_
My current iron (a Rowenta that’s more than 6 years old) has been slowly dying over the past year – the shut offs are more frequent, and the water reservoir doesn’t hold for shit. A new pressing tool is definitely in the future, and I’ve been eyeballing this gravity feed iron for what seems like forever. Fingers crossed that Santa heard my wishies!

BLCS2_1_med
File this under things that I really really want but can’t afford – a coverstich machine! I know, there are other brands that are equally loved, but I’m a Babylock girl when it comes to my sergers and the like. I’ve tested this machine in the past, several years ago (yeah, I guess I’ve been lurking on this for a while!) and it’s fucking amazing. Totally deserves a spot in my sewing room.

Hey, putting this post together was really fun! Like shopping without actually spending money (or getting product, but let’s not think about that right now). I love it!

A couple more things while I have your attention!

First, I owe y’all a giveaway winner. Random number generator says….
wins

winsss

Lauren Talley! Congratulations, Lauren! Great name 😉 hee! Expect an email from me soon!

For everyone who inquired about the sewing prints being in Joanna’s shop… I believe they will be offered soon, but give her a couple of weeks because she’s in the process of getting married 🙂 So sit tight!

Finally, can I ask a tiny favor of my local/Nashville readers? I have a friend who is doing some research for a local fabric store (and I swear, this is not a thinly disguised “friend” who’s really me, or anything like that. Promise!) and she needs a few more opinions. If you’re in the Nashville/Middle Tennessee area, or come here frequently to buy fabrics, she would loooove your opinion to help her research. Click here to take survey. Again, local people only, please! I love you all but your buying habits on the other side of the country are not relevant for this particular purpose 😉

Ok, I guess that’s it! Now let’s get back to the fun part: PRESENTS. What’s on your wishlist this year?

Completed: A Fabulously Festive Skirt

13 Dec

Ok, y’all, time to wrap up this trio of holiday crafts. You saw my Halloween contribution and the joint effort with my mom for Thanksgiving… what could be in store for the winter holidays, you might ask?

Christmas Tree Skirt/LT Skirt

Thinking about the given theme, and what was was needed for my personal holiday decor (Christmas, specifically), I decided to make a gorgeous tree skirt since I’ve been covering my tree stand with a giant fabric scrap for the past couple of years. Before I bore y’all to tears, I must point out that this skirt is quite special in the fact that it does double duty-

Christmas Tree Skirt/LT Skirt

YEP. You can totally wear it as a skirt for humans!

Christmas Tree Skirt/LT Skirt

I am beyond excited about this project (seriously, it woke me up in a glorious epiphany in the middle of the night!) and hopefully y’all feel the same way. I mean, really, who doesn’t want a little kitsch in their Christmas? 😉

Christmas Tree Skirt/LT Skirt

I mean, for god’s sake, I managed to get pictures in the snow. It never snows here (although it does snow on my blog, as a lot of you noticed ;)). It was clearly meant to be.

Christmas Tree Skirt/LT Skirt

Want to make your own? It’s SO easy!
Just a head’s up: this tutorial required lots and lots of pictures and words, so feel free to skip if it’s not your bag. You have been warned!

First things first – let’s talk about what sort of shape works best for this type of skirt. What we want to make is a circle skirt. I’ve seen people call skirts circle skirts when they really aren’t – a circle skirt is literally a circle with a smaller circle cut in the middle of it. It doesn’t have gathering, and the edge of the hem is curved completely all the way around (i.e., no straight lines). Like this:

Christmas Tree Skirt/LT Skirt

Mmm, looks like a donut.

You can make a circle skirt that is a seamless, continuous circle, like what you see above. However, for our purposes, we do need at least one seam so we can get the skirt over the tree. So your pattern will actually look like this, with seams:

Christmas Tree Skirt/LT Skirt

You know, like a Poké Ball.

This pattern is really easy to draft. Seriously, the hardest part is just finding a big enough piece of paper for it (I tape lots of paper together, personally). I won’t be going over how to draft a circle skirt, but I can point you to this excellent tutorial on how to draft a circle skirt, by Casey. This is the tutorial I used to draft my pattern, and it’s really easy to understand and execute. You can make the skirt as long or short as you want it – mine is 18″. Once you have drafted your pattern, you can measure the amount needed for trim and fabric. If you’re buying before you draft, a good ballpark is 4+ yards for the main fabric, and at least 4-5 yards for any trim you sew along the hemline. This is a great project for those gorgeous quilting cottons that you can’t bear to use for apparel purposes – I got mine from JoAnn, and it was on sale whoop whoop.

Christmas Tree Skirt/LT Skirt

Once you have drafted your pattern, you should have two pieces of fabric that look like this. The straight edges are your side seams, and the little curve in the middle is where your waist sits.

I tried to take photos to explain this, but it ended up being waaay too difficult, so here’s a little hand-drawing diagram instead!

Christmas Tree Skirt/LT Skirt

Sew up one side seam of your skirt. On the unsewn side, you will sew velcro so the skirt can open and close. How long you make the velcro is up to you – I suggest making it go all the way down to the hem, to make it easier to put it on the tree (since the skirt will open all the way). However, if you’re like me and your swear you bought velcro but it somehow managed to not come home with you and you have to dig through your stash to find some little leftover pieces that equal maaaybe 12″ total… you can do that to, and just sew the remaining seam closed. At the top, instead of a waistband, you will sew a length of ribbon to finish the top of the skirt. If you are concerned about the skirt not staying closed while you are wearing it, you may also sew a hook and eye to keep things secure (or even make a drawstring casing for cinching it tight when it’s around the tree), but I can assure you that the ribbon does a pretty good job of not untying itself, at least on me 🙂

A few little tips for constructing the skirt-

Christmas Tree Skirt/LT Skirt

I like to staystitch the waistline curve before I do anything- just sew a line of short stitches (if your machine sews at 2.5, reduce the stitch length to 2.0) just inside the seam allowance. Since the waistline is cut on the bias, it will stretch out of shape if it’s not secured beforehand.

Christmas Tree Skirt/LT Skirt

To attach the velcro, first finish your seams in whatever method you prefer (mine are serged, and oops didn’t change the serger thread haha) and press under the seam allowance on one side.

Christmas Tree Skirt/LT Skirt

Keeping close to the edge, sew the loop side of your velcro to the side seam that is not turned under (this will be the underlap of the velcro) and the hook side of the velcro to the wrong side of the turned under seam.

Christmas Tree Skirt/LT Skirt

If your velcro does not extend to the hemline and you need to close the remainder of the seam, overlap the folded under seam allowance with the underlap and pin down.

Christmas Tree Skirt/LT Skirt

Then topstitch!

After you have attached your velcro, you can sew the ribbon to the skirt waistline. No photos for this step, but I think it’s pretty self-explanatory.

Let your skirt hang for at least 24 hours, to allow the bias to settle before you hem it – otherwise you may end up with an uneven hemline.

Then comes the fun part… embellishing! Seriously, I had sooo much fun trolling the aisles at JoAnn, trying to find the ~perfect~ sparkle trims. I ended up with pom-pom fringe (I think I used about 4 yards – again, MEASURE FIRST. That hem takes up a lot of yardage!), sequins, and glitter ribbon.

Christmas Tree Skirt/LT Skirt

I sewed the pom-pom fringe to the bottom of my skirt by machine.

Christmas Tree Skirt/LT Skirt

Since I couldn’t get my hands on any red, I improvised by adding a line of red sequins on top of the fringe. These are just hot-glued on; ain’t nobody got time for dealing with sequins.

Christmas Tree Skirt/LT Skirt

My favorite part about this skirt, though (other than the fact that I can WEAR IT), are the 3-D poinsettias! I made these using felt and hot glue and it’s super, super easy, once you make a little template.

Christmas Tree Skirt/LT Skirt

Start by drawing a petal shape that is approximately half the the desired poinsettia size. Mine is about 2.5″ long.

Christmas Tree Skirt/LT Skirt

Now draw a circle. This doesn’t have to be perfect; it’s just a guideline for the petals.

Christmas Tree Skirt/LT Skirt

Trace your petal shape over the circle, with the four points touching in the center of the circle.

Christmas Tree Skirt/LT Skirt

Cut the template out and flip it over so no one can see the shame.

Christmas Tree Skirt/LT Skirt

To assemble the poinsettias, cut two pieces of felt using the template, four additional petals (cut slightly smaller than the first petal shape), a circle for the inside, and a leaf (the leaf is just two petals with the points touching, cut as one in green felt).

Christmas Tree Skirt/LT Skirt

Stack the template pieces like so and glue together.

Christmas Tree Skirt/LT Skirt

Then glue on your four petals.

Christmas Tree Skirt/LT Skirt

Attach the center (I know, traditionally, poinsettias have white centers, but my fabric had gold centers SO GOLD IT IS).

Christmas Tree Skirt/LT Skirt

Then glue on the leaves. Done!
To make my poinsettias extra fancy, I added some beads in a bottle at the center and a healthy dose of glitter spray paint.

Christmas Tree Skirt/LT Skirt

I put my skirt on the form with a petticoat, and just stuck the poinsettias on until I was happy with their placement (since they’re felt, they will temporarily stick without glue), then I hot glued them on.

Christmas Tree Skirt/LT Skirt

And that’s it! It’s a tree skirt/me skirt!

Christmas Tree Skirt/LT Skirt

Christmas Tree Skirt/LT Skirt

Christmas Tree Skirt/LT Skirt

Christmas Tree Skirt/LT Skirt

I am wearing mine with a petticoat for maximum fluff, fyi.

The best part about this project?

Christmas Tree Skirt/LT Skirt

It’s SOOOO twirly!

So I guess that’s it! I feel pretty #fabulouslyfestive, what do you think? I realize this project is probably a bit too twee for most adults, but it would be perfect for kids. Aren’t kids the best excuse for dumping a load of tacky, or is that just me?

Christmas Tree Skirt/LT Skirt

If you managed to sit all the way through this giant post, so awesome! Here’s a coupon just for you 😉

unnamed

Thanks to JoAnn Fabric and Crafts for letting me get my DIY Crafty on this season, and thanks everyone for hanging in there with me for some non-clothing-related sewing. As always, if you’d like to see more crafty goodness, you can check out the Celebrate the Season website.

Christmas Tree Skirt/LT Skirt

Happy Holidays, y’all!

Giveaway: Sweet Sewing Prints

9 Dec

My first introduction with Joanna Baker was the best kind of introduction – I actually won a giveaway that was hosted by Madalynne. I immediately fell in love with her beautiful illustrations and send her plenty of gushy emails that may have even bordered on creepy/obsessive. What can I say – when I fall for some, I fall for it hard!

Joanna Baker - Thread

An illustrator trained in fashion design, Joanna creates some of the prettiest sketches, for both wall prints and note cards – just lurk her Etsy if you don’t believe me! I especially love this fancy little pug! Or, ooh, how about this Poppy Sundress, too bad I can’t find that kind of fabric and make myself a real-life one!

Joanna Baker - Dressforms

Now here’s the fun part – Joanna has created these three beautiful sewing prints for one lucky winner! Yeeeah!! Wouldn’t these be perfect in a sewing space? Or even just hanging around the house, because why should something this lovely be restricted to one room amirite?

Joanna Baker - Buttons

To enter the giveaway for the sewing prints, all you gotta do is like Joanna’s Facebook page and also leave a comment and let me know what is your favorite thing in Joanna’s shop. That’s it! One lucky winner will recieve all three sewing prints – perhaps an early Christmas present for yourself? 🙂 Also, this giveaway is open WORLDWIDE (if you can receive mail, you can enter this giveaway!) and I will close all entries 12/16/13 at 8:00am CST.
GIVEAWAY IS NOW CLOSED

I am SO jealous of whoever wins these prints. It kills me how cute they are! Here’s a little Instagram shot of mine chilling in their new home – I found these cool frames at the flea market, I love how fancy they are! I hung the prints over my ironing board so I can see them from pretty much anywhere in the room 🙂

Good luck!

EDIT These prints are now available in Joanna’s shop for a limited time – go get you one!

DIY with Zazzle

6 Dec

Have y’all ever heard of Zazzle? It’s an online marketplace where you can create custom, well, anything, and have it printed and shipped directly to you, on demand. Not only that, but you can also upload your designs to sell and have other people buy them! Pretty neat, and pretty perfect if you love creating designs but hate going through with actually getting the design printed on anything. Ooh La Leggings Zazzle contacted me a couple of months ago to see if I wanted to try out some of their products for a review. Did I! The hardest part was figuring out what I wanted – seriously, the options are endless. You can make tshirts (with like 50+ styles and colors to choose from), business cards, coffee mugs, key chains, buttons, stretched canvases for your wall, phone cases, greeting cards, custom wrapping paper… the list goes on and on and on and on and on! And everything can be customized. Ooh La Leggings I spent about 2 weeks trying to sort through the products, and in the end I decided to go with a pre-designed raglan tshirt – the Crafty Tee! Isn’t it cute? I love the design and the fact that I could get it printed on a raglan. You can also change the colors of the raglan, but I love the simple black and white. Ooh La Leggings My only beef with this top is the sizing – the suggested sizing says I need to go up from my normal size, since it runs small. So I ordered a medium, and it was just too big 😦 Should have trusted my gut and went with the small, oh well! Fortunately, I have a serger and I can make shit, so one quick swipe through my machine and the fit is perfect. No bagginess! Ooh La Leggings Ooh La Leggings Keeping things relevant with the ol’ blog, I also made my leggings. I used the Ooh La Leggings pattern (my flavorite), and this amazing solid red rayon ponte from Mood. You can’t see too well in the pictures, but it has a lovely sheen to it and it’s very soft. I love these ponte leggings because they are SO comfortable, and they almost pass as pants! Especially if you tuck them into boots, ha. Zazzle Loot I still had some extra credit burning a hole in my account, so I decided to also order some tiny business cards and a custom mug. Aren’t they cool! Zazzle Loot Zazzle Loot You probably saw this mug on my Instagram, because it’s hilarious. My sewing motto (other than “I’ve made a huge mistake” haha) is “That’s steam out” (because, seriously, IT WILL STEAM OUT). I say it all the time! So naturally, I needed a mug that said it. I couldn’t think of an appropriate, non-licensed picture to include, so I just went with one that I know doesn’t have any copyrights attached to it – my tattoo! Ha! “Designing” the mug was really easy – I just uploaded my picture, centered it where I wanted it on the mug, and then added text and played around with fonts until it looked right. There are multiple views of the mug, so you can do a 360 to make sure everything is placed correctly. If I could change anything about the whole process, I would include some pre-set, standard placements to choose when you’re centering your picture and text. There is a center vertically and center horizontally, which helps a lot, but most of my mugs have the design centered when the mug is turned to the side – so it looks nice while you’re holding it. I’ve learned that choosing placement is hard when you don’t have the physical mug to look at, and as a result, my stuff isn’t quite centered. And it’s also on the wrong side (I’d say oops, but it faces me when I’m holding it sooo that’s actually kind of a good thing, maybe). Honestly, I could send this back and get it fixed (it’s Zazzle’s policy to refund or replace if you’re not satisfied with how your design turned out), but I dunno, I guess I’m lazy. This works good enough for me! I’m also happy with the quality – it’s a nice, solid porcelain (makes a fun ‘ting!’ when you hit it with your spoon, aha) and the image is very sharp with saturated colors. Zazzle Loot The last product I chose were these skinny business cards for my blog! Nothing fancy, just my name, email and blog address (plus that little pincushion because, d’awww). I forever have people asking me for my blog link when they find out I have one, and I’m forever searching for paper to write it down on. Now I can just hand them a card! And they’re so tiny and cute. I also love the package they came in – it keeps the cards safe from the dangerous land that is the inside of my purse, but it’s easy to pull a card out by sliding your thumb across the top. Ooh La Leggings Overall, I’m very happy with my Zazzle experience – everything went to print and then shipped quickly, and the ordering process was smooth and simple. I would love to create a custom printed tshirt and then work some refashioning magic on it – how fun would that be?! Plus, I think I need more coffee mugs – like this one. And ooh, check out the cool sewing tshirts – one, two, and holy shit this is hilarious. Thanks, Zazzle, for letting me test and review a tiny offering of your massive array of products! Guys, just as a head’s up – this post contains affiliate links. Meaning, if you click the link and then buy the product, I get a teeny kick-back. Just in case some of y’all hate me or something, and don’t want to contribute monetarily. No worries! Anyone else get a hankerin’ for some DIY with someone else doing the work? Have you ever ordered from Zazzle before? I think I’m in love!

edit sorry the tshirt link was bad, y’all! I updated it and hopefully it’s fixed now 🙂 Also, I just noticed that everything on the site is 20% off – and tshirts are 50% off! Sale runs today only, so go shop your little hearts out 🙂

Tailoring the Vogue Coat

5 Dec

When I originally posted my Vogue coat muslin posts, there was quite a bit of interest about what goes in the process of making a coat from start to finish. I’m not one to tease, so here’s a glimpse into what I’ve been up to, coat-wise, for the past couple of weeks.

The first thing I should mention is that coat-making isn’t hard. It is time consuming, for sure, but anyone with a few projects under their belt could easily tackle this. It might take you a couple of months, and you may have some hair-pulling moments (either with deciphering instructions or actually trying follow them), but it’s doable. I don’t know who started this whole thing of ~omg coat-making is so hard~ (probably the same person who said that sewing with knits was also difficult. Nope! It sure ain’t!), but, ugh, just ignore them. It’s not hard. It’s time consuming, it’s expensive, and you definitely need to muslin the shit out of your pattern before you even think about cutting into your coating… but in reality, it’s not terribly different from making a lined skirt or dress. You just need to follow a few more steps. You can also totally omit the whole tailoring part, with the special interfacing and padstitching and bound button holes and all that – and then shit gets super easy (well, as super easy as sewing a lined garment can get :)). Personally, I don’t see the point in spending all that money on a garment if you’re not going to go all out and do the whole nine yards, but then again, I think tailoring is fun. So do what you will.

My first task, post-muslin, was to start cutting the plaid coating. I won’t go into detail on that process – basically the same steps as the tutorial I posted on matching plaid – and it took foreverrrr. Seriously, I think I spent close to three hours just cutting the outside fabric! WOOF. I also had to cut interfacing (I am using hair canvas, which is a hefty interfacing commonly used for tailoring purposes, such as coats!), lining, and silk organza. The silk organza was a last-minute addition – I originally wasn’t planning on underlining, although the pattern calls for it, since I don’t need my coating to be super warm in our mild winters. However, my pattern is a fairly structured peacoat, and the coating has a bit of a loose weave, so I decided to underline with silk organza to give it that nice crisp hand without adding a lot of bulk or unneeded warmth.

Vogue Coat WIP

Silk organza can be expensive, and some people like to use poly if it’s not touching the skin… but personally, if I’m going to dump all this time and money into a coat, the couple dollars in price difference doesn’t really effect my final budget. So I went with silk, since it presses nicely along with the wool.

The bonus part of using an organza underlining (or really, any underlining at all) is that you can mark directly on the underlining and you don’t have to worry about it showing through the coat fabric. I totally use a sharpie. Go ahead, judge me.

I underlined my pieces flat on my tabletop (see this tutorial if you need more info on underlining!), using silk basting thread and going alllll the way around each piece. Every piece is underlined except the facing – only because I ran out of silk organza :). I will be interfacing that piece with a fusible. This process took a long time, but it’s pretty relaxing work – perfect for grabbing the computer and watching shitty documentaries. That’s my excuse, and I’m sticking to it.

After underlining, it was time to put in the bound button holes!

Vogue Coat WIP

I was actually a little scared of this part! I don’t know why – I’ve sewn plenty of successful bound button holes in my day, and used a different technique each time. Maybe I’m out of practice, but for whatever reason, I was not looking forward to this part and I definitely put it off for like, a week. Which is shitty because bound button holes are the kind of thing that get done before you do any other work on the coat, so that meant the project was put on hold until I got my ass in gear and put those damn button holes in the front piece!

To make my button holes, I wanted to try yet another technique, so I downloaded Karen’s e-book on bound button holes and followed her instructions. Folks, these are the prettiest, most perfect button holes I’ve ever made on the first try. Seriously! If you have any concerns about doing these, or have fucked them up in the past, you should definitely check out her book. I think I paid about $3.50 for it after the rate conversion. For $3.50, you really have no excuses.

Vogue Coat WIP

I mean – look at them! I even managed to match up the plaid on that particular one, ha!

Vogue Coat WIP

As I mentioned previously, the instructions include all the steps needed for a fully tailored coat, so fortunately I don’t need to compile a list of steps and modify the pattern to suit my needs. They are a little different from the previous coats I’ve made, in that some of the pieces are sewn together before you start with the interfacing and pad stitching. Personally, I like to do all that before I assemble the rest of the coat because it makes it easier to handle, but I’m also a stickler for following instructions. So, I attached the pocket, the front and side pieces (being careful to match up the plaid, which for some reason took me like an HOUR. Shifty plaid, go die.). I attached the interfacing using long basting stitches with my silk thread. This took a while, but I also recently rediscovered all my favorite awful pop-punk and ska bands from my youth, so I may or may not have had a personal dance party in the process.

Vogue Coat WIP

Here you can see some of the details – the hair canvas, the uneven permanent basting with the silk thread, my underlining, the pressed open seams. It’s coming along, that’s for sure!

Vogue Coat WIP

Next, I sewed my twill tape to the roll line of the collar. This will help the collar keep it’s shape as a wear it, since the twill tape will dictate how it falls at the fold line. You measure your twill tape to the length of the roll line, then subtract 1/4″ from the length and ease the coating to the tape and catch stitch it down. Pretty simple, but it makes a huge difference in the finished coat.

I also marked my pad stitching lines on the collar, but I forgot to take a photo. I totally used that sharpie, too. Ha!

Vogue Coat WIP

So that’s where we are now! The coat fronts have been mostly assembled – I just need to pad stitch the collar, and it’ll be ready to attach to the back and side back pieces. Obviously, it’s not anywhere near completion, but that doesn’t stop me from pinning it to my dress form and pretending it’s a coat. Call it inspiration, or call it a kick in the pants, or whatever. Either way, I’d love to finish this by Christmas, but we’ll see!

I know the plaid looks like it doesn’t match in those pictures, but the fronts are not properly overlapped. Trust me. Three hours of cutting means all the plaid fucking matches, dammit.

What’s on your sewing table this week?

Completed: From A to Z Cardigan

2 Dec

I feel like the knitting of this cardigan took forever, but it was really only about 2.5 months. Crazy!

IMG_5547

This particular project is a little special to me because I started it right when I put in my final notice at my old job, then I got a huuuge chunk of it done while I was in Chicago, and now it’s been my saving sanity since.

IMG_5580

The main reason why I haven’t knitted it up as quickly as the others is just TIME. I never feel like I have enough anymore! I guess every adult feels that way, though, huh? 🙂 Once I realized I was not getting back those 1 hour lunch breaks (and let’s be real – working from home means NO LUNCH BREAKS EVER, EAT WHILE YOU WORK !!!! haha), I just let myself manage what I could manage. Which usually meant a full 15 minutes of knitting, at the tail end of my lunch. This equates to about 10 sleeve rounds (oh, don’t look at me like that, there were 30-50 stitches per round. very small!).

IMG_5545

Once I hit that, I finished fairly quickly! Yay for me taking my own advice 🙂

IMG_5540

Anyway, pattern talk time! This is From A to Z by Andi Satterlund. A little different from what I usually knit – the construction is bottom up, with knitted-in pockets and a few bits of intarsia for contrast, plus that monogram at the front (it’s duplicate stitch, not intarsia. FYI!). I used Valley Yarns Northamton worsted weight yarn for the main color, and the contrast is leftover bits from my Central Park Hoodie.

IMG_5542

The pockets on this cardigan are SO COOL. They are knit with the body – meaning they aren’t seamed on separately. It was hard for me to wrap my head around first (honestly, I had to email Andi and ask her for help, and she was very prompt in her response!), but once I got going it was pretty easy. The top stripes are intarsia – my first intarsia, ever, and while it’s not terrible, it could use some improvement. I still have problems with holes where the colors join (which you can’t see because, duh, I sewed those shits right up), but it’s a start!

IMG_5549

Part of the reason why this took so long was because it was sooooo repetitive. Stockinette can really take forever, especially at the bottom where it’s the widest! Once I got to separating the tops and then adding the sleeves, I finished this up fairly quickly. In comparison, anyway.

IMG_5553

(I was really horrified when I saw this pantyline picture, until I later realized that those lines are caused by the ruffles in my undies. JUST SO WE ARE ALL CLEAR)

IMG_5572
IMG_5573

I plan to wear it closed, but it looks good open, too!

IMG_5565

I made the XS and had no pattern alterations. This is what I love about Andi’s patterns – they fit me perfectly as-written! Can’t argue with that 😀

IMG_5566

I LOVE the monogram. As with my intarsia, my duplicate stitch could reeeeally use some work as it’s definitely a Monet. It doesn’t look so great up close! But from far away it’s not so bad.

IMG_5583

Ugh, sorry for all the pictures. I’m just really proud of how this cardigan turned out!

IMG_5568

Like the varsity sweater of my ~dreamz

IMG_5527

IMG_5530

IMG_5531

Told ya that dupe stitch was lacking. OOPS haha!

IMG_5528

IMG_5529

IMG_5532

Here’s the back of the pocket, in case you were curious about the construction. I created the pocket by making kfbl stitches and pulling the new stitches to a holder, then knitting the pocket lining separately, then picking up each stitch along the side as I knit the bottom of the cardigan. I hope that makes sense! It’s pretty genius, in my opinion, glad I had a chance to try it out!

IMG_5554

I’ve plumb run out of things to say, so I reckon that’s it! Ravelry notes are here. Next knit project – Owls! I have some lovely grey yarn for that and I’ve already started swatching 🙂

Oh, and just in case you were curious – my shirt says “I Listen To Bands That Don’t Even Exist Yet” (because it’s hilarious, that’s why) and I made my hairbows myself:)

One last thing – the giveaway winner! Let’s see who the random number generator picked today….

winner
winnername

Congratulations PoldaPop! Keep an eye on your mail, you’ve got a Sugar Plum headed your way!

Thanks to everyone who participated!

Review: 110 Creations: A Sewists Notebook

29 Nov

Hi everyone! Hope y’all had a good Thanksgiving (or Thursday, if you live in non-Thanksgiving land. So sorry for your loss). Mine was most excellent as I managed to eat a giant meal TWICE in once day. Before I settle into a food coma, though, let’s talk about this cute little book that I recently received!

110 Creations Book

110 Creations: A Sewists Notebook is literally, exactly what the title describes. It’s a spiral bound notebook specifically designed for us sewists – with places for notes, line drawings, etc – and there’s room for, well, 110 creations! Wanna have a look with me?

When Beth originally emailed me asking if I’d like to review a copy of the book, I’d barely finished reading her email before I had started my own reply with something along the lines of “OMGOMG OMG PLS YES GAHHHHH!!!” See, this type of book is exactly what I’ve been looking for, notebook-wise, for a few months now. Somewhere to write all my plans, notes, and LINE DRAWINGS. Sticking that shit on the wall is good and fine, but carrying it around is like a little whipped topping on the sweet cherry pie of organized sewing.

I know, I just told y’all I got this book for free, and I totally did. However, this review is totally honest, even though I am absolutely gushing. I’m not afraid to rip something apart if I think it sucks and is a waste of money. Fortunately for everyone, this shit rules.

110 Creations Book
110 Creations Book

When Beth sent me the book, she filled out the first few pages based on my F/W 2013 sewing plans. I love that she even wrote my name in the beginning, it’s like a real library addition now 🙂 Of course, a few things have changed since I wrote up that post – like, I chose a new pattern for my coat, I used a different fabric for the Lola dress and the Zinnia skirt, but those can easily be changed out in the book. I mean, what’s a notebook without a bunch of scribbles and edits and doodles, am I right? 🙂

110 Creations Book
110 Creations Book

Here you can see a blank page, and a “sample” page of how to go about filling out all the blanks. There are spaces to write all the info you need – from Project Title (if you’re more creative than I am and give you projects names that contain more than just the color+pattern, ha!), to pattern/fabric/notions, to planning notes, alterations, finishes, hems, and even a place to write notes for next time. Not to mention, there’s a little croquis so you can even draw out the garment and attach a swatch of fabric for more organization. How many times have you planned a project, but forget to execute some vital part while you were actually making it up? I always leave off something – a special hem finish, some type of decorative accent, an alteration, something. With everything clearly laid out in one place, you can easily keep track of everything that’s going in and out of your project space.

110 Creations Book

Oh, there are also a few blank pages in the back, croquis-less, so you can plan menswear, children’s clothing, bags, etc.

110 Creations Book

There’s ALSO a Pattern Catalogue, so you can keep track of what you already own (if you’re a hot mess like me with hundreds of patterns and no real system for avoiding duplicates… oops)…

110 Creations Book

… a wish list…

110 Creations Book

… and even a place to keep track of when you last changed the needle in your sewing machine!

Seriously! She has thought of EVERYTHING!

110 Creations Book

I’ve had a lot of fun writing out my project plans in this book! Here you can see my coat plans, all in one place! I love all the little spaces to write notes – it’s like filling out the most fun survey ever (surely you guys agree with me that filling out surveys is stupid fun, ha). I can also see myself tweaking this to include plans for knitwear as well. Mostly because I looove planning. Ugh, it’s just so good.

The only thing I would change about this book is to make the croquis a little lighter, so the lines of the garment show better when they’re drawn on. If the croquis was sketched in grey, instead of black, it would be perfect.

If you want to see more of this book, you can read more about it here. Also, if you’re staring down that croquis and thinking, “Yep, my body does not look ANYTHING like that!”, just know that Beth also offers books with customized figure drawings.

110 Creations Book

So here’s the fun part – Beth is offering a 10% discount on this book, as well as free shipping! The offer is good through Monday 12/2. This would be an excellent holiday gift for any crafter on your list – I totally would ask for a copy if I didn’t already have one (or maybe I’ll just end up with two. Why not!).

You can buy your copy here for $13.49 (marked down from $14.99, and again, free shipping!). There is also an ADORABLE smaller size (6″x9″ ee!), although it’s not 10% off since it’s a pretty new release.

So what do you think? Are you the type A who salivates at the thought of having ALL THE PLANS, ALL IN THE SAME PLACE? Is this book just appealing so hard to you right now?

One last thing before I peace out for the weekend – I noticed that a LOT of places are running some pretty epic Black Friday specials right now, so if you’ve got your Shopping Hat on and are looking for a few discounts to sweeten the deal, check these out –
Papercut Patterns is running 15% off ALL patterns (through Monday 12/2)
Mood Fabrics has 20% off all fabrics through end of today (through Friday 11/29)
A Fashionable Stitch has 25% off the entire shop, use the code THANKS2013 (through Saturday 11/30)
Grainline Studio is offering 20% off the entire shop, use the code GIVETHANKS20 (through Monday 12/2)
Colette Patterns has 20% off the entire pattern shop (through Friday 11/29)
Victory Patterns is 30% off all paper and PDF patterns, use the code happyanny (through Friday 11/29)
Disparate Disciplines has a fun Black Friday sale – get a free $5 gift certificate for every $10+ gift certificate you buy (through Friday 11/29; after that it’s $5 for every $20+ gift certificate you buy through Monday 12/2). She just released a new Mitten pattern that is SUPER adorable – and 15% off, to boot!
Sleuth Patterns is 30% off your entire order, use the code BLKFRIDAY (through Saturday 12/7)
Christinie Haynes is 20% everything in the shop (plus she is donating 10% of every sale to the LA Regional Food Bank! Awh yeah!), use the code thanksgiving (through Monday 12/2)
She’ll Make You Flip has 20% off your entire order, use the code LLADYBIRD20 (through 12/31) (Ok, this isn’t a Black Friday deal – just a sponsor deal! – but I thought I would mention it anyway$)

Wow, that list got way longer than I meant it to! Happy shopping, I guess, ha! Let me know if I missed any good sales – I know there’s a lot out there today!