
Hey friends! I hope everyone is doing well and staying healthy during these strange times. I think most of us are firmly in the “stay home and self isolate” camp (at least, I hope all y’all are! STAY HOME!!) (except for those who are, of course, on the front lines – thank you, thank you, THANK YOU, for your sacrifices every single day. Y’all the real MVPs <3), and while it’s a great excuse to catch up on all the projects we’ve been putting off… I know I’m not the only one who is experiencing a dip in their creative energy. It’s not surprising; stress can really do a number on your mental health and overall energy, and sometimes the first thing to go is the desire to do anything other than [barely] survive. However, for me – and I’m sure this can be said for a lot of us – being creative is what brings me joy, so it is important that I make at least a tiny effort every single day. Sometimes that means I sew, sometimes I draw, sometimes I just read. And sometimes I want to sew, but not necessarily start a new project. This is where alterations are so useful! I can get a little bit of sewing in – 20 to 60 minutes – and let my brain have a little stab at problem-solving. Plus, it feels pretty good to take something previously unwearable and make it wearable!
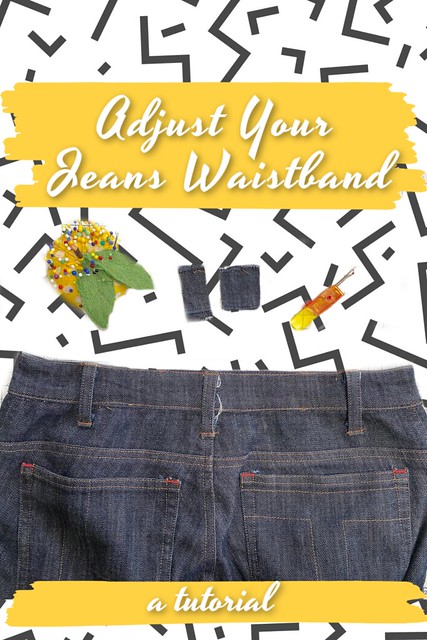
So with all that being said – today I want to share a tutorial on how to alter the waistband of your jeans! This is something you can do on both handmade and ready-to-wear jeans (I actually perform this alteration frequently for clients as one of my side-gigs). You can of course use these steps for any waistband adjustment – trousers or skirts for example – just be aware that some steps may differ depending on what you are working on.
I am sorry in advance for the quality of the photos. I originally shot these with the intention of posting them on Instagram, but while typing my caption i realized it was too long for the app! So I’m moving it here to a blog post (and I can’t re-shoot the steps since, well, all my pants fit now! LOL). For more mini-tutorials and pro tips, please follow and/or occasionally check in on Instagram – the hashtag is #lladybirdprotips
Some notes about this process – as I mentioned, this is not technically jeans-specific, as you can use this process to alter any waistband, including trousers and skirts. Keep in mind that anything you alter without belt loops will mean a visible waistband seam (which I personally thing is a worthwhile trade-off for having a fitted waistband, but you can be the judge of your own wardrobe!). If you don’t like the idea of a visible waistband seam, you can either re-cut a new waistband (I keep leftover fabric from projects specifically for this purpose!) or remove volume from multiple areas (which would make the adjustment appear more of a ~design element~ rather than an alteration).
When determining the amount of take out of your waistband, you will be tempted to overfit. Don’t do this. You want to aim for snug, but not tight. It’s hard to really articulate this into specific words, but I’ll try. A waistband should not have negative ease (unless it’s super stretchy), but should be quite close to your own actual measurements, if not slightly larger (no more than 1”, but this will vary based on body shape and personal preference). For me, I like a waistband that is fitted enough to only allow a couple of fingers, but not so snug that it gives me back fat / love handles. I know with some body shapes, this can be unavoidable – so use your best judgement, and understand that it’s totally fine if you end up needing to re-adjust later down the line. It’s a learning process, after all! Better to not take out enough and need to re-do the adjustment (think of it as another chance to practice, rather than that you did it “wrong” the first time), than take out too much and render the pants unwearable. Because of this, I tend to err on the side of a looser waistband when first sewing my pants, with the understanding that I can always make adjustments later down the line. Sometimes your fabric – especially if you are working with a rigid denim – takes a bit of wearing and washing before it really settles into its shape. A LOT of my pants start out needing a belt for the first few wears, then the waistband shapes itself over time and washing. I recommend waiting a couple of months before doing this alteration!
I know a lot of people recommend adding darts to your yoke to get a better fit, or subbing a curved waistband. While these are certainly viable solutions, I personally find a curved waistband uncomfortable (and it’s something you rarely see in RTW – most waistbands are cut straight and eased in) and I think darts in a yoke look terrible (there, I said it! Fight me!). So my method is a little different, but it works! Try it!
Now, without further ado- Altering the Waistband of Your Jeans: A Lil’ Tutorial!
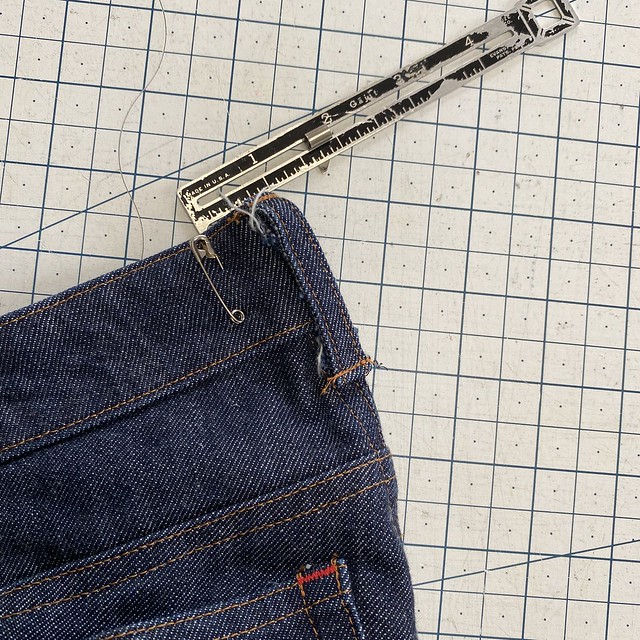
1. Try on your jeans and pinch out the center back waistband until it fits snugly. Pin this measurement (or use a binder clip), and then measure the distance from the pin to the fold. This is how much you will need to take out- in my case, 1” total. Don’t worry about doubling the measurement or anything, we aren’t mathing here! If you are fitting yourself, you may need to pinch the side seam rather than the center back.
Trying to figure out if you just need to adjust the waistband or the whole back of your pants? A good rule of thumb is if it fits everywhere *except* the waistband (like you just need a belt to snug it up, or else the waistband shelfs open when you sit down)- then you will just work on the waistband. If you’ve got quite a bit of extra space down the center back of your pants as well (like you can easily shove your whole hand down there), then you will want to also take in the center back seam in addition to the waistband. If you’ve got loads of unnecessary room everywhere in the back, you probably just cut a size too big – so take a bit out of the side seams in addition to the center back. Don’t be afraid to pin shit until you’ve got a fit that feels good!
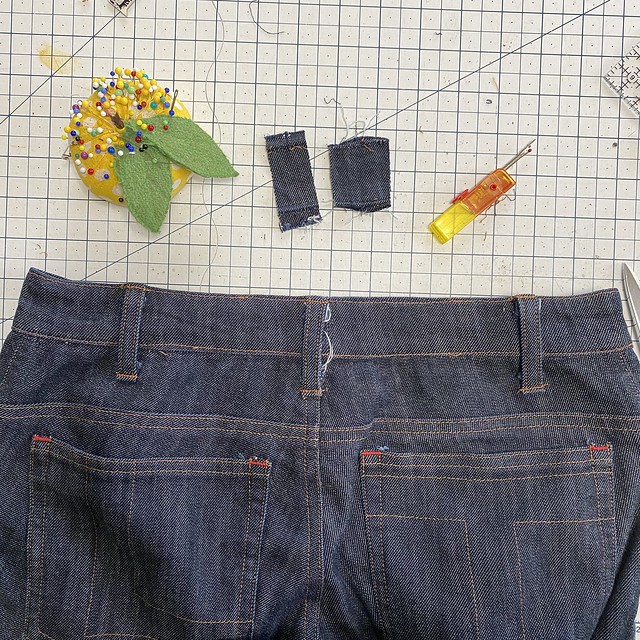
2. Ok, time to start unpicking! Completely remove the center back belt loop, and remove the bottom stitching lines from both side back belt loops.
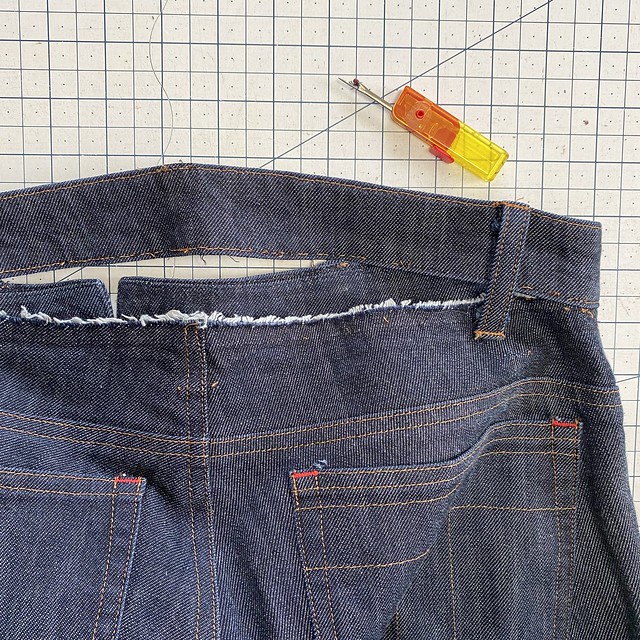
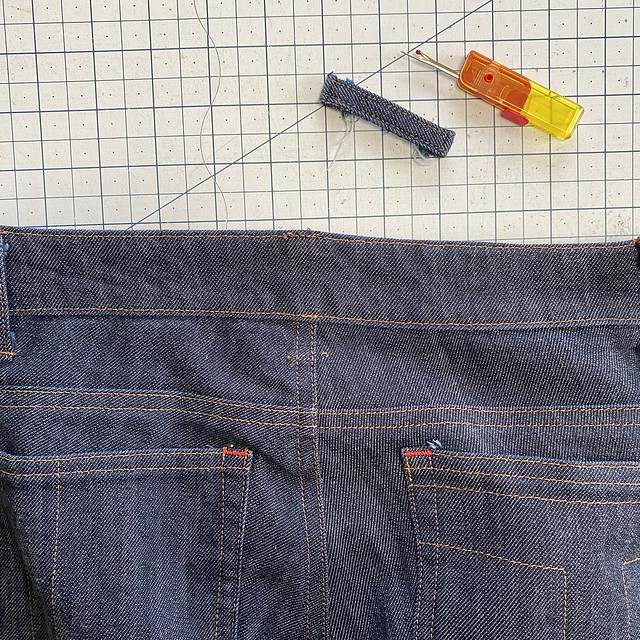
3. Remove the back waistband from the jeans, from side seam to side seam. Depending on how much you are taking out of the waistband, you may be able to get away with unpicking less (although I tend to err on the side of removing more than less, since you’ll be closing the whole thing up later anyway). I do not recommend unpicking far beyond the side seam!
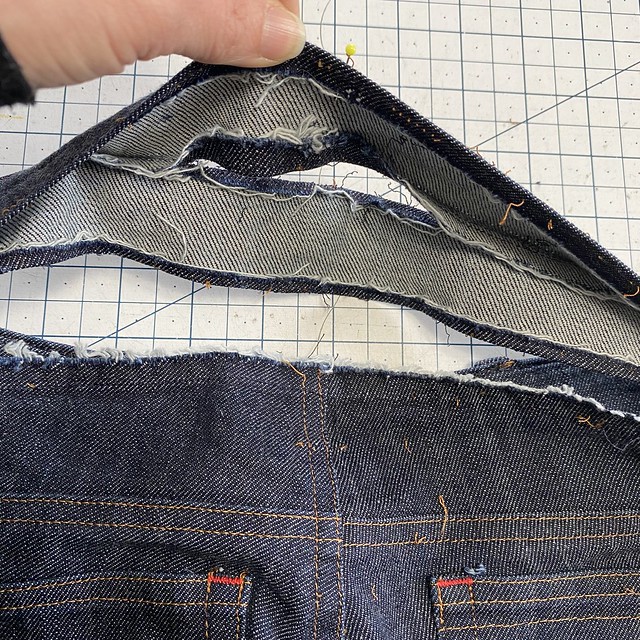
4. Remove all top stitching and under stitching from all sides of the waistband, so that you can completely separate the waistband from the facing. You don’t need to unpick completely from side seam to side seam here – 3”-5” is plenty, depending on how much you are taking out. If you are removing understitching, you will need to unpick about 1” of top stitching beyond the understitching on either end. Mark the center back of the waistband (I used a pin here).
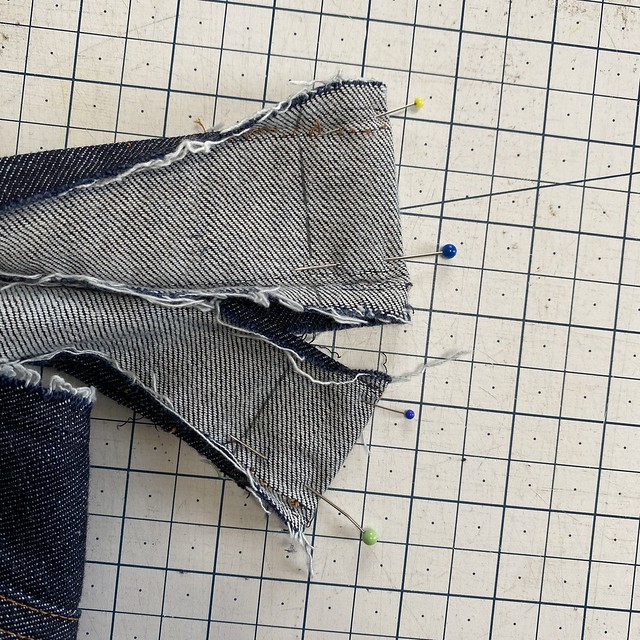
5. Fold the waistband at the center back together short ways, with the right sides facing, and open out all folded seam allowances so it is completely flat. Sew a new seam line from one end to the other, with the distance from the fold being whatever measurement you took in step #1. Repeat for the waistband facing.
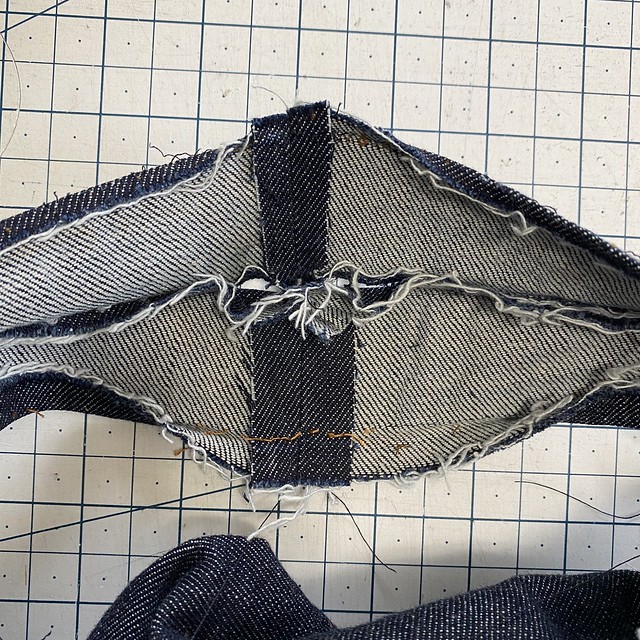
6. Cut open the fold, trim seam allowances if needed (I like to trim my facing seam allowances slightly shorter so there isn’t a bunch of bulk right at the center back), and press both seams open.
7. Sew the waistband and the facing together along the top edge, and understitch.
8. Pin the center back seam of the waistband facing to the center back seam of the pants, with the right side of the facing against the wrong side of the pants, then ease the top edge of the pants to match the new length of the waistband (no photo, sorry!). You will probably need to pull the waistband quite a bit to stretch to fit (#unintentionalpoetry), but it can be done! I took out 2” total from my waistband (1” on the fold), using a very low stretch denim cut on the cross grain, and was able to ease it in with some womanpower. If your fabric is very rigid or you need to take out a lot, you may want to unpick the top stitching from the center back seam of the pants and remove some of the excess there, grading to nothing along the CB seam line. Use your best judgement here!
10. Now sew the facing to the top edge of the pants, pulling the waistband to stretch and easing the top edge of the pants to fit (pro tip – keep the facing on top and the pants against the feed dogs of your machine. This will kept ease the excess fabric, as well as give you more control over stretching the waistband). Press the seam allowances up toward the waistband, steaming out any ease wrinkles at the top edge of the pants if necessary.
11. Now just sew everything back together! Pin the waistband on the outside to cover the previous stitching line, then topstitch along the top edge of the pants. Topstitch the waistband to the facing along the top of the waistband. Re-attach the center belt loop (which ideally will cover your CB stitching line) and the bottom of the side back belt loops. Give everything a good press and you are done!
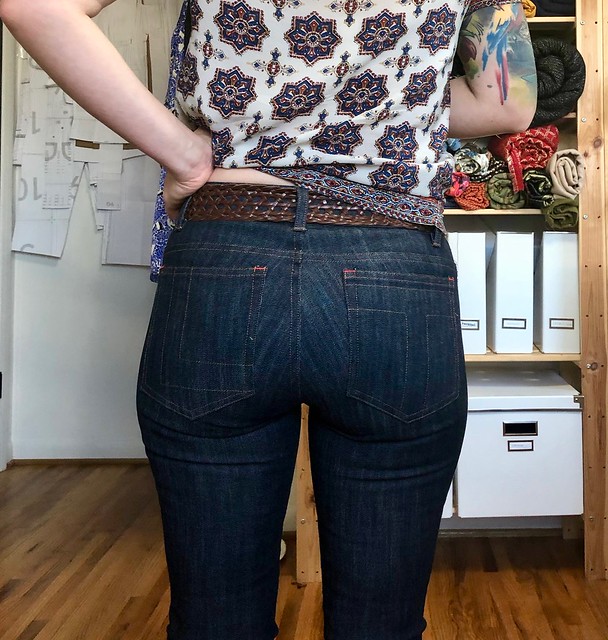
And that’s it! Honestly, this is a very easy (and very emotionally fulfilling!) adjustment – I think writing this blog post might have taken longer than actually making the alteration! I encourage y’all to give this a whirl if you have a pair of jeans that’s just a little loose in the waist – even the smallest adjustment can make a huge difference!
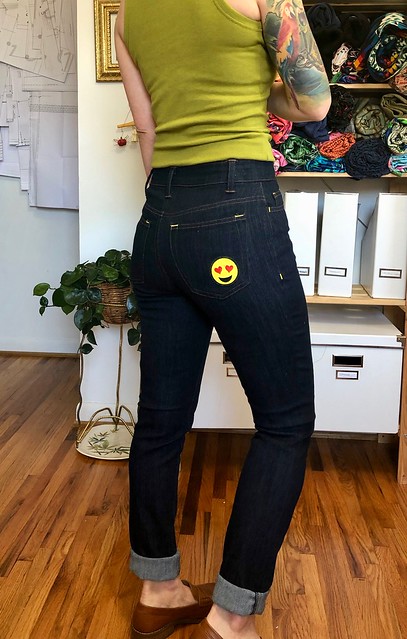
Some notes: The jeans in this tutorial are the Claryville Jeans from Workroom Social (blog post can be found here). Also, I am still offering Virtual Private Lessons if you have an alteration need that you’d like to chat about or get a little guidance with! So far they’ve been a blast!
How is everyone holding up these days? What are you doing to bring a little creative joy to your life?


Thanks for this tutorial. Although I will admit I have done the darts in the past. You are right, it does not look great.
Hey, if it works, it works! I just think this method is a little more refined than using darts 🙂
You’re timing is perfect. I was about to botch a pair of jeans (I had a whole dart plan), and now I’m inspired to do this.
Yay! No darts!!!! haha!
Fantastic as usual! Love how detailed you are. You make it seem easy
Because it *is* easy 🙂 I promise!
Thanks for the PSA!
Quite succinct and not scary at all, lol. I can do this while I STAY AT HOME & FLATTEN THE CURVE! Thanks Lauren!
Yes! Flatten the curve (while also making your clothes fit better than ever!) ❤
Fantastic! Thanks for this. I make myself jeans all the time but have a RTW pair that I love that has a huge gaping waist. It never occurred to me to take it apart and do this.
Oh yeah, then this will be an easy fix for you! 🙂
I had to do this very adjustment to all of my son’s school uniform pants. Five of them. Navy twill. It was an interesting week to get through them all tbh. Especially as I also had to take a dart out of the centre back of the pants itself as well.
I bet they all fit sooo much better now, though! And even if your son doesn’t fully appreciate it, I do 😉
Oh yeah, he was very appreciative. He definitely preferred the adjusted pants to them falling straight down to the ground. 🤣🤣
Great tutorial but the term “pin shit” took me by surprise !!
Don’t be afraid to pin shit until you’ve got a fit that feels good!
LOL I’m amazed that anyone is surprised by my use of language at this point 😀
Thanks for this! This is almost always the adjust my pants and jeans need, whether I do it or not. I’ve done darts before, but love how this looks. What do you think is the limit for this method?
I think your major limit is going to be pocket placement – if you take out too much of the center back, it will push the pockets toward the center. Sometimes you can remove them and shift them outwards, sometimes you can’t (if the fabric underneath isn’t faded, for example). In that case I’ve had luck with splitting the difference between the center back and side seams. Really, just play around and see what works!
I do this adjustment all the time for my sister in law, it works great! I agree, I don’t prefer darts but I do find that sometimes it’s necessary depending on how much I have to take them in and where the excess fabric is sitting. 1”-2” is fine, but if it’s 3”-4” I will distribute the alteration.
That said – thanks for the clear tutorial!
Yeah, it depends on the amount you take out – too much and it needs to be distributed over darts or at the side seams. But most of us aren’t taking out that much of our handmade jeans (generally) so it works well at the CB for smaller amounts 🙂
Thank you for this post. I just finished my first pair of Ginger Jeans and am frustrated by the gaping waistband. I appreciate your note about waiting a few months to see how the pants wear and ease to the body. I had already altered my waistband pattern to curve for a future pair, but I will see how pair 1 wears before making any major changes. I also wonder if I should have done more easing of the waistband CB to side seam notch. I assumed I had mis-measured and didn’t line up the sideseam notch precisely.
Yeah there should be quite a bit of easing between the side seam notch and the CB – depending on how your body is shaped. Fortunately it’s an easy fix!
Thanks so much for this tutorial! I thought it was above my paygrade but decided to try it out on a pair of pants I bought for $10 that were too big. It totally worked and wasn’t as difficult or scary as I thought! Really appreciate you taking the time to photograph and write this out!!!
Oh awesome!! yay! This comment makes me so happy! 😀
This tutorial is pure gold. Thank you.
Nice bblog thanks for posting