
I know this is going to make me sound like the biggest dork ever, but I loooove matching plaids. It’s really fun and it makes me feel super smart when I get all my lines to match up. I know a lot of people are skeered of dealing with The Plaid (or The Stripes, or the Gingham, or the Buffalo Check for that matter), but I promise they’re not hard to sew! It just takes a little prep, a bit more attention while cutting, and then you’re golden!

The first think you need to do is determine what areas need to match, and what you can get away with cutting on the bias to avoid matching. My biggest #1 tip for plaids is cut whatever the fuck you can on the bias. It breaks up a monotonous pattern, it creates visual interest, and it saves you a few matching sessions. Generally speaking, the parts that go bias tend to be pockets, the yoke and the button placket (on a shirt), princess seams (on a dress), under sleeves (on a jacket) and waistbands (on a skirt or pants), as well as anything that is a small detail (such as pocket welts).

A couple things I never cut on the bias – sleeve plackets (those shits are fiddly enough without throwing bias in the mix), shirt cuffs (tends to be too busy; just accept that the lines won’t match up all the way across and get on with your life), collars and collar stands (you can’t see the collar stand, and a collar doesn’t have to match up to the lines on the shirt if there’s a bias piece underneath it. And, again, too busy). It should go without saying, but try not to sew bias pieces next to each other. They are good for breaking up the lines, but use them sparingly!
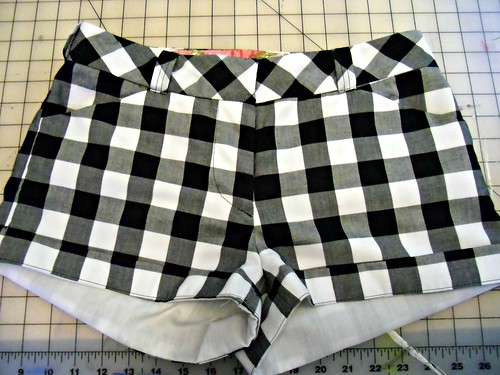
Once you’ve determined your bias pieces, now is the time to locate all the seams that need to match up. Generally, it’s not very many – for my Archer, I matched the side seams and the sleeve seams. The back yoke, pocket and button placket were cut on the bias, and the remaining pieces (collar, collar stand, sleeve placket) were cut without any matching. Sounding easy so far? Ok, let’s get cutting!
Now, just a head’s up – I don’t cut my plaids on a folded layer. I know a lot of people do it that way but I personally have never ever had any luck with that method – there is always oneeee line that is slightly off, and ugh, do not want! So I cut my shit on a single layer whenever I can get away with it. This goes the same for bias pieces (if your piece is on a fold – like the back yoke – trace it so it’s a full piece and cut it on one layer. Trust me.).

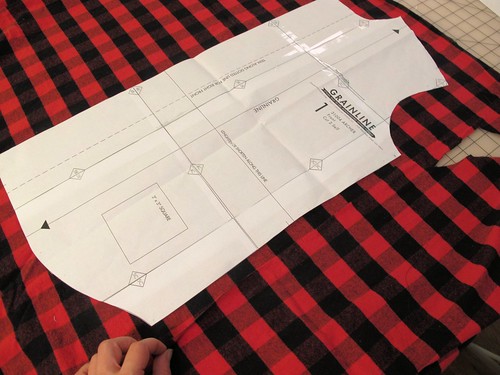
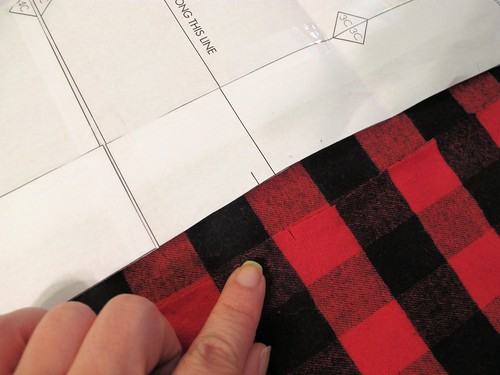
Of course, there are some pieces you have to cut on the fold – like the back for the Archer shirt. Start with this piece. Fold just the amount of fabric you need, being very careful to match up every single line (and now you realize why I cut shit on the single layer, right? This part is maddening!).

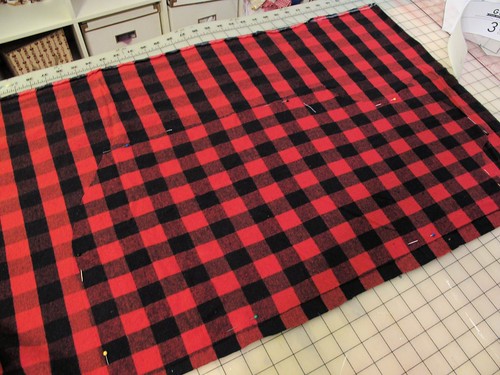
Once you’re satisfied with how everything matches up through both layers, pin the selvedge down so the fabric won’t shift. Cut out your pattern piece and clip all your notches.

For the next piece – in my case, the two front pieces – open out your fabric so it’s a single layer. Take the folded piece you just cut and open it up (hope you marked those notches, buddy!). Line up the side seam – the part that needs to match – with the plaid lines on the fabric. Get it so it’s totally even and basically plaid camouflage.
Then take your front piece and align it on the fabric so the side seams match, from underarm to hem. I know it’s hard to see the in the picture, but the piece I’m holding at the bottom is my back piece, lined up with the remaining fabric.
Make sure your notches are aligned on the same bit of plaid, and then cut your one front piece. Don’t forget to clip your notches!
Now take the piece you just cut – the front piece – and flip it over on the single layer so the pieces are mirrored with the same sides together. Take care to match the lines on every single cut edge.

If you squint your eyes and can’t see the piece you pinned down, you know it’s matched up there perfectly.
Once you cut this piece, you should have two front pieces that are a perfect mirror image of one another – this means that the side seams will match the back on both sides, as well as the center front matching (since it’s a mirror).
I’ve found this technique to be much more successful as you have complete control over the matching and cutting since you are doing everything on a single layer (so no unhappy fabric-shifty surprises when you open up the pieces). And bonus – cutting a single layer means you use less fabric. Seriously! I think I eeked that Archer out in like, less than a yard and a half of fabric. Crazy talk, y’all!
Also, I should probably point out now that once you’ve cut all your pieces, you don’t have to give any other thought to matching the lines as they should perfectly fall into place. Yay for mindless sewing that looks difficult!

Now go forth and match up those plaids like a BOSS!

Man, this shit will never not be funny to me.


This is so great, you are the smartest person in the world! Really!
Lately, when sewing my grainline Moss skirt, I tried to match up the plaid both vertically and horizontically. It really took me so much thinking, my head started to ache really bad. This only worked on the front and back center seams naturally. I then gave a d*** for all other pieces.
Oh, did you write this tutorial just for me? JK, but I have been getting up the nerve to make my black and white checked fabric for an Archer, but have been a fraidy cat about cutting into fabric. You just saved my life! xoxooxo
I really loved that. When I did my plaid trousers, I pinned and matched every single square on a folded layer until I ran out of pins: big headache but luckily it worked in the end! I will defo try your method next time…sounds like I will get my life back with your method next time I do it!
But how’d you get your sleeves to match up, gurl?! Or was that cutter’s luck? The sleeve plaid looks like it falls in line with your bodice plaid pattern.
I had the same question! The rest seems do-able (if a little fiddly), but the sleeves seem like they could go terribly wrong really easily.
Match the underarm points of the shirt and the sleeves and you’ll be good to go.
Nice! Thanks for chiming in Jen. 🙂
I match the sleeves the same way I match the rest of the shirt – lay the front bodice on a single layer of plaid, find a stripe line to match at the front of the sleeve cap, and then cut. Mirror the second sleeve to match the first and that’s it!
You may have to cut the sleeves slightly off-grain to get the plaid to match at the underarm seam, and it may not completely match where the sleeve joins the shirt under the arm. That’s fine, just ease it until it starts matching (usually around the elbow or right before. If anyone is looking at your armpit and saying your plaid doesn’t exactly match, then I’m guessing they have bigger problems 🙂 haha!
Perfect timing on this! I bought some plaid for an Archer and haven’t had a chance to cut it out yet. Thanks for the tutorial!
Aaah! Too late for me by about 2 weeks. I made a Zinnia skirt with a plaid cotton and those lines are all over the place like a rash. I messed up the pleats too which makes it look even worse so I think I will have to write that one off as a bad job and just be happy that I put in a perfect invisible zip. What makes it worse is that, everywhere I look, people are saying ‘Oh, the Zinnia skirt is just too easy’ – it even says ‘beginner’ on the pattern sleeve – yet I still messed it up big time. If I can ever look plaid in the face again I will definitely be trying your method.
Hehe I’m about to make a plaid Zinnia! What I would do is make sure those side seams match, and then cut the waistband on the bias. If you’re doing the version with the button placket, cut the placket on the bias and make sure either side of the skirt is a straight plaid line 🙂
I guess this doesn’t help your Zinnia in question, but it may help you ~envision for future plaid matching.
Oooo…I’m positively obsessed when it comes to things matching up at the seams! RTW looks SO cheap when the stripes or plaids, etc aren’t matching and are all off. HATE that.
Thanks for some ideas on how to do it – including cutting things on the bias:)
Dude, I cut EVERYTHING single layer, the yield is SO much better. You would not believe (or probably you do since you single layer cut) how little fabric you can use that way!
This is so exciting! I really want to be able to work with plaids, but I was scared. I was looking at your Archer longingly and now I a may just have to try to make one myself. Now, I just have to find the perfect purple plaid.
Brilliantly informative, I will be changing my ways with plaid from now on!
Omg! I’ve seen all your matching plaid clothes, and I’m green with envy. Now I can do the same! I’m going to try this! Thanks!
Ooh, thanks for all the tips! I’m cutting into some plaid tonight or tomorrow so this is just in time!!
I want to be a fucking boss. Let the plaids begin.
Mae
I finished sewing my Archer a week or so ago, and it’s out of a plaid as well. While I did cut on only one layer, my fabric was kind of crappy and and the grainline or cross grain was skewed. That’s what happens when you give your crappy local fabric shop that overcharges for everything another chance, I guess. It doesn’t match at all on the side seams, but across the front and the cuffs, I matched Like a Boss! I really want to make another one in (better quality) plaid, tweaking the drafting a bit, and I’m totally following your method here!
Also, I bought the Archer pattern after seeing your first version. Just so you know. 😀
Ohh, yeah, that’s one reason to be skeered of cheapie fabrics. The off-grainlines don’t look right when it’s printed with straight lines! Oh well, lesson learned I guess.
And yay, Archer! Isn’t it a fun pattern? I wear mine all the time, want to make another haha.
Great post and perfect timing! But how do you match the sleeves to the bodice? What point do you pick? Ugh!
I answered this above, but here’s a copy paste:
I match the sleeves the same way I match the rest of the shirt – lay the front bodice on a single layer of plaid, find a stripe line to match at the front of the sleeve cap, and then cut. Mirror the second sleeve to match the first and that’s it!
You may have to cut the sleeves slightly off-grain to get the plaid to match at the underarm seam, and it may not completely match where the sleeve joins the shirt under the arm. That’s fine, just ease it until it starts matching (usually around the elbow or right before. If anyone is looking at your armpit and saying your plaid doesn’t exactly match, then I’m guessing they have bigger problems 🙂 haha!
Oh, and as far as what point to pick – just make sure your horizontal lines on the bodice connect to the horizontal lines on the sleeve cap. It’s not going to match all the way, obviously, but you should have straight unbroken lines. I wasn’t even thinking about that when I cut my Archer, and you can see that one side the plaid is slightly off. The shirt is a loose enough fit where it’s sort of hidden, though 🙂
Your tips and tricks about plaids are very interesting and usefull! I’m usually not a big fan of those, yet your blog makes them interesting. So maybe I will make my first dress of plaids in the future :).
This is excellent info, thanks for posting Lauren! I have plaid/tartan and have been afraid to use it!
ohhh nooo one week too late, i think i messed by hubs shirt, oh well he’ll still love it, he’s cute like that haha
I’m about to make a Pendleton 49’er with a plaid that’s about 3 1/2″ at the widest point. I’ve never tried to match plaid at the sleeve/armhole notches with a plaid that wide. In theory, if the plaid at the notch on the sleeve is in the same place as the notch on the front armhole, I should have a nice straight line of plaid, right?
Yep! And really, you don’t need to worry about matching up every single part of the plaid at the sleeve… just make sure the prominent horizontal lines are horizontal all the way across, and you should be good 🙂
Ahh yes, nothing quite beats the feeling of satisfaction of a plaid or stripe well matched. What a great set of tips you’ve given!
I had heard before that you’re better off cutting single layers when working with plaid, but It was made out to be a big deal and I thought it all sounded like too much work when I recently lined a coat. Boy, do I wish I’d taken the extra 10 minutes out of my life to follow that piece of advice! You have managed to make it sound very manageable – thanks for the tips!
I’ve been avoiding plaid/checks for a while now because I hate it when RTW doesn’t match, so how could I do worse and be happy with it? It’ll also help when I make my dream item…. green tartan trousers.
Thank you for this wonderful tutorial. I’ve pinned it to keep forever and ever with me. Thank you, darling!
You are too funny. People have been asking me, also, about the matching. Of course, a lot of these people say that making pants is too hard, plaids are too much, etc. I usually just get an extra yard of fabric to make mine. The leftovers come in handy for lots of things.
And, I’ve been on a plaid (and all variations) kick lately.
Great post, Lauren. But can you just save me the trouble and make one for me already? I wanna match you and Landon. (Is that creepy?) x
Ah, this is so helpful! Thanks for posting!
Thank you for this awesome tutorial! Just in time for the plaid skirt I was going to make 😀
Thanks so much Lauren!! I’ve always been a bit spooked by plaids/checks – I’ll admit. But I’ve got a serious jonesing for some buffalo check shirts this winter (definitely inspired by your flannel Archer) – so this is a timely post indeed!!
Thank u for this, I need all the plaid help i can get! 😉
Lauren! You are a freaking Star! Thank you for posting these instructions. They are soooo thorough! Appreciate sister friend! I owe you a bottle of whatever you like to drink!!
Very impressive Mrs! Unfortunately I like to drink wine while I sew so I doubt I’ll ever reach this level of perfection with my tartan matching!
Thanks a lot for your great tutorial and you just posted it in time for me 🙂 I matched plaids first time ever. They don’t looks as if a boss has done them, hihi, but are surely much better than without your help. Thank you!
I have been searching for a plaid tut that looked like it would work for a blazer and I think this just might do it! Thanks
Like a boss!!! I love that comment . great job with the shirts:-)
Thanks for this tutorial Lauren! I just finished a plaid dress and could have used this tutorial when cutting out the plaids! Oh well, next time. 🙂
I know this is an old post but one tip that helps if you are have a piece that needs to be cut on the fold (e.g. a back) is to trace around one side with chalk, mark the top and bottom of the centre back, then flip the pattern piece and chalk the opposite side. That way it will be on grain and the plaids will match. Hope that makes sense.
Good tip! That’s exactly what I do, and you’re right – it keeps everything aligned up properly 🙂
Thank you so much. How refreshing.
I’m new to plaids, so Ive come to the internet half way through a project (bad habit, I know) to see if I’m doing this right…
Lile you, I think cutting single layer is the only way to go. That’s how I’ve done it so far. I thought about pins, tape, weights, extra eyes, etc… But to me it just makes more sense to see what I’m doing and do it twice.
Button packets on the bias… That I hadnt thought of, but I think I might try.
Thanks again for the great article. You really lightened my plaid-matching mood!