Tag Archives: lining

Completed: Reworking A Vintage Blazer

7 Oct

Here’s a big ol’ project I worked on for a couple months this summer that I believe warrants a whole ass blog post!
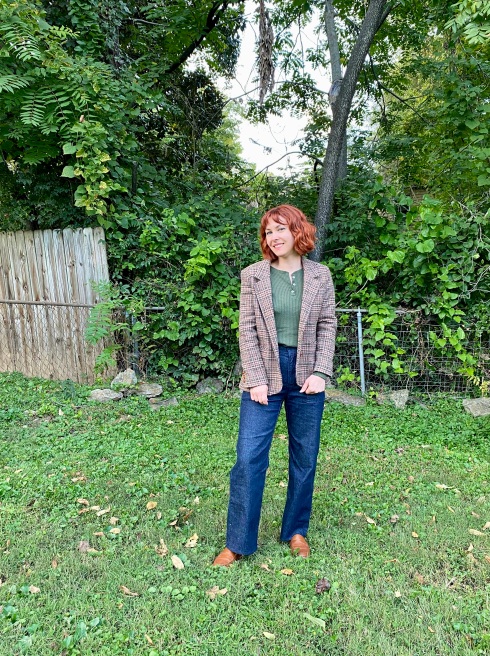
Fair warning – there are a LOT of photos in this post. I tried to narrow them down and include some collages, but… don’t say I didn’t warn you!

This project started with me wanting to make a blazer – but after months of looking and just not feeling any of the fabrics I was seeing, I decided I would try altering one instead. I’ve altered plenty of blazers, jackets, and coats for lots of clients + photoshoots over the years, but I’ve yet to really tackle complicated alterations beyond sleeve shortening and taking in the body (since, understandably, most people don’t need those kind of crazy alterations!). Over the summer, I worked closely on a photoshoot set with a master tailor here in Nashville, Loretta, who was delighted to share a lot of her trips and tricks with me. I spent some time looking for the perfect blazer for this project, and eventually found this 70s gem at the Southern Thrift in West Nashville, for a grand $5.99-

The before – click to zoom a lil’

As you can see, the before wasn’t super terrible! Obviously the sleeves were a little long and the back a bit saggy (there was no size tag in this jacket but I suspect it was probably 1-2 sizes too big for me). I also felt like the shoulders were a touch wide, and the length a little too long. But I loved the fabric and knew I could work some magic to get this bad boy to fit the way I liked!

I started with pulling off the buttons, the back belt, the cheesy patch pockets (I’m sorry, but they are SO cheesy lol and were also poorly sewn on!). I removed the entire lining from the shell and set about my alterations first. Here is what I ended up doing:

  • Narrowed the shoulders by 1/2″
  • Added shoulder pads (the original ones had disintegrated into the jacket hem! I am STILL finding old shoulder pad dust in my studio, despite regular vacuuming!)
  • Took in back arm seams 3/8″
  • Took in side back seams 1/8″
  • Took in center back seam 1/2″
  • Shortened body length 2″
  • Shortened sleeve length 3/4″

This was accomplished by lots of pinning, basting, trying on, and taking photos (so I could see what the back looked like). Usually when I do these alterations, I work with a client who is already wearing the jacket – so it’s quick and easy to pin where needed. It’s a little harder when you are doing it yourself, but still totally doable!

Adding pockets and plackets!

After finishing the alterations, I could work on the fun stuff – adding design elements to the shell! I knew I wanted to change those patch pockets out for double welt pockets. I also wanted to include sleeve vents with functioning (!!!) button holes, a single welt breast pocket, and an interior “Barcelona” pocket.

Since I had removed the patch pockets and back belt from the original jacket, I was able to carefully disassemble them which gave me some fairly good-sized pieces of fabric to work with. Adding the double and single welt pockets was pretty straightforward and easy – it’s the exact same as sewing on a piece of fabric, you just have to contend with, well, an entire jacket getting in your way haha. I used the instructions + pattern pieces from the Closet Core Patterns Jasika Blazer for the two exterior pockets, and a beloved In-House Patterns tutorial for the inner pocket. Honestly, the hardest part about this endeavor was figuring out where exactly to put the pocket! For the outside pockets, I drew chalk lines directly on the blazer and checked the proportions in the mirror until I was happy. For the interior pocket, I went a little lower than my chest after looking at loads and loads and LOADS of blazers online with interior pockets – consensus seems to be that it starts right below the welt of the outer breast pocket. Which makes sense, as you don’t want whatever you put in that pocket to sit right on top of your breast. Well, I don’t want that anyway haha.

For the sleeve placket – well, that was a fun experience! The original jacket had no placket – just buttons sewn straight on a plain sleeve. Loretta had shown me how to shorten a jacket sleeve with a working button placket, which is the same process as adding a placket. You just sew fabric to the edge to create a placket extension; all the seams are hidden when it is finished. I had no idea shit would be that simple. I think the scraps I used came from the back belt. For a step by step, I followed these directions for sewing a back vent (a back vent and button placket on a jacket are essentially the same – except there is no exposed line of diagonal stitching) from Waffle Patterns. The hardest part of that was getting the corners to miter correctly haha. Wish I could give y’all some tips for that but TBH I just used a lot of trial and error and unpicking until it was right.

I also decided to change out the lining, after determining the original lining – while a really beautiful soft pinkish beige – was just too smelly and discolored. I took the lining apart and used the pieces to cut a new lining from a piece of silk charmeuse that I already had in my stash (here is a blog post I wrote a few years ago about replacing a lining in a coat, which is the same process I used!). I made sure to add my alteration adjustments and sleeve plackets to the pieces, then sewed the whole thing together and bagged it in. I did hand sew at the sleeve button plackets and near the front facing (you can sort of see the pins in the above photos), but the rest was done by machine.

After THAT was done (whew!), I added some fun finishing touches 🙂 I sewed buttons + button holes on the sleeve plackets (using the original buttons, cos, well, I like them!), added a leather hanging tab + label to the back facing – oh, and I made a sweet wool felt embroidered undercollar!

To make the undercollar piece, I cut some Swedish tracing paper and traced it around the undercollar, trimming and refining until it was the exact same size. Then I cut it from wool felt (which I ordered the The Felt Pod); my piece was wider than the felt so there is a seam in the center. Then I embroidered it by hand with a simple chain stitch, and attached it directly over the existing undercollar using embroidery floss + a blanket stitch. It’s not visible when the collar is down, but it is a fun surprise when flipped up!

I actually finished the whole thing about a month or so ago, but didn’t get around to taking photos until this last weekend. I’ve said it before, and I’ll say it again – taking photos is the part I hate most! So, like, enjoy or something 😛 I’m pretty sure my neighbors did considering that came outside RIGHT WHILE I WAS SHOOTING THESE dear lord can you see the fear in my eyes?

And if you don’t want to look at my mug (it’s cool, I don’t want to look at it either), here are some dressform shots:

I think that’s about it for this project! I had a lot of fun digging into this one and feel extra confident in my alteration skills as a result. Funnily, the original jacket isn’t very fancy – it’s actually pretty cheaply made as far as jackets go. The wool is a blend, and there wasn’t much tailoring inside the shell apart from a bunch of interfacing. Spending so much time + effort (and silk lining lol) was basically the equivalent of polishing a turd – but, you know what? I love how it turned out, and I learned a lot during the process. I don’t know if such an involved reconstruction would be worth it if you were paying someone else to do it – but for me and my sewing practice? It was perfect. I was only out about $10 for this project (the jacket + wool felt, as I already had the lining in my stash) which we can all agree is WAY cheaper (and faster!) than making the dang thing from scratch!

I will always love making garments from their humble fabric beginnings, but truly, you can’t beat a solid reconstruction (or even just a couple simple alterations to an otherwise great + previously-loved garment!). This might be the most sustainable I get when it comes to sewing, ha! How about you? Does this inspire you to give it a try?

Giving New Life (+ Lining) to An Old Coat

14 Mar

Hi everyone!

Wow. It’s been a minute, huh? Many, many thanks/hugs/appreciation for everyone who reached out regarding my dad. Every single comment, email, text message, card – I read every single one of them. While I can’t possibly reply to every single one of them, I do want to thank all of you, as I found them all so comforting. I feel like I am saying this way too much lately, but y’all truly all are the best.

As it is, it’s time to jump back into real life. Actually, I did that pretty much the day after the funeral – I went to Leesburg, VA to teach a workshop at Finch Knitting and Sewing Studio, which was really wonderful and a very welcome distraction from what I had been dealing with the week prior. The next weekend, I flew to Brooklyn, NY to teach my Jeans Making Intensive and Pants Making Intensive classes at Workroom Social. I just got home about a week ago, and have spent this time trying to catch up all the things I’d set aside while I was gone- boring adult-y things, like work and cleaning my much-neglected apartment. I’ve finally gotten a chance to get back into my normal life indulgences – like sewing! – and man, it feels good to be back!

Before I get into the post, I did want to announce my next upcoming workshop in May! I will be traveling to Hyattsville, MD to teach another workshop at Three Little Birds Sewing Company May 13th and 14th (and also a meet and greet / project gossip the evening of May 12th, because wine). This is like all the other workshops I do (other than the pants-specific ones in Brooklyn, which are also Workroom Social specific ;)) – you get to choose whatever project you want to work on that weekend! Whether you want to make a lined dress, a fabulous pair of jeans, a new winter coat, your first bra, whatever – I’ll be there to support ya! And if you don’t have a particular project that is screaming for support, can I just say that this is also a great excuse to make your sewing a little more social for the weekend 😉 I always have such a great time running these workshops, and I’m so excited to do it again!! You can read more about the workshop here, and also sign up! It’s going to be an awesome weekend 😀

Ok, now for the post!

Re-Lining a Coat - before

This is a bit different that what I usually post about – it involves repairing an existing garment, rather than making a new one from the start. I think most of us have announced at some point or another that we’d rather make a new piece than alter or repair one that needed it. I know I’m guilty of it! But lately, I’ve been making a bigger effort to reduce waste whenever I can, and repairing garments that need it is a great place to do this!

I bought this coat at Banana Republic when I was 19. I remember being super proud of the purchase – it was one of the first “nice” things I ever bought with my own money (well, and the help of some gift cards). It’s not the nicest thing I own – and I can certainly produce better garments out of my own sewing room today – but it’s followed me around for the past 12 years regardless. I love the color and I love the way it fits me. It has certainly seen it’s share of wear over the last decade, though – the lining was shredding in several places (I can specifically vouch that the lining at the hip was probably torn by my studded belt – YES, THAT’S HOW LONG I’VE HAD THIS DAMN COAT), and I recently ripped a huge hole in the sleeve lining while trying to put it on. I realized that I would either need to replace the lining entirely, or just get rid of the coat. Y’all all know that I am pretty much always up for a challenge, so I decided to give it a shot! Worst thing that could happen was that I’d ruin a coat – which, admittedly, was already kind of halfway ruined anyway.

Re-Lining a Coat

Re-Lining a Coat - before

Re-Lining a Coat - before

Here you can see some of the places the lining was tearing. The lining was also discolored, especially under the arms, and wearing very thin in several places.

I actually planned this project last year, in December. I waited until I could go to Mood Fabrics in NYC and pick my replacement lining fabric in person – the green wool is a really unique shade, and I wanted to try to match or coordinate with it as much as possible. Spoiler, I never did find a perfect match to the green (not surprised), but I found a print that I adore, so there’s that!

Re-Lining a Coat - process

This is the silk that I went home with me – it was with the rest of the silk prints on the 2nd floor. I am not sure what type of silk it is specifically – it has a heavy, fluid hand just like silk charmeuse, but it is slightly textured, almost like a twill. I suspect it may also be a blend, because it didn’t take to pressing as well as I would have liked. I bought 2 yards (after consulting with the guy who cut my fabric and going by his suggestion), which ended up being plenty. I actually have leftovers – matching silk top, anyone? 🙂

After I bought the lining fabric, this project had to sit on hold for about 3 weeks while I went to Egypt. I haaate leaving stuff half-finished if I’m going to be gone for longer than a weekend, and this project I especially didn’t want to have a lapse in, since I was kind of winging it. So I didn’t actually start until the end of January, but fortunately it did not take very long!

I should confess: I had every intention of turning this post into a tutorial on how to re-line a coat. I started with a bunch of photos, but as soon as I got to the sewing part – guys, it’s pretty much impossible to photograph these steps. Plus, every coat is a little bit different in how it’s constructed. So this post is more of a loose guide if you’re considering doing this yourself, and I have linked to the resources that I found useful when I was in the throes of my repair. Also, I should point out that I have made several lined coats at this point, so the process isn’t really that different from sewing a coat and then adding the lining. If you have sewn a lined coat, you can totally handle this. If you have yet to hit this milestone in your sewing practice, maybe wait before you tackle this project 🙂

Re-Lining a Coat - lining removed

The first step is removing the lining from the coat entirely. This part wasn’t difficult, but it was annoyingly tedious. I knew I didn’t want to deal with the drama of drafting a lining, so I needed to keep the lining pieces as intact as possible in order to use them as my pattern pieces. I removed the lining from all the way around the facing of the coat, being sure to take notes and photos of anything that I might need to know when I was putting it back in – such as the seam allowances used, how the back pleat was sewn in, stuff like that. This was the #1 reason why I waited to start this project – I knew I’d forget everything while I was in Egypt!

Re-Lining a Coat - lining removed

Pulling out lining can be kind of interesting though – you get to look into the guts of the coat and see how it was put together! I’m always fascinated to see how RTW does things, as opposed to what the home sewer does. For example, they sewed small rectangles of the lining into the seam allowances where one traditionally puts thread chains (such as under the arms). Then, the rectangles were sewn directly to the seam allowances of the outer, eliminately the time it takes to make a thread chain and attach it. I thought that was pretty cool!

Re-Lining a Coat - lining removed

Another thing I found interesting was the tailoring done on the coat. It’s actually pretty nicely tailored (with fusible interfacing), considering its just a coat from Banana Republic.

Re-Lining a Coat - process

After I had the lining out of the coat, I carefully separated all the pieces and marked which one was which. I flattened them with an iron and marked grainlines. I will be honest here – I used a similarly-styled jacket pattern I had in my stash to figure out where the grainlines were. They might be slightly off, but eh, it’s a lining. I could NOT for the life of me see where the grain was on the actually pattern pieces, and the fabric was so delicate that is just kind of disintegrated when I tried to rip it.

One thing I will point out when you are marking your pattern pieces – it is really important to mark the sleeve front and back, and also where the sleeve cap hits the shoulder seam. You can snip directly into the seam allowances before taking the pieces apart – presto, notches 😉

From there, you just lay your pattern pieces on the fabric and cut them out. Remember, they already have seam allowances – no need to add those.

I should also point out that I did not pre-wash my silk before cutting it. Since the jacket outer is wool/polyester, it is dry clean only. Which means this silk will never hit a washing machine, so I didn’t bother to wash it! I DID wash the leftover piece after I finished the coat, and it changed the texture of the silk a bit. More on that if I ever get around to sewing that piece up haha.

Re-Lining a Coat - process

Next, you assemble the lining to make a lining-coat. Easy stuff!

Ummmm so here’s where I stopped taking pictures haha. I had to figure out how to get the lining into the coat shell, and not a single one of those steps was remotely photogenic 😉

You have two options when putting the lining in- One, you can do it the old school couture way, and hand sew it around the entire perimeter of the facing. This is definitely the easier of the two options, but it’s more time-consuming. The second option is bagging the lining into the coat – sewing everything together at the hems and pulling the coat through a hole in the lining. This step is much more fiddly – you have to set everything up properly so you don’t twist the sleeves or whatever, and it totally looks like a hot mess until the very end. Also, I realized this a bit late in the game – but it’s reaaaally finicky to sew the lining to the facing at the neck (where the collar is). The layers are super bulky and you don’t have much of a seam allowance to work with. I made it work, obviously, but I did end up un-picking out my stitches a few times.

If you need help bagging a lining, this tutorial on bagging a lining from Grainline Studio is great. For the back vent, I watched this YouTube video from FashionSewingBlogTV on sewing a lining to a vent.

Re-Lining a Coat - process

So, I bagged my lining, pulled everything from a hole in the sleeve, and then went back on the inside and attached the lining to the shell with thread chains (I wasn’t even gonna try those weird lining rectangle things haha). Then I pressed everything really well, and attached new buttons. Oh, and I sewed the labels back on too – the original BR one, and one from Mood Fabrics (the sizing and fiber info tag is underneath the Mood tag, fyi). It’s kind of a collab coat now, you know?

Sooooo, drumroll pls…

Re-Lining a Coat - after

Yay!!! I just love it so much 🙂

Re-Lining a Coat - after

Due to the new layer of silk, the jacket is actually much warmer now (the old lining was polyester). Always a plus!

Re-Lining a Coat - after

Re-Lining a Coat - after

The colorful new lining makes me so happy!

Re-Lining a Coat - after

Re-Lining a Coat - after

Re-Lining a Coat - after

Re-Lining a Coat - after

Re-Lining a Coat - after

I also replaced the buttons, with something similar but a little more refined. These buttons are from Pacific Trimming, which I also picked up while I was lining shopping. I reallllly wanted to do self-covered buttons, but I could not find anything that remotely matched this green. So I went with tortoiseshell, although these are shank buttons (the original buttons are flat).

Re-Lining a Coat - after

I really enjoyed the challenge of working on this project – in fact, taking things apart and putting them back together was how I originally taught myself how to sew, so it was a cool throwback to revisit those roots. I like doing things that force me to slow down (and/or walk away) and think, and this was definitely one of those. And hell yeah, this coat is finally back in rotation! Feels good!

Note: The silk fabric used in this post were purchased with my monthly Mood Fabrics allowance, in exchange for my participation in the Mood Sewing Network.

Completed: Plaid Rosarí Skirt

29 Nov

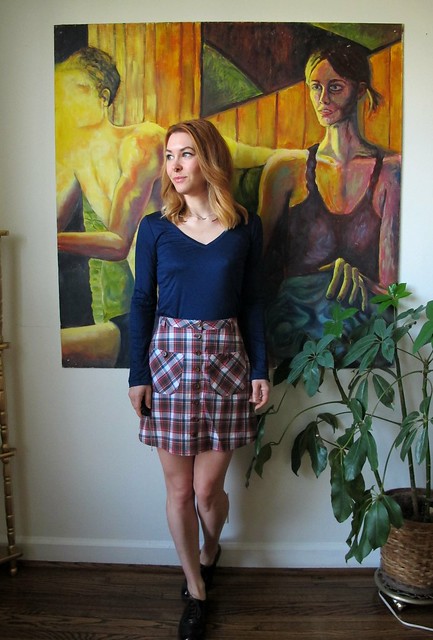
Y’all. I love this skirt pattern.

Plaid Rosari Skirt - front

I’ve made it in corduroy, stretch twill, and Cone Mills denim, and I’ve had my sights on making a plaid version as well. Nothing like channeling your inner Cher Horwitz with a plaid mini amirite? This pattern is especially great for plaids as it doesn’t involve a lot of matching – just center front, center back, and the side seams – and you can add some ~visual interest~ by cutting the pockets and waistband on the bias.

If you didn’t already figure it out, this is the Rosarí Skirt from Pauline Alice Patterns. I made the mini version in a size 34, and added curved front pockets and a lining (this is not covered in the pattern, but it was pretty easy to figure out).

The plaid fabric is from Mood Fabrics. It is listed as a cotton flannel, but I think “flannel” is a bit of a stretch. It is VERY slightly flanneled if you look at it really really closely, I guess. Honestly, it just looks like a plaid shirting to me. It’s definitely cotton, just the flannel part isn’t exactly accurate. While I had visions of a cozy flannel skirt when I ordered the fabric, I think the smooth cotton works just fine. Probably makes it look a bit less like pajamas, ha. With that being said – if you are wanting to order any of this fabric, definitely get a swatch first!

The lining is Bemberg Rayon that I had in my stash (I’d say it was a miracle that I had a perfect color match, but ha ha have y’all seen my stash?), and the buttons are also old stash (I think they are originally from the flea market, though, probably).

Plaid Rosari Skirt - front

Plaid Rosari Skirt - side

Plaid Rosari Skirt - side

Plaid Rosari Skirt - back

Sewing this up was really easy and mostly uneventful, considering I’ve already made this pattern so many times. Like I said, I added a lining so that I could wear this with tights – the one thing that bums me out about my other Rosarí skirts is that they stick to tights and ride up (generally right in between my legs, which is sooo attractive I know) (I ended up making a teeny half-slip out of stretch silk charmeuse to wear with those – so problem solved! This is the tutorial I followed, FYI!). To add a lining, I cut the lining from the front and back pattern pieces, and sewed them together like a lining skirt. Then I attached them to inside along the top edge of the plaid pieces (also assembled together), and then treated everything as one piece. The lining is basically flat-lined to the outer fabric, except the side and back seams are enclosed. The front button band and hem are turned to the inside as per the pattern and topstitched down.

The only part that was eventful about this sewing – the fit! I was nearly finished – like, button holes sewn in and marking button placement nearly finished – and I tried the skirt on to mark those damn buttons. That’s when I realized that it was too tight – way too tight. I could get it to close, but it was less “cute plaid skirt” and more “sausage stuffed in a casing,” if you know what I mean. I couldn’t figure out why it was too small – did I gain weight? did I fuck up the seam allowances somewhere? – because, again, I’d made this skirt several times, all in the same size, and THOSE still fit just fine (I went in my closet and tried them all on to be sure haha). Then I threw it on the cutting table and plotted how I was going to fix this mess.

Well, first of all – I figured out why it was too small. See, all 3 previous versions were made using stretch fabric. Due to the addition of the lining, this skirt didn’t have any give to allow for a little more room (actually, the fabric itself wasn’t very stretchy either, so – that factors in as well). I probably also fucked up a seam allowance somewhere, idk.

To fix the skirt and actually make it wearable, I removed the waistband entirely. I let out the side seams until the skirt fit comfortably (I think I ended up with 3/8″ seam allowances – I don’t remember), in both the outer and the lining. Then I cut a new waistband and reattached everything. As you can see, it now fits. Success!

Here are a lot more photos. Sorry about that giant-ass wrinkle on the right, by the way.

Plaid Rosari Skirt - on dressform

Plaid Rosari Skirt - on dressform

Plaid Rosari Skirt - on dressform

Plaid Rosari Skirt - flat

Plaid Rosari Skirt - flat

Plaid Rosari Skirt - flat

Plaid Rosari Skirt - flat

I guess that’s it for this post! Moral of the story – even if you’ve made a pattern numerous times, always ALWAYS check that fit as you go! Your fabric can really change the fit of the garment. I generally do this when I sew, but the ONE time I did not, I ended up regretting it!

Plaid Rosari Skirt - front

Completed: The Gabriola Maxi Skirt

28 Apr

Guys. I love maxi skirts. Love love loveeee. I’ve always been told that short gals aren’t supposed to wear them, as it’s supposed to make us look shorter… but you know what? I’m short. The length of my skirt is not going to change the fact that plenty of people can use the top of my head as an armrest. I’m ok with being short, so I proudly wear my maxis.

Apart from the silk crepe de chine Anna maxi I made last year, though, there haven’t been a lot of maxis in my handmade radar these days. Which is a damn shame, considering how FUN they are to wear (speaking of that Anna maxi… I wore it to prom this year. Yes, you read that right.). There are a few sewing patterns lurking around, but most are either designed for knits or in the shape of a damn tube. So you can imagine that I was pretty excited when Sewaholic came out with a maxi skirt pattern. PRAISE JESUS, the maxi of my dreams!

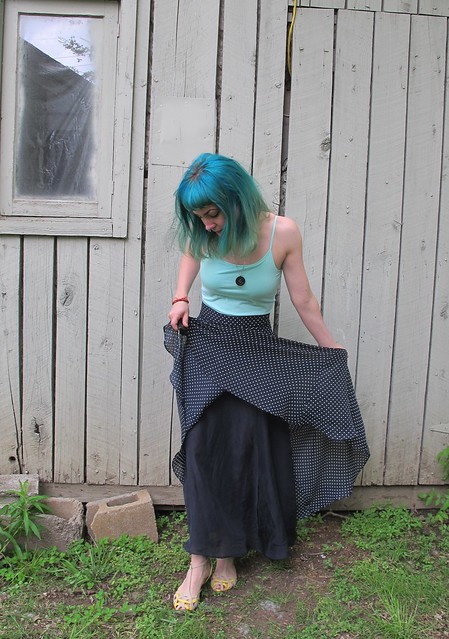
Gabriola Maxi Skirt

I know I can always count on Tasia to dream up some classic pattern with a twist – and this one is no exception. Gabriola is designed with angled panels that sit closely at the waist and hip, flaring out to a dramatic skirt that hits the floor. No straight tube here! The pattern is pretty simple to construct, assuming you are using a stable woven fabric.

My particular rendition was not so simple. It took me a good two weeks to get this completed, and I considered punching a lot of things in the process. It was TOTALLY worth it, though – look at that floaty drape! Yeeeeahh!!!

Gabriola Maxi Skirt

I based this skirt off another maxi I owned and wore the shit out of for a good two years. The maxi in question was a vintage skirt I found at the thrift store (or, rather, Lauren found and generously let me have it before I ripped it out of her hands). I LOVED that skirt. It was silk georgette, lined in sheer polyester – it was so floaty and fun to wear, and it went with practically everything in my closet. Unfortunately, it doesn’t fit me anymore – and I had no intentions on trying to resize it to fit. I’d rather just give the skirt a new home and make another one! So that’s exactly what I did (and the skirt is quite happy in it’s new home, thanks for asking ;)).

I found this fabric while I was in NY… it’s one of the few pieces that I *didn’t* buy from Mood Fabrics, ha! It was from Fabrics For Less, and I paid $5 a yard for it. It’s polyester georgette, and quite sheer, so I also grabbed some navy china silk lining from my good pal Sam at Chic Fabrics.

Gabriola Maxi Skirt

Like I said, sewing this skirt up was a BEAST. I technically had to sew two, since it needed a lining. The polyester georgette was not difficult to sew – the crepe texture gave it some good grip, so it didn’t slide around much. It did fray like crazy, though, and it resisted pressing. I had to use high heat (my iron has a shoe, so poly can totally handle that shit) and hold the seams open with a clapper while they cooled. Even then, it doesn’t look completely pressed. Wah.

Gabriola Maxi Skirt

The china silk was the real hardass of this project. I’ve said before that sewing china silk handles about as well as sewing butterfly wings (or… so I’d imagine) and I 100% stand by that statement. That shit is sooo difficult! It’s thin, it’s lightweight, and it wants to go flying everywhere except under the presser foot at the seam allowance. On the flip side, it does press quite well 🙂 So, sewing the lining was rough. Not rough enough for me to swear off china silk forever – it is a great lightweight lining and it feels AMAZING – but hey, don’t make your first Gabriola out of china silk. Just don’t.

Gabriola Maxi Skirt

I also french-seamed every single one of those long skirt panels. Again – this is the skirt that took forever. Again – totally worth it.

Gabriola Maxi Skirt

Gabriola Maxi Skirt

As far as the rest of the construction – nothing groundbreaking here. I sewed the size 0 and cut about 5″ off the finished length. I did not french seam the yoke pieces; just pinked the edges and pressed them open – since the skirt is fully lined, you don’t see any raw edges. I guess I could have done that with the panel seams too, instead of essentially sewing them twice, but whatever. I finally got to bust out my sheer fusible interfacing for the waistband (I used black), and I love how it adds stability without a bunch of bulk. I swapped out the standard zipper for an invisible zip, and I closed the top with a hook and eye. It’s far from being my best make – the fabric shiftiness, combined with the polyester’s inability to press, makes for some wonky seaming on my part – but it’s pretty lovely nonetheless and I am totally happy with how it turned out.

Gabriola Maxi Skirt

I hemmed it a little on the short side, just so I can walk up stairs without tripping.

So… do you want to see the swish? YES YES YOU DO.

Gabriola Maxi Skirt

Gabriola Maxi Skirt

GOD, I love it!

Gabriola Maxi Skirt

Here you can better see the yoke detailing. Unfortunately, I can’t get rid of that weird wrinkle at the point – it’s not a pucker, the fabric is completely flat. It’s just wrinkled. No amount of steaming/clapping would get it out. You don’t notice it so much when I’m wearing the skirt, so that’s good!

Gabriola Maxi Skirt

The invisible zip went in flawlessly.

Gabriola Maxi Skirt

The instructions for this skirt do not include adding a lining. Here’s what I did for my lining:
– Sewed the lining the same as the skirt, minus the waistband
– After inserting the invisible zip into the skirt, I sewed the right side of the lining to the zipper tape (remember sewing down the facing in my invisible zip tutorial? Same thing, except no need to worry about turning the corner at the top since the waistband hasn’t been attached yet).
– Flip the whole thing right side out and baste the top of the lining to the top of the skirt
– Attach the waistband as usual
And voila! Fully lined with a clean finish and no hand sewing! Yay!

Gabriola Maxi Skirt

Here she is in all her glory 🙂

Gabriola Maxi Skirt

I’m so glad I was able to replace my beloved navy/white polka dot maxi skirt with something that actually fits now! Y’all will be seeing a LOT of this during Me-Made-May! Also, I am totally digging this pattern. Thinking about making a super trendy version with some silk georgette and a shorter lining. We’ll see!

Oh! One more thing before I forget-

Workroom Social is hosting a Pop-up studio in Manhattan May 2-4! There are 3 sewing workshops that will be running (hosted by some of my favorite NY ladies – Sonja, Oona and Fleur!), plus a sit-and-sew with Jennifer, plus a big ol’ sewing swap/meet and greet party (with proceeds going to Rational Animal).

It is my understanding that y’all in Manhattan don’t like to trek out to Brooklyn (and vice versa), so now you have no excuses – Brooklyn is coming to you! 😀 If you are in the area, you should definitely GO – because I’m already totally jealous and butthurt that I can’t be there too 🙂 You can get all the info and RSVP here!