Tag Archives: review

Review: 110 Creations: A Sewists Notebook

29 Nov

Hi everyone! Hope y’all had a good Thanksgiving (or Thursday, if you live in non-Thanksgiving land. So sorry for your loss). Mine was most excellent as I managed to eat a giant meal TWICE in once day. Before I settle into a food coma, though, let’s talk about this cute little book that I recently received!

110 Creations Book

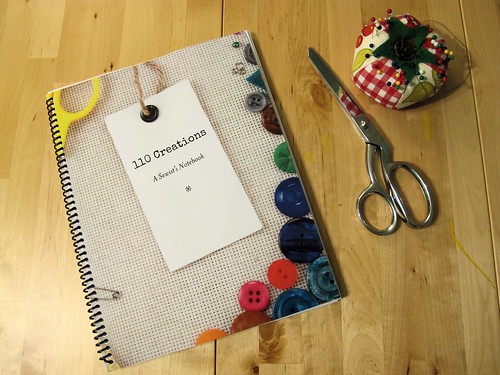
110 Creations: A Sewists Notebook is literally, exactly what the title describes. It’s a spiral bound notebook specifically designed for us sewists – with places for notes, line drawings, etc – and there’s room for, well, 110 creations! Wanna have a look with me?

When Beth originally emailed me asking if I’d like to review a copy of the book, I’d barely finished reading her email before I had started my own reply with something along the lines of “OMGOMG OMG PLS YES GAHHHHH!!!” See, this type of book is exactly what I’ve been looking for, notebook-wise, for a few months now. Somewhere to write all my plans, notes, and LINE DRAWINGS. Sticking that shit on the wall is good and fine, but carrying it around is like a little whipped topping on the sweet cherry pie of organized sewing.

I know, I just told y’all I got this book for free, and I totally did. However, this review is totally honest, even though I am absolutely gushing. I’m not afraid to rip something apart if I think it sucks and is a waste of money. Fortunately for everyone, this shit rules.

110 Creations Book
110 Creations Book

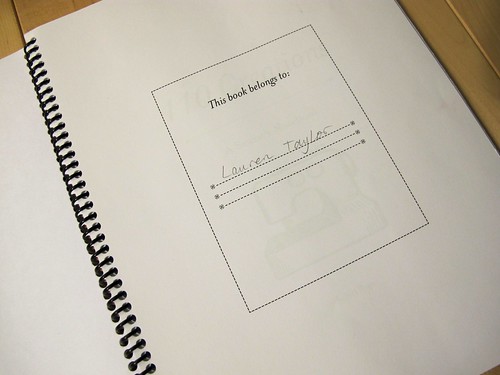
When Beth sent me the book, she filled out the first few pages based on my F/W 2013 sewing plans. I love that she even wrote my name in the beginning, it’s like a real library addition now 🙂 Of course, a few things have changed since I wrote up that post – like, I chose a new pattern for my coat, I used a different fabric for the Lola dress and the Zinnia skirt, but those can easily be changed out in the book. I mean, what’s a notebook without a bunch of scribbles and edits and doodles, am I right? 🙂

110 Creations Book
110 Creations Book

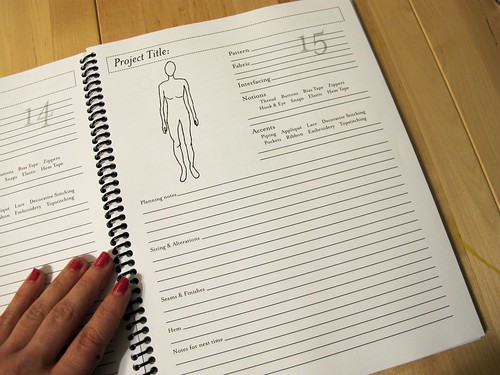
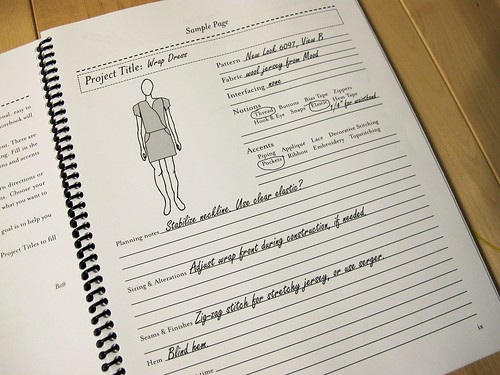
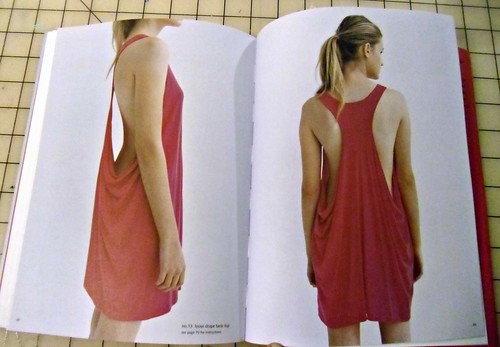
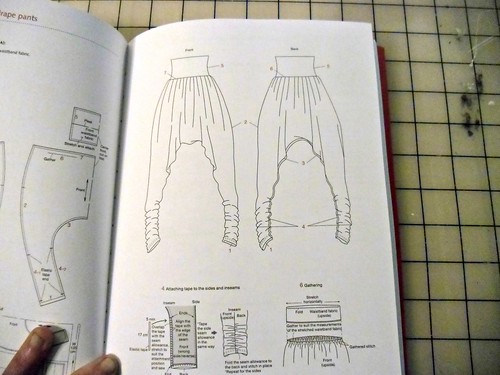
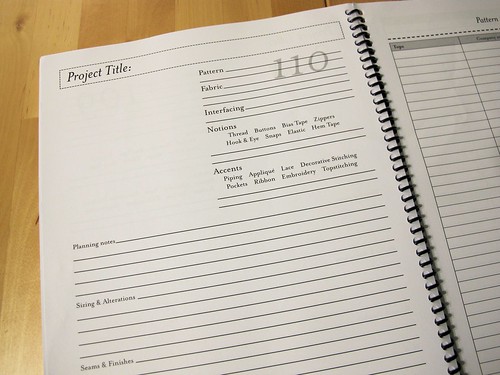
Here you can see a blank page, and a “sample” page of how to go about filling out all the blanks. There are spaces to write all the info you need – from Project Title (if you’re more creative than I am and give you projects names that contain more than just the color+pattern, ha!), to pattern/fabric/notions, to planning notes, alterations, finishes, hems, and even a place to write notes for next time. Not to mention, there’s a little croquis so you can even draw out the garment and attach a swatch of fabric for more organization. How many times have you planned a project, but forget to execute some vital part while you were actually making it up? I always leave off something – a special hem finish, some type of decorative accent, an alteration, something. With everything clearly laid out in one place, you can easily keep track of everything that’s going in and out of your project space.

110 Creations Book

Oh, there are also a few blank pages in the back, croquis-less, so you can plan menswear, children’s clothing, bags, etc.

110 Creations Book

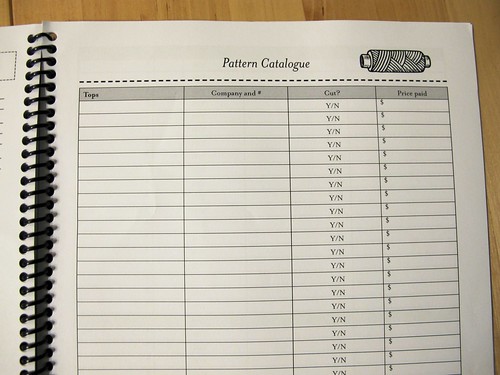
There’s ALSO a Pattern Catalogue, so you can keep track of what you already own (if you’re a hot mess like me with hundreds of patterns and no real system for avoiding duplicates… oops)…
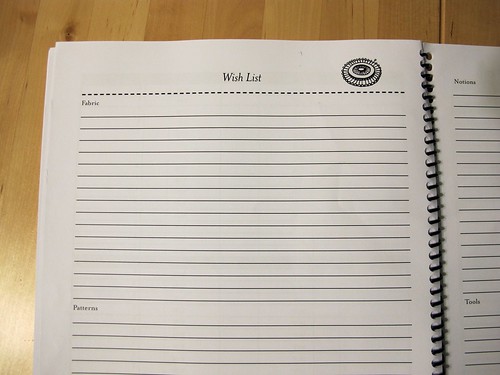
110 Creations Book

… a wish list…

110 Creations Book

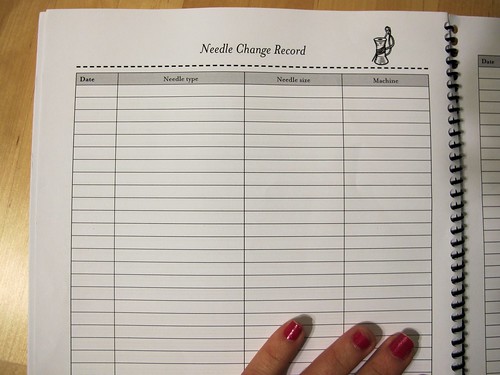
… and even a place to keep track of when you last changed the needle in your sewing machine!

Seriously! She has thought of EVERYTHING!

110 Creations Book

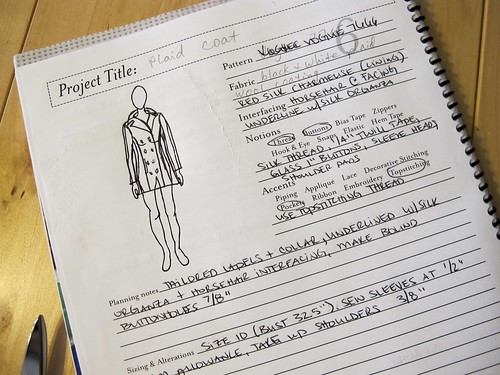
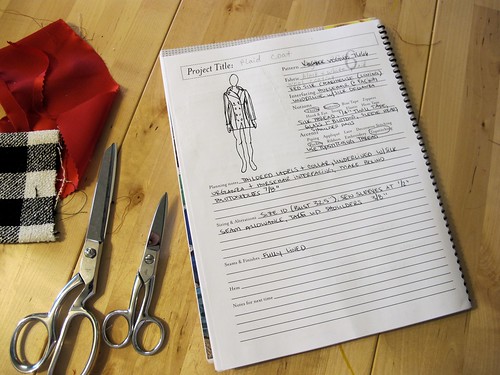
I’ve had a lot of fun writing out my project plans in this book! Here you can see my coat plans, all in one place! I love all the little spaces to write notes – it’s like filling out the most fun survey ever (surely you guys agree with me that filling out surveys is stupid fun, ha). I can also see myself tweaking this to include plans for knitwear as well. Mostly because I looove planning. Ugh, it’s just so good.

The only thing I would change about this book is to make the croquis a little lighter, so the lines of the garment show better when they’re drawn on. If the croquis was sketched in grey, instead of black, it would be perfect.

If you want to see more of this book, you can read more about it here. Also, if you’re staring down that croquis and thinking, “Yep, my body does not look ANYTHING like that!”, just know that Beth also offers books with customized figure drawings.

110 Creations Book

So here’s the fun part – Beth is offering a 10% discount on this book, as well as free shipping! The offer is good through Monday 12/2. This would be an excellent holiday gift for any crafter on your list – I totally would ask for a copy if I didn’t already have one (or maybe I’ll just end up with two. Why not!).

You can buy your copy here for $13.49 (marked down from $14.99, and again, free shipping!). There is also an ADORABLE smaller size (6″x9″ ee!), although it’s not 10% off since it’s a pretty new release.

So what do you think? Are you the type A who salivates at the thought of having ALL THE PLANS, ALL IN THE SAME PLACE? Is this book just appealing so hard to you right now?

One last thing before I peace out for the weekend – I noticed that a LOT of places are running some pretty epic Black Friday specials right now, so if you’ve got your Shopping Hat on and are looking for a few discounts to sweeten the deal, check these out –
Papercut Patterns is running 15% off ALL patterns (through Monday 12/2)
Mood Fabrics has 20% off all fabrics through end of today (through Friday 11/29)
A Fashionable Stitch has 25% off the entire shop, use the code THANKS2013 (through Saturday 11/30)
Grainline Studio is offering 20% off the entire shop, use the code GIVETHANKS20 (through Monday 12/2)
Colette Patterns has 20% off the entire pattern shop (through Friday 11/29)
Victory Patterns is 30% off all paper and PDF patterns, use the code happyanny (through Friday 11/29)
Disparate Disciplines has a fun Black Friday sale – get a free $5 gift certificate for every $10+ gift certificate you buy (through Friday 11/29; after that it’s $5 for every $20+ gift certificate you buy through Monday 12/2). She just released a new Mitten pattern that is SUPER adorable – and 15% off, to boot!
Sleuth Patterns is 30% off your entire order, use the code BLKFRIDAY (through Saturday 12/7)
Christinie Haynes is 20% everything in the shop (plus she is donating 10% of every sale to the LA Regional Food Bank! Awh yeah!), use the code thanksgiving (through Monday 12/2)
She’ll Make You Flip has 20% off your entire order, use the code LLADYBIRD20 (through 12/31) (Ok, this isn’t a Black Friday deal – just a sponsor deal! – but I thought I would mention it anyway$)

Wow, that list got way longer than I meant it to! Happy shopping, I guess, ha! Let me know if I missed any good sales – I know there’s a lot out there today!

Review+Giveaway: Sweet Dress Book

12 Aug

Laurence King really has cornered the market on these cute little sewing books, haven’t they?

Sweet Dress Book

Their newest offering, Sweet Dress Book by Yoshiko Tsukiori, is just as saccharine as the title suggests. Beautifully photographed (guys, there is a FLUFFY CAT in like half the pictures omgomg) and illustrated, the book includes 6 patterns and enough variations to make a total of 23 different outfits.

Sweet Dress Book

Each pattern incorporates a different technique – french sleeve, no darts, straight-cut, pants and playsuits, raglan sleeve, and with darts – and has three variations to make a full range of clothing. This being a Japanese pattern book, the instructions are laid out differently than standard sewing patterns – there is a list of steps and a numbered illustration (or two, or three!) to show how everything goes together. I don’t think the patterns in this book are nearly as complicated as the ones in Drape Drape – a confident beginner should be able to navigate their way through these.

Sweet Dress Book

While the patterns in the book aren’t necessarily my cup of tea, style-wise, it’s still really fun to flip through for inspiration. The model is freakin gorgeous and I love the way the letters are illustrated to look like ribbons. Sweet, right? Oh, and the book also includes a recipe for cupcakes. If anything, I will definitely be testing that one out… for science.

Sweet Dress Book

Before you go nuts with the credit card, I should mention this book isn’t available to the public just yet. It will hit the market on 8/20!

Laurence King has generously offered an extra copy for one of you lucky peeps, so let’s have a giveaway! If you’d like to enter to win your very own Sweet Dress Book, simply leave a comment on this post and let me know your favorite sweet. This giveaway is open worldwide and I will close the comments next Monday, 8/19, at 9 AM CST.

Good luck!

GIVEAWAY IS NOW CLOSED

An Amazing Review

24 Jul

Have you heard about The Amazings?

Silver Clay 2

I know what you’re thinking. “Laurennnn, why are you telling us about this – there are SO MANY online video classes, this market is oversaturated and we are tired of hearing about it blah blah blah.”

Well, take a look at their Mission Statement:
The Amazings was born out of a single, simple idea.
Society has always learned from its elders. but somewhere along the way we have lost that connection between generations — which means losing rich, valuable, and rare skills.
We’re on a mission to fix this and we need your help.

Felt Furry 1

If that doesn’t immediately appeal to you, I don’t know what does! Granted, I’m not trying to badmouth other forms of online video learning – I love ’em all, I’d buy ’em all if I could justify the cost and time – but there’s something to be said about learning from someone who’s been honing their craft for years and years. It’s like learning from your granny, except it’s actually probably someone else’s granny 😉

Felt Furry 2

Even better, up to 20% of every enrollment goes directly to the elders teaching the classes. Since most of them are retired, you can imagine how much this benefits them.

Big Needle 3

The Amazings has been around for over a year, teaching classes in London (lord, I wish I lived in London – some of those look AWESOME!), but they’ve recently branched out into the online world with videos to teach certain skills. There are currently 10 classes available, with more being added regularly. I was contacted and asked if I wanted to try out a class to review – how could I say no??
(also, I have no idea what is going on with the above photo but HOLY SHIT that lady is the coolest, I want to hang out with her!!)

Natural Beauty Products 3

I chose to learn making natural beauty products. True story: I’m a bit of a documentary freak (if I’m going to sit and watch TV, I want to feel like I’m learning something in the meantime, yeah?), and I’ve watched enough about the evils of chemicals in our food and beauty products that I’m basically terrified to buy things from the grocery store now! Making the food switch has been easy – food gets consumed quickly in my home, so you gotta buy more to… uh, stay alive – but the changing out my beauty products has been a long and somewhat expensive process. My budget doesn’t allow me to buy a bunch of new stuff at whim (especially if the new is gonna cost more up front!), so I’m slowly using my old products and replacing them with more natural options.

Natural Beauty Products 4

After watching this video, I checked my cabinets and realized I had all the ingredients on hand to make my own body scrub. YES! I’m not going to show you a picture because mine is in an old salsa jar aaaand it’s pretty white trash looking, ha, but the inside looks just like this press photo! I used lavender from my garden, and peppermint essential oil, and it smells fabulous! It’s very moisturizing – which is important to me, as my skin tends to be very dry. I can’t wait to try some of the other products once I get my hands on the supplies.

Watching the class was less like watching a “class” and more like watching a small one-on-one teaching session that just happened to be videoed. It was very personal and intimate – both women were chatty, swapping stories, and it was obviously unscripted. I like that! It’s filmed in a way so that the “student” is basically a placeholder for you – asking questions you might ask and such – but of course, the elders are available for you to contact directly if you have questions. Another thing I really liked about this class was that there is a separate document with recipes, as well as a crib sheet for different types of herbs and essential oils and how they interact with your body. I’m a total n00b when it comes to skincare, so this information is super helpful!

Silver Clay 1

I’ve also been lurking on this class for making a pendant using silver clay, but it’ll have to wait for me to get my finances in order before I can really try it out. That stuff is NOT cheap! But it’s SO COOL, and Debbie makes the process look so easy. I’m not much of a butterfly person, but I am imagining so many other possibilities!

Silver Clay 3

Seriously. Those were all made with CLAY.

Upcycle 2

There are also classes on upcycling a man’s shirt, retro hair styles, needle felting, and quilting, amongst other things.

Loom Knit 4

The classes run between $12-$28 and are viewable on most devices (I say most because I did have some trouble getting the video to work on my Kindle Fire, but I have been assured that they are working on fixing that), anytime, anywhere, forever.

So… who’s interested in signing up for that silver clay class with me, and crafting some legit awesome jewelry? 😉 Are you are terrified as chemicals as I am? What was the best thing you learned from an elder – relative or not? Let’s discuss!

The Bombshell Swimsuit: a Review and a Giveaway!

10 Jun

Remember this little teaser during the last week of Me Made May?

5/27

The pattern has been released so I can announce it now… allow me to introduce the Bombshell Swimsuit, from Heather Lou at Closet Case Files!

And now, I’m going to post pictures of myself in a bathing suit, on the internet. Eep.
(Also, can we talk about how Landon laughed at me when he saw me tromping out the backdoor in this swimsuit with these shoes? Excuse me, but if I’m going to stand half-naked for pictures on the internet, I’m at least going to make sure my legs look AWESOME, ok??)

Bombshell Swimsuit

When Heather Lou contacted me about testing this swimsuit pattern, I hadn’t even finished reading the email before my yes response was being sent right back to her (ok ok… let’s be honest here, it was more like OIASDL;GAJSD;LFAJSDF OMG FUCK YES !!!!!). I’ve never made a swimsuit, although this year I was ready to try. I had bought some fun swimsuit fabric and lining while in New York, and had a 70s bikini pattern that I planned to make up. But have you SEEN this sexiness?! Bikini went on the backburner, Bombshell hit my cutting table.

Bombshell Swimsuit

I won’t lie, there was a minute there when I hesitated, and then got scared. Like I said, I’ve never made a swimsuit before, let alone any sort of lingerie. As much as I looove working with knits and stretchy fabrics, sewing on elastic with that a zigzag stitch is totally uncharted territory for me. Not to mention I didn’t have enough fabric to muslin this, so it was really a testament of trusting the pattern sizing, and crossing my fingers in hopes I got it right the first time.

Bombshell Swimsuit

Spoiler: I did! 🙂

This is PRETTY CUTE, amirite?! Let’s see, I sewed the size 8 – I fit exactly into the 34-26.5-36 measurements – and the fit is SPOT-ON. I did not many any changes to the sizing of this pattern whatsoever. Dreamy, right? I used a gingham swimsuit lycra for the suit, and a proper nude swimsuit lining for the inside. I put bra cups in the front to avoid any nippage. The only thing I did not do was use proper swimsuit elastic. Ahhh, I’m so sorry! Truth, I was pushing really hard to finish this before I went on vacation, and I didn’t have a chance to run to the fabric store for swimsuit elastic (if you are sitting here thinking, “wtf are you on, Lauren, elastic is elastic is elastic” let me tell you that swim elastic is different because it won’t break down over time like standard polyester elastic). I did have some cotton elastic that *said* it was good for swimwear, but we’ll see if that actually stands the test of time. If not, I can always replace the elastic later. Ain’t no thang!

Bombshell Swimsuit

I LOVE THE WAY THIS SUIT LOOKS ON ME, THOUGH. Look at how flattering it is – and fully covered! Like I said before, I was very hesitant to actually wear this in the water, for fear that it would… I dunno, disintegrate and float away into the ocean, maybe? Shouldn’t have worried, though, as this baby stuck to me like a comfy second skin and didn’t budge at all while I was thrashing around in the waves. And I felt SO SWANK sitting on my beach chair, reading a book and sipping a cocktail.

Bombshell Swimsuit

As far as the actual construction… I really should not have worried! The instructions can look a bit intimidating at first glance (Me: “OH SHIT what is all this elastic stretch percentage talk here I can’t math this HELP”), but each step made perfect sense as I approached it. Making this swimsuit was very intuitive – for someone who’s never made swimwear before – and there are lots of pictures and words in the instructions to guide you along and hold your hand. If you still need help, there is now a Sewalong to really clear things up!

Bombshell Swimsuit
Bombshell Swimsuit
(I don’t know why these pictures turned the color all crazy. Sorry.)

Bombshell Swimsuit

So… a little tip about those bra cups. I actually tried to buy them while I was in NY, but I got SUPER overwhelmed by all the options available (Sonja and Oona can attest to the fact that I was lurking in the back of each store, putting cups over my boobs and trying to decide was size to get! HAHAHA). I ended up going home with none. Fast forward to this swimsuit, and part of my freakout was that I didn’t have any bra cups to put in – and no time to order online, let alone go to the fabric store. So how did I end up with cups, you might ask? I went to the thrift store, grabbed a bikini top from the 99¢ section, and cut the cups out! They fit just fine and I know they’re good for swimwear because, duh, they came out of a bikini 🙂

Now here’s the best part – Heather Lou has graciously offered up a freebie pattern to give away to one of y’all! YAY!!! BOMBSHELLS FOR EVERYONE!! Don’t let yourself get scared away from the concept of sewing swimwear – it’s really fun and YOU CAN DO IT.

For a chance to win a PDF copy of the Bombshell Swimsuit, leave a comment here on this post and let me know what fabric you’d use to make it! If you have a specific fabric in mind, or just a color or pattern that you’d love to see it made up in, do share! I’m nosy and I need to know! This giveaway is open worldwide – as long as you have email and can receive PDF attachments, you can win this pattern. I will close the comments next Monday AM, 6/17, so get yer entries in while you can!

GIVEAWAY IS NOW CLOSED

Bombshell Swimsuit

If you want to go ahead and buy the pattern, you can do so here ($10 only, hells yes). Thanks to Heather Lou, for letting me test this amazing pattern and also for providing a giveaway copy!

Good luck, y’all!

Review: eShakti, revisited

8 May

Here be another product review for eShakti.com. I wasn’t 100% thrilled with the first dress they sent me (honestly, it ended up getting donated because I just COULD NOT deal with those arm holes), so after they contacted me, I decided to give them a second chance.

For those of you who don’t know, eShakti is an online shop that sells a variety of cute lady clothes (not just dresses, there are skirts and blouses floating around there as well) in sizes 0-36, as well as offers inexpensive customizations for your size and certain style options (such as adding sleeves, shortening the hemline, etc). The prices are reasonable, and it’s definitely a good option if you normally have problems fitting into straight sizes, since you can adjust the measurements to correspond with *your* body.

Eshakti dress

This is the contrast poplin trim dress (unavailable now, sorry!). After the deal with the last dress, I was careful to choose something that-
1. Could easily be adjusted at the shoulders;
2. Was 100% cotton
This one fit the bill, and it was pretty cute, so I requested it and it was promptly shipped to me. I’m just going to say this now – I’ve been waiting to photograph this dress for a couple of months now. Why hasn’t it made it to the blog sooner?

Eshakti dress

UM. DO YOU SEE HOW SHORT IT IS?

I KNOW I just made like short short short BUTTCHEEK shorts, but shorts and a full-skirted dress are two entirely different beasts, if you will. I just can’t feel comfortable in a big skirt that only needs the slightest gust of wind to expose even more leg, you know? So I had to wait, and figure out my undergarment situation. And also buy a new bra – you can’t tell too much in these pictures because I’m wearing a strapless, but the straps are pushed way more toward the center than a standard bra. This means you cannot wear a bra with straps with this dress – the straps end up side-by-side. I needed a new strapless bra anyway, but man.

Eshakti dress

Anyway, back to the dress! It IS pretty cute – I love the nauticalness, and it looks equally good with bright yellow (or even brown!). It has pockets, as evidenced by me not taking my hands out of them at all. The quality is acceptable – nothing terrible, but nothing groundbreaking either. The back has elastic to accommodate more sizes (which honestly, kind of drives me crazy. If this is made-to-size, then why do you need elastic?). You can’t really see in these pictures, but there are some sweet tucks and covered buttons at the bodice. CUTE.

Eshakti dress

Eshakti dress

I do NOT understand how this dress came out so short, to be honest. I’m 5’2″ – I don’t think I’ve ever had an issue with a dress being too short on me. On my last dress, I requested that the hemline hit above the knee – and it’s knee-length on me (figures). So for this round, I chose “short dress.” And woohoooeeeooo is this dude short!

Eshakti dress

So what do you do with a too-short dress that can’t be let out at the hemline and cannot have length added (thank, stripes!)?

Eshakti dress

You make matching bloomers and pretend like it’s a playsuit set!

(Oh god, this picture is probably going to end up in sooo many Flickr spank-banks, ughh, the things I do for you guys haha)

Colette Madeline bloomers

Remember these? These are the Madeleine mini-bloomers, a free download from Colette patterns. Yep, free! I love these things and I knew they would go perfectly under this dress – the skirt is full enough where the bloomers don’t add bulk, and they’re cute enough where I don’t mind a wind situation now.

I used a remnant from my local fabric store, and pretty navy/red ribbon to tie it in with the dress.

Colette Madeline bloomers

I love the way the elastic looks at the waistline – and it’s sooo comfortable. Like wearing pajamas. I totally wear these are pajamas, btw.

Colette Madeline bloomers

Pretty sweet, huh?

Eshakti dress

I’m still not totally sure on my feels for eShakti at this time. They definitely need to add a skirt length measurement in the dress descriptions, because that would help when determining how much to shorten or lengthen if you are customizing. At least the sizing is much better this time – which I consider a personal victory with the size of my bust vs ribcage. So yay for that, I guess!

~*~Disclosure: I was not financially compensated for this post, although I did receive a sample to review & keep. All opinions on this product are my own.

Let’s Talk Sewing Machine Maintenance!

13 Feb

In the spirit of Karen’s series of True Confessions, I think most of us tend to plead guilty when it comes to maintaining our machines and keeping them in tip top sewing shape. Fess up, guys! Are you guilty of:
– Using the same needle for months at a time?
– Sewing over pins?
– Going far too long between regular tune-ups?
– Letting the lint build up to epic proportions?
– Forgetting to oil your machine?

Let me be the first to say that I definitely hit some of those categories myself. Oops! I’m very vigilant about keeping the lint to a minimum (I clean my machine with that tiny brush every time I wind my bobbin; yes, I get freaky like that), but I regularly forget to change my needle until it breaks from the sheer pressure of existing. I also didn’t realize you were supposed to oil a computerized machine. I thought that was only something you did with the manual ones. No wonder my stitches were looking like shit! Hello!!

Part of my problem is that I just never had anyone tell me what I should and shouldn’t be doing. Yes, you should refer to your owner’s manual for upkeep on your machine – but how many of us actually read that? (if you have a Featherweight and you’ve read it like a book, you’re exempt from this question. We all read our Featherweight manuals like a book, because it’s fucking fascinating and the pictures are amazing). So today, let’s talk about those little basics that should be second nature but totally are not. It’s ok, we’re all in this together, y’all.

Changing your needle
We all know to change the needle when it’s broken – you can’t sew anything otherwise 🙂 But did you know that you actually should be changing the needle far more frequently than that? Not just when there’s an issue. It is recommended that the needle is changed after 8 hours of sewing, which comes out to every 1-2 projects (depending on the project, of course). Waiting longer to change your needle causes it to get dull and loose the sharp point, which can result in wonky or skipped stitches (and hours of hair-pulling frustration, because ARGH!). I know it can be hard to remember to change your needle out that often – hell, I forget all the time, although I’m trying to be better about it. It helps to keep a stash of needles on hand (I buy a pack every time I go to the fabric store!), so you’re not tempted to try and plow through if the needle is super old but seems “good enough” -it’s probably not. You should also be proactive and change your needle if you ever manage to sew over a pin – it may look fine at a glance, but the tip is likely bent and this can also cause stitch problems. Which brings me to my next point…

Don’t sew over pins
I really hope I’m just preaching to the choir here, but just in case someone doesn’t know any better… DON’T SEW OVER YOUR PINS. Don’t don’t don’t! I cannot stress this enough! Sewing over pins causes all kinds of problems, from bending/breaking the needle (ever thought about where that broken tip might land? How about IN YOUR EYEBALL), to completely fucking up the timing of your machine so that you have to take it to the repair center and pay $ to have it fixed. Lame! Do yourself a big huge favor and pull those pins out before the needle gets anywhere near them. Do it for the sewing machines.

Regular Tune-ups
At the risk of sounding like a big fat sewing machine snob, it makes me cringe when I hear people brag about how their machine works so well and it hasn’t had a tune-up in decades. I understand that it may not be common knowledge that sewing machines need regular maintenance, but hey – that’s not something to brag about! Think about your car (if you don’t have a car, you can think about someone else’s car ;)) – would you let that thing go so long between tune-ups? Hell no! A sewing machine must have very precise timing to function correctly; if one little beat is off, it can wreck the whole output. Getting a tune-up can be a bit of a hassle – here it costs between $50-$90 (computerized machines are on the higher end of the price spectrum), and they hold your machine hostage for 1-2 weeks, depending on how quickly they can get to it. However, it is very important to have this done at regular intervals, as the machine needs benefits from having the timing and tension adjusted back to the factory settings, as well as getting a nice deep clean in all those little nooks & crannies that you can’t get to without actually opening the thing up and taking it apart. What constitutes as a “regular interval” is really a matter of how much you use your machine – I take mine in every year, but I also sew a LOT. You may be able to get away with getting a service every 2 or even 3 years, depending on how much you use the machine.

Taking care of lint build-up
Here’s my confession: I’m a big freak about cleaning my machine. I pull the whole bobbin apart and go to town with the lint brush before every sewing project, usually while the bobbin is winding. I also do this on my serger – I mean, have you seen how linty those things get? Nothing delights me more than getting a good sized ball of lint to marvel at (I also like cleaning the lint screen on my dryer. I’m sorry, is this TMI?). So keeping the lint build-up to a minimum has never been a problem with me. I’m not saying that you need to start digging for gold every single time you have a project – but please, make it a habit to at least keep a regular cleaning schedule. You’ll be amazed at how much better you machine functions when there’s not a big build-up of lint and broken thread lurking under the throatplate.

Oiling your machine
OMG. Until I bought my new Bernina, I never realized you were supposed to oil those things! For some reason, I was under the impression that computerized machines were exempt from regular oiling. My mechanic assures me that neglecting the oil does not necessarily hurt the machine, but it can do some wonky shit to those bobbin stitches since there is too much friction going on down there. If you’re not oiling your machine, take a quick peek at the owner’s manual (or call your local sewing repair place and ask them) and see if it’s necessary to keep things running smoothly. I now oil my machine once a month – and it doesn’t take much! A little dab will do ya.

If the idea of poking around in your machine just sounds too overwhelming and terrifying – well, there’s an app for that! 🙂
diy
DIY Household Sewing Machine is an app for iPhone and iPad (sorry Droid users 😦 Maybe soon?) that guides you through three basic steps of maintaining your sewing machine – removing the bobbin case to clean and oil the bobbin area (there are instructions for both top and front-loading bobbins – yeah!), changing the needle, and cleaning the tension units (which is not something I was aware of until, uhm, last night. Eep! Don’t worry, I’ll get a-cleaning as soon as I get home :)). While you shouldn’t necessarily consider this a total replacement for a regular session with an actual sewing machine mechanic, it is a great assistant in keeping things clean and running smoothly in between tune-ups.

screenshot2

screenshot3
What’s interesting about this app is that there are three ways the information is shared – a short animation (which totally reminds me of Money For Nothing and I TOTALLY LOVE IT OMG), a text document, and live-action video. The animation is great if you just need a little refresher on how to do something (you know, for those brainfart moments. I’m not the only one who gets them all the time…?), and I love that everything is spelled out for those of us who are just too impatient to sit through a 2 minute video.

screenshot5
Speaking of the vidoes… they are actually really great. I just mentioned that I’m too impatient to watch videos (it’s true! They are always just too damn slow-moving for my fast paced brain, I guess), but the longest one is only 2.5 minutes long, so it’s not too bad. Everything presented is very easy to see and understand, and there are some good tips about what tools are best for cleaning what parts of the machine. Bonus that dude has a delightful accent. God, I love accents.

The app is not free, but it only costs 99¢ – which is pretty much pocket change as far as I’m concerned. It’s nice to have a go-to reference of the text and videos when you need a little hand-holding but don’t want to put your machine’s life in the hands of Google… and bonus, those little animations are fun to watch 🙂 I’m so easily amused, ha!

What about you? Do you have any confessions about maintaining your machine that you’d like to get off your chest? C’mon, fess up – we’re all friends here 😉

As a side note, I know I’m a few days late to the party but LADIES HAVE YOU SEEN MADALYNNE’S NEW UNDIE PATTERN? From the technical sketch to the gorgeous finished piece – I’m in love!! Must make me some undies, stat!

~*~Disclosure: This is a sponsored post for which I received financial compensation. All opinions on this product are my own, however!

Review: Drape Drape (plus a giveaway!)

11 Feb

Drape Drape
I’ve heard a lot of buzz in the online world about these Japanese pattern books- they appear to have quite the cult following. I’ve always been curious to see what exactly they entail (and I also just really love following the pack, ok), so when the publisher contacted me and asked if I’d like a copy of Drape Drape by Hisako Sato to check out, there was no hesitation on my end between when I received the email and when I replied and said YESSS YES YES. New patterns to try! Yes!!

These books were originally published in Japanese (no duh, Lauren), but they were recently translated into English. The translation struggles a little on some points – right side is referred to as “upside,” interfacing is “interlining,” – but overall, it’s pretty easy to understand. The book starts out with general information on the pattern sizing, an explanation on the various drapes and tucks used in the book, and a small chapter on sewing knit fabrics using a standard sewing machine. Drape Drape is actually a pattern book – there are a few pattern sheets with nested pattern pieces (such as what you see with Burdastyle) in the back of the book- 17 patterns in all. It is not, as some might be led to believe, an instruction book on how to drape.

That being said, the pictures in the book are very beautiful – showcasing these gorgeous fluid, drapey designs. The kind of stuff that Vogue wishes their photoshoots would end up looking like:

Drape Drape
Drape Drape
Drape Drape
Drape Drape
Drape Drape

I personally love the line drawings. Like, I want to chop them out of the book and hang them on my wall.
Drape Drape
Drape Drape
Drape Drape
Even Hammer Pants look good as a line drawing.
Drape Drape
~easy breezy~
Drape Drape
Drape Drape
This last one STOLE MY HEART. I was bound and determined to make it up – using a slinky, drapey black rayon knit. Nevermind not having anywhere to wear it – I was gonna make it, and no one was gonna stop me.

But hold up a minute, because have you seen how these pattern instructions work?
Drape Drape

Drape Drape
If this looks easy, it is because it is the easiest pattern in the book. The V-neck dress is quite a bit more involved, with interfacing and a zipper. I spent about 2 weeks staring at the instructions and pulling hair out of my head in an attempt to understaaaaaaand, but the instructions were just too sparse for my comfort and those mountain and valley folds got the best of me. Not that I think it was a necessarily hard pattern to complete – I just need hand-holding when it comes to things like this. Lots and lots of hand-holding. I’m actually like that in pretty much every aspect of my life, so this doesn’t come as much of a surprise.

I’m not saying this to scare you – I don’t think this book is too difficult for the average sewer to comprehend. It just doesn’t work for me and the way my brain functions (plus: tracing nested pattern pieces, NOPE.). Rather than have it sit unused on my shelf, I’d much prefer to give it to someone who can use it 🙂 So if you’ve been curious about these pattern books – here’s your chance! One caveat – this is my copy of the book, and I did mark up one of the pattern sheets (the skirt piece for the v-neck dress has been outlined in blue Sharpie. Yes, I write in my books. Sorry.). The book is in otherwise perfect condition – including the dust jacket – and the pattern sheets are still usable despite the markings.

To enter the giveaway, leave a comment (with an email address where I can reach you if you win, please) and tell me your favorite sewing book. This giveaway is open worldwide – if you can receive mail, you can enter the giveaway – and I’ll close the pool a week from today, Monday 2/18/13. Good luck!

GIVEAWAY IS CLOSED.
Thanks to everyone who entered!

Completed: White Tshirts. Yes, Tshirts.

1 Feb

At the risk of really beating this dead horse to the ground- I like making solid, every day basics. Boring shit like plain pants, tshirts, solid knit dresses, and I’ve got my eye on making underwear as well. I mean, making a bunch of party dresses is super fun, don’t get me wrong – but there are only so many frilly/froofy dresses I can fill my closet with before I start pulling my hair out on Saturday morning whining that I don’t have anything to weeeear. And I, too, have read Overdressed, which basically punched me in the face the same way that Fast Food Nation punched the rest of the world in the stomach. I can’t even walk in the mall anymore now without yelling about polyester and stitch lengths. It’s insane and no one wants to go shopping with me these days… not that I do much “shopping” as it is.

So, I’m ok with sewing my own basics. I like that I make a tshirt for roughly the same cost as something from the mall, except I can control the fit as I like it and I also know the hem stitches aren’t going to fall out the first time I throw it in the wash. Maybe making tshirts is simple and the exact opposite of exciting, but sometimes I’m having a bad day and I just want to make something without thinking to much about it – and for me, that perfect something is the tshirt. Some people bake when they’re in a bad mood. I make tshirts.

A couple of weeks ago, I was contacted by Organic Cotton Plus and asked if I would like to sample some of their organic fabrics. Yeah! I chose the white interlock knit and set to work making some basics. In organic because, yeah, I be fancy.

Organic Renfrew- V-Neck
I used my beloved Renfew pattern and made two tops. Here’s the v-neck -probably could have stood to make that v a little more, uh, v-like, but it ain’t too bad for a first attempt. The secret, I’ve learned, is to sew the neck band on a regular sewing machine first, and then serge the edges after. Otherwise, the blades of the serger will chop a big ol’ hole in the middle of your tshirt when you try to pivot (and disabling the blades just makes a huge mess, oh god). I know this because I actually tried to do the v-neck version several months ago, and it failed. Also, I realize I just lied to y’all about this being a first attempt. I’m sorry, I’ll never lie to you again~.

Organic Renfrew- V-Neck
I made no changes to the pattern (other than my initial fitting changes), except I did not add the hem band. I just hemmed the bottom with a double needle and used my walking foot.

Organic Renfrew- V-Neck

Organic Renfrew- V-Neck

Organic Renfrew - Scoop Neck
I also made a scoop neck!

Organic Renfrew - Scoop Neck
Making tshirts is FUN!

Organic Renfrew - Scoop Neck
I actually really really love this fabric. It is the *perfect* weight for a basic Renfrew – super soft, a bit of stretch (but not all slinky like jersey – which I love, but there is a time and a place for slinky jersey) with a good hefty weight. Even though it’s white, it’s actually quite opaque – the scoop-neck top has neon yellow twill tape on the shoulders. Can you see it? NOPE. I’m pretty sure I could get away with wearing a neon bra under these and on one would be the wiser.

Organic Renfrew
Plus, the fabric is less than $9 a yard. So yes, a teeny bit more expensive than F21 – but it’s also light years nicer, as well as ethically-sourced. Which I’m totally willing to pay extra for.

Organic Renfrew

Organic Renfrew

Organic Renfrew

And while we’re on the subject of paying extra for ethical fashion… didja see my new jeans?

Imogene Stretch
WELL LOOK AT THEM.
Before you get all excited and start freaking out, I didn’t make these. As much as I wish I was a jean-making-master like Taylor Tailor, I can’t make a good pair of jeans to save my life. I don’t even think it’s a matter of fit anymore – I just don’t like the denim that is currently available. As much as I love love love my Thurlow jeans, I rarely wear them because the fabric just sucks. They stretch out so much over the course of the day, they are huge and baggy by the time I take them off – and I’ve sized them down twice now. Ugh. So I give up. Jeans, you win. I will buy you from now on.

Imogene Stretch
So here’s the deal – like, I dunno, every single woman I know, standard jeans just don’t fit me right. They are too big in the waist, too tight in the thighs, and the length is always much too long (and I’m too lazy to hem my own jeans, let’s be real here). I guess I could fix the waist issue by wearing a belt, but I hate wearing belts with pants, not to mention I don’t even own any belts that fit around my hips. Plus, the denim is just shitty. I bought some GAP jeans a couple of years ago and they’re already getting holes – and I barely even wear them! So I recently got rid of all my jeans – I had almost a dozen pairs – and bought one pair. I only own one pair of jeans now, and here they are.

Imogene Stretch
These are made by Imogene and Willie, and they are the Imogene Stretch. I’m not going to sugar coat – they were fucking expensive. Actually, these jeans are the most expensive piece of clothing I have ever owned. This is also the first piece of new/non-sale clothing I’ve bought in several years (and yes, I bought them with my own money. Ha, I WISH I+W would give me free jeans!). So, why would I spend $200+ on one pair of jeans, you might ask?
– They are made here in Nashville, TN, by a small business. I like supporting small businesses. I like knowing my money is going back into my community.
– The materials are amazing. The denim is high-quality and wears beautifully (and it’s woven in the USA! Yeah!). I also get 3 free repairs, should I happen to gouge a hole in them or some shit.
– The fit is better than any pair of pants I’ve ever owned. I dunno about you, but I’d rather own one pair of well-fitting pants than a dozen pairs of ill-fitting pants. I have no waist gap, the legs fit perfectly, and the length was hemmed to my exact measurements when I bought them.
– THEY LOOK DAMN GOOD ON ME.

Also, the workmanship is just beautiful-
Imogene Stretch
The topstitching is three different colors. Can you see it?

Imogene Stretch

Imogene Stretch

Imogene Stretch

I’m not posting this because I secretly want everyone to stop shopping at fast fashion places (ok, I kinda do – in a perfect world. But that’s not really attainable right now, and not everyone has that kind of budget! ;)). I mean, I just bought a pair of Keds the other day. Whatever. But… know when to pick your battles. Know what matters to you, and what you can let slide. And personally for me – I’ll make what I can, and buy local when I can find and afford it, and not feel bad if I occasionally have to buy shoes at Macy’s. Small changes eventually equal big changes.

Organic Renfrew

Organic Renfrew

~*~Disclosure: I was not financially compensated for this post, although I did receive a fabric sample from Organic Cotton Plus to review & keep. All opinions on this product are my own.

Review: eShakti.com

19 Nov

Fair Warning: I did not sew this dress at all. This is a product review for eShakti. They mailed me a dress of my choosing, and now I get to talk about it on the internet woohoo!

When I was first contacted for a review, my initial thought was, “lolwut.” I mean, this is a sewing blog. I make clothes and then we talk about how awesome (or not awesome, I can swing both ways) the finished piece is. Trying out something for someone else’s clothing line just seemed weird and completely against the entire point of this damn blog. I’m not ~punk rock~ anymore, but I still get real weirded out at the idea of selling out, if that means anything.

Then I realized that there are lots of people who read this blog who don’t sew – or don’t sew clothes. There are a lot of us out there who struggle with getting a good fit (and yep, I’m part of this crew! Always learning new stuff!), and it sure would be nice to have a grey area between “Making Everything I Wear” and “Buying Bullshit At The Mall That Doesn’t Fit Over My Ass.” You know?

So, my non-sewing readers. This is for you. And also for me, because, hey, free purple dress 😀

If you’re not familiar with eShakti, it is a website that sells cute lady clothes. Mostly dresses, but there are also tops and coats and even skirts floating around if you look hard enough. Everything is adorable, and there is a wide range of styles to cover most events, from cocktail parties to a semi-professional office. What makes them unique, though, is that they not only offer a serious slew of sizes – 0-36! – but you can customize the fit to accommodate your ass. Or boobs, or petite stature, or whatever. In addition (I know, I’m just blowing your mind over here), you can change certain design elements as it strikes your fancy. Changing up sleeves, hem length, and sometimes even the neckline. So basically, it’s like the seamstresses’ dream wardrobe without actually pulling out the sewing machine and doing it yourself. FANCY.

Oh, I forgot to mention the price range. Most of the stuff they offer is under $80, and any customization is $7.50. Not too shabby, eh?

For my dress, I went with the Ruffled Tiers, except mine is purple, obviously, and not black. I didn’t see the purple one on the site anywhere, so sorry if you’re salivating in jealousy over mine (on the other hand, I did just discover this green goddess one, this silk (!!!) one, and this one that is totally channeling Liz Taylor, and now I’m really jealous haha). It was really hard to NOT just get a fancy cocktail dress, but seriously? I own like a dozen of those things and I couldn’t tell you the last time I actually wore one. So I went with something office-appropriate, in a pattern/fabric that I wouldn’t sew myself (too slinky!), that would also be suitable for biking. I did end up customizing the sizing (since this is normally an issue for me with RTW), but I kept the general style of the dress the same as it looks on the site.

And how did that turn out, you might ask?

eShakti dress
ME GUSTA.

Seriously, though, isn’t it just adorable? I’m a big fan of the color, especially… and all the cascading ruffles. The off-center neck bow is my favorite part.

From a construction perspective, I have no complaints. Obviously, we’re not talking about the finest couture here – this dress is polyester, after all – but I will say that I was pleasantly surprised. I actually studied the insides like I was studying for a test, except that I was giving it the Evil Eye the entire time and waiting for it to slip up somewhere.

eShakti dress
I would like everyone to know that this dress is absolutely perfect for cycling in – a good length to prevent flashing, and the shirring in the back keeps it snug without cutting off circulation.

eShakti dress
My only beef is that the armholes are a bit low on me – see my bra peeking out? Yikes! I think this problem is pretty unique to me and my body, though – I definitely have low shoulders in comparison to my bust size (hence why it is so important to do a FBA on sewing patterns and not just size up), and most stuff has to be taken up quite a bit there. Out of all the measurements I gave, shoulder height was not one. So I’m going to chalk this up to LT-body problems and not point fingers back to eShakti.

That one doesn’t bother me too bad, though, because…
eShakti dress
THIS DRESS LOOKS SO FUCKING AWESOME WITH MY MUSTARD AGATHA CARDIGAN.
Doesn’t it?! I knew it as soon as I spied it on the site. Actually – it looks good with ALL my handknits, including the Chuck sweater. The top is fairly sleek and smooth, so there isn’t much bulk when you wear stuff over it. Add in a ruffly tiered skirt and a little bow at the neck and now we’re just talking straight-up adorable.


Right now, they are offering $25 off your first purchase! Someone should go buy this dress, because holy shit I want.

In conclusion: Big thanks and thumbs up for eShakti!
In other news, I have a new garment on the sewing table that just needs picture… hope to get a post up this week 🙂

~*~Disclosure: I was not financially compensated for this post, although I did receive a sample to review & keep. All opinions on this product are my own.