
Good morning, everyone!
In light of the official start to the OAL2018, I wanted to share a little tutorial for a very common pants adjustment – adjusting crotch depth. Even if you are not participating in the OAL, I hope you will find this useful! As I mentioned, this is a very common adjustment (at least half of my students in every Sew Your Own Jeans workshop that I teach ends up needing to make this adjustment!) that is a lot easier than it sounds.
This is the only pants-fitting post I’ll be doing for this OAL – most other adjustments can be done after the pants are basted at the side seams. If you have more pants-fitting needs, I absolutely recommend getting a copy of Pants for Real People (which is where the image below is from) – it is a fantastic resource that is full of valuable information and my top reference book when I’m fitting pants! Another post to check out is the Common Fitting Adjustments in the Lander Sewalong!
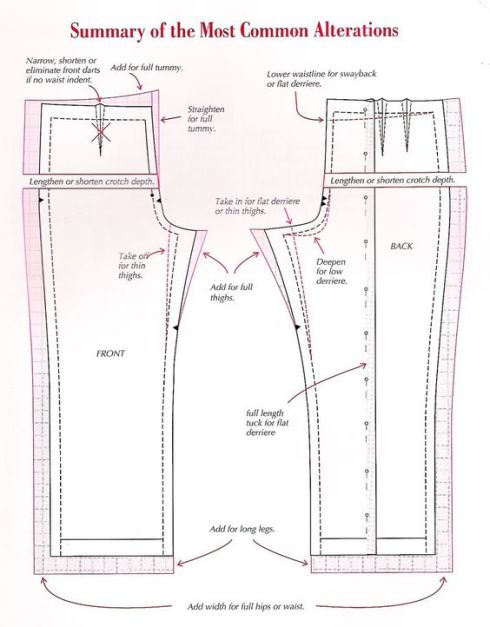
Common Pants Fit Adjustments – From Pants for Real People
So what does it mean to adjust crotch depth? The depth (versus the length, which runs from front waist to back waist) is the distance from your waist to the bottom of your crotch – i.e., the determining factor between a drop crotch and cameltoe. If you’ve ever had a wedgie, your depth is too short. Pants crotch hanging WAY lower than your actual crotch? Your depth is too long.
Since we are all special little sewing snowflakes (sewflakes?), all of our bodies are different – even in ways that aren’t super visible. Which means that not every single pants draft is going to fit every single person flawlessly – it’s just not possible. Personally, I have found that I have a slightly shorter crotch depth and generally need to make this adjustment with nearly every single pair of pants I sew. It’s not a hard adjustment to make, but if you’ve never seen is done before, it can be a little difficult to wrap your head around. Hopefully this tutorial will give you some insight on how to do it!
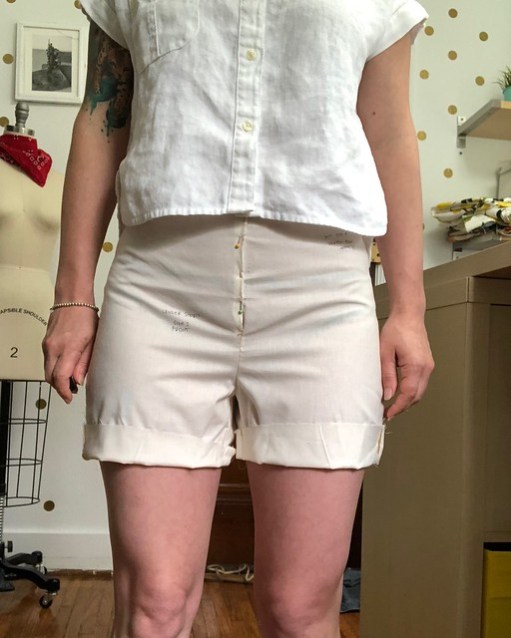
First, you’ll want to make a muslin of your pants (or at the very least – a shorts version of the pants). Sew the front and back as instructed. You don’t need to include the whole fly setup (unless you want to practice sewing it!) or waistband (unless you anticipate needing to change it to a curved waistband). Pin the fly shut and move around a bit. Don’t freak out over wrinkles – muslin wrinkles like crazy (mine are extra bad because I pulled these out of my rag pile, true story) and doesn’t have as much “give” as your regular fabric. Feel where the crotch is in relation to your body – is it hanging too low and causing extra folds due to excess length? Is it all up in your business and giving you cameltoe?
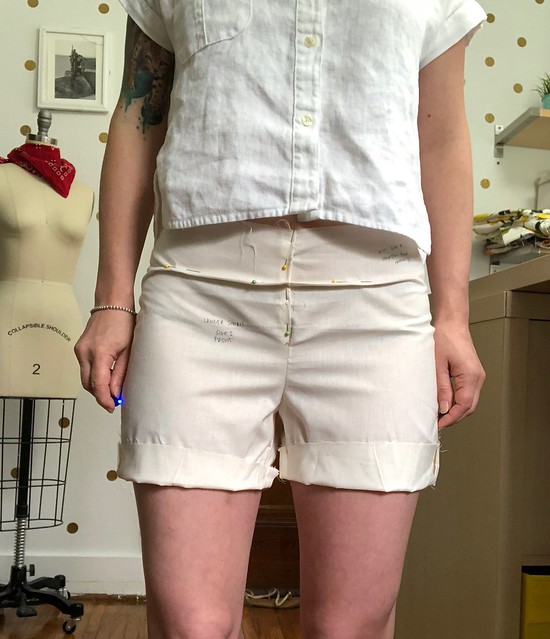
For a low-hanging crotch, pinch out the excess somewhere along the depth and pin it until it feels right. DO NOT OVERPIN – you don’t want to give yourself cameltoe (learn from my mistakes, people). Walk around, make sure you can sit, and let them settle a little. Likely, you won’t need to make a massive adjustment here – between 1/4″ – 1/2″ is most common. Little tiny fractions make a big difference when it comes to fit!
If your problem is the opposite and you need to add length, the easiest way to do this is to slice across the front of the pants and insert a strip of fabric (I just pin this, although you can sew it in, too). Pull down the bottom portion until the crotch feels like it is in the correct spot, then pin to the fabric strip.
I realize you likely cannot see a difference between those two photos (I mean… I definitely can’t haha). Like I said – it’s a small adjustment, and not always visible. But you can feel it!
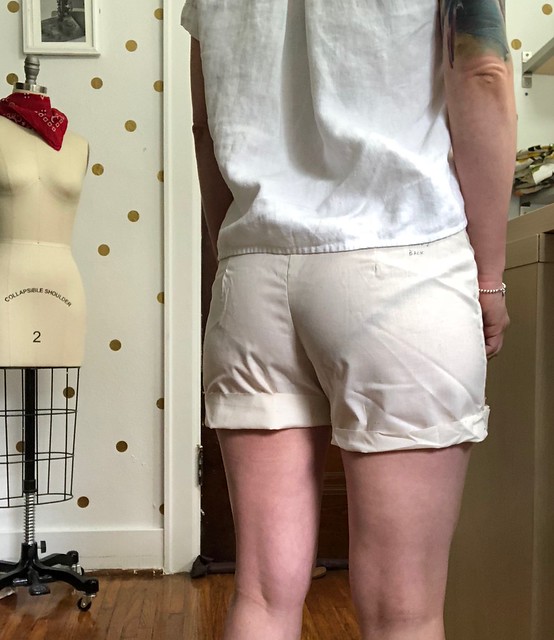
Check the back to be sure there aren’t any depth adjustments needed. I’d say that maybe 1 out of every 15-20 students of mine need to actually adjust the back – it’s usually all in the front. If you do need to adjust the back, do so the same way you adjusted the front. Mine looks fine, so I left it as is.
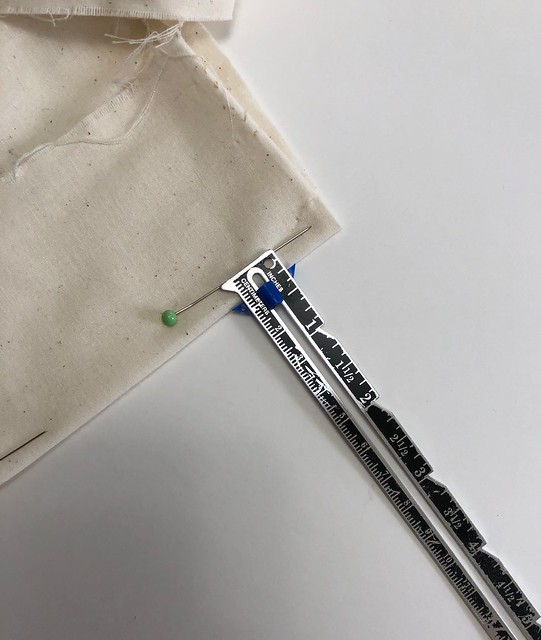
Now take your muslin off, and measure the distance from pin to fold – or the additional length added by the strip of fabric. If you are only adjusting the front, then only measure at center front. If you are adjusting front + back, measure at the side as well as the center front and center back. This is how much you need to either add or remove from the depth.
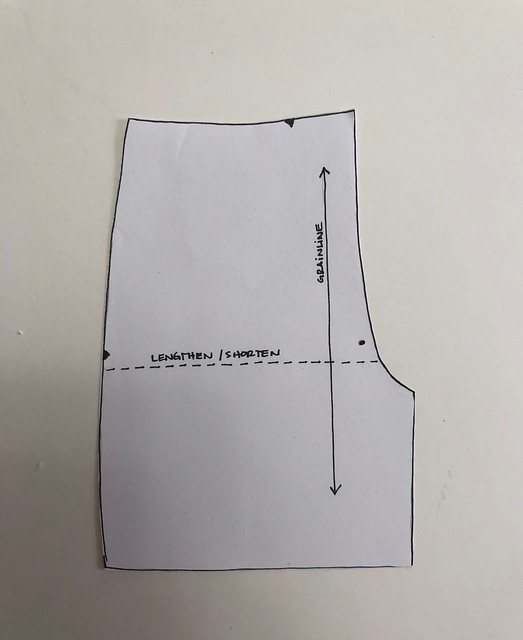
Now how to translate this to your pattern? Easy! Your pattern piece should have a lengthen/shorten line that cuts across the fly (if it doesn’t – first of all, SHAME ON THAT PATTERNMAKER, but second, it’s easy to just add it somewhere in that general area nbd). If you are only shortening the front crotch, you will cut along that line from center front *just* to the side seam. Do not cut through the side seam – you want to leave a hinge. If you are also adjusting the back, cut straight across from edge to edge.

To lengthen, spread the pieces apart until the center front matches the measurement you took, and then fill the gap with paper and tape closed. If you are only lengthening the front, it should fade to nothing at the side seam.
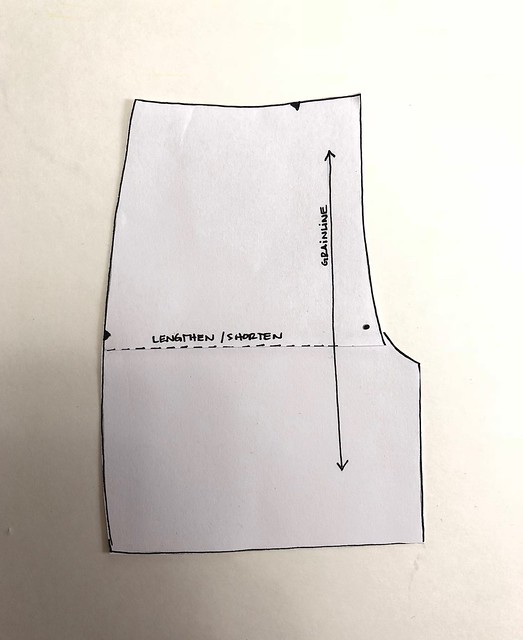
To shorten, overlap the pieces until the center front is overlapped by the amount you measured. Again, if you are only adjusting the front, it should fade to nothing at the side seams/hinge.
If you need to adjust all the way around to the back, you’ll want to walk your pattern pieces to make sure that the side seams still match after making your adjustment.
Finally, redraw any wonky links or curves (such as the crotch curve if you overlapped – just smooth the curve) and straighten the grainline if necessary. You will also want to shorten or length your fly pieces (shield, facing, etc) the same amount so that they match up when you sew them together. I strongly advise making another muslin as this point to be sure that they changes didn’t wonk something up. You do you, though!
And that’s it! Like I said, a really easy adjustment that can make a world of difference in how your pants fit and feel. This is definitely the most common adjustment I see in my Sew Your Own Jeans workshops, so I wanted to share it here too!


And, when you achieve Old Age, and your once pert and perky bubble butt has deflated and sunk, you can change the shape of the crotch from a “U” to an “L.”
Keep the back slope — and maybe the front slope too, if you’re still flat in front (I am not) — almost vertical until just before the point where you need to veer off to meet the inseam junction. Then do a near-right angle turn to swing for home, that point at the top of the inseam in the crotch. This alteration pulls in extra fabric that pools at the top of your thighs, without having to futz about with keeping side seams on the straight-of-grain. Can be easily done to RTW pants and jeans, too.
That alteration isn’t just for the older age; I also have to change my crotch to a more L shape 🙂
As someone with a super short front crotch depth and ample bubble bum, I can attest that this is the Holy Grail of pant pattern adjustments! Thanks for the great tutorial. Love your blog. 😊
Hey Lauren, will this shortening of the crotch also help increase the mobility of the front thigh too? I’m making my first pair of pants (at least the first that I’m determined will be wearable)and I’ve noticed a pulling / restriction of movement on the front thighs that seems to disappear when I pull up the centre front seam. Also I know some people ensure the back leg inseam is shorter than the front to allow slight stretching, with the intent of lessening bum wrinkles and improving fit. Thoughts? Yikes that was long…sorry.
I think you are right that it will increase the mobility of the thigh, especially if you find that to be the case if you pull the front seam up. I haven’t personally experienced that sort of fit issue with pants, but I do with sleeves (specifically, the armscye being too low, which restricts movement) so that would make sense.
And yes, most pants patterns include a slightly shorter back inseam so that it stretches to reduce wrinkles under the butt. It should only stretch from about knee to back crotch (i.e., not the entire length of the inseam). Adjusting the crotch depth should not affect this.
Thanks so much….I want to finish these up so I can get started on my OAL pants. Improve with every pair is my goal. I’m tired of stuffing new cat beds with crap pant attempts. Lol.
I’m impressed that you found a use for the past attempts! 🙂
Thanks for this tutorial. Wish there had been tutorials like this years ago when I was newer to fitting. Used a clear plastic curved ruler that duplicated my shape (called a Pantsformer). I still have it! Learned this by trial and error with a pair of non itchy wool pants. Wore those well fitting pants a long time until they wore out. Fitting your own pants really does make a difference for those little adjustments.
It’s crazy how much of a difference the smallest adjustments can make!
thank you! thank you! i know i’ll need this 🙂
You are welcome!
Thank you! So helpful.
So welcome 🙂
Thank you so very effing much! This is so helpful, and you explained it so well. Maybe now I can sew a pair of pants that fit.
Yay I’m glad you found it useful! 🙂
Really helpful and simpler than what I’m doing. Thanks!
You are welcome!
This is very helpful, however, I have an odd adjustment I need to make to my son’s jeans. He wears everything below his belly, which means the front crotch is much shorter. When I copied his jeans to make a pattern (purchased pair that wore out) the crotch doesn’t lay flat. I have thought and thought on this for months and still haven’t come up with a solution.
Hmm I’m not sure! I don’t have a lot of experience with fitting men’s bodies, I’m sorry!
Thank you so much for this! I just figured out a few weeks ago that this is the adjustment I need, so it’s perfect timing. I’m anxious to get rid of that extra space for the package I do not possess 😛
Thank you for the info! I was running into a wall on some shorts I’m working on so now know what I need to do to fix the wonk.
I was just reading Barbara Emodi’s newly released sewing book and on the subject of crotch depth, she suggests using a flexible ruler with an elastic band placed at your mid crotch. Being careful to maintain the shape and measurement, make up a cardboard template of it that you can use to put over any pants pattern. Just thought I’d share since this seems like a great idea 🙂 I have the Palmer/Pletsch fitting for pants but haven’t pulled it out yet but seeing that diagram I’m going to have to get it at the ready 🙂 I watched Melissa on her Craftsy class doing pants fitting (they had a free weekend recently) and found that really helpful as well. Every time I see or watch a class on pants fitting, it looks so simple to do but when you start working on your own body….well it’s suddenly NOT so easy. I think as you say, it is removing or adding very small amounts that’s key. We look in the mirror and it looks so baggy or feels too tight and we tend to go overboard, ie an inch here or there then the pendulum gets swung way in the opposite direction and before long we’re completely discouraged. Thanks for another great post Lauren!
Thank you for this! I made a pair of pants about 5 years ago and although wearable(???) I cut off about 4 inches at the waist to get an almost fit. (never heard about muslins then) However in the intervening years I have never made another pair of pants. Now I WILL have another go a see if I can actually get a proper fit – we’ll see
Awesome tutorial, thank you!
I’ve just made a relaxed fit all in one that mede me look like Andy Pandy! The crotch was at least 2 inches to low but fitted on the bum.. I’ve looked at tutorials before I re make and to be honest, you need a degree in technical drawing to understand them…. Until I found this !
Thank you!
(Would I just alter the front trouser pattern pieces as the bum fits nicely?)
Can’t wait to browse your patterns now!
How do I add an inch or two to the depth of the crotch on my elastic waist pull-on pants?
BUENAS TARDES
PODRIA SER EN ESPAÑOL LA TRADICIÓN HUSTEDES TAN BIEN EN SEÑAN CAMISAS ME EN CANTARIA APRENDER PANTALON Y CAMISAS