Tag Archives: completed

Completed: Chambray Tencel Butterick 5526

3 Oct

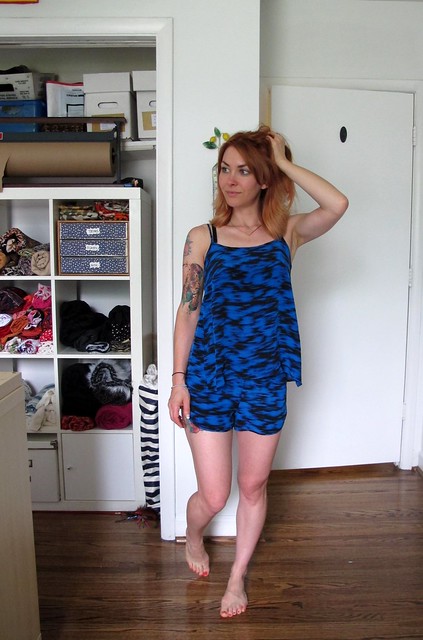
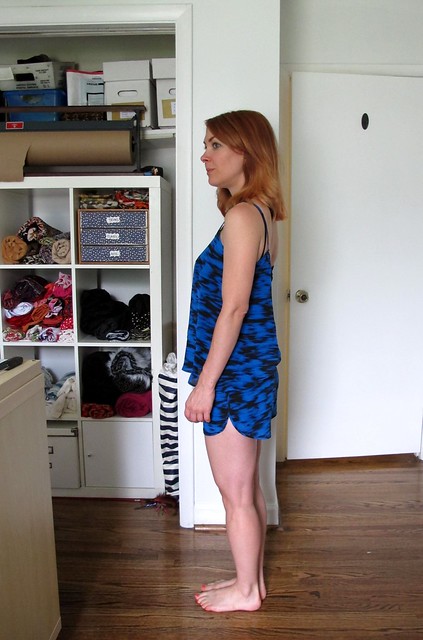
Well, surprise surprise…. I am back again with – you guessed it! – another button-up shirt. Ha! Is this all I wear these days? Probably. I’ve been sewing – and making button-ups – for years at this point, but it still tickles me to no end that I can get them to fit every part of my body without bagginess or gaping. To hell with all those tiny safety pins and double-sided tape – I finally have buttons where the buttons need to go! Yay!

So now, my wardrobe is just slowly filling up with the button-ups of my dreams. Also, button-ups are really really really fun to make. You like making jeans and bras? You’ll love making button-ups. So many tiny pieces with lots of precise topstitching I LURVES IT β™₯

B5526 Chambray Tencel

B5526 Chambray Tencel

When I was in NYC earlier this year, I made some time during my trip for a couple hours at Mood Fabrics flagship store in the Garment District. Since I live way way outside of NYC, I don’t generally get this opportunity except once or twice a year – so I try to make it count! I always come prepared with a list and a plan – and while I allow myself to veer off the list if I see something shiny that appeals to my magpie tendencies (very much like when I go grocery shopping, although that sort of veering usually involves chocolate :P), the list is helpful for keeping me on track so my purchases are a little more focused. I don’t know if you’ve had the pleasure of shopping in the physical Mood Fabrics store, but it is QUITE overwhelming if you’re not used to it! The aisles of fabric go on forever, piled to the ceiling – and there are 3 glorious floors of it!

One of the things on my list for this trip was to find a chambray Tencel shirting. I’ve seen this all over sewing blogs and even in RTW – chambray Tencel was apparently very hot last fall (whether or not it’s still hot this fall – whatever, I like it, that’s all that matters!). I wasn’t familiar with Tencel until a couple of years ago, when I was sewing for Elizabeth Suzann and she started using it for some of her designs. Tencel is very similar to rayon – it’s a wood cellulose fiber, so it breathes beautifully, and it has an incredible drape. Unlike most of the rayons I have sewn with, this is a bit thicker and easier to handle – it’s not quite so floaty. My brief internet research also tells me that Tencel is a very environmentally friendly, and the fibers are grown sustainably. Gooooo Tencel!

I found this particular Tencel in the depths of the shirting fabrics in Mood’s store, and it was exactly what I had been dreaming of when I wrote my list. It’s drapey and nearly as soft as a baby’s butt – just like rayon – but with a thicker hand and an incredible sheen. I am pretty sure this is the same stuff available on the website, actually (also FYI, Mood Fabrics now has tons of Tencel on their site – including flannel WUT). I bought enough yardage to make a long sleeved button up, prewashed that bad boy when I got home, and set it aside to allow summer to pass before I cut into it. And finally, here we are!

B5526 Chambray Tencel

B5526 Chambray Tencel

B5526 Chambray Tencel

B5526 Chambray Tencel

B5526 Chambray Tencel

I used my very favorite shirt pattern, Butterick 5526, to sew this up. I’ve made this pattern dozens of times at this point, so there’s not much I can say about it that I haven’t already said dozens of times. I’m so familiar with this pattern, I’m pretty sure it could sew itself if I gave it a chance. I decided to mix a couple things up to make my shirt look a little more like a workshirt – rugged, casual details, but with that pretty, slim fit that only princess seams can give you. And also to make it look less like I am just wearing the exact same shirt every day. Even though I totally am.

I redrafted the back to include a yoke (and by redrafted – I mean I just sliced off the top of the pattern piece and added seam allowances, ha!) and swapped out the simple bias plackets for a more manly tower placket. I also drafted pointed pockets with matching pointed flaps (again, I am using the term “drafted” VERY VERY loosely here!). Another big change was to topstitch everything at 1/4″, instead of my usual 1/8″ edgestitching. It’s a lot more bold and pronounced, like the RTW stuff I’ve been lurking on, and gives a completely different look! I imagine that over time, the edges will curl and wave a bit and make the whole shirt look more settled in. All the interior seams are flat-felled, with the exception of the yoke – which is faced with more Tencel. Oh, and I added button tabs to the sleeves, so I could roll them up if I wanted to!

B5526 Chambray Tencel

B5526 Chambray Tencel

B5526 Chambray Tencel

B5526 Chambray Tencel

Working with Tencel wasn’t much different than any other shirting fabric I’ve used, although it does have a tendency to stretch and slide if it things it can get away with it. I added lightweight fusible interfacing to all the normal shirting bits – collar, collar stand, button placket, etc – as well as the sleeve tabs and pocket flaps, just to give them a little more structure. This fabric responds really well to heat, so I was able to steam everything easily into submission, which is a must for shirt making.

I did have one pretty big unpicking session with this shirt – for some reason, the collar ended up too big (I don’t think it stretched out, as the top collar is cut on the straight grain and was also immediately interfaced after cutting – I am thinking maybe I skewed my seam allowances somewhere, somehow?) and went almost to the ends of the collar stand. I noticed it right before I started topstitching, and while I tried to convince myself it was ok – it wasn’t, and I knew deep in my heart of hearts that it looks absolutely fucking shitty. At this point, I had already aggressively trimmed down all those seam allowances and pressed the shit out of everything, and while I could still unpick things – it would going to be a giant PITA. I left the shirt on my dress form for a few days so I could get some space, and upon revisiting, I knew I wouldn’t be happy with the collar the way it was. Considering how much time I had already spent making this shirt (and the uncertainty of knowing whether or not I’d be able to get more of this fabric to cut another one), I ultimately decided it was worth the time to unpick everything, re-sew the collar with larger seam allowances, and then re-insert it. Not gonna lie – it took me about 2 weeks of leaving the shirt wadded up in the corner of my sewing room (so it could really think about what it had done) before I got up the energy to do all that unpicking, and another week or so before I re-sewed everything. But you know what? It looks SO SO SO much better now (it’s not perfect, but it is a 1000% improvement, no question) and it was worth the anguish! Sometimes you just gotta step away from whatever is frustrating you, to get another perspective.

B5526 Chambray Tencel

B5526 Chambray Tencel

B5526 Chambray Tencel

B5526 Chambray Tencel

B5526 Chambray Tencel

B5526 Chambray Tencel

Butterick 5526 is *my* personal go-to button-up pattern for sure – I’ve got my tweaks down to a science at this point, and there’s nothing this shirt pattern can’t do for me! I love a good button-up shirt and I’m so happy to see more of this sort of pattern emerging out of the wild these days! Cashmerette’s Harrison Shirt is drafted specifically for plus sizes all the way up to an H cup (like, seriously, the double princess seams with no gape is absolutely mind-blowing to me) and Tilly & The Button’s new Rosa Shirt & Shirtdress is a gorgeous little beginner-friendly piece that will walk you through every single step (stay tuned for my Rosa review, btw, bc OF COURSE I made one of those bad boys!). I also love the Grainline Studio Archer for a more rugged/boyfriend looking shirt (lack of princess seams on this one means less fitted, but also much more suitable for those cozy plaid flannels!) aaaand I just got my hands on a copy of Deer & Doe’s MΓ©lilot shirt so that’s coming up next! What’s your favorite shirt pattern?

As a bonus, the skirt I am wearing in these photos was also made with fabric from Mood Fabrics! I used a cotton corduroy and you can read all about it in this post from earlier this year. This skirt has been on hold during the summer – it’s too hot here to wear cord, plus, it just looks silly in 100* weather – and I am excited to bring it back into wardrobe rotation with these dipping temperatures! Mustard and denim – is there a prettier color combination? I think not!

Note: The fabrics used in this post were provided to me by Mood Fabrics, as part of my participation with the Mood Sewing Network. That fabulous hat is all mine, though πŸ˜‰

Completed: Silk Rite of Spring Shorts

19 Sep

Hey everyone! I want to thank all of you for your kind words, thoughts and prayers in regards to my last post about my dad. I am overwhelmed (in a good way) by the outpouring of support I received via blog comments, Instagram comments, and emails. I’ve said a million times before how much I love and appreciate everyone in the sewing community, and this just really reinforced this. I sincerely appreciate all the comments and emails, all the kind words and wishes, prayers and positive thoughts, and I am so so grateful for all of you. Thank you all so much β™₯

With that being said, I do have a positive update! On Saturday evening, I came to the hospital after getting off my shift at Craft South (which was a whole drama in itself – my dad is in a hospital in Hendersonville, TN, which is about 20 miles from where I am in Nashville. Not a huge deal, however, there is currently a gas shortage here that people are PANICKING over and of course I only had like 1/4 tank when it happened! But I decided not to stress about it and just deal, and that’s when I managed to find gas. A miracle in itself because most of the stations here were completely out!) and they had been able to successfully wake him up out of the sedation! They took the tube out on Sunday morning and have slowly been introducing soft foods and liquids, and he may be able to get out of the ICU and into a normal room within the next day or two – and then home after that (hopefully soon!)! There is still a lot that he needs to overcome, of course – but this is a very good, very positive improvement over last week and we are all so so so happy. I honestly wasn’t sure that he was going to pull through, but I guess I forgot that my dad is even more stubborn than I am. Literally, his first words when they took the tube out were (to my mom): “Your husband ain’t done yet.”

So anyway, back to regular posting – here’s a project I finished a couple of months ago.

Silk Rite of Spring shorts

Pin-up Style silk shorts! You know, totally appropriate to combine in a post about my dad (you know what the other option was as far as photos I had on hand? Bras. Sooooo booty shorts it is hahaha):P

These are the Rite of Spring shorts from Papercut Patterns. Remember when I made a really adorable pair of these a few years ago? I have been wearing the hell out of them this summer – they look really excellent with my Elizabeth Suzann Birdie Crop (mine is the ivory one). I wanted to make a couple more pairs, so I started with this silk crepe (leftovers after making those Silk Lakeside Pajamas).

I’ll just say this right now – I don’t like these at all. I don’t think they are flattering on me – they make me look sort of boxy (maybe they look ok in the photos but I reeeeeeally HATE the way they look in real life!) – and the silk crepe feels just a bit too lightweight to be bottom coverage. I actually wasn’t planning on posting this project at all, however, I think it’s important to share the fails along with the victories.

Silk Rite of Spring shorts

Silk Rite of Spring shorts

Silk Rite of Spring shorts

Why I’m not happy with them, I couldn’t tell you exactly. I think it’s a combination of bummers that makes the overall effect just “meh.” I do love this fabric, but I don’t like it as shorts. While I love the idea of a drapey little pair of high-waisted shorts, these just look kind of… saggy and sloppy, at least on me. They’re also too big in the waist, and while I did take them in a little – it wasn’t enough and I realized I just don’t care to keep futzing with them. I’m not going to wear them. I didn’t even bother to straighten or edit these photos. That’s how much I just don’t care about this project haha.

Silk Rite of Spring shorts

Silk Rite of Spring shorts

Silk Rite of Spring shorts

Silk Rite of Spring shorts

I put some real effort into the construction, so while they aren’t that great (for me) stylistically – they are great in terms of how they were made! πŸ™‚ There is silk crepe piping at the front seams, which is topstitched to help it lie flat. Due to the piping, I opted to just sew + serge the seams (instead of using French seams, which I generally prefer for silks). The waistband is lightly interfaced with a stretch tricot, to help it maintain a little bit of stretch and stay comfortable. The invisible zipper seam is reinforced with interfacing as well, to keep the area smooth and also give it a little bit of strength. I also interfaced the hem, to give it a little of structure and so it wouldn’t be quite so floaty.

To be completely honest, I felt a bit bummed when I finished these and realized that I didn’t really like them. It’s certainly a let-down to spend time on a project, only to be unhappy with the result. These days, I am actively working on focusing on the positive (sorry, I’m big hippy dork ok)- so instead of feeling sorry for myself for “wasting” time on a project, I instead used it as an opportunity to learn from it. Why am I not happy with these shorts? What could I change next time to make the outcome a good one? It’s important to learn from the fails so you don’t repeat them!

I think if I had straightened the hemline so it wasn’t curved (which I had considered doing before cutting the silk, but then decided it wasn’t worth the effort), and made them more fitted at the waist – that would have helped. But honestly, I think I just like this pattern in a heavier weight fabric with more structure. Not necessarily a bottom weight – but definitely not this floaty gossamer weight. My next pair (which will probably be next year, as it’s just too late in the season now to keep making butt shorts) will be in cotton sateen.

Silk Rite of Spring shorts

So, there you go – a sewing fail (at least in a sartorial sense – as I do feel good about the construction of these!) but a personal life WIN. I’ll take them both!

Tell me about your last sewing fail! Did you learn from it, and if so, what was that lesson?

As a side note… if anyone wants these shorts, email me with an offer (I will entertain anything at this point). They are a size XS and the waist is approximately 27″. The silk has a little bit of lycra so it’s slightly stretchy, and it’s machine washable! Seriously, someone take these before they end up in the Goodwill pile haha.

Completed: Sea Wall Socks (Also, dad update β™₯)

15 Sep

As much as sewing is my very first love, I’m really glad that I learned how to knit. The repetition is extremely therapeutic when I’m stressed and need to calm down – on me, it has almost the same effect as doing an hour of yoga. It’s very meditative, giving me something to focus on with my hands while allowing my mind to quiet down. Even just sneaking in a couple of rounds at opportune times – before I’m rushing out the door, while I’m sitting in my car in the parking lot trying to work up some nerve to go inside (tbh, usually because I’m about to walk into a first date, ughh), at the end of the night after a class when I’m having trouble turning my brain off. I’m not a crazy enough knitter to where I can manage it during a walk (yet!), but I do drag my little Field Bag with me everywhere, because you never know when you need to bust out those needles for a moment of zen. Really, the only place I’ve found so far that you can’t take your needles is in a courthouse (that was a sad moment for me – literally, I shed a tear when they told me I had to put my project + needles back in my car… at least they didn’t make me throw it away!).

Seawall Socks

Socks are my #1 project of choice for de-stress knitting, as they are small enough to carry around and work on somewhat discreetly. I love knitting sweaters, but they get large and unwieldy quite quickly and they tend to require multiple balls of yarn to complete. Socks are a lot easier when it comes to portability. I’ve mentioned this before, but I try find the local yarn store with each new city that I visit, and pick up a skein of sock yarn as my souvenir. Sometimes it’s from a local yarn dyer (the best!), sometimes it’s something I can’t find here in Nashville, and sometimes it’s just something pretty that reminds me of the city I’m in.

My latest sock project is the Sea Wall Socks pattern from Tin Can Knits, which was offered for free last year as their 12 Days of Christmas celebration. I actually don’t mind paying for knitting patterns – seriously, people who complain about a $5 pattern drive me mad – but I extra extra don’t mind free patterns πŸ˜‰ I love the interesting cables on this pattern and I think it looks especially nice with a variegated yarn. I knit a size 6 using size 0 needles with sock weight yarn.

Seawall Socks

Speaking of sock yarn, isn’t this one super pretty? I bought at Gather Here last year, while I was visiting Jenny in Boston after my retreat at A Gathering of Stitches in Portland (which I just realized was almost exactly a year ago from this posting, wow!). This is my Boston yarn (ok, Cambridge – whatever.). The yarn is Knittink, which I can’t seem to find any info about online but they had a ton of it in the store! The colorway is actually called “Unicorn Snuggles,” which is admittedly a big part of the reason why I chose it πŸ™‚ There are sparkly silver threads running throughout, and the yarn is extremely soft and easy to work with. I had such a wonderful week up in New England last year, and I think about it every time I look at this yarn. I love that.

Seawall Socks

Seawall Socks

Seawall Socks

I knit these socks as instructed by the pattern, however, I did not block them after knitting as you can probably tell. In the past, I have dutifully blocked all my socks after they were finished (using sock blockers and everything)- but I really don’t like the way the yarn feels after blocking. The fibers tend to relax, the stitches flatten and spread, and then the socks just feel loose on my feet and don’t stay up. So now, I don’t block them at all. To wash, they get a cold wash in the machine (along with the rest of my clothes) and thrown right in the dryer. I’m sure some people hand wash their socks, but not me. Not anymore. Yolo, etc.

Seawall Socks

Anyway, this post isn’t really about the socks. I’ve been absent the past couple weeks for a few reasons – first, I was in Rhode Island for work (which was WONDERFUL – seriously, I could not have asked for a better week). I came home on Labor Day, and then on Wednesday, my dad had to go to the ER with a bout of pneumonia. Long story short, he was admitted to the ICU that night due to several problems, and he’s been on a ventilator since Saturday morning. For those who don’t know, my dad was diagnosed with cancer almost exactly 3 years ago, and so while this shouldn’t be a surprise – it’s still a big, huge shock. My entire family is basically living at the hospital at this point, and while I’m so grateful for their support, it’s been really scary and just downright shitty. I don’t know what is going to happen, as we are just stuck in this awful limbo state of waiting.

I wasn’t planning to write about any of this – I felt like it was too personal and sad for an otherwise pretty fluffy blog. And posting finished projects seems downright silly and trite when you’re dealing with much bigger issues at hand. However, I’ve started getting emails from people wondering why I haven’t posted in 2 weeks, and while I don’t think I owe anyone any sort of explanation about my personal life – it doesn’t seem right to just ignore this, since it’s impacting me pretty hard. Also, I really need this escape. My entire week has revolved about a hospital at this point, and it’s downright depressing.

Anyway, I’m not trying to turn this into a sob story/woe is me sort of post – yes, everything is real shitty right now, I won’t deny that – this is just currently what we are dealing with at the moment. My dad is fighting the fight of his life right now, but I know that he lived his life exactly the way he wanted to, and he has 0 regrets for anything. After his first bout of chemo, he swore it off completely and has been treating himself holistically, which has really made him feel incredible this past year. He actually ran 55 miles the weekend before he went to the hospital, right after tearing up a bunch of carpet and laying new hardwood floors. I look up to him in so many ways, and could not have asked for a better role model – he’s taught me so much about life and love, and this year especially has really strengthened the bond we have. I have a lot to be thankful for, which is what I am choosing to focus on right now.

Positive thoughts and prayers for all of us are appreciated. Much love to all of you β™₯

Completed: Silk Chiffon Archer Button-Up

30 Aug

So I guess we are now officially in that time of the year again – when the shops are screaming FAAAAAALLL (Wool caps! Corduroy bottoms! Pumpkin spice everything!) but our temperatures are still firmly stuck in summertime. While I’m not ridiculous enough to pull on my Ugg boots when it’s still 100 degrees outside (LOL JK I don’t own Uggs hahaha) (but seriously, Ugg-watching in 100 degree weather at the ritzy mall is absolutely my favorite pasttime during these months. Bonus points if they are wearing a wool hat, too.), I still want to at least look the part of the changing seasons, which still complying with the temperatures outside. For me, that means colors and silhouettes that give a nod to fall – but sticking to lighter-weight fabrics so I’m not sweating my arse off.

So anyway , with all that being said – here’s another button-up shirt! HAHA

Silk Chiffon Archer

I used the Archer pattern to make a fall-inspired button-up, but with a twist – instead of the traditional plaid flannel (which I lurrve, but again – HOT!), I used a light and breezy wide silk chiffon from Mood Fabrics for the main, and woven silk crepe de chine for the collar, collar stand, button band, pockets, and bias facings. Mood Fabrics carries tons of colors of both of these fabrics, but I went with boring ol’ basic black. In the future, I might go completely insane and try this with a PLAID silk chiffon. Maybe.

Silk Chiffon Archer

Silk Chiffon Archer

If you are feeling some major dΓ©jΓ  vu about right now, you are absolutely correct – I totally and completely 100% shamelessly ripped off Kendra’s silk Archer from the Grainline blog. I don’t ever think I’ll look as chic as she does, but that doesn’t stop me from trying! πŸ™‚ I followed Jen’s instructions for making the Archer sleeveless (basically shortening the shoulder drop and adding some contour to the back armhole, nothing crazy here) and shortened the length by about 2″. I sewed a size 0, which is what I normally make for this pattern.

Silk Chiffon Archer

While I have made my share of button-ups in tricky fabrics – silk georgette, silk crepe, crazy plaids, and a rayon challis that has yet-to-be-blogged – I did worry a little that this one was going to be a beast to sew. My last experience with chiffon did NOT go well (you didn’t miss anything – this was several years ago), but I think a big part of the problem was the quality of the material I was using (it was pretty cheap poly chiffon). Using a high-quality fabric makes a big difference in the ease of your sewing when it comes to tricky fabrics like this – you know they’re already on-grain (or it’s easy to straighten the grain if you need to) and the natural fiber content means you can actually press them (which, again, makes a world of difference during construction – especially for a pattern like this). With all that being said – I only used a yard of the chiffon to make this sleeveless version, which at $20.99 per yard isn’t really that expensive. I got a yard of the crepe de chine as well, but only used a fraction of that (I use silk bias on everythingggg so I have tons left over for other projects). Even having been made out of silk, it’s fairly economical! And you definitely cannot get a silk button up shirt for less than $50 in retail, at least not new. Plus, I machine-washed all my fabrics before cutting – so my silk is machine washable now πŸ˜‰

Silk Chiffon Archer

Silk Chiffon Archer

Silk Chiffon Archer

Silk Chiffon Archer

So anyway, about that sewing! I didn’t do any sort of prep before getting into cutting – in the past, I’ve used fabric stabilizer to stiffen the fabric so I’d have an easier time cutting and sewing (and yes, it does work – see the aforementioned silk georgette button-up post for my full review on that), but I didn’t bother with any of that this time. It certainly would have been easier if I had, but obviously it was doable without πŸ™‚ I did trade out my scissors and use a mat and rotary cutter to cut this, which was tremendously helpful.

Sewing was really easy and straightforward – I used a sharp 70/10 needle, polyester thread, and a lot of high heat from my iron. All seams are enclosed – the yoke and collar cover most of that, but the side seams are French-seamed, and the arm holes are finished with silk bias facing. The hem is just a simple rolled hem (I usually use bias facing there as as well, but I was afraid the crepe de chine would be too heavy for the silk chiffon). I used a super lightweight interfacing (which comes in black!) for all my interfaced areas – it gives some stability without making them weirdly stiff, which is important when you’re dealing with silk chiffon. The buttons are some vintage glass buttons that I’ve had in my stash for ages. The only thing I’m not thrilled about is the pockets – the crepe de chine sags a bit on the chiffon, so they’re not perfectly smooth when I’m wearing it (or when it’s hanging on the wall, for that matter). And also – they are a bit lopsided! Whoops! I hesitate to unpick them because I am afraid it may damage the delicate chiffon, but thankfully no one notices it – even when I point it out. Of course, that may be all you see now πŸ™‚ Sorry πŸ™‚

Oh, and in case you were wondering – I am wearing a black tank top under this, and I did not make the shorts (I WISH I did, though! Because then that would mean that I had found awesome fabric like that!). They are from Express, but the shape is quite similar to the Rite of Spring shorts. The fabric is a nice rayon challis. I pretty much never buy clothes these days, but these were given to me by my boss while she was cleaning out her closet in preparation for her cross-country move (she also gave me a pair of Jimmy Choo’s. Um, I WIN.). Speaking of which, I will be flying up to Rhode Island this week to orchestrate all the unpacking and whatever else you’re supposed to do when one moves cross-country (I’ll be staying here in Nashville and working remotely after that). I’ve never been to RI before so I’m excited to check it out! Wish me luck!

Silk Chiffon Archer

I don’t have much else to say about this pattern that hasn’t already been said to death, so I’ll keep this post reasonably brief. Yay for silk chiffon button-ups! Once we get into full-on winter mode, I think this top will continue to be useful as I can wear it under my cozy sweaters for an extra layer of warmth.

**Note: The fabrics for this project were provided to me by Mood Fabrics, as part of my participation in the Mood Sewing Network.

Completed: Smells Like Teen Spirit Sweater

26 Aug

I am SO happy to be finished with this sweater!

Smells Like Teen Spirit Sweater - front

Clocking in at nearly 6 months to knit, seam and finish – this sweater was definitely a labor of love to complete.

Smells Like Teen Spirit Sweater - front

Smells Like Teen Spirit Sweater - side

Smells Like Teen Spirit Sweater - back

Both the pattern and the yarn are from Wool and the Gang, which is pretty much the coolest yarn company I’ve ever heard of. WATG sells yarn, patterns, needles, and complete kits for their patterns (as well as RTW knit pieces, if you want to be completely lazy πŸ˜‰ no judgement over here from me!). The company reached out to me earlier this year – well, 6 months ago – and asked if I’d like to try one of their kits for a review. Being the cheeky piece of shit I am, I choose the Teen Spirit Sweater, in the classic red/grey colorway.

Smells Like Teen Spirit Sweater - kit

Smells Like Teen Spirit Sweater - kit

The kit came beautifully packaged, and included 21 balls of their Wooly Bully alpaca yarn, the Teen Spirit Sweater pattern, at set of size 10.5 Rosewood needles, and a giant needle for weaving in all the ends.

Smells Like Teen Spirit Sweater - front

Smells Like Teen Spirit Sweater - back

The pattern is One Size, which I knew immediately off the bat was gonna be WAY too big for me – it has a 44″ chest measurement (compared to my measly 32″ – that’s a LOTTA ease!). So the first thing I did was knit a gauge swatch to figure how many stitches I knit per inch, and recalculate the pattern so it would work with my specific measurements. Since the pattern is basically 4 giant rectangles (the sleeves have very gradual increases but nothing crazy), this was not at all difficult to do. All I needed to change was the amount of stitches I cast on, and then just follow the pattern henceforth. I also shortened the body of the sweater, because I wanted mine to be slightly cropped to offset the boxiness.

All the pieces are knit separately – front, back, and two sleeves . The front and back are identical, and are literally just two big rectangles – there is no shaping for the neckline, arm holes or waist. As I mentioned, the sleeves have very gradual increases to make them slightly shaped, but they are still primarily just big ol’ rectangles. To make the tartan, you knit in stripes following the pattern, and then weave the vertical stripes in afterward using this technique from WATG. It looks a lot more complicated than it actually is – it’s just time-consuming! I spent MANY nights sitting on the couch, binge-watching Mad Men, with a tiny blanket o’ sweater in my lap, weaving tartan stripes. In fact, this was the main project I worked on in the last week before my move – as it was the only thing I hadn’t packed!

After I wove in all the tartan stripes, I then blocked the pieces (which seriously took like 2 days to dry completely) before seaming. You seam the shoulders first, then attach the sleeves at the sleeve cap, then seam up the side and sleeve seam in one go (same as you’d do when sewing a knit tshirt). Finally, you knit the neckline ribbing (the sleeve and hem ribbing are knit while you are knitting the pieces). The resulting sweater is MASSIVELY heavy – I wish I owned a scale, because I’d love to know how much it actually weighs! Honestly, I love throwing it at people and watching how surprised they are when they feel it’s heft hahaha. It’s surprisingly not that itchy – it’s a little bit itchy, but I think another wash with some lanolin will clear that right now – but it is super duper warm. Way too warm to wear right now, obviously, but I’m sure I’ll really appreciate it come winter πŸ˜‰

Smells Like Teen Spirit Sweater - flat

Smells Like Teen Spirit Sweater - flat

Smells Like Teen Spirit Sweater - flat

As complicated at this sweater looks and as long as I spent working on it – it honestly was not difficult to knit at all. Even with rewriting the pattern to work with my measurements, the overall construction was very simple and straightforward. It was definitely time-consuming, but not hard – seriously, this is a great pattern for a beginner. Lots of knitting and purling, simple color changes for the stripes, and then seaming everything together (my seaming definitely needs some work, btw. Woof.).

Part of what took me so long to finish was simple mistakes I made on my end. I wasn’t happy with my first batch of tartan stripes – which I decided after I’d finished weaving the tartan for the entire front. I ripped everything out, recalculated, and wove it all in again. I could have stood to do a neater job with my weaving – all the other examples I see are much more even and precise and mine looks a bit sloppy in comparison – but I’m pretty happy with it regardless because I AM SO NOT RIPPING THAT SHIT OUT AGAIN. I also had some trouble with the neckline ribbing – I picked up too few stitches the first time, and wasn’t able to get the sweater over my head! So I got PISSED, ripped out the ripping, and put that fucker in time out for a solid month. Ha! Eventually, I got some liquid courage (aka wine) and tried again – this time picking up stitches at a 1:1 ratio and making sure it pulled over my head before binding off. It worked! Go me!

Check out my Ravelry page for the full low-down on this project – my stitch counts, measurements for the tartan weaving, etc. Didn’t want to clog up this post with all that, but it’s on the ‘Rav! BTW, I should mention – you can also buy this pattern individually, if you don’t need the yarn and needles. Teen Spirit sweaters for everyone! πŸ˜€

Smells Like Teen Spirit Sweater - front

When I started this sweater, I naively thought that I would have it finished before the weather started warming up – ha! Not even! On the flip side, it’s definitely ready and waiting for the next season! I’m actually pretty glad that I had an entire summer to fuss with this, because it made me not be in a hurry to finish it – I knew I’d have to wait months before that was even an option. Instead, I took my time and ripped out when needed, and I think the end result was worth it. Man, I cannot WAIT to wear this bad boy! I think it’ll look especially ace with my Elizabeth Suzann Cecilia Pants. Which, btw – if you are looking for the magic pants that look amazing on EVERYONE, that’s those. You’re welcome.

**Note: The kit for my Teen Spirit Sweater (which included the yarn, pattern and needles) was VERY generously given to me by Wool and the Gang, in exchange for a blog review. Thank you, WATG!

Completed: Augusta Hoodie // Anima Pants

22 Aug

I know it’s still like 8000 degrees here in the South, but I’m already thinking ahead to the next season! This year, I want to be ready when the cold starts creeping in – even though you & I both know that won’t realistically happen here until, like, December (if not later!).

With that being said, I started this project WAY THE FUCK back in May – you know, when summer was the creeper. Took me this long to finish it, but whatever!

Prepare yourselves. This is a two-part project, so there are a bunch of pictures.

Organic French Terry Augusta Hoodie

First part – the one I started in May (or was it April? omg.) is this sweet-ass track jacket hoodie combo! The pattern is the Augusta Hoodie from Named. I don’t tend to sew a lot of patterns from this company – I find most of the styles a bit outside of my personal style preferences (like the Inari dress that everyone is going apeshit over and I JUST CAN’T GET BEHIND THAT SORRY), but occasionally I’ll come across something that makes *me* go apeshit (see: my beloved Jamie Jeans LOVE U). As was the case with this jacket! The pattern was given to me as a gift by my lovely friend Carla; it has taken me over a year to decide what to make it up with, but I think it was worth the wait!

Organic French Terry Augusta Hoodie

Organic French Terry Augusta Hoodie

Organic French Terry Augusta Hoodie

Organic French Terry Augusta Hoodie

The Augusta Hoodie is a combo track jacket/hoodie with welt pockets, front snaps, and seaming that is perfect for some crazy colorblocking (even though I totally went the boring route). I made a size 32, and adjusted the sleeve length as I found them a bit long (a normal alteration for me).

Pattern construction wasn’t too terribly difficult – Named has gotten much better with their pattern instructions (they used to be quite sparse) and I had no problems with any of the steps, including the welt pocket. The jacket is unlined, but there is a facing so you get a nice clean edge at the front. The hood is lined, which I left off because my fabric was so thick. I also added a drawstring to the hood, cos I liked the way it looked. Ideally, I would have done this before finishing the hood – and used my machine to sew grommets around where the drawstring goes. Instead, I decided to do it after the hoodie was completely finished, and thus just popped a couple holes in the hood with my scissors and hoped for the best, ha.

Organic French Terry Augusta Hoodie

Organic French Terry Augusta Hoodie

Organic French Terry Augusta Hoodie

The fabric is a super thick, super heavy cotton French Terry from Organic Cotton Plus. I went with the Cranberry color, although they have tons of other color options for French Terry. This fabric is amazingly thick and soft and will be wonderful to wear when the temperatures start dropping. The piped sleeve seams are done with strips of rib knit fabric, just flat – there is no piping in there (only cos I didn’t have any on hand and I didn’t feel like waiting for any to ship). The ribbing at the bottom and cuffs is actually two different kinds of fabric – I originally planned to use the aforementioned rib fabric from OCP, to keep everything consistent, but it was way way WAY too lightweight to work with this thick fabric. I ended up painstakingly ripping off the bottom band (which was serged on) and replacing it with a sturdy rib knit from Mood Fabrics, which holds up much better with the thick French terry. Of course, I fucked up my measurements and didn’t buy enough, so the cuffs is an entirely different rib knit that is a lighter weight (but heavier than the rib fabric from OCP). I don’t remember where that rib came from as it was in my stash, but I’m sure it was also from Mood. If you look closely, you can see that they are two slightly different shades of white, but I am choosing to ignore that. Also, rib is a weird word when you type it over and over. RIB.

Sewing with this fabric wasn’t necessarily difficult, but it did require some finesse because it is SO THICK. Cutting was kind of awful – my scissors are still pretty dull (yup, haven’t gotten them sharpened yet. How long have I been meaning to do this? 2 years?), and they didn’t have the easiest time chopping through all that thickness. It actually hurt my hand to cut through double layers, but also I am a huge baby. I sewed the majority of this on my serger – French Terry sheds like crazy, and serging helps keep that at minimum – and there were a few sections of massively thick layers where I had to coax the handwheel to get things to keep moving. My snaps are set using an industrial snap-setter – again, I have access to this from my old job (in sewing production) – I have NO idea how you’d set snaps in this otherwise! I guess the pattern calls for a lighter fabric, which would certainly be easier to work with. Overall, I wouldn’t say it was hard – it just required being slower and more patient. Which is infinitely easier when you are sewing something way the fuck out of season and know you won’t be able to wear it for months regardless πŸ™‚

Organic French Terry Augusta Hoodie

Organic French Terry Augusta Hoodie

Organic French Terry Augusta Hoodie

Organic French Terry Tracksuit

Organic French Terry Tracksuit

This track jacket reminds me of the stuff we used to wear back in the early 2000s, which I was still super active in the Nashville Hardcore scene. We were ALL ABOUT track jackets and hoodies, which looked real good with our tight jeans and Saucony Jazz shoes πŸ˜‰ I definitely had a baby blue track jacket for years, which I loved everything about except that the fit was just a little boxier than what I wanted. So, here I am reverting back to my 16 year old self. Maybe should buy some Sauconys and relive the memories of the mosh pit or some shit.

Organic French Terry Anima Pants

Organic French Terry Anima Pants

Organic French Terry Anima Pants

Anywayyyy, after I finished the jacket, I realized I had enough French terry left over to make a pair of pants. Sweet! Like I said, this fabric is really thick and cushy, and I figured it would make a nice and warm pair of pants for lounging around the house.

I used the Anima Pants pattern from Papercut Patterns, sewn in a size XXS with about 2″ of length taken off. This was a very easy and straightforward pattern – basically just a knit pant with pockets, cuffs at the hem, and an elastic waistband with a drawstring. I did have minor troubles getting the elastic waistband sewn in – I think mostly due to fabric choice, as again, SO THICK OMG – but it’s fine, just a bit wonky looking. Whatever! For the white ribbing, I used a white cotton interlock knit, also from Organic Cotton Plus, which I so happened to have in my stash (the knits I used on the hoodie didn’t have enough yardage for these pants). It is leftover from these tshirts, btw. I can’t believe that shit was still hanging around my stash, but I ain’t gonna argue with that!

I am quite happy with how the pants fit, as well as how comfy and cozy they are. I am not especially happy to see that I have basically made an unintentional pair of Santa pants, but, it is what it is. I wasn’t planning on wearing these out of the house anyway (sorry, the whole ~athleisure~ trend is another thing I just cannot get behind), so I’m not terribly concerned about it. At least I have the perfect outfit to wear this Christmas.

(Btw, in case you were wondering – I also made my top. It’s a Papercut Patterns SJ Tee, sewn in a lightweight jersey fabric and cropped.

Organic French Terry Anima Pants

Organic French Terry Anima Pants

I should add, another thing I had no intention of doing was actually wearing these two pieces together.

Organic French Terry Tracksuit

Because I definitely look more like a late 90s Puff Daddy in this ensemble HAHA

Organic French Terry Tracksuit

I will let y’all know when my rap album drops, ok? Holler.

**Note: The French terry was given to me by Organic Cotton Plus, in exchange for a review. All rap opportunities are 100% my own.

Completed: Travel Backpack

11 Aug

Look! I made a backpack!!

Travel Backpack

Ok, let me back(lolz) up a little first here!

When I travel around (whether it’s personal or sewing workshop related!), I like to check my luggage and bring a carry-on bag that is big enough for all my entertaining shit (knitting, Kindle, etc), but not so big that I’m forced to keep it in the overhead bin. I’ve dabbled around with different sorts of shoulder bags – totes, giant purses, I dunno, all sorts of stuff – which worked fine, but I didn’t like that they weren’t super useful once I got off the plane (like, who wants to walk around NYC with a giant tote bag?). I have a tendency to overpack more than I need to, and I’m really trying to pare down on the amount of stuff I lug around when I go out of town. I wanted a bag that would work for both my flight *and* getting around whatever city I was hanging around. Big enough to hold some essentials – a notebook, my water bottle, phone charger, stuff like that – but not so big that I would be tempted to put everything I own in it and weigh myself down for the day.

I bought a small backpack while I was in Peru when I realized that my normal backpack wasn’t gonna hold all the shit I was trying to carry home, which ended up being really awesome for my purposes, except when it fell apart at the seams while I was last in NYC. Boo! I was on board with the backpack idea at that point, so I decided to change what I didn’t like about the Peruvian pack (too soft/no support, drawstring, not enough pockets, straps weren’t adjustable, etc) and turn it into my dream travel pack.

I used the Toddler Backpack pattern, except enlarged it for a school-age child (there are instructions on how to do this in the pattern). I first discovered this backpack thanks to Kelli and her awesome versions made for actual toddlers (this one is particular makes me want to cry because it is SO FREAKING BEAUTIFUL), and I realized the size was exactly what I needed. I wanted to keep the essence of a small backpack – like the tiny packs we carried around in the 90s and felt real cool about – but I wanted it to have some features like my big traveler backpack had, like extra pockets and a place to carry my water bottle. I also wanted it to be structured, because I am not about those sad and droppy cloth backpacks!

Travel Backpack

Travel Backpack

I feel real good about the finished size! It’s just big enough to hold an 8.5″ x 11″ folder (which I will not be carrying around in this thing, but, that gives you an idea of it’s size). I included a few pockets that weren’t part of the pattern, to make organizing more useful – there is a big pocket in the front, a pocket on either side, a small velcro’d pocket on the inside, a large padded laptop pocket on the inside, and also a secret pocket in the back! The backpack is fully lined, the outside fabric is interfaced, there is self-made piping around the outside, the straps are adjustable and padded, and the bottom is also padded and quilted. There is a double pull metal zipper at the top, and little zipper tabs on either end (to help with zipping and unzipping – they are just folded and interfaced rectangles). It was a lot of work, but it’s pretty much exactly what I want!

Travel Backpack

This pocket is for my water bottle – the bottom is gathered, and there is elastic along the top. It fits my water bottle pretty securely. The pattern doesn’t include instructions for a water bottle pocket, but it was easy to figure out. I used this post as a guide on how to cut the pieces and assemble them.

Travel Backpack

The opposite side has a sort of bastardized bellows pocket that closes with a little piece of velcro. I used this tutorial as a general guide to draft the pocket. I did consider adding a flap to completely cover the top, but figuring out how to insert it without crossing over the side seamlines was starting to make my head hurt, so I just went with a velcro closure instead. I don’t think I’ll use this pocket to carry anything necessarily worth stealing – but it will be handy for my reusable bag, or tissues, or something like that.

Travel Backpack

Travel Backpack

The front pocket closes with a zipper (pulled from my stash) and is lined.

Travel Backpack

I spent a little more (aka- bought one instead of taking one from my stash) on the main zipper and bought a metal one intended for purses, with two pulls. When you’re trying to quickly get into your pack, it’s nice to not have to find which side the zipper pull is on. Also, I like that I can clip the two pulls together with a keyring, to discourage someone from trying to take a peek inside. I bought the zipper on Etsy from ZipIt Zippers, who I’ve always had good experiences with!

Travel Backpack

The straps are plain cotton webbing, with gold D rings so that they are adjustable. The upper portion of the straps are lightly padded with cotton batting so they are a bit more comfortable. Just a word of warning – if you are making this bag for an adult, check the sewn strap length! The first pair I made was laughingly WAY too short and looked completely ridiculous on me. These were lengthened by about 5″, which works much better.

Travel Backpack

Travel Backpack

Here’s something I’m proud of – a hidden zippered pocket in the back! It’s sized to fit my passport/wallet, and no one can access the pocket while I’m wearing the backpack. I always hated that someone could theoretically open my backpack and take my stuff, and now at least the shit worth stealing is a little more safe πŸ™‚

Travel Backpack

Travel Backpack

I added two more pockets to the lining – a small pocket for holding things like chapstick, Advil, tickets, etc; and a larger pocket that is sized to hold my tablet (a Microsoft Surface, one of the older ones). Both the tablet pocket and the back side of the backpack are padded with cotton batting (the pocket is also lightly quilted), to protect my tablet and also for comfort against my back. I finished all the pocket edges with leftover bias from my piping, which I think looks really nice! I also included a keyring, so I can quickly find my keys when I need them.

I am not going to lie – sewing this backpack was a fucking BEAST. There aren’t a of of pieces, and it’s not even necessarily hard – but there is a lot of bulk once everything starts getting sewn together, especially if you include piping. That being said, the steps are reasonably simple. The instructions are easy to follow, the pieces fit together well, and there’s a lot of room for customization to make ~your perfect backpack~. Despite this being sized for an 8 year old, it’s exactly the right size for my needs.

I bought all my fabrics locally here at Craft South. The outer is my favorite – it’s a great woven cotton from Diamond Textiles that I loved working with cos it’s so pretty! (it’s not on our website, but I can personally vouch that we have like 30 yards in the store, so if you want some – just call the shop! I think it was around $18-$20 yard). The red contrast is Kasse shot cotton, and the lining is just plain ol’ Freespirit quilting cotton. I interfaced all the outer pieces (except for the gathered water bottle pocket) with medium weight fusible interfacing – Pellon 809 to be specific. I did not interface the bottom pieces, which in retrospect I kind of wish I had (the padding/quilting doesn’t make it quite as stable as I’d like, but oh well!). Also from Craft South came the cotton batting, cotton webbing and D-rings. Even though I get a pretty generous discount at Craft South, this backpack still cost me around $50 for all the materials – so it definitely wasn’t cheap (I could buy one for less than that). However, it’s sewn exactly to suit my needs AND the outer fabric is just so beautiful! So there’s that. Also, I am much more likely to take my damn time and do the best job I am capable of when I drop that kind of cash on a project – ha! I think it definitely shows with this backpack. It turned out even nicer than I was expecting!

Travel Backpack

Travel Backpack

Anyway, my little backpack is ready for it’s first adventure! I’ve got a few travel dates coming up soon, starting in September, so I can’t wait to start using it. And OH, speaking of traveling – after much planning, saving, and brain-racking… I just booked a big solo trip! I’ll be visiting in Egypt in January 2017!! HOLY SHIT, right!? I have ALWAYS wanted to visit Egypt and see (touch) a pyramid – which I am finally gonna do! I am also gonna take a Nile River cruise from Aswan to Luxor πŸ˜‰ (which I am MASSIVELY excited about!) Can’t wait to nerd out super hard at the Egyptian Museum, too! Until then, though, I’ve got a vacation wardrobe to flesh out and sew – because let’s face it, none of my clothes are very modest and I definitely need to stick out as little as possible! πŸ™‚

Completed: 2 More Scout Tees

8 Aug

Apologies in advance for the big Grainline kick I’ve been on lately. Nothing intentional, no ulterior motives – I am just really loving the patterns these days! Brace yourselves for more where this came from (oh ho ho ho wait till you see my backlog of finished projects), but first – some Scout Tees!

I made 2 Scout Tees, both of which I will be sharing in this post because I think splitting it into separate posts is a bit of an overload – especially since I’ve already made and posted about this pattern twice (see: handwoven cotton and birds). What can I say – I love this pattern and it’s been a hardworking staple in my summer wardrobe this year.

Gauze Scout Tee

First Scout is this one that I made out of a cool (both literally and figuratively) cotton gauze. The best part about this particular project is that the fabric didn’t start out as a yardage – it was actually a scarf! See?:

Gauze Scout Tee

I don’t know the true origins of the scarf; it was given to me by the one guy in my knitting group (btw, every knitting group should have a Token Dude. It really makes you feel like you made it as a knitting group coordinator haha). He was in the process of helping his mother downsize and move, and thus ended up with a big stack of fabrics that needed to be rehomed – most of which ended up in the trunk of my car. This scarf was part of that loot bag. I originally wanted to keep it as a scarf and just wear it like that, cos I looove those gorgeous gauzy scarves and yes I wear them in the summer don’t you dare judge me, but the fact is I never ever come across fabric in this weight/print and I felt like I needed to take advantage of that surprise yardage. Once I realized that I could squeeze a little woven top out of it, my game plan immediately changed.

Since Scout is intended for wovens, it was a good pattern for this project. It’s also fairly small (at least in the size that I cut, which was a 0), doesn’t have a bunch of pieces, and is narrow enough to fit on this scarf. The scarf was also fairly wide – not quite as wide as true fabric yardage, but wide enough to accommodate the pattern pieces on the fold. I had enough length so that I was able to place the print where I wanted it, as well as match it across the seams. I decided the pattern would look best with the paisley design across the hem (which I made sure to account for the hem allowance while cutting), and the white/blue scattered paisleys at the top and on the sleeves. Having a large cutting surface is ideal for this, as I was able to lay everything out and make sure I had enough fabric to match everything before I started cutting.

Gauze Scout Tee

Gauze Scout Tee

Cotton gauze is super lightweight, as well as borderline sheer, so I used French seams throughout for a neat and delicate finish. The hem is 2″ deep, to slightly crop the tee as well as give the bottom some extra weight. The sleeve hems are a simple rolled 1/4″ hem. And I used silk crepe as the neckline bias facing, instead of self-fabric (I don’t even want to think about trying to do a bias facing with this gauze – that shit would have been a nightmare!).

The finished top is definitely a bit see-through if you look very closely, but the busy print helps camouflage things. I also make sure to wear a light or flesh-colored bra underneath (I’m wearing my yellow lace Marlborough in these photos) so there’s not too much of a contrast. The only downside is that the fabric – despite being pre-washed by me, as well as whatever washing it may or may not have gotten in it’s previous life – tends to transfer blue dye on anything it constantly rubs against. Learned this one the hard way after getting home from the flea market last month and discovering that my bra straps were blue, as well as the back side (the part that goes against my body) of my mostly white purse. LAME. Thankfully, most of it washed off with some dish soap and a bit of patient scrubbing. As a side note, if anyone has a good recommendation on how to get a white canvas purse cleaned – yeah, I think I’m gonna need that. I have put that poor Kate Spade through hell and back at this point haha.

All right, second Scout Tee!

Birdy Scout Tee

Recognize this fabric?! I made a fantastic bird dress out of most of it (which is still one of my favorite things I’ve ever made to date, and I still wear it whenever I need to impress someone), but I had about 1 yard left over that I’ve been hoarding ever since, just waiting for the right project. Silk Scout Tee it is, then! And you can go ahead and laugh that I now have 2 bird print Scout Tees. It’s ok, I just really like birds πŸ˜›

Birdy Scout Tee

Birdy Scout Tee

As with the gauze Scout, this pattern is really great for letting the fabric take center stage. And same as with the gauze version, it doesn’t require a lot of fabric, so I was able to eek it out of my tiny yardage remains. Notice how completely different the shape is, though, since this georgette has a lot more drape an less body than the gauze. I think both look awesome, but this one is definitely a bit more flattering since it’s not so boxy.

Not much to say about this one that wasn’t already said about the gauze one (and hence why I’m slapping both into one post). It was sewn pretty much the exact same way – French seams, 2″ hem, etc etc. I did use self-fabric as the bias facing for this one, which I’m not entirely happy with how it lays and probably should have used silk or cotton voile instead, but whatever. I just don’t think the georgette behaves as well as a silk crepe would have. Too late now, though, cos I ain’t about to rip it out! It’s fine. IT’S FINE.

I don’t know why I got dressform and flat shots of this one and not the other, but here you go:

Birdy Scout Tee

Birdy Scout Tee

Birdy Scout Tee

Birdy Scout Tee

I’m trying really hard not to get all weird and hoardy with my favorite fabrics, because they don’t do me a lot of good just sitting on the shelf. I want to make them into things that I love so I can wear them and love them every day! It can be a little stressful when it’s fabric you know you can’t get more of in case you done goof it up (this bird stuff sold out REALLY fast!), but I’m working on trusting myself and my best judgement. Again – it’s not doing me any good sitting on the shelf! Gotta take that shit out and actually give it the use and love that it deserves!

Gauze Scout Tee

I think I’m done with Scouts for now, but that doesn’t mean I’m over the woven tshirt! Right after I finished cutting these two, Megan Nielsen released her Sudley pattern, and the blouse is giving me all kinds of heart eyes. I’d love to make a version with the back keyhole!

As a side note – hi, welcome to my living room. I think I like these pictures better than the ones in my sewing room (the only good lighting in my sewing room has some wretched boring background action), although the changing light is a bit of a challenge. I dunno. Taking photos indoors in general is a bit of a challenge, to be honest, but it sure beats standing outside with a tripod while all my neighbors snoop on me through their windows haha (which is what I imagine is happening, and more than likely actually not the case at all).

Completed: Silk Lakeside PJs

19 Jul

Once you get to the point of having a fully me-made wardrobe (speaking as I write this now in a 100% me-made outfit – including my bra and underwear, HA! I’m not wearing shoes just yet so I can still say that :P), that’s when you start getting to fill in the really fun gaps. For me, that means practical things made out of impractical fabrics. Like silk pajamas. Ooh la la!

Silk Lakeside PJs

I have wanted to make a new set of Lakeside Pajamas for quite a while now, since I really love my original tropical set and have worn them so much they are starting to look pretty beat-up. For the past year, it hasn’t been much of a priority because my basement apartment was WAY too cold to wear something so light and floaty to sleep in (trufax, I wore flannel pjs to bed up until I moved. In June.), but now that I’m ~solo livin’~ and have full control of the a/c (I actually turn it off before I go to bed now, which is the opposite of what most people do BUT WHATEVER I LIVE ALONE AND DO WHAT I WANT), which means light and floaty pjs are totally a go again! I have been wearing the HELL out of those tropical Lakeside PJs and loving them, but like I said, they are starting to look pretty ratty. Also, I wanted to try out this pattern in something that had a softer drape.

Silk Lakeside PJs

Silk Lakeside PJs

I made these over the 4th of July weekend, and part of the reason why I chose silk (other than what I just mentioned) was because I figured the project would keep me occupied for a few days. French seams and silk bias binding are both pretty time-consuming, and I was ready to work on something that would take longer than an afternoon. I dunno what happened – maybe the holiday got me all riled up over my freedom to sew my own clothes – but I definitely finished the entire set in a few hours. I even had time to leave my house and drive out to a party (at my old stompin’ grounds in Kingston Springs, no less) for a few hours, and STILL finish in time to wear these to sleep. To be fair, there are only a few seams on these things – and once you get the hang of the bias binding (which I have sewn so much in my day that now I can practically do it in my sleep), there isn’t really anything time-consuming about sewing them. Of course, they would be even faster in a nice cotton – but SILK. Omg I am so in love.

Silk Lakeside PJs

The silk fabric is a piece that I bought at The Fabric Studio here in Nashville during their closing sale. I snapped up a yard and a half, originally thinking I’d make a button-up shirt with it. It’s a lightweight silk crepe with a little bit of stretch, and absolutely lovely. I was all set to make said shirt with the fabric, until I realized I wasn’t crazy about the shirt pattern I had chosen (obviously no B5526, my spirit pattern :P) and instead decided to enjoy the silk fabric in the form of pajamas. I have no regrets about this whatsoever. I didn’t even realize how nice it is to sleep in fancy PJs until I owned a pair! I feel like I’m floating around the apartment when I wear these.

Silk Lakeside PJs

Silk Lakeside PJs

I think this is my favorite cut for a tank top – floaty and billowy when made in a silk, not cut on the bias (don’t get my wrong – I love bias-cut anything, but it does limit fabric choices as it turns prints on the diagonal *and* can eat up quite a bit of fabric in the process), and with that fun little peek of skin in the back. This top would totally be suitable to wear on it’s own with jeans or shorts, too, which was something I thought about while I was sewing it. That being said, I sleep in this shit pretty much every single night soooo silk-pajama-tank-as-normal-everyday-clothes still hasn’t actually happened yet πŸ™‚

Silk Lakeside PJs

Silk Lakeside PJs

I made the size 0 in both top and bottom (my usual size for Grainline patterns) and the only thing I changed was to shorten the straps as they are a bit long for me (this is pretty typical for spaghetti-straps + me). All the seams – both for the tank and the shorts – are French seams. To sew the binding, I followed the directions in the pattern EXCEPT I reversed the order that you sew from the right side vs the wrong side. I attached the binding to the wrong side first, and then once everything was folded over, I topstitched from the right side. I noticed on my original pair that if you do it in the order that the pattern suggests, it’s hard to get an even line of stitching on the right side – where it shows. By finishing on the right side, I was able to focus on getting my topstitching even and accurate. This was super easy for the top, not as easy for the shorts… but I made it work.

Speaking of change, I also didn’t add any binding to the curved hem of the tank – just the top edge that creates the straps. For the curved hem, I just double turned a 1/4″ seam allowance and topstitched it down. I felt that the hem would lay better without the added bulk and weight of the bias.

Silk Lakeside PJs

Silk Lakeside PJs

Silk Lakeside PJs

Silk Lakeside PJs

The only snafu I hit with modifying the order that I sewed the binding was when it came time to attach it to the side seams of the shorts. I had to improvise to get everything to work out, and while I can’t remember exactly what I did – just pinning things down and looking at them was enough to figure it out. One thing I noticed on my first pair of Lakeside shorts is that the intersection where the front meets the back is a bit weak and has a tendency to fray, so I reinforced the area with a little triangle of stitching. Time will tell if I’ve actually solved that issue or not, haha.

Silk Lakeside PJs

Here is the completed set! I β™₯ my silk PJs πŸ˜€

Silk Lakeside PJs

2 weeks into wearing, and I can confidently say that sleeping in silk IS THE JAM. Despite being basically the opposite of an elegant person, these sure make me feel classy as fuck πŸ˜‰ What about you? Are fancy PJs worth the effort or a waste of expensive fabric?