Tag Archives: craft south

Completed: My Maid of Honor Dress

18 Aug

Here’s a fun fact about me: I have never been a bridesmaid before. Never! I would almost say I’ve never been in a wedding at all, but I did get to carry the bride’s train in a wedding when I was really young (I think 8 – it was for my mom’s best friend). Is that a bridesmaid? I don’t know, let’s not get nitpicky here. My point being – I’ve never, as an adult, had a friend get married and ask me to be in their wedding. I think it’s kind of a rite of passage for most women at some point – but I’m not complaining, because I am not keen on spending $$$ on a dress I’ll never wear again!!

Anyway, that’s a moot point now because I was just officially in my first wedding last month! My very best friend in the entire world – my BFF, my life partner, and my favorite person everrrrr – was married in July and asked me to stand with her during the ceremony as her Maid of Honor. The bride, Morgan, is a really laid-back person and wanted a laid-back wedding – so I didn’t need to buy an expensive formal dress, or plan a ~cRaZy~ Bachelorette party (sidenote: did you know Nashville is now officially the #1 destination in the world for bachelorette parties? Yeah. And it’s awful. If you’re thinking about coming here and ~getting wild~, please don’t.) or anything like that. It was a small wedding – the bridal party consisted of me + the best man – held in their backyard, with a short ceremony and lots of food, alcohol, and dancing. There wasn’t even a “theme” or particular colors for this – which meant I had a lot of creative freedom when it came to choosing what I was going to wear. Which, of course, I wanted to be handmade by me!

Gertie Surplice Bodice Floral Dress

Since the wedding was going to be outdoors in July, this limited me to only looking at natural fibers (y’all can defend polyester all you want, but this sweaty gal is not gonna wear that shit under the July sun in Tennessee at 5p girl bye) – I needed something lightweight and breathable. The only thing Morgan said she cared about design-wise was 1. That the dress was not white (obviously); 2. That it had a light, neutral background; 3. That it had some kind of floral design that wasn’t super bright. Finding a fabric that matched this description was surprisingly hard – most floral designs are either really bright, or on a dark background. Or they were polyester! I probably spent an entire month just combing through every fabric website I could think of, and coming up short and a little desperate.

Gertie Surplice Bodice Floral Dress

Gertie Surplice Bodice Floral Dress

I actually found this fabric at the shop I work at, Craft South! It’s a 100% cotton barkcloth from the Outback Wife collection. We had a ton of colorways, and while I admired them when they came in the shop – I didn’t buy any because florals really are not much my thing these days. I love looking at them, but I don’t really like to wear them. That being said, this particular colorway was perfect for the wedding – the fiber content was right, Morgan loved the colors and florals, and I got that sweet employee discount on it (yay!). I bought the last of the yardage (sorry!), but we still have the dark colorway in stock FYI! And here’s the same colorway I used in some random Etsy shop, too!

This barkcloth is a little stiff on the roll, so I prewashed a swatch to see what would happen. It ended up softening quite a bit and getting a nice little drape, although it is very prone to unraveling. I prewashed the entire yardage (cold wash, regular heat in the dryer) and set it aside while I could locate a pattern.

Gertie Surplice Bodice Floral Dress

Gertie Surplice Bodice Floral Dress

Gertie Surplice Bodice Floral Dress

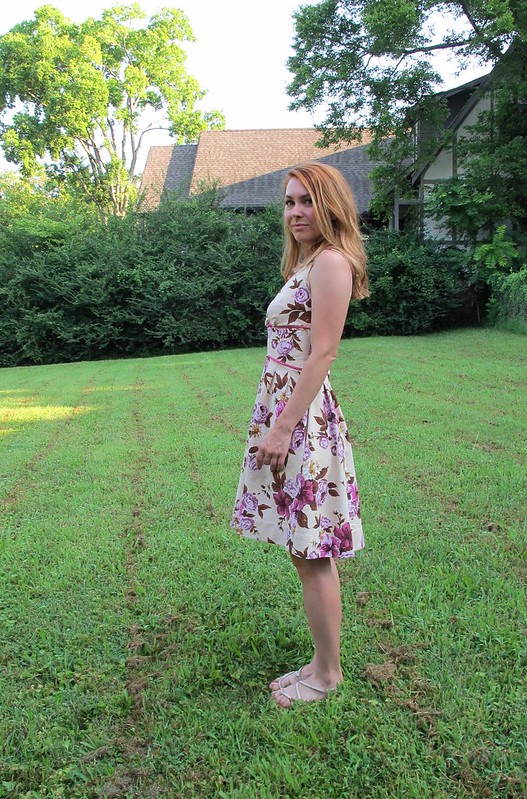
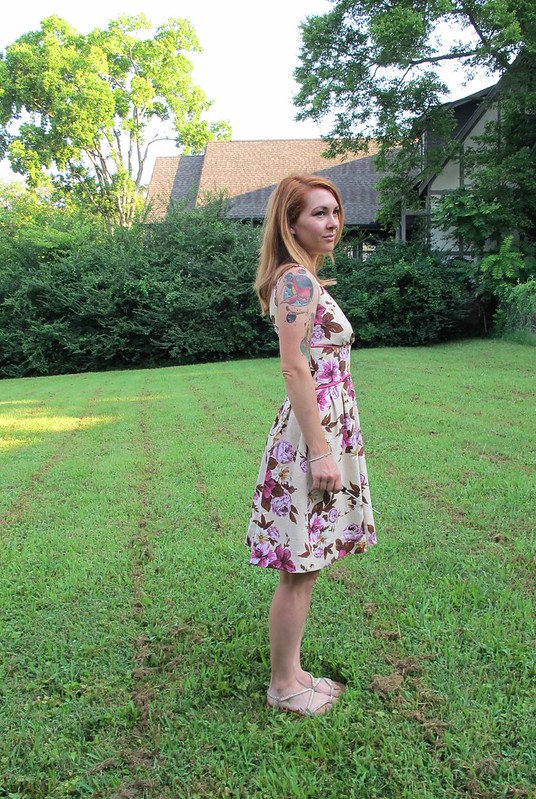
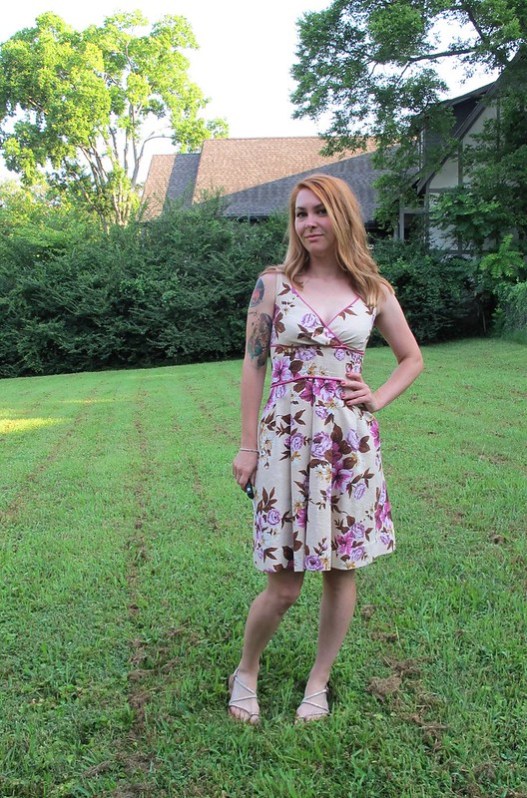
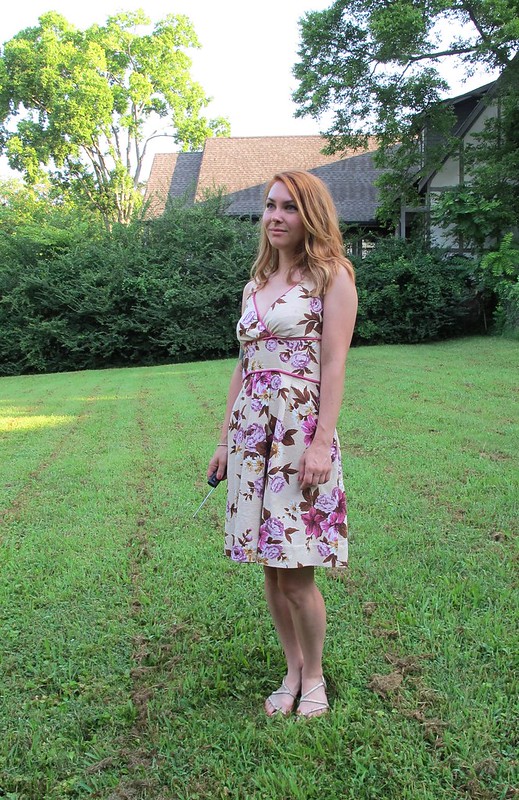
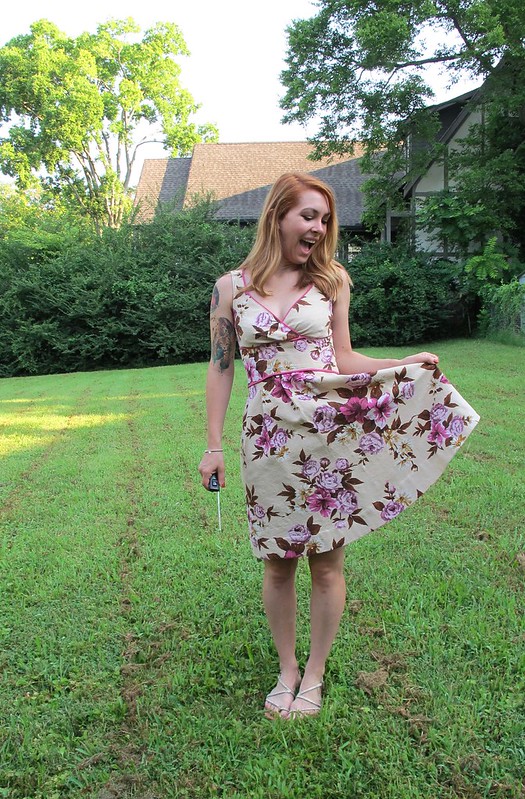
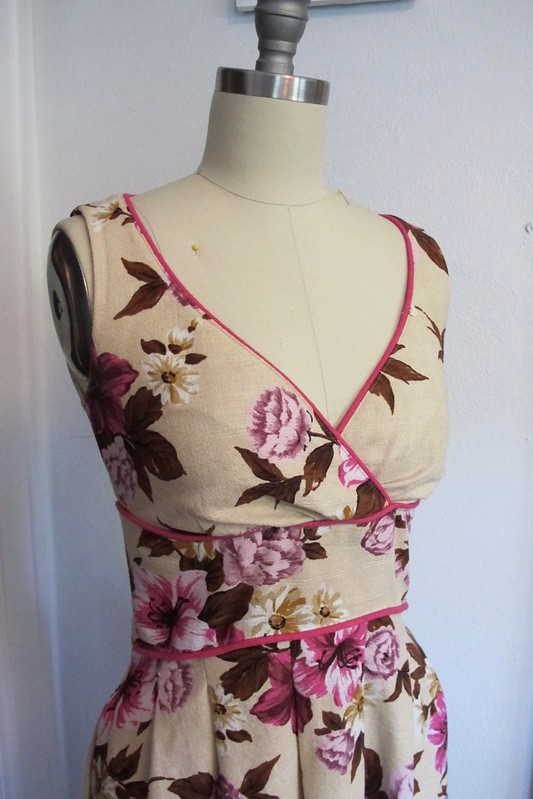
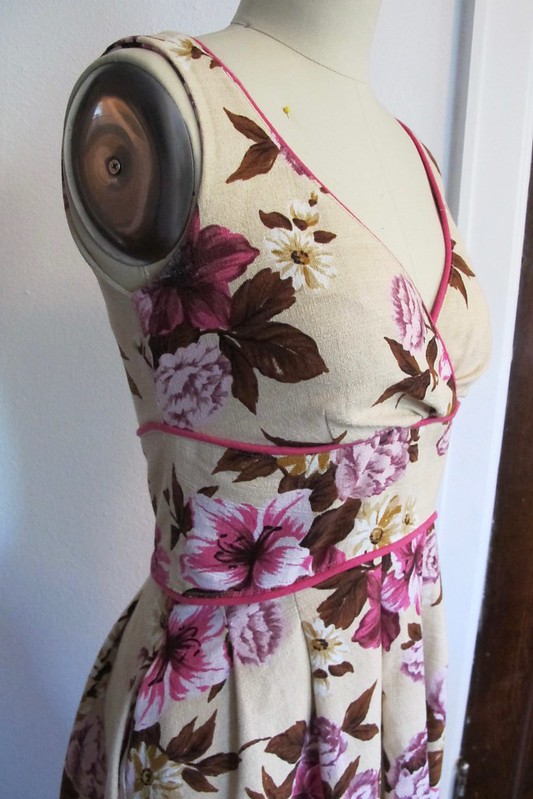
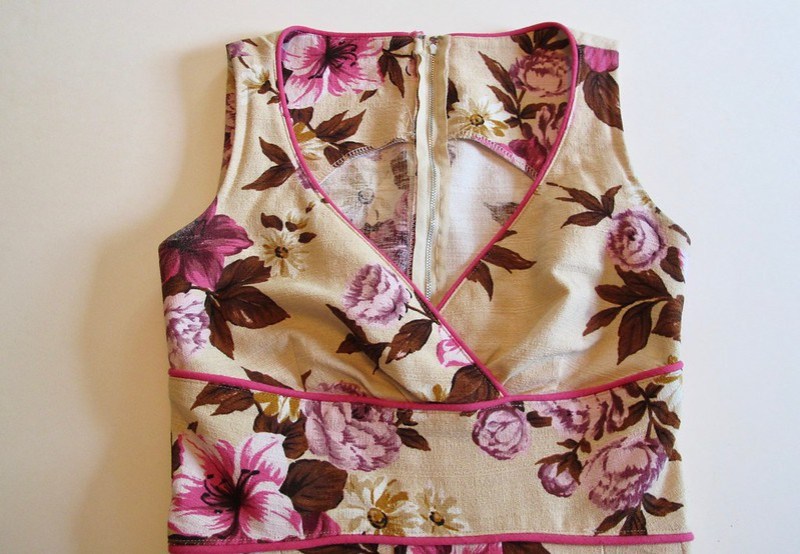
Finding a pattern also took foreeeever! I didn’t know exactly what I wanted in a dress – since the fabric had some structure to it, it couldn’t be a really swingy/draped design. I wanted a loose skirt (so I could move about freely during the evening) and no sleeves (sun’s out, gun’s out amirite lol). I ended up finding just the thing in Gertie’s Ultimate Dress Book – which I had won ages ago in a giveaway and hadn’t actually made anything out of yet! This pattern is the Floral Surplice Dress – which features a crossed over bodice, a separate midriff piece, and a side-pleated skirt. Done and done.

A few notes about this book – the pattern pieces are overlapped all over one another (like a BurdaStyle pattern), which means you have to trace them. The first half of the book goes into detail about fabrics, seam finishes, special techniques, and fitting – and then the patterns themselves have very brief instructions on how to put them together (assuming that you would flip back to the relevant section in the first half to get full instructions if you need them). I like this sort of layout as I don’t need the hand-holding, and appreciate just having a list of ordered steps. Finally, the pieces are all designed to mix and match with one another – so you can swap out the skirt for a different one, or add sleeves, or whatever. I liked the design of this dress, though, so I stuck with the suggested pieces and finishing.

I did make a muslin before cutting into my fabric, as bodices like this tend to gape on me. I’m VERY glad I did this, because there is a big sizing error with the midriff piece! It’s about 2″ too small – even after measuring and walking the pattern pieces. I thought I was going crazy because Google wasn’t pulling up anything, until I saw in a forum where someone briefly mentioned it in passing. So I’m not crazy. And also, if you make this pattern – just know that the midriff piece will need to be adjusted to fit your waist (unless you’re in denial about your size and consistently pretend like your waist is 2″ bigger than it actually is, that’s your prerogative). I cut my muslin to the biggest size, then added 1″ seam allowances, and fiddled around with it until I could get it to fit the bottom edge of the bodice (the bodice is graded and sized correctly, as is the skirt waist. It is just the midriff that is incorrect). After I fit my bodice, I took the pieces apart and used them to make new pattern pieces, then made a second muslin bodice to verify that it all fit correctly.

As far as other adjustments, the only things I did was take a little 1/4″ wedge out of the neckline so it fit closer to my body (using this method), and I also shortened the skirt by about 2″.

Gertie Surplice Bodice Floral Dress - front

Gertie Surplice Bodice Floral Dress - back

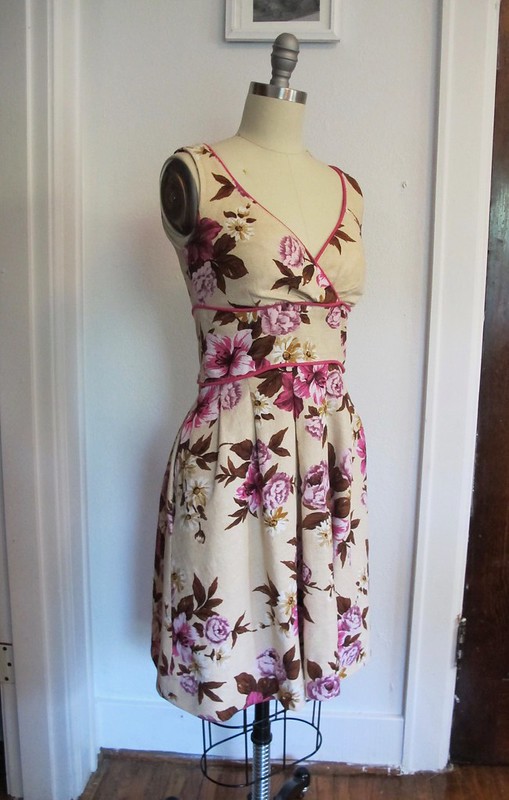
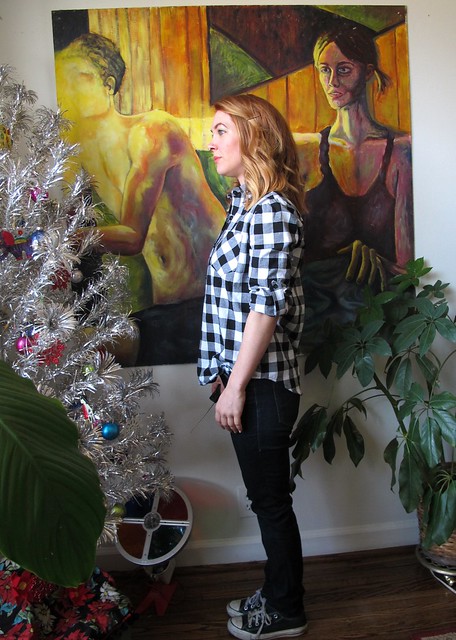
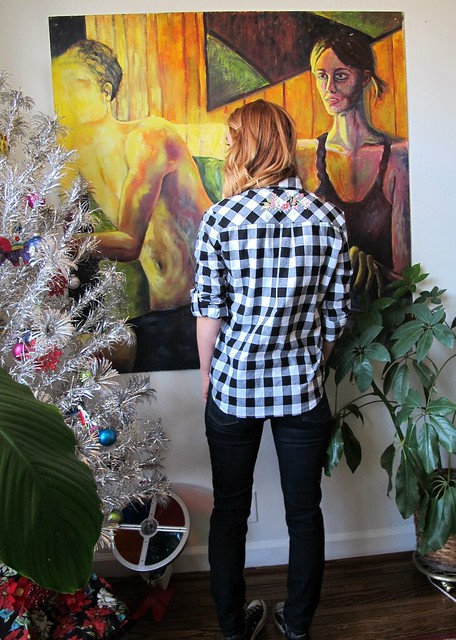
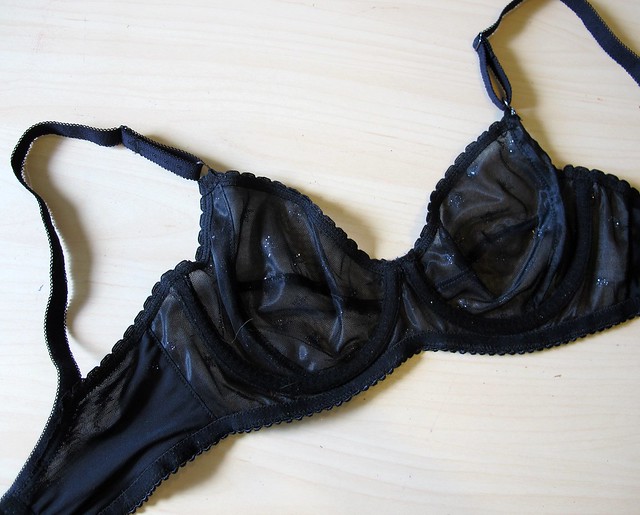
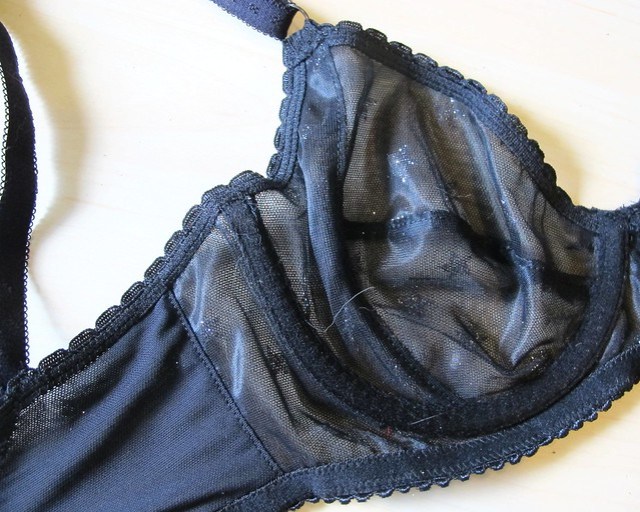
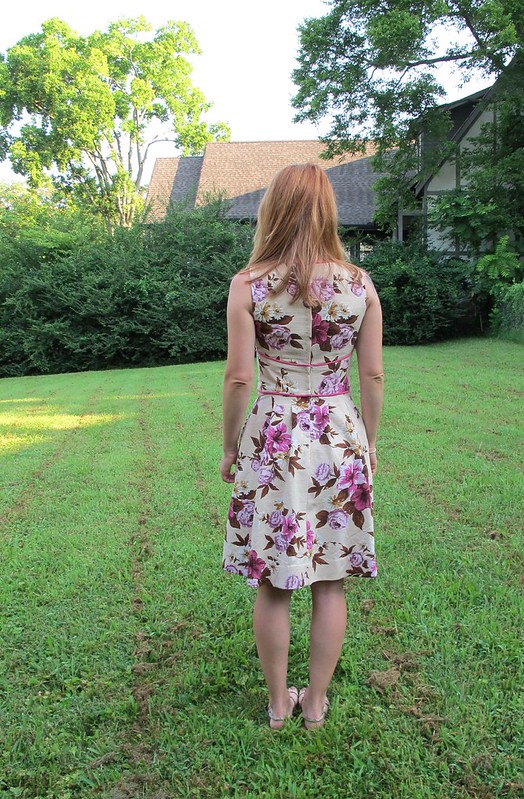
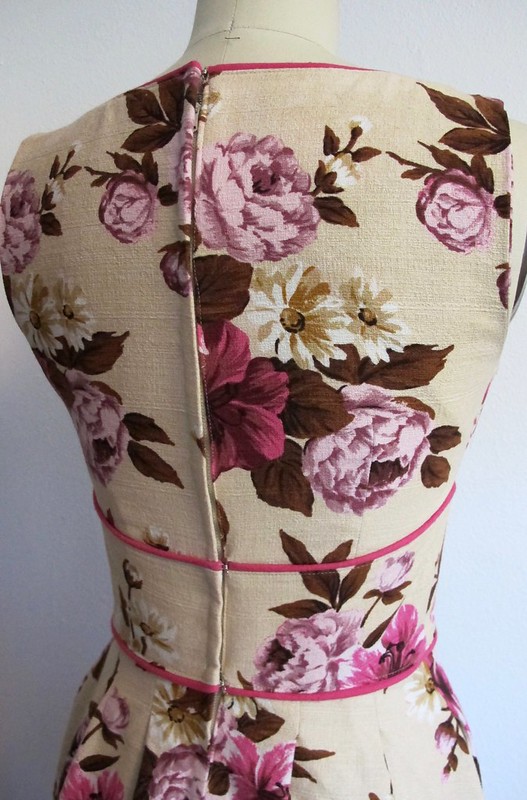
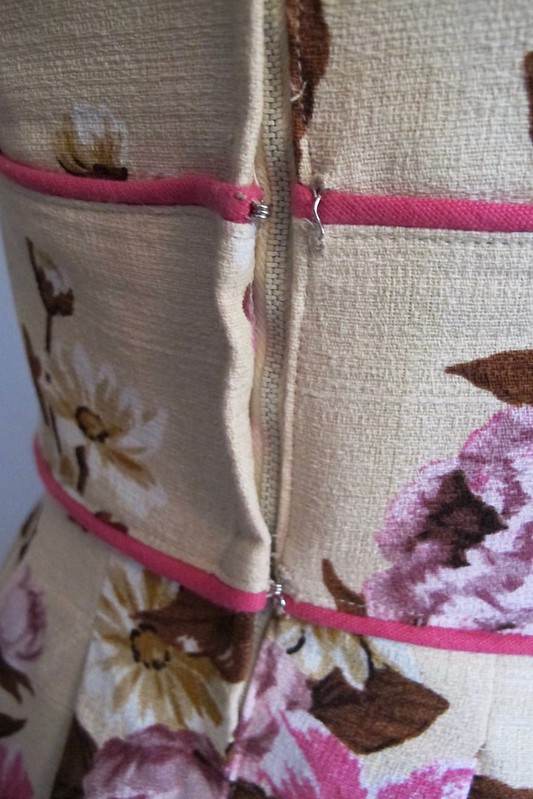
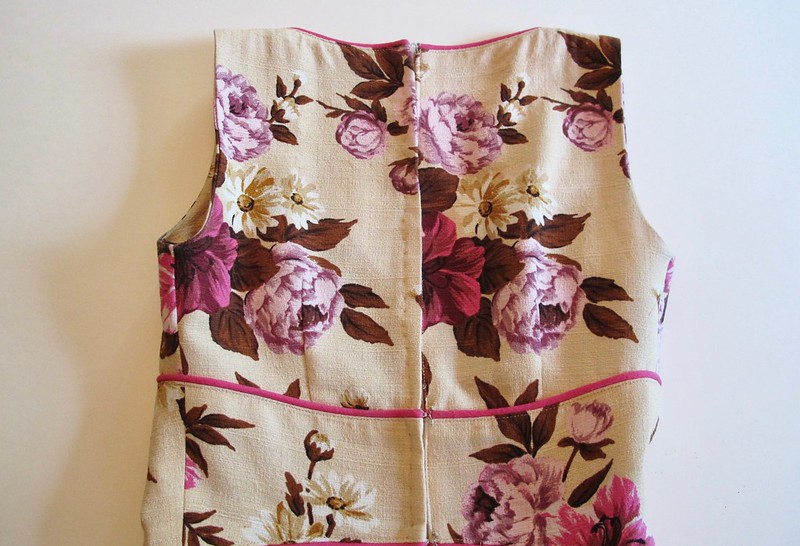
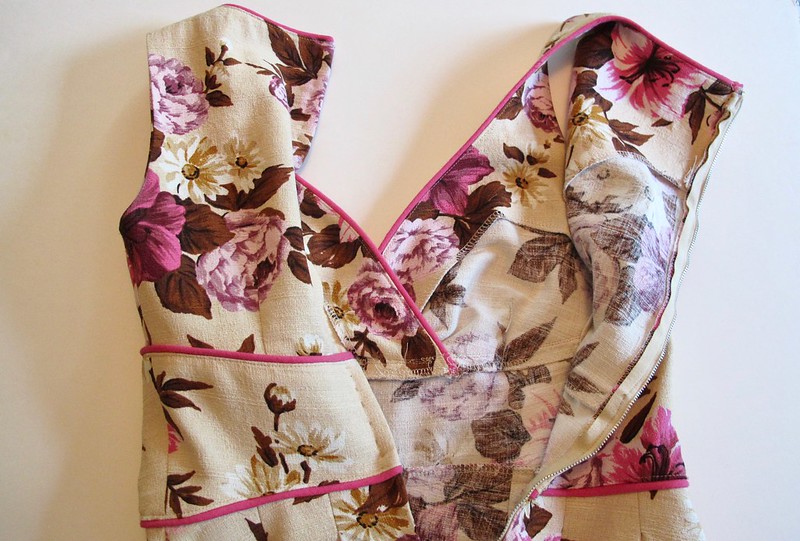
Right after I cut out the pieces, I realized that the dress was going to look like a total clusterfuck unless I did something to highlight the seamlines. So I tailed it to Textile Fabrics and bought a pink linen/cotton blend to create piping (ideally, I would have loved a darker color that wasn’t pink – but this was the only thing they had that matched, and my options are very limited here in town). I added piping to the top edge of the neckline, and both sides of the waistband. This not only breaks up the seamlines so the dress doesn’t look like a hot mess, but also visually separates that neutral background a bit from my skin (which matches a little too close for comfort, in my opinion).

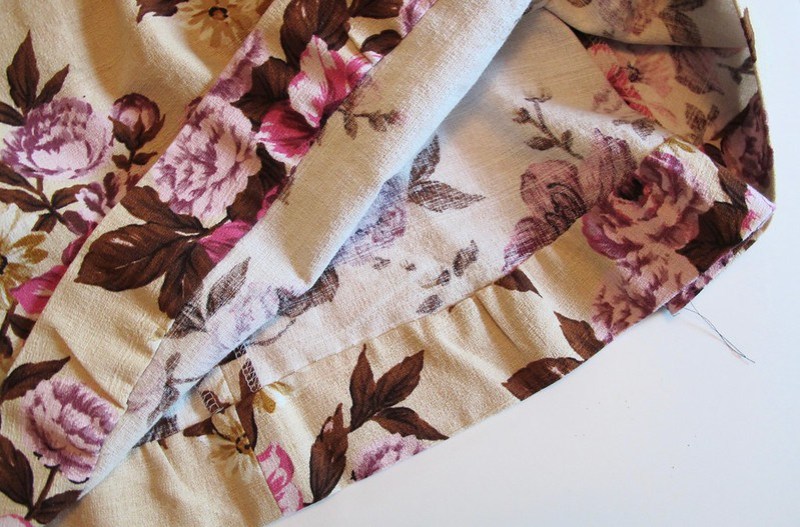
All that aside, the rest of the sewing was pretty easy and straightforward. I used a serger to finish all the seams, which I pressed open. The piping is topstitched with matching neutral thread, to help it lie flat. The zipper is a simple lapped zipper that is pick-stitched by hand. I also added hooks and eyes at the piping intersections in the back, again, to help them lie flat and stay closed. Didn’t want anyone creeping on my zipper! Finally, the hem is serged and blindstitched by hand.

Now, for the mistakes that I made! At one point, I did sew the midriff upside-down and didn’t realize until after I had finished applying the piping – serged and topstitched and everything. I tried to convince myself that it was ok, but honestly one of my favorite parts of the dress design is how the side seams curve down at the midriff – and it didn’t look right when they were flipped the other way. Oh, and it didn’t fit right, either! It was not fun to unpick that mess and re-sew with teeny serged-off seam allowances, but I’m glad I did it. I also originally inserted an invisible zipper, but it was toooo hard to zip up due to the bulk at the intersecting back seams (with the piping). I had visions of the zipper breaking while I was at the wedding, and didn’t want to put myself through that mess. So I unpicked, and added the lapped zipper – which is much easier to zip and unzip!

Gertie Surplice Bodice Floral Dress - bodice front

Omg, I’m like nowhere near done with showing pictures. I’m sorry.

Gertie Surplice Bodice Floral Dress - bodice side

Gertie Surplice Bodice Floral Dress - bodice back

Gertie Surplice Bodice Floral Dress - zipper detail

Gertie Surplice Bodice Floral Dress - bodice flat

Gertie Surplice Bodice Floral Dress - bodice back flat

Gertie Surplice Bodice Floral Dress - bodice interior

Gertie Surplice Bodice Floral Dress - hem detail

Whew! So that’s a big ol’ post for a big ol’ project! The dress ended up being perfect for the occasion – I matched the aesthetic of the wedding, I was comfortable, and I had room to eat and dance! I am also pleased with myself for remembering to add pockets – those were super handy for carrying things like my sunglasses and hankies for when we started crying! It was a fabulous wedding and I’m so honored that I was able to stand up there with my best friend and be a part of such an important day.

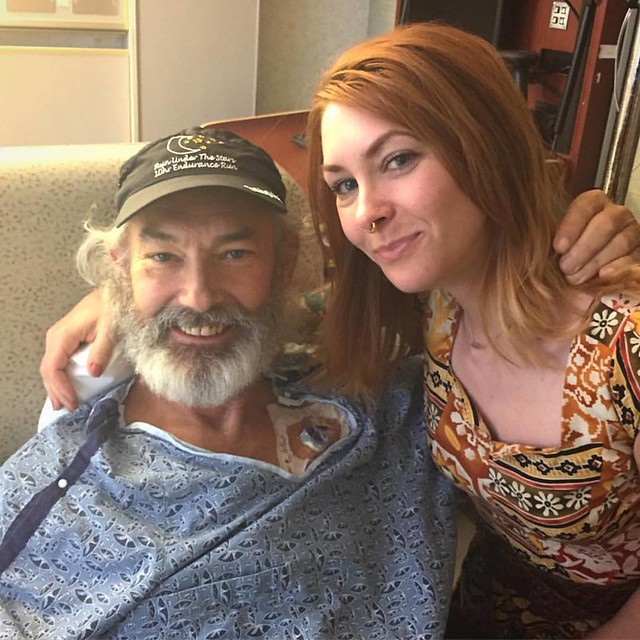
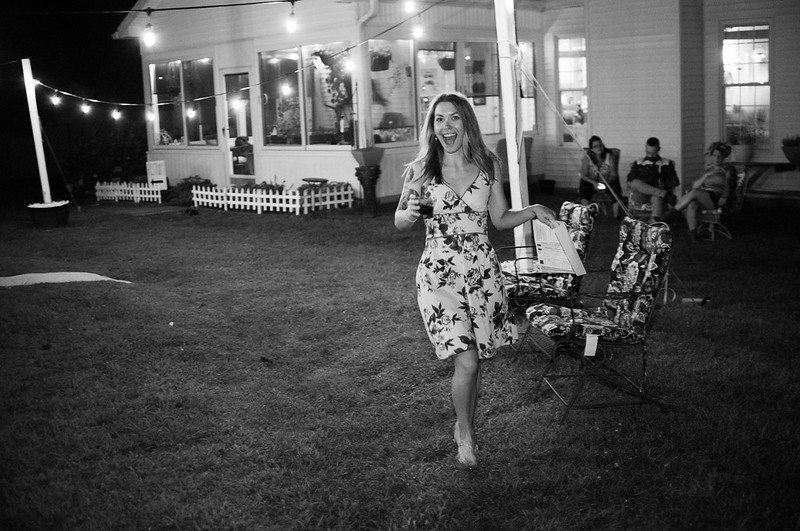
I am going to leave y’all with some photos from the wedding, if you feel like creeping! All photos were taken by Lilika Strezoska, who is based out of Macedonia but came to the US to shoot this wedding. Lilika did an incredible job capturing everyone in a beautiful and candid way – I have really loved looking through all the photos!

Morgan's Wedding!

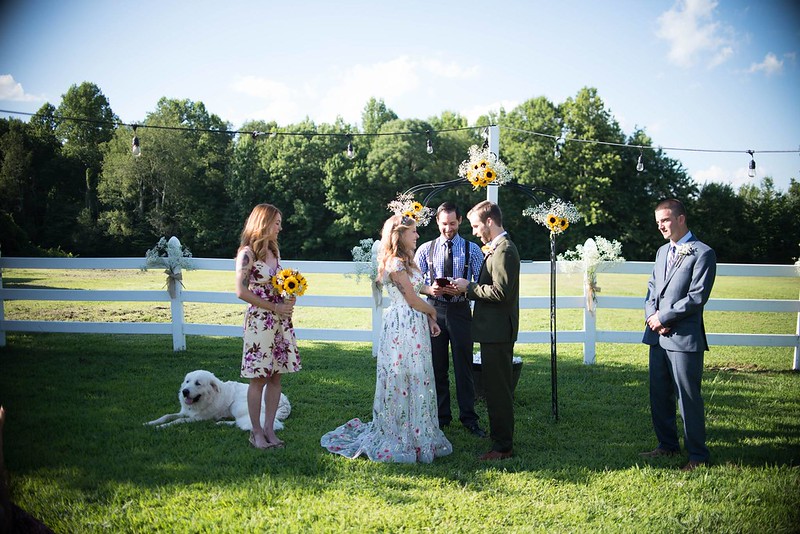
The ceremony. That giant cloud of a dog is Bootes, who absolutely had to be nearby.

Morgan's Wedding!

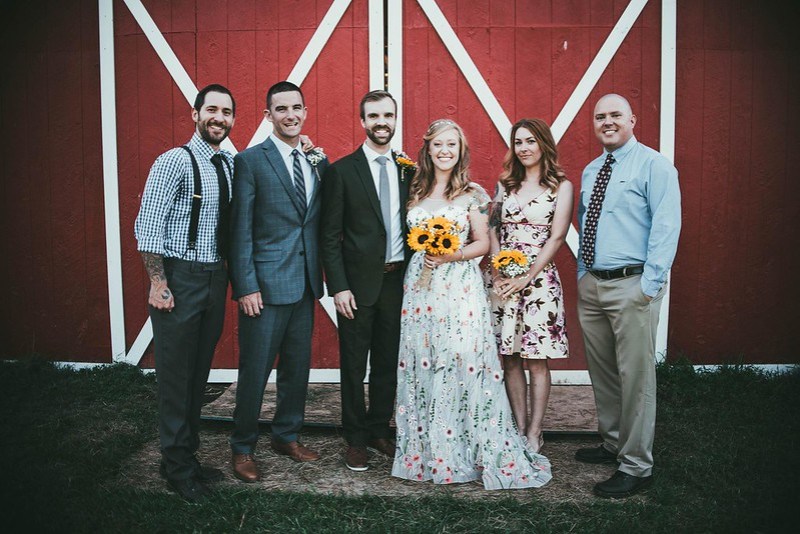
Here we are looking nice and like adults.

Morgan's Wedding!

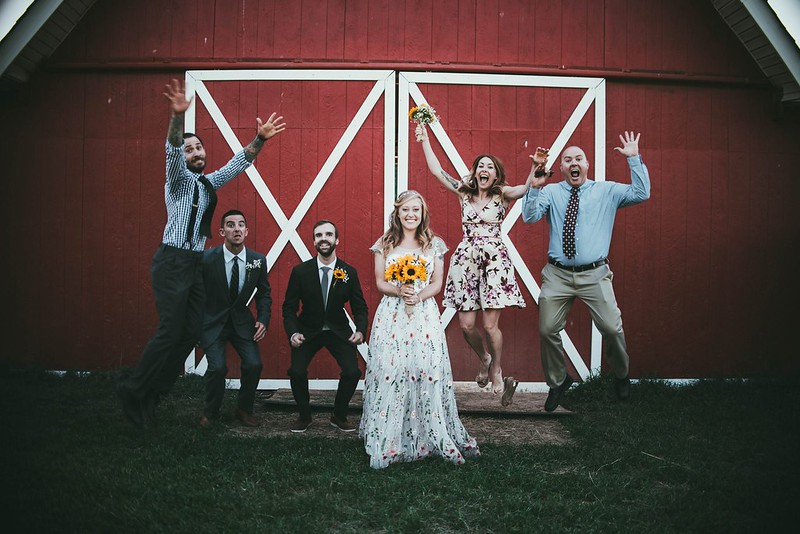
And here we are jumping. Also, I would like to point out that this shot actually captured my shoe flying off hahaha.

Morgan's Wedding!

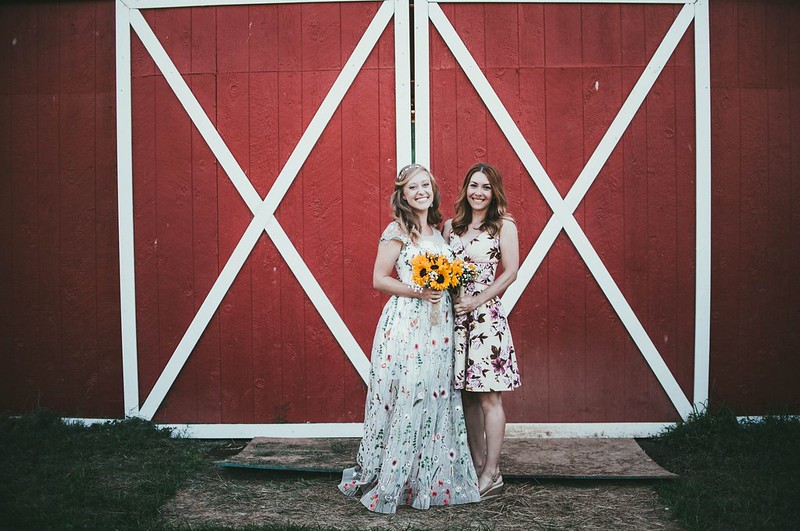
With my bestie! ❤ (she had her dress custom made by a seller on Etsy, I am not sure who the seller is though!)

Morgan's Wedding!

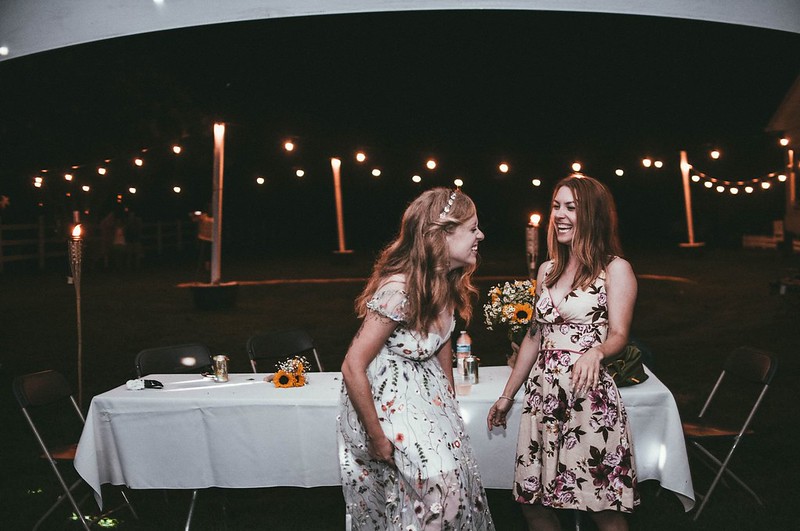
Here we are giggling together and having a BFF moment.

Morgan's Wedding!

And, finally, this is me carrying the Marriage Certificate over to be signed! I was so excited!

Ok, that’s all! Thanks for sticking around for this exceptionally long post 🙂

Completed: The Archer Popover

29 Dec

Oooh, one last make for this year!!!

Gingham Archer Popover

I made this about 4 months ago, but it was a sample for Craft South so I’m just now getting possession of it to actually wear! I love making samples for the shop – you get access to the pattern + materials for free, and are allowed to sew during downtime at the store – but the trade-off is that you have to leave it at the shop for at least a couple of months. Which makes sense – it is a sample, after all, haha. But it can be frustrating when you have to wait to be able to wear it!

For this top, I used my personal Archer pattern (which we do sell in the shop, but I didn’t want to rip one open when I had a perfectly usable pattern at home), and I downloaded the popover variation. The fabric is Cotton + Steel Checkers, in the 1″ black and white. It’s a nice woven cotton that feels similar to a yarn-dyed cotton – it hangs (and feels!) nicer than a quilting cotton, but it does have a dense weave that still makes it have quite a bit of body. The checkers are woven, not printed, so the design is the same on both sides of the fabric. I did take this fabric home and prewash it before actually sewing the sample – I wanted to be sure it got its shrinking out of the way before I cut it up. Actually, I also cut it while I was at home, and fused my interfacing as well. Matching plaids takes some focus and concentration, and there are a lot of pieces to contend with on this pattern. I didn’t want to have to try to juggle cutting/matching while also dealing with customers as they come in and out of the shop, so it made more sense to tackle that part of the project at home away from distractions. But all the actual sewing did happen while I was at the shop!

Gingham Archer Popover

Gingham Archer Popover

I’ve made lots of Archers in my time, so there’s not much to say that I haven’t already said. I made a size 0, and followed the instructions as they are written. This particular version is a bit different in that the button placket doesn’t extend all the way to the bottom of the shirt – hence, that it’s a popover, not a button up. The variation pack includes a new shirt front, a new front placket, and a different sleeve placket, as well as the instructions you need to actually sew them in. It’s been a few months since I made this top, so my memory is a little fuzzy, but I recall the instructions being easy enough to follow. I do remember that I did not like the instructions or pattern pieces for the tower placket on the sleeve – I found that whole process unnecessarily fiddly, although it did turn out nice in the end. Personally, my favorite way to sew a tower placket is by way of the Colette Negroni, it is very straightforward and simple, with a really nice finished result.

Other changes I made to the pattern was to include tabs for rolling up the sleeves (I swiped the pattern piece from my copy of B5526) and different shaped pockets (pattern piece swiped from the Negroni). I cut the gingham on the straight grain as directed, except for the outer yoke and pockets, which were cut on the bias. The inner yoke is also cut on the straight grain, to give the bias side some support. I didn’t get any photos of me with the sleeves rolled down, but they are full-length.

Gingham Archer Popover

Gingham Archer Popover

There were 2 reasons why I wanted to make this particular shirt – one, I really liked that Cotton + Steel fabric and I wanted to sew something out of it; and two, I wanted an excuse to bust out some fancy machine embroidery. I love embroidered western shirts, hence the inspiration for this one. Because I work in a sewing machine shop and we have several models out on the floor to play around with, I went straight for the Rolls-Royce of the bunch and did all my embroidery (and sewing, for that matter!) on the Horizon Memory Craft 15000. Y’all, we sell this sewing machine for a little over $10,000 (yes, all those zeros are supposed to be there). It comes with a fucking IPAD. It’s a super badass machine that I’m going to confidently say will never ever be in my personal budget to own, but you bet your ass that I’m gonna take advantage of the fact that I can sew something on it right now. Ha! Honestly, it was actually a good thing for me to sew this project on that machine, because it gave me lots of time to play around with it, learn how to use the embroidery features, and get comfortable sewing on it. I can’t imagine anyone would ever want to buy a sewing machine from someone who doesn’t even know how to use the thing themselves, so it was beneficial for me to learn all that in shop downtime. Also, I have a new shirt from it. Yay!

Anyway, that particular sewing machine comes with a bunch of pre-loaded embroidery designs, plus you can download (or create) more designs and upload them straight to the machine (either via USB, or with that aforementioned iPad haha). I get too overwhelmed when presented with way too many options, so I kept it simple and stuck with what was available on the machine. This little floral design fit right in the back yoke, although the suggested colors were a little weird (those were easy enough to change, obviously). I made a few practice pieces to get a feel for the finished size and also how the embroidery goes on, then I embroidered the actual garment piece. To do this, I first cut my piece and fused a piece of interfacing to the back to stabilize it (this isn’t 100% necessary in all cases, but since that piece is on the bias, it was needed). I used my sample piece to determine where the machine would start the embroidery, and centered my pattern piece in the hoop with tear-away stabilizer. Then you just turn the machine one and let it go to town! I can’t remember how long the embroidery took – we turned the speed down and let it roll on in the background while we worked – but it wasn’t super long. The machine will stop when its time to change the colors, and thankfully its also smart enough to pick up where it left off if you run out of thread or have to stop the embroidery for any reason.

Gingham Archer Popover

Gingham Archer Popover

Other than that, sewing was pretty uneventful. I finished the rest of the shirt on the same machine, which let me play around with all the available feet and additional sewing settings. It was pretty fun! All the seams are flat-felled, so it looks just as good on the inside as it does on the outside.

Gingham Archer Popover

Gingham Archer Popover

Gingham Archer Popover

Gingham Archer Popover

Gingham Archer Popover

Gingham Archer Popover

Gingham Archer Popover

I think the shirt turned out really nice, however, I’m not super crazy about how much it stands away from my body. I normally like my Archers in a stiffer fabric, but all the others I’ve made button all the way to the bottom, so I can leave them open and wear them sort of like a little jacket.This particular style might do better in a drapier fabric. With that being said, I am hoping the fabric will soften with more washing, as cotton tends to do. We will see! In the meantime, it gave me an excuse to sew something on a machine that costs more than the first 3 cars I owned combined, so that’s saying something haha.

Gingham Archer Popover

Review: The Janome AMH M100 Sewing Machine

19 Dec

Good morning, everyone! I have a review post today (if you’re not into reviews, no worries – I will have a ~normal~ post later this week, too! So much catching up on projects before the year ends!) – for a sewing machine! NGL, I am pretty excited about this little machine.

As you may or may not know, I started working for Craft South earlier this year. Craft South is an adorable little fabric/yarn/crafty store, located in the seriously hip 12 South neighborhood in Nashville, TN, and owned by our fearless leader, Anna Maria Horner. In addition to our sewing, fiber and other craft supplies, we also sell Janome sewing machines. Now, I am not particularly attached to any one brand of sewing machine – I have several different brands that I use at home myself – and I strongly believe that all brands are good brands, it’s just a matter of what fits best with your budget and needs. Whenever I have the opportunity to try out a new machine – especially one that’s perhaps a little more budget-minded than whatever I have on my sewing table at home (sorry, guys, but I LURVE me some expensive-ass sewing machine hahahaha) – I am ALL about that! This particular machine is especially delightful to me, cos it’s a branded Anna Maria Horner machine *and* it’s our future classroom machine for Craft South.

I will lead with a stock photo from the Janome website, because it’s much prettier than the pile of trash photos you’ll see in the rest of this post, lolz

AMH M100

This is the AMH M100 – designed by Anna Maria Horner, and manufactured by Janome sewing machines. It’s a reasonably basic machine – no crazy embroidery functions, a few decorative stitches – that is easy to use, has some fun features, and is just plan adorable! It’s a fairly small machine, and I think the floral design is so beautiful! There’s also a big honkin’ space that is perfect for having signed by Anna herself, and yes, speaking from experience here.

There are a lot of features about this machine – too many to put in a blog post (well, without making this post insanely boring), so I am just going to touch on the ones that I think are really cool, as a sewist and also a sewing teacher. You can always go to the website and get the full run-down, or, if you’re local – come in our shop and play with the machine.

AMH M100 Sewing Machine

The machine has 99 stitch designs – ranging from your basic utility stitches (straight, zigzag, button hole, etc) to some crazy looking embroidery stitches that are perfect for quilting and applique projects. They’re all based on Anna Maria Horner designs – so lots of hearts, swirls, girly things like that. I admit, I don’t ever use stitches like this in my projects, but they are REALLY fun to just sew samples on and ooh and ahh over.

As a sewer of garments, the stitches I use most are 00, 01, 04, 06, 07 & 18. That’s your basic straight stitch, the Lock-O-Matic stitch (it will automatically backstitch at the beginning and end of your seam, which I find especially useful for bra making), the triple stitch (which is what I use now for topstitching, instead of topstitching thread + straight stitch), zigzag stitches, and the button hole stitch. There is also a locking stitch (02, it’s the same idea as the lock-o-matic, except it locks the stitches by stitching in one place instead of backstitching), stretch stitches, overcasting stitches, darning stitches, blind hem stitches, the triple zigzag, and all those applique stitches. One thing I do appreciate is that there isn’t a mass overload of decorative stitches – just a handful. It’s not overwhelming, but there are a few cute options to play around with.

AMH M100 Sewing Machine

AMH M100 Sewing Machine

The little stitch card fits in a piece that clips to the machine, so you can keep it attached to your machine if you want to reference it. The clip also folds down, so you don’t have to stare at it if you don’t want to. Or you can take it off completely and lose it somewhere in your sewing space, which is generally what I do.

AMH M100 Sewing Machine

There are several feet and accessories included with the machine – a straight stitch foot (not shown in this photo, but it’s attached to the machine), a clear satin stitch foot, a 1/4″ foot (PRAISE), an overcasting foot, a blind hem foot (which I use as an edgestitching foot), a zipper foot, a button hole foot, *and* an Even-Feed Foot. The Even-Feed foot is similar to a walking foot, except instead of “walking”, it clamps down on the fabric and moves it. I am told this is more precise than a walking foot, since the pieces are held together when they are moved. At any rate, that alone is a pretty sweet add-on! Those feet tend to be pretty expensive on their own.

The machine also comes with boring but useful things, like extra bobbins, spool caps, a seam ripper, etc. The Organ needles included are a new thing for me – I’d never heard of this brand before I started working at Craft South, but they are just as nice as Schmetz and soooooo much cheaper. I can get a pack of 10 Organ needles for like $2.30, WTF. Janome machines are made to work specifically with Organ needles – they will work with other brands, including Schmetz, but the needle-threader is calibrated to work with the eye placement of an Organ needle. So you can sew on the machine with any brand of needle, but you may or may not be able to use the needle threader if it’s not an Organ brand. I haven’t tested this theory bc Organ is all I keep in my sewing room now (and it’s all we have at Craft South, too).

AMH M100 Sewing Machine

AMH M100 Sewing Machine

The front box opens up so you can store all your feet and accessories in one handy spot. This piece can also be removed so that the machine has a free arm – useful for sewing stuff with a small circumference, such as sleeves and pants hems.

AMH M100 Sewing Machine

AMH M100 Sewing Machine

Threading is super easy. For the needle, there are numbers and arrows to direct you the thread path (if you’ve ever threaded ANY sewing machine before, just know that they are all mostly the same in this regard), and then there is an automatic needle threader to pull the thread through the eye if you have trouble seeing / are lazy.

AMH M100 Sewing Machine

The bobbin winder also has a clear diagram. One thing I really love that about this machine is that the bobbin can be wound without the foot pedal – just unplug it and press the Start/Stop button on the machine. This is incredibly handy when I am setting up for class – sometimes I’ll have all 10 machines winding bobbins simultaneously and I feel like a little Sewing Machine Goddess hahahaha

AMH M100 Sewing Machine

The AMH M100 has a drop-in bobbin, which makes it incredibly easy to thread. There is a little diagram on the case cover to show you how it is threaded – just a head’s up, 9 out of 10 of my students always thread it backwards the first time (actually, on my old Janome – I had it threaded backwards for like the first 6 months of use haha). The threading feels counterintuitive to what you’d think, but it’s necessary for proper tension. At any rate, you’ll know if you thread it backwards because your stitches will pull out very easily.

AMH M100 Sewing Machine
To thread the bobbin, you drop in your spool and pull the thread down, with the tail pointing toward the left…

AMH M100 Sewing Machine

Then you pull it under the metal piece and up the channel, toward the 1…

AMH M100 Sewing Machine

And pull the thread down toward the 2…

AMH M100 Sewing Machine

Where there’s a built-in thread cutter that will clip the tail to the correct length. Then you just put the cover on. That’s it! No need to pull up the bobbin threads, it’s ready to sew.

A word about drop-in bobbins: I’ve used both drop-in and front-loading, and both have their merits. The front-loading bobbins will give you a more even, precise stitch. However, they are also prone to tangling and creating thread needs on the underside of your work. The drop-in bobbins don’t give you quite as beautiful of a stitch (I think this is negotiable, though, since very few people are going to be able to tell the difference just by glancing), but they are a lot more user-error-proof. These bobbins in particular are known for being really really hard to mess up. We rarely have problems with the bobbin in our classes, unless something else is wrong (such as a dull needle, or incorrect threading). Our Janome rep loves to do this trick where she throws a big thread nest in the bobbin and sews a seam – the nest just shoots out of the back and doesn’t affect the stitching. It’s kind of weird and also really amazing haha. I think this sort of bobbin is really ideal for the beginner sewer, or someone who buys a machine for their kid and doesn’t want to mess with fixing it when they inevitably screw something up. Like I said, it’s really hard to jam it up, even if you intentionally shove a thread nest in it.

AMH M100 Sewing Machine

Here are the buttons on this machine. The Start/Stop can control the machine without the foot pedal – you just have to unplug it first. I will admit I’ve never personally used this button except to wind the bobbin, but kids whose feet don’t quite reach the floor love it. ha. There is also a backstitch, locking stitch (again, same as the backstitch except it stitches in one place to lock. This is really useful for those embroidery stitches), needle up/down, aaaaand my favorite button – the scissors! Press that little dude after you finish sewing, and it will raise the needle and clip your threads! Argh I love that feature so much! There is also a slider to control the machine speed.

AMH M100 Sewing Machine

The stitch buttons are in the green section. From here you can select your stitch, move the needle position, adjust length/width, make a button hole, and there’s also a “memory” feature for the scissors button.

AMH M100 Sewing Machine

The throat plate has a ton of markings for measurements, which are especially useful for quilting and applique. This is my only beef with the machine, actually – I absolutely hate the guide markings. I find them really confusing to see which one you’re using, and I don’t like that they are only on one side of the needle. This is easily solved by slapping a piece of tape on the machine along the markings, which is what I do for my classes.

AMH M100 Sewing Machine

AMH M100 Sewing Machine

The machine also comes with this giant (removeable) tabletop, which is ideal for quilting.

Finally, here are some stitch samples:

AMH M100 Sewing Machine

AMH M100 Sewing Machine

Just your basic straight stitch. The top fold is the bobbin stitching.

AMH M100 Sewing Machine

Here is the straight stitch with a triple stitch underneath. These stitches used the exact same thread – just basic polyester Gutterman, the stuff you use to sew a garment. This is why I love that triple stitch – it’s sooo much thicker than the straight stitch, but doesn’t require a special thread or needle.

AMH M100 Sewing Machine

I also played around with some of the embroidery stitches.

AMH M100 Sewing Machine

And a few of the utility stitches (zigzag, triple zigzag, and stretch/lightning bolt stitch). Sorry the angles are so weird and artsy, it was really hard to take a photo without a huge shadow over it.

Here are some more photos of the machine working her glorious angles:

AMH M100 Sewing Machine

AMH M100 Sewing Machine

AMH M100 Sewing Machine

AMH M100 Sewing Machine

In conclusion, this is a fantastic little machine and I’m excited to bring these into the Craft South classroom! It’s very easy to use (as in, intuitive and user-friendly) and a solid little machine that doesn’t bounce around the table when you’ve got it on a high speed. It’s very similar to our current classroom machines, the Janome 4120 – the main differences that I have noticed thus far is that the AMH M-100 has less decorative stitches (and doesn’t have the stitch alphabet – which, let’s be honest, rarely gets used). However, the AMH M-100 does come with that Even-Feed foot. I love those 4120s and think they are wonderful machines, but I can’t wait to make our classroom just a little bit prettier 🙂

AMH M100 Sewing Machine

Note: I was not compensated in any way for this post (no, I did not get a free machine either). However, if you come to Craft South and buy a machine from me, I *do* get a commission. If you’re not local and are interested in this machine, visit your local Janome dealer!

Completed: Travel Backpack

11 Aug

Look! I made a backpack!!

Travel Backpack

Ok, let me back(lolz) up a little first here!

When I travel around (whether it’s personal or sewing workshop related!), I like to check my luggage and bring a carry-on bag that is big enough for all my entertaining shit (knitting, Kindle, etc), but not so big that I’m forced to keep it in the overhead bin. I’ve dabbled around with different sorts of shoulder bags – totes, giant purses, I dunno, all sorts of stuff – which worked fine, but I didn’t like that they weren’t super useful once I got off the plane (like, who wants to walk around NYC with a giant tote bag?). I have a tendency to overpack more than I need to, and I’m really trying to pare down on the amount of stuff I lug around when I go out of town. I wanted a bag that would work for both my flight *and* getting around whatever city I was hanging around. Big enough to hold some essentials – a notebook, my water bottle, phone charger, stuff like that – but not so big that I would be tempted to put everything I own in it and weigh myself down for the day.

I bought a small backpack while I was in Peru when I realized that my normal backpack wasn’t gonna hold all the shit I was trying to carry home, which ended up being really awesome for my purposes, except when it fell apart at the seams while I was last in NYC. Boo! I was on board with the backpack idea at that point, so I decided to change what I didn’t like about the Peruvian pack (too soft/no support, drawstring, not enough pockets, straps weren’t adjustable, etc) and turn it into my dream travel pack.

I used the Toddler Backpack pattern, except enlarged it for a school-age child (there are instructions on how to do this in the pattern). I first discovered this backpack thanks to Kelli and her awesome versions made for actual toddlers (this one is particular makes me want to cry because it is SO FREAKING BEAUTIFUL), and I realized the size was exactly what I needed. I wanted to keep the essence of a small backpack – like the tiny packs we carried around in the 90s and felt real cool about – but I wanted it to have some features like my big traveler backpack had, like extra pockets and a place to carry my water bottle. I also wanted it to be structured, because I am not about those sad and droppy cloth backpacks!

Travel Backpack

Travel Backpack

I feel real good about the finished size! It’s just big enough to hold an 8.5″ x 11″ folder (which I will not be carrying around in this thing, but, that gives you an idea of it’s size). I included a few pockets that weren’t part of the pattern, to make organizing more useful – there is a big pocket in the front, a pocket on either side, a small velcro’d pocket on the inside, a large padded laptop pocket on the inside, and also a secret pocket in the back! The backpack is fully lined, the outside fabric is interfaced, there is self-made piping around the outside, the straps are adjustable and padded, and the bottom is also padded and quilted. There is a double pull metal zipper at the top, and little zipper tabs on either end (to help with zipping and unzipping – they are just folded and interfaced rectangles). It was a lot of work, but it’s pretty much exactly what I want!

Travel Backpack

This pocket is for my water bottle – the bottom is gathered, and there is elastic along the top. It fits my water bottle pretty securely. The pattern doesn’t include instructions for a water bottle pocket, but it was easy to figure out. I used this post as a guide on how to cut the pieces and assemble them.

Travel Backpack

The opposite side has a sort of bastardized bellows pocket that closes with a little piece of velcro. I used this tutorial as a general guide to draft the pocket. I did consider adding a flap to completely cover the top, but figuring out how to insert it without crossing over the side seamlines was starting to make my head hurt, so I just went with a velcro closure instead. I don’t think I’ll use this pocket to carry anything necessarily worth stealing – but it will be handy for my reusable bag, or tissues, or something like that.

Travel Backpack

Travel Backpack

The front pocket closes with a zipper (pulled from my stash) and is lined.

Travel Backpack

I spent a little more (aka- bought one instead of taking one from my stash) on the main zipper and bought a metal one intended for purses, with two pulls. When you’re trying to quickly get into your pack, it’s nice to not have to find which side the zipper pull is on. Also, I like that I can clip the two pulls together with a keyring, to discourage someone from trying to take a peek inside. I bought the zipper on Etsy from ZipIt Zippers, who I’ve always had good experiences with!

Travel Backpack

The straps are plain cotton webbing, with gold D rings so that they are adjustable. The upper portion of the straps are lightly padded with cotton batting so they are a bit more comfortable. Just a word of warning – if you are making this bag for an adult, check the sewn strap length! The first pair I made was laughingly WAY too short and looked completely ridiculous on me. These were lengthened by about 5″, which works much better.

Travel Backpack

Travel Backpack

Here’s something I’m proud of – a hidden zippered pocket in the back! It’s sized to fit my passport/wallet, and no one can access the pocket while I’m wearing the backpack. I always hated that someone could theoretically open my backpack and take my stuff, and now at least the shit worth stealing is a little more safe 🙂

Travel Backpack

Travel Backpack

I added two more pockets to the lining – a small pocket for holding things like chapstick, Advil, tickets, etc; and a larger pocket that is sized to hold my tablet (a Microsoft Surface, one of the older ones). Both the tablet pocket and the back side of the backpack are padded with cotton batting (the pocket is also lightly quilted), to protect my tablet and also for comfort against my back. I finished all the pocket edges with leftover bias from my piping, which I think looks really nice! I also included a keyring, so I can quickly find my keys when I need them.

I am not going to lie – sewing this backpack was a fucking BEAST. There aren’t a of of pieces, and it’s not even necessarily hard – but there is a lot of bulk once everything starts getting sewn together, especially if you include piping. That being said, the steps are reasonably simple. The instructions are easy to follow, the pieces fit together well, and there’s a lot of room for customization to make ~your perfect backpack~. Despite this being sized for an 8 year old, it’s exactly the right size for my needs.

I bought all my fabrics locally here at Craft South. The outer is my favorite – it’s a great woven cotton from Diamond Textiles that I loved working with cos it’s so pretty! (it’s not on our website, but I can personally vouch that we have like 30 yards in the store, so if you want some – just call the shop! I think it was around $18-$20 yard). The red contrast is Kasse shot cotton, and the lining is just plain ol’ Freespirit quilting cotton. I interfaced all the outer pieces (except for the gathered water bottle pocket) with medium weight fusible interfacing – Pellon 809 to be specific. I did not interface the bottom pieces, which in retrospect I kind of wish I had (the padding/quilting doesn’t make it quite as stable as I’d like, but oh well!). Also from Craft South came the cotton batting, cotton webbing and D-rings. Even though I get a pretty generous discount at Craft South, this backpack still cost me around $50 for all the materials – so it definitely wasn’t cheap (I could buy one for less than that). However, it’s sewn exactly to suit my needs AND the outer fabric is just so beautiful! So there’s that. Also, I am much more likely to take my damn time and do the best job I am capable of when I drop that kind of cash on a project – ha! I think it definitely shows with this backpack. It turned out even nicer than I was expecting!

Travel Backpack

Travel Backpack

Anyway, my little backpack is ready for it’s first adventure! I’ve got a few travel dates coming up soon, starting in September, so I can’t wait to start using it. And OH, speaking of traveling – after much planning, saving, and brain-racking… I just booked a big solo trip! I’ll be visiting in Egypt in January 2017!! HOLY SHIT, right!? I have ALWAYS wanted to visit Egypt and see (touch) a pyramid – which I am finally gonna do! I am also gonna take a Nile River cruise from Aswan to Luxor 😉 (which I am MASSIVELY excited about!) Can’t wait to nerd out super hard at the Egyptian Museum, too! Until then, though, I’ve got a vacation wardrobe to flesh out and sew – because let’s face it, none of my clothes are very modest and I definitely need to stick out as little as possible! 🙂

Completed: Marlborough Bras for Spring (also some life-y updates, yay)

5 May

I say this every time I post about this subject, but I love making bras. Hell, I really love not having to buy bras. I just realized the last bra I actually purchased was when I was in London back in 2014. Pretty sweet!

Anyway, I don’t have a new bra pattern to share or even new techniques to talk about… so this post is going to be a repeat of most of my other lingerie-making posts. I really like how these turned out, though, which is why I’m showing you them! I used the same pattern for both bras – the Marlborough from Orange Lingerie – which is one of my favorite patterns to use (I also looove the Boylston, which is a foam cup – and don’t worry, I have a post for that to share next week HAHA). I love this pattern because it’s comfortable and supportive, fits me well with some very minor adjustments, and I think the shape is just beautiful. The fabric cups are really soft and natural looking (you better be ok with the world knowing that you are cold, though. I decided that was not something I was going to worry about anymore haha) and you can make it out of a really awesome variety of fabrics. After a lot of Marlboroughs, I’ve learned that my favorite fit comes from woven fabrics that are backed with sheer cup lining. I like slightly narrower straps (3/8″ or 1/2″, as opposed to the recommended 3/4″ for DD+) and a 3 row hook & eye. I use the size 30D.

Also, because I get this question ALL THE TIME – this is a fantastic beginner bra pattern. At least, it was for me! I’ve made some soft bras in the past, but this is the first “proper” bra pattern I ever made – with underwires and all that fun. The instructions are very clear and you can buy a kit that includes everything you need to make it. If you want more info on making bras, check out this post I wrote last year 😉

Sheer black polka dot Marlborough bra

Bra #1 is really simple! I bought this sheer black polka dot mesh netting from Blackbird Fabrics (it appears to be sold out, but here is some in the white colorway), and Caroline threw in a black findings kit as a little bonus with my order. I can’t remember where I bought the sheer cup lining (I just got a lot of it so I have a big stash that I dip into haha) but it’s either from Blackbird Fabrics or Bra Maker’s Supply. Both are stores with I highly recommend, especially for their kits! Unfortunately, they’re both based in Canada which is a shipping bummer for us in the US. I’ve recently gone all up Tailor Made Shop‘s butt these days, and I’ve been really happy with everything I’ve received. And she is based in the US, so yay!

Anyway, back to the bra!

Sheer black polka dot Marlborough bra

Since the fabric was pretty flimsy on it’s own, with a little more stretch than I needed, I lined every piece with black sheer cup lining- including the top where one would normally put lace. I thought about leaving that part sheer, but I think I made a good choice because I do like the resulting fit! Because all the pieces were lined, I was able to encase all the seams inside the layers, so the inside is very clean and makes me happy.

Sheer black polka dot Marlborough bra

For the back, I used firm black power mesh on a single layer.

Flat bra shots:

Sheer black polka dot Marlborough bra

Sheer black polka dot Marlborough bra

Sheer black polka dot Marlborough bra

All right, now for the second bra!

Floral/lace Marlborough bra

Bra #2 is definitely a bit wilder in terms of color, and yes it looks suspiciously like another Marlborough I made last year don’t you dare judge me 🙂 The fabric was given to me by Annessa – she was showing me something she made with it and I about lost my mind over how beautiful it was. So she offered to send me some scraps, which OF COURSE I accepted because I can totally sew a bra out of scraps! The lace is from Blackbird Fabrics – it was part of that aforementioned order – and the notions are just a bunch of stuff I pulled out of my stash (I think the strapping and gold hardware are from Tailor Made Shop, actually). I had fun putting this one together in terms of what colors to use – there are so many colors in the fabric, and I have collected a lot of elastics over the past couple of years! In the end, I went with white everything except the underarm elastic, which I think is really pretty.

Floral/lace Marlborough bra

Cutting the fabric was a bit of a bear because I was trying to place the colors with a bit of thoughtfulness, but I think it turned out ok! Honestly, I didn’t really like the way this looked when I first finished it – it seemed a bit chaotic with all the colors and piecing everywhere. But I’ve worn it a few times and have really grown to love it!

Same as with the black version, I underlined all the pieces with sheer cup lining (this time in white), except I did not underline the lace. I did stabilize the edge with a piece of navy powermesh selvedge. I think that looks and feels better than using clear elastic.

Floral/lace Marlborough bra

The back is pretty boring, although it does have purple topstitching 🙂 I just used firm powermesh for the back pieces, again, one layer.

And the flat shots:

Floral/lace Marlborough bra

Floral/lace Marlborough bra

Floral/lace Marlborough bra

The inside definitely doesn’t look as good as the black one. For one, my dark topstitching doesn’t work with the white interior (go figure?). I should have threaded two machines but I was feeling lazy (although I did at least put white in the bobbin when I sewed the band elastic). Further, I should have changed out that pink serging thread for white – or better, made that open seam the one right below the cups, as it would have been covered by the underwire casing and elastic. Whatever!

So those are the bras! Now let’s talk about meeeee!! I’ve already mentioned most of this stuff on Instagram, but I realize that a lot of y’all probably don’t use/follow me on Insta, and also, I can just go into more detail here!

First of all – as of March, I am no longer working for Elizabeth Suzann. Everything is fine between us – I just got a really good offer for another job that I couldn’t refuse (and unfortunately, I can’t do both because there are only so many hours in the day). More on that in a sec! I absolutely love love LOVED working for Elizabeth – her and her husband, Chris, are some of the best bosses I’ve ever had, and my coworkers were just fucking amazing. I had so much fun on the days that I worked there, and I never really felt like it was a job. Every day was different, and I liked challenging myself to do things faster while still being accurate. Of course, it helps to be somewhere where you feel appreciated and valued, which I certainly did! Liz is always looking for fabulous new seamstresses, by the way, so if you’re in Nashville and have some sewing skills, you should definitely apply! I can’t say enough good things about the company or the people who work there. I offered to help as a freelancer whenever they are overloaded with orders – so we’ll see, I just may be back from time to time 😉

So, hey, the new gig! I am now working at Craft South, which is an ADORABLE little crafty shop that Anna Maria Horner opened in Nashville about a year ago. We sell fabric, yarn, Janome sewing machines (which means I will definitely be buying a coverstitch at some point this year, hellz yea), embroidery and weaving supplies, handmade/locally made gifts, and just a general assortment of craft-based merchandise. My official title is “Education Coordinator,” which means I’ll be handling all the class stuff – scheduling and coordinating, planning, making samples, etc. I’m working alongside Anna and we have got some super awesome stuff in the plans for this summer! I’m also teaching Beginner Garment Basics classes – next up is this Breezy Caftan on 5/12 – and whatever else I can dream up, cos guys, I love teaching sewing 🙂 ALSO, I’ll be manning the registers and fabric cutting like a normal retail shop person on Tuesdays and Fridays – so if you’re in Nashville, stop by and say hi! Take a class! Support the local fabric store! You might even run into Anna Maria Horner herself, who is way cooler than I am 🙂

FINALLY, one more big change coming up – don’t laugh, but I’m moving! AGAIN! (and if this doesn’t surprise you – dude, get in line, literally everyone I’ve told this to replied with, “Yeah I was waiting for this to happen” haha) Honestly, I really love the house I live in and my living situation is totally ace (I’m in the middle of the woods with my best friend, so it’s like constant BFF night over here), but the reality is that I don’t like living so far from the city. If I could pick this house up and plop it back down into Nashville, I absolutely would… but that’s not how life works. My commute from Kingston Springs to Nashville is about 30 miles one way, which I’ve learned is absolutely killer for me. I hate it!! I miss being in biking distance of my job! I miss ordering takeout (lol jk I never order takeout or delivery but HELLO OPTIONS ARE NICE)! I miss having a 10 minute / 5 mile commute. These are things that are important to me. I’ve felt stuck here for a while now, because Nashville has gotten outrageously expensive now that everyone is moving here (btw – if you’re thinking about moving here, don’t. We’re full.). However, this new job has literally afforded me the opportunity to get out and back into the city. So I found an apartment in West Nashville (where I was before I moved out here, and also, my favorite area!) and I’m moving in mid-June! Yay! That means a new sewing room will eventually be in the works, too 🙂 I’m not sure how I’ll manage blog pictures since I don’t really like doing the tripod/timer thing in public, but eh, I’ll figure that out when I get to it. At any rate, if things get a little quiet here in June… that’s why. As a side note, I’m cleaning out my closets in anticipation for the downsize in housing, and I’ve listed a few of my handmades that I don’t wear on Etsy. Most have already sold, but there are 2 things still listed if you are interested – you can check out my shop here. Someone give these handmades a good home and the wear that they deserve!

And, in case you were wondering – only my cat is coming with me (cat is a deal-breaker!). The pigs actually belong to my roommate, so obviously they are staying here in the country 🙂

One last thing – it’s May, which means Me Made May ’16 is in full swing again! If you’re not familiar with Me Made May, it’s a month where you challenge yourself to wear handmades (every day, a few times a week, entire outfits – whatever works for you!). I have participated in the past (see: 2012, 2013, 2014), but I won’t be doing it this year. About 99% of my clothes are handmade at this point, and it’s pretty much Me Made Everyday. There’s not really a challenge involved for me to wear them, so it seems silly and almost a little show-offy to jump in with everyone else. Also, I hated doing the daily selfies 😛 But rest assured that I am still rocking the me-mades – today I am wearing my Ginger Jeggings, the Starwatch Watson bra, a handmade black tshirt (unblogged because, it’s a tshirt) and a striped hoodie (also unblogged. Man I’m behind on this).

:)

Anyway, that’s about it for me! Have a picture of my favorite part of my (current) sewing room. I really love this space, but it’ll be fun to set up a new one 🙂