Archive | Mood Sewing Network RSS feed for this section

Completed: The Sugar Plum Dress (+ a Giveaway!)

25 Nov

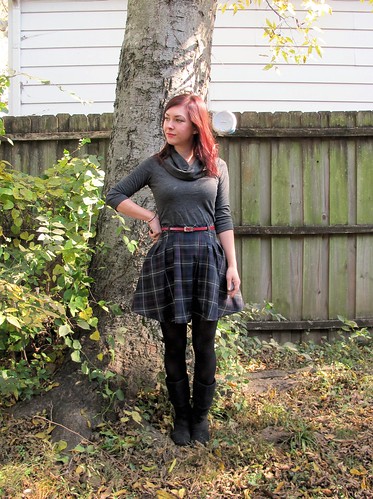
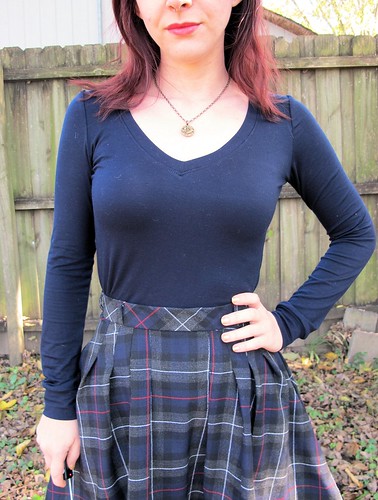
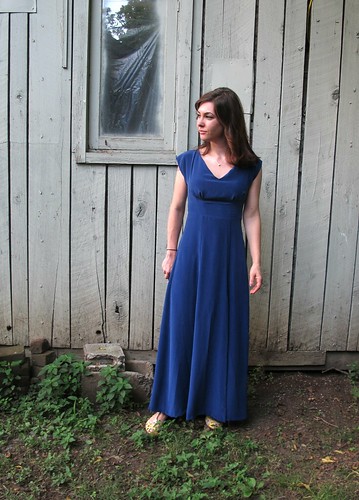
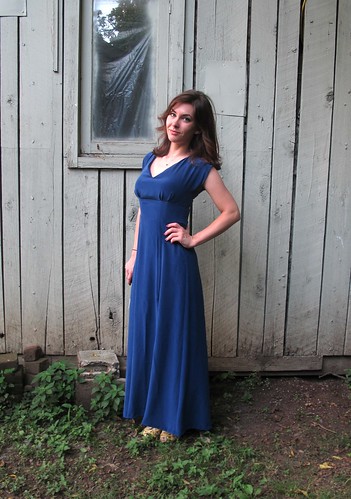
This dress is SO awesome and sneaky. Looks like two pieces, but wait- there’s more! It’s actually one dress! Sugar Plum dress made with Oscar de la Renta silk and ponte knit from Mood Fabrics I LOVE these kinds of dresses! Looks like a silk blouse with a high-waisted pencil skirt, without the bother of keeping a shirt tucked in all day and making sure things match in the morning (because, ew, all I wanna do is sleep right now). Extra bonus – the skirt is a ponte knit, so it’s actually a COMFY pencil skirt. Are y’all feeling my excitement right now?? Sugar Plum dress made with Oscar de la Renta silk and ponte knit from Mood Fabrics 
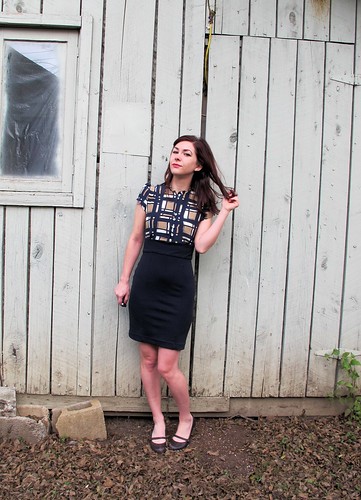
This is the Sugar Plum, from Lolita Patterns. Full disclosure: Amity sent me this pattern free to try it out and see how I liked it. I guess you probably gathered at this point my reaction to the finished dress – ummm, amazing! I love how it’s totally appropriate for a professional environment (not that I need clothes like that anymore, but, you know, I still like to dress up ;)), but it’s still beautiful and feminine and unique. The pattern is really fun to put together – lots of tiny pieces, clever seam finishes, the kind of stuff that makes me 😀 Since it doesn’t require a lot of fabric to make up the top half (less than a yard!), I splurged on this amazing Oscar de la Renta silk print from Mood Fabrics. I also bought this navy blue ponte knit for the skirt (omggg so comfy) and lime green china silk for the lining for a bit of a color pop. Sugar Plum dress made with Oscar de la Renta silk and ponte knit from Mood Fabrics 
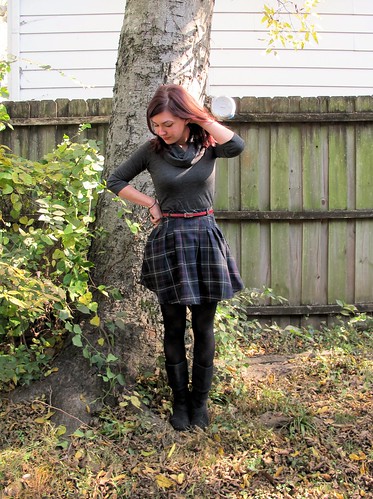
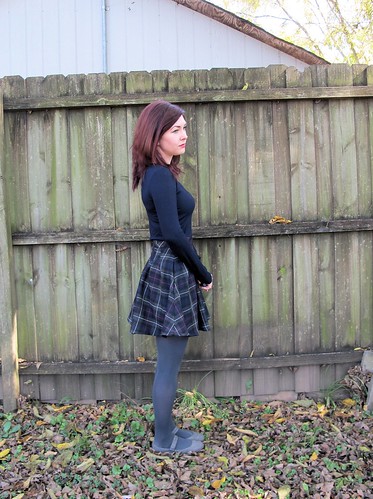
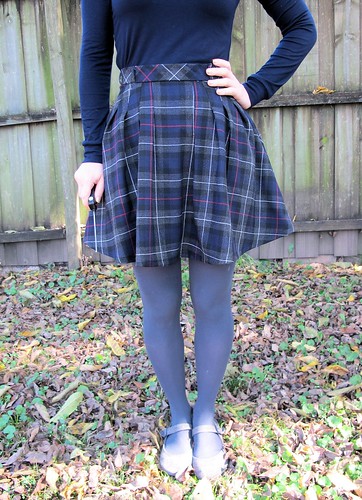
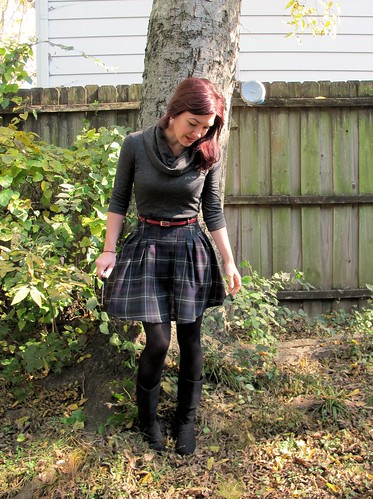
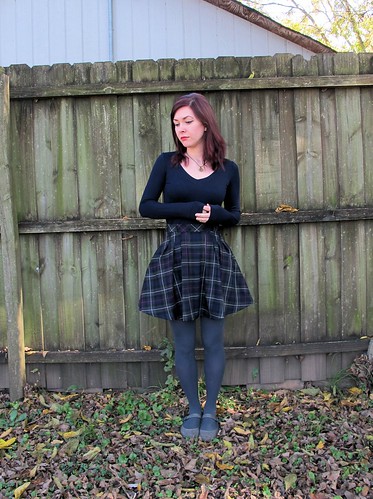
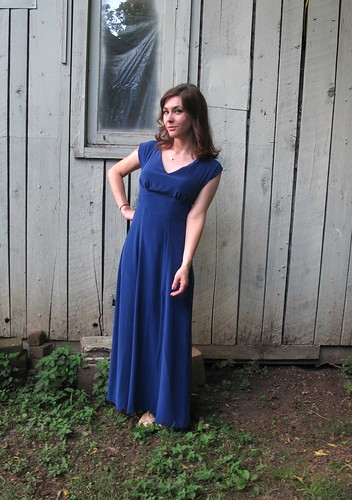
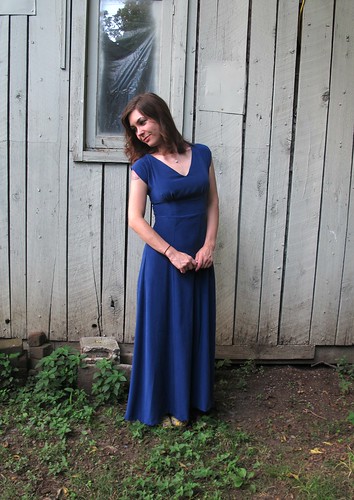
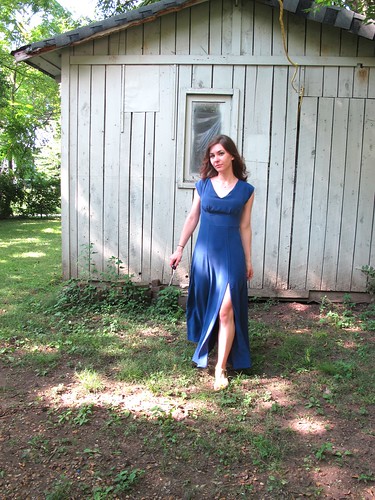
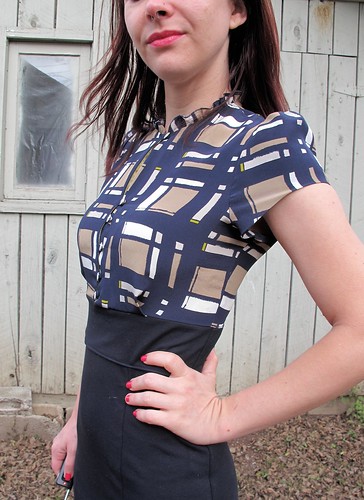
This is view B, without the front flounces. I sewed up a size 2. The top fit with no alterations, although I did need to take the skirt in a bit to get it fitted (it’s actually a bit toooo fitted now, whoops. Good thing it’s a knit lol). I did use a much stretchier fabric than suggested by the pattern, so I’m not surprised. The pattern has you use a stretch woven, and pontes tend to be a little more like an actual knit. Based on the way the skirt fits, I suspect you could also use a non-stretch woven and just cut the panels on the bias for the same fitted/comfortable effect. I skipped the pockets and the sleeve gathering detail for a more simple look. Sugar Plum dress made with Oscar de la Renta silk and ponte knit from Mood Fabrics 
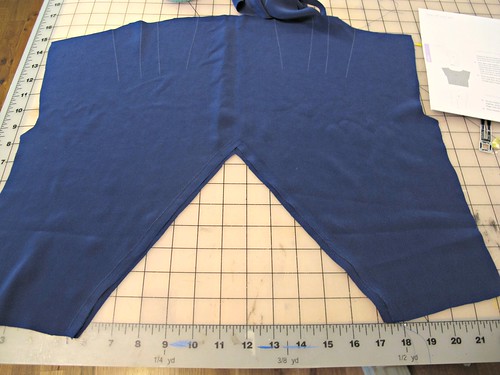
The more I sew with silks, the more I find myself not wanting to make up anything else. The most important thing I’ve learned when it comes to sewing lightweight/slippery/silky fabrics is to make sure that your cutting is super accurate, then the sewing is a piece of cake (or, at least, as much of a piece of cake as it can be!). I always rip my fabric along the cross grain first, to ensure that the edges are perfectly straight, and then pin the selvedges together before I lay down my pattern pieces. This prevents the silk from shifting as I cut it. When it’s time to cut, make sure your scissors are nice and sharp, and try to cut the entire length of the blades (instead of timid little snips). One thing I loove about ordering from Mood Fabrics is that I know the fabric is going to already be on-grain, so I don’t have to worry about straightening the grain before I cut. Just rip the cut edge, pin, and cut those pattern pieces! Sewing with the ponte was much easier than the silk, obviously. I used a serger for all the skirt seams, and my regular sewing machine (treating it like a woven) to attach the silk top to the ponte waistband. I love this ponte because it’s quite a bit more stretchy than other pontes I’ve tried, which means it’s extra extra comfortable. Just be careful when you press it – it definitely gets a shine, so use a press cloth. I keep a big square of silk organza specifically for this purpose. It absorbs the heat of the iron so my fabric underneath doesn’t shine, and it’s sheer so I can actually see what I’m doing 🙂 Sugar Plum dress made with Oscar de la Renta silk and ponte knit from Mood Fabrics Sugar Plum dress made with Oscar de la Renta silk and ponte knit from Mood Fabrics I really enjoyed working on this pattern – lots of tiny details to make me feel challenged as a seamstress, but not so much that I got overwhelmed with the process. A lot of indie patterns run on the easy/beginner side – which is fine, I know there are lots of people who want something simple to make up, and it’s easier to complicate a pattern than simplify it. But sometimes it’s nice to have something that I feel is aimed at a slightly higher level, without me having to run through the steps and find ways to make it harder for myself. Wow, I just made me sound like a total weirdo. What can I say, I like a challenge! Sugar Plum dress made with Oscar de la Renta silk and ponte knit from Mood Fabrics 
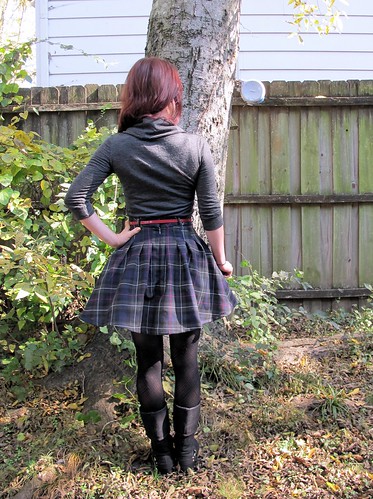
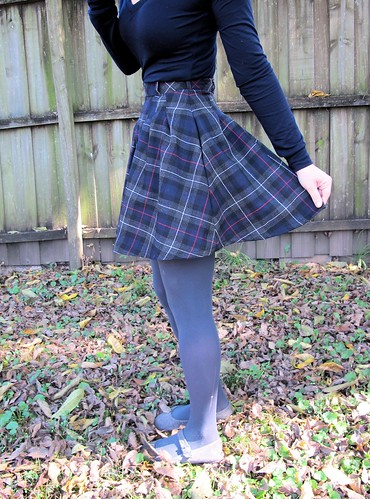
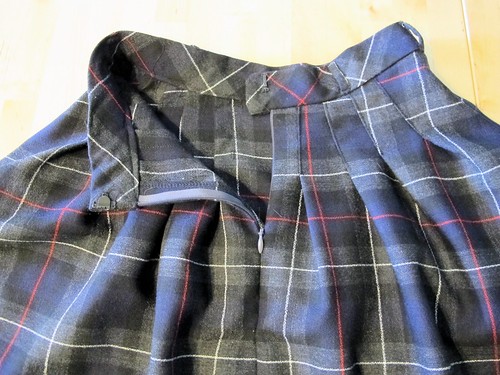
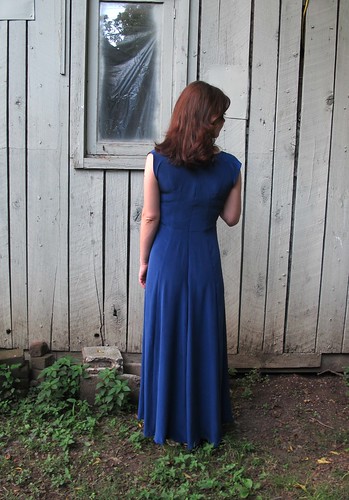
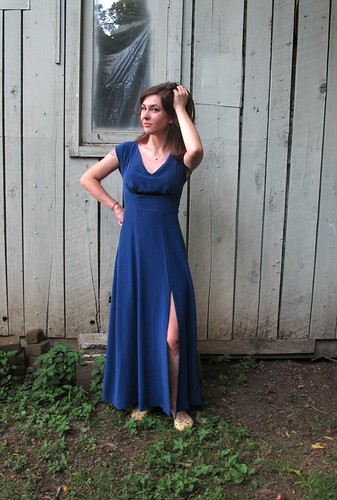
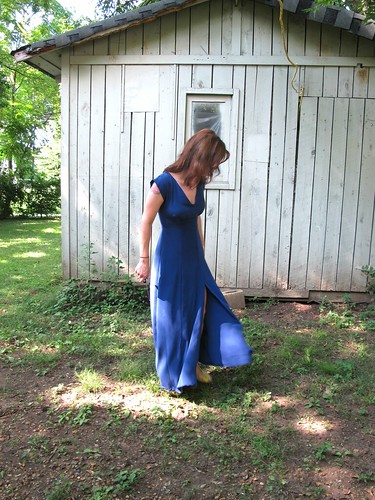
I did make a pretty crappy mistake toward the end of this dress. I was sewing in the invisible zipper and could not get the waistband seams to match up. I was tired, hungry, getting grouchy (you can see where this is going), and I thought, “One more try and then I’m outta here.” While picking out the zip, I somehow managed to detach the teeth from the zipper tape. WHYYYYY. I know I tell y’all that I have millions of zippers in my stash, and I do, but none of them are invisible. I actually have to go out of my way and buy one whenever I need it (because I’m too stubborn to keep those in stock, apparently), which usually ends up with me going to Walmart because they sell invisible zippers and they’re open at 3am when I suddenly need one. So I pretty pissed about destroying this zip, and trying to avoid another trip to Walmart. I ended up cutting the zipper right above where I sliced it open, and just finished the dress with a super duper short zipper – it ends about halfway down the waistband. Since the skirt is so stretchy, this works, kind of. It’s funny to watch me pull it on, ha! And you know the worst part? THE WAISTBAND PIECES STILL DON’T MATCH UP. Whatever, I’m over it! Sugar Plum dress made with Oscar de la Renta silk and ponte knit from Mood Fabrics Sugar Plum dress made with Oscar de la Renta silk and ponte knit from Mood Fabrics 
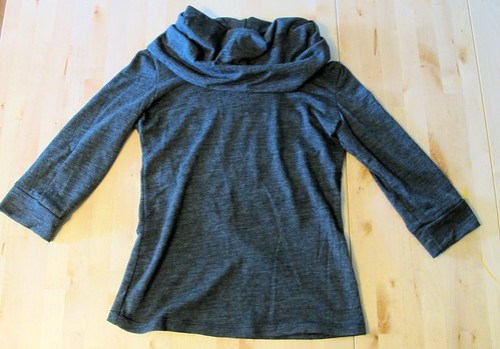
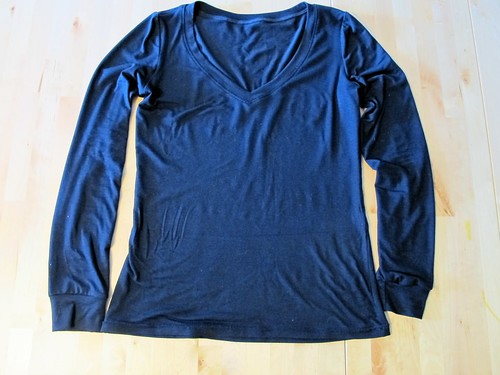
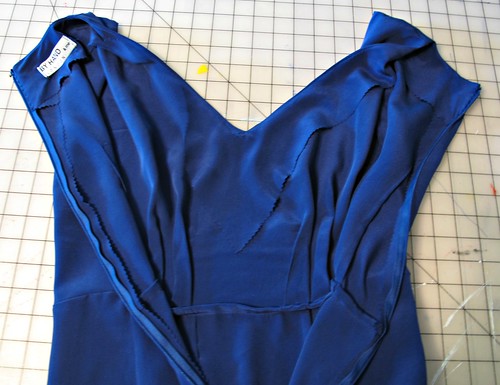
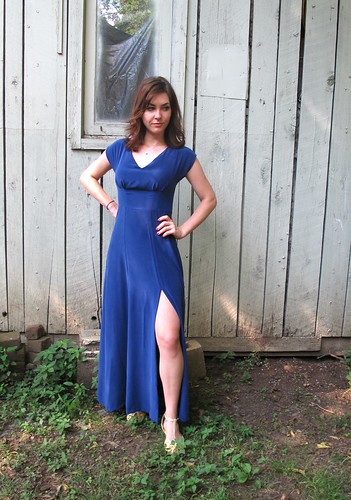
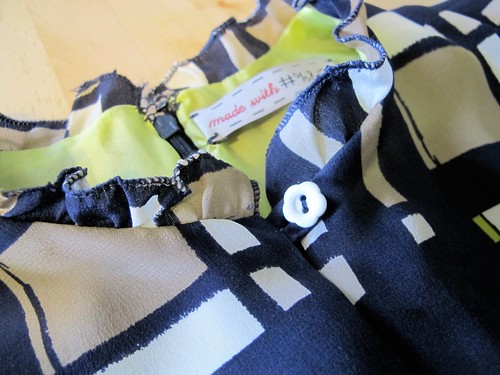
I love the little details on this dress that make it so special – the ruffled collar (hemmed using the rolled hem on my serger), the tiny buttons with the tiny button loops, and that BRIGHT LIME GREEN LINING. Really, it’s like a party when I take the dress off! Sugar Plum dress made with Oscar de la Renta silk and ponte knit from Mood Fabrics Sugar Plum dress made with Oscar de la Renta silk and ponte knit from Mood Fabrics Sugar Plum dress made with Oscar de la Renta silk and ponte knit from Mood Fabrics By the way, don’t ever search Oscar de la Renta on the Mood Fabrics site unless you plan on dropping some serious dough on some seriously incredible fabrics. I just fell down the rabbit hole – again! – and discovered violet boucle, boucle with sparkly lurex (!!!), silk floral and some freaking polka dot silk taffeta. I want, I want it all! Sugar Plum dress made with Oscar de la Renta silk and ponte knit from Mood Fabrics

Now time for the fun part – a giveaway! Amity has generously offered a copy of Sugar Plum to one lucky winner, yeeeah!! Still having reservations? Just know that the sizing goes aaaaall the way up to 24 (yes!) and there is an entire sew-along on the blog for anyone who needs some hand-holding. You have no excuses, people! To enter, just leave a comment on this post and let me know what you’d make your Sugar Plum up in (Personally, I’m lurking on a second version with a leopard blouse and a denim skirt, like, ahem, Leila’s. Yes. Exactly like that. Sorry boo!). This giveaway is open to WORLDWIDE and I will close the entries a week from today, Monday, December 2 8:00AM CST. Good luck!

GIVEAWAY IS NOW CLOSED.

Completed: the Zinnia Skirt

8 Nov

Who doesn’t love to wear wool in the winter time?

Zinnia Skirt made with plaid wool from Mood Fabrics

I feel like a broken record when I start singing the praises of wool, but foreal you guys – this stuff is awesome. It’s super warm and cozy, breathes very well (so you don’t get overheated in all that warm and cozy-ness), and it’s also antimicrobial, which means it naturally repels odors. Which means now you know why I wear so much wool and still manage to keep up with the laundry – it doesn’t need to be washed very frequently! Airing out is fine for day-to-day. Yay for being lazy!

Zinnia Skirt made with plaid wool from Mood Fabrics

So obviously, I was ready to bust the wool out just as soon as the temperatures started dipping. I’ve had my eyeball on that Zinnia pattern, and I paired it up with this beautiful lightweight wool plaid suiting from Mood.

Zinnia Skirt made with plaid wool from Mood Fabrics

I didn’t take any special precautions when sewing this – it’s wool, it’s just easy! The stitches sink in (bad for unpicking, but great for hemming since you can’t see the top stitching ;)), it presses beautifully, and as weird as this is gonna sound – it was really fun to cut, too. My scissors just sliced right through that yardage. I love the colors and it looks just as good paired with black as it does with navy. Double duty fabric and all that.

Zinnia Skirt made with plaid wool from Mood Fabrics

For the skirt, I cut the size 2 (although I did end up taking in the waist so maybe the 0 would have been better). I left the skirt unlined and shortened the hem by about 3″ so I could have a mini. The waistband is cut on the bias and, despite what you might think you see, I promise that the plaid matches up at the side seams 🙂

Zinnia Skirt made with plaid wool from Mood Fabrics

See?

Zinnia Skirt made with plaid wool from Mood Fabrics

Oh yeah, and I did totally just change shirts. We’ll discuss those in a second.

Zinnia Skirt made with plaid wool from Mood Fabrics

So. About working with this skirt in a plaid fabric. It works – kind of. Matching those side seams was HELL ON EARTH and I’m not really sure why. There are only two pattern pieces, for fuck’s sake! That was also the same day I got my kidney stone (which, if you’re still wondering… it’s still here. Just hangin’ out. Ugh ugh ugh), so I blame it on the pain meds. Anyway, I don’t really think this patterns works very well with a stripe – at least not the stitched-down-pleats version. They just look like a hot mess at the front and back. Might want to save your plaids – or at least your large-scale plaids – for another project.

Zinnia Skirt made with plaid wool from Mood Fabrics

I also had to drastically shorten the hemline – like I said, 3″ and WOO IT’S A MINI – because the longer length just looked dumpy as hell on me. Which means my plans for using a border print probably won’t work with this pattern, at least not the print I had in mind. It’s just too tall for the skirt length.

Zinnia Skirt made with plaid wool from Mood Fabrics

Also, the fabric I chose maaaay be a little too much for this pattern – seeing as how it sticks out like I have a teeny petticoat underneath it, ha – but I actually like the flared look.

Renfrew top made with wool knit from Mood Fabrics

Oh yeah, my tops! This is a Calvin Klein wool jersey, also from Mood Fabrics (attached link isn’t the same color – looks like they’re sold out of the grey, SORRY – but it’s the same fabric type) and it is deeeelicious. So soft and cozy, and not itchy at all! I used the Renfrew pattern and made the cowl version with 3/4 sleeves. I just love the way the fabric drapes at the cowl – it has enough body so it’s not droopy, yet it’s also not huge and standing up on it’s own or anything.

Also, sorry about the rouge leaf. Didn’t see that during the photos, haha!

Renfrew top made with rayon knit from Mood Fabrics

I made the navy v-neck because I felt like my contribution was a little boring, and also because I wanted to see how good navy looks with this skirt (it does! it does!). I used a rayon jersey from Mood Fabrics that’s been in my stash for ages – originally considered for leggings, until I realized that it was a tiny bit too sheer aka I would be baring my bum. I’m so glad I found a use for it, though, because it is some of the most luxurious fabric I have ever handled! It may just be a rayon knit, but it’s silky smooth and amazing. I really wish I had it in every color! I’m also, like, stupid proud of how that V turned out, by the way.

As usual, I took waaay too many pictures, so I’m just going to dump the rest here.

Zinnia Skirt made with plaid wool from Mood Fabrics

Zinnia Skirt made with plaid wool from Mood Fabrics

Zinnia Skirt made with plaid wool from Mood Fabrics

Renfrew top made with wool knit from Mood Fabrics

Renfrew top made with rayon knit from Mood Fabrics

Zinnia Skirt made with plaid wool from Mood Fabrics

Zinnia Skirt made with plaid wool from Mood Fabrics

The tiny belt loops are my favorite part! So tiny and cute!

Zinnia Skirt made with plaid wool from Mood Fabrics

See what I mean about the plaid? It looks like a hot mess at the pleats. Oh well.

Zinnia Skirt made with plaid wool from Mood Fabrics

One last thing – I wanted to thank y’all for all your advice regarding my muslin, as well as my kidney stone. I’ve decided to set the muslin aside for now; I may revisit it in the future but I think my coat for 2013 will have to be a totally different pattern! So I guess I’ve got that to figure out. As far as the kidney stone… well, it’s still there, taking up residence. Y’all will probably be able to hear me scream from the rooftops once it finally emerges haha. A few people urged me to to go the doctor, and I did want to follow up and let y’all know that I went to both a doctor and a specialist last week, got the x-rays as well as a variety of medications. There’s not much else we can do at this point beyond surgery or shooting lasers (which my uninsured ass is reeeeally trying to avoid), which means I gotta shoot it out! For the past couple days I’ve been on an essential oil regimen, and tonight I will be trying some Coke/asparagus concoction that sounds fucking disgusting but is supposed to work. Anyway, sorry for the TMI, keep thinking happy kidney stone thoughts! haha!

Zinnia Skirt made with plaid wool from Mood Fabrics

Completed: Plaid Flannel Archer (+ Draping winner!)

10 Oct

Finally, a successful Archer button-up – in my dream plaid flannel, no less (seriously, I keep eyeballing all the other colors… do I take the plunge and buy them all?? Because I want to!)

Lumberjack Archer; Ponte Leggings

I am pretty proud of this shirt, so let’s be honest – there are lots of pictures in this post.

Lumberjack Archer; Ponte Leggings

Although the more I look at these pictures, the more they appear to just be the same picture at a slightly different angle or pose. Oops 😦

Lumberjack Archer; Ponte Leggings

ALSO, please forgive my awful editing and how the color changes in every picture. I bought a new photo editing software with my new laptop (Corel Paintshop Pro, if you’re curious!) and I’m still trying to get used to it 🙂 BUT HEY, I can edit out zits and stuff now, so that’s pretty freaking awesome!

Lumberjack Archer; Ponte Leggings

Anyway, ok, let’s talk about this Archer I made! Using my failed linen Archer as a wearable muslin, I shortened the sleeves by about 1″ and left the body length intact (you’ll recall that the linen one I ended up cutting too short. Or maybe you don’t recall, see if I care). I think my sleeves are still a little long, but I also anticipate this shrinking more in the dryer (I only washed the flannel once before cutting, sorry, I was just excited!) so hopefully they won’t end up too short!

Lumberjack Archer; Ponte Leggings

I also made the pocket smaller! No rhyme or reason to how I did it, I just eyeballed until it looked “right.”

Lumberjack Archer; Ponte Leggings

Making this shirt was super fun, from cutting (what can I say… I love matching up plaids haha) all the way through sewing. I forgot how much I love sewing really precise things like button-down shirts. Makes me want to sew another shirt for Landon, maybe. What’s funny is I actually caught myself starting to rush through the construction of this – not because I was on a deadline, but because it’s starting to get cold and I wanted to wear this shit nooooooow – and I decided to force myself to slow down by sewing flat-felled seams instead of just serging the seam allowances off. Even the arms are flat-felled. I’m so glad I did, because the end result turned out pretty fabulous if I do say so myself.

Lumberjack Archer; Ponte Leggings

I cut the back yoke, pocket, and front button band on the bias. Everything else is straight and painstakingly matched. The only boo-boo I made was that I put the button band on the wrong side – oops! I originally chose the opposite side of the flannel as the right side, then changed my mind when I started sewing. Since the front pieces are not mirrored, this meant I had to compromise my button band side. Oh well, I am just pretending that it’s actually a men’s shirt, haha!

Lumberjack Archer; Ponte Leggings

At any rate, the side seams match up beautifully. Look at that shit!

Lumberjack Archer; Ponte Leggings

I changed out the buttons for pearl snaps, so I can hulk my way out of this shirt when the urge strikes. Funny thing about those pearl snaps – they actually started out white, and while it looked ooookay, it also just looked like I bought the wrong color pearl snap. I can’t get black snaps locally (and DAMMIT that I SAW them in Chicago and was like “nah I don’t need that” lol oh Lauren, hindsight is 20/20 or some shit) and I couldn’t wait sooo… I painted these with black nail polish. Black glitter nail polish, to be precise. Hey, it works!

Lumberjack Archer; Ponte Leggings

Lumberjack Archer; Ponte Leggings

I sewed the size 0, as I did last time, except the side seams are sewn at 5/8″ instead of the pattern’s 1/2″. This makes for a slightly (very slightly) smaller fit.

Lumberjack Archer; Ponte Leggings

The collar stand turned out fucking perfect, which I’m VERY proud of! I followed Andrea’s tutorial and I had no unpicking with that method. I’m sold, and Andrea, I owe ya a beer for that. Thanks bb♥

Lumberjack Archer; Ponte Leggings

I also changed out the sleeve plackets and used the ones from the Negroni pattern. I just think these look so much better with the flannel check, plus they are more conductive for rolling up sleeves. I also find this type of placket easier to sew. Man, I love sewing plackets.

Lumberjack Archer; Ponte Leggings

Oh, I also made my leggings! You can’t really see any detail because they are black, wah, but I did make them! I used the Ooh La Leggings pattern and a black ponte knit from Mood Fabrics. My take on ponte leggings – AWESOME. So so awesome!! I actually wore these when I traveled to/from Chicago (so, 18+ hours total) and they were SO comfortable – and they actually look like pants! Guys, I am so sold on these.

I don’t have much else to say, so have some pictures –

Lumberjack Archer; Ponte Leggings

Glitter buttons, yeah? 🙂

Lumberjack Archer; Ponte Leggings

Collar stand pride~

Lumberjack Archer; Ponte Leggings

Lumberjack Archer; Ponte Leggings

Placketz

Lumberjack Archer; Ponte Leggings

Flat-felled seam, curved hem

Lumberjack Archer; Ponte Leggings

Proof that these are actually leggings and not some black blob.

Lumberjack Archer; Ponte Leggings

This outfit has basically become my fall uniform. Seriously! The flannel is so warm and cozy – and easy to throw on if I’m chilly (which is always. Yes, I have worn this shirt every day since I finished it, don’t judge me). I am really happy with how both turned out, and definitely plan on making more. Question – is it really dorky to make me & Landon matching plaid flannel shirts? Because I’m totally about to go there.

One last thing – We have a winner for the Draping book! Random number generator, who do you choose?

random

yaywinner

Congratulations, Jennifer Stephenson! I can’t wait to see what vintage recreations you end up making!

Completed: Polka Dot Peter and The Wolf Pants

26 Sep

Remember when I was trying to hunt down the perfect polka dot fabric for these Peter & The Wolf pants? And then I couldn’t find it and I was sad but I made them anyway? Well! Look what I found!

Peter & The Wolf - Polka Dots

My dream stretch polka dots pants fabric – a polyester wool suiting with flocked polka dots (right?! right?!)!

Peter & The Wolf - Polka Dots

I got a fistful of swatches from Mood about a month ago, this swatch being one of them. I immediately zeroed in on those flocked polka dots and called the store to get a couple yards sent to me. I should also mention this was like day #2 post-surgery, and I was laying on the couch totally hopped up on painkillers and I’m fairly certain that the dude on the other end of the line thought I was a crazypants. Whatever! Joke’s on him, now I HAVE the crazypants!

Peter & The Wolf - Polka Dots

Then I got my fabric and I rolled around in it for a couple of weeks because that is what you do when you are in love.

Peter & The Wolf - Polka Dots

Again, I used the Peter & The Wolf pants from Papercut Patterns, with just a couple modifications from the last time I made them. I already had the pattern pieces modified to reflect the changes I made – sizing, crotch length, crotch curve, all that good stuff – but I went ahead and made a quickie muslin just to be SURE before cutting into this precious stuff. I added another 1/2″ of length to the legs and swapped out the waistband for a curved waistband – specifically, I used the waistband from my Clovers. I definitely prefer the way this fits over the straight band – and it’s a good height, too. It just barely covers my bellybutton, which I like.

Peter & The Wolf - Polka Dots

I lined my pockets with a little scrap of Bemberg rayon lining and it’s kind of amazing. I feel so posh whenever I stick my hands in my pockets now, ha!

Peter & The Wolf - Polka Dots

Also, I’m very happy to report that the grainlines are totally straight on these pants (since I didn’t have to do emergency pants-weightloss surgery while sewing them), and as a result the hem scallops are straight as well. Yay!

Peter & The Wolf - Polka Dots

The only part about all this that I was NOT digging was when it came time to actually press my seams. Lord, that polyester refused to do anything that involved heat. I solved most of the issue by doing a lot of top stitching – front and back leg center seams, the yokes, the pockets, the waistband. Basically everything I could get my needle into.

Peter & The Wolf - Polka Dots

I think it worked out quite well in the end, though! And yay, all my seams match up!

Peter & The Wolf - Polka Dots

Next time I make these, I will stabilize the zipper opening. It’s just a little too wavy – which, I mean, I could fix, but I also got those seams matched up fucking PERFECT and I’ll be dammed if I’m ripping that shit out again. Nope.

Peter & The Wolf - Polka Dots

To get the bottom scallops to have a nice sharp edge (remember, the polyester wanted nothing to do with that iron), I had to improvise and figure things out as I went along. I did include the facing, which I under stitched and then top stitched (I find under stitching is VERY helpful when you are sewing something that is difficult to press, as it forces facings to roll to the inside). To press the edges, I used my sleeve board and a silk organza press cloth and steamed the shit out of each section. After it got nice and hot, I used my clapper to hold down the fabric until it was completely cool. This is probably the closest I’ll get to a good press on this fabric, and hey – no shine! Woohoo!

Peter & The Wolf - Polka Dots

God, I love these pants.

Peter & The Wolf - Polka Dots

I also really love these labels. They speak the truth, at least as far as these pants are concerned.

Peter & The Wolf - Polka Dots

Sorry ’bout the creeper hand.

Peter & The Wolf - Polka Dots

Peter & The Wolf - Polka Dots

Peter & The Wolf - Polka Dots

I added arrowhead tacks to the bottom pocket opening, because why not? I used embroidery floss and followed this tutorial on the Coletterie (I also see that I commented about a western shirt I was going to make. Obviously that never happened, but it SHOULD. Ooh!)

Peter & The Wolf - Polka Dots

Really thinking about making a wool version for the cold weather – maybe lengthen the legs to full-length, omit the pocket detailing and scallops? What do you think?

(psst! If you were wondering – my wrap top is handmade, and my shoes are from Clark’s ;))

Completed: A Luscious Silk Anna

28 Aug

Hey guys. I would like to introduce you to Anna, my newest piece for the Mood Sewing Network.

Anna Maxi

So, Oona and Sonja originally planned this silk challenge, in which they both would make Anna dresses with a notoriously difficult fabric. Once I got wind of what was going on, I walked straight into that party and invited myself to be the third wheel. I can’t help it; I love being part of a Mood Fabrics sandwich. Especially when it involves Thakoon Crepe de Chine. I mean, COME ON.

Anna Maxi

So, as we all know at this point – this is the Anna dress, the newest offering from By Hand London. For mine, I decided to try my hand at the maxi version with the slash neckline, after getting good results with my wearable muslin shorter version. Since the dress itself is very simple, it was the perfect excuse for getting my hands on the aforementioned silk Crepe de Chine.

Anna Maxi

Anna Maxi

I’ve never sewn with this type of fabric before, so I was admittedly a little nervous. Would I regret my decision?

Anna Maxi

Anna Maxi

Really, though, it wasn’t so bad! The crepe texture of this fabric actually made everything a LOT easier – it gave the pieces something to “grab” onto (as opposed to being all slinky and slippery all over the place). For cutting, I did pin my selvedges together to keep everything intact, and I used a lot of pins on the actual pattern pieces as well. One protip – make sure you use silk pins; this stuff is very delicate and normal pins may leave holes! I also used a microtex/sharp needle on my machine. The fabric fed through very smoothly (again, thanks crepe, for your grabby lil hands!) and it pressed with very little fuss. I like this stuff!

Anna Maxi

Anna Maxi

Construction was very straightforward. I finished every seam with a french seam, and tackled miles of blind stitching by hand along the thigh split, sleeves, and bottom hem (I just want y’all to know that I watched the Great British Sewing Bee while doing this, and as a result I am celebrity-in-love with Patrick. Don’t tell Landon.). The facing and zipper edges are finished with pinking – I actually deliberated on this a lot, pinking isn’t necessarily my favorite seam finish, but I felt it was important that the edges were not detectable from the outside of the dress as this silk is very thin. Fortunately, it doesn’t want to unravel much so I’m not concerned about that.

Anna Maxi

I also stabilized the slash neckline with scraps of selvedge from the silk – just pinned them within a bit of the seam allowance and staystitched them down with a tiny stitch. Keeps things nice and gape-free!

“Hold the phone, Lauren – did you say thigh high split???”

Anna Maxi

Uh huh, I sure did.

Anna Maxi

Truth, I normally don’t have much of a reason in my life to wear something like a floaty silk maxi dress with a thigh split. However, it was a fun project and I am totally fine with scheming up date ideas as an excuse to give this silk lady the exposure she deserves! Do you think eating pizza in this dress would be the worst idea ever? 😉

Anna Maxi

Anna Maxi

Now, I leave you with some walking photos. What would this post be worth without a couple action shots, amirite?

Anna Maxi
Anna Maxi

WOULD YOU JUST LOOK AT HOW THAT SILK FLOATS AND FLOWS.

Finally, here I am giving my best Angelina Jolie impression:
Anna Maxi

What do you think? Silk Anna yeah, or Silk Anna fuck yeah?

Psst! Mood Fabrics is running a one day flash sale for 20% off fabrics sitewide! If there was ever a good time to dip your toes into the world of silk, that would be now.

Completed: The Simone Dress

19 Jul

Can we talk about Victory Patterns today?

Simone Dress

Specifically, let’s talk about the Simone.

Simone Dress

This is new for me in two ways – a new pattern company (well, new to me) and a new shape. Seriously, guys, I do NOT wear these loose-fitting dresses… I feel like my body gets swallowed up in the fabric and I lose my waistline, which just isn’t a good look for me. But I’ve been wanting to try this pattern since it was first released… I’m not even ashamed to admit that 100% of the reason was because the girl modeling this shit is a fucking BABE. For real. Go have a look and try to tell me otherwise. I’ll wait for you to come back.

Simone Dress

I don’t think this dress pulls me quite that far into babe-ville, personally – it’s still not totally the best shape for me – but I’m surprised at just how much I like it!

Simone Dress

For my Simone, I cut the size 2 and decided to add piping and a couple pops of contrast. Originally, I had the whole front yoke purple (like the racerback), but after I finished sewing the piping on, I pinned everything together, stood in front of the mirror… and realized how weird it looked. Like I was wearing a big, purple bib. I think the contrast yoke is a good look (the version of the top has a contrast yoke), but not with my particular fabric choices. So I ripped that shit out and made my yoke in the same fabric as my main fabric, with a contrast placket, racerback, neck binding and piping.

Simone Dress

I did have to make a couple of modifications to the pattern – namely, the original length of the shoulder straps and racerback was much too long, making the armholes sit too low (like exposing a good 1″ or more of of bra too low). Since I’d already sewn on the armhole binding at that point and I didn’t feel like ripping it out (so sorry, so lazy), I pinched out about 5/8″ at the shoulder seam and another 5/8″ out of the center of the racerback. Honestly, I should have considered these adjustments BEFORE I cut my fabric – I’m petite and I generally have to shorten those areas – but my quick fixes worked just fine, I think.

Simone Dress

The only drawback was that I now had a weird seam right across the middle of the racerback. I covered it with a little tube of my main fabric. Done and done!

Simone Dress

I also shortened the back of the hi-lo hem – it was a little too long on me, almost hitting my ankles. I did not shorten the front of the dress; that is the original length.

Simone Dress

I will admit, I didn’t care much for this dress while I was sewing it. I think it’s mostly my fabric choice, but this reeeeally looks like pajamas to me. And something about the shape of the tab reminded me too much of a tiny tie, which was throwing me off. It wasn’t until I completely finished the dress and put it on that I decided I liked it. Actually, scratch that – I LOVE it. I don’t even care if it makes me look sorta preggers from the side. This shit is COMFY and it feels amazing to wear during this heat wave.

Simone Dress

I do think the instructions on this pattern were a bit lacking, and definitely earn it that “intermediate” mark. The diagrams were mostly helpful, but there were a few that made absolutely no sense to me at all. Some of the wording was a little off, and there were a couple steps that were completely missing (such as sewing the button on the tab to anchor it down. At least… I think you’re supposed to sew a button there, or at least invisibly tack it down??). The hardest part was deciphering the pleating instructions – the diagrams showed them sewn in one direction, but the photos showed the opposite.

Simone Dress

Still, with that being said… this dress took a couple afternoons to sew. It’s not hard and you can always hit up another resource if you get stuck.

Simone Dress

Shoulda topstitched that armhole binding in purple, but I didn’t. Oh well.

Simone Dress

Isn’t this fabric fun, though? It’s another design from my new favorite new-heard-of-’em-before-Mood designer, Thakoon. Just like my previous piece of Thakoon loveliness, this stuff is super soft, super drapey, and feels like pure love on my skin. It is a little bit on the translucent side, but as long as I wear nude colored underthings, it doesn’t seem to be too noticeable.

Simone Dress

I used a gorgeous purple sateen to sew all the contrast. This one is soft and lightweight with a rich color and no stretch. I used the wrong (aka non-shiny) side to sew the tab, the neck binding and the racerback, and the shiny side to make the piping. Looking at the fabric as one piece, the two sides are quite different… but when looking at the dress as a whole, you can’t really distinguish much between sides. Oh well!

Simone Dress

This is just a random button from my stash. I thought it looked good!

Also, JUST IN CASE YOU WERE WONDERING…

Simone Dress

This dress looks awesome belted!

Simone Dress

I know so many of y’all are probably groaning so hard at my love affair with belts on everything (sorry, not sorry), but I’m actually really surprised at how well the shape looks with a cinched belt. It totally changes up the look!

Simone Dress

Personally, I plan on embracing the dress as-is, in all it’s flowy goodness… but for those of you who have been hesitant to try this pattern due to the volume at the waist, perhaps you can consider this as a solution!

Simone Dress

I can’t wait to try more patterns from this company! I already have the Lola (which, sadly, is going to have to wait until the weather cools down a bit!), but I’m also loving the Nicola too.

Who else loves Victory Patterns? Let’s fawn over them together!

Completed: Some Fabulous Silk Birds

17 Jul

I am just going to preface this post with a warning: This is my VERY favorite thing I’ve ever made. Forget everything else up to this point. This here, this is the winner.

Also, I tried REALLY hard to cull down the number of pictures, but there are still a lot. Sorry, not sorry.

Marc Jacobs Birds

I initially saw this fabric on the Mood Fabrics Instagram (which, if you’re not lurking that – WHY NOT, THEY POST THE BEST FABRICS!!). Isn’t it fabulous? I immediately called the store and had them set aside 4 yards for me. When I finally had it shipped all the way to Nashville, I was amazed at just how wonderful it was in person. The designer is Marc Jacobs, and it’s a soft silk Georgette with a gorgeous drape and some incredibly saturated color.

Of course, I had no idea what I was going to do with 4 yards of bird silk Georgette. I hoarded it for about 2 months, while plotting and planning.

Marc Jacobs Birds

I had a Sewing Epiphany while on the way to work one morning (does anyone else have those? Aren’t they so awesome?) and realized that the print would work perfectly with a 40s style dress – and the drapiness of the silk would be a 100% match for McCall’s 6113. Yes, the same pattern I used for last month’s Mood dress. What can I say – I love this pattern, and I want to make a million of it’s babies.

Marc Jacobs Birds

Since this was my first time sewing with silk Georgette, I spent a few weeks devising a game plan and learning all I could about this fabric before slicing into my yardage. Georgette – or, at least, this Georgette – is on the sheer side, so it was going to need some sort of underlayer to keep things opaque. I didn’t want to underline the dress and compromise the flow of the fabric, so I decided to make a slip to wear underneath. Bonus: this is quite handy on a windy day! Already tested that theory 😛

Marc Jacobs Birds

I used french seams to construct the entire dress, except at a few sections where it was impossible to sew them – such as the curved yokes. For those parts, I pinked the seams to keep them from fraying. I also stabilized the fabric underneath the yokes with a piece of black silk organza. Since the Georgette is so lightweight and that area gets so much stress, I wanted to give it as much support as possible. I also found the use of my walking foot quite helpful while assembling the dress – it kept the layers from shifting (and me from crying tears of frustration).

Marc Jacobs Birds

Despite having made this dress twice already (my red wool crepe version, plus a boring ol’ muslin), I still encountered some construction challenges unrelated to the fabric. For one, the sleeves gave me HELL when I was trying to set them in. I don’t even understand how it happened – they eased in perfectly with the crepe, but for some reason, it just didn’t work with the Georgette without including a lot of unwanted puckers. I was stumped and let the dress simmer for a few days on my dressform. I even considered leaving it sleeveless, no lie.

Marc Jacobs Birds

Fortunately, I remembered that Casey posted a tutorial on excess sleeve ease on her blog a couple years ago, so I followed the instructions for redrawing the sleeve cap and crossed my fingers.

Marc Jacobs Birds

I am happy to say that it worked! I’m so glad I was able to figure it out – the sleeves really make the dress!!

Marc Jacobs Birds

Marc Jacobs Birds

Marc Jacobs Birds

I just think this pattern is SO PERFECT for such a bright print! Isn’t it beautiful?

Marc Jacobs Birds

I even got super fancy and put a (non-functional) fancy button where the front of the dress fastens.

Marc Jacobs Birds

Marc Jacobs Birds

Marc Jacobs Birds

Marc Jacobs Birds

Now, let’s talk about my slip! I am going to post pictures which I realize is essentially me in my underwear, so bear with me here.

Silk Slip

I’m not going to lie – like 99.9% of the reason why I decided to go with the matching slip was so I’d have a chance to get my hands on some 4-ply Silk Crepe. I’ve heard some amazing stories about the stuff, but never had a chance to try it for myself. It tends to run on the expensive side (truth, this silk crepe cost more than the silk Georgette!), but a slip doesn’t require a whoooole lot of yardage, so I sucked it up and put in my order. I didn’t know what to expect when the package arrived at my door.

Silk Slip

People. This stuff is INCREDIBLE. Throw out any mean thoughts you had about silk and focus on the 4-ply. It’s not at all slippery – even when I was cutting bias pieces, the fabric stayed put. It’s nice and robust and opaque, and it feels amazing against the skin. It presses beautifully and sews like a dream. I was extremely skeptical before I properly introduced myself, but I really think it deserves the hype.

Silk Slip

To make the slip, I used the free Ruby Slip pattern. I spent a lot of time redrafting shit to get it to fit right, and it was kind of a nightmare and I kind of almost gave up (no hate on the pattern itself – I’m just VERY particular about how my slips fit!). I started with the size 8, made a lot a lot a lot of changes, and I’m just going to list them here:
– The original bodice was very small, so I added a 1/2″ FBA using the sew-along tutorial. Truth, I tried to get away with not doing this (I wear a DD cup, but let’s be real here – the only thing “big” about my boobs is the proportion, not the actual size, kwim? I could totally fit into like a C cup if the band was small enough), but my first muslin informed me otherwise.
– I then redrafted the bodice to include a center front seam and underbust gathers, following this tutorial.
– My second muslin showed that now the bodice was too big at the center front, and the gathers were sitting in such a weird place… I looked like I had puffy nipples. So awesome, except not. I wish I could tell y’all I did some mathematical pattern drafting magic and fixed it, but honestly I pinned that fucker to my dress form and manipulated it until I had a decent fit. I pinned out a chunk of the center front seam, redistributed the gathers, and chopped about 1″ width off the back midriff. I readjusted the side seams of the skirt (that shit fit almost perfect with no adjustments, thank god) and crossed my fingers.
– Since the new back midriff was slightly (I’m talking 1/2″ or less) smaller than the skirt, I cut that piece on the bias and carefully eased the two pieces together. I think the result is pretty good – it fits my small back, and the bias makes it easy to pull on and off!
– I also cut about 5 1/2″ off the hem of the skirt. It was long, and I need this slip to be shorter than my skirts!

Silk Slip

Silk Slip

Finally, I added some beautiful lace around the top and the hem, and a little self-made bow in the middle of the bodice. The straps are just satin ribbon outfitted with strap adjusters and rings – very easy to put together.

Marc Jacobs Birds

Now, here’s the real question: I still have like a yard (maybe more) of this bird fabric left. WHAT SHOULD I DO WITH IT?

Completed: 40s Wool Crepe Wrap Dress

12 Jun

I know, this dress looks strikingly similar to the 40s wrap dress that Peter made for his identical cousin Cathy earlier this month, not to mention I’ve already dabbled in wool crepe for summer wear, as well as a full 40s wool crepe dress. Yeesh. Ya think it’s possible for me to branch out a little here? Nuh uh, no way. Not me.

Red Wool Crepe 40s Dress

I actually bought this fabric ‘way back when I was visiting Mood Fabrics in NY. I’m sure y’all are sick of hearing about it at this point, but heyyyy I’ll be working through that stash for at least the next couple of months. Just so we’re clear.

Anyway, fabric. As I mentioned before, I wasn’t planning on buying any wool crepe – but again, Carolyn talked me into it. She’s SUCH a good enabler! This wool crepe is actually a bit thinner and drapier than most wool crepes I’ve come across, making it a good weight for a smart summer dress (oh god, did I really just describe a dress as “smart”? I am totally stuck on this 40s thing…). With Carolyn’s advice, I underlined the entire dress in a lightweight cotton batiste, to combat the slight sheerness and make the dress more comfortable to wear in the heat.

McCall 6113

I used McCall’s 6113 to make this dress up. Isn’t the pattern gorgeous!? A friend found it (along with an entire paper grocery bag full of patterns – ranging from the 40s to the 80s, all in my size. I MEAN COME ON, WHAT ARE THE ODDS) in her attic, and gifted the whole stash to meee! Yes!! The pieces are intact, but unfortunately… the instructions are not. Wah wah. Thankfully, I’ve made a few wrap dresses in my day, not to mention I feel fairly confident in my assemblage skills, so I decided to give it a go.

McCall 6113 - pattern piece

… this is what I found when I pulled the pieces out. Not only is everything labeled (thank you, printed patterns!), but there are construction notes printed ON the pattern sheet, AND the notches are numbered in the order that things go together. PRAISE THE LORD. Although, in all honesty… I probably could have put this together without the help. But MAN, it was nice to eliminate most of the guesswork!

Red Wool Crepe 40s Dress

Despite the pattern being in my size, I did have to make a few adjustments to get everything to fit nicely (I generally like to go down a size or two – sometimes more – since I find most patterns tend to have more ease than I prefer to wear. Yep, even vintage patterns. What gives; am I just in denial of my size or something??), mainly in the form of taking in the side seams and shortening the shoulders, as well as hacking about 5″ off the length. I made a muslin for fit, but it ended up also giving me a great idea of how the pattern was put together so I had less guesswork with my wool crepe. Which is good, since wool crepe can be a sneaky little bitch when it comes to ripping out stitches.

Red Wool Crepe 40s Dress

In hindsight, wool crepe is definitely a little on the bulky side for the gathers in this dress. I’m afraid I look a bit boxy at the waistline here 😦 Oh well!

Red Wool Crepe 40s Dress

I do love the little tucks in the back 🙂

Red Wool Crepe 40s Dress

And the curved hem at the overlap.

Red Wool Crepe 40s Dress

I don’t know what’s going on with this picture, I just thought it was funny. ~Maybe she’s born with it, maybe it’s Maybelline~

Red Wool Crepe 40s Dress

Oh, did you notice my pretty embroidery? This all happened entirely on a whim – I finished the dress, put it on and looked in the mirror, and it just looked… red. Overwhelmingly red, and plain! I decided to add a small punch of (neutral)color by embroidering the shoulder detail. The embroidery is from the Hoop Love Vintage Transfers Flickr Group, and it’s all just a basic back stitch with french knots in the middle of the flowers. Ha, that sound so easy but it seriously took me about 6 hours to do. Embroidery is definitely a time-suck!

Red Wool Crepe 40s Dress

Here you can see the underlined inside, as well as the series of snaps and hooks that hold the dress together.

Red Wool Crepe 40s Dress

And there it is closed!

Red Wool Crepe 40s Dress

How many of you will groan if I finish this post with something like, “WELL I GUESS THAT WRAPS IT UP!!”

Sorry.
Not sorry.

Sewing the Robson Trench Coat, part 2

29 Apr

Following up on last week’s Robson progress post, I have a few more bits and pieces I’d like to share before the ~big reveal~. I normally hate dragging these types of projects out over several posts, but I think this coat deserves more than just a single post (plus, I haven’t taken pictures of my newest projects! So consider this filler, ha!).

Robson Progress

Last week, I left off with the main body of the coat completed – everything from the collar, to the facing, to the hem. All that was left was the sleeves, the belt and belt loops, and the buttons. Easy enough, yeah?

I WISH. I about killed myself over those dumb ol’ sleeves! Putting them together was easy – even with the added step of trimming/grading the sleeves and adding the bias binding – but setting them in took me close to 2 hours, and there was lots of scream-cussing involved. The hardest part was getting the bias binding on the sleeve seam allowance once everything was set in – mostly because the area was obscenely thick with all those fabric layers, and also because I’m an idiot and I trimmed the seam allowances to super short before putting on the bias binding.

PROTIP: Sew one side of the bias binding on before you trim down those seam allowances. It will give you much more leeway in an area that’s already pretty tight to maneuver around.

Lace Trench

I will say that, despite my troubles, those sleeves set in perfectly the first time – and they look beautiful! The drafting on this thing is pretty amazing.

Lace Trench

Hemming the sleeves was also kind of tough, because the total circumference of the sleeve was smaller than the circumference by the throat plate. Which means I couldn’t just slide the sleeve over the arm of my sewing machine and go in the round – I had to do some horrible wedging and go VERY VERY slowly. To keep my hem even, I stuck a piece of tape on the arm of my machine (you can barely see it in this picture, if you squint) and used that as a guideline. My hems turned out pretty straight and even – not that you can see it with that busy lace pattern :B

I did come across one problem when sewing the sleeve tabs – the pattern calls for you to sew 3 edges, right sides together, and then turn right side out and press. Well, I tried that…

Lace Trench
Lace Trench

And, um well, I’m not sure exactly what happened. HAHA. I guess my loop turner just grabbed the lace and not both layers? Anyway, I was able to shove the underlining back inside the lace tube with a knitting needle, but it made me think about how I was going to tackle the belt and belt loops, since they are also sewn the same way.

To make the belt loops, I followed the same procedure as for the Thurlow belt loops. You can see a tutorial on that here (from my Thurlow sew-along!).

Lace Trench

For the belt, I folded in 5/8″ along each edge and pressed it.

Lace Trench

Then I folded the whole thing in half…

Lace Trench

And topstitched along all four sides. This made for a nice, crisp belt – without having to worry about turning a long tube and ending up with that… thing.

Lace Trench

Here is my finished belt. As you can see, I made a few changes – I decided to use a buckle instead of tying the belt, as I think it makes the coat look a little more trench-y. It’s just a basic self-covered buckle that I pulled out of my stash, and covered with the navy sateen that I used for underlining (also, the sticky guide in the kit was all dried up, so I used spray-mount on the fabric to get it to stick aaaaand I didn’t go outside to do this, so my sewing room may or may not be covered with spray glue jsyk). I also narrowed the belt by about an inch – I’m not sure exactly how much, I just kept hacking at it until it fit in the buckle. With this in mind, the belt loops were also shortened to accommodate the narrower belt.

With all that done, it was time to add the button holes and buttons! Not much to report on that – I used my button hole cutter to slice through the holes, and I am pleased to report that they are decidedly unhairy. The buttons were sewn on with silk thread, which I first ran through beeswax – I wanted them to stay on that damn coat! I moved the bottom buttons outward slightly, so the coat is more straight than A-line (I just think that suits my figure better!). Oh, and I didn’t bother with the interior buttons – I don’t ever use those things anyway, meh.

As it stands now, the coat is finished! I am so proud of it and I can’t WAIT to show it off 🙂 I even got some super-fancy pictures taken, and damn it looks good.

Here is a sneaky peek because I can’t help myself.

IMG_6541

Stay tuned!

Completed: My Easter Outfit

12 Apr

Remember that wool crepe I bought while I was in NYC? Remember how I was afraid it was going to be too winter-y for a climate that’s already rapidly approaching summer weather?

WELL, CHECK THIS SHIT OUT:

Easter Outfit

I made me a fancy lady flouncy pencil skirt! Totally banking on Carolyn’s reassurance that wool is a lovely fabric to wear during the summer, I decided to test that theory by making it into a skirt. I really wanted a whole ladysuit – or even a dress – but unfortunately, this kind of saturated yellow doesn’t do favors for my coloring. I went with a skirt so there would be plenty of space between my face and the yellow.

Easter Outfit

I felt pretty silly making a wool pencil skirt just as we’re creeping into 75* days – I mean, I’ve always thought of wool as a winter fabric (and I’d guess that a lot of people feel the same way). The best coats are wool – why would I wear wool in the summer heat? Isn’t that just asking for a sweaty disaster?

Easter Outfit

So here’s my little wool crepe pencil skirt for spring – in the kind of bright yellow that would almost be embarrassing if it wasn’t so awesome. But sit back down for a spell, there’s a lil’ surprise in the back…

Easter Outfit

… a circular flounce insert! I call it a party in the back, Landon calls it my tail. Either way, it’s a fun little addition to jazz up an otherwise plain pencil skirt (well, as plain as a *bright yellow* wool crepe pencil skirt can be, I suppose!).

Easter Outfit

This pattern is Vogue 8317, which I received during a sewing swap (also while I was in New York – thanks, Oona!). Just based on the envelope art, the pattern is a bit dated looking (I originally thought it was from the earlyl 90s, but the copyright date is 2006 wut), but the line art showed promise. I made a 10, although I probably should have done a smaller size as I needed to take in quite a bit at the waist. I also shortened the skirt by about 2″ before cutting into my crepe.

Easter Outfit

Easter Outfit

Easter Outfit

Easter Outfit

The skirt is fully lined with Bemberg Rayon. I originally wanted a bright yellow like the crepe, but there wasn’t any in the store when I was there (nor was there any white – at least not in rayon!), so I ended up getting a light peach that is very close to my skin tone. Surprisingly, it picks up quite a bit of the hue of the wool and almost looks like the exact yellow I was trying to obtain. Love it when that happens!

Easter Outfit

Easter Outfit

I also made my bow-neck blouse, using polka dot cotton batiste (from Mood, of course) and Simplicity 4676, a vintage pattern. The batiste is quite sheer, so I underlined the body with white batiste. I love this stuff – it’s incredibly soft and lightweight, and the black and white pin dots go with EVERYTHING. Seriously. I will probably end up wearing this top all summer, it’s so good!

Easter Outfit

Easter Outfit

Easter Outfit

I made this outfit to wear for Easter dinner with my family, but I can definitely see myself wearing it all throughout summer, as well as pairing up the individual pieces with different tops and bottoms. Oh, and to answer my own question at the beginning of the post- wool crepe gets two thumbs up from me when it comes to summer wear. Just make sure you pair it with a lightweight, breathable lining, and you can wear this amazing fabric year-round.

Easter Outfit

Do I sound like an advertisement, yet? 🙂 WOOLCREPEWOOLCREPEWOOLCREPE