
Time to kick the sewing portion of this OAL! Wheee!!

Today, we will be going over fabric options and choosing your size. Just a head’s up – I know a lot of y’all already have your material picked out, and may have even started sewing. That’s great! You are welcome to forge ahead if you so choose – my posts will be aimed at beginners, so don’t feel like you have to stick with the slow pace if it ain’t your thang. Those of you who have not chosen your fabric and/or plan to make a muslin, just be aware that you have a couple weeks until we actually start sewing. These posts will, of course, stay up long after the sewalong is over, so they will always be available for reference if ya need it 🙂
Ok, that’s out of the way – let’s talk fabric! A few of you mentioned that you’d like a little guidance on fabric, and I aim to please, so I’ve pulled a few pieces out of my stash to show you. Just a side note – the majority of these pieces are from Mood Fabrics. Not because they are sponsoring this OAL or anything – I just have a LOT of fabric from Mood. That’s all! I’ve linked to everything that you can get from the website, so you can buy it yourself if you so please. No sneaky affiliate links are hidden in this post, so feel free to click away 🙂
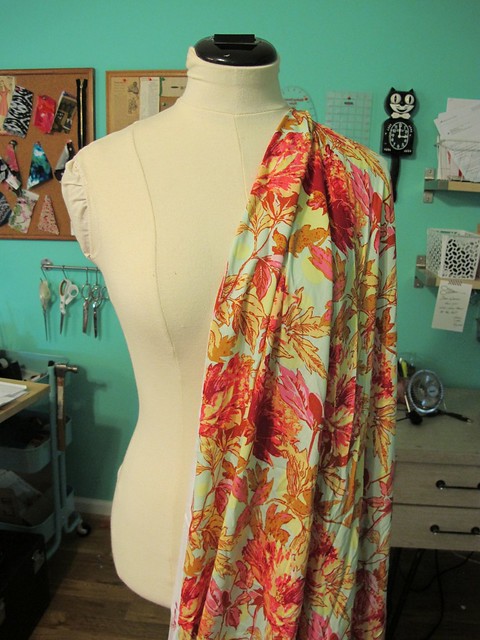
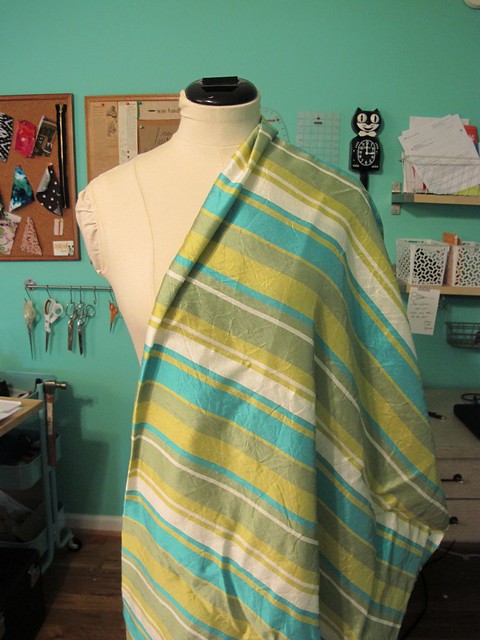
When it comes to choosing fabric, the first thing you want to decide is what you want your overall dress silhouette to be. The fabric you choose will ultimately determine if your dress is drapey, or has a skirt that likes to stand out on it’s own. Here’s an example – this is the same pattern I will be making for the sewalong (Simplicity 1803), sewn up in two completely different types of fabric:
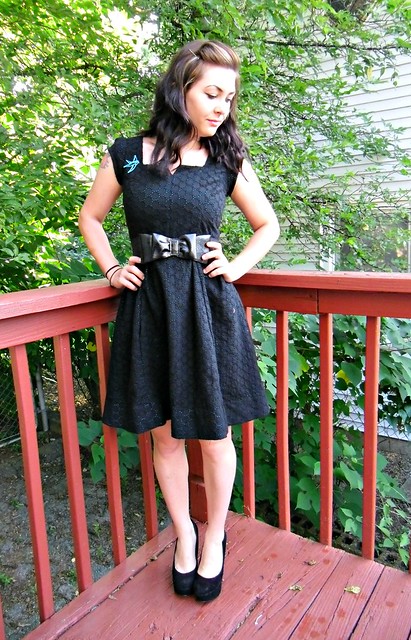
Version 1 was sewn up in a thick cotton eyelet that had a lot of body. There is a nice structure to the bodice, and look at the skirt – see how the pleats stand on their own? The thickness of the fabric help give the skirt some structure.
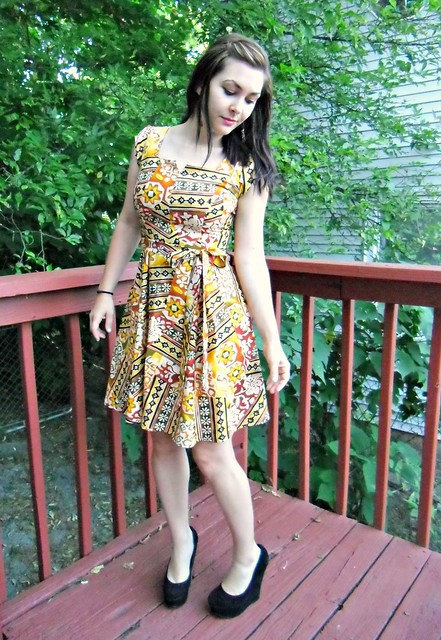
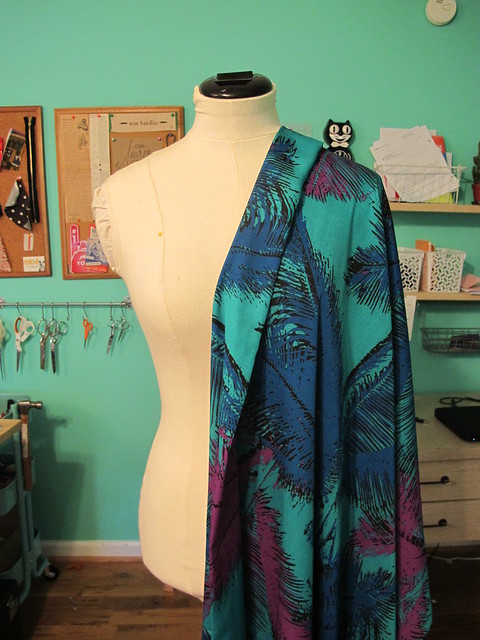
Version 2 was sewn in a drapey rayon fabric, which means the resulting dress is much softer. See how the pleats in the skirt look more like soft, draped folds? This fabric does not have a lot of body, so it hangs in soft drapes (I just think that’s so pretty!). The bodice does not have a lot of structure – the notch in the neckline has folded over itself over time (not really shown in this picture, but if you look at more recent photos of me wearing this dress you will see what I mean).
Still confused about how body and drape can affect how a pattern looks? Check out these two versions of my Tania culottes – version 1 is sewn in a lightweight drapey cotton, and version 2 is made in a nice linen/silk suiting with a lot of body. Both of those are made the in EXACT same size from the EXACT same pattern, but they are very different!
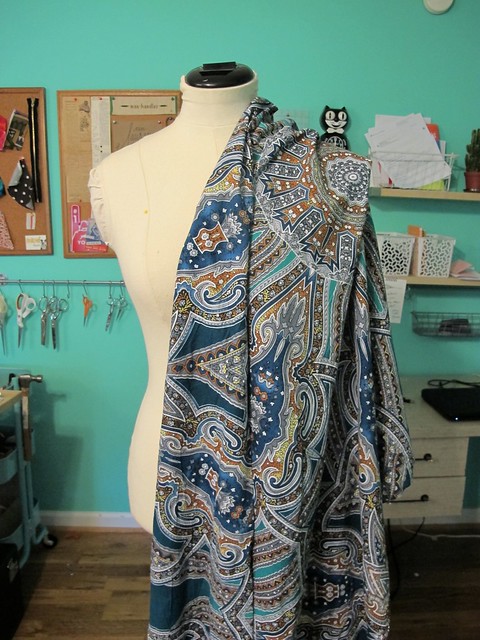
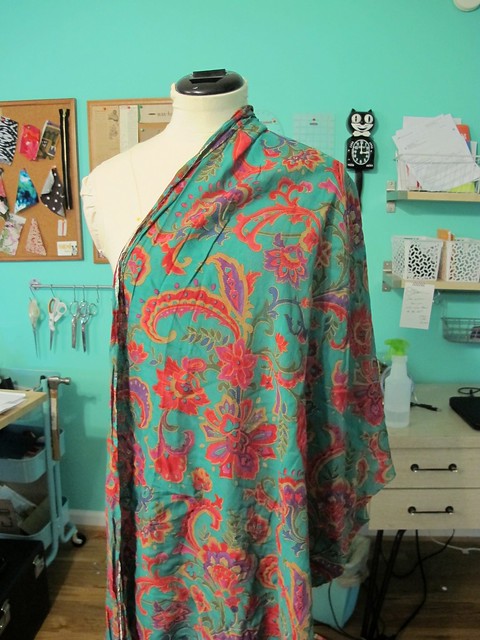
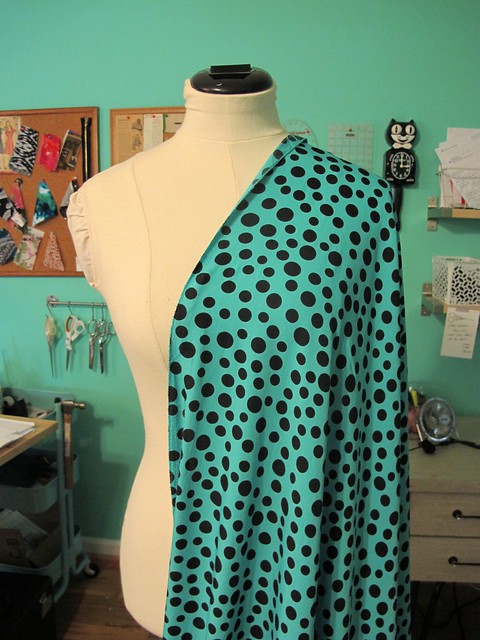
Hopefully those visuals will give you a good idea of how drape can affect the finished dress! How you want your dress to look is totally a matter of personal preference – however, I will point out that if you are concerned about adding bulk to your waist, you will probably want to stick with a drapey fabric. Anything with body will stand out at the gathers or pleats (however you decide to do the skirt), and it will make your waist look bigger. Just an fyi! I personally love the drapier stuff, but again, it’s totally up to you. If you’re having trouble envisioning how a particular fabric will drape and whether or not it has body, just hang some folds over your arm (or a chair, or whatever) and that should give you a good idea of how it’ll hang off your body. In the following pictures, I’ve hung my fabrics off my dressform so you can see what I’m talking about.
Once you’ve decided if you want a structured or drapey dress, now comes the time to pick fabric! The pattern gives you lots of options for various fabrics – and this is a pretty flexible style, so *most* anything will work as long as it’s not a knit.
If you’re a n00b to dressmaking and want something easy to work with, a lightweight cotton is my #1 suggestion! This is the fabric I will be using to make my dress for the OAL; it’s a lightweight cotton that I picked up at Mood while I was in NYC earlier this year. Cottons are great because they are easy to cut, press, and sew, and they feel wonderful to wear in the summer. Plus, they usually come in cool prints and colors! Other types of cottons to look for: cotton lawn, cotton bastiste, cotton voile, cotton shirting.
Here is a gorgeous cotton/silk blend that I just LOVE. Isn’t it beautiful? The addition of silk makes this a very lightweight, very drapey fabric – it’s practically tissue-weight. This fabric is also on the edge of being sheer, so an underlining is recommended.
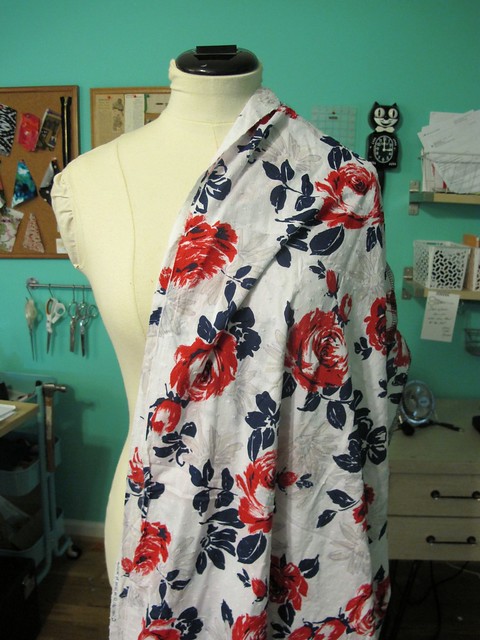
Another good choice for this dress (assuming you want drapey) is rayon! This gorgeous rayon challis was sent to me from Grey’s Fabric!
A word on rayon: Rayon is amazingggg to wear, one of my favorite fibers. It’s also a big giant pain to sew, because it’s very shifty. I would not recommend this fabric if you are brand-new to sewing, but do give it a thought if you’re up for a challenge! It is absolutely worth the extra effort, I promise.
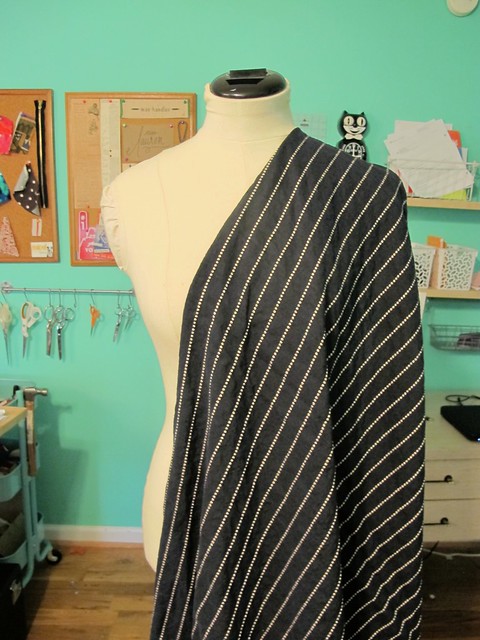
Here’s another drapey challis that looks and hangs similar to the rayon, except it’s polyester. Poly is a nice cheap alternative to rayon, although be warned that it is a little more difficult to press due to the nature of the fibers. This fabric is from Metro Textiles in NYC.
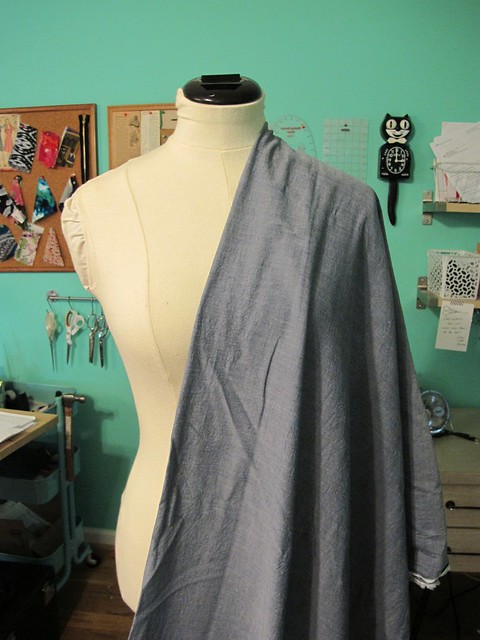
Another lovely choice is a lightweight chambray! This one is from my man Sam at Chic Fabrics in NY.
Here’s a lightweight cotton dotted swiss that has a little bit of body – see how it stands away from the form? This is another fabric that would benefit from an underlining as it’s a bit sheer. Also, I’m just now remembering how pretty this fabric is (from Mood in NYC) and why the FUCK haven’t I sewn anything out of it yet??
Ooh oooh I LOVE this fabric!! This is a mediumweight silk crepe, also from Mood NYC. Silk crepe is great because the “grabby” texture makes it easier to sew than most silks, and it has a lovely drape and very saturated colors.

The last of my drapey options – cotton gauze. This stuff very lightweight – it’s semi-sheer and almost floaty – but it does have a little bit of body (compare it to the cotton/silk near the top). This fabric is *also* from Mood NYC. Haha that place is awesome.
Moving onto the more bodylicious of the fabric options…
Linen is, of course, always a good choice! This is a medium weight linen. There’s a fair amount of body in the fabric – which will show in the gathers – but it has a nice drape that results in soft folds.
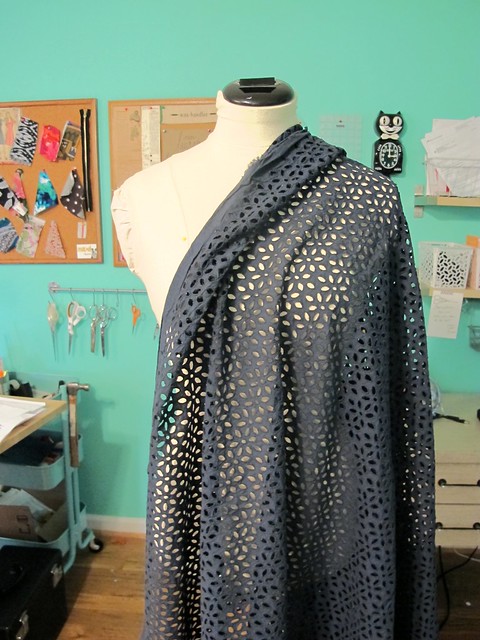
You could always go with my ol’ TNT, eyelet 🙂 I think eyelet (or any lace in general) is a beautiful option for this pattern. Just keep in mind that you will need to underline the dress so it’s not see-through. This fabric is from Muna’s, but I’ve seen similar ones at different retailers.
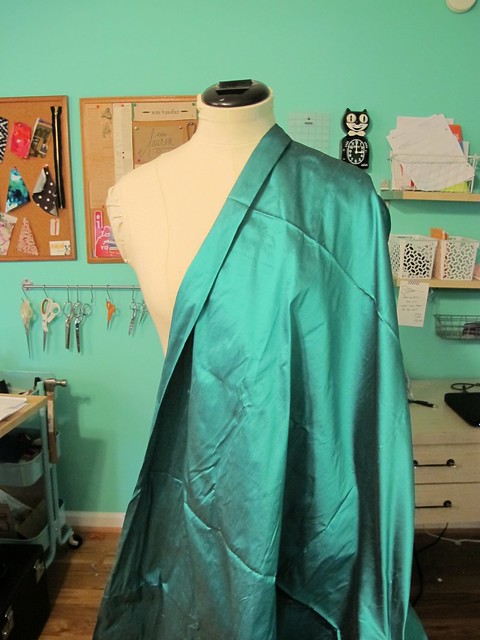
The pattern suggests silk Shantung as a fabric option, so here’s what that looks like! Notice how the fabric practically stands up on it’s own – silk Shantung (and dupioni, for that matter) has a very crisp drape before it’s washed.
If you’ve ever been curious to know what silk Shantung looks like after it’s been washed, here ya go! This striped Shantung originally looked more like the silk above – very stiff with a definite sheen – but after a go in the washer and dryer, it’s softened up quite a bit and has a much more subtle luster. It definitely still has a good amount of body, but the drape is much softer now.
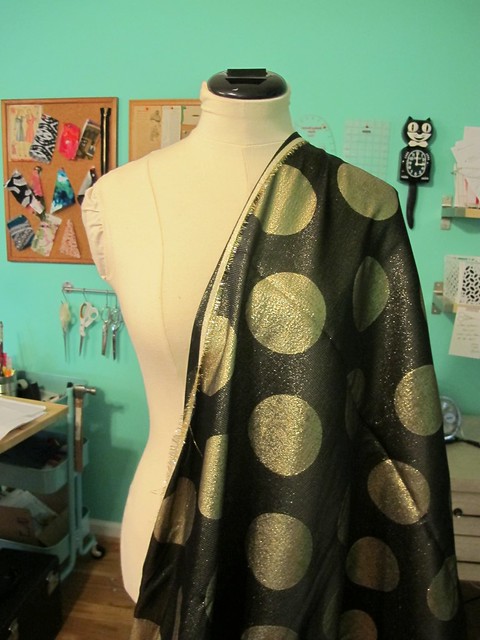
Hahaha how’s this for body? 😛 This is a polyester brocade, with lurex for sparkles. It’s probably not for the meek, sure, but I think it would look awesomeeee in this pattern!

Finally, here’s a stretch cotton sateen. I don’t want to say I don’t recommend this fabric- because, honestly, it would be fine for this pattern – but it wouldn’t be my first choice. I personally don’t care for the way stretch wovens hang- I think they always look a little stiff and awkward. If you have your heart set on a stretch woven, go on with your bad self, but I do suggest that you consider sizing down since the stretch factor will give you a bit more room. Fabric is from Mood NYC, btw!
Speaking of sizing, let’s talk about that now!
The back of the pattern has sections for body measurements and suggested sizes. Just ignore that. If you go by what the pattern tells you to do, you are gonna end up with some sad sack of a dress headed straight for frumpsville.
I always (always always always- regardless of indie designer or Big 4) base my pattern size off the finished measurements. Too often, patterns come with a lot of extra ease built in (ease= the difference between your actual measurements and the measurements of the garment in question), which usually ends up being too big for how I like to wear my clothes. I figured out a looong time ago that the finished measurements generally give you a better idea of fit, so that’s what I go by now.
For the sake of keeping things simple, I’m just showing the Simplicity pattern, but this works for pretty much any pattern. Every company has a different place they like to print the finished measurements- some do it on the pattern pieces, some do it on the envelope, some include it in the instructions, oh, and some don’t include it at all! – so you may have to hunt it down. For those companies who don’t include their finished measurements (also: Really??? No seriously, how hard is it to add a least add that information??), I’m afraid you’ll have to measure your pattern pieces and subtract the seam allowances. Sorry! Simplicity prints their finished measurements at key fitting points – the bust, waist, and hips.
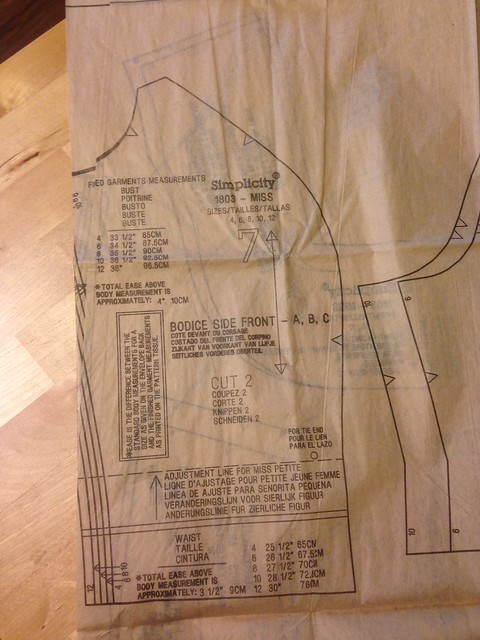
Take a look at your front bodice piece and you should see the measurements. This tells you what measurement the bust will be, assuming you made no modifications and kept the same seam allowance. Your ease preferences are completely up to you, but I personally like about 1/2″ of ease or less as I wear my clothes very fitted. If you don’t know how much ease you like, measure a dress you have that fits the way you like and that should give you an idea. A good rule of thumb is that you want to aim for 1/2″-2″ in the bodice, depending on how fitted you want the final dress to be. Anything more than 2″ runs the risk of looking too big.
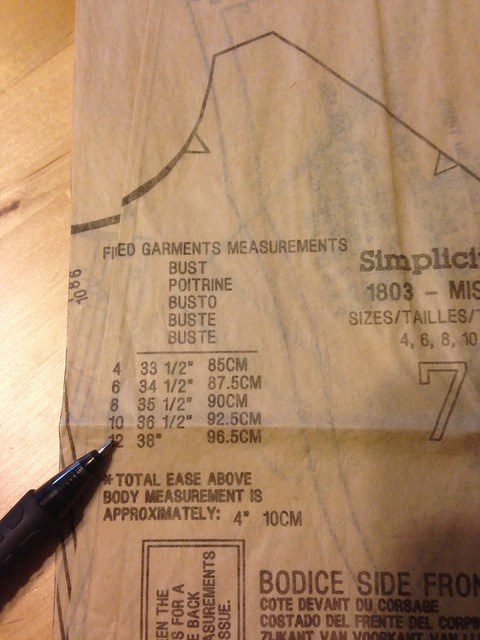
Here are the finished bust measurements. Fun fact: according to Simplicity’s measurements on the envelope, I should be sewing a size 10 as I exactly fit those body measurements. Looking at the finished measurements, I’m going to sew a 4, as 33.5″ is the perfect amount of ease for my 32.5″ bust. If I went by the envelope, my size 10 would have a finished measurement of 36.5″ – a whopping 4″ above my actual measurements. That’s pretty loose-fitting – too much for me! So I’m going with the 4. You may find that the size you cut is smaller than the size indicated on the envelope – or you may like the amount of ease, and want to stick with that. Either one is fine! The only thing that matters here is that you end up with a dress that fits the way YOU like.

After you’ve decided what size to cut the bodice based on the finished measurements, find the waist measurements and proceed the same way. Again, I’m going with the 4 because I like very little ease at my waist- and that 10 would be much too big for me.
You may or may not be the same size throughout the pattern – perhaps you’re one size at the bust, and a different one at the waist. That’s fine! You can grade between sizes to get a custom fit – just mark the size you want at each point, and use a ruler to connect the lines at an angle. That’s it! If you find that you are between sizes, then I suggest going with the bigger size, as it is easier to take something in than let it out. Keep in mind that this pattern includes a 5/8″ seam allowance, so that does give you a little bit of room to play with.
A few more things to consider (sorry, I know this is long, but I swear I’m wrapping up!)
– Make sure to prewash your fabric! You absolutely don’t want it to shrink after you’ve made it into a dress (talk about a huge bummer!), so get that taken care of now. Prewashing means you just treat the fabric the same way you will launder the finished garment. I throw mine in the wash on cold (cottons, rayons, silks, polys – everything except wool gets a prewash) and hang it to dry if it’s sunny out (not because I’m opposed to the dryer – but because I’m opposed to ironing. All my handmades get hung to dry because I hate dealing with wrinkles!). It can be helpful to serge or zigzag the raw edges before washing, just so the fabric doesn’t fray.
– Does the fabric need an underlining? Does it feel nice against your body and is it opaque enough that you feel comfortable wearing it? I will not be covering underlining in this OAL, but you can reference my post on underlining here if you’d like more guidance (The dress I was making in that post is the same black eyelet one posted near the top, fyi 🙂 ).
– If your fabric is on the thicker side, consider using a lightweight fabric for the facings to reduce bulk. I usually go with cotton broadcloth for this purpose – it’s cheap, it’s stable, it’s lightweight, it does the job – but you can use anything you want.
– Planning on matching stripes or plaids? Make sure you buy enough fabric! An addition 1/2-1 yard should be fine (err on the side of more if you have any suspicion that you might need to recut – better to have too much than not enough!)
– You will also need interfacing and a zipper to complete the pattern. For interfacing, I recommend this lightweight fusible from Fashion Sewing Supply – it’s the best! Really! You can use whatever interfacing you want, just make sure it is the right weight for your fabric. *Most* fabrics are ok with lighweight fusible, though. As far as zippers – I like standard lapped zippers for this pattern, but you can use an invisible if that’s what you prefer (unless your fabric is very thick; in that case, I recommend using a lapped zipper as an invisible won’t be strong enough). Either one works as long as it’s 16″!
– If you have not made this pattern before and you are still unsure of what size to choose, make a muslin! This can be as simple as just cutting the bodice pieces (don’t worry about the facings) out of old fabric and inserting a zipper so you can get an idea of the fit. In addition to helping you determine that the finished dress *will* fit you, it will also give you a little practice with sewing the bodice before you cut into your nice fabric. I will not be covering muslins in this sewalong, due to time, but I am happy to help you assess fit if you need some assistance. Just holler at me – leave a comment on this post, tag me on Instagram (please make sure your account is public, otherwise, I won’t be able to see your post!), or link me in the OAL Ravelry Thread – and I’ll get back to you as quickly as I can 🙂 You can try Twitter, but I’m only getting about 1/3 of my notifications when they happen so that’s probably not the best way to reach me, fyi.
Ok, that’s all for today! Sorry this post was so long! Next week, we will cover cutting your fabric and marking your pattern pieces.


Ahh, exciting. I can’t wait to get started! Really helpful to see the drape of all those different fabrics on your dress form. Couldn’t agree more with the sizing – I made a 12 last time I made this (which was down from the 14-16 the pattern said I should make), this time I’m going to go with a 6…
Wow! Yeah, they put a LOT of ease in these patterns, don’t they?
Lauren, do you use interfacing to reinforce the zipper opening, and, if so, what do you use? I know Sunni recommends using interfacing strips from SewKeysE.
Sorry, I forgot to ask what is your usual amount of ease you like for the waist area, or what is your recommendation? I, too, like things more fitted but wasn’t sure if it is comfortable to have “no” ease for the waist area or if a wee bit is needed?
I hesitate to give you a recommendation because I tend to wear my garments a lot more fitted than most people find comfortable, ha. For me, I like my waist to have 1/2″ of ease at MAX… I’m most comfortable at 0-1/4″ ease, however. I can absolutely breathe and eat fine in it, but it is very fitted.
If you’re unsure, I’d start with tracing whatever size gives you 1/2″ of waist ease and then make a muslin to see if you find that comfortable, and from there you can adjust before you cut into your fabric.
Thanks, Lauren. I like my clothes fitted in the waist too. If I eat a big meal it usually doesn’t affect my waistline much.
Same! My waist isn’t anywhere near my stomach hahaha 🙂
Try the 1/2″ ease and see how you like the fit… although, you may find you like 0 ease like I do 🙂
I only reinforce the zipper opening if I think it needs it, based on the fabric. Generally lighter weight cottons (voile, batiste), rayon challis, lightweight silk crepe – those do best with a little stabilizing at the zipper. I will bring that up when we get to inserting the zipper, thanks for the reminder! As far as what to use – again, it depends on your fabric, but I’ve had success with strips of interfacing cut on the grain (just from my yardage; I don’t buy them precut or anything) and also strips of silk organza. Occasionally, I’ve even used selvages from my fabric 🙂
Thanks for the info. I did think of one more question. I am making Vogue 8997 & it calls for interfacing the whole bodice. In addition, the whole dress is lined. I did read your blog post on underlining; however, I am curious if I should underline & line the bodice or interface & line the bodice as the pattern suggests? My fabric is a linen/rayon blend. I would love any suggestions you might offer. Thanks.
Hmm, I think it really depends on the weave and drape of your fabric and how structured you want the bodice to be. Interfacing the bodice – even with a lightweight interfacing – is going to eliminate any drape and give you a very structured look. Underlining will definitely give a softer feel. I just checked Pattern Eeview and one of the reviews for 8997 said they underlined their bodice in cotton poplin, which might be nice with that linen/rayon. You might try making a swatch of each (interfacing and underlining) and see how you like the way the fabric feels. Personally, I think I’d probably go with underlining and then lining, but again, it’s hard to tell without actually feeling the fabric!
I hope this helps 🙂
Thanks, Lauren, I will try that. Yes, that helped a lot!
That is so useful – I am new to sewing and had not even looked at the ‘finished garment’ measurements. Thanks Lauren!
You have some beautiful fabrics. I’ve chosen mine but am tempted to purchase some lighter drape fabric. This week is a muslin to see if the pattern will work for me. I learned the hard way that finished garment measurements are the way to go. The pattern suggested sizes are worthless for me. Thanks for taking the time to write this informative post.
You could do what I’m doing and make two dresses 😛 hah! I couldn’t decide on a fabric, and those stash fabrics NEED to get sewn… right!?
I’m not going to use this pattern (not because I don’t like it, simply because I don’t have it and would rather sew something from my stash!) but I have to admit you’re doing a great job of explaining it all!I’ve been sewing for almost 3 years now (That long?!can’t believe it!) but I found some very useful information in your post, which I wouldn’t have thought of (like looking at the finished measurements of a garment instead of the size according to my actual measurements…I’ll keep that in mind for future projects!)
So thanks for this post, and I’m looking forward to reading the next!
Awesome, I’m glad you found the post helpful! And yay for sewing from your pattern stash! 🙂 I’m hoping the rest of the posts will be helpful for everyone, even if they’re not sewing the 1803 pattern 🙂
I am excited to get a better fitting dress out of this pattern this time around. My measurements would put me at a ten, and I am learning all about pattern ease, the hard way, so I am definitely sizing down for this attempt. I still can’t decide on a drapey fabric look or more of the stiffer style… Thanks for your suggestions with this.
Do what I’m doing and make two!! 😛 HAHA!!
What a great post–so helpful! Thank you. I actually wasn’t planning to sew along but with this level of guidance I’m thinking, why not?
Come come, join us! Do it!! 🙂
Thanks for the useful tips so far! I think I’ll sew a muslin to check the fit. I really like my fabric and would hate to mess it up. I can also practice using my new serger on the muslin!
Definitely make up a muslin! If you only do the bodice (and one sleeve, *if* you feel like you need to be sure of the fit), it shouldn’t take too long at all 🙂
wheee! i am excited! and i will admit i already have my fabric, but i find myself with a little niggling doubt, so! do you have any strong opinions on using quilting cotton for this? because my fabric is so darn pretty!
Well, I *personally* don’t think quilting cotton is appropriate for garments, so I’m afraid my opinion is a little biased 🙂 It’s not, like, the worst thing you could use (your dress won’t fall apart or anything), but the drape of the fabric doesn’t tend to translate well on clothing; it’s a bit stiff and it doesn’t gather well. I also think the prints make things look a look homemade, but again, personal opinion!
However, my girl Roisin is the QUEEN of making quilting cotton dresses that look like a million bucks. If you’ve got a quilting cotton you have your heart set on, I say go for it 🙂
well, i do have much envy for Roisin’s dresses, and i’m pleased to hear that they are made of quilting cotton. i will take my chances! but at least i will do so with my eyes open 🙂
Dear Lauren, please may I have your stash?
Yours sincerely,
Jenny
p.s. Grey’s fabrics is the best! Fantastic fabrics and good to support the little guys! http://greysfabric.com/ (yes I am biased, I live next door)
You can have it when you pry it out of my cold, dead hands hahahahaha 😉
And yes! Love Grey’s fabrics! Such a lovely selection!
Wow, such stunning fabric!! Wish Mood’s international shipping was less exorbitant – though maybe that would totally ruin me… The OAL is such a brilliant idea!
What a helpful post. Thank you for going into such detail. I have learned so much from your blog (especially the post about underlining -thanks again!). I still am at a loss for sizing. I always base my decision on the finished garment measurements, but am still struggling with some issues, especially ease at waist. Someone else asked this question, but I was wondering, also, what are your wait ease recommendations?
If you’re having trouble figuring how much ease you like, I definitely recommend taking a garment you own that you like the fit of, and measuring the bust and waist to see how much ease you’re comfortable with. Might be a little easier than a bunch of trial and error 🙂
As far as a general recommendation for waist ease – I hesitate to give you a hard and fast answer, because I wear my clothing pretty fitted (and I know most people don’t). I personally like little to no ease at my waist – 1/2″ MAX. I know that’s reeeeeally fitted; I think most people are more comfortable in 1″-2″ (and sometimes more, if you tend to flux in that area throughout the course of the day). My first suggestion would be to measure a garment as I previously said, or, if you don’t have one, tracing off the size that allows for about 1″ of ease and make a muslin (don’t forget to include a zipper so you can really determine how the final dress will fit). That should give you a pretty good idea, and you can always tweak the muslin if you need to add or remove some ease.
Hope this helps 🙂
I’ve learned the hard way to base my size on the finished measurement sizes. I had a lot of scrapped projects until then. I have my fabric and now have to search through my patterns for Simplicity 1803 to get started on this. I am very excited.
That’s very useful info on fabric drape:) I just printed my Myrna pattern last night and still need to decide on a dress pattern and fabric !
What a fantastic stash! I, too, am having ease issues. I have been sewing for a number of years but find it so difficult to get the fit right. I’m going to make my muslin with 1″ of ease at the bust and waist – I hope I’ll be able to breathe! 😉
You should be able to 🙂 I usually wear my stuff with no ease at the waist, and I find it comfortable to breathe and eat haha 🙂
I am laughing my ass off at ” I am happy to help you asses fit if you need some assistance. Just holler at me – ” 😉
Awesome info. I need to get over my zipper phobia and move on with my sewing life. This may be just the thing.
HAHA OMG. That one s really makes a difference in how that sentence translates, huh? 🙂
I plan on doing full coverage on how to insert a zipper, so, yes, no zipper phobias allowed here!
I am drooling over your fabrics…..
The fabric I was going to use is supposed to be a cotton/silk blend but now that I really look at it, it has quite a bit of two-way stretch (does that seem normal?) and is very drapey (although it has a decent weight to it and is opaque) so I’m not sure if it will work.
Also, it’s always confusing to me when to underline and when to line?
I don’t know why it wouldn’t work – although you may want to size down the bodice to make up for the stretch. Hang the fabric over your arm and see if you like the way it drapes; that should give you a good idea of how the skirt will hang 🙂
For underlining vs lining – in general, you underline if you want to add a layer of support/stabilization/opacity to your fabric, and you line if you want a completely clean finish with no visible seams. Since each piece is attached individually while underlining, you get the benefit of a layer of structure to your fashion fabric (or opacity, or whatever), but your seams will be exposed so you still have to finish them. With lining, you’re literally dropping a second garment inside a garment (like an inception garment, ha!), so while you get a clean finish with no exposed seams and no contact with the fashion fabric (which makes lining good for stuff where the fashion fabric doesn’t feel nice against your skin), it does not really affect the structure of the fabric itself… it’s just a second layer. Also, with lining, seams are visible if the fabric is very sheer. Underlining eliminates that since the two fabrics are basted together before the seams are sewn.
I hope this makes sense!
Thank you!! That totally helps 🙂
Don’t apologize for the long post, that was full of so much useful and important info that we all should hv been taught on our 1st day of sewing! That’s for the reminders!
Thanks I mean!!
Thanks for the info about ease. I knew I was supposed to check the finished measurements but wasn’t sure how much space I needed for breathing, etc!
PS. I love your blog… love it!
Hi Lauren, I have just found you. What a wonderful site you have! You are such a talented person! I am always in awe of people so talented. I have always had issues getting pants to fit properly. I have NO hips, NO butt, & now have a Gut! UGH! Dress don’t seem to be a problem, don’t usually make them, stick to skirts & tops 🙂 In my younger days made dresses, but skirts work much better now. Anyway, any suggestions for pants? I am making a pair of capris with some cotton/spandex (from my stash) these will be my trial pair to see how the pattern works, so I can tweek the pattern if need be. The pants have elastic.
It really depends on how you want the finished pants to look 🙂 Definitely stick with something that has a bit of lycra in it, since your trial pair has lycra (if you go with a rigid woven, you run the risk of the pants not fitting even though the muslin did!). I personally love lightweight denims, linen, and stretch twill for pants. Another fun option would be a nice drapey rayon or silk crepe, if you wanna go fancy 🙂 And, of course, there’s classic suiting – you can get pretty much any fiber, but I really like silk/linen in the summer heat 🙂 Hope this helps!
Hi Lauren,
Your comments did help. Unfortunately, we do not have the fabric storese here in VA that I was used to in CA. I’m not too sure about buying online, as I am a touchy feely type of fabric buyer. But, I have quite a fabric stash, so when I get this pattern down-pat I will dig into my stash. Can you recommend any good online fabric stores?? Thank you again.
I buy pretty much all my fabric from moodfabrics.com 🙂 i’ve also had luck with fabric.com, although it’s been a long time since I’ve ordered from them. I’m like you – I like to touch the fabric before buying it!
Hey Lauren! Thanks for the sizing tips. I have made this dress before and it ended up being HUGE. I wanted to make a try again and make a muslin of the bodice but wondered how to pick my size. Now I know. Thanks again!
The interfacing that you recommended from fashion sewing supply, is it similar to armo-weft? Shipping from fashion sewing supply is way too expensive to Canada, and I can get armo-weft here in stores much cheaper.
Hm, I’m actually not sure – I’ve never used armo-weft, so I have no idea how it compares to the Pro Weft. Sorry! 😦 I imagine it’s probably fine tho 🙂
Blimey, this is useful. I’d chosen my size, and hadn’t realised this information was printed on the pattern! (I’ve never made a dress and have always winged it with skirts!) I’m now going to cut a smaller size, still with a couple of inches of ease. Ive got a quilting cotton with butterflies on. I think they’re moths… I’m pondering whether to cut the front bodice piece on the fold (minus the seam allowance) , just so I don’t chop one of the moths in half. I’ll give it a go on the practice bit.
I think the nature of the design means you cannot cut the bodice on the fold – you need that seam running down the middle to give the V strength. Maybe try pattern matching those pieces? I know it’s a pain, but you’d only have to match that one seam so it’s not quite as bad 🙂
This is very helpful. I especially appreciated your commentary on different fabrics. When choosing sizes, I always go by my upper bust measurement, not the full bust measurement. I then do a full bust adjustment. If I went by the full bust measurement, the garment would be far too big in the shoulder area.
I’m the anonymous one 🙂 I accidentally posted before filling out the contact info
True! I always forget about that since I don’t do FBA anymore (my upperbust is usually way smaller than the smallest finished bust measurement, argh!). But that is something I did when I was a FBA lady – going by the upper bust does make the shoulders and neckline fit properly.
You say, “argh.” I say I wish I were that tiny, lol 🙂 Grass is always greener, right? Since I’m sewing along with you, I can snap some photos of how I do an FBA for others who may need to do this too…if it would be helpful?
That would be very cool!
Oh yeah, that would be awesome if you’d like to do that! No pressure tho – I know photographing tutorials is very time-consuming 🙂
Okay, Lauren. I’ve got me drooling over the beautiful yardage you showcased here. Great post.
Thank you sooo much for blogging about the drape of various fabrics! I still get a little nervous about fabric shopping and knowing which material would suit the patterns I want to make. No nonsense and straight forward advice at last! 😀
Thank-you so much for that tip about referencing the finished measurements rather than the ones suggested by the brand. It makes so much sense. It’s something I’ve started to do with knitting patterns but I didn’t think to apply it to sewing patterns, mostly because I wouldn’t have known where to find the information I needed. Thanks.
Hey Lauren. I’ve just finished a simple version of this dress with no major snags. HOORAY and THANKS! I really appreciated your tutorials : the success of this project has been a major morale boost.
Now I have plenty of ideas for more versions of this dress. I have a RTW dress that has the same lines (princess seams, gathered skirt) that uses chiffon underlined with dark coton voile. Do you think this could work with Simplicity 1803? I’d underline the bodice, but make an overlay for the skirt. (I know chiffon is a bitch to work with, but I’d like to try my hand at it after reading insane amounts of info on the subject.)
Awesome!! I’m thrilled to hear that you found my tutorials helpful and that you were able to get your dress made up! Woohoo, stuff like this makes me so happy 😀
I think your chiffon/voile version sounds gorgeous. You’re right that chiffon will be difficult to work with (my main tip: don’t cheap out! Get the good stuff, aka, silk. It’s easier to work with than polyester and you can actually press it. If you don’t need it to be super sheer, consider getting Georgette – it’s even easier to work with. Well, relatively speaking :P), but it’s totally doable with that pattern. Also, I am gonna HAVE to see if you make it up!
I already have some cheaper stuff in my stash i’d like to use up. (I bought it quite a while back before I understood the value of nice fabric!) I plan on using boatloads of starch to help it from shifting too much. If all hell breaks loose while using the slippery cloth, I can always chuck it and buy some of “the good stuff”. If I ever make it out of this project of sound mind AND with a completed dress, i’ll be sure to show you the results.
Thanks again for the tips!
I’m ready to go on the chiffon version and everything is planned out… except for the skirt’s design. I’d really appreciate your insight!
I really want a chiffon overlay separate from the cotton lining. I know I don’t want the lining to be gathered, so i’ll be using a simple A lining piece with darts from another pattern. I’ll be gathering the overlay and basting it to the lining at the top. It is the chiffron overlay that i’m hesitating about. Should I :
A) Use the skirt pieces as they are (two in the back, three in the front, which would mean having two seams in the front)
OR
B) Use the back skirt pieces as they are and draft a one-piece skirt front (which would eliminate the seams in the front)
I hope this makes sense… And thanks again!
I would go with option B, especially if your chiffon is on the extra sheer side. The less seams, the better – for both sewing and the overall effect 🙂
Ahhhh it’s gonna be so pretty!!
My thoughts exactly. Thanks again: i’m so PUMPED!! 😀