
Remember that Monet of an Archer I posted with my lime green Maritime shorts the other day (which turned out totally awesome, and yes, that’s me tooting my own horn, toot toot)? Remember when I said I was too traumatized to talk about it any further? Well, I think I feel like dishing today. Let’s dish!
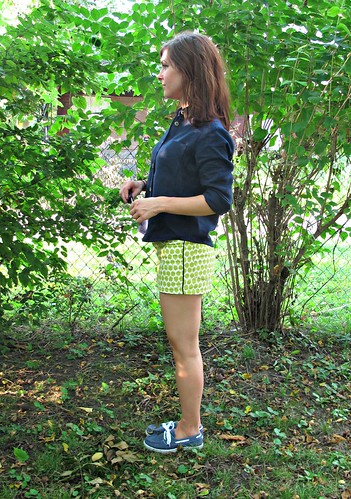
(I took these pictures at the same time as my last batch – hence the exact same outfit – but I moved to a different side of the yard so they’d look a little different. That’s how much I love y’all. Also, this is pre-skeeter attack, fyi).
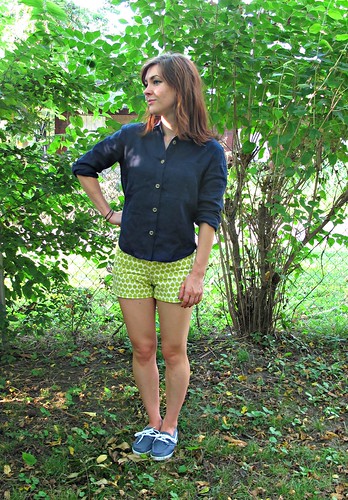
Ok! This is the Archer from Grainline Studio. I cut the smallest size and shortened the hem (too much, it looks). I think my relationship with this pattern has definitely gotten off to a rocky start, but I’m willing to give her a second chance. Funny, I thought this style looked horrible on me when I checked myself out in the mirror, but it’s not so bad in pictures!

I made this using some scrumptious Ralph Lauren linen from Mood Fabrics – doesn’t the idea of a floaty linen button-up in September sound so luxe? Nice and airy for the AM, but you can roll the sleeves down with the sun sets. Also, I just really love navy and I needed a shirt to go with my new aforementioned shorts, so I was feeling pretty confident about myself. So confident, I sliced directly into the linen without the benefit of a muslin or even reading the directions carefully. Oops.
Now, don’t get me wrong here – I don’t think a shirt like this necessarily requires a muslin, so to speak. It’s fairly loose-fitting and very forgiving in that sense. However, I do think a shirt like this requires the correct length when it comes to the body and the sleeves, and I think it is kind of a bad idea to dive into something so precise as shirtmaking without giving yourself a few test runs before you get into the good stuff. These were my mistakes. Had I made a little mock-up, I might have had the chance to try out that collar deal before I done goofed it up, ripped it out, realized that the linen was fraying at an alarming rate and oh god what have I done.
Also, the sleeves are way too long and the body is a bit on the short side (the latter isn’t the pattern’s fault, I just got a little too slash-happy with the scissors).
With all that being said, I actually really enjoyed sewing this pattern – it’s very precise, with all the top-stitching and perfect pressing, the kind of thing that I find SO relaxing to sew. Rather than get bummed that I made a shirt that isn’t up to my personal sewing standards, I consider this a muslin and I can’t wait to start my ~real~ version. The instructions are clear, albeit brief (if you get stuck, there is an entire sew-along with plenty of words and pictures), and every piece fits together nicely.
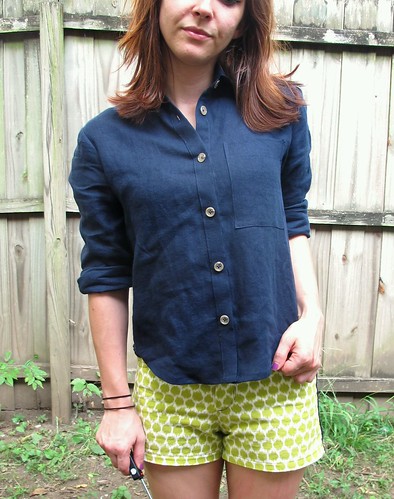
I know. The shirt looks fine in the pictures.
Which is why I took close-ups of the bad parts. You know you wanna see!
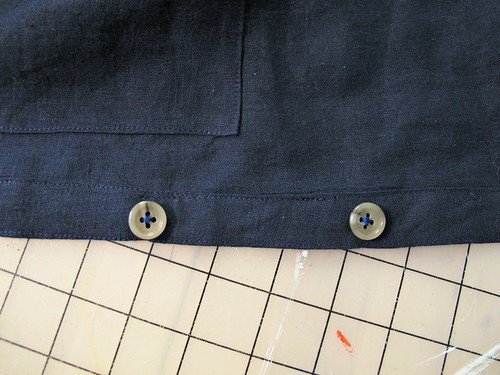
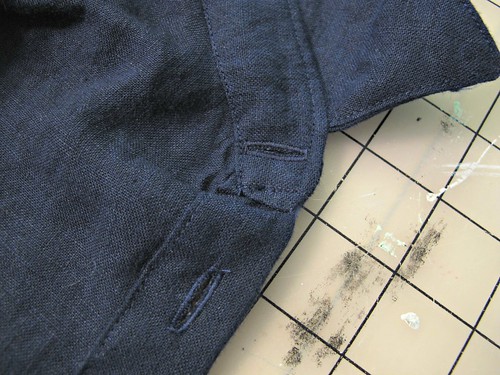
My first fuck-up was the top stitching on the button band. True, it’s not tooooo bad, but it’s definitely crooked. I’m not even sure how I managed to get that seam so crooked, but a crooked seam means crooked top stitching which means sad button band.
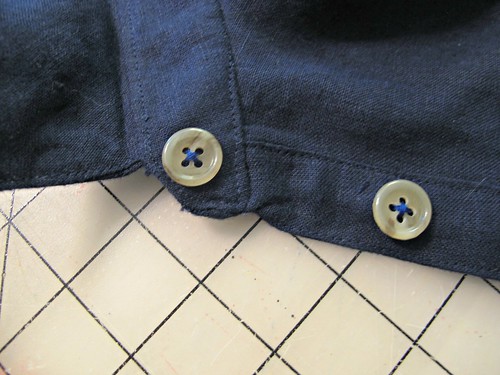
If you zoom in, you can even see an errant line of stitching running straight into a button. What is this I don’t even.
Then I tried to attach the collar stand.
And this is what happened. The fuck is that bump sticking out there? What the hell is going on?
And here is the crowning glory, which I obviously saved for last. This is what happens when you sew the collar stand wrong, then try to unpick it, then realize that the fabric is unraveling and now you have no seam allowances so you just sew haphazardly across a few points and hope for the best. It’s wonky and terrible and I can’t even button the top button. OOPS.
Speaking of buttons, the button holes *do* look nice. Thanks, Bernina!
If you were wondering, here is what I plan on changing for my next version:
– Shorten the length (although maybe not quite as much as this one!)
– Shorten the sleeves – they are WAY too long on me, like, the cuff starts below my wrist. I actually did not even bother sewing the buttons on the cuff here because they are so laughably long, I figured I’d just roll these up 4evs. But for my next version, I need to get the sleeves the proper length.
– Change the placket to a more traditional sleeve placket (such as the ones on the Negroni pattern). The ones on this shirt are much more simple – just a little binding, which isn’t bad, but I like the fancier look of the Negroni.
– I think I need to take out some of the width of the back, it’s super blousey on me.
– Draft smaller pockets; these are a little overwhelming on my frame.
– Get that god-forsaken collar stand under control, I mean, WOOF.
If you were also wondering, here are my suggestions should you decide to tackle this pattern yourself:
– MUSLIN IT. If you feel confident in your fitting skills, you may skip this, but I strongly encourage you to at least make a mock collar/collar stand so you can get an idea of how this shirt gets put together. You may also want to consider measuring the sleeves against some sleeves that fit you, unless you prefer the perma-roll.
– Don’t make your first version in linen. Just… don’t.

Despite an iffy start with this pattern (which I’m chalking up to user error), I think it’s a keeper and I will be making this shirt again. It’s a lovely design and a fun pattern, and I’ve already sourced my dream plaid flannel. I have an entire outfit planned around this pattern in that fabric, ain’t no one gonna stop me.


THANK YOU for showing your little boo-boos, for those of us (like moi!) who have those on pretty much everything we sew, and like to be reminded it happens to even the best of us occasionally ^__^ It’s funny, though, how the little crooked seams and shite don’t end up mattering when you really love wearing something… for me it’s the fit that ends up deciding whether I wear something, not my piss-poor zipper installation or errant seams (thankfully LOL).
Love your commentary on the collar stand – I swear I say the exact same things when I see that stuff happen to me LOL.
Hear, hear!
I’ll third that one! 😉
Thanks for this, Lauren. I’m sorry to hear your first Archer didn’t work out so well… But it’s great to read what you’d change and what the challenging parts were. I’ve been debating this pattern and it’s helpful to read both the good and the bad, ya know?! 🙂
What’s funny is that I want a linen one now too. heh
oh no!!! thank you for sharing, i’m sure i would have been so distraught i wouldn’t have bothered to finish! collar stands are hard–definitely the most challenging part for me! i do love the archer, and i’ve been singing it’s praises for months. in fact, i’m making another right now. (with giant polka dots!!! yeah!!!) and ohmygosh i have monkey arms… i actually add an inch to the sleeve length… haha!
Aagk collar stands!! I always have the hardest time getting that final line of top-stitching to look good on both sides (you know the very last step when you’ve attached the stand, and then sandwich the top of the shirt between the two layers of the collar stand and sew?) I’ve looked online for tips on having it all pretty but apparently everyone’s collar stand always magically line up (darn it magic!) If I stitch in the ditch on the right side, then the top-stitching on the inside of the collar is all wonky. I usually go all Monet on it (that’s right) and settle for getting the top-stitching inside to look good (since that’s what shows the most to the Outside World), and leave the unsightly line of stitches at the back hidden under the collar! HA. (But then I secretly know it’s wonky and it hurts oh-so-very-much). Le SIGH.
In your side photo I can see that the horizontal lines go way up toward the center. If you had made this in a gingham or cheapy plaid muslin it would have shown all sorts of ugly. Making a solid the first time does not show all the lines going off in weird directions.
Lay the paper pattern for the collar band out and make one out of cardboard for the next pattern. Those little pieces can be torqued a little and never sit right. Make a separate perfect collar band out of something not so ravely and show yourself that you understand the construction sequence and final result. People judge your sewing on collar bands and even collars and rarely look at uneven top stitching and if they are standing that close, they need to be slapped. Interfacing the collar bands with a soft tricot knit helps keep the fabrics from raveling and adds a bit of stability without being like a board.
Your Monet assessment is spot on, ’cause I loved this shirt in your previous post and still do. Look forward to seeing the next version.
It’s a great wearable muslin! I think you and I are on the same page, I just downloaded the Archer yesterday and bought black and white checked fabric from Mood last week!
Ooh, we can be twins! 😀
Oh, it’s not too bad (at least, I can’t see it from my house). Linen tends to ravel, no matter what you do: it is the nature of the beast. That makes fiddly details like collar stands, plackets, etc. extremely frustrating to sew up correctly. However, linen is on the side of Goodness and Light for wearing in hot weather.
To save these sleeves, why not try sewing a deep tuck or two around the sleeve, above the placket –either at or below the elbow, or above the elbow? The added weight might make the sleeves hang better, and it’s a tidy “design feature” that was v. popular in the 1980s and in the 1880s; and thus long enough ago that it will look fresh again in the eyes of all too young to have seen it on the first go-round. I did not see it in the 1880s, but I used that detail fairly frequently in the 1980s.
nobody ever pretended that shirts are easy! i just made my first archer too, and i have exactly the same issues. welcome to the short arms club, haha. i think that for my next version, i’ll look into some other methods for sewing in the collar stand, as i found jen’s method very fiddly. i don’t remember it being so hard from when i my my boyfriends shirt… anyways, it’s nice to know you also mess up sometimes 🙂
Great post! I still think the shirt looks good in the pictures, but in the close-ups I can see why it’s not excactly how you’d like it.. I do believe that we seamstresses tend to see every small bit, because often when I’m not happy with something my bf and other people don’t even notice it.. Overall I think it’s a great wearable muslin right?
I’ve just ordered the same plaid flannel from Mood two weeks ago! Coincedence 🙂 Can’t wait to see what you make with it, for my fabric I was thinking an Archer shirt (muslin first!) or maybe something completely else..
Thanks for showing your trials! Your positive attitude is probably one of the things that make you awesome at sewing! Accept mistakes, learn from them and move on. Words to live by I reckon… despite all your problems it looks really good. Your next will be amazing! 🙂
I’m a long-time lurker of your blog and today I feel compelled to comment. When I made my first few collars they were pretty awful, then I discovered this tutorial:
http://sharonsews.blogspot.ca/2009/02/bump-begone-or-how-to-sew-collar-with.html
The tutorial is a bit muddy but after you figure it out it’s MAGIC. Assuming you don’t already know this stuff and just had a shit time with the linen…
Thanks for sharing. As Kat, I’m a weekly lurker and collar stands and cuffs are favs of mine after mastering David Coffin’s Shirtmaking book by Tauton Press. Amazing way to get it perfect everytime. My husband prefers the shirts I make to the purchased ones and has even appeared on TV in my homemade shirts!
Ah, thank you for the link! This is very helpful!!
Long time lurker. I also shortened my Archer waaay too much and it looks super funky because I did mine in a fabric that looks like a checkered table cloth. Your linen one still looks lovely! To correct the wonky proportions, I ended up trying to shorten the sleeve by cutting off part of the cuff……What a disaster. Next one will be better!
Despite Peter being able to make a perfect collar stand, it is a very precise and fairly daunting undertaking. I made one with a loose weave madras (mine was a .99 cent duvet cover that I made a cowboy shirt out of) and had much of the same nonsense going on. I was traumatized to where I may never sew a collar stand again or I might just find his tutorial that makes it seem so easy-peasy. Don’t beat yourself up!
Oh, I forgot that Peter had a tutorial on sewing collar stands… I will definitely be referencing that when I do my next one 🙂
It is definitely a pattern to take your time with, I think 🙂 I took a little too long but I do think each step needs a little bit of extra attention to detail. And I actually had to lengthen the sleeves, because I have long spindly arms. I have thought I might just remove the back pleat in my next one, because I also felt it was a bit blousy in back- do you think that would work?
I think you could remove the back pleat without too much drama. I know it’s usually there to give some ease for movement, but since the shirt is loose-fitting as it is, I don’t think the pleat is as necessary so much as it just looks nice 🙂
Oh boo!! I hate when that sort of shit happens!! And it always seems to snowball – like “oh god what happened with my topstitching… OH GOD what is that bump…. AAARRRGGGHHH FUCK ME WHAT IS GOING ON HERE?!?!” If it wasn’t 9am I would raise my glass to you and say “Here’s to sewing fuck-ups!” and “May the Sewing gods grant you with a stress-free round 2 Archer!” And also, if it’s any consolation… it ain’t that bad!! I mean… I’ve done worse (like, 80% of the time…)
You do not! All your shirts and jeans are always perfect and I HATE YOU!!!!
Ha! But seriously. Tell me your secretsssss.
Shirt looks great. I’m not a big fan of linen. Too much fraying and too much ironing, but I do like this shirt. Looking forward to seeing the next version.
Oh, it’s terrible when you realize your fabric is fraying so fast that you might not have any more seam allowances! You made it happen, though, and in the solid color (and what a great color it is!) you can’t really see the problems. The Archer is my first real shirt, and I had trouble with the collar stand too. It looks okay from a distance, but up close it’s just not quite good enough…
I think most of us mere mortals would be all “woohoo! I made a freaking SHIRT! And all I cocked up was this little bit of top stitching and the edges of the collar stand! I AM THE MASTER”.
Mistakes notwithstanding, the colour and silhouette look great on you and I think your dream plaid version will be amazing!