
I’m currently working on the madness that is Simplicity 1803 (seriously thinking about calling this dress The Disaster Dress, if that means anything) and I thought I would share a few of my trials & tribulations with y’all. I’ve had a lot of comments requesting a tutorial for underlining (or even just asking wtf underlining is exactly), and while I haven’t been able to fulfill those requests in the past – but today is your lucky day! Underlining day, yaay!
First up, let’s talk shop. What exactly is underlining? Some people tend to confuse it with lining; this is incorrect. Lining is a duplicate garment that hangs separately inside your dress (or skirt, or pants, or whatever) that covers all seams for a nice clean finish. It is constructed separately and generally only attached by a few seams – perhaps a neckline, or the waistband of your skirt. The hem usually left free-hanging for ease for movement. Consider lining the inception of sewing – a garment within a garment (see what I did there?).
Underlining is when you sew two pieces of fabric together & treat them like a single piece – kind of like some relationships (ahhh I’m on a roll today here). Since the underlining is actually sewn to the back of your fashion fabric, the seams do show & the inside of the garment doesn’t necessarily have that clean finish.
Underlining is wonderful for a variety of reasons – you can use it to stabilize your fashion fabric to give it a bit more body (like with my Bombshell dress), to add a layer of opacity to an otherwise sheer fabric (my Swiss Dot Violet really benefited from a batiste underlining), to add a layer of warmth to a coat (the lining of my Lady Grey is underlined with cotton flannel), or even to brighten up your fashion fabric a notch (look at the difference underlining made on my Gingham Peony!) If you were concerned about the integrity of a delicate fabric – lace, or vintage, or… I dunno, vintage lace – you could underline every piece for additional strength. Underlining has lots of uses, it’s awesome!
For my dress in question, I am using this pretty black eyelet from Mood. The whole thing is quite see-through so I knew ahead of time that it would going to need some kind of backing to keep certain places under cover. I originally planned on just dropping a whole lining in the thing & calling it a day, until I realized that you would see every single seam through the eyelet – and by every single seam, I mean eyelet seams & lining seams. I’m using Bemberg Rayon here (LOVE!!!!!) and that stuff frays like nobodies business. I started imagining little shreds of turquoise popping out all over the place & it gave me the willies.
So I decided to underline instead. An added bonus is that it totally negates the two issues I was having with the individual fabrics – the Bemberg was sliding all over the place, and my sewing machine was throwing a giant fucking fit every time I tried to sew over the textured eyelet. By sewing the two fabrics together, the Bemberg stays put & provides a layer over the eyelet that keeps the needle from freaking out. Yeah!
This process is pretty easy. I’m almost embarrassed to even post this.

Cut each pattern piece from both your fashion fabric & preferred underlining fabric (as I mentioned here, I’m using Bemberg Rayon – which is traditionally a lining fabric, but it’s main job for this dress is opacity). The pieces should be mirror images of each other. I like to go ahead & snip all my notches, it makes things easier to match up. Don’t worry about your pattern markings (the kind you use chalk or tailor tacks or whatever for) just yet.

Place the underlining on the wrong side of the fashion fabric. If your underlining has a right side, make sure it is facing the wrong side of the fashion fabric (so when you flip the whole thing over, both right sides should be facing up). Pin everything together – I used these tiny silk pins because my lining shows pin holes.

Then you just sew the lining to the fabric! Here are some tips:
– Yes, you can sew it by machine. I chose to sew by hand because the rayon is super slippery & I wanted it to shift as little as possible. It also makes ripping the basting stitches out MUCH easier. If you sew by hand, you want to keep things as flat as possible – sit at a table! It’s very mindless work, so feel free to watch a movie (or two!).
– Sew giant basting stitches using one strand of thread. Pick something contrasting so it’s easier to pull out the stitches after you sew the seams. I used orange thread; I thought it was pretty haha.
– Try to stay well within your seam allowance – you can see that mine is less than 1/4″ from the edge. I think this makes it easier to pull out the stitches (it’s not anywhere near the 5/8″ SA, so I’m not actually sewing over the basting with my machine) and it hides any pin-marks that may get left behind on delicate fabrics.
– You may also notice that I did not sew along the bottom edge of the piece. Call me lazy, idgaf. The basting for underlining is really there to hold the pieces together until they are properly sewn. I’ve found that I can usually get away with omitting the bottom hem & any seams that extremely short (such as the point between the princess seam & the armscye). Play around & see what works for you!
BONUS TIP:

(sorry about the crappy Instagram picture!)
For super precise darts, thread trace the dart legs through both layers after you have basted the pieces together. This keeps the fabrics together while you sew the dart, and eliminates any weird bubbling that may otherwise happen.

Here is the other side of my underlined piece. Cute!
Now that you’ve got your pieces all basted together, you can treat them like one piece of fabric. You can transfer your fabric markings to the underlining side of the fabric so it doesn’t show on the front. Sew as you normally would, and make sure to pull out your basting threads as you sew each seam.
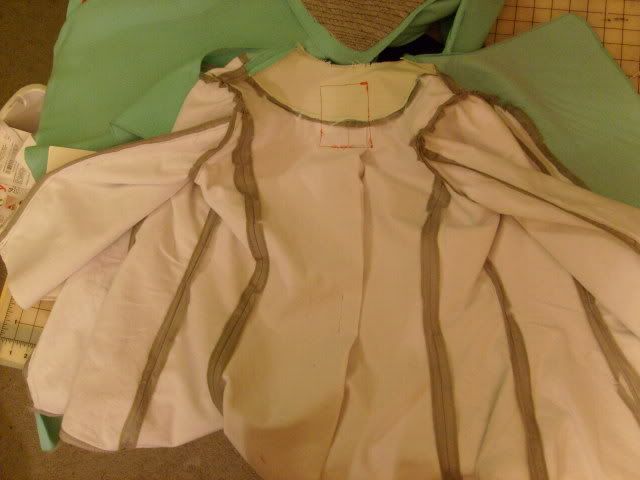
Here is how my bodice is looking as of this morning

Since this is an underlining, and not a proper lining, you will still have to finish your seams & deal with facings. My seams are serged; my facing is a simple cotton broadcloth as the eyelet was too bulky.

I love the subtle peek of turquoise 😀

I am including this picture because it looks like a uterus, and that is funny to me.
So that’s it! Hopefully this brings a light to some of the mystique 🙂 As always, let me know if you have any questions!


Ha ha! Can I say I love you back (in a purely platonic way) – there is no where in sewing blogland that I have read some serious knowledge/ technique sharing that ends with a reference to a uterus. You crack me up 🙂
Hey, I’m in the process of making this dress as well, but I chose the keyhole version. I an using a hot pink and white cotton rayon print. I didn’t need an underlining, but added a white cotton lining. I also added white piping surrounding the keyhole, neckline and waist. The pattern has a huge amount of ease in the bust and waist. I think I cut it two sizes smaller in places. All I have left to do is add the skirt.
Yeah, the amount of ease in this pattern is ridiculous – I’m sewing a size 4, and my body measurements correspond more with a 12-14! Your version sounds like it’s going to be super pretty!
Ahhh I’m making this dress as well but I’m making the sleeveless keyhole version. I interlined my bodice and will just line my skirt. I’m such a newbie so the interlining was easier than I thought. I can’t wait to get this dress finished. Check it out on my blog!!
shanniloves.blogspot.com
Thank you!! Underlinings and linings have been kind of a mystery to me so far. But I’m thinking it may just be in order for some lawn this summer. This is really helpful! One (probably obvious) question: when you baste the darts through both layers, do you do that inside where you’d stitch (I guess that’s not a seam allowance in this case) so you don’t sew through your basting stitches?
Love your uterus. 😉
I like to baste the tiniest smidge beyond my dart legs (like, 1/16″ or something crazy haha), so I can sew right along the lines & avoid the basting stitches. I have found that if you sew over the basting stitches, they can still be pulled out – you just have to use tweezers when you do it 🙂
Thanks! Oh yes, I have discovered this the hard way many a time. Usually it’s the tail of the basting thread I’ve forgotten to be careful with and sewn over. 😛
This is coming out really nice. I am loving this color combo peek-a-boo.
Thanks for posting this. You may think this is so simple, but I have been underlining a Crepe dress for the same reason as you (the fabric is kind of see through) and I actually found myself doing a Google search for hand basting tips. It was taking me so long! I had nine pieces to do and my fingers were hurting after just a few hours. I tried sewing with a thimble but that’s another story. I can’t do it. Anyway, I still have one piece left to do and I think I could be making the stitches bigger. So thanks for the tips. This is a very timely post for me!
Great post about the difference between underlining & lining. Love the hint of turquoise and totally agree about the uterus. 🙂
Awesome!! I just bought some white eyelet, from Textile Fabrics no less, and this is perfect! Love the color combo!
Thanks for this post! That uterus pic is why you are my fave blogger, just saying’ ;). I have this pattern lined up in my to-dos and if it was a bitch for you it’s going to be…well….much worse for me. Yikes! Still it looks like it’ll be purty, can’t wait to see it (and read all about it).
Underlining can make some pretty awesome fabric combinations.
Really excellent tutorial! Somehow I’ve never managed to underline, though I constantly imagine I’ll have to…
This dress is looking very cute. Love the contrasting Bemberg peeking through.
This is probably a stupid question, but I am new to the world of hand basting. I always see people say to use silk thread – what is the significance of that? And do you have to use silk or could you just use normal thread? I’ve tried to look up the why behind it online, but I can’t find anything – just lots of things telling you to use it. Your dress looks lovely, by the way 🙂
Not a stupid question at all! A lot of people like to use silk thread because it doesn’t tend to tangle as easily as polyester thread, especially if you run it over some beeswax first. Also, if you are pressing your fabric with the basting stitches in it, silk thread will not mar the fabric like some polys will (this is totally dependent on your fabric, fyi – some mar & leave pin holes, some don’t). I personally use good ol’ polyester thread – I’m not opposed to the silk stuff, but it is expensive! And I feel so wasteful just using it to baste, only to rip it out after I sew my seams. I save the silk for more permanent uses, like hand-tailoring 🙂
Awesome 🙂 I agree, it feels so wasteful and I saw how expensive the silk was and it made me sad. It’s good to know that I can use the regular stuff and get by just fine. I’ll be using just a thin cotton and lining it with a thin polished cotton to hopefully achieve a not-so-thin-feeling dress. It’s el-cheapo all the way, but I’m new at clothes in general, so I don’t want to spend a bunch of money on something that I will probably not like so much once I have sewn more.
For basting, i use what’s called “faux-fil” in French. It’s thicker than regular thread, cheaper, and breaks much more easily so it’s easier to remove. I wouldn’t use it with fine fabrics as it’s quite thick.
I haven’t ever bought silk thread on purpose for this, but I bought a bunch of old silk ties in bulk to cut up and use for bias binding on necklines, and I discovered that if you carefully dismantle an old necktie, you will end up with a good length of strong, slippery thread that is insanely useful for whenever you want a nice, frictionless basting stitch (I especially love it for gathering/ruffling). My old sewing machine ofren has trouble with consistent stitch length/tension, so I can’t really rely on it for basting stitches I know I’m gonna want to easily remove. But a sloppy line of hand-stitched stitches in that slippery necktie thread always pulls out easy, no muss, no fuss.
I have to say that was the best piece of writing I have ever read about sewing, great use of swearing too. I love That now I can fucking underline if I want too. You are a very talented writer. You could really turn your hand to a how too sewingbbook that people would Actually read. Would also love to hear your take on the race for the white house, middle east conflict etc. You could make it very interesting and educational and funny at the same time!
I was about to make an underlined dress. Thanks for the tips! I feel more confident about it now.
Good info. I really love that black eyelet fabric!
I was thinking about underlining the other day. I bought a drapey fabric but I want it to be stiff. Can I choose a stiff underlining, and magically make the fashion fabric crispy too? Or is that pushing it too far? Perhaps the powers of underlining are…limited? p.s love the uterus!
Haha yep, you can do that! It won’t make it “crispy,” per se, but it will eliminate the drape of the fabric and give it some solid body. Try a thicker cotton, like medium weight muslin. Cut a good-sized swatch of each and baste them together, that should give you an idea of what to expect 🙂
Thanks for your reply! I shall consider it an experiment and I may just feel like a mad scientist of fabric. Woohoo! I bought the fabric because it was a perfect colour for my Colette Meringue. I shall mould it to my will! 🙂
This was the exact same question I had! Thanks to you both! ☺️
this is going to be so pretty! I love underlining – it’s such a nice touch – and this little turquoise peak is going to be beautiful. And Ha! Uterus bodice…
Very cool! I think I might have underlined before and not even known that’s what I was doing, LOL. Now I understand the difference between lining and underlining. Thanks!
I also hand baste my underlining. It works great. Even non slippery fabrics slip around when you sew them together by machine. Thanks for the post.
This is gonna be gooooooorge…. Can’t wait to see it!
Fanbloodytastic your tutes are fabulous Dahhhhling Lol. I will feature one day when I do one of my, it’s all about tutes section, which I have just started doing for beginners like moi .
That’s great! I just finished the same dress, 1803, in black eyelet! Thanks to Gertie I cut a
size 4 instead of 10 (as the envelop suggested) and it fitted in one time. That’s usually not the case 🙂 so for me this pattern is a winner!
Thank you so much for this useful info! I have learned the difference between lining and underlining through my adventures in Sew Colette, but this takes underlining a step further for me, and confirms my suspicions that I can add it to any old pattern!! I tend to be attracted to sheer-ish kind of fabrics so it’s especially good to know I don’t have to shy away from them if they’re otherwise perfect for a project.
Also, thanks for the bodice-uterus pic – I literally LOL’d…. at work… try explaining that one to your coworkers ^____^
Your dress is lovely and this tutorial on underlining is very timely actually! I just began sewing Colette pattern’s Lily in a fabric that will need to be underlined…so thanks a lot for sharing your knowledge…and making it sound fun at the same time ;)!
I have another question too, about seam finishes (yours always leave me in awe) : do you finish your seams as you go, or once the garment is totally put together ? (well, of course I’ve noticed your side seams weren’t joined in the last pic, so that makes my question sound a little stupid, but I’m still rather new to sewing and totally suck at finishing my seams…so I’d rather ask!)
Haha, it’s not a stupid question at all 🙂 I tend to finish my seams as I go – meaning I’ll serge (or bind if I’m feelin’ fancy) them & then sew together. Occasionally I will finish the edges after I sew the seam, but that’s kind of fiddly & I really don’t like to do that. Sometimes I will finish all the seams before even sewing – but only if it’s something REALLY prone to unraveling. Hope this helps! 🙂
Your creations have been an inspiration to be for such a long time and I just wanted to thank you for this post on underling!
I tried working with them for the first time today and thanks to your advice it went pretty smoothly. Thanks for the tip about tread tracing on the darts!
I basted by machine (made my stitches really long) and it worked a treat (I was working with cotton though).
Almost all silk fabric has to have an underlining (thanks for the terminology! Didn’t know what to call it before) because it’s so fine, it often tears out at the seams without something more substantial underlining it. Ax me how I know. 😦
Question: is there a reason why Bemberg is almost exclusively a “lining” fabric and not a standard for underlining? It’s so nice against the skin and it seems sturdier than silk!
THANK YOU SO MUCH, this is just what I needed to know and more.
“I am including this picture because it looks like a uterus, and that is funny to me.” Not even 5:30AM and you made me spit coffee out my nose. That’s freaking hilarious!
I tracked back to this post because I’m doing the OAL with you (June 2014). I still need to grab the pattern, which I’ll do today/tomorrow. I had the fabric sitting out and could NOT remember why! Seriously, it was pre-washed and folded nicely ready for a project and my brain kept going “…wtf was that for? I know it’s a dress with a bodice & skirt…” 🙂 Getting old ain’t for sissies.
Underlining: The Why & How | LLADYBIRD
dqssfqqhz http://www.gtln14s7iwxgp14zz622753ta07e025us.org/
[url=http://www.gtln14s7iwxgp14zz622753ta07e025us.org/]udqssfqqhz[/url]
adqssfqqhz
There is a quicker, easier & IMO better way to attach the underling. I learned this trick from Palmer & Plesch excellent book, “Sew Like A Pro.” Layer the pieces on top of each other just as you would to sew them. Instead of sewing the layers together, you GLUE them together. Yes, I said GLUE. I simply put a tiny dot of Soho craft glue between the layers, within the seam line about every inch all the way around. Let dry then forget about it like it never happened. I think it’s a superior method because it’s not only faster, but the underling shifts less than hand basted layers. When the glue is dry, you will hardly notice it as you sew. It does not gum up your needles or cutting blades of a serger or scissors.
Use the glue sparingly….tiny dots of glue every inch works best. I do hand base inside the darts after the glue has dried.
Thanks for this. I have never read your blog before, but immediately added you to my feedly reader. Your voice is exactly how I talk to myself, my husband, and actually outloud to most other people
thank you for sharing! this is helpful information.
I have the same fabric, from Mood, in purple. My plan is to make a trumpet skirt, a little past the knee.
Instead of using traditional lining, I’m wondering if I could just use the eyelet as the lining too. I love the fabric as a solo act -when I place the fabric on top of it’s self the transparency and coverage are perfect.
What is your thought of using the fashion fabric to line itself?
Self-lining with the fashion fabric is definitely something you can do – I’d just make sure that the thickness of the double layers isn’t too much weight for the garment in question (it doesn’t sound like it, but double check if you haven’t already). I do love the idea of self-lining with lace, it sounds very luxe!
Very good, im doing a Laurel and the underlined pieces look a bit baggy.if i unpick the bottom and hand hem might get rid of bagginess?p.s.lesson learnt i used rayon with a silky underlining,think i shoulda used a cotton to avoid slide factor.any advice welcome. I think uterus pic funny as well x
It sounds like your underlining wasn’t attached completely flat to the fabric, so if you unpick the hem and push the excess down before re-hemming, I think that would help!
I’m coming to this post waaaay after the fact, but I’m so glad you posted this! I am using rayon bemberg to underline a voile dress (or two!) and couldn’t find anyone else who had used bemberg this way–so glad someone did it and it worked! My method for basting was a little different, but both my fabrics were slippery as heck (I even used spray stabilizer on the bemberg!) so I pin-basted everything during cutting, and then zig-zagged all the edges together before I did anything else. Putting in some of the tucks and other features helped to stabilize things too.
Thanks for this!
Useful tips…but your distasteful language was totally unnecessary.
Thanks for stopping by! 🙂