Archive | completed projects – new RSS feed for this section

Completed: Colette Peony – Summer Gingham!

27 Feb

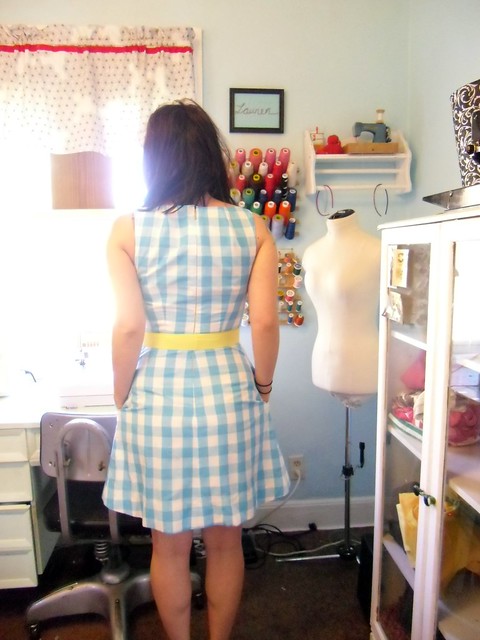
Ok, it’s not summer here, but it sure feels like it – right after I took these pictures yesterday, I pulled on a short-sleeved tshirt & some denim capris and took my bicycle out for a spin. It was LOVELY outside – and today doesn’t look like it’ll be any different. Yay for spring getting a head start this year 😀

Gingham Peony

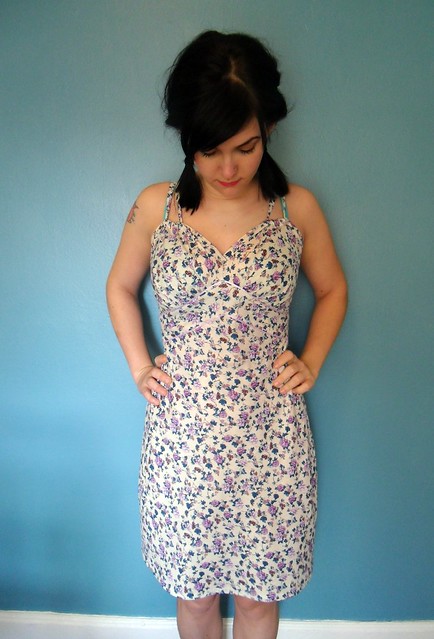
Anyway, here’s a little summer sundress to get us in the mood – sorry if you live in a cold climate, maybe you should move to the South 🙂 Ha! I kid, I kid! I can’t wait to wear this dress as God intended – no tights, no cardigan, just some espadrilles and a sweet little rose brooch. I have a feeling this dress will be in heavy rotation for the next few months!

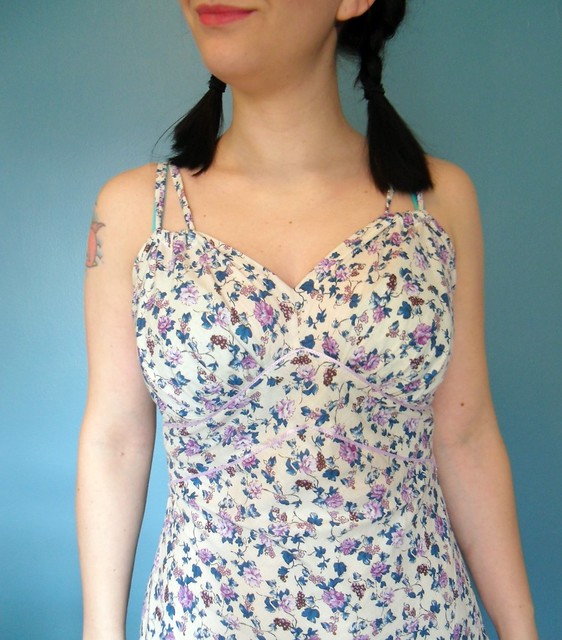
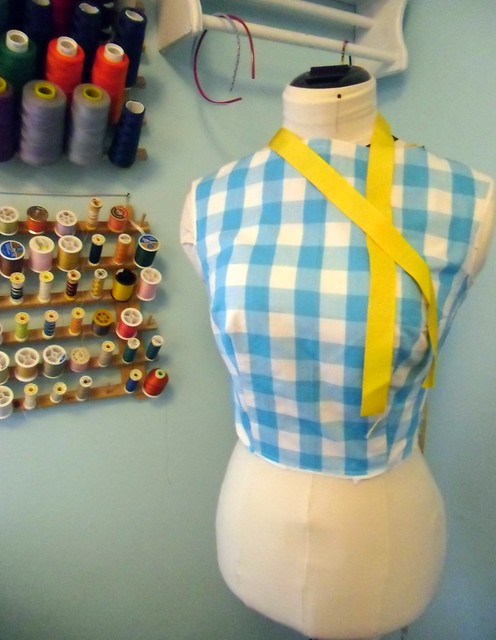
There’s not much to say about this pattern – I’ve already made it twice, so I didn’t have to do any preliminary fitting or a muslin – just cut & go! I did putter around with the pattern, since I had a pretty limited amount of fabric – 1.5 yards of 44″ gingham is exactly enough to cut out this pattern with no sleeves or facings (but still keeping the pockets) in a size 4, FYI. I underlined the entire dress – bodice & skirt – with white cotton batiste to keep everything modest, since my gingham was pretty sheer! Since I didn’t have enough fabric to cut facings, I faced the neck & arms with white bias binding for a clean finish. I did consider lining the dress (as opposed to underlining) so I wouldn’t have to deal with facings at all, but I wanted my batiste to offer a little structure in addition to making things opaque, so I stuck with underlining. As a bonus, it brightened up the colors, too! I also scooped a little out of the neckline so it wasn’t quite so boat-neck, per my inspiration.

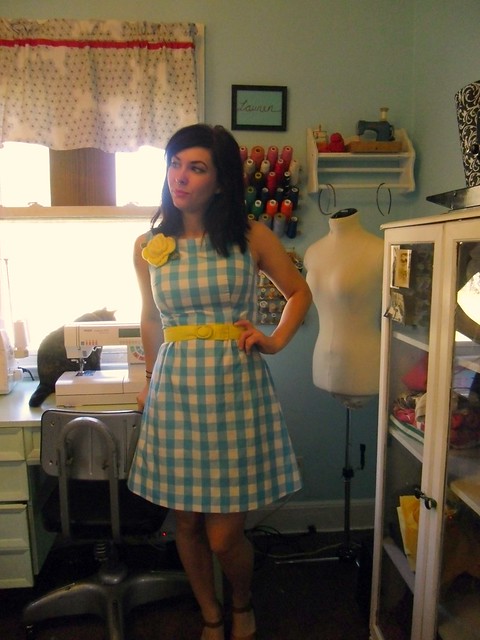
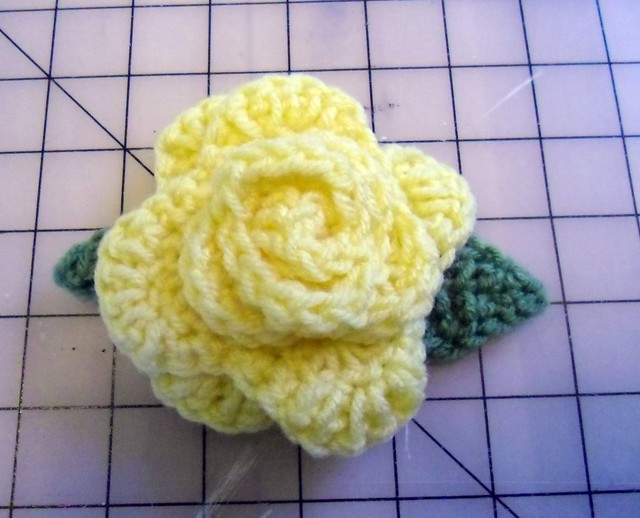
I decided to keep the overall look of this dress simple & clean – with pops of yellow to make everything less Dorothy-esque 🙂 The yellow belt is a leftover from my first rooibos (man, I miss wearing that dress! GET WARM OUTSIDE!), and the yellow crocheted rose pin is something I made a couple of years ago when I had this crazy idea I was going to crochet a white granny square afghan with yellow roses. Actually, I still want that afghan, but I have too many projects to finish & I hate crocheting anyway 🙂 Here is the video I used to make the rose, it’s really easy! I still have a pile of these roses that I need to do something with – maybe I’ll give them away. Dunno!

Gingham Peony
My sewing room is so tiny, but I just love standing in there & gawking, so I thought y’all might like it too!

Gingham Peony

Gingham Peony
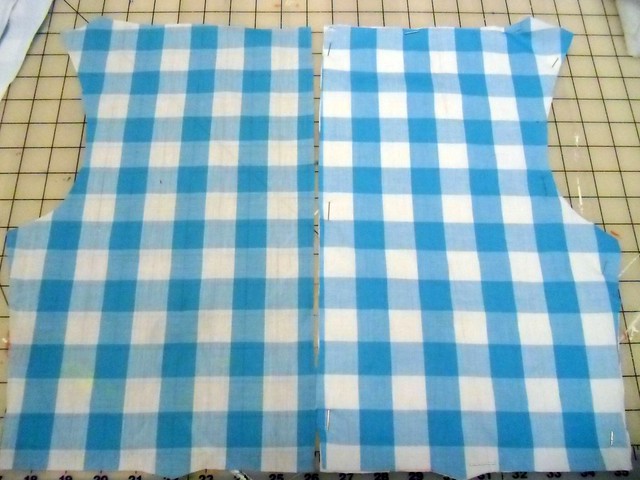
I cut the pockets out of gingham as well, so they blend in with the sides of the dress 🙂

Gingham Peony

Gingham Peony
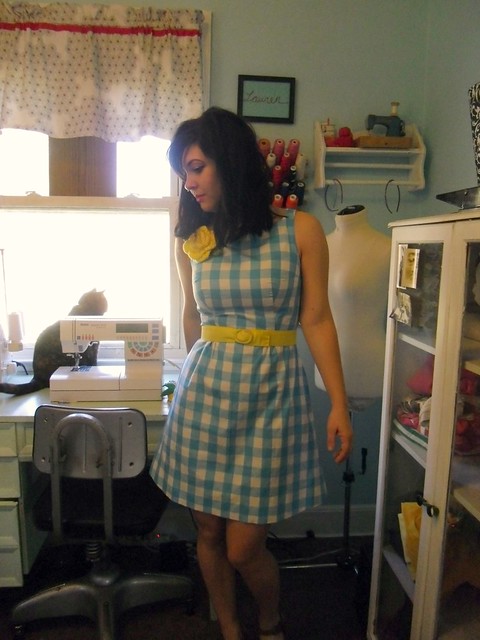
Oops, I almost forgot – here is a shot of it without the belt! The checks match up pretty well, if I do say so myself 🙂

Gingham Peony
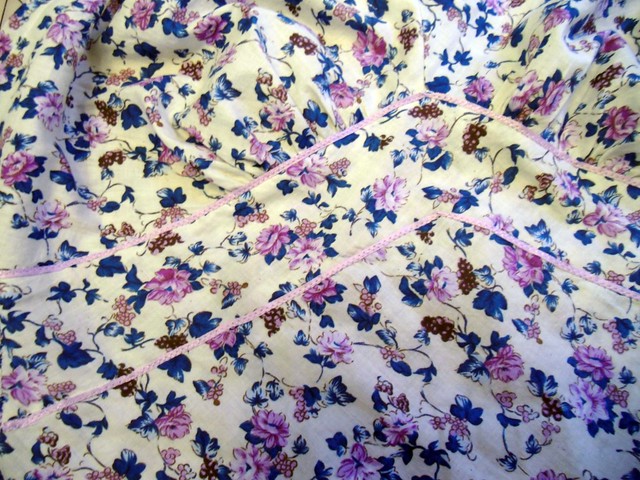
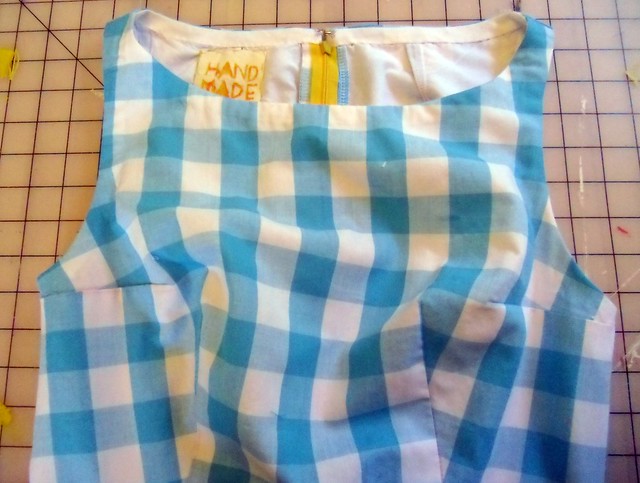
This is the best close-up I could get – every single other one of my pictures turned out super dark 😦

Gingham Peony
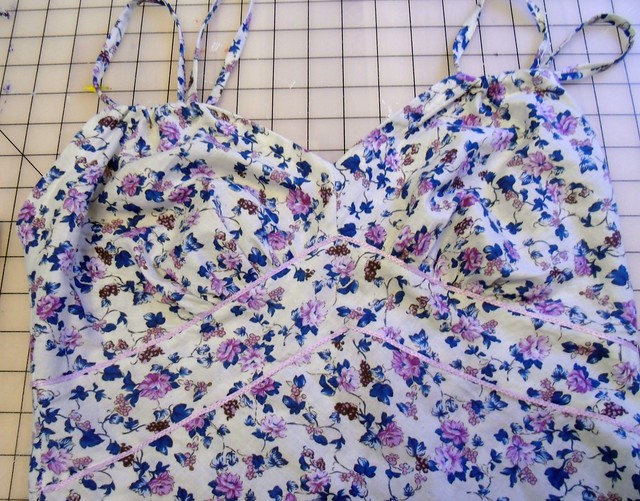
It cracks me up how my dresses look post-FBA when they are hanging or flat – they have little built-in boobs! HAHA!

Gingham Peony
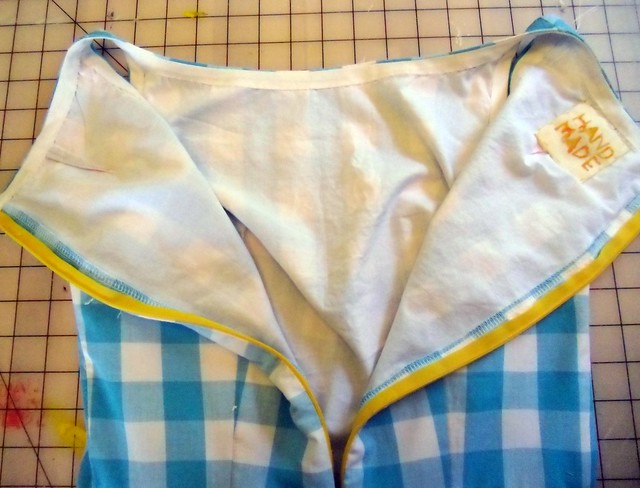
You may have noticed that the zipper is bright yellow. I did not have a white 22″ zipper on hand, but I did have yellow! And it goes with my overall theme – not to mention that pretty burst of color when it’s unzipped! I love colorful little surprises like that 🙂

Gingham Peony
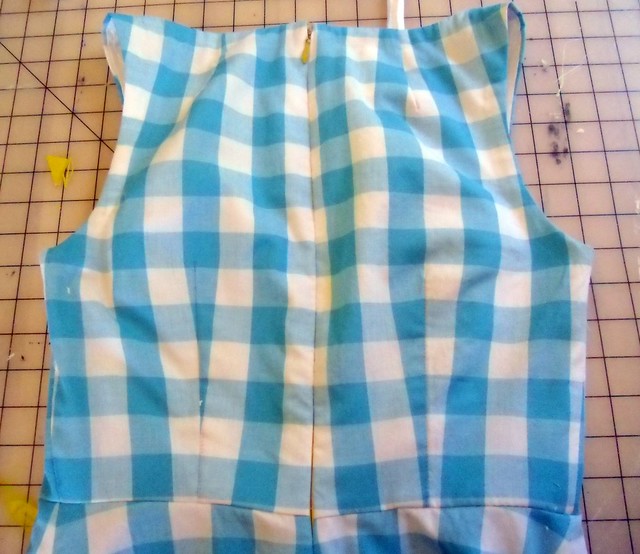
I just wanted to share my check-matching at the zipper. That’s as close to perfect as I could get! I know the checks don’t line up at the waistband – it’s due to the back darts. The fronts & side seams match up, though – you can’t win ’em all!

Gingham Peony - yellow lace @ hem
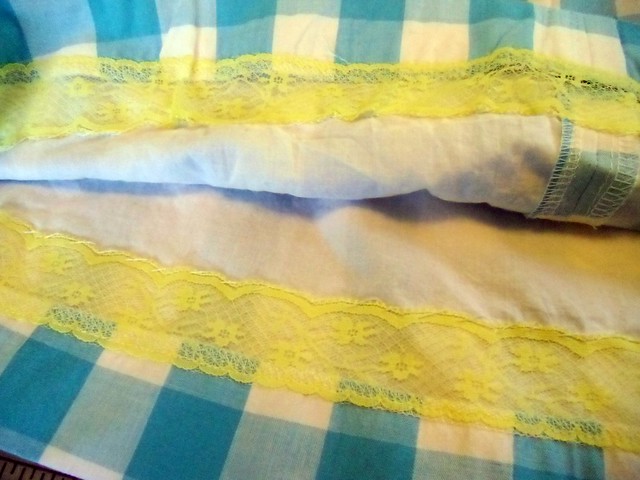
Yellow lace on the inside of the hem 🙂

Crocheted yellow rose pin

The flea market was kind of mehhh this weekened, but I did score at the thrift – look at this beauty I picked up~
Thrifted silk skirt
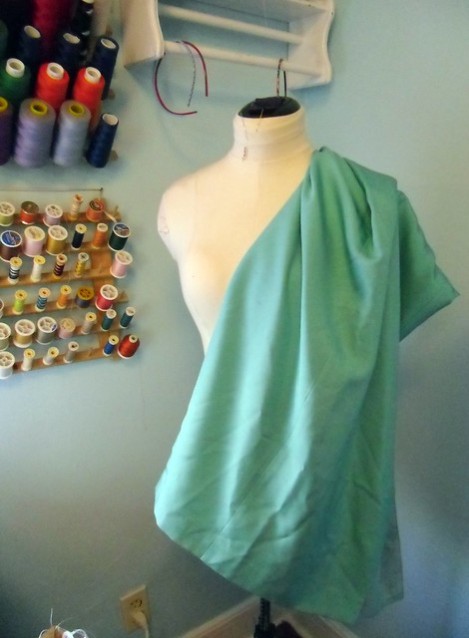
100% silk, in the most gorgeous shade of teal – $2! It’s a skirt, but it’s fairly large & long, and the seams are very simple. Cutting it apart yielded about 1 3/8 yard of 36″ fabric – plus the silk lining & zipper. Also, I bought a cashmere cardigan (not pictured) for $4. YUS THRIFT.

Gingham Peony
YEP.

Completed: Cinnamon Slip

21 Feb

It’s a little early for me to jump in the spring clothing game, but holyyyyy mother the weather has been positively spring-like here! Well, except on Sunday – we had “snow” (you know, that weird slightly frozen rain that just makes a slush mess on your windshield? Yeah, ew) and it was so cold, I refused to get off the couch/out of my pajamas. But it’s back to the 60s today and I’m ready for this warm weather to stick around for good! Can’t hurt to make some springy clothes that could be layered to ward of a little chill, eh? Eh?

I got this pattern as a Christmas present from my baby brother (thank you, Matt! You are the best :D) – I really love wearing vintage slips around the house (and, er, sometimes out in public :B) in the warmer months. That’s some dainty shit! Unfortunately, vintage slips are difficult to find in my size… and I don’t care to pay the super marked up prices that resellers charge. I don’t mind makin’ em, though! Especially when it means I can use colors that aren’t pastel and fabrics that aren’t slippery nylon. Whee!

Cinnamon Slip

I’ve never sewn up a whole bias garment before – bias skirts, yes, and bias midriffs. Never the whole thing! So this was an interesting experience. The pattern has lots of information on working with bias – including what stitches to use & where. I was a little put off at the suggestion to use a small zig zag stitch to construct everything, but I ended up following the instructions to a T since I figure Sarai knows more about this stuff than I do 🙂 I do like the finished result!

Cinnamon Slip
I do have a couple small fitting concerns – the center point of the V is not flat against my body; it sticks up a little. And there are wrinkles across the top of the midriff. I’m guessing I need to cut my next one a size bigger – this is a 2, with a 4 bust, and it fits reeeally perfectly except for those wrinkles. It doesn’t look so bad in the photos but it is definitely noticeable in real life.

Cinnamon Slip
The fabric is a lovely cotton voile that I picked up for a steal last summer at my local fabric store – I think I paid like $3 a yard for this stuff! It’s totally NOT my style – I don’t care much for the super sweet florals, or lavender for that matter – but it was sooo soft, it just kind of leapt into my arms. I love how it looks & feels as a slip dress, though! And it made the whole bias experience much easier than if I had started out with a giant piece of slippery silk.

The print *is* a little busy, though, so I raided my stash for trim to highlight that pretty midriff detail. This lavender ribbon matches perfectly – no idea where it came from, or why it was in my stash, but yay for being a stash hoarder!

Cinnamon Slip

Cinnamon Slip - ribbon detail
Here is some ribbon detail. It’s sewn on with a tiny zig zag stitch – amazingly, I had matching lavender thread on hand too! What are the odds?

I made this slip with the intention of it being for around-the-house wear, but I think it really looks like a casual sundress. I can totally see myself wearing this to the park with some flats and a light cardigan. What do y’all think? Strictly slip or approps for public wear as well?

Cinnamon Slip

As a side note, here’s a sneaky peaky at my next project – another summer dress!
Next project - gingham peony
It’s a Peony, in some gingham that’s been lurking in my stash for about a year (actually, I think I bought it at the same time/from the same sale rack as that floral voile lol). Not sure what I’m going to do with the petersham yet; I do want to incorporate some yellow so the dress isn’t so Dorothy 🙂

And check this out –
sheer vs underlined
I underlined the pieces since they were so sheer. Pretty amazing how much of a different underlining makes! The blues & whites are much more vibrant now!

Completed: Another Stripey Renfrew Top

17 Feb

Didn’t see this one coming, did ya? 🙂

I bought this stripey jersey fabric on my last big fabric excursion, right before I enabled The Ban. Actually, I bought it because I *thought* it was navy/white striped, but upon closer inspection it would appear to favor black over navy. Oh well! Anyway, this top was screaming to be a Renfrew – so there ya go! I’m clearly not the only person who wanted their Renfrew to be stripey-delicious, although mine is a little different because I didn’t cut my bands out of the stripey fabric. Solid black over here!

I did save my stripey pieces, though, so watch out for them – they may end up banding a solid colored shirt 🙂

Stripey
Not much else to report here – it’s a tshirt, and I made it up (cutting included!) in less than 2 hours. LOVE.

Stripey
I’m actually pretty surprised I got the stripes on the sleeves (mostly)matched up with the stripes on the body. That definitely was not something I made an effort towards.

Stripey
The sides match up until about 3″ below the armpits. I think anyone who is staring at my armpits long enough to realize that the stripes don’t match up has bigger problems than me, just sayin’.

Stripey

Stripey - topstitching
I managed to get a much more clear shot of the double-needle topstitching.

SO MUCH LOVE FOR THIS PATTERN, Y’ALL.

In other news – I signed up for a Twitter account! Actually, I think Twitter is kind of stupid but since I don’t really venture into blogland on the weekends, I like the idea of having Twitter around for communication. So please add me – I went through a few fellow sewists friends lists and added 6 people (and Pee Wee Herman because, well, why not?) but then I got overwhelmed and gave up. And now my only follower is some spambot who keeps tweeting about sex & debt, ew. So if you have Twitter, let’s follow each other! I’m LLLLADYBIRD!

Also, check out my sweater progress –
Agatha sweater - right side
Kinda looks like a tiny vest, amirite?

Agatha sweater - on form
I put it on my form, but my circular needles are just barely long enough to knit this comfortably, so I didn’t stretch it to pull across the front. So here’s the back! I’ve knitted a few rows since taking this picture – that yarn-butt on the shoulder is now part of the sweater, and I’ve officially started my second ball of yarn 🙂 Yay!

Ok, I’m going to go figure this Twitter thing out some more.

Stripey

Happy Friday! 😀

Completed: Colette Clovers (again!) (but these are modified!)

16 Feb

I guess these are technically a “wearable muslin,” but bear with me here. This is the sixth time I’ve made these pants… and I think I’m finally happy with the fit. We’ve had some trial & error, some hair pulling, and a lot of wasted fabric. But on the flip side, I really feel like a Fitting Guru now *and* I’ve used up a significant portion of the weird stretch polyester that I can’t seem to get rid of.

I completely & shameless ripped these off thanks to two completely different sources. For starts, I found myself in the Gap a couple of weeks ago (totally weird in itself, since I never buy RTW from the mall anymore. Handmade or thrifted, thanks!) and I just fell in love with these high-rise flared trousers. Until I tried them on, that is, and realized they were a whopping 8″ too long on me – at 5’2″ (and a half!), I am shorter than average, but I ain’t that short, y’all! And they couldn’t be hemmed, because then I would have lost all that delicious flare. Anyway, they didn’t fit me too hot (too stretchy, plumber’s crack waistband, smile wrinkles all over the crotch, etc) and they were $69, so I tucked the inspiration away in my head and moved on with my life.

Imagine my delight when I discovered Sallieoh’s fabulous red pair – I mean, look at those pants! LOOK AT THEM. Perfect little trouser pants! I DIE. I immediately put the rest of my sewing on hold because, pants. And Sallieoh was so kind enough to provide a series of very detailed tutorials, which saved me all the trouble of figuring that shit out for myself. Thank you, lady! The only part I strayed from the tutorials was to add a flare to my legs – I used instructions from Patternmaking for Apparel Design (a book I’ve had in my possession for a few years now and never actually used… don’t beat me!) and added a ~9″ flare starting at the knee.

I think my pattern could still use a little bit of tweaking to get it perfect – the back dips a little too much, and I need to get that button tab on the waistband under control. But for a wearable muslin, these ain’t half bad! I am going to make them again in my nice lightweight, stretchy denim. These current pants look fine but the polyester isn’t exactly the most comfortable thing to be wearing against one’s skin 🙂

My apologies in advance for the pictures – navy doesn’t photograph too well! Ughhhhh

Navy Trousers

Navy Trousers
Haha goddd my hair looks ridiculous

Navy Trousers

Ok, these pictures are bad… have some super-lightened close-ups.

Navy Trousers

Navy Trousers
I’m sorry for making y’all look at my ass, but don’t these pants fit so nice? 🙂

Navy Trousers

Navy Trousers - flare leg
Flare leg

Navy Trousers
I know, I know – the button tab looks bad. Whatever, wearable muslin!

Navy Trousers
I’ve sewn up a fly or two in my time, but never a fly shield! How exciting!

I feel pretty good about these – they are exactly what I wanted! And pants are so easy to sew up once you get that fit part down.

Navy Trousers

DO NOT FEAR THE PANTS.

Completed: The Renfrew Top (and why I love knits!)

7 Feb

Omg you guysssss have you been lurking the Renfrew top as hard as I have? I was seriously excited when Tasia released this pattern – I love working with knits and I want everyone else to love them, too! Honestly, I already have a tshirt pattern block and I’ve got a pretty good handle on knits – not to toot my own horn or anything, but I’ve been pumping out knit tshirts/dresses for a few years now (mostly LLADYBIRD stuff. But I bought this pattern anyway – for SCIENCE. Despite making hundreds of tshirts, I’ve never actually sewn with a pattern for knits. So I was curious to see what it was like, and I wanted to report back to y’all. Also, SCIENCE.

Chevron Renfrew

I do love how versatile this pattern is – and not even with just what is offered on the envelope! You can seriously butcher this pattern up to make all kinds of other designs! I do like it better than my personal block, although it took some tweaking to get the fit correct. My biggest issue with Sewaholic patterns is the bust size – the measurements are so much smaller than mine, and since I already have to do a FBA with normal patterns, it’s not usually worth it to go the extra step with something that will take even more flat pattern adjusting. Knits, however, are very very forgiving. You don’t have to do a FBA so much as you just cut a bigger size 🙂

I was a little confused with the finished measurements – they include a few inches of ease, which is guess is necessary for a stable knit. Me, I use super stretchy knits – I have a whole cabinet full of them! I cut my pattern to accommodate for this – a 4 at the bust, reducing to a 0 at the waist/hip. I left the sleeves at a 4 (I have big upper arms for my size, I guess) and the shoulders/neckline are a 0. I also reduced the shoulder width just a hair past 0 as my first prototype was in danger of falling off my shoulder.

Speaking of my first shirt, I’m not going to show it to you. There’s nothing wrong with it – the fit is great – but it’s a boring red long sleeve shirt with a scoop neck. BORING. Who wants to look at that?

The whole pattern is great. I love the fit and the instructions are very clear and concise. I love the bands – this is not a new concept to me, personally, as I’ve been using this method for a few years, but it was reassuring to know my method was the right method 🙂

I do have one small change I made to the pattern that I think makes a huge difference with the finished neckline, though – if you are sewing this up with a stretchy/slinky knit (i.e, not something stable), cut the neckline band an inch or so shorter than the pattern piece indicates, and then stretch it to fit as you sew it on. The ending result is that the band shrinks down to fit the neckline and you get a perfect curve without needing to top stitch it down. As far as how much to cut off – well, I wish there was a formula to tell you, but it’s really dependent on how stretchy your knit is. Usually an inch is enough, but you might need to experiment! It is definitely worth it for the end result, though.

Chevron Renfrew

The fabric requirements on this pattern, btw, can easily be fudged. If you play around with the cutting layout, you can definitely save on fabric. Fabric can also be pieced at certain points if you don’t have enough length – this particular shirt is pieced right down the front. Partially to form the chevrons, but mostly because I barely had any of this stripey fabric.

Chevron Renfrew - back
And look – the back is solid black 🙂

Chevron Renfrew - side
I love the way it looks from the side (and no, I have no idea what is going on there with my hand)

Chevron Renfrew

Chevron Renfrew - top stitching
I tried to get a picture of my top stitching but you can’t really see it, even with my super obvious ‘shopping 😦 Instead of using the zig zag (which I think looks kind of amateur on knits), I used a double needle and stitched with the seam in the middle of the needles. This is something I see on lots of RTW and I think it looks pretty professional! The bobbin stitch in a double needle is kind of a zig zag, so you still get a little stretch even though the top stitching is straight 🙂 I also did this with my shoulder seams when I stitched down the twill tape.

So… as a lover of knits, my final verdict on this pattern is a definite WIN. I can’t wait to play around with this pattern some more; I’ve already pulled out a giant stack of knits from my cabinet to see what else I can cook up 😀

Chevron Renfrew

Completed: Dotted Swiss Colette Violet Blouse

31 Jan

Swiss dot or dotted swiss? I’ve heard it both ways. Which one do YOU use?

I’m going to apologize in advance for 2 things – 1. These pictures are terrible (when am I going to figure out that white photographs like doo-doo?) and, 2. This isn’t even how the shirt looks now, and no I won’t be taking more pictures (see fig. 1).

Ok, now that that’s off my chest…

Violet - front

Here be the Colette Violet blouse in pretty dotted swiss! Let’s talk about the good stuff first.

I barely – barely squeezed this out of 7/8 yard. The under collar is actually cut on the bias and pieced in the middle. The bias part actually makes it roll quite nicely at the seam, so bonus mistake turned into a ~design element, yeah? My dotted swiss was extremely sheer, so I hand-underlined the whole thing with equally sheer cotton batiste – you can still kind of see the seams through the fabric, no biggie. I was originally going to leave the sleeves underlined, by a practically unanimous vote, but when it came down to it… leaving the sleeves sheer just looked like I had run out of underlining fabric. They didn’t go with the rest of the blouse at all, sadly. Instead of interfacing, I used a slightly heavier bleached muslin to stabilize the collar & facings. I wanted the entire shirt to be cotton/white/breezy – perfect for a summer bike ride 🙂

The fit was… interesting. I wanted this version to be more fitted, like Joanne’s fitted Violets, so I put some giant (like 1″) vertical darts down the front. If you’re curious how I did it – ehh, I sewed the entire shirt up, minus the hem, put it on inside-out and properly buttoned, and then just pinched away until it fit the way I like. Then I basted my darts, checked the fit right-side out, and sewed them down forreal. Easy! I think fitted looks much better on me and now I don’t have to tuck it in if I don’t feel like it 🙂

Violet - front

I sewed this up in a size 4, but cut the back down to a 0 at the side seams to make it a little less blousey. In the future, I will probably cut this to a 2 and add a FBA because my darts were all kinds of in the wrong place! You can’t really tell in the pictures – partially because I’m standing still so it stays in place, and partially because the pictures are total shit, but trust me. I wore this thing all day yesterday and every now and then I’d look down and notice the side darts were hanging out on the tops of my lady lumps. It would appear the shoulders were too big, which would cause the shirt to ride up every time I moved. I had originally moved the darts up when making my first Violet blouse, and they look fine where they are, so I’m not sure why these were such a pain. Maybe because this version is more fitted? Ehh.

Violet - back

Of course, the entire shirt is serged within an inch of it’s life, so any normal person would probably either deal or wad, but I REALLY NEED A DOTTED SWISS PETER PAN COLLAR BLOUSE TO WEAR WHILE RIDING MY BICYCLE THIS SUMMER. So I ripped up all the seams last night & spent an hour pinning, fiddling, basting, tucking, and pressing until I moved the darts into a more respectable position and shortened as much of the shoulder seams as I dared.

Violet - side

Violet flat
Flat – the buttons are from the flea market! Love it when stuff like that just appears for me 😀

Violet flat
Inside – underlining, serged seams, oh and yes, my tag 🙂

Violet waist dart
Nevermind the dart creeping upward, here is a vertical dart for waist fitting.

Anyway, I am quite happy with my shirt now 🙂 It fits nicely & the darts are in the correct places. And isn’t it perfect for a summer bike ride? Hm I need to sew me up some plaid shorts asap 🙂

Violet - front

Completed: Giant Plaid Circle Skirt

30 Jan

plaid circle skirt

This is a pretty giant plaid, huh? I originally bought this fabric from Denver Fabrics, anticipating a cute little plaid dress (view A of Vogue 8667, to be precise), but once I actually got the fabric in my greedy little hands I realized I was not in the mood to match that enormous repeat. So the fabric went into my stash – for a year (or has it been two?) When I went through my big fabric reorganization effort, I pulled out the plaid yet again and wondered what the heck I could do with it.

Make a circle skirt, duh!

I’ll keep this recap simple: I used my self-drafted circle skirt pattern, courtesy of Casey’s sew-along. My plaid was big enough where I didn’t have to cut any seams – it’s just a circle with a little circle in the middle! I lined it in bright yellow Bemberg rayon – also no seams, yaaaay – and sewed 3″ horsehair braid at the bottom for a nice floof. The waistband is interfaced with horsehair interfacing (lots of horsies went into the making of this skirt, it would seem…), which I opted to top-stitch down to keep it from stretching out (something my previous circle skirt has been slowly doing, sadly, despite stay-stitching and everything). The back is closed with a button. Besides letting the thing hang for 48 hours, this was a really quick project!

plaid circle skirt
IT’S SO BRIGHT.

plaid circle skirt - lining!
Some yellow lining for your troubles

plaid circle skirt - open
In all it’s circular glory

twirl!
lol I tried to take a twirl shot… it sort of worked out…

plaid circle skirt

plaid circle skirt - waistband
I guess you want to see it without the belt, huh? I cut the waistband on the bias to avoid doing any plaid-matching.

plaid circle skirt - back
Here’s the back. That bright yellow line is actually the bright yellow zipper – if I’d known it was going to stand out so much, I would have made a better attempt to hide it in the plaid design. O well.

plaid circle skirt - lining!

plaid circle skirt - button

I finished this up on Friday night & wore it to the Flea Market on Saturday… these pictures were taken post-Flea (hence my frazzled hair). I went onward with two things in mind – buttons for the Violet blouse, and yellow lace for this skirt. And look – the gods of the Flea Market were smiling down on me!

plaid circle skirt - lace
No pictures of me wearing it all lacy-like, though. SORRY.

Speaking of the Flea Market, ahem…

flea market haul
Check out my haul trolololol

I’m not going to post every single thing I picked up, but here are my two favorite patterns-
Simplicity 3766
Slip!

Butterick 7557
Pants!

flea market haul - notions & trims
All kinds of notions & buttons! I am the most excited about the bound buttonhole maker – I’ve been looking for one of these babies for a few months now! I don’t even know how much I paid for it because it was in a giant bag of stuff for $4. Also excited about those little flower buttons on the bottom – there are several in that container, although they are dirty as hell so they will definitely be getting a good cleaning soon.

Well I think I just ran out of things to say so I’m just going to end this here.

plaid circle skirt

Bye!

completed: colette’s clover, v2.0

19 Dec

or i guess you could call these version 5.0, considering this is the fifth time i’ve made these trousers (the first three being oh-god-you-can’t-wear-that-in-public muslins).

ahem.

not much to say about these – i’m still picking away at my pants-fitting, still can’t decide if i’m making shit better or worse as i slash & tape. i received a lot of good feedback on my last clover post (i definitely recommend taking a peek if you are still questioning your pants-fitting), and made some more changes to the front of the pattern – added a tiny bit back to the front rise, and scooped out a little more of the front crotch. next time, i will need to add to the sides what i took off the front (i left it off because, well, i don’t know why.), as the whole top was super tight until i reduced the seam allowance to something laughably thin.

these pants have LOTS of wrinkles, but i’m fairly certain that a good chunk of them are due to my fabric choice – that shitty stretch poplin i bought from fabric mart, which btw is on my list of online fabric stores i will not buy from again. it’s a *very* flimsy fabric, so i underlined the pants with more stretch poplin… just serged all the pieces together. there is a little sheen to the fabric so i think that is also making the wrinkles look more pronounced. i have also convinced myself that those smooth pants on the colette website must be photoshopped, and whether or not this is actually true, i still feel quite a bit better about myself.

oh, and these pants would have been ready last week, except that after i finished *everything* and put them on to check the length for hemming… the red zipper broke and i had to cut myself out of my pants. EW. i did not have another red zipper (that one was actually pulled from a pair of wool pants i harvested for the material a couple of years ago), and i didn’t want to go back to the fabric store so i just used an orange zipper in my stash. it doesn’t match, but no care!

red clovers

red clovers
the leg wrinkles are from wearing them all day! they are VERY comfortable! haha!

red clovers
see the orange zipper? yep, me neither.

red clovers
view from the back

red clovers
with my leopard jacket! 😀

red clovers - inside
here’s an inside shot – i bound the facing with white bias tape. and there’s my orange zipper lol.

i actually bought another piece of fabric that i think will make up a great little pair of clovers – more on that tomorrow!

red clovers
RED PANTSSSSSSSSSSSSSS

completed: mccall’s 5936; the leopard jacket

12 Dec

this was one of those “i am going to make this but i don’t actually want to start it” projects – i dragged it out into FOREVER. i bought this fabric in… july? took my sweet time making a muslin, cutting the pieces out, making bound button holes. part of the reason why i dragged my feet so hardcore with this pattern is that i couldn’t decide how i was going to attempt construction. i wanted to fully tailor the whole thing – even bought matching silk thread & drafted a back stay – until i realized that linen doesn’t exactly lend itself well to tailoring. and my muslin was giving me the side eye so i wasn’t feel too confident about the overall fit.

those high-waisted jeans i made last week are basically what pushed me into completing this. and you know what? i ended up not doing a damn bit of tailoring on this jacket (minus the bound button holes). i basically had the whole thing pieced together & ready for slip-stitching in an afternoon. fastest jacket ever. and it feels good. it feels real good.

leopard & teal jacket
this is what i used – mccall’s 5936, which is sadly out of print (sorry!). my leopard fabric is a nice sturdy linen. and check out that lining! the woman at the fabric store talked me into it – i started to pick up the red, and she told me i wasn’t boring enough for that. that woman is totally onto me. anyway, i am in LOVE LOVE LOVE with this teal bemberg lining & when said fabric store has it’s biannual 50% everything sale next month (u jealous?), i may end up just buying the entire bolt & wrapping myself in it for the rest of my life. it is that fabulous.

in retrospect, this jacket could have benefited from some light tailoring – the lapels don’t quite lay right, i may need to steam them more. my button holes are not in the right place, sadly, and i can’t do anything about it sooo i decided that i don’t care. also, i need to redo the lining slip-stitching at the waistline, because i definitely pulled it too tight so there are some odd wrinkles on the outside fabric. but i finished it! and it is a jacket and it is leopard and it has a peplum and i am about to eat the lining, seriously.

leopard jacket

leopard jacket
recognize my jeans? 🙂
as a sidenote – they have stretched quite nicely (thanks to that pure denim – i forgot what jeans were like before the introduction of stretch!) and fit beautifully. i want to wear them forever!

and closer:
leopard jacket

leopard jacket

leopard jacket
this is an unflattering picture, but i love the way the peplum looks from the side

leopard jacket

leopard jacket - lining :)
lining! 😀

leopard jacket

leopard jacket

leopard jacket - flat

leopard jacket - inside

leopard jacket - L tag
other than the lining, my favorite part is the tag 🙂 i embroidered this last year for my lady grey but decided to use something else. it is satin stitch with a back stitch outline. lovely!

leopard jacket - buttons
buttons – vintage!

leopard jacket - bound button holes
bound button holes

and just for fun – here’s how i wore it today:
leopard jacket
excuse the extra christmas tree in the background lol

so fun! i think everyone needs a leopard print jacket 🙂

also, i think i’m gonna need some red clovers next 😉

completed: denim trousers

9 Dec

ahhh i’ve been looking for a pair of trousers like this – high-waisted, wide-legged denim trousers. you’d think this would be an easy thing to source at the thrift store – i recall many years of pushing past racks of high-waisted jeans – but i guess they’re back in style now, so they are getting snatched up at a rapid pace. meh.

anyway, i mentioned that i won a giveaway on molly‘s blog a couple of weeks ago… i got vogue 2925 and a really sweet vintage slip pattern. seriously, i made out like a bandit here. i mostly just wanted to make up that fabulous coat, but i didn’t realize until i received the pattern that there was also a pants pattern involved here. just the kind of pants i want, too!

i did have to make a few alterations to get the pattern to work for me – i folded out about 1″ of the crotch length (i am okay with my short crotch, and you should be too! huh, that came out all wrong) and eliminated the cuffs. the waist was a little too big, so i pulled that in on the sides (although, in retrospect, i may have pulled it in a little too much. they are kind of tight up there!). i ended up cutting quite a bit of the leg flare off the sides – something like 2″. they were dwarfing my poor little legs & making me look like a stump in 2 leg skirts.

i can’t really call these “jeans” because there’s not much about them that is like a traditional pair of jeans. there is minimal topstitching – and i went with denim colored thread because i wanted these to still be sleek – and no pockets. the seams are mock-flat felled. i did use a ~real~ jeans button & fly zipper (see my fly zipper tutorial if you’re like me & need hand-holding with this process!). the denim is… interesting. i picked it up at a yardsale over the summer… something insane like 4 yards for $2. and this is serious workman denim – it is very heavy and has no stretch. honestly, it’s probably as old as the pattern i used lol. this pants would probably benefit from a slight amount of stretch, especially considering how tight i made them. ah, live and learn!

denim trousers
obviously, i still need to work on my pattern fitting. there are smile lines & a little bit of bagginess at the bottom of the crotch.

denim trousers
the butt is a little tight, could have benefited from a small full butt adjustment.
(if you are wondering why my wall color keeps changing, blame the photo editing program i used :B)

denim trousers
they look good from the side, though!

denim trousers - flat

denim trousers - inside
the original pattern called for a folded over waistband… i felt like that was too much bulk with this denim, so i shaved an inch off the width & faced it with a bit of interfaced cotton. much more comfortable!

so, i feel pretty good about my trousers. there are definitely some fitting issues, but i approached these as a “wearable muslin” (hence the mock flat-felled seams), and i think i can get a better fit with the next pair. they are definitely wearable – and definitely perfect for those little boy’s sweaters i keep picking up that are too short to wear with regular-rise pants.

they would also probably look fabulous with a leopard print jacket. DAMMIT. i need to get cracking on that beast!

denim trousers