Archive | completed projects – new RSS feed for this section

Completed: A Luscious Silk Anna

28 Aug

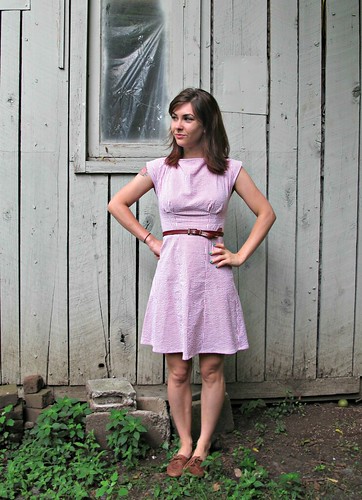
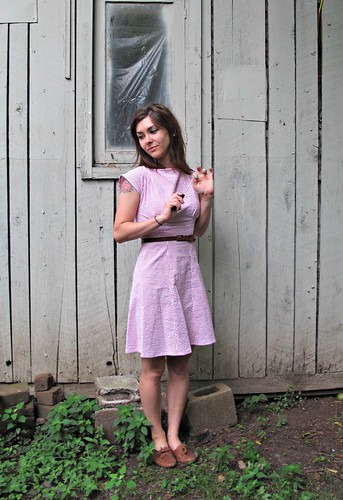
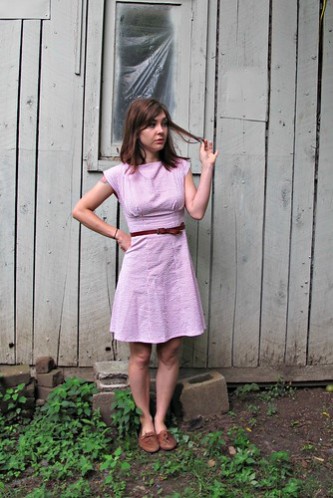
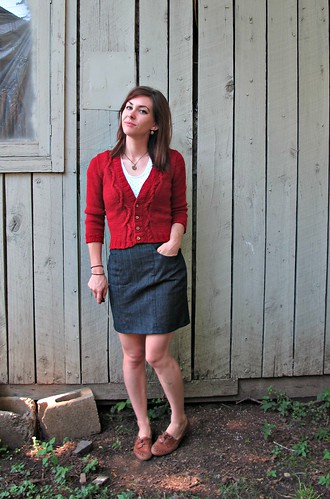
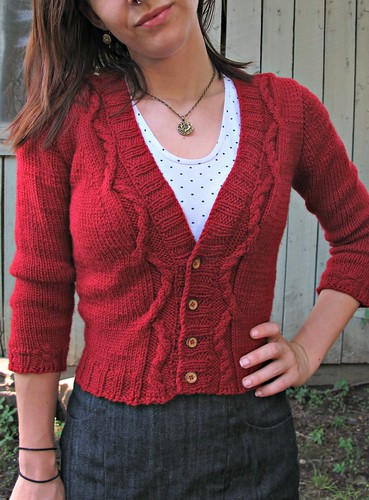
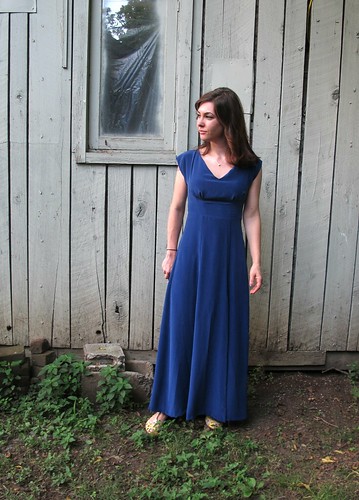
Hey guys. I would like to introduce you to Anna, my newest piece for the Mood Sewing Network.

Anna Maxi

So, Oona and Sonja originally planned this silk challenge, in which they both would make Anna dresses with a notoriously difficult fabric. Once I got wind of what was going on, I walked straight into that party and invited myself to be the third wheel. I can’t help it; I love being part of a Mood Fabrics sandwich. Especially when it involves Thakoon Crepe de Chine. I mean, COME ON.

Anna Maxi

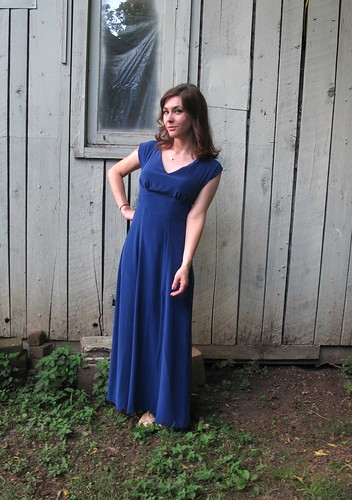
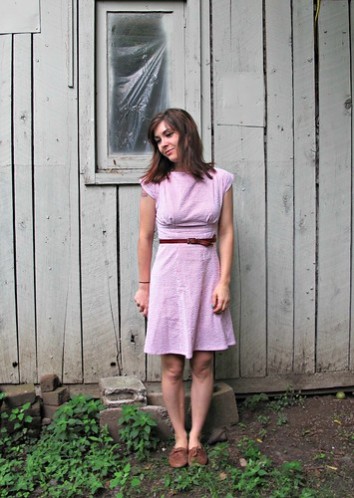
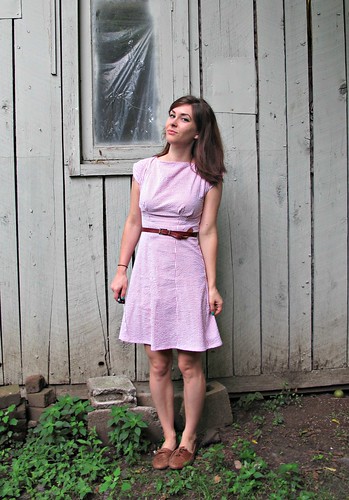
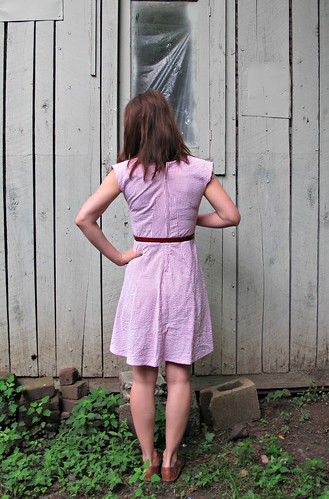
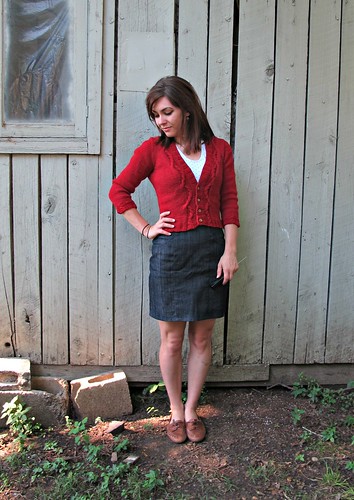
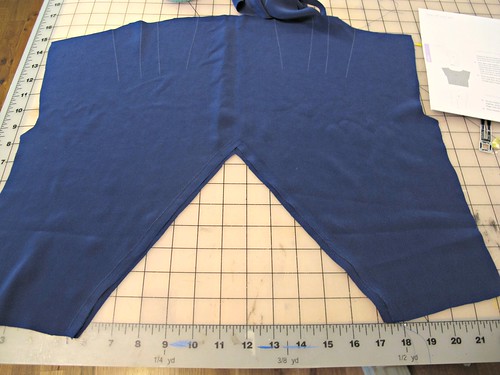
So, as we all know at this point – this is the Anna dress, the newest offering from By Hand London. For mine, I decided to try my hand at the maxi version with the slash neckline, after getting good results with my wearable muslin shorter version. Since the dress itself is very simple, it was the perfect excuse for getting my hands on the aforementioned silk Crepe de Chine.

Anna Maxi

Anna Maxi

I’ve never sewn with this type of fabric before, so I was admittedly a little nervous. Would I regret my decision?

Anna Maxi

Anna Maxi

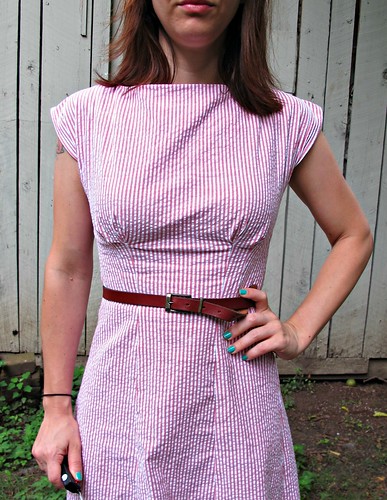
Really, though, it wasn’t so bad! The crepe texture of this fabric actually made everything a LOT easier – it gave the pieces something to “grab” onto (as opposed to being all slinky and slippery all over the place). For cutting, I did pin my selvedges together to keep everything intact, and I used a lot of pins on the actual pattern pieces as well. One protip – make sure you use silk pins; this stuff is very delicate and normal pins may leave holes! I also used a microtex/sharp needle on my machine. The fabric fed through very smoothly (again, thanks crepe, for your grabby lil hands!) and it pressed with very little fuss. I like this stuff!

Anna Maxi

Anna Maxi

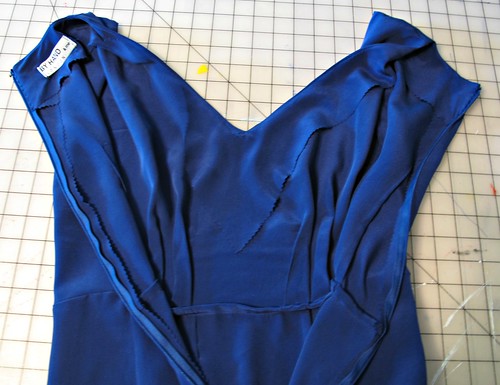
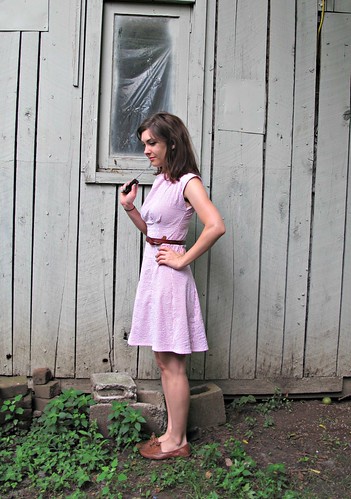
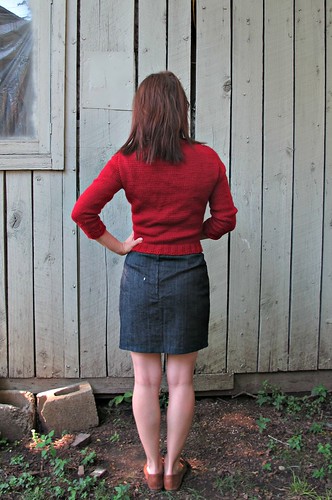
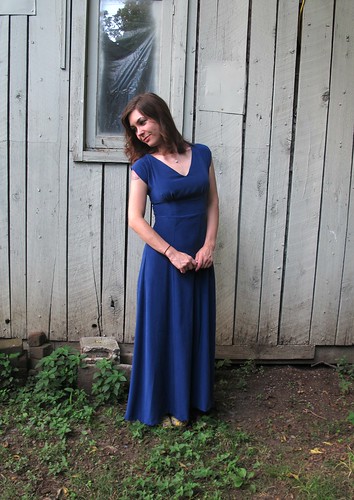
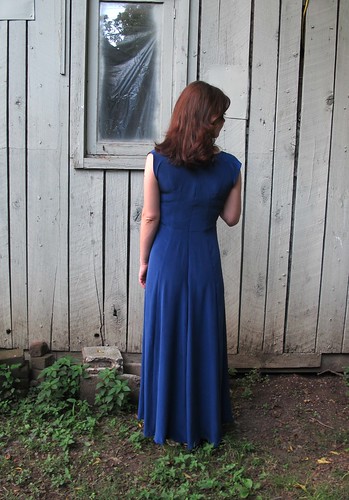
Construction was very straightforward. I finished every seam with a french seam, and tackled miles of blind stitching by hand along the thigh split, sleeves, and bottom hem (I just want y’all to know that I watched the Great British Sewing Bee while doing this, and as a result I am celebrity-in-love with Patrick. Don’t tell Landon.). The facing and zipper edges are finished with pinking – I actually deliberated on this a lot, pinking isn’t necessarily my favorite seam finish, but I felt it was important that the edges were not detectable from the outside of the dress as this silk is very thin. Fortunately, it doesn’t want to unravel much so I’m not concerned about that.

Anna Maxi

I also stabilized the slash neckline with scraps of selvedge from the silk – just pinned them within a bit of the seam allowance and staystitched them down with a tiny stitch. Keeps things nice and gape-free!

“Hold the phone, Lauren – did you say thigh high split???”

Anna Maxi

Uh huh, I sure did.

Anna Maxi

Truth, I normally don’t have much of a reason in my life to wear something like a floaty silk maxi dress with a thigh split. However, it was a fun project and I am totally fine with scheming up date ideas as an excuse to give this silk lady the exposure she deserves! Do you think eating pizza in this dress would be the worst idea ever? 😉

Anna Maxi

Anna Maxi

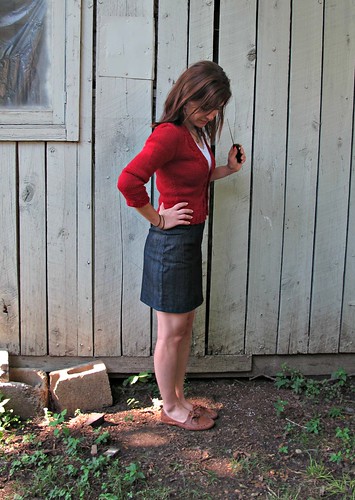
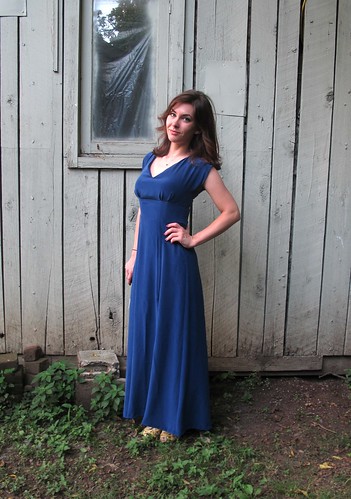
Now, I leave you with some walking photos. What would this post be worth without a couple action shots, amirite?

Anna Maxi
Anna Maxi

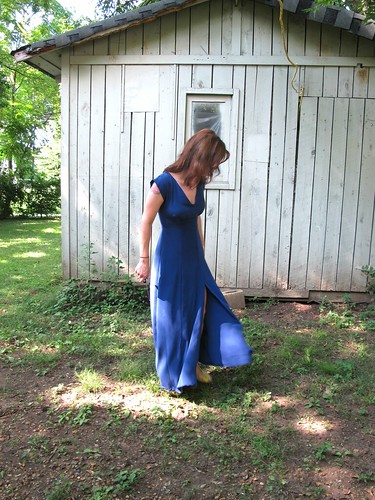
WOULD YOU JUST LOOK AT HOW THAT SILK FLOATS AND FLOWS.

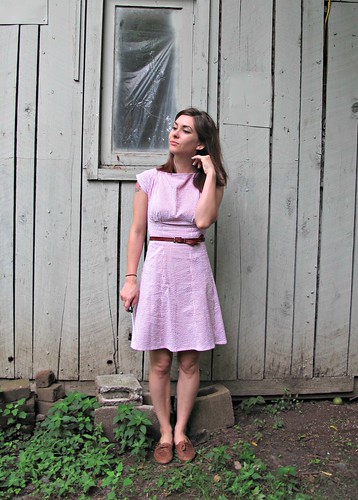
Finally, here I am giving my best Angelina Jolie impression:
Anna Maxi

What do you think? Silk Anna yeah, or Silk Anna fuck yeah?

Psst! Mood Fabrics is running a one day flash sale for 20% off fabrics sitewide! If there was ever a good time to dip your toes into the world of silk, that would be now.

Completed: Audrey in Unst

26 Aug

My knitting has been OFF THE CHAIN lately with regards to how productive I am. I don’t feel like I’m knitting any faster or even more frequently than usual, but I’m averaging a finished piece every month and a half or so. My ultimate goal is to replace all my cheap/pilled acrylic RTW sweaters with beautiful wool handknits, so I like to think I’m making good progress here 🙂

Audrey in Unst

And here’s my newest one! Isn’t it pretty?
(I know these pictures are awful and washed out; I tried using my camera on “auto” for this photo set. Um. NEVER AGAIN, holy shit).

Audrey in Unst

This pattern is Audrey in Unst. It’s been in my queue forever – I actually started swatching it with the purple yarn that eventually became Peggy Sue. The pattern calls for DK weight yarn, but I could NOT get gauge with such a heavy yarn (I’m a loose knitter), so I set the pattern aside and made, well, Peggy Sue.

Audrey in Unst

Two sweaters later, I was ready to try again. I’ve been very good about stash-busting for the last few projects, so I treated myself to a new fancy yarn from my local yarn store. This is Malabrigo sock yarn – a merino wool in a light fingering weight. Again, I know the pattern calls for DK weight but since my gauge was all crazy (and when I did get the stitches small enough, they were so tight that the fabric felt stiff), I took a leap of faith and sized down in both yarn and needles.

Audrey in Unst

Spoiler alert: it worked!

Audrey in Unst

I still consider myself a relatively new-ish knitter, so please don’t take my word for gospel, but I assume you can go up or down a yarn weight as long as your gauge swatch matches that in the pattern. I had the same number of stitches per inch, even though my yarn was lighter and I was using size 2 needles, and my cardigan fits perfectly. Which is even more impressive to me, since this sucker is knit bottom-up – which means I couldn’t try it on as I went. I’m so daring, y’all.

Audrey in Unst

This pattern was very straightforward and easy to follow, although I gotta say – I don’t like how she wrote some parts of it. When doing repeat rows, she doesn’t give you an exact number of rows to do, or a finished measurement, so at first I was kind of guessing and hoping I was following along correctly. Think like: “repeat decrease row every 4th row one time, then every 7th row five times.” Usually a pattern will follow up with: “… for a total of 39 rows.” I like to follow patterns that hold my hand through the process, so I didn’t like that. But, you know, minor complaint.

Audrey in Unst

I knit the size 32.5 for everything except the waist and the sleeves, which I did in the size 30.5. This was pretty easy – the pattern gives you stitch counts, so once I got to the waist shaping, I just continued decreasing until I got to the stitch count for 30.5. When it came time to increase, again, I followed the stitch count until I had the same stitches for the 32.5. I wanted my sweater to be very fitted and it is exactly that!

Audrey in Unst

I love how it looks open.

Audrey in Unst

Fingering weight might be my new favorite yarn weight. It feels so dainty to knit up on tiny needles, and it feels SO NICE to wear in this heat! Not bulky or hot at all! Well, ask me again come winter, but for now – fingering weight FTW!

Audrey in Unst
Audrey in Unst

It does feel drapey and stretchy, which makes me slightly anxious and gives me flashbacks of cotton yarn stretching out, but I took these pictures after wearing the sweater for an entire day and the shape is still nice. That’s wool yarn for ya!

Audrey in Unst

Isn’t the yarn such a pretty color? It’s slightly variegated – enough for visual interest, but not so much to take away from the design of the sweater.

Audrey in Unst

Audrey in Unst

Audrey in Unst

I love the lacework at the yoke! So much fun to knit!

Audrey in Unst

Audrey in Unst

The twisted rib too foreeeever, but it does look nice.

Audrey in Unst

I tried to get a good picture of the buttons, but it was difficult. They have an argyle design etched into them. I bought these specifically for the sweater at last month’s flea market – they were kind of expensive (they’re from the 20s-30s and the guy tells me they are vegetable protein), but they are perfect so I had to.

Audrey in Unst

I guess that it’s! Full Ravelry notes are here!

Completed: Ooh La Leggings

23 Aug

Leggings are one of those types of clothing that have always mystified me. What is their appeal? Why do people insist on treating them as pants? Don’t they have enough decency to cover their asses, for fuck’s sake?

Ooh La Leggings & Coppelia Cardy

And yet, here I am, posing in leggings-as-pants, with a nice dose of cameltoe to boot. The things I do for you guys.

Ooh La Leggings & Coppelia Cardy

Haha in all seriousness, though, I don’t actually plan on wearing them out in public without my ass being covered – the fabric is too thin, it’s practically transparent as far as I’m concerned. I wasn’t sure how to treat these pictures – since, if I did cover the top of them, it would kind of cover everything and defeat the purpose of even taking the pictures, yeah? – so in the end, I took one for the team and here I am baring my ass on the internet. Don’t judge me.

Ooh La Leggings & Coppelia Cardy

Anyway, back to what I was saying. Leggings! I never got their appeal. Why not just wear… tights? I mean, if you’re gonna wear socks anyway (my feet are always cold, I like the multiple layers). But I gotta say, these Ooh La Leggings from Papercut Patterns were REALLY intriguing to me. They look so cozy and comfortable – and the model just looks super glamorous. Or maybe it’s because she’s gorgeous, I don’t know, either way, it got my attention.

Ooh La Leggings & Coppelia Cardy

The pattern is one of those deceptively simple patterns that offers a bit of a kick with the finished piece with all the interesting seaming – front and back yokes and seams down the front and backs of the legs. It’s very easy to put together – I can get these done in a couple of hours, from cutting to hemming – and it doesn’t require a lot of knit finesse or even fitting to get everything looking good. Only 5 pieces, a self-encased elastic waistband, and a quick pintuck of the front leg seams (or leave it off, see if I care) and you’ve got a pair of leggings that has a little somethin’ somethin’.

This is actually my second pair of Ooh La Leggings… I made another pair a couple of months ago, in red rayon knit. I never bothered to take photos (again, I wasn’t sure how to go about modeling them), but I can assure you that they get worn frequently. They are SUPER comfortable and they’re red!

Ooh La Leggings & Coppelia Cardy

I cut the smallest size – the XXS – and took about 4″ off the hem. I should point out that the waistband hits very high on these – above the belly button.

Ooh La Leggings & Coppelia Cardy

The grey fabric is a lovely merino wool, straight from New Zealand. Katie sent me a big, gorgeous stack of this shit earlier this summer, and I’ve been hesitant to cut into any of it because I didn’t know what to make with something so special! Leggings, I think, are a good choice – I can layer them in the winter when I’m biking, or wear them as loungewear.

Ooh La Leggings & Coppelia Cardy

If you’ve never used merino wool, let me be the first to tell you that this stuff is AWESOME. It’s soo soft and warm, and you can wash and dry it like normal in the machine! It doesn’t slip around while you’re cutting it, nor do the edges roll up when you’re sewing it. There is a good elasticity and stretch recovery as well. The fabric of the gods, basically!

Ooh La Leggings & Coppelia Cardy

The only drawback (which I don’t consider a drawback, since I don’t wear these as pants!) is that this stuff is a little thin. Thin enough where you can see everything under my leggings – including my panty lines (hey, at least you know I’m wearing undies amirite) and all the muscles in my legs. I was a little hesitant to post these pictures because I don’t think they’re terribly flattering – are my thighs really that big?! – but, you know, whatever. Them’s my legs and that’s just what they look like.

Ooh La Leggings & Coppelia Cardy

I also made my top, do you like it? The pattern is the Coppelia, and if you’re keeping track here you’ll know that it’s my third one (others are here and here). For this one, I sized down to the XXS and lengthened the bottom by 2″. I also shortened the neckband because it was gaping a bit, but I think that’s my fabric choice. Speaking of which, this is some type of rayon knit from Mood Fabrics, and it’s really weird. It feels like a cheap polyester, but it’s definitely rayon (I burned it and everything). Also, it’s kind of see through, despite being a bit thick. So weird!

Anyway, whatever, white wrap top/good layering basic.

I just realized you can totally see a mosquito on my chest in this picture. HAHA. Omg I hate mosquitoes.

Ooh La Leggings & Coppelia Cardy

Consider me a leggings convert! I still don’t know if I would willingly leave the house without something covering my ass (I say this as I have posted pictures of myself ON THE INTERNET with my ass out, and everyone knows the internet never forgets), but maybe with a thicker fabric, I could see it happening. I think these would be really wonderful in a ponte knit. You know I’m gonna try it!

Ooh La Leggings & Coppelia Cardy

Did I show you how good my ass looks in these? Because… look at how good my ass looks in these things.

Completed: The Anna Dress, 1

19 Aug

Thank you so much, everyone, for your overwhelming support this past week. My recovery is going well (although I’m still not clear to lift anything that weighs more than 10lbs – that includes my CAT! HAHA! Oh well, I’m sure she’s happy about that, anyway), and I’m back to work and back to… sewing!! Yeah!!! Well, sort of. I promised myself I would take it easy (aka: laying, knitting, snoozing) until Friday, per Doctor’s orders, and only then could I get back in the sewing room. Lucky me, I woke up on Friday morning with a fucking cold! So, needless to say, the past few days have been a haze of cold meds and even more snoozin’. I’m functioning, albeit slower than normal.

But hey, look, I have a make to share with y’all today!

Anna Dress - Seersucker

Ok ok, before you flip your shit on me – I finished this dress before the surgery! Haha! I actually wore it to work the Friday prior; it’s just taken me this long to take photos. Speaking of which – if I look a bit extra happy in these photos… cold meds. That is all.

Anna Dress - Seersucker

This is the Anna Dress, from my friends, the babely babes, over at By Hand London. I’m no stranger to the patterns from this line – I can proudly say that I have sewn every single one of ’em, yeah! – but I gotta say… Anna is my favorite. Based on everyone else’s gushing about this particular pattern (here is where I was planning on linking my favorite Annas, but again, cold meds. If you made it, linky up in the comments pls!), I’m not alone. Anna is a WINNER!

Anna Dress - Seersucker

Am I allowed to tell y’all that I actually saw this dress waaaaay before I was announced to the hoardes of blog readers? Truth! Elisalex showed me a sneaky peeky while she was in Nashville back in May! I have been dying to get my hands on the pattern ever since! I love my short version, but I am SO EXCITED to try out that thigh-high split, peeps.

Anna Dress - Seersucker

I opted for a very simple version for my wearable muslin, in a classic seersucker from Mood. This is one of my last pieces of fabric from the NY stash, btw. I’ve held out on making this up because it’s a stretch cotton, and we don’t play well together. But I think stretch cotton works fine with this type of dress, as long as you’re ok with how the bodice looks in a slightly structured fabric. I like it!

Anna Dress - Seersucker

My Anna is the short version, with the slash neckline. I cut the size 2/6 and shortened the skirt about 5″. I found that the back was rather large on me – I just pinched out the excess along the zipper line. Oh, I also put in a lapped zipper because I didn’t have any invisibles on hand. Sue me!

Anna Dress - Seersucker

Since my fabric is stretchy, I stabilized the neckline facing with a bit of non-stretch cotton. To do this, I just cut a second facing piece from the cotton, sewed it to the seersucker facing (as you would a sew-in interfacing) and applied the facing as normal. This keeps the neckline nice and smooth and secure!

Anna Dress - Seersucker

The pattern itself was an absolute delight to put together. There’s a reason why this pattern has so many fangirls – especially considering how short a time it’s actually been available on the sewing market. There aren’t a lot of pieces, and what is there is super simple to put together. I think this would make a great beginner pattern, whether you’re a beginner at sewing or a beginner with a a certain type of fabric (meaning: yes, you should make this up in silk!)

Anna Dress - Seersucker

I should probably tell you that I already have a couple more versions planned. Better get used to this dress! Ha!

Anna Dress - Seersucker

Oh, one more thing before I tear outta here… our giveaway winner!

wins2

There were 230 entries in all (accounting for duplicates), and you ALL made me hungry (special shoutout goes to Marchelle who linked me to this lemon cookie recipe from Martha Stewart… I will have y’all know, I made this yesterday and they are delicious aaand I’ve already eaten about half of them, ha!). Random Number Generator sayssss-

wins1

Louise is the winner of the Sweet Dress Book! Yay!!

Um, will someone kindly tell me what spotted dick is, though? Here in America, that means something TOTALLY different and I’m afraid to google it…

Completed: Lakeside Pajamas

9 Aug

Hey look! I made pajamas!

Lakeside Pajamas

I feel kind of weird posting pictures of myself modeling pajamas, but eh, let’s roll with it. At least I kept my shoes on 😛

Lakeside Pajamas

These are the Lakeside Pajamas, the newest offering from Grainline Studio. The pattern was given as a gift to me from Carla, yes, the same person who have given me multiple patterns. Thank youuu, Carla, you are the best! I never would have thought to make myself sleepwear (other than a slinky slip), but now I want a million sets of these.

Lakeside Pajamas

This is a great little set, and it’s SUPER comfortable. The shorts are loose with an elastic waist, and the top is floaty and cool, with some interesting detailing so you don’t feel like sewing it is a total snoozefest (pun intended, maybe?).

Lakeside Pajamas

Isn’t this fabric beautiful!? I’ve been hoarding it for years, waiting on a ~special~ pattern. Part of what kept me from using it is that I barely had much it – about 7/8 yard – and the print is pretty large. Obviously, I was able to squeeze all my pieces out on that tiny yardage, but I had to make my bias tape with a contrasting fabric. I used the rest of my navy organic cotton sateen and ughhhh shit took forever. The pattern calls for 7 yards of bias tape (!!) and I only had small pieces, so I found myself cutting tiny squares to make continuous bias tape. I ended up using only about 6 yards, but be warned that I also made the smallest size in the shorts and the second smallest size in the top.

Lakeside Pajamas

Anyway, it was worth the effort because I haaate pre-made bias tape. It’s so stiff! This stuff is nice and soft and the color matches beautifully. Plus, it has that cotton sateen luster. Yummy.

Lakeside Pajamas

The pattern was surprisingly easy to follow. I had a small snafu with the shorts, but it was 100% user error (note: the front and back seams are not the side seams, Lauren! I basically made a huge circle of fabric and spent like 10 minutes trying to figure out the crotch seam until I realized I’d done goofed loololol. What was not lol-worthy was all the unpicking I had to do after that, wah!).

Lakeside Pajamas

I LOVEEEEE these shorts, though. They’re pretty low-rise (you can almost see my belly button; it’s right where the tank top hem is hitting). I am totally going to make a couple more pair for running and general house-lounging – they’re like the perfect 70s running shorts, except they’re not knit (although I think these would work beautifully with a stable knit, and that is something I am totally going to try). I really want to make a classic red with white trim.

Lakeside Pajamas

Lakeside Pajamas

I was a little hesitant at first to use my beautiful hoardy fabric on a pair of PAJAMAS, but I’m soo glad I did. I can actually wear these every day (or just one piece at a time), unlike my regular clothes – which means I get to look at the fabric all the time! Seriously, they are so pretty I want to hang them on the wall when I’m not wearing them 😉

Lakeside Pajamas

Lakeside Pajamas

Lakeside Pajamas

A big part of the reason why I decided to make pretty loungewear is because I am scheduled for a minor surgery on Monday. It’s not anything serious – hence the “minor” – but I am going to be in recovery for about a week. Including no work, no biking, no… sewing 😦 (we’ll see how long that lasts lolololol) (seriously, tho, I’m gonna plant my ass on the couch that whole time because I do NOT want to do this twice!). I bought myself the prettiest kelly green yarn and plan on knitting and watching lots of those ancient Egyptian documentaries that Landon hates! Oh god, this means I finally have a chance to watch the Great British Sewing Bee too!

With that being said, thanks to everyone who purchased something from my Etsy shop – combined with some aggressive saving, I think I have enough to pay everything off up front 🙂 SUCH a good feeling!

For those of you who were interested in taking local sewing classes taught by yours truly, obviously that’s on hold for a short time. I will be sending emails when I get my life figured out, ha. For those of you who are interested in taking a sewing class taught by me who are NOT local, I’m working on that too 😉

Lakeside Pajamas

Wish me luck! I’ll be around next week, but apologies in advance if I start talking painkiller-induced nonsense 😉

Completed: the Organic Hawthorn

7 Aug

First of all, thanks to everyone who voted for me in the Colette Hawthorn Contest – I somehow ended winning second place! Such a wonderful surprise, and do check out those other winners – because, guys, I’m not worthy.

With that being said, I love this pattern and I’ve already made a second dress.

Navy Hawthorn

I realized that my wardrobe was severely lacking some basic, work-appropriate, tattoo-covering clothing (we are fairly casual here at my office, but I think it’s good to have a few pieces that err more on the professional side should I need it for meetings or important clients dropping in), and a Hawthorn with sleeves pretty much fits the bill here.

Navy Hawthorn

It’s modest and sleek without being frumpy, vintage-inspired without being costumey. Win!

Navy Hawthorn

I am super happy with how it turned out, however, I am NOT happy with those bust dart points. I promise you they look 1000% worse in the pictures than they do in real life – according to these photos, I have two sets of eyes D: I resewed the dart tips more times than I care to admit – lowering them, raising them, tapering them more subtly – as well as pressing the everloving fuck out of them. No dice. Like I said, they’re not as bad in real life as they look here, but now I can’t stop staring at them oh god I’m sorry.

Navy Hawthorn

Anyway, dart issues aside – we’ve already discussed the pattern, so today we are going to talk about the fabric!

Navy Hawthorn

This is organic cotton sateen, from my pals at Organic Cotton Plus (my second review for this – they liked my my first review so much, they came back for a second round :P). I’ve not had much experience with cotton sateen – most of what I’ve seen has been the sort of fabric I shy away from. Think super shiny (if you like shiny, that’s totally fine, but personally I always feel like I’m wearing a prom dress!), too much stretch, and much too stiff for my liking. This stuff is NOTHING like what I described, though. Don’t let the boobie-eyes deter you; there ain’t much shine on this fabric, other than a spectacular luster that comes from high-quality cotton and a gorgeously deep pigment.

Navy Hawthorn

The fabric has a great drape – it just floats and creates the most lovely folds. It’s pretty lightweight, with no stretch, which makes it ideal for this pattern. And since it’s cotton, it’s super comfortable to wear. It also wrinkles like crazy, because of the aforementioned cotton, but I’m ok with a few wrinkles – I’d rather have wrinkles than pools of sweat from polyester!

Navy Hawthorn]

This is a great basic if you want to make something in a solid color but feel bored with the idea of, well, solid colors.

Navy Hawthorn

Both the buttons and the monogram are from the flea market. I think they both add something special to the dress, while still keeping it office-appropriate.

Navy Hawthorn

I love the monogram! It’s actually metal, and has sharp bars at the back that pierce the fabric and bend to keep it in place. Which means it’s never coming off this dress… except to wash, I guess. I’m not sure how old it is, but it’s pretty sweet! I’ve been hoarding it for a few months now, waiting on the perfect shirtwaist backdrop.

Navy Hawthorn

Soo, as you can see here, I tried splitting the dart on this version, following the tutorial at the Coletterie. I’m not totally happy with how the darts turned out – they are too close together at the top (and I suspect that, while they likely aren’t 100% of my nipple-eye problems, they likely contribute to it, ugh). I didn’t realize how they looked until after I’d put the bodice front together- and cut up all my fabric. Shoulda made a muslin, shoulda woulda coulda.

Navy Hawthorn

Oh well!

Navy Hawthorn

Quick, look at this! Shiny!!

Navy Hawthorn

I trimmed the hem with matching rayon seam binding, and catch-stitched it down for a clean finish (and yeah, that took forrrever haha). I’m mostly including this picture because it really shows the color best. It’s so rich!

Navy Hawthorn
Navy Hawthorn

The dart points aren’t as prominent here – this is much more accurate of how they look in real life. Still… how do I fixxxx thiisssss????

Navy Hawthorn

Navy Hawthorn

I think this dress will end up getting a lot of wear this fall! I can’t wait to pair it with future Kelly Green cardigan – navy and green is one of my favorite color combinations at the moment. I better get knittin’!

Completed: The Marion Cardigan

5 Aug

I should probably first confess that this cardigan has been a finished object for over a month now. Oops! In fact, I’m nearly done with my next knitted project. It’s just hard to bring myself to take photos of a wool, worsted weight cardigan when it’s 95* outside, ya know?

Marion Cardigan

But anyway, here she is – my newest cardi and and Andi Satterlund‘s newest pattern offering, the Marion!

Marion Cardigan

This was SO MUCH FUN to knit, guys!

Marion Cardigan

Marion is a lovely little cropped, 3/4 sleeve cardigan, knitted seamlessly from the top-down in almost entirely stockinette. There is some fun cabling around the v neck to add a bit of interest (both in looks and during the actual knitting, ha!), but it is an easy, fast knit. Well, for me, anyway. I finished it in just under a month!

Marion Cardigan

I think everyone knows about my love affair for Andi’s patterns, but let me just repeat – I LOVE her patterns! I love the construction, I love the fit, and I love the finished pieces! Every time she releases a new pattern, it immediately goes into my queue.

Marion Cardigan

Marion Cardigan

This is a straight size small, with no alterations. I did size down my needle to a 6 (I find that I knit pretty loosely!), but everything else in the pattern was knitted as written. Going forward, though (because I WILL knit this again… maybe in a lovely grey alpaca? Ooh!), I will probably adjust the length of the sleeves. They hit me in a weird spot when they’re not scrunched, I guess I have short arms? Whatever, not a big deal.

Marion Cardigan

The yarn is from Sonja, a little destashing prezzie she gave me while I was in NY. I actually have a LOT of this stuff left over… I think the sweater took maybe 6 skeins, and she gave me 10. I may have to dream up a matching hat and scarf, yeah?

Marion Cardigan

The yarn is Knit Picks Wool of the Andes. I found it very similar to my beloved Cascade 220, but with a little less pilling. I just love this color – it’s the perfect not-quite-cranberry-not-quite-harlot red. It’s also VERY warm. This will be nice in the winter, I guess!

Marion Cardigan

Oh, who am I kidding – it’s fucking freezing in my office these days. I’ve been wearing this a LOT!

Marion Cardigan

The only thing that was a bummer about this pattern is that the cabling looks really weird until it’s actually blocked. That’s why I didn’t show any progress shots – the cables were all lumpy and weird and it just wasn’t pretty enough to photograph! I did give this a proper block – soaking and all – and the cables bloomed out and now it’s basically perfect.

Marion Cardigan

I’m so happy with how they turned out 🙂

Marion Cardigan

There are teeny cables on the sleeve ribbing, too!

Marion Cardigan

Here is how it looks unbuttoned. I don’t think I’ll ever wear it like this – I like to keep my stuff closed – but I thought I’d show y’all anyway. You probably noticed that I didn’t stabilize my button bands with petersham this time. I was planning on it – I even bought some cranberry red petersham ribbon – but the way the buttonband is constructed was going to look really weird with ribbon sewn on half of it. Anyway, I tried the sweater on and the button holes don’t gape at all, so I just sewed my buttons directly on there and called it a day.

Marion Cardigan

Also, here is a picture of Amelia judging me.

Marion Cardigan

And that makes 10 sweaters for me! Fuck yeah, I love knitting 🙂

Pattern Testing: The Saltspring Dress

2 Aug

I looove pattern testing, but what I don’t love is the part where I have to keep my mouth shut about my project until the pattern becomes officially available to the rest of the world.

Well, Tasia just released the Saltspring Dress, so I guess I can talk now! YAY!!!

Saltspring Dress

Here’s another pattern that is quite a bit outside my ~personal style comfort zone~ – that blousey look is not something I normally go for – but I actually like it a lot, surprisingly! It’s very comfortable and cool for summer, while still managing to look pulled-together (or, eh, as pulled-together as one can look in FLORAL ANIMAL PRINT lolz).

Saltspring Dress

This is view A, size 2. I didn’t make any significant changes to the pattern – since I was testing it, I wanted to try it straight out of the envelope. I’m happy to say everything came out great, with no alterations, although I should probably trim down those tie straps a little 🙂

Saltspring Dress

The construction of this dress is very interesting, and Sewaholic’s pattern design chops really shine here. There are actually two layers to this dress- an smooth, semi-fitted underlayer, and the top blousey layer. The underlayer is shorter than the top layer, so that it “blouses” itself without needing to be tucked in. It’s kind of genius! There is elastic at the waistband, so this is the perfect dress to wear while eating a big meal 😉

Saltspring Dress

I’m wearing a belt with this dress because I personally don’t like the look of exposed elastic casing, but it’s not needed to get the bloused look. The dress does that by itself!

Saltspring Dress

Isn’t this fabric so fun? I’ve actually had this in my stash for a few years… Morgan’s grandmother gave it to me after a giant destashing effort on her part. I’m not completely sure of the content – based on a burn test, I believe it is rayon, but it also has a weird crinkly texture and a slight stretch – but what I can say is that woman has some FINE taste in fabric, so I’m fairly certain this is some nice stuff. It sure feels nice, anyway!

In retrospect, I don’t know if this fabric was truly my best choice, because it doesn’t drape as well as it needs to. The top of the dress doesn’t exactly look structured, but it’s not as flowy and drapey as it needs to be. But, you know, I think the print actually makes up for it a bit 🙂 Hard to be mad at the world when you’re wearing this kind of awesome island tiki type shit, yeah? 🙂

Saltspring Dress

The only “drawback” (if you can even call it that) to this pattern is that it does not look flattering AT ALL until you actually put in the zipper and the elastic. I don’t know how many of y’all try stuff on as you sew it (I do – constantly – which is why I mostly sew in my underwear 😉 haha), but I just thought I would point that out. Obviously it works out in the end, but I was a little terrified for a minute there 🙂

Saltspring Dress

Anyway, this is a great pattern – very easy to make up (perfect for beginners!), comfortable to wear in the summer, and I think you can really try a lot of different options with the design. Personally, I’d love to try this up without the overblouse, just a slim-fitting, spaghetti strap top with a flared skirt. Ah, that sounds so perfect right now!

Want a copy of your own? You can buy the Saltspring here!

Completed: A Stripey Belladone

29 Jul

Oh noes, you guys – I’m running out of fabric from the huge haul I bought at Mood in NYC. Can you believe it? I only have two pieces left! What happened! WHEN DO I GET TO RESTOCK?

Belladone Dress

I am happy to say that the striped cotton I bought finally found a home in a new dress. Yay!

Belladone Dress

I actually had different plans for this fabric, but then Eléonore sent me the Belladone dress pattern and my plans immediately changed. Stripes are PERFECT for this dress – you have so many fun stripey placement options! And y’all know how much I love playing with stripe direction 😉

Belladone Dress

I can’t even begin to tell you how happy I am with how this dress turned out. Sometimes when I’m going crazy with my stripe (or plaid, for that matter) directions, I start to wonder if I’m going to end up with a giant clusterfuck in the end. Fortunately, I think this one turned out pretty perfect – there’s plenty of interest, but it won’t make you dizzy if you stare at it too long!

Belladone Dress

My Belladone is a size 34, with no alterations except a few tucks at the back to get it to lie flat (I’ll talk more about that in a minute). I went with the invisible bias trim – which is topstitched in white – as I didn’t want a bunch of contrast competing with the stripes. The upper back pieces are cut on the cross grain because I liked that stripe placement better, and the waistband is cut in four pieces on the bias, and then pieced together. I also interfaced the waistband because I was afraid the bias would distort over time – it’s pretty fitted. Otherwise, the dress is basically sewn straight out of the envelope -length and all!

Belladone Dress

I love this dress! Look, it has pockets!

Belladone Dress

And a cool back cut-out!

Belladone Dress

Belladone Dress

The stripes made some cool chevrons down the sides, ha.

Belladone Dress

This is a fairly simple pattern to make, but be warned that the back may take a little finessing to get a perfect fit. You want it to lie perfectly flat – no gaping! I’ve noticed that most reviews tend to not need any adjusting, so I think I may be a bit of a rarity in needing it – I also have a pretty small back (I wear a 30 band, fyi), so most stuff is big on me anyway.

Belladone Dress - Adjustments

I made a muslin of the bodice – zipper and all – and pinned out the excess at the upper back when I tried it on. Obviously, this is kind of difficult to do without assistance – but it’s totally doable, I mean, I did it. I just kind of eyeballed it, took the top off, pinned at my guesstimate, and tried it on. Over and over (ok, it was like twice, haha). A dressform would be helpful for this, but mine has a bigger back than I do sooo I had to do it the hard way. Anyway, once I pinned out my excess (and then sewed up tiny darts and tried it on a final time), I measured the amount I needed to take out.
(Also, I just realized I was drinking out of an American Pride coffee mug while working on a French pattern. lolz.)

Belladone Dress - Adjustments

To make the adjustment to your pattern (since you don’t want darts in that piece, you want it nice and smooth), just slash right up the middle of the piece and leave a little hinge. Overlap the edges by however much you need to take out (I think mine was 1/4″, not much) and then tape it down. Make sure the line is smooth and straight, and you’re done!

I also ended up overlapping the upper back pieces an additional 1/2″, as well as taking about 1/4″ out of the center back seam (along the zipper).

Belladone Dress

The back looks pretty good, though, yeah?
Ignore the lump at the waist of the zipper, I had a lot of bulk there, so the zipper doesn’t want to lie flat! Wah!

Belladone Dress

Stripessss!! 😀

Belladone Dress - Necklace from Chatter Blossom :)

Oh, and check out my new necklace! This is from ChatterBlossom, my newest sponsor! Jamie has some of the prettiest reclaimed vintage pieces I’ve come across (and enviable hair to boot, I mean, ugh, that’s EXACTLY what I wanted mine to do when I cut it short!!), and I love that she gives each of them a story. I picked a couple of pieces from her shop – and that was hard, there are soo many things in there that I need – and I am so happy with what I got. This necklace is Egyptian, circa 1880-1918. I’ve really gotten sucked into Egyptian history lately (the pyramids! Nefertiti! The Spinx! Aliens!! lol just kidding on that last one :P), so I’m really excited about this little treasure. Fair warning: I’ve worn this every day since I received it, and I don’t plan on taking it off. You’ll be seeing this necklace a lot, jsyk.

Anyway, back to Belladone…

Belladone Dress
Belladone Dress

Even though my bias tape is invisible from the outside, I still wanted it to be pretty – so I used polka dot bias tape 🙂 I used the bias tape left over from my Blue Lace Robson (and I still have more of this stuff, it’s like the gift that keeps on giving haha). I also faced the waistband with a piece of navy cotton sateen (also from that same lace coat, gah), since I didn’t want the interfacing all up in my biz. Unfortunately, the sateen is a bit heavy, which is why the zipper is lumpy at the waistline. Oh well, live and learn!
Oh god, ignore that rogue navy thread on the upper back btw.

Belladone Dress

I’m pretty happy with how this dress turned out – it’s fabulous on it’s own, and I think the navy stripes will also look good with different colors, such as yellow and kelly green. The dress is perfect for bike riding, even if it does give me a funny tan line 😉 Ha! Worth it 🙂

Completed: The Hawthorn Dress

26 Jul

Ok, before I go any further, let me just address the elephant in that room that is my hair in these pictures.

Hawthorn Dress

This is what happens when you put your hair up in Heidi braids (or, as much of a Heidi braid as I can manage with my length – or lack thereof) and leave them for 24 hours straight (yep, I even slept in ’em). When I took them down the next morning, my hair was a glorious lion’s mane according to the mirror. Looking back at these pictures… err, maybe not so much. Lying-ass mirror.

Hawthorn Dress

Another thing I should point out is that I’ve basically given up on trying to hide the camera remote.

deal with it

With all that out of the way – let’s talk about my dress!

Hawthorn Dress

This is the Hawthorn from Colette Patterns. GUYS, I LOVE THIS PATTERN. I love it so much, I’ve already planned two more versions.

Hawthorn Dress

I always always love the patterns that come from Colette – even if the shape of the garment isn’t specifically something I would wear (the Laurel falls in this category, although seeing everyone’s versions pop up during that epic contest has really made me reconsider what I think I can’t wear!), the styling of the photoshoots is just lovely. Of course, this is something I would absolutely wear – I love me a good shirtwaist, and this one has some pretty and unique details that set it apart from other shirtwaist patterns.

Hawthorn Dress

For my dress, I cut a size 0 based on the finished measurements. I did not make a muslin – just a quick tissue-fit to make sure everything looked right. For future dresses, I may shave a bit off the side seams as the waist is about 1/2″ too big. It fits fine in these photos, but that’s because I moved the buttons to compensate for the width. A quickie fix for sure, but definitely not want to want to do with every Hawthorn I make!

Hawthorn Dress

I also took about 4″ off the hem. It originally hit me at knee-length, but I like my dresses shorter 😉

Hawthorn Dress

I also changed the button position at the waist, as I plan on wearing this dress with a belt so I don’t want a button right by the waistline seam. I raised the lowest bodice button just a smidge, omitted the top skirt button, and slightly raised the next-highest skirt button to compensate for the gap. Hope that makes sense! I also added a hook and eye closure at the waistline to keep things smooth.

Hawthorn Dress

The only thing I don’t absolutely loooove about this dress is the bust darts – or, rather, the bust dart puckers. Yeesh! I tried to smooth them out as best I could, but my fabric must have a bit of poly in it because I was getting a bit of shine whenever I pressed them, in a most inappropriate place. Restitching the dart tips helped a little, but you can see they still need a little bit of work.

Hawthorn Dress

I just LOVE this fabric and I think it’s perfect for a dress called Hawthorn 🙂 Funny, I picked this up at my local fabric store during their biannual sale – it was in the remnants sections and heavily marked down (I think I paid $8 for a little over 2 yards). I had no idea what I was going to do with it, but I bought it anyway – I mean, it has embroidered cherries on it! Later that week, Sarai contacted me and asked if I wanted to see pictures of the newest Colette pattern before it was released to the masses, and as soon as I downloaded those pictures, I knew I had found the perfect match.

Hawthorn Dress

My buttons are from the flea market and I have been hoarding them for ages. They are sparkly!

Hawthorn Dress

I love the tiny collar, but I will warn you that it was a bear to get to lay right – with the layers of the collar and the facing and the dress, that’s a lot of bulk! I understitched as much as I could, as well as tacked the facing down at the shoulder seams and back neck darts. This seemed to help, although my next go will involve some aggressive grading as well.

Hawthorn Dress

Anyway, I’m really happy with this dress and how it turned out! I can’t wait to try a sleeved version (won’t this look incredible in plaid?? Oh GOD, I love plaid), or maybe even redraft the collar for a more peter pan style. Lots of possibilities here!

As a side note – I’m QUITE a bit late to the party here, but I’ve recently joined Kollabora and I can’t get enough of it! It has totally filled the Craftster-shaped hole in my heart, and then some 🙂 Who else is on Kollabora? Let’s be friends!