Tag Archives: wool

Completed: Simplicity 2145

10 Feb

Happy Monday, everyone! I have some good news and I have some bad news. The bad news is – I didn’t make it through the first round of Project Sewn. Bummer! Although, I’ll be honest right now – as soon as I saw who I was competing up against, I immediately figured I’d be one of the first to go πŸ™‚ On the flip side, my girl Oona made it as the winner for the first round! YAY OONA GET IT GIRL. Can’t wait to get some celebratory drinks with you when I’m in NYC next month!

Speaking of my short stint with Project Sewn – I’ve received lots of sweet messages and comments since I was eliminated, and I am absolutely floored by all the support. Aw! You guys! I think some of you were more upset about the elimination than I was πŸ™‚ I’m actually a tiny bit relieved to have that heavy workload off my shoulders. I’m not gonna lie – it was tough trying to coordinate all that sewing (for PS, as well some other ~secret~ side projects, stuff for the Mood Sewing Network, not to mention this blog!), and it got a bit stressful. SO MANY UFOS ALL OVER MY SEWING ROOM. Which is certainly a first world problem, don’t get me wrong, but it is what it is. I really don’t know if sewing contests are for me at this point – I always feel too rushed when I’m making my shizz, and half the time I end up with something that isn’t up to my personal standards. I really loved participating in Project Sewn, and I don’t regret my decision to join one bit, but but I think from here on out, I’ll be staying out of contests like that πŸ™‚

So, anyway, the GOOD news – my pink dress is already finished and photographed, and since I’m not one to let a perfectly good project go to waste, I’ll be showing y’all a whole DAY earlier than originally planned. Woohoo!

Simplicity 2145

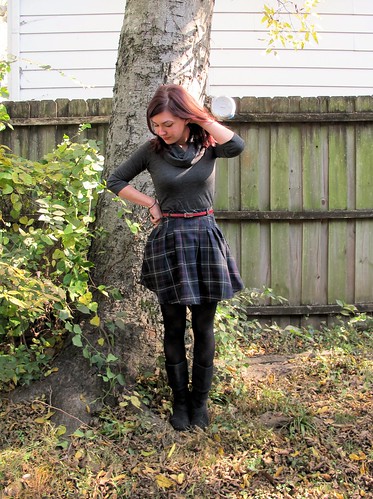
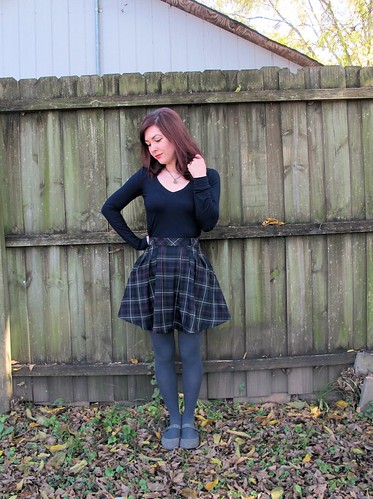
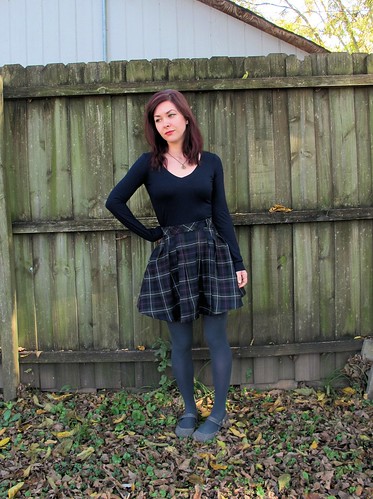
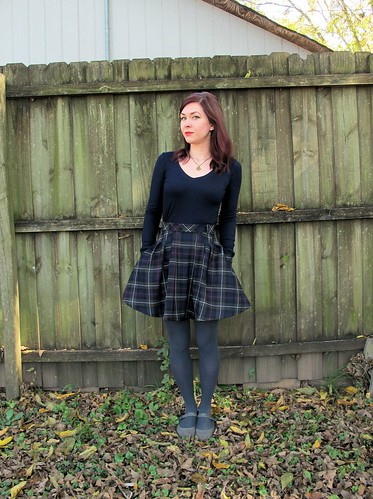
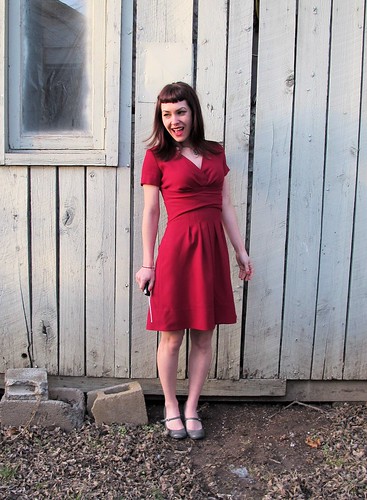
The color is a deep magenta, although it looks quite red in these photos.

Simplicity 2145

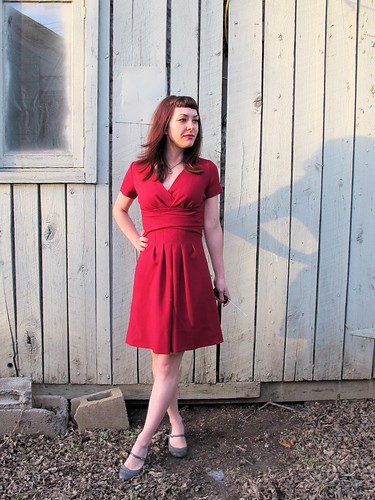
This is Simplicity 2145, which is one of those ~be your own designers~ Project Runway patterns. I’m just going to throw this out there – I don’t like the PR patterns. Sorry! The drafting is fine for what it is, but the method of construction (and instructions) is usually pretty subpar in my experience. I suppose the drafting is more important than the instructions (ok, I KNOW the drafting is more important than the instructions, ha), but they are generally intended for “emerging designers” and I think they just set a bad example. I’ve sewn lots of these patterns in the past – they usually have some neat style lines that I don’t find replicated in other patterns – and if I was dealing with those instructions as a beginner, I think I’d give up on sewing entirely. Lots of unfinished edges, missing information (I can’t remember the particular pattern, but I do recall one that spent 3 paragraphs explaining how to sew a dart, and then forgot to tell you to close the side seams. Really!), and the yardage requirements are waaaay too generous.

I guess my point is – if you want to sew these patterns, great, but make sure you have a good instruction book close by. That is all.

Simplicity 2145

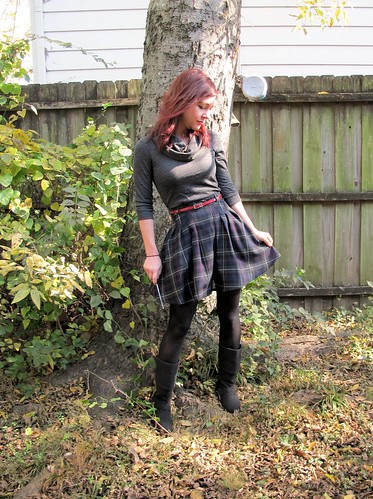
ANYWAY, back to the matter at hand – I think this particular dress turned out great! I really love the front wrap and the pleated skirt, and I think it’s a cute (and flattering!) look. I believe this pattern was intended to be a knockoff of Princess Kate’s engagement dress, although let’s all take a moment to acknowledge that she looks 1000x better in hers than I do. Must be the silk jersey πŸ˜‰

Simplicity 2145

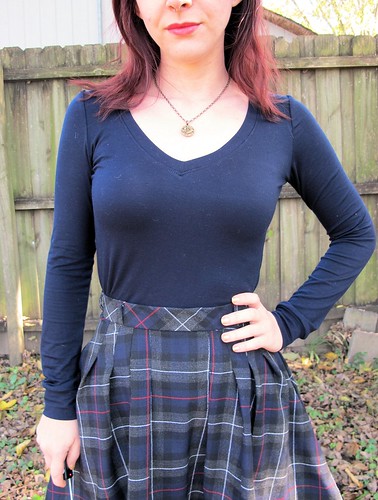
My version is made from wool crepe, which I picked up at Textile Discount Outlet while I was in Chicago last year. It was cheap, too – I think I paid less than $10 a yard for it (and it’s pure wool, according to my burn test. Nice!). I used a scrap of baby pink Bemberg Rayon to underline the bodice, and left the skirt unlined (only because that’s all the lining I had). I decided to go with underlining because the thought of trying to draft a lining for this style gave me a headache, haha. Underlining also meant that I got to keep the facings without there being a lot of bulk. I like facings.

Simplicity 2145

One thing I will warn y’all about this pattern is that it runs LARGE – like, super duper large! Holy shit! According to Simplicity’s size chart, I should be wearing a size 10. Well, I know how much they (and the rest of the Big 4) looove to make things way too fucking big, so I double-checked those finished measurements and ended up sewing the 4. So freaking ridiculous!

On the flip side, I didn’t have to make many adjustments to get a good fit. I did make a muslin – this has become a very regular thing for me (more so than usual) because I’ve learned that my posture means the back is too large at the top and needs a flat pattern adjustment. So I have to muslin everything I make now. It’s a pain for sure, but I will admit that it is REALLY nice to not have a big gape at the back of my neck! This one didn’t need much of an adjustment – I did a 3/8″ rounded back adjustment, and the fit at the back is pretty much spot-on now. The only other alteration I made was to shorten the sewn-down part of the skirt tucks. They were a little too long on me and it just looked weird.

Simplicity 2145

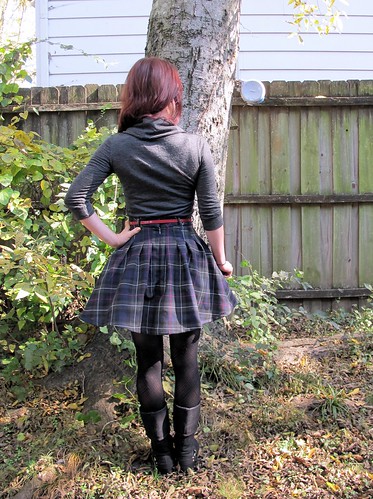
The dress also has two tucks at the back, which upon viewing these pictures appears to hit a somewhat unflattering spot right above my ass. Oops.

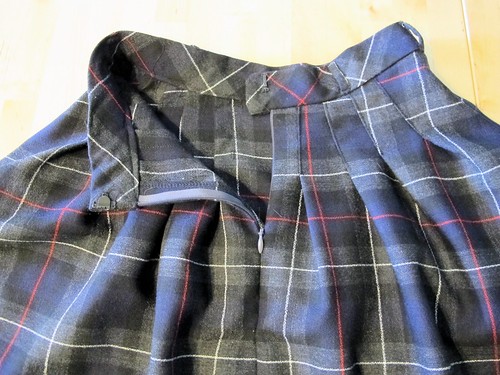
Also, for some reason, I had a DEVIL of a time inserting that invisible zipper. I don’t know why – invisible zips don’t really give me much trouble! – but my feed dogs were trying to make it gather on one side. So weird! I’ve since inserted several invisible zips, and they go in flawlessly. I don’t know if it had something to do with the wool crepe or what. If you super zoom into this photo (which, I mean, uh, don’t. Haha), you can see that my waistline seam at the zipper is off by about 1/4″. That was the closest I could get it, after ripping the zip out like 4 times. Stupid zipper!

Simplicity 2145

Another thing I don’t care much for about this dress is that the sleeves are SUPER tight and it’s difficult to raise my arms very high. So it’s ok for wearing if I’m going to be sitting all day/not moving around, but that’s about it. I need to rip them out and reinsert them and see if that helps. I’ve been told that if the sleeve isn’t eased in the right areas, it can make it difficult to move your arms, but I was pretty careful about that while I was setting these in. I’m thinking it might be another pattern adjustment that I need to address, because it happens a lot to me. Anyone have a suggestion on what I should be looking for? The armhole is high enough (I believe) and the circumference around my bicep is the correct size, so I’m not sure where to go from here, or even what to research.

Simplicity 2145

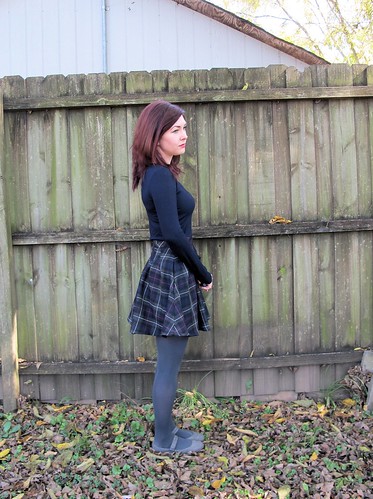
Sleeve issues aside, the rest of the dress is right up my style alley. You can get a better idea of the true color here – it’s a very rich, deep pink, and it looks super fabulous with all the wool crepe-y texture.

Simplicity 2145

Simplicity 2145

Simplicity 2145

Wish I’d actually had the correct thread color on hand – I had a pale pink, which in retrospect was a horrible decision (you can sort of see it at some seams when I’m wearing the garment, ugh), but at least it matches the lining, I guess?

Simplicity 2145

Oh yeah, and if you were wondering why my hair looks SO good in these pictures – I’d just had a haircut and that blowout they gave me was LEGIT. God, I wish I could afford regular blowouts haha! As it stands right now, my hair doesn’t even look like this anymore. I had it bleached last week, and now it’s neon orange. More on that later πŸ˜‰

A couple things before I dip outta here:
– Remember Joanna Baker, she of the sweet sewing prints giveaway? Well, I just heard back from her (she’s been busy getting married since then!) and she has listed the 3 sewing prints in her shop for a limited time. I know some people were interested in purchasing them, so if that’s you – here are the dressform, button collection and thread prints.
– Also, She’ll Make You Flip is currently offering a nice discount – use the code VALENTINE25 for 25% off your entire purchase, good through 2/24/14! Someone should go buy this and hang it on their wall, because that is EXACTLY what I would do with that pattern. Ok ok, in all seriousness, how cute is this pattern?? AND IT’S IN MY SIZE. EEP, my neverending quest for the perfect stripe fabric continues!

Completed: The Owls Sweater

2 Jan

Happy New Year, everyone!! Gah, I feel like I really dumped a load on y’all with my last post… sorry about that! I promise to keep things much more concise, at least with the current offerings πŸ™‚ And before we get too far into the new year, I do have one small confession – I actually finished this sweater at the very end of 2013! Whoops! So it’s not my first completed garment of 2014 (and it’s sweater #9 of 2013, wow!), but we’re going to count is as such since that’s when the pictures surfaced πŸ™‚

Let me introduce you to: Owls!

Owls!

I’m sure a lot of you knitters already recognize this pattern, since it’s insanely popular on Ravelry. Truth, this was one of the sweaters that really made me want to improve my knitting skills enough to be able to have one of my own! This is the famous owls pattern by Kate Davies and there’s a good reason why it’s so overplayed (in the best way, I mean) – it’s a simple, quick knit and looks flattering on pretty much everyone who makes it up!

Owls!

Like I said, this has been in my queue for aaaages. So long! Part of what made me waffle on starting it up was finding a suitable bulky weight yarn that didn’t cost a fortune – some of the stuff I was looking was pretty pricey! Eep! I was actually gifted the pattern by Jo for my birthday last year (did you know you can gift patterns on Ravelry? So dangerous…), which really pushed me to try to find a good yarn.

Owls!

What ended up working for me was the Valley Yarns Northampton Bulky from good ol’ yarn.com. What I loved about this yarn was that it was cheap (I think I paid $3.99 a skein, but it’s normally $5.99!), 100% wool, and it came in colors that didn’t suck. I know a lot of people love that Cascade 128 that comes in a giant yardage, but I never cared for the colors offered and plus, with the amount I needed I would end up with a lot of unneeded yardage. So this worked out perfectly.

Owls!

Thanks to the bulky yarn, this pattern knit up SUPER fast – I finished it in a little over 3 weeks. That’s a record for me! Definitely needed after how long I toiled on my A to Z cardigan πŸ™‚ The construction for this was pretty interesting – it’s knit bottom-up to the armpits, then you knit each sleeve from the bottom up, then you connect everything and finish the owls and the neck binding. It gets a bit heavy at the end, but fortunately there’s not too long of that.

Owls!

I love how the owls wrap around the shoulders. So cute!

Owls!

I knit the pattern as-is, and there were a few things I didn’t care much for during the process. For one, the back decreases were kind of… weird? I think it also gives me a slightly poofy upper back, although it’s more noticeable in pictures. I would have changed to side decreases – it was even suggested to me by a few people – but the construction was so weird that I didn’t quite understand where the sides started, so I just followed the instructions blindly. Oh well! It doesn’t look bad, I just think the bad is a weird place to put decreases! Another thing I did not like was how the sleeves were attached, because you end up grafting stitching at the underarms. There are 4 stitches to graft, but my holes were WAY bigger than 4 stitches! It was like an armpit window or some shit! I managed to close it up and you can’t even tell, but man, that’s more sewing than I want to do on a knit. Sorry.

Owls!

One last beef, and you’ll probably notice this the second I point it out (if you didn’t notice already ;)) – I ran out of yarn at the very end! I bought the recommended yardage (oh ho ho, I actually bought a whopping 5 yards more than required, like, I’m such an adult), but I obviously goofed something because I ran out of skeins while finishing the owl cables. Shit! And since I ordered this online, I didn’t want to pay for shipping to ship one whole skein to me for like… 5 rows of knitting. I unraveled my two gauge swatches (bummer, because I was saving them to make a blanket o’ gauge swatches, like, someday haha) and still came up short. I hemmed and hawed for a few days, dug around my stash, lurked the yarn store by my house… and eventually realized that the black yarn I used to knit my Blagatha was an *almost* perfect match. Not quite, but close enough. Since the donor yarn is a lighter weight, I held it double and it worked out fine to finish the ribbing. It doesn’t quite match, but it blends into kind of an ombre effect. Fancy!

Owls!

The most agonizing part about the whole yarn ordeal was that once I blocked the sweater, I realized the sleeves were too long! DERP. So, yeah, I totally had enough yarn! Whatever, fuck that shit. They’ll just stay cuffed and maybe my arms will magically lengthen someday :B

Owls!

You probably also notice that I left off the eyes on all my owls. I started to sew on buttons, but decided I like them more subtle. So there!

Owls!

Owls!

This puppy is WARM! I’ll probably live in this for the remainder of winter. I love how it looks with this silk skirt (which, btw, is vintage, not me-made – but now I’m thinking, ooh, silk Zinnia??). Anyway, full Ravelry notes here!

Owls!

One last thing… we have a giveaway winner from last year! Ooh, so who’s the lucky recipient of the $25 credit at She’ll Make You Flip?

win79

winmeow

Congratulations, SewMeow! Go check your inbox! πŸ™‚

Thanks to everyone who entered, and thanks to She’ll Make You Flip for offering such a lovely prize! Guys, if you’re still eyeballing a sweet vintage pattern, let’s up the ante a little! Use the code LLADYBIRDNY25 for 25% your total purchase through January 15, 2014! Yeah! Now don’t say I never did nothin’ for ya πŸ˜‰

Tailoring the Vogue Coat

5 Dec

When I originally posted my Vogue coat muslin posts, there was quite a bit of interest about what goes in the process of making a coat from start to finish. I’m not one to tease, so here’s a glimpse into what I’ve been up to, coat-wise, for the past couple of weeks.

The first thing I should mention is that coat-making isn’t hard. It is time consuming, for sure, but anyone with a few projects under their belt could easily tackle this. It might take you a couple of months, and you may have some hair-pulling moments (either with deciphering instructions or actually trying follow them), but it’s doable. I don’t know who started this whole thing of ~omg coat-making is so hard~ (probably the same person who said that sewing with knits was also difficult. Nope! It sure ain’t!), but, ugh, just ignore them. It’s not hard. It’s time consuming, it’s expensive, and you definitely need to muslin the shit out of your pattern before you even think about cutting into your coating… but in reality, it’s not terribly different from making a lined skirt or dress. You just need to follow a few more steps. You can also totally omit the whole tailoring part, with the special interfacing and padstitching and bound button holes and all that – and then shit gets super easy (well, as super easy as sewing a lined garment can get :)). Personally, I don’t see the point in spending all that money on a garment if you’re not going to go all out and do the whole nine yards, but then again, I think tailoring is fun. So do what you will.

My first task, post-muslin, was to start cutting the plaid coating. I won’t go into detail on that process – basically the same steps as the tutorial I posted on matching plaid – and it took foreverrrr. Seriously, I think I spent close to three hours just cutting the outside fabric! WOOF. I also had to cut interfacing (I am using hair canvas, which is a hefty interfacing commonly used for tailoring purposes, such as coats!), lining, and silk organza. The silk organza was a last-minute addition – I originally wasn’t planning on underlining, although the pattern calls for it, since I don’t need my coating to be super warm in our mild winters. However, my pattern is a fairly structured peacoat, and the coating has a bit of a loose weave, so I decided to underline with silk organza to give it that nice crisp hand without adding a lot of bulk or unneeded warmth.

Vogue Coat WIP

Silk organza can be expensive, and some people like to use poly if it’s not touching the skin… but personally, if I’m going to dump all this time and money into a coat, the couple dollars in price difference doesn’t really effect my final budget. So I went with silk, since it presses nicely along with the wool.

The bonus part of using an organza underlining (or really, any underlining at all) is that you can mark directly on the underlining and you don’t have to worry about it showing through the coat fabric. I totally use a sharpie. Go ahead, judge me.

I underlined my pieces flat on my tabletop (see this tutorial if you need more info on underlining!), using silk basting thread and going alllll the way around each piece. Every piece is underlined except the facing – only because I ran out of silk organza :). I will be interfacing that piece with a fusible. This process took a long time, but it’s pretty relaxing work – perfect for grabbing the computer and watching shitty documentaries. That’s my excuse, and I’m sticking to it.

After underlining, it was time to put in the bound button holes!

Vogue Coat WIP

I was actually a little scared of this part! I don’t know why – I’ve sewn plenty of successful bound button holes in my day, and used a different technique each time. Maybe I’m out of practice, but for whatever reason, I was not looking forward to this part and I definitely put it off for like, a week. Which is shitty because bound button holes are the kind of thing that get done before you do any other work on the coat, so that meant the project was put on hold until I got my ass in gear and put those damn button holes in the front piece!

To make my button holes, I wanted to try yet another technique, so I downloaded Karen’s e-book on bound button holes and followed her instructions. Folks, these are the prettiest, most perfect button holes I’ve ever made on the first try. Seriously! If you have any concerns about doing these, or have fucked them up in the past, you should definitely check out her book. I think I paid about $3.50 for it after the rate conversion. For $3.50, you really have no excuses.

Vogue Coat WIP

I mean – look at them! I even managed to match up the plaid on that particular one, ha!

Vogue Coat WIP

As I mentioned previously, the instructions include all the steps needed for a fully tailored coat, so fortunately I don’t need to compile a list of steps and modify the pattern to suit my needs. They are a little different from the previous coats I’ve made, in that some of the pieces are sewn together before you start with the interfacing and pad stitching. Personally, I like to do all that before I assemble the rest of the coat because it makes it easier to handle, but I’m also a stickler for following instructions. So, I attached the pocket, the front and side pieces (being careful to match up the plaid, which for some reason took me like an HOUR. Shifty plaid, go die.). I attached the interfacing using long basting stitches with my silk thread. This took a while, but I also recently rediscovered all my favorite awful pop-punk and ska bands from my youth, so I may or may not have had a personal dance party in the process.

Vogue Coat WIP

Here you can see some of the details – the hair canvas, the uneven permanent basting with the silk thread, my underlining, the pressed open seams. It’s coming along, that’s for sure!

Vogue Coat WIP

Next, I sewed my twill tape to the roll line of the collar. This will help the collar keep it’s shape as a wear it, since the twill tape will dictate how it falls at the fold line. You measure your twill tape to the length of the roll line, then subtract 1/4″ from the length and ease the coating to the tape and catch stitch it down. Pretty simple, but it makes a huge difference in the finished coat.

I also marked my pad stitching lines on the collar, but I forgot to take a photo. I totally used that sharpie, too. Ha!

Vogue Coat WIP

So that’s where we are now! The coat fronts have been mostly assembled – I just need to pad stitch the collar, and it’ll be ready to attach to the back and side back pieces. Obviously, it’s not anywhere near completion, but that doesn’t stop me from pinning it to my dress form and pretending it’s a coat. Call it inspiration, or call it a kick in the pants, or whatever. Either way, I’d love to finish this by Christmas, but we’ll see!

I know the plaid looks like it doesn’t match in those pictures, but the fronts are not properly overlapped. Trust me. Three hours of cutting means all the plaid fucking matches, dammit.

What’s on your sewing table this week?

Completed: From A to Z Cardigan

2 Dec

I feel like the knitting of this cardigan took forever, but it was really only about 2.5 months. Crazy!

IMG_5547

This particular project is a little special to me because I started it right when I put in my final notice at my old job, then I got a huuuge chunk of it done while I was in Chicago, and now it’s been my saving sanity since.

IMG_5580

The main reason why I haven’t knitted it up as quickly as the others is just TIME. I never feel like I have enough anymore! I guess every adult feels that way, though, huh? πŸ™‚ Once I realized I was not getting back those 1 hour lunch breaks (and let’s be real – working from home means NO LUNCH BREAKS EVER, EAT WHILE YOU WORK !!!! haha), I just let myself manage what I could manage. Which usually meant a full 15 minutes of knitting, at the tail end of my lunch. This equates to about 10 sleeve rounds (oh, don’t look at me like that, there were 30-50 stitches per round. very small!).

IMG_5545

Once I hit that, I finished fairly quickly! Yay for me taking my own advice πŸ™‚

IMG_5540

Anyway, pattern talk time! This is From A to Z by Andi Satterlund. A little different from what I usually knit – the construction is bottom up, with knitted-in pockets and a few bits of intarsia for contrast, plus that monogram at the front (it’s duplicate stitch, not intarsia. FYI!). I used Valley Yarns Northamton worsted weight yarn for the main color, and the contrast is leftover bits from my Central Park Hoodie.

IMG_5542

The pockets on this cardigan are SO COOL. They are knit with the body – meaning they aren’t seamed on separately. It was hard for me to wrap my head around first (honestly, I had to email Andi and ask her for help, and she was very prompt in her response!), but once I got going it was pretty easy. The top stripes are intarsia – my first intarsia, ever, and while it’s not terrible, it could use some improvement. I still have problems with holes where the colors join (which you can’t see because, duh, I sewed those shits right up), but it’s a start!

IMG_5549

Part of the reason why this took so long was because it was sooooo repetitive. Stockinette can really take forever, especially at the bottom where it’s the widest! Once I got to separating the tops and then adding the sleeves, I finished this up fairly quickly. In comparison, anyway.

IMG_5553

(I was really horrified when I saw this pantyline picture, until I later realized that those lines are caused by the ruffles in my undies. JUST SO WE ARE ALL CLEAR)

IMG_5572
IMG_5573

I plan to wear it closed, but it looks good open, too!

IMG_5565

I made the XS and had no pattern alterations. This is what I love about Andi’s patterns – they fit me perfectly as-written! Can’t argue with that πŸ˜€

IMG_5566

I LOVE the monogram. As with my intarsia, my duplicate stitch could reeeeally use some work as it’s definitely a Monet. It doesn’t look so great up close! But from far away it’s not so bad.

IMG_5583

Ugh, sorry for all the pictures. I’m just really proud of how this cardigan turned out!

IMG_5568

Like the varsity sweater of my ~dreamz

IMG_5527

IMG_5530

IMG_5531

Told ya that dupe stitch was lacking. OOPS haha!

IMG_5528

IMG_5529

IMG_5532

Here’s the back of the pocket, in case you were curious about the construction. I created the pocket by making kfbl stitches and pulling the new stitches to a holder, then knitting the pocket lining separately, then picking up each stitch along the side as I knit the bottom of the cardigan. I hope that makes sense! It’s pretty genius, in my opinion, glad I had a chance to try it out!

IMG_5554

I’ve plumb run out of things to say, so I reckon that’s it! Ravelry notes are here. Next knit project – Owls! I have some lovely grey yarn for that and I’ve already started swatching πŸ™‚

Oh, and just in case you were curious – my shirt says “I Listen To Bands That Don’t Even Exist Yet” (because it’s hilarious, that’s why) and I made my hairbows myself:)

One last thing – the giveaway winner! Let’s see who the random number generator picked today….

winner
winnername

Congratulations PoldaPop! Keep an eye on your mail, you’ve got a Sugar Plum headed your way!

Thanks to everyone who participated!

Completed: the Zinnia Skirt

8 Nov

Who doesn’t love to wear wool in the winter time?

Zinnia Skirt made with plaid wool from Mood Fabrics

I feel like a broken record when I start singing the praises of wool, but foreal you guys – this stuff is awesome. It’s super warm and cozy, breathes very well (so you don’t get overheated in all that warm and cozy-ness), and it’s also antimicrobial, which means it naturally repels odors. Which means now you know why I wear so much wool and still manage to keep up with the laundry – it doesn’t need to be washed very frequently! Airing out is fine for day-to-day. Yay for being lazy!

Zinnia Skirt made with plaid wool from Mood Fabrics

So obviously, I was ready to bust the wool out just as soon as the temperatures started dipping. I’ve had my eyeball on that Zinnia pattern, and I paired it up with this beautiful lightweight wool plaid suiting from Mood.

Zinnia Skirt made with plaid wool from Mood Fabrics

I didn’t take any special precautions when sewing this – it’s wool, it’s just easy! The stitches sink in (bad for unpicking, but great for hemming since you can’t see the top stitching ;)), it presses beautifully, and as weird as this is gonna sound – it was really fun to cut, too. My scissors just sliced right through that yardage. I love the colors and it looks just as good paired with black as it does with navy. Double duty fabric and all that.

Zinnia Skirt made with plaid wool from Mood Fabrics

For the skirt, I cut the size 2 (although I did end up taking in the waist so maybe the 0 would have been better). I left the skirt unlined and shortened the hem by about 3″ so I could have a mini. The waistband is cut on the bias and, despite what you might think you see, I promise that the plaid matches up at the side seams πŸ™‚

Zinnia Skirt made with plaid wool from Mood Fabrics

See?

Zinnia Skirt made with plaid wool from Mood Fabrics

Oh yeah, and I did totally just change shirts. We’ll discuss those in a second.

Zinnia Skirt made with plaid wool from Mood Fabrics

So. About working with this skirt in a plaid fabric. It works – kind of. Matching those side seams was HELL ON EARTH and I’m not really sure why. There are only two pattern pieces, for fuck’s sake! That was also the same day I got my kidney stone (which, if you’re still wondering… it’s still here. Just hangin’ out. Ugh ugh ugh), so I blame it on the pain meds. Anyway, I don’t really think this patterns works very well with a stripe – at least not the stitched-down-pleats version. They just look like a hot mess at the front and back. Might want to save your plaids – or at least your large-scale plaids – for another project.

Zinnia Skirt made with plaid wool from Mood Fabrics

I also had to drastically shorten the hemline – like I said, 3″ and WOO IT’S A MINI – because the longer length just looked dumpy as hell on me. Which means my plans for using a border print probably won’t work with this pattern, at least not the print I had in mind. It’s just too tall for the skirt length.

Zinnia Skirt made with plaid wool from Mood Fabrics

Also, the fabric I chose maaaay be a little too much for this pattern – seeing as how it sticks out like I have a teeny petticoat underneath it, ha – but I actually like the flared look.

Renfrew top made with wool knit from Mood Fabrics

Oh yeah, my tops! This is a Calvin Klein wool jersey, also from Mood Fabrics (attached link isn’t the same color – looks like they’re sold out of the grey, SORRY – but it’s the same fabric type) and it is deeeelicious. So soft and cozy, and not itchy at all! I used the Renfrew pattern and made the cowl version with 3/4 sleeves. I just love the way the fabric drapes at the cowl – it has enough body so it’s not droopy, yet it’s also not huge and standing up on it’s own or anything.

Also, sorry about the rouge leaf. Didn’t see that during the photos, haha!

Renfrew top made with rayon knit from Mood Fabrics

I made the navy v-neck because I felt like my contribution was a little boring, and also because I wanted to see how good navy looks with this skirt (it does! it does!). I used a rayon jersey from Mood Fabrics that’s been in my stash for ages – originally considered for leggings, until I realized that it was a tiny bit too sheer aka I would be baring my bum. I’m so glad I found a use for it, though, because it is some of the most luxurious fabric I have ever handled! It may just be a rayon knit, but it’s silky smooth and amazing. I really wish I had it in every color! I’m also, like, stupid proud of how that V turned out, by the way.

As usual, I took waaay too many pictures, so I’m just going to dump the rest here.

Zinnia Skirt made with plaid wool from Mood Fabrics

Zinnia Skirt made with plaid wool from Mood Fabrics

Zinnia Skirt made with plaid wool from Mood Fabrics

Renfrew top made with wool knit from Mood Fabrics

Renfrew top made with rayon knit from Mood Fabrics

Zinnia Skirt made with plaid wool from Mood Fabrics

Zinnia Skirt made with plaid wool from Mood Fabrics

The tiny belt loops are my favorite part! So tiny and cute!

Zinnia Skirt made with plaid wool from Mood Fabrics

See what I mean about the plaid? It looks like a hot mess at the pleats. Oh well.

Zinnia Skirt made with plaid wool from Mood Fabrics

One last thing – I wanted to thank y’all for all your advice regarding my muslin, as well as my kidney stone. I’ve decided to set the muslin aside for now; I may revisit it in the future but I think my coat for 2013 will have to be a totally different pattern! So I guess I’ve got that to figure out. As far as the kidney stone… well, it’s still there, taking up residence. Y’all will probably be able to hear me scream from the rooftops once it finally emerges haha. A few people urged me to to go the doctor, and I did want to follow up and let y’all know that I went to both a doctor and a specialist last week, got the x-rays as well as a variety of medications. There’s not much else we can do at this point beyond surgery or shooting lasers (which my uninsured ass is reeeeally trying to avoid), which means I gotta shoot it out! For the past couple days I’ve been on an essential oil regimen, and tonight I will be trying some Coke/asparagus concoction that sounds fucking disgusting but is supposed to work. Anyway, sorry for the TMI, keep thinking happy kidney stone thoughts! haha!

Zinnia Skirt made with plaid wool from Mood Fabrics