Tag Archives: dress

Completed: Simplicity 8345; the Daisy Sundress

20 Mar

Hi everyone! Apologies for my bout of silence all week – I found myself feeling ill early in the week, and regulated myself to crafts that involved sitting on the couch with little to no concentration (paint-by-numbers, if you’re curious. HOLY SHIT I love those things!). Despite my best efforts, I spent the entire weekend sick 😦 I did drag myself out of bed long enough to catch as estate sale on the other side of town:
Estate sale finds!
$5.50 for the whole box! There’s about 2 yards of fabric in there (it’s very sheer – almost like cheesecloth – so it’ll need to be underlined), plus the book has lots of sewing-related newspaper clippings 🙂 The house was totally awesome – unchanged since 1961. Beautiful pink bathroom, original kitchen appliances, knotty pine dining room, and orange & green shag carpet!

Anyway, THAT took all my energy – seriously! I got home, crawled into bed, and slept for the rest of the weekend. Being sick sucks, yo.

Then I woke up on Monday morning with a migraine. LOVELY. So I called out of work, slept the migraine off, and tried to make some use of my day later in the afternoon.

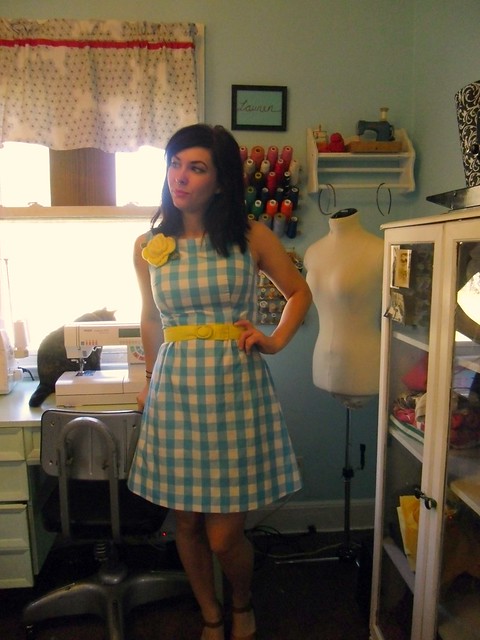
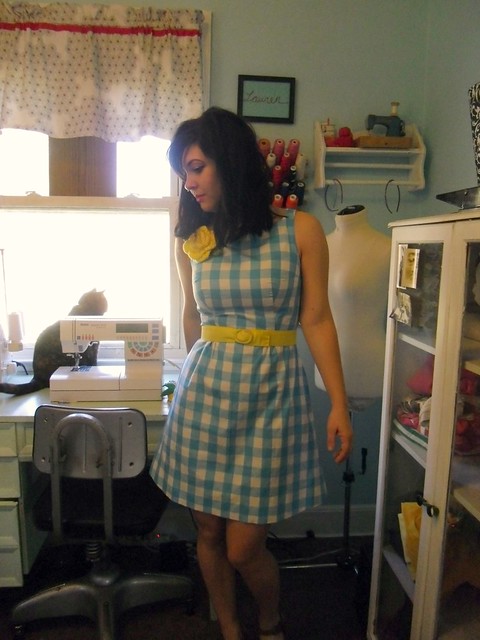
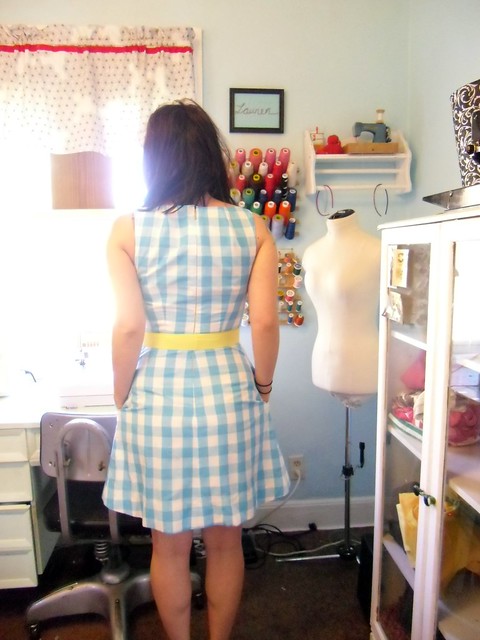
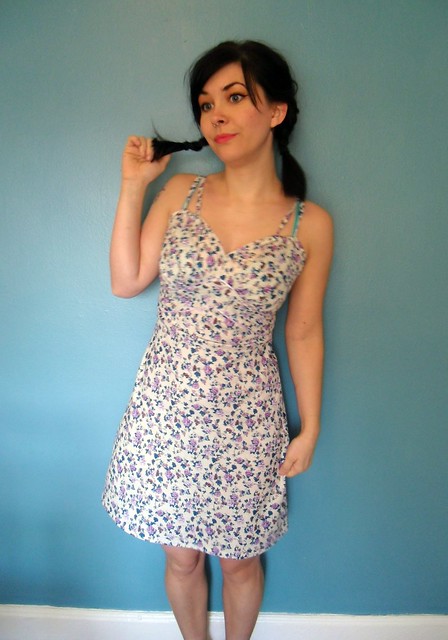
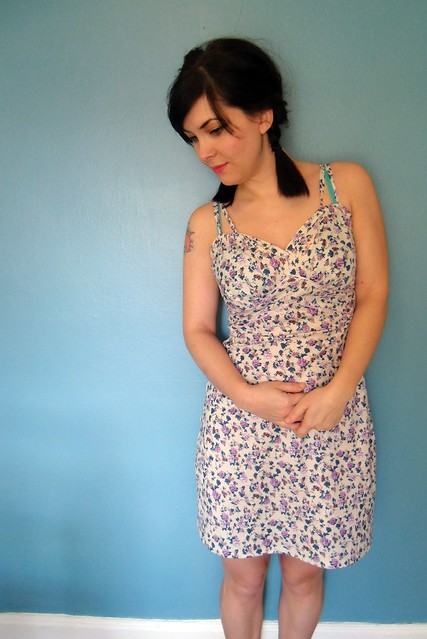
So here’s my meager project after a weekend of sick – the daisy sundress!
sundress
Also totally approps for the first day of spring, amirite? 🙂

Daisy Sundress
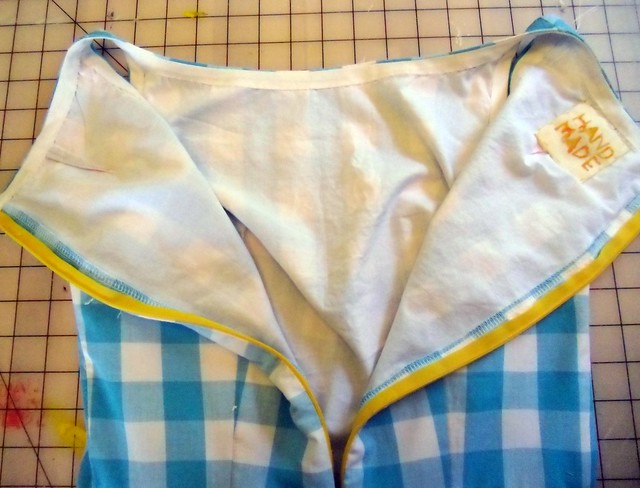
I used Simplicity 8345, a simple sundress with princess seams & a scalloped neckline. This dress was seriously easy to sew up, albeit with a strange order of assembly – you put in the zipper first, then sew the shoulder seams, then insert the neckline facing, then sew the side seams together, then put the sleeves on the side seams, then sew that whole mess to the front/back mess. Kind of interesting!

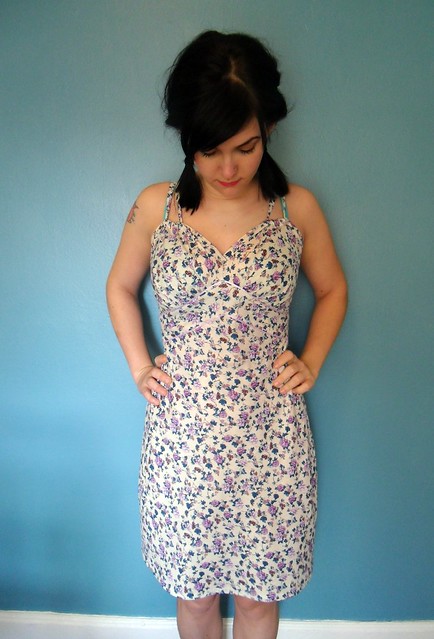
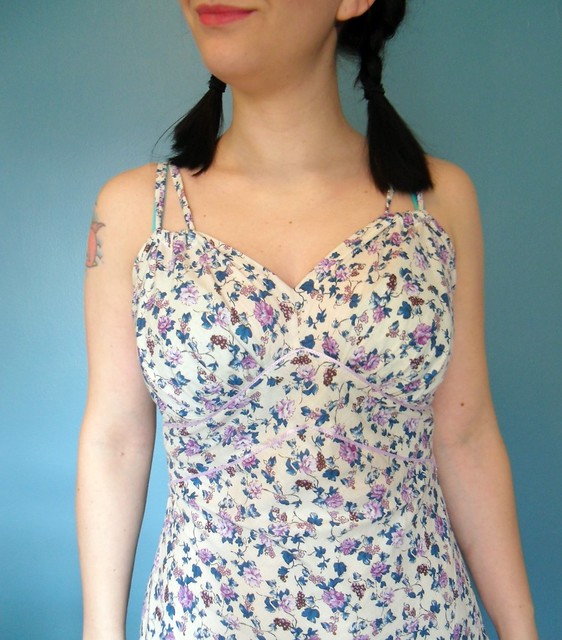
I did make a few small changes – my first princess-seamed FBA, which was sort of a disaster. Oops. Blame it on poor ol’ sick me 😦 Everything fits fine, but I should have divided my addition of width to both the front & side front panels, not just the side front. My seams are WAY too front & center, and I feel this dress now has the magical ability to make me look both flat-chested & wide on top. Oh well, live & learn I guess. lol.

Daisy Sundress

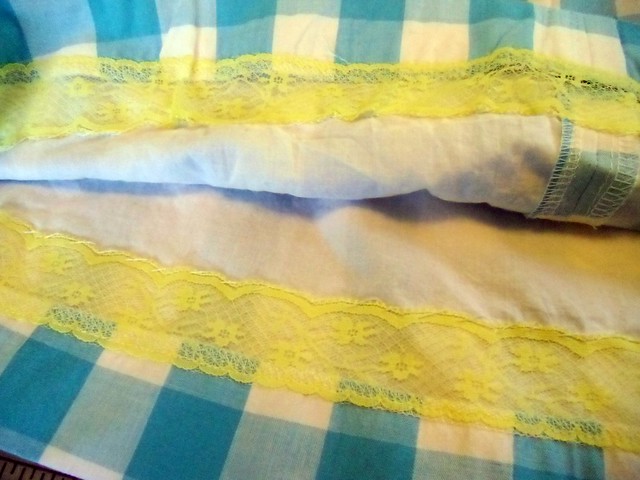
I also sewed my sleeves up a little differently – they are supposed to be faced. LOLWUT. Who faces sleeves in a sundress? Well, I’m sure people do, but not me! I just hemmed them as normal and omitted the facings. Boring facings! The sleeves are a little tight, I might add. Not a lot of room for movement there, oh well.

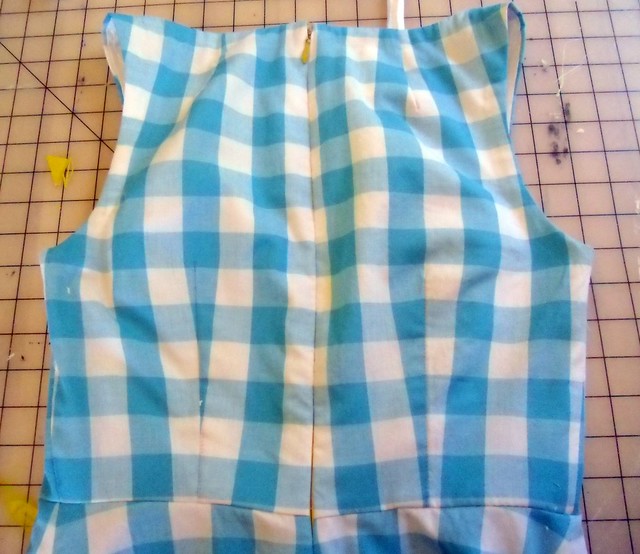
I also cut like 6″ off the hem. Knee-length, my ass!

Daisy Sundress

Daisy Sundress
I do like the scalloped neckline. So pretty!

Daisy Sundress

Daisy Sundress

Wanna know the best part about this dress?

troll
The fabric was a BEDSHEET! trololololol

Daisy Sundress - scallops

Daisy Sundress - zipper

Daisy Sundress - unzipped!
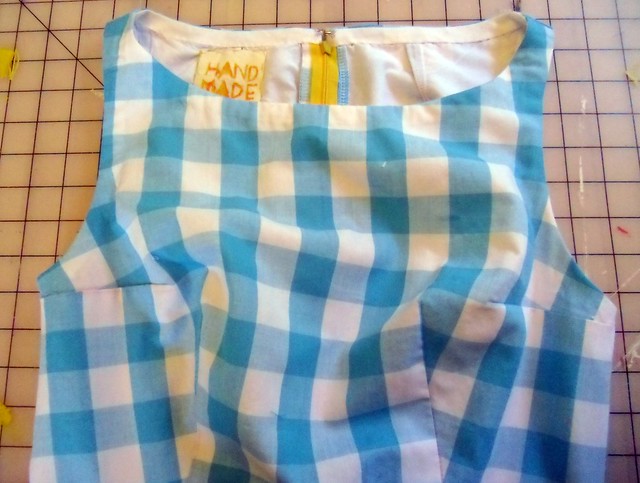
I didn’t have a matching zipper, so I used dark green. Again – stash-bustin’ 😀

Daisy Sundress

I guess there’s not much else to say about this. It’s a sundress. I’ll wear it in the sun. Or something.

Spring :)
And look – spring is already making an early start here in Tennessee 🙂 SO GREEN. SO BLOOMY.

Daisy Sundress
Happy first day of spring, y’all!

Completed: Cheetah (mock)Wrap Dress

13 Mar

TIME FOR A CONFESSION.

wrap dress

The Leopard Wrap Dress? Well, first of all – it’s cheetah, not leopard. Oops! I still like the fabric, though! 🙂 Secondly, it would appear that my wrap dress is actually a mock wrap dress – double oops! And wouldn’t you know, I didn’t even realize it until I got about halfway through the directions and saw that there was a zipper in there. Yep, even with cutting the pattern, I did not figure out that this wasn’t a true wrap dress! Oh well, I find wrap dresses kind of hard to keep closed, especially with slinky fabric like this – so let’s consider this a blessing in disguise 🙂

That being said, check out my cheetah print mock wrap dress, guys!

Cheetah Wrap Dress

I used Simplicity 6268, which I can’t seem to find anywhere on the internet, sry2say. I picked this up a couple of years ago at the flea market – in a bag full of sewing supplies for something like $5. The fabric was given to me by my best friend – her grandmother was cleaning out her sewing room so I ended up with a LOT of this fabric (5 1/4 yards, if you’re curious. And yes, I have leftovers! Lots of leftovers!). It’s not something I would typically buy for myself, as it’s some class of poly and pretty drapey, but I LOVE how the finished dress turned out and it seriously does not wrinkle at ALL. I think this dress would be great for traveling – very wash & wear!

Since my pattern is for a 33.5″ bust, I was afraid I’d have to do some adjusting, but a quick tissue fit showed that everything fit fairly well. I’ve noticed a lot of patterns put extra (excess) ease in their garments – which is awesome for me, because that means I get to snap up all those cute little 32″ bust patterns and they fit fine! HA HA! Like I said, this one fit with no alterations, other than the length. See how short the skirt is? This is after I added 1.5″ to the hem & I used a 5/8″ hem (instead of the suggested 1.5″ hem). This baby was supposed to be SHORT! I don’t mind short, usually, but not with a flowy dress. Especially not a dress I plan on wearing to work. So, if you get this pattern, consider the length.

On a side note, I just have to share this because I felt pretty freaking brilliant:
Cheetah Wrap Dress
I ran out of tape, so I sewed the tissue pieces together! I got the idea from Liz haha. And no, I still haven’t bought more tape. Need to get on that.

Cheetah Wrap Dress

The tie belt is actually supposed to be sewn to the sides & tie at the back – I ended up sewing my pieces together to make a long belt, and it is not attached to the dress. I think tying it in the front makes it look more like a wrap dress, plus now I can wear different belts if I feel so inclined 🙂 I think cheetah (and leopard!) go with all kinds of colors, so it makes the dress much more versatile.

And can I just point out that I took these pictures after I got home from work – at 5:30! Daylight Savings, I looove you! Plz to stay with me forever, thnx.

Cheetah Wrap Dress

Cheetah Wrap Dress
I just love the shape… I think it is super flattering. I want to make more of these!

Cheetah Wrap Dress
See? The zipper 🙂

Cheetah Wrap Dress

Cheetah Wrap Dress

Cheetah Wrap Dress
The zipper also came from my stash – I think I ripped it out of something I used for the fabric. So basically, this dress was free. Yay free dresses!

Cheetah Wrap Dress
I love the little tulip sleeves.

Cheetah Wrap Dress
I did end up putting a small snap at the overlap on the bodice, for a little extra modesty. The dress is not immodest by any means – I don’t think the lack of snap would cause a wardrobe malfunction or anything – but the extra security is nice. You know, so I can splay myself across the couch & eat Italian Ice & not worry about the girls getting a sneak peak. Not that I was doing that last night or anything.

Cheetah Wrap Dress
Also, it was WINDY outside yesterday! See? WINDY!

So happy with my new dress, even if it’s not really cheetah or a wrap 🙂

Cheetah Wrap Dress

Completed: Colette Pastille

12 Mar

Well you guys, I defeated the Pastille pattern! Wheeeee me!

I actually feel pretty good about this dress – I wasn’t totally crazy about it when I saw the pictures in the book (I think the coral color of the fabric – while lovely, just looks waay too much like the model’s skin. It would have been better suited for a lady with a darker complexion), but I think that the overall shape, if properly fitted, is actually quite flattering. And while it really lends itself well to a print, I think it would make a sweet little basic black dress, since the shape is unique enough in itself 🙂

Pastille

Fitting… fitting this thing was weird. I already glossed over the process in my last Pastille post, but to summarize – while I pretty much *always* need a FBA, this pattern did not require one (didn’t figure that out until after I’d cut & taped all over the tissue though, arhghhghh!!). Actually, the finished measurements were just wrong – I cut a size 2 and the bust measurement was much closer to 36″, not the 34.5″ the book says. Consider yourselves warned!
The next fitting problem I had was with that damn back… I didn’t take any pictures of my muslin, but it billowed out all over the place across the upper back. I mean, it plain made me look like I had a hunchback. I eventually concluded that the upper back was longer than the front, so I did a 3/4″ swayback adjustment at the lengthen line that tapered to nothing at the side seams. That pretty much fixed it!

Pastille

The rest of the dress fit fine with no other adjustments.

I actually tried to make this dress without the facings for my first go-round, but those sleeves are way too curved to handle bias tape. So back to facings (although mine are interfaced with cotton muslin, not fusible interfacing). I tacked them down as best I could since they like to pop out; sewing the trim at the neckline also helped. Rather than do fancy finishing work on the inside, I opted to finish the raw edges with a simple serged seam. I wanted the making of this dress to be quick & painless!

Pastille
There *are* pleats at the bottom of the dress… I think doing those took the longest! I followed the handbook directions & thread traced all the lines, using different colors of thread for the various fold lines. It worked beautifully, but pulling out aaaaaall those threads was a pain in the ASS. No tips for making it go smoother (I don’t regret thread-tracing; it really did make lining up those pleats a breeze), just be prepared to spend some quality time with your seam ripper 🙂

You can’t tell due to my super duper busy printed fabric, but all the darts & seams actually line up perfectly. Just trust me on this one 🙂

Pastille
I also would like to point out that my hair needs a dye job something fierce (I actually had a hairstylist examine my roots the other day & declare that I’m naturally dishwater blonde – which blew my fucking mind. I’ve always been a brunette, wtf?!). If you’re thinking, “Whatever, your roots don’t look bad!” that’s because I ‘shopped the shit out of them teehee 🙂

Pastille
The dress looks best with a belt, in my opinion. Wish I had a yellow belt, but the one I have on hand is too neon yellow for this print & the thrift gods have been ignoring me lately in the belt department.

Pastille

Pastille

Pastille - neckline

Pastille - pleats at hem
The hem ended up being way too long for me, and I’d already sewn in the pleats, so I just flipped up the bottom of the hem & sewed it to the inside. This is why my pleats are at the very bottom of my dress. I think it worked out fine!

Pastille - zipper
I am really proud of how my zipper turned out! Basically perfect!

This whole dress was a great/cheap stash bust. Feels good to cull that shit down! I didn’t have *quite* a long enough zipper (I think mine was 20″ instead of 24″ or something), so I have to pull the dress over my head to get it on hahaha. Oh well!

Pastille
So what do you think? Pastille – yay or nay?

Completed: Colette Peony – Summer Gingham!

27 Feb

Ok, it’s not summer here, but it sure feels like it – right after I took these pictures yesterday, I pulled on a short-sleeved tshirt & some denim capris and took my bicycle out for a spin. It was LOVELY outside – and today doesn’t look like it’ll be any different. Yay for spring getting a head start this year 😀

Gingham Peony

Anyway, here’s a little summer sundress to get us in the mood – sorry if you live in a cold climate, maybe you should move to the South 🙂 Ha! I kid, I kid! I can’t wait to wear this dress as God intended – no tights, no cardigan, just some espadrilles and a sweet little rose brooch. I have a feeling this dress will be in heavy rotation for the next few months!

There’s not much to say about this pattern – I’ve already made it twice, so I didn’t have to do any preliminary fitting or a muslin – just cut & go! I did putter around with the pattern, since I had a pretty limited amount of fabric – 1.5 yards of 44″ gingham is exactly enough to cut out this pattern with no sleeves or facings (but still keeping the pockets) in a size 4, FYI. I underlined the entire dress – bodice & skirt – with white cotton batiste to keep everything modest, since my gingham was pretty sheer! Since I didn’t have enough fabric to cut facings, I faced the neck & arms with white bias binding for a clean finish. I did consider lining the dress (as opposed to underlining) so I wouldn’t have to deal with facings at all, but I wanted my batiste to offer a little structure in addition to making things opaque, so I stuck with underlining. As a bonus, it brightened up the colors, too! I also scooped a little out of the neckline so it wasn’t quite so boat-neck, per my inspiration.

I decided to keep the overall look of this dress simple & clean – with pops of yellow to make everything less Dorothy-esque 🙂 The yellow belt is a leftover from my first rooibos (man, I miss wearing that dress! GET WARM OUTSIDE!), and the yellow crocheted rose pin is something I made a couple of years ago when I had this crazy idea I was going to crochet a white granny square afghan with yellow roses. Actually, I still want that afghan, but I have too many projects to finish & I hate crocheting anyway 🙂 Here is the video I used to make the rose, it’s really easy! I still have a pile of these roses that I need to do something with – maybe I’ll give them away. Dunno!

Gingham Peony
My sewing room is so tiny, but I just love standing in there & gawking, so I thought y’all might like it too!

Gingham Peony

Gingham Peony
I cut the pockets out of gingham as well, so they blend in with the sides of the dress 🙂

Gingham Peony

Gingham Peony
Oops, I almost forgot – here is a shot of it without the belt! The checks match up pretty well, if I do say so myself 🙂

Gingham Peony
This is the best close-up I could get – every single other one of my pictures turned out super dark 😦

Gingham Peony
It cracks me up how my dresses look post-FBA when they are hanging or flat – they have little built-in boobs! HAHA!

Gingham Peony
You may have noticed that the zipper is bright yellow. I did not have a white 22″ zipper on hand, but I did have yellow! And it goes with my overall theme – not to mention that pretty burst of color when it’s unzipped! I love colorful little surprises like that 🙂

Gingham Peony
I just wanted to share my check-matching at the zipper. That’s as close to perfect as I could get! I know the checks don’t line up at the waistband – it’s due to the back darts. The fronts & side seams match up, though – you can’t win ’em all!

Gingham Peony - yellow lace @ hem
Yellow lace on the inside of the hem 🙂

Crocheted yellow rose pin

The flea market was kind of mehhh this weekened, but I did score at the thrift – look at this beauty I picked up~
Thrifted silk skirt
100% silk, in the most gorgeous shade of teal – $2! It’s a skirt, but it’s fairly large & long, and the seams are very simple. Cutting it apart yielded about 1 3/8 yard of 36″ fabric – plus the silk lining & zipper. Also, I bought a cashmere cardigan (not pictured) for $4. YUS THRIFT.

Gingham Peony
YEP.

Completed: Cinnamon Slip

21 Feb

It’s a little early for me to jump in the spring clothing game, but holyyyyy mother the weather has been positively spring-like here! Well, except on Sunday – we had “snow” (you know, that weird slightly frozen rain that just makes a slush mess on your windshield? Yeah, ew) and it was so cold, I refused to get off the couch/out of my pajamas. But it’s back to the 60s today and I’m ready for this warm weather to stick around for good! Can’t hurt to make some springy clothes that could be layered to ward of a little chill, eh? Eh?

I got this pattern as a Christmas present from my baby brother (thank you, Matt! You are the best :D) – I really love wearing vintage slips around the house (and, er, sometimes out in public :B) in the warmer months. That’s some dainty shit! Unfortunately, vintage slips are difficult to find in my size… and I don’t care to pay the super marked up prices that resellers charge. I don’t mind makin’ em, though! Especially when it means I can use colors that aren’t pastel and fabrics that aren’t slippery nylon. Whee!

Cinnamon Slip

I’ve never sewn up a whole bias garment before – bias skirts, yes, and bias midriffs. Never the whole thing! So this was an interesting experience. The pattern has lots of information on working with bias – including what stitches to use & where. I was a little put off at the suggestion to use a small zig zag stitch to construct everything, but I ended up following the instructions to a T since I figure Sarai knows more about this stuff than I do 🙂 I do like the finished result!

Cinnamon Slip
I do have a couple small fitting concerns – the center point of the V is not flat against my body; it sticks up a little. And there are wrinkles across the top of the midriff. I’m guessing I need to cut my next one a size bigger – this is a 2, with a 4 bust, and it fits reeeally perfectly except for those wrinkles. It doesn’t look so bad in the photos but it is definitely noticeable in real life.

Cinnamon Slip
The fabric is a lovely cotton voile that I picked up for a steal last summer at my local fabric store – I think I paid like $3 a yard for this stuff! It’s totally NOT my style – I don’t care much for the super sweet florals, or lavender for that matter – but it was sooo soft, it just kind of leapt into my arms. I love how it looks & feels as a slip dress, though! And it made the whole bias experience much easier than if I had started out with a giant piece of slippery silk.

The print *is* a little busy, though, so I raided my stash for trim to highlight that pretty midriff detail. This lavender ribbon matches perfectly – no idea where it came from, or why it was in my stash, but yay for being a stash hoarder!

Cinnamon Slip

Cinnamon Slip - ribbon detail
Here is some ribbon detail. It’s sewn on with a tiny zig zag stitch – amazingly, I had matching lavender thread on hand too! What are the odds?

I made this slip with the intention of it being for around-the-house wear, but I think it really looks like a casual sundress. I can totally see myself wearing this to the park with some flats and a light cardigan. What do y’all think? Strictly slip or approps for public wear as well?

Cinnamon Slip

As a side note, here’s a sneaky peaky at my next project – another summer dress!
Next project - gingham peony
It’s a Peony, in some gingham that’s been lurking in my stash for about a year (actually, I think I bought it at the same time/from the same sale rack as that floral voile lol). Not sure what I’m going to do with the petersham yet; I do want to incorporate some yellow so the dress isn’t so Dorothy 🙂

And check this out –
sheer vs underlined
I underlined the pieces since they were so sheer. Pretty amazing how much of a different underlining makes! The blues & whites are much more vibrant now!

completed: peony, this time in PLAID

17 Nov

pretty sure the peony is my new favorite TNT dress, y’all. it is SO easy to make up – even with matching plaids! – and extremely versatile in all the ways you can change it up. i am already thinking about making a summertime-approps peony with a chiffon overlay & no sleeves. oooh i just inspired myself again.

anyway, before i get ahead of myself, let’s focus on the peony at hand. this is my second make up, floral being the first. in addition to the previous alterations i made to the pattern, i shaved about 1/2″ off the front neckline, as i felt it was a tiny bit too high. i omitted the facings & instead lined the bodice & sleeves. i wanted to line the entire dress, but i only had 1 yard so it was either sleeves or skirt… i went with sleeves, because i can always wear a slip with the skirt.

the plaid fabric is my new favorite! i bought it from miss lauren winter right before she moved house (and, sadly, out of my neighborhood ::sob!::), although considering she charged me $2 for the whole 2 yards it’s more like she basically gave it to me. it is a very fine/soft wool, super drapey & comfortable. the lining is a pale periwinkle blue bemberg rayon that i found in the remnant rack for super duper cheap & i’ve been hoarding for like a year.

i was concerned that this dress wasn’t totally appropriate for plaid, but i think i did an ok job at matching. this pattern really doesn’t use a lot of fabric – even with matching up the plaids, i used less than 2 yards. the side seams match perfectly (if i do say so myself) and surprisingly the darts match up. well, kind of. the bottoms don’t, but that’s just the way they are positioned. furthermore, the waistline doesn’t exactly match up & again, that’s because of how the pattern was drafted. i can’t decide if it bothers me or not. in the meantime, i’ll just wear a belt and pretend otherwise.

i actually cut out the pieces for the cummerbund (in navy taffeta), but decided to go thrifting last night instead of sewing it up. it’s all good, though – look at the belt i got for $3!

plaid peony

plaid peony - side/back

plaid peony - back
the dark vertical line is actually part of the plaid, and not my invisible zipper, fyi.

plaid peony

plaid peony - no belt
here it is without the belt
ooh the mismatched plaid at the darts actually is really bothering me

plaid peony - front, flat

plaid peony - waistline

plaid peony - back
sorry ’bout the rogue white thread lurking back there

plaid peony - lining
really pleased with myself here – i figured out how to attach the lining without having to slipstitch it to the zipper tape. so clean!

plaid peony - hem
tiniest hem ever – this dress is SHORT!

and some bonus shots…
plaid peony & lady grey
with my lady grey

plaid peony & lady grey - back
a result of gertie’s sew-along last year, my first venture into tailoring. this baby is lined, interlined, padstitched… and it is nice & heavy, just like a coat should be 😉

plaid peony & lady grey - open
LOVEEEE THIS COAT

and, in case you were curious:
SHOES
my shoes 🙂

plaid peony

i have the whole week off next week, and i think i’ve already overwhelmed myself with all the sewing projects i want to tackle. we’ll see how many actually get accomplished, though 😉 hehe

completed: colette peony, in a floral explosion

14 Nov

first off, i realize i took way too many pictures of myself making the same pose/face in this dress. i’m sorry. i tried to edit them down as much as possible. i also apologize for the crappy lighting – i think i might be the only sewing blogger who’s not married to a photographer? just me & my tripod! and don’t tell me to move away from the coral wall, or i will hit you with the empty paint can 🙂

moving on…

i finished my dress! so happy with the final piece – it is AMAZING! let’s talk shop – i made this using a stretch velveteen fabric. stretch fabric is NOT my choice for this dress, the neckline sits kind of weird & i had to do all kinds of alterations to get it to fit (as it stretched too big, when my woven muslin was a perfect fit). i didn’t realize the fabric was stretch until i received it in the mail… my bad for not reading the description more closely, oh well. i added piping to the neckline & waistline, and interfaced the facing with god ol’ cotton muslin. instead of using an invisible zipper (i was afraid it would bubble under that stretch fabric), i handpicked a lapped zipper, stabilized with a strip of silk organza.

as far as the actual fit of the pattern, me likey! it did require a little tweaking – MAKE A MUSLIN – i had to move my vertical darts over and my horizontal darts up, but the overall fit is good! and it doesn’t use a whole lot of fabric. win win! i cut a size 4 and added a 1/2″ FBA… i think this made the shoulders fit better than if i had cute a size 4.

floral peony

floral peony
using the pockets

floral peony - OMG POCKETZ
omg pockets!

floral peony

floral peony - back
back
the bunching on the cummerbund is due to there being no stabilization at the buttonhole (i used polyester taffeta for my cummerbund, fyi). next time, i will put some interfacing there.

floral peony

want to see the dress without the cummerbund? you got it!

floral peony - no belt

floral peony - no belt
(no idea what my face is doing here)

floral peony - flat

floral peony - piping at waistline
ooh i love piping.

floral peony - inside
per usual, i finished the edge of my facing with rayon seam binding. i actually found this in my stash – the color is called “toast,” but i think it looks more like “baby shit.” anyway, it matches my dress (should i be unhappy about this?). oh, the red lines are from my markings. they won’t wash off this fabric, awesome.

floral peony - hem
more baby shit at the hem!

floral peony - belt
taffeta cummerbund. i love that this pattern only uses one button – awesome if you’re a button hoarder like me and have jars and jars of awesome buttons and only one of each.

floral peony
so yep! that’s my peony! i really love this dress, the pockets, the fit – everything! so much that i’ve already cut out my pieces for peony #2… and i know y’all want a little sneaky peeky, so here you go 🙂

plaid peony

😉

next up: the peony!

11 Nov

first, a sad story.

Photobucket
this is my sewing machine. it is a pfaff 7570 and it is my lifeblood. i paid more for it than some of my friends paid for their first car. i bought this machine – used – at the tail end of 2007, so we are approaching our 4 year anniversary (aw!). to say i love this machine is a serious understatement.

so you can imagine how upset i was when, during galaxy dress construction, the tension started messing up really bad & nothing i did would fix it. i had it cranked up to a 7, which is pretty unheard of for this machine. and on top of that, it was… squeaking whenever i sewed. UHM. MY MACHINE DON’T SQUEAK.

i had a minor panic attack and spent the next 2 days researching where to take it – the place i originally bought it from is sadly no longer in business, and the woman who serviced it last year (yep, i take my machines in to be serviced every year! you should too!) was nowhere to be found. i was starting to think i was going to have to drive to lousiville or atlanta to have the thing checked out – you can’t get a pfaff serviced by any ol’ dude with a tool set. then i convinced myself that i was going to need to actually replace the machine. cue more tears.

i did end up finding an authorized pfaff repair shop within 20 miles of my house (yay!). the guy looked at it and said that, while it doesn’t sound good, it doesn’t sound like i need to junk my machine or anything (double yay!). so right now it’s in the safe hands of the repair shop, and i anxiously await their call. there is some discussion that the woman who fixed it last time may have messed it up, which sucks since i paid her $89 and now i have to pay another $89+ to undo the damage she caused. ugh. anyway, fingers crossed!

in the meantime, i’m using my back-up machine:
back-up sewing machine
it’s a janome memory craft 4000 and i hate it. it is actually a decent machine, it just isn’t my pfaff. and i’m spoiled as shit and all i can think about are it’s shortcomings – like, i have to adjust the tension? ew, my pfaff does that automatically. and why isn’t there a light to show me the bobbin is running out? my pfaff could tell me when the bobbin is running out. i miss my dual-feed. this machine is ugly. i need a needle-threader. etc etc.

anyway, enough whining. let’s talk peony!

oooh u guise, this dress is EASY. easy easy! i started sewing on it last night & it’s practically finished! and it looks GOOD. i can already tell i’ll be making a few more of these 😉

i did start out with a muslin, as suggested by a few people. i’ll mimic them: make a muslin! i decided to try a different approach with this pattern – i usually cut a straight 4 for the bust, this time i cut a 2 and added a 1/2″ FBA. i also found out that i needed to move the darts around a little, as they were placed kind of weird according to my body shape. here is my altered bodice front:
peony alterations
see the ruled paper sections? that’s how far i had to move the darts. again: make a muslin! 🙂

for the 3 of you who live under a rock & don’t read good sewing blogs, jane hosted a giveaway recently for the colette sewing handbook. and i just wanted to rub in everyone’s face that i won! hehe 🙂 seriously, though, if you haven’t picked up this book – do check it out! it is full of great information & beautiful pictures. and PATTERNS. anyway, i mention the book because i used a few of the tips with working on the peony – the diagram for a FBA (a little more concise than fit for real people) and gathering stitches with 3 rows of basting. it is kind of tedious to sew three rows of basting stitches (especially on this stupid machine! ok ok, i’ll stop.), but the results are worth it. setting in the sleeves was SO easy. mine still have a few puckers, but it is mostly from my fabric choice – a thickish velveteen that i didn’t realize was stretch until it was too late. oops.

pockets
the pockets are some cheapie red lining i found in my stash… apparently they grew when i serged them, wtf.

peony progress!
and so far! there is piping at the neck & waistline, which was also found in the stash – a match made in heaven, i must say! i am headed to the fabric store to pick up cummberbund fabric – i’m thinking olive green. and a fancy button, of course. oooh buttons.

what are y’all working on this weekend?

completed: the galaxy dress, a loving ripoff

8 Nov

i know we’re all familar with the roland mouret’s galaxy dress:
galaxy dress - the original
although i did not discover it until last year, it became an instant “must-have.” lucky me, vogue 8280 it an absolute, blatant rip-off, making this dress completely obtainable for my greedy hands.

let me preface this post by saying this pattern is confusing as shit. it’s not necessarily difficult, per se, but the instructions jump around a lot and i noticed many people were complaining that they inadvertently caught themselves sewing up the wrong view. so, fair warning, y’all. i went over the instructions before sewing, circled & highlighted what i needed, and wrote things like “STOP!” and “DON’T DO THIS!!!!1″ under the ones that were unnecessary.

that was my smart moment.
my not-so-smart moment was skipping the muslin. oops. i ended up having to open up the shoulders & remove about 5/8” from each piece. this is an adjustment i ALWAYS make with vogue patterns – why i didn’t make the adjustment to the flat pattern, i have no idea. sometimes i just refuse to learn from my mistakes.

the pattern calls for lining only the bodice and self-facing the flanges with the fashion fabric. since my fabric is a super wooly, super itchy tweed, i interlined them with cotton & faced with my lining. i also lined the skirt and covered the sleeve heads as well. the whole thing is pink on the inside! yay pink! i also stitched down the flanges to the bodice, as otherwise they would have have just been flapping around, and no. the pattern calls for no interfacing or stay-stitching (right??), and i was afraid those seams around the neckline would stretch, so i stabilized them with strips of silk organza – both the bodice neckline & the curves of the flanges. nothin’ sadder than a gapey neckline, amirite?

i used the aforementioned itchy wool tweed (yard sale score – $3 for 4 yards OH YEAH) and watermelon-pink bemberg rayon (left over from my circle skirt) to line. i actually stashbusted the shit out of this project; the only things i had to buy were the seam binding and a spool of brown thread. basically, my galaxy dress cost me less than $10. take that, mouret!

galaxy dress

galaxy dress b00ty
this is a *very* fitted style, as evidenced by the booty protrusion

galaxy dress
i put a lapped zipper in the back since i was afraid an invisible zip would have trouble zipping over those layers. i like the effect, but i got a small bubble at the waistline. ugh.

galaxy dress
had to lighten this photo, but check out the sleeve detail! yeehaw!
also, i know i kind of look preggers here but i promise i’m not 😉

galaxy dress

galaxy dress - sleep cap
here’s a little progress shot – the sleeves are giant & droopy without support, so i made a sleeve cap to give them some lift. i used horsehair crinoline and stuck it between the sleeve & the sleeve lining. the instructions wanted me to put it on top of the lining… why?

galaxy dress - sleeve
happy sleeve!
i ended up tacking my down by about 1/2″ at the sides – they were super huge & too footballesque, otherwise!

galaxy dress
the lining took forever because i had to keep changing out the thread from brown to pink. i think it was worth it, though.

galaxy dress - hem
put a little seam binding at the hem

snap inside dress
the neckline also had it’s fair share of problems (something i could have dealt with if i’d bothered to make a proper muslin!) – it is wide. too wide to wear a normal bra with! i don’t do strapless and i don’t do braless, so i sewed these little snaps inside the V to hook my bra to.

bra snap
and here is the bra i sacrificed to the galaxy dress. it was the most low-cut out of any bra i own, and uhhh it’s teal blue.

so yep! there’s my galaxy dress, and another outfit down for fall/winter 2011! next up: the peony. i’m working on my muslin right now 🙂

galaxy dress

completed: ceylon v2.0

1 Nov

picking up where we left off…
green wool ceylon - progress

this turned out to be one of those “add-on” projects. you know – the kind that start out relatively simple (TNT pattern, easy fabric, no embellishment, etc) until you begin to branch with a bunch of “oooh, let’s add THAT to it!” i decided i didn’t like the way the fusible interfacing acted when i used it last time, so i used muslin as a stabilizer (basting it to the facing pieces, then trimming it out of the seam allowances). i decided to hand-embroider the yokes – this was actually really really easy, just time-consuming (done during my lunch hour over the course of a week or so. and yes, my coworkers are used to me doing this kind of stuff in the lunchroom :B). then i decided that i didn’t like the way the facings looked serged, so i trimmed all the edges in straight lace. i hand-hemmed the sleeves & skirt bottom. and i covered all 16 buttons, using the shittiest coverable buttons i could find (aka in my stash), without a tool. my fingers hurt and i should have learned my lesson from my last ceylon, but nope. at least i used all the buttons up – and i won’t be buying them again. at least, i don’t think so. ha.

i made one small adjustment to the pattern fit – tapered in the waist & hips to a size 0. i kept the bodice at a 4. i love the fit & i didn’t have to make any further modifications after cutting! yay! i also narrowed the skirt a little, to get it to fit on my piece of fabric. i had 2 3/8 yd of 44″ fabric (which is more than a yard less than the requirements on the envelope), but i managed to get everything cut, on-grain (!!), using some very creative cutting layouts & narrowing the skirt side seams.

wool ceylon

wool ceylon

wool ceylon

wool ceylon

wool ceylon

wool ceylon - tag & embroidery
i put a tag in… makes me happy 🙂

wool ceylon - buttons
OH GOD THOSE COVERED BUTTONS

wool ceylon - lace facings
lace-trimmed facing 🙂 you can see it in the sleeves, too – look closely.

green wool ceylon - embroidery detail
embroidery detail – forgot to take a close-up on the finished dress, whoops
here is the embroidery pattern i used – it’s free! i used 2 strands of cream-colored embroidery floss & outlined everything in a backstitch. there are a few french knots, those used all 6 strands.

wool ceylon - lace hem
lace hem

oh! i also made a covered belt to wear. it is the same shade of cream as the embroidery. i used muslin and a self-covered kit. i had high hopes of putting in cute eyelets & making the whole thing super jazzy & special, but i didn’t realize i needed a tool & those eyelets were shitty 1-piece eyelets anyway and now i’m pissed off. so have a slidey belt:
wool ceylon
what do you think? can’t decide if i like it or not. i wanted a green belt but i definitely did not have enough green wool left over after cutting out the pieces.

overall, i’m very pleased with my new dress. the fit is perfect & the wool is very warm – which is great for a southerner like me who thinks anything below 60*F should be against the law :P. the only thing that bothers me is the lace is white, and my embroidery is off-white. i considered tea-dying the lace, but it’s polyester & also i’m lazy.

special thanks to my kitchen wall for being such a gorgeous & colorful backdrop xoxo

wool ceylon