Tag Archives: completed

Completed: The Cascade Skirt

3 Jun

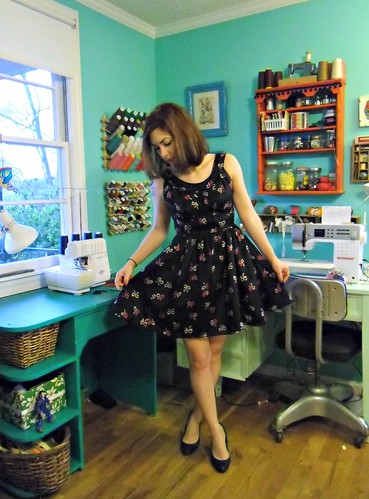
I think this might be my favorite thing I’ve made yet!

For those of you who have been around for awhile, remember this amazing fabric?
Fabric from Macedonia :D
It’s from Macedonia – my best friend bought it for me while she lived there last year. I’ve hoarded it for over a year, waiting for the ~perfect pattern to come my way. That proved to be a bit tricky – the paisley motif is fairly large (bigger than my hand), so it definitely needed to be made with a pattern that didn’t have a lot of little pieces. Since I look awful in shift dresses, I thought a maxi dress or skirt would be a good way to showcase the fabric – a lovely, floaty cotton voile. But, almost all the maxi dress patterns I found either required stretch fabric, or gobs of yardage (and I only had 2 yards). So I sat, and I waited as patiently as I could.

Then I got the Cascade pattern for my birthday, and it was like the heavens opened up and started singing to me RIGHT THEN.

Cascade Skirt

I mean, that skirt is pretty heavenly, y/y?

I did have to make a few changes to get this pattern to fit on my short yardage – I had two yards at 60″, and the pattern calls for 3. I did take about 5″ off the back length (partially to preserve precious yardage, partially because I am not an Amazonian Long Legged Beauty like the model and thus did not need a skirt that came down to my ankles :P); I also used the waistband option that buttoned, rather than the ties – again, this saved a lot of yardage. Also, just a head’s up, but I chucked another 2″ off the length once I had the skirt assembled, as it was still a little long. I love the length now!

Cascade Skirt

I sewed the XS and other than taking up the length, I didn’t make any adjustments. This is a VERY easy pattern – it definitely has a lot of wow factor, but it’s super super simple to put together. Even with the french seams and the rolled hem that is FOREVER long, it came together very quickly.

Cascade Skirt

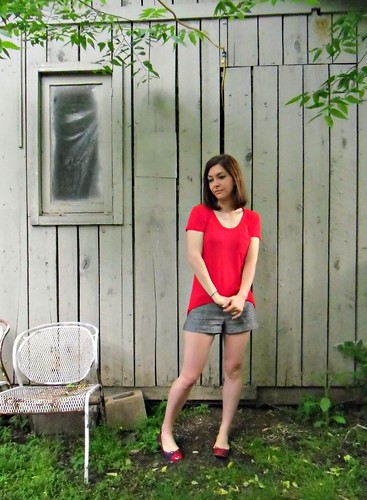
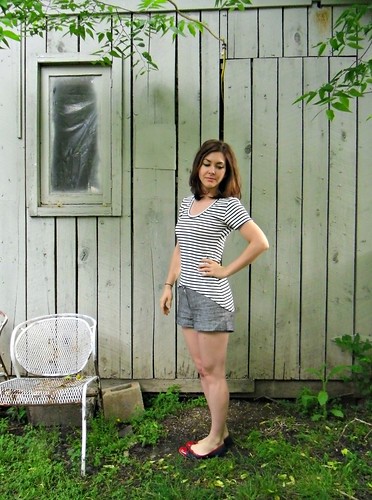
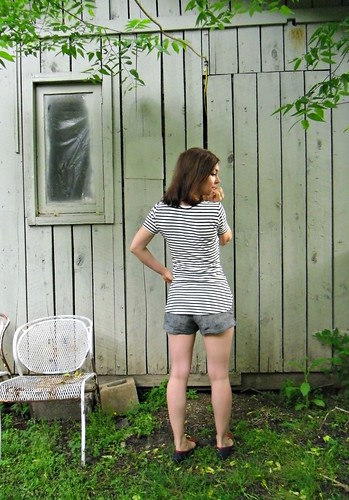
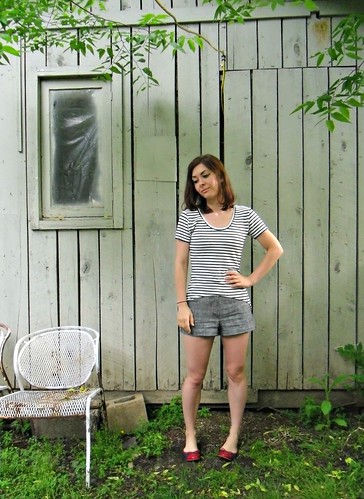
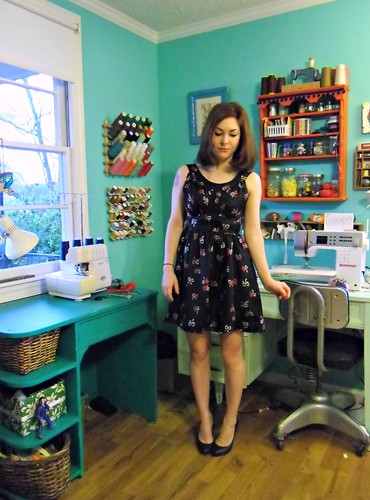
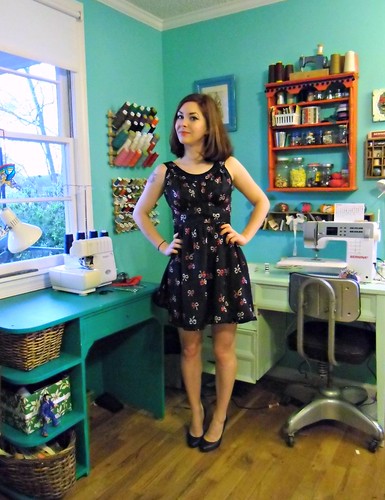
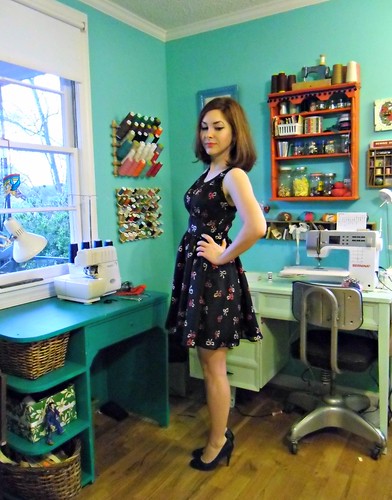
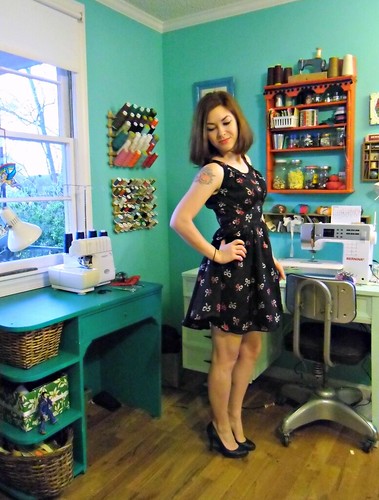
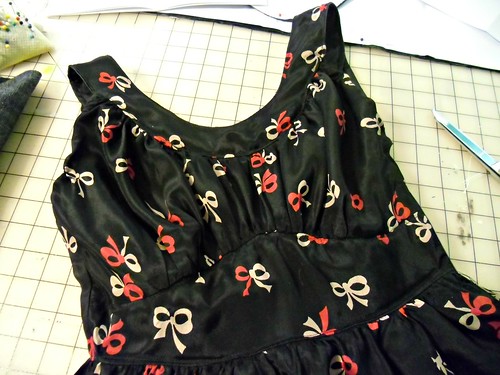
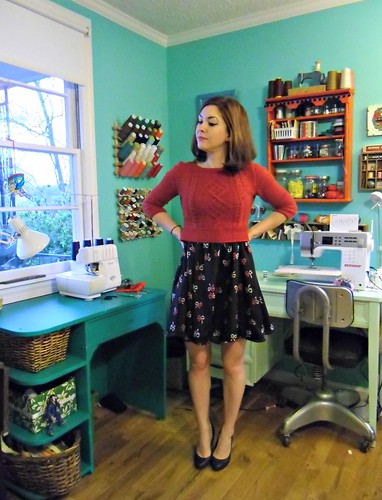
I even had time to throw together a little tshirt to wear with it 🙂 This is the Briar top, the cropped version with short sleeves. It’s basically the same as the ones I’ve made before, just shorter! I tucked the back into the skirt for these pictures, FYI.

Cascade Skirt

But let’s get back to that skirt.

Cascade Skirt

Fuck yeah.

Cascade Skirt

This shit totally makes me feel like Shakira, and I mean that as the highest possible compliment.

Cascade Skirt

And it’s perfect for showcasing this large print, so yay!

Cascade Skirt

The button-band of this skirt is actually really great for using special buttons, since you only need two.

Cascade Skirt

I love these buttons! I’ve been hoarding them for years; since I only had 2, I couldn’t find a suitable use for them. Nailed it 🙂
Also, I totally used purple thread. I didn’t have any pink on hand and I think the purple actually works really well 🙂

Cascade Skirt

Cascades! One thing to keep in mind if you make this pattern is that the wrong side of your fabric will show at the back (that is, assuming you don’t line it). So make sure your fabric is pretty on both sides! As you can see, mine is almost the same – just a little less bright.

Cascade Skirt

Cascade Skirt

Not much else to say here (sorry for the picture overload, btw – I got excited I guess, haha), but I’m so glad I found a use for my special fabric!

As a side note, guess who IIIIIIIIIIIIIII hung out with on Friday…
Oh nbd just hanging out with @elisalex !!!!!
Yep, that would be the lovely Elisalex from By Hand London!! EEEE!!! She was in ‘Murica for a week, and made an evening pit stop in Nashville, so OBVIOUSLY we met up and went dancin’! I also was there for her very first PBR (sorry, Oona! I know you hate that stuff, haha!) 🙂 She’s just as fun (and gorgeous!!) and you’d expect in person. It was a magical evening and it was STELLAR to meet her and I’m already trying to figure out how to save up enough to go visit HER! So hopefully soon there will be a LLADYBIRD-UK edition. Yes? Yes.

Also, one last thing!!

Refashioners

The Refashioners is live, starting today! Head over to Miss P’s blog to check out all the posts for the next two weeks 🙂

The lovely ladies involved this year are Karen, Tasha, Marie, ME (!!!), Zoe, Sally, Joanne, Liz, Dixie, and Elisalex. I am DYING to see what everyone made up, can’t wait!

Me Made May ’13 – Week 5 Round-Up

31 May

OMGAH I am so happy to finally be done with Me-Made-May! I loved participating, but MAN taking pictures of myself every day got real rough, real fast. Let’s round up the past week, yeah? Also, fair warning: I just had 4 cups of coffee and I’m real jittery and I kind of hate myself right now.

5/25
5/25, Saturday
Shirt: Megan Nielsen Briar top
Shorts: Sewaholic Thurlows
Necklace: Fire Finch
Shoes: Keds
After a 7.5 hour drive, we made it into Florida! Yeah! This is the balcony of our condo; we were waiting for my parents to figure out the lock situation so we could get inside. Landon took this picture, btw- he took all the pictures while we were in Florida.

5/27
5/26, Sunday Part 1
Sunglasses: Pangea
Bathing suit: Can’t tell you just yet! It’s a pattern I tested that will be available soon, though 😉 (and yes, I got permission to post this from the patternmaker! I won’t say what it is, but if she wants to announce herself in the comments…)CAT’S OUTTA THE BAG!! Check out this post if you want to see a sneaky peek of the swimsuit (and reveal who is the mastermind behind this gorgeous pattern!). I’ll have a review post up after the pattern launches, fo sho.

This is the first bathing suit I’ve ever made! This is also the first time in a LONG time – like, years and years long time – that I’ve gone out in public wearing a handmade something and worried that it would fall apart at some point. I’ve been wearing my me-mades for so long, I don’t even give them a second thought… I trust that the construction is well-done, and that I won’t have any wardrobe malfunctions. But a bathing suit – that’s a whole different ballpark! I was almost afraid to go in the ocean, oh god what if I didn’t sew something right!?!
Spoiler: It held up fine 🙂 For both swimming AND sunbathing. Win!

5/26 part II
5/26, Sunday Part 2
Dress: Sewaholic Lonsdale
Shoes: Born
I LOVE this dress and I’ve been dying to wear it since I first made it! Since I wanted MMM to not involve any outfit repeats, I hoarded it until my vacation. Worth it, although I’m excited to be able to wear it, like, once a week now 🙂

5/27
5/27, Monday ~Memorial Day~
Top: Thrifted, recostructed by me
Shorts: Papercut Patterns Rite of Spring shorts
Necklace: Flea market
Shoes: Born
Spent the day wandering around Seaside (no bikes this year – I ran a couple miles that morning and I was TIRED because I am a BABY), and then drinking on the beach in the afternoon 😉
Sorry this picture is so dark – I had to lighten it considerably to get anything to show up! Totally felt like a babe in that outfit, btw.

5/28
5/28, Tuesday
Shirt: Megan Nielsen Briar top
Shorts: Sewaholic Thurlows
Necklace: Fire Finch
Sunglasses: Pangea
Flip-Flips: The Children’s Place (yep, I have small feet haha)
Last day on the beach 😦 I miss the ocean already 😦

5/29
5/29, Wednesday
Top: Colette Patterns Sorbetto
Shorts: Sewaholic Thurlows
Shoes: Born
Belt: Thrifted
Sorry for the shitty picture! We got home Tuesday evening, and Landon left for a business trip early early Wednesday morning (ew). I did take a couple of days off to get some work done around the house – and to take a SEWING VACATION fuck yea – so this is as good a picture as you’re gonna get.

5-30
5/30, Thursday
Top: Megan Nielsen Cropped Briar
Skirt: Megan Nielsen Cascade Skirt
Shoes: Franco Sarto
Necklace: Fire Finch
… and here’s the result of my sewing vacation! A whole new outfit, hahaha!!! I’ll write a proper blog post about this next week, but here’s a sneaky peeky for now 😉 What you should know is that this fucking skirt makes me feel like Shakira, and I mean that in the best way possible.

5-31
5/31, Friday
Top: Papercut Patterns La Sylphide
Skirt: Megan Nielsen Kelly skirt
Shoes: Sam Edelman
Just kidding, I made another shirt on Thursday. Ha! Expect a blog post on this next week too 🙂 There *is* a peplum on this, it’s just tucked into the skirt. Also, I realize that I’m teetering dangerously into Canadian Tuxedo territory, with the denim skirt and a chambray shirt, but idgaf. You’re just lucky I didn’t put on my denim jacket too.

And that wraps up Me Made May ’13! For the rest of the weekly recaps, check here:
Me Made May 13 Week 1
Me Made May 13 Week 2
Me Made May 13 Week 3
Me Made May 13 Week 4

I had a lot of fun participating this year, but as I mentioned before – taking pictures is a PITA. Glad that part is over! I also got a little burnt out on trying to figure new outfits… since I’ve lost weight this past year, I dropped a couple sizes and most of what I made last year is too big now. I figured a lot of this out as I was getting dressed in the morning which led to some frantic scrambling around (I’ve developed this weird aversion to wearing stuff that doesn’t fit perfectly. I can’t do it! I’ll sit and fuss with it all day and be uncomfortable), and occasionally wearing stuff that just made me feel blech. I really need to purge out my closet.

I also really missed wearing some of my clothes – my vintage dresses sat unloved all month, and my very favorite outfits only got worn once due to the no-repeats. I’m glad I branched out, but man, I really just want to wear the same thing every day for a week now!! Haha!!

Also, speaking of branching out… I need to explore other shorts patterns. I love love love my Thurlows (clearly), but maybe I should give some other shorts a try, yeah?

To everyone who participated in Me Made May – YAY WE DID IT!! Aren’t you so glad to be off picture patrol now? 😉

Now I leave you with one last picture of Florida… the view from our balcony.
Practically paradise
This is supposed to make you jealous. Did it work?

Completed: The Briar Tshirt (with Bonus Thurlows!)

21 May

Hey, look, I finally got my ass into gear and hopped on the Briar bandwagon! Yay!! I know I’ve hated on the high/low hems in the past (aka mullet hems) but if anyone can make a high-low hem look like something I need in my closet, it’s Megan Nielsen, Our Lady of the High/Low.

Stripey Briar, Linen Thurlows

Actually, I made TWO!!

Red Briar, Linen Thurlows

Oh, and another pair of Thurlow shorts for good measure 🙂

Linen Thurlows

I mean, why would I pair my beautiful new tshirts with an old pair of shorts? AS IF.

Red Briar, Linen Thurlows

This red one is the first one I made (and sorry in advance for the overly saturated pictures – red is hard to photograph!). I used a super drapey rayon knit from Fabrics for Less in NYC; it’s delicious and airy and PERFECT for this kind of top. I don’t normally wear such loose-fitting clothing (and I know y’all are laughing because this is hardly loose-fitting, but it is for meeeeeee ok!), but I LOVEEE this way this looks and feels. Must make several more.

This version has a tiny pocket (which, yep, you totally can’t see) and I finished the neckline with a binding – partially because the fabric is soo drapey, it wouldn’t work with the normal stretched bands, and partially because I wanted to try a new technique! I must say, I’m really happy with now the neckline turned out. It’s perfect and flat and looks really good. Megan Nielsen, you are a binding genius.

Red Briar, Linen Thurlows

I was smacking a mosquito in this picture (the ‘skeeters were sooo bad this morning, ugh!), but I like that it shows the tshirt doesn’t gape out when you bend over. Nice!

Red Briar

For this shirt, I sewed an XS and took in additional bit at the side seams because it was a little loose. I also cut about 3″ off the length (I cut it off the bottom for this one, but for the next one I did properly slash and shorten the pattern pieces like a good seamstress ;)).

Red Briar

Oh, yeah, and I used the last of my neon yellow twill tape to stabilize the shoulder seams 😉

Stripey Briar, Linen Thurlows

I made the second version immediately after. Ha! This one is a fairly hefty weight knit from Mood when I was in NY. I’ve been hoarding this fabric for the months since and I’m so glad I went with this pattern because I think it’s pretty perfect! Of course, I got way too excited/ahead of myself and neglected to match the stripes at the side seams… oh well!

Stripey Briar, Linen Thurlows

This version is pretty much the exact same as the red one, except that I finished the neckline with a band instead of the binding. I actually tried the binding first, since I loved it soo much – but my machine was NOT having it. The fabric was too thick, anyway. So, band it is!

Stripey Briar, Linen Thurlows

Stripey Briar

I left off the pocket for this one, and also ended up taking in the side seams quite a bit – at least 1″. Since the fabric is fairly heavy, it looked weird all blousey. Like it was too big. This looks much better, and bonus – it looks great tucked in!

Stripey Briar

I really love this fabric and I wish I’d bought several yards of it, oh well!

Linen Thurlows

For the shorts, I don’t have much to elaborate on as this is like my squillionth pair. Haha! I used my TNT pattern and whipped these up in a couple of evenings (they are RILL easy after you made a bunch of them, just fyi!).

Linen Thurlows

For fabric, I used a beautiful, soft grey linen that I got from my new favorite local fabric source, Muna Couture. Muna’s shop is actually a dressmaking shop – and she makes some pretty incredible ball gowns and wedding dresses – but she also sells fabric. Not just fancy dress fabric (although there is plenty of that, and it is AMAZING), but also basic stuff for daily wear, like wools and linens and prints. I got this remnant from her and it was *just* enough to squeeze out some shorts. I love that they’re linen – so breezy and nice for summer! They do wrinkle a bit with wear, but not too bad 🙂 The white lining is fabric leftover from my Madeline bloomers.

Linen Thurlows

This is the only bummer about the shorts – I drew on the fly with my disappearing wax, and it didn’t disappear! WTF!!! I managed to fade it out a bit (put a piece of paper over it, applied heat, and then rubbing alcohol very sparingly, if yr curious), but it’s still pretty disappointing that you can see it. Sooo with that being said, important lesson learned here – ALWAYS test your marking utensils before marking on your fabric! DUH. I should have been doing that anyway, but I wasn’t, and now I know, and it won’t happen again. Learn from my mistakes 🙂

Side note, today is the last day to get 15% off at Sweet Little Chickadee, so get on it, son! Use the code LLADYBIRDBIRTHDAY and get to shoppin’! You could even get the Briar and Thurlows, y’know, if you wanted to be like me 😉 ha!!

Another side note, it’s my birthday todayyyy!! Yay!! Happy birthday to all my birthday twins (there were several of you, yay 5/21!!!) and all the other May Babies 🙂

me & my dad :3

Here is my gift to you, baby L with my dad 🙂 AWWWW!!!

Completed: A Hawaiian Lonsdale

13 May

I actually had this finished a couple of weeks ago, but it’s taken me this long to post since I had to get a special bra to wear with it. And by “special,” I mean strapless. I don’t know why I’m talking about my bra right now, let’s talk about this dress instead!

Lonsdale

This is the Sewaholic Lonsdale dress. REAL TALK: When this pattern first came out, I had absolutely no intention of sewing it up as I assumed it would be mega unflattering on me. Not because of the bra issue, like most people pointed out – I have no problems with wearing a strapless bra, it’s like a staple in my lingerie wardrobe (and yay that I finally have one that fits!) – but because the bodice doesn’t have any darts, which I figured wouldn’t work with a large bust. Also, this pattern eats up a lot of fabric and I just wasn’t feeling it. So no Londsale for me, at least not while everyone else was snapping them up.

Lonsdale

While I was in NY, we had a mini sewing stuff swap (which I’m REALLY sad I missed out on dumping into… I will have to come back with a suitcase full of patterns and we can do it again, ok?? Hmm plane tickets appear to be cheap right now…) and Sonja added this to the pool, encouraging me to try it. So I snapped it up and found this fabric the next day… it’s from Chic Fabrics, and it was $5 a yard. HELLS YES. Lonsdale, comin my way!

Lonsdale

As I was trying it on (no muslin, and not really even a tissue fit… I just based my size off the finished measurements and started cutting), I realized that this dress is SUPER cute and flattering. A bodice with no gathers or bust darts, who woulda thunk?

Lonsdale

I also totally get why everyone keeps freaking out over the skirt, it’s really flattering!

Lonsdale

(Not really sure what I’m doing here… smelling the breeze, maybe?)

This is a size 0, by the way. I did not make any alterations to the pattern, except my zipper insertion (lapped instead of centered) and I cut something crazy like 5″ off the hem. I like my skirts to hit above my knee.

Lonsdale

Sorry for the shit picture and my sad little droopy bow, but isn’t the back cute?? I LOOOOVE that the straps are adjustable, since I can never seem to get them right on the first/second/eighth try. Now I don’t have to worry, whoop whoop.

Lonsdale

I definitely want to make a couple more of these – or even just Lonsdale skirts, gawd – as I can see myself wearing these aaaall summer. I think you could probably reduce the amount of fabric needed, too, with some careful planning. Part of the bulk of fabric yardage comes from the bodice being double-layered (you can see the second layer a little bit in my close-ups, as my fabric is slightly sheer), and the ties are one big long piece that goes into forever. I think this could be REALLY fun with the lining being a contrasting fabric – you’d see the contrast in the ties and around the neckline.

Lonsdale

Here’s a terrible close-up. Sorry! The sun was REALLY bright and I don’t do that whole wait-until-it-gets-less-bright patience thing very well 😉

Lonsdale

Lonsdale

If you’ve been holding out on this pattern because of the large bust issue, maybe this will sway ya 😉 It swayed me, anyway!

Can’t wait to bust this shit out on my vacation! LONSDALE 4 LIFE.

Completed: Rite of Spring Short-Shorts

6 May

Wooohoooo y’all, Katie was NOT kidding when she described this pattern as “Pin-up style shorty shorts.” These puppies are SHORT.

Rite of Spring Shorts

‘Scuze my white legs. Sorry not sorry.

Rite of Spring Shorts

These are the Rite of Spring shorts from Papercut Patterns and I am 1000% in LOVE with them. I couldn’t imagine how they were going to turn out based on the pattern art and photos – in some ways, they kind of look like underwear, almost – but having made them, I do they think they are definitely just like those pin-up style shorts that we are always gawking over in Time Magazine photos or whatever.

Rite of Spring Shorts

Just be sure you’re ok with showing a LOT of leg because, well, they’s short.

I cut these in the very smallest size – XXS – and shaved an extra 1/4″ off each seam to get a close fit. That’s it! I am actually surprised – and DELIGHTED – at how well these fit straight out of the package, especially considering how much trauma I went though to get my Clovers to fit. I was expecting to have to mess with the crotch length, the depth, the rise, all that shit – but they’re pretty perfect. So yay!

Rite of Spring Shorts

I have so many favorite parts about this pattern, I don’t think I can just narrow one thing down. I love the curved side seams that make your waist look half the size it actually is. Piping is optional – but if you’re making these, I strongly encourage the piping, especially if you’re working with a busy fabric.

Rite of Spring Shorts

I love how the back curves down too – for a little extra butt coverage. I think my very very favorite thing is that the back hem is actually faced with self-fabric – so if it flips up, you still see the right side. I mean, I might be showing asscheek or whatever but GOD FORBID you see the wrong side of the fabric amirite 😉

Oh, and the rise is super high – like past the belly button high – so these are totally suitable to wear with crop-tops.

Rite of Spring Shorts

And look at how the hem flips out on the sides! DARLING, JUST DARLING.

Rite of Spring Shorts

Putting these together was surprisingly quick and easy. There are only a 4 pieces, and even with the piping and the zipper I still had them done within a couple of hours. They also just use the tiniest scrap of fabric (I mean, duh, they’re tiny as it is – but sometimes shorts suck up a surprising amount of fabric, you know?). I should’ve measured, but I think I used something like half or 5/8 yard. The fabric is actually leftover from my Miette Wrap Skirt, and the piping is leftover bias binding from my Blue Lace Robson Trench.

Rite of Spring Shorts

The pattern calls for an invisible zipper in the back, but I was in major stash-bust mode so I subbed in a lapped zipper. I think an invisible zipper would definitely look nicer, but this isn’t so bad!

Rite of Spring Shorts

I’ll confess, I was hesitant about adding a zipper right up the middle of that back seam because I wasn’t sure if it would backfire and look terrible. I don’t think it does, though – it’s totally inconspicuous!

Rite of Spring Shorts

I didn’t do the best job of putting these together, as they’re more so a wearable muslin (oh you just wait and see what I have planned for this pattern…), but I think they’ll actually get a lot of wear during Me-Made-May! Polka dot shorty shorts, yay!

Rite of Spring Shorts

Here you can sort of see the polka-dot piping. Unfortunately, my fabric had the polka dots printed so that they kind of don’t show up on the bias strips… so my piping is only half-assed polka dots. Oh well!

Rite of Spring Shorts

If you’re lurking on this pattern as hard as I was, be aware that Papercut Patterns is currently offering free worldwide shipping. HOT DAMN, Y’ALL. Butt shorts for everyone! 😀

Completed: The Blue Lace Robson (!!!)

2 May

Ok folks, here ya go – big reveal time!

Lace Trench

LOOK THAT GORGEOUS BLUE TRENCH COAT.

Lace Trench

JUST LOOK AT IT.

Lace Trench

For the full nitty-gritty of this project, see my posts part 1 and part 2 for the making of.

Lace Trench

If you just want quick facts, here ya go! The pattern is the Robson Coat by Sewaholic Patterns. I cut a size 2 at the shoulders/neckline, graded out to a 4 at the bust, and then down to a 0 at the waist/hips. I removed about 3″ of length from the bottom, and about 1″ of length from the sleeves.

Both of the main fabrics are from Mood – the blue lace for the top (and yeah, sorry, but I bought the last of it! HA!), and the cotton sateen underlining. The polka dot batiste I used for the bias stripes came from my local fabric store. I’m sure Mood had something perfect in the store, but it’s hard to color-match from several states away (and if you were wondering… I had one of the employees help me pick the underlining to make sure I had the right color).

Lace Trench

Fair warning: this coat eats up a LOT of fabric! Not the full 6 yards as suggested by the pattern envelope (at least not in my size!), but I still wouldn’t recommend this for a very expensive fabric unless you are just really really in love and willing to deal with the cost. I spent about $175 on materials for this coat – that includes the blue lace, the navy underlining, the polka dots that I used for the bias strips, the interfacing, the thread, and the buttons. Yes, part of this *was* subsidized for Mood as part of the Mood Sewing Network, but I still had to pay quite a bit out of pocket. I’m not saying it’s not worth it – because it isssssss – but be forewarned that this coat can get very very expensive, very fast.

Lace Trench

Still, it’s a helluva lot cheaper than that $2000 Burberry trench I see floating around Pinterest. Forreal!

Lace Trench

Plus, it’s not a boring neutral color. That fucker is BLUE.

Lace Trench

Anyway, I used a little under 4 yards of 54″ wide fabric to cut the coat. Keep in mind that I did shorten the length (and my ONLY regret is that I shortened at the hem instead of at the waist because the pockets are a bit low. Oh well! I don’t use pockets that much anyway). My cotton sateen was 50″ and I used about 4.5 yards of that. For the bias tape, I bought 2/3 yard of 45″ fabric and made my own 1/2″ tape…. I did not use the whole 2/3 of the yard, as I stopped when I got to 20 yards. I did however, end up using about 15 yards of the stuff to bind my seams. I know the envelope calls for less than that, buy an extra package if you’re unsure!

Lace Trench

Lace Trench

I can wear the lapels up or folded down. Which one do you like better?

Lace Trench

Lace Trench

Here it is open. Omg I felt like such a flasher taking that picture, ha!

Ok, I’m running out of things to say so here’s a picture dump.

Lace Trench

Lace Trench

Lace Trench

Lace Trench

Lace Trench

Lace Trench

Lace Trench

I could not be more thrilled with my finished coat – all the workings of a classic trench, but sewn up in a beautiful (and colorful!) lace! Yes!!

Special thanks to my friend Jenna for taking these gorgeous pictures (oh yeah, you didn’t think I took these, did ya? :)) and capturing our beautiful city in the background. She is the best, and if you don’t already follow her you are SORELY missing out. Also, sorry not sorry for the picture overload… I’m just elated, ok!?

Welcome to Music City, y'all!

Yay Nashville!

Completed: Peacock Pullover

26 Apr

Hey look, I finished another sweater! What does this make, 8? Give me another year and I’ll have all those nasty arcylics in my closet replaced with glorious handknit wools, woohoo.

Peacock Pullover

As boring as this name is (“Peacock Pullover”? Really? Whatever, you should know by now that I’m not imaginative with my garment names), calling something a pullover will always make me think of this:

pullover-dumb-and-dumber

Which is pretty much one of the best things (from one of the best movies) ever, amirite? Unfortunately, this sweater isn’t very exciting. You could stop reading this post right now and still get the general gist of it. It’s a basic raglan pullover with a crew neck. Snore.

Peacock Pullover

But y’all know I’m a big proponent of making ~basics~. And this is totally a basic sweater, but hey – the color is fun, yeah?

Peacock Pullover

This pattern is the Ladies Classic Raglan Pullover. Obviously, mine looks a bit different than the pictures on the project page, and I’m not just referring to the color. Mine is much more fitted as I prefer to have a bit of waist definition with my sweaters. It wasn’t too hard to get the fit adjusted, although in my first go, I didn’t try the sweater on enough and after finishing the waist I realized that it was WAY too big. Ugh! I spent an entire week ripping out about 30+ rounds of stockinette. It’s still a little big – there’s some weird bagging on the sides of the chest where the ease suddenly becomes positive instead of negative – but it fits pretty well for the most part.

Peacock Pullover

If this is starting to look like deja-vu, that’s because Tasia recently(ish) knit this pattern in brown. I swear, I had it in my queue long before I saw her finished project, buuuuut I fully admit that her pictures were what moved the pattern to the top of the queue. God, she always knits the best stuff. I gotta stay out of her Ravelry or else I’m going to start looking like a total creeper, ha.

Peacock Pullover

Anyway, I’m just going to glean over the basics here (if you want the full deets, check out my Ravelry notes). This is a size 33, with modifications to the waist and arm width. I used Plymouth Galway in a lovely peacock blue; it’s similar to my beloved Cascade 220 except a bit cheaper (and this was REALLY cheap, as I picked it up during the after-Christmas sale at Haus of Yarn). I started it during my flight to NYC, and finished earlier this week. It would have knitted up much faster had I not spent a week unknitting my boo-boo, but oh well 🙂

Peacock Pullover

Next time I make this, I will probably go down another size, as well as make more decreases. It’s still a little too baggy for my liking.

Peacock Pullover

At any rate, this is a great pattern – quick to knit, easy to customize (look at the other Raveler’s projects; some people have made their with STRIPES. Ooh!), and fairly mindless stockinette. I think this would make a great first-sweater pattern. Bonus – it doesn’t use a whole lot of yarn! Which means I still have like 3 skeins of that peacock blue laying in my yarn stash. Uh.

Peacock Pullover

Sorry these pictures are bad, by the way! I took these yesterday as soon as I got home from work. Lesson learned – wait until the brightness of the sun goes down JUST A BIT. And yes, I am totally wearing shorts with my wool sweater. Whatever, it was like 80* outside and this is my blog and you can deal with it :B

Peacock Pullover

But hey, spring is totally in the air. Here I am looking at the birds fussing at each other in the tree above me.

Peacock Pullover

And lest you think I live in a mud pit (naw girl, that’s just the one part in front of my nasty-ass shed, ha), here is proof that the rest of the yard has exploded in green. I just realized that bush behind me is honeysuckle, and you have no idea how happy that makes me.

Completed: Another Kelly Skirt, In Denim!

15 Apr

Let me just start off by saying I LOVE this Kelly skirt pattern. It’s incredibly simple – 5 pieces, and the skirt sections are nice and rectangular (which is magical when it comes time to make flat pattern alterations, especially to the length). Easy and fun to sew, and super duper flattering. I love it and I want to make its babies.

Denim Kelly Skirt

And I love my denim version – I really really do – but DAMN GIRL we got off to a rough start 😦

Denim Kelly Skirt

I bought this denim at Mood while I was NY (I’m starting to sound like a broken record… sorry! I told you I bought a lot of shit while I was there, deeeal with it haha). While I can’t tell you exactly what it is so you can find some for yourself (although George might, he found it and squirreled it away for me because he is awesome), I can say that it is a lovely light/medium weight, dark dark denim with no stretch. The color is super rich, and it has a nice body without being super heavy and stiff. Also, I bought like 3 yards of it. Expect more denim-wear, aha 🙂

Denim Kelly Skirt

So, like I said – this is the Kelly skirt. I made this lil’ dude before in corduroy. I wanted to make this immediately after that silk near-disaster, as something easy and mindless that didn’t require a lot of focus. Plus, my wardrobe was desperately missing a denim skirt, as my faithful denim Ginger is just way too big for me to continue wearing at this point. Kill two birds with one stone? Don’t mind if I do!

Denim Kelly Skirt

Well, I don’t know what I did wrong here, but the making of this skirt was a HOT MESS from practically beginning to end! You can’t tell from the finished skirt, because it’s awesome (and I’m totally tooting my own horn here, dgaf. toot, toot), but there was lots of screaming and cussing during the process. I know, I cuss even when I’m thrilled with how things are going – but I’ve never cussed AT my machine until this. Sorry, Nina :\

Denim Kelly Skirt

My biggest issue was that top stitching thread. My machine was NOT having it, and kept throwing fits at me every time I tried to sew. If you think the topstitching looks good – well, that’s because I ripped out out several times. I had a lot of practice at that point! Good thing denim is forgiving when you hit it with the steam iron, because I had a big ol’ denim needle and everything. The machine just kept flipping it’s shit over the thread – I had to use all-purpose (aka, regular) thread in the bobbin, which caused the tension to freak out in a major way. I probably spent about an hour fussing over the bobbin tension, trying different threads and needles and changing the numbers and… ugh. That was the biggest issue. I was so concerned, I actually asked the Bernina store if my machine was behaving normally or if I needed to take her in for a check-up. General consensus was that the machine was being finicky due to the thread, that these things happen, and next time I should try a topstitching needle (me: oooh, those exist?!).

Denim Kelly Skirt

So, I spent foreeeeever messing with that, and ripping seams and restitching and re-ripping, and finally I had my waistband on – topstitched and everything. I put the skirt around my waist to check the fit. Uhmm… I know my last skirt was a tiny bit big, so I sliced off just the tiniest bit of size for this time… and it was TOO SMALL. Like, a good half-inch smaller than my actual waist measurement. Wtf?! I don’t know what I did, but I must’ve fucked it up somewhere. I also couldn’t let the waistband out at the seam allowances because I’d aggressively clipped the corners for when I turned them out :X

Denim Kelly Skirt

In the end, I unpicked the old one and cut a new waistband. It wasn’t too painful to do – especially with that steam press interfacing fusing masterpiece I now have. YEP. I also ripped out one of the front plackets and sewed it slightly narrower, to give the skirt a little bit of extra room up top.

Denim Kelly Skirt

I also had problems with my button holes. The machine just wasn’t having it… especially when I tried to make them vertical. I ripped out 4 button holes before I just let them be horizontal. I also had problems with top stitching the hem, but I won’t get into that. I can just be an idiot sometimes.

Denim Kelly Skirt

After seam-ripping my button holes open, I don’t really like the way the threads are hanging out there everywhere. So sloppy! Soooo, I bought myself a button hole cutter. FANCY. I can’t wait to use it!

Denim Kelly Skirt

You may notice that I didn’t have enough buttons – the pattern calls for 7, I had 6. I compensated by only putting one on the waistband, and sewing a hook and eye below it so it wouldn’t gape.

Denim Kelly Skirt

The topstitching did turn out nice in the end, after MUCH finagling. Just a little tip – when you’re topstitching, increase the stitch length slightly (for me, I go from 2.5 to 3). It makes for a prettier stitch 🙂

Denim Kelly Skirt

And hey, here’s a little surprise – polka dot in the pockets! This is the same Marc Jacobs fabric I used for my Miette wrap skirt.

Denim Kelly Skirt

One last thing – remember when I said I only had 6 buttons for this skirt? Wellllll, I was trying to jump on Landon’s back and unfortunately I broke the bottom button. Haha! I mean, split the shank and everything. So now I only have 5. If the hem stitching looks mis-matched, it’s because I pinned the skirt together at the bottom for the pictures and I didn’t do quite a good job. I promise that shit actually matches… I spent a good 45 minutes futzing with it, you know 😉 OH, and in case you were wondering… that is totally an original Stray Cats shirt, and it is totally awesome.

This will be great for Me-Made-May – I LIVED in my denim Ginger last summer. So glad we can finally be reunited, even if it’s a different pattern 🙂

Completed: My Easter Outfit

12 Apr

Remember that wool crepe I bought while I was in NYC? Remember how I was afraid it was going to be too winter-y for a climate that’s already rapidly approaching summer weather?

WELL, CHECK THIS SHIT OUT:

Easter Outfit

I made me a fancy lady flouncy pencil skirt! Totally banking on Carolyn’s reassurance that wool is a lovely fabric to wear during the summer, I decided to test that theory by making it into a skirt. I really wanted a whole ladysuit – or even a dress – but unfortunately, this kind of saturated yellow doesn’t do favors for my coloring. I went with a skirt so there would be plenty of space between my face and the yellow.

Easter Outfit

I felt pretty silly making a wool pencil skirt just as we’re creeping into 75* days – I mean, I’ve always thought of wool as a winter fabric (and I’d guess that a lot of people feel the same way). The best coats are wool – why would I wear wool in the summer heat? Isn’t that just asking for a sweaty disaster?

Easter Outfit

So here’s my little wool crepe pencil skirt for spring – in the kind of bright yellow that would almost be embarrassing if it wasn’t so awesome. But sit back down for a spell, there’s a lil’ surprise in the back…

Easter Outfit

… a circular flounce insert! I call it a party in the back, Landon calls it my tail. Either way, it’s a fun little addition to jazz up an otherwise plain pencil skirt (well, as plain as a *bright yellow* wool crepe pencil skirt can be, I suppose!).

Easter Outfit

This pattern is Vogue 8317, which I received during a sewing swap (also while I was in New York – thanks, Oona!). Just based on the envelope art, the pattern is a bit dated looking (I originally thought it was from the earlyl 90s, but the copyright date is 2006 wut), but the line art showed promise. I made a 10, although I probably should have done a smaller size as I needed to take in quite a bit at the waist. I also shortened the skirt by about 2″ before cutting into my crepe.

Easter Outfit

Easter Outfit

Easter Outfit

Easter Outfit

The skirt is fully lined with Bemberg Rayon. I originally wanted a bright yellow like the crepe, but there wasn’t any in the store when I was there (nor was there any white – at least not in rayon!), so I ended up getting a light peach that is very close to my skin tone. Surprisingly, it picks up quite a bit of the hue of the wool and almost looks like the exact yellow I was trying to obtain. Love it when that happens!

Easter Outfit

Easter Outfit

I also made my bow-neck blouse, using polka dot cotton batiste (from Mood, of course) and Simplicity 4676, a vintage pattern. The batiste is quite sheer, so I underlined the body with white batiste. I love this stuff – it’s incredibly soft and lightweight, and the black and white pin dots go with EVERYTHING. Seriously. I will probably end up wearing this top all summer, it’s so good!

Easter Outfit

Easter Outfit

Easter Outfit

I made this outfit to wear for Easter dinner with my family, but I can definitely see myself wearing it all throughout summer, as well as pairing up the individual pieces with different tops and bottoms. Oh, and to answer my own question at the beginning of the post- wool crepe gets two thumbs up from me when it comes to summer wear. Just make sure you pair it with a lightweight, breathable lining, and you can wear this amazing fabric year-round.

Easter Outfit

Do I sound like an advertisement, yet? 🙂 WOOLCREPEWOOLCREPEWOOLCREPE

Completed: A Bow-Print Silk Chantilly

11 Apr

Here you go, folks – the reason why I’ve been absent (well, completed-project-posts-wise) for like a week and a half:

Silk Chantilly

I made the mistake of sewing a silk dress. Can you say WOOF? Because… woof. So much woof.

Silk Chantilly

This is the Chantilly, by Colette Patterns. Secret time – I got this pattern as a birthday gift last year and this is the first time I’ve sewn up the dang thing. Honestly, I was a little put off by the amount of fabric needed (both fabric AND lining, mind you!), especially since this is the type of dress that really needs a floaty voile or silk to really work. As some of you may know, I was on a really really strict budget for almost all of last year, and my fabric buying options were *very* limited. So, hence, the reason this pattern sat for so long. Bc forreal – this is a gorgeous dress, and it needs to be made up a million times, y/y?

Silk Chantilly

Of course you can’t see the detail too well, because it’s black – sorry! That’s probably a good thing, because I really hacked this one up and some of the construction is a little embarrassing. Silk is hard to sew, yo – and it didn’t help that I didn’t even bother to give a muslin a chance, which would have solved some of my fitting issues before I was dealing with a fabric that floated away every time I sneezed.

Silk Chantilly

I sewed this up in a straight size 2, except the waist seam was sewn with a 3/4″ seam allowance instead of the standard 5/8″. This is version 1, without pockets. I actually started with version 2, put the neckline/shoulder yoke thing together… and realized that my silk was so sheer, you could see directly through it to the WHITE interfacing on the back of the lining. Of course, I didn’t notice this until after I’d already clipped, trimmed, graded and understitched the thing, UGH. I actually threw it in the corner of the sewing room (where the Bad pattern pieces go to sit in time-out until I can decide what to do with them) and finished the dress while I contemplated what to do. I didn’t have enough bow fabric to cut a second yoke, and the silk was so delicate, even the finest microtex needle left holes after unpicking. I ended up very very carefully unpicking all my stitching (srsly this took like an hour to do), cutting a new underlining with the seam allowances trimmed down to 1/4″ to match, and then putting everything back together.

Silk Chantilly

Fortunately, my mistake was spotted before I dealt with the midriff – since it is also interfaced, we could have had 2 disastuhs on hand. But I remembered to underline it, so yay me! I also just want to take a moment here to brag about my new interfacing revelation – I found a digital steam press at the flea market last month (similar to this one, although my model is slightly older) for $30. Did you click that link and see how much those fuckers cost? (don’t worry, I don’t have affiliate linking or anything like that, ok!) YEAH BUDDY. I bought the shit outta that thing. AND IT IS AMAZING. You just put your fabric and interfacing on the board, close it, and thirty seconds later it is PERFECTLY fused, without you fussing over it with a hot iron. Plus, the board is much bigger than an iron, so it covers much more fusing ground at once. I am in love, and I shall never go back.

Silk Chantilly

I should probably stop and talk about the fabric for a sec – this is the fancy bow print silk that I picked up from Fabrics for Less in NY. It’s Betsey Johnson! Actually, I don’t care much for her clothes – too much price for too much polyester, yeeck – but her fabric prints are always fun. And hey, since this is Betsey Johnson silk, does that mean I can now say I have a Betsey Johnson dress? Huh huh?

Silk Chantilly

Real talk, tho – this fabric was a BITCH to sew. It was exactly like what sewing butterfly wings must be like – just really really hard to get under control. It was worth it in the end, but oh god I need a silk break. My lining is a plain black rayon from Mood – it’s not Bemberg, it’s much heavier than that. Honestly, I was a little disappointed at first because I wanted the floaty bemberg to go with the floaty silk, but having dealt with the silk… I’m glad the rayon I ended up with had more body. It was MUCH easier to sew, and it gives the skirt some foof. Yay!

Silk Chantilly

Here’s another foofy skirt picture, because of reasons.

Silk Chantilly

Isn’t the bow print delightful, though? Ah, I just love it! I was rushing to finish this dress because I plan to wear it for my friend Colleen‘s wedding on Saturday, so I’m glad that’s done!

Silk Chantilly

I can’t even tell you how glad I am that I FINALLY finished this. Seriously, the agony of construction made me start to hate it toward the end. I seriously considered throwing the whole thing in The Corner and leaving it until I had my head back together, but I was too invested in the beautiful fabric. Which, by the way, going back to the yardage needed for this dress… I squeezed mine out of 3 yards of 45″ fabric. Check those layouts before you make a big silk splurge!

As a bonus – the skirt looks totally fabulous with my Chuck sweater, yeah? 🙂

Silk Chantilly

Silk Chantilly