Archive | completed projects – new RSS feed for this section

FINALLY COMPLETE: The Bombshell Dress

7 May

Yay! It’s done, it’s done, it’s done!

5-5
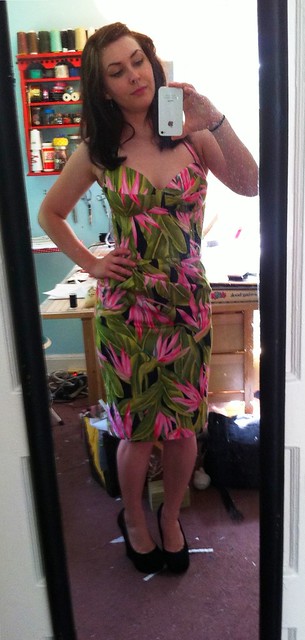
Those of you who follow me on Twitter or lurk the MMM Flickr Pool have already seen this picture… I snapped it right before I left for a lovely Saturday afternoon wedding (spoiler: it was a beautiful wedding and I overindulged and DEFINITELY paid for it the next day, ugh haha).

I did take better pictures, though! And now I will share then with the group 🙂

Fair warning – there’s a lot here, and you can see that I moved locations a couple of times while shooting. I actually took over a hundred pictures – I know that sounds kind of, uh, self-obsessed, but the light was extremely bright and it’s pretty difficult to get a good shot when you have to keep running back and forth to the tripod! I was able to narrow the selection down to WAY below 100, but there are still quite a few. I normally feel a little narcissistic posting a bunch of pictures of myself in the same freakin’ pose, but I’m really proud of my dress so just indulge me this one time. Ok? Ok!

Bombshell Dress
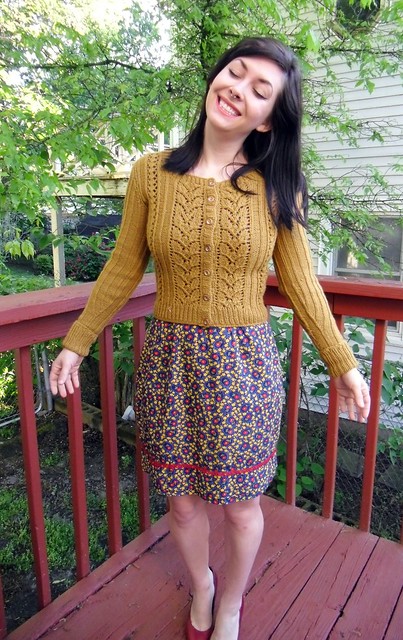
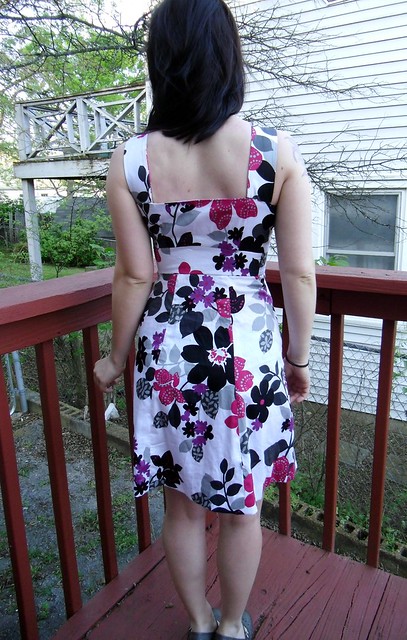
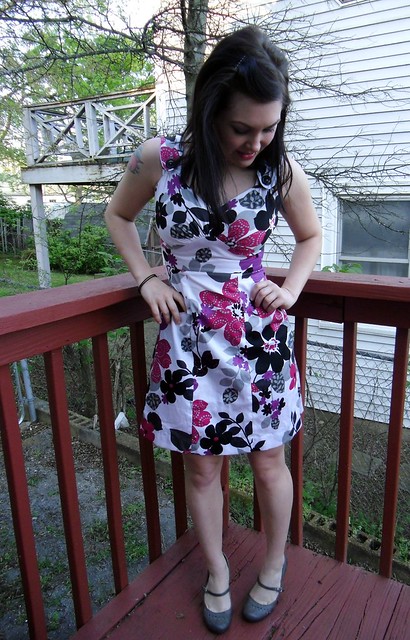
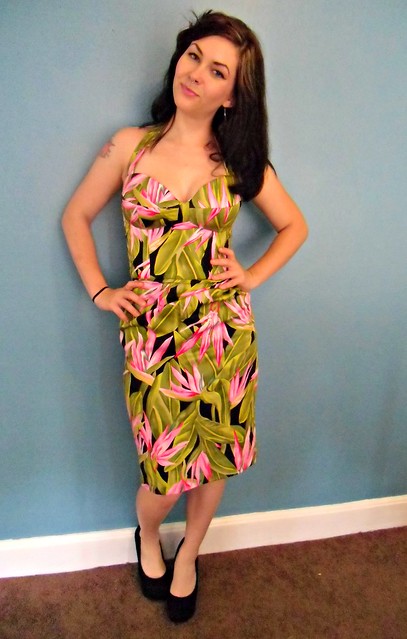
Here is where I started – in my backyard. Isn’t it so lush & green? Lovely backdrop for this dress 🙂 Unfortunately, the light was too harsh here, so only a couple of pictures survived the cut.

Bombshell Dress

Bombshell Dress
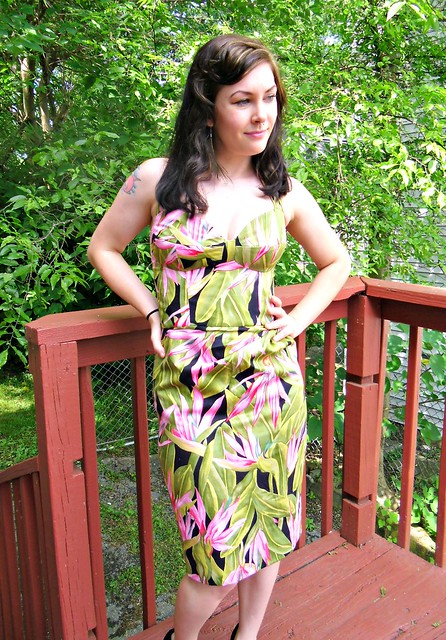
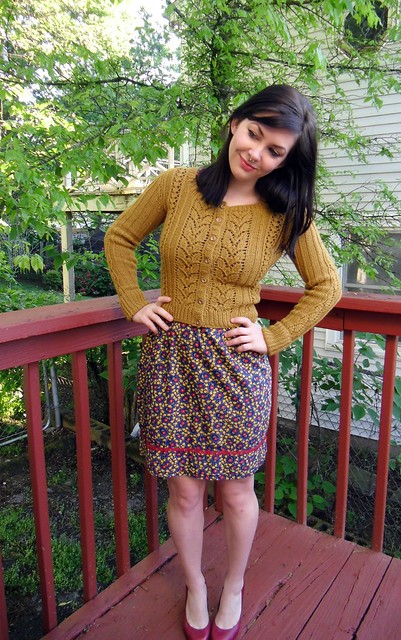
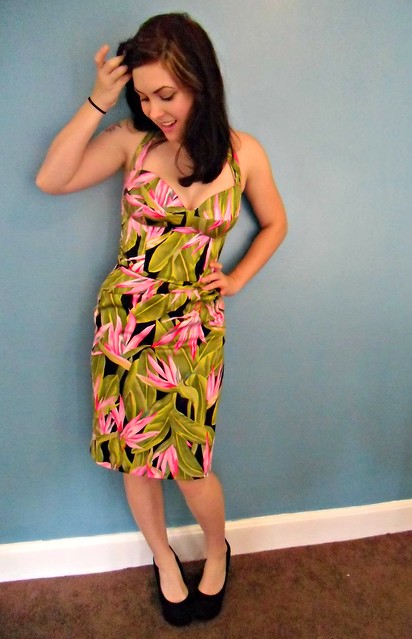
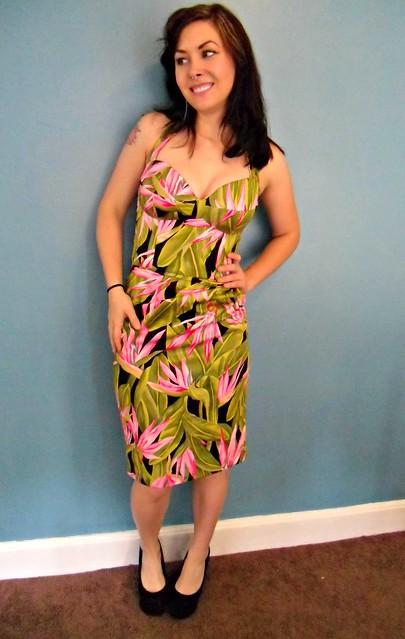
On the porch (which appears to be the best light ever; this is why you always see outfit pictures on this porch haha). Not a terribly awesome picture of me, but – my hair! My hair looked so good! Alas, it was almost 90 degrees on Saturday and extremely humid so the curls ended up drooping about 5 minutes later. Ah well.

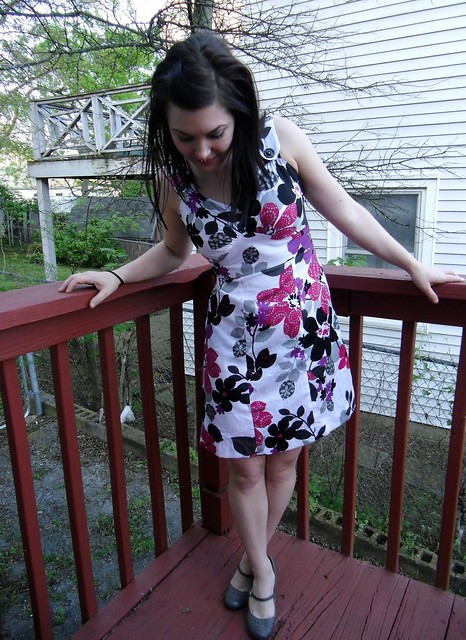
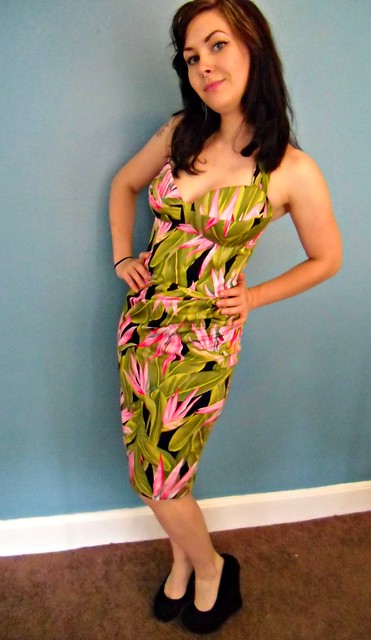
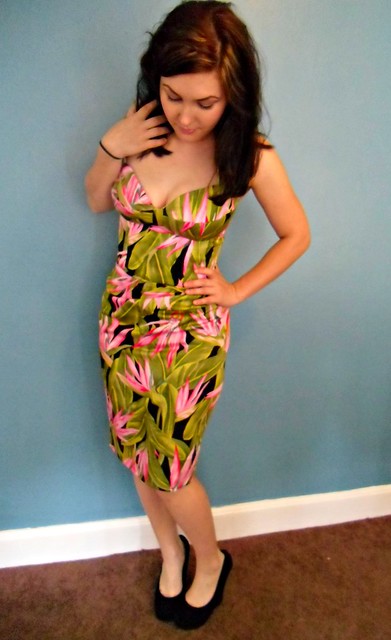
It got too hot, so I gave up and went inside to the air conditioning.

Bombshell Dress

Bombshell Dress

Bombshell Dress

Bombshell Dress
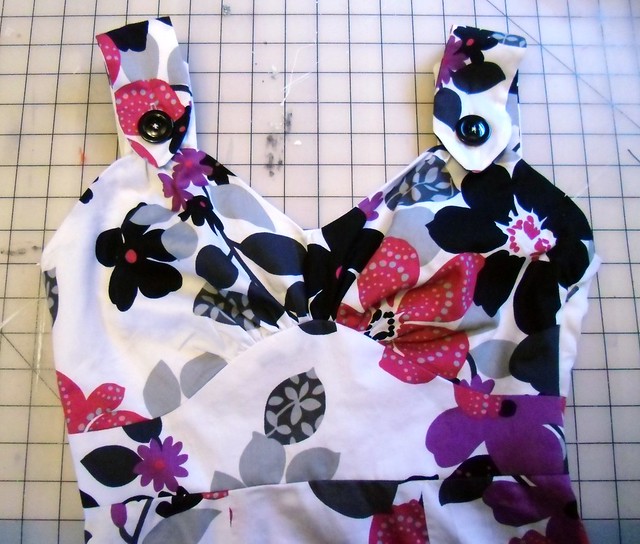
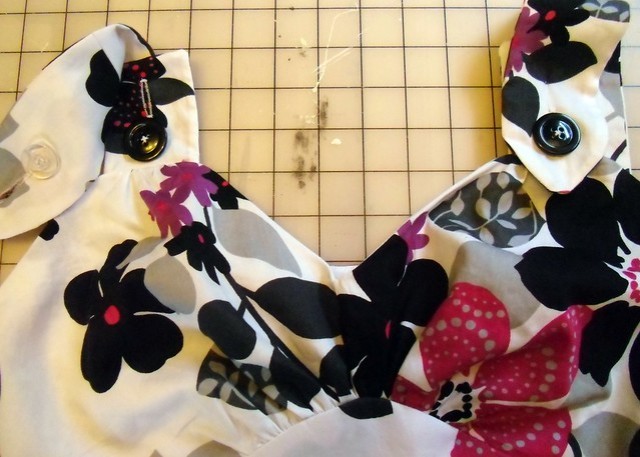
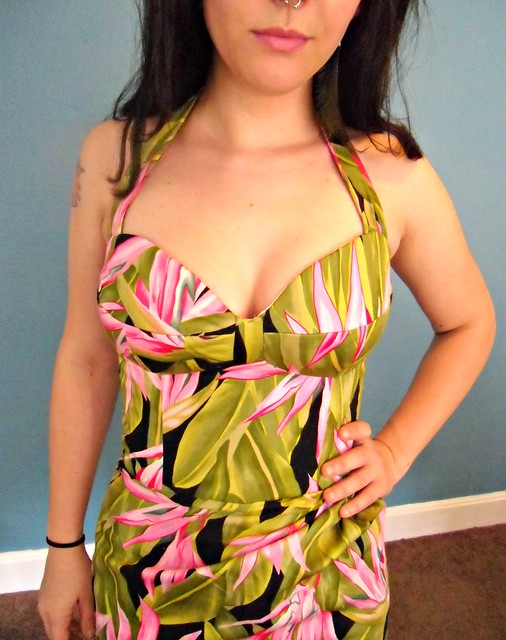
The strap! I made mine fairly wide, with small gathers where it joins the bodice. There are button holes & buttons, but the strap didn’t sit right buttoned in, so I used tiny fell stitches to anchor it to the top of the bodice as well.

Bombshell Dress

Bombshell Dress

Bombshell Dress

Bombshell Dress

Bombshell Dress

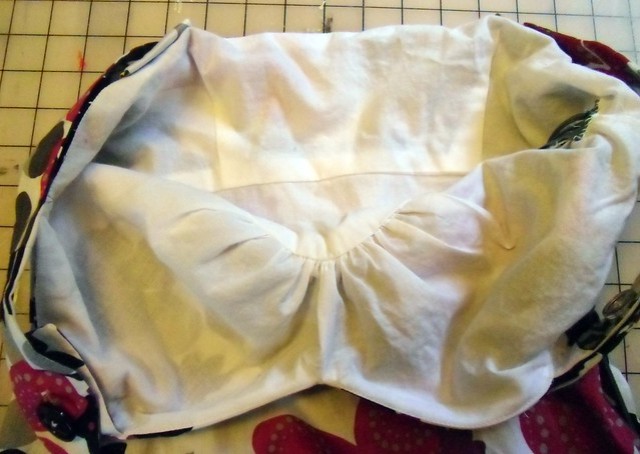
I’m not going to share any more pictures or details of the insides, I think there are plenty enough as it is on this blog!

A few thoughts on the Bombshell:
– It is quite comfortable! Of course, I tend to wear my clothing with little to no ease regardless, but boning is something that I’ve always associated with discomfort. The boning in this dress is great: it kept everything into place but didn’t hinder any movement whatsoever.
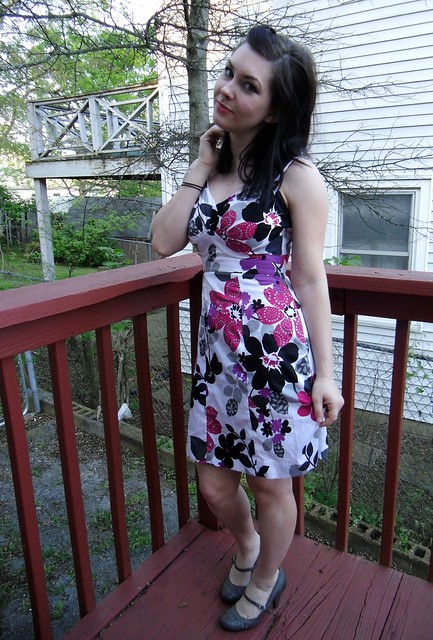
– When I first finished the dress, I was worried that the bodice was too long for my torso. Maybe I’m just used to a shorter bodice, because this one absolutely ends right at my waist, so it’s the correct length. Anyway, now that I’m looking at the pictures, I think it looks fine.
– Despite multiple muslins, the middle of the bodice does not actually sit flush against my chest. I guess my cups are a smidge too small as it should fit just like a bra does (and my bras do fit with the middle flush against me. Is that tmi?). Then again, I think any gal who is increasing the cups to fit a chest that is too big for the original pattern size is probably going to struggle with getting that piece to lie flat. The lesson here: no one else noticed, and I only noticed because I have this wonderful angle of looking straight down. I still think the fit looks great. Don’t sweat it if yours doesn’t lie flat either!
– As I mentioned, it was 90* outside and the wedding ceremony was in the middle of a flower garden covered with direct sunlight. It was hot outside! And even though my dress has many layers and is extremely fitted, I didn’t feel any more warm that I would in shorts & a tshirt. Make sure your fabric (and lining) is very breathable if you are planning on wearing this in super hot weather!
– I enjoyed working on this dress, and I loved the process of all the fiddly detail work, but I will confess that toward the end I was just ready to be DONE! I think this is a great dress for a special occasion, but make sure you give yourself a nice long deadline in the distant future so you don’t feel terribly rushed – a dress like this, with all the fitting, and handwork, and special techniques… doesn’t need to be rushed.

I guess that’s it? I am very pleased with my finished dress, and I definitely think the course was worth the $$ – I learned so much, including new favorite hand-stitches and little tips/tricks that never occurred to me otherwise. If you are still on the fence for a class like this, I hope this post & these pictures nudged a little closer to my side 🙂

Bombshell Dress
And I’m still rolling along Me-Made-May! 🙂

Complete: My First Sweater!

18 Apr

Fair warning: There are a lot of pictures in this post. Can you blame me? I’m so proud of my little wool baby!

Agatha

I guess there’s not much more to say, since I’ve documented most of the progress here on the ol’ blog. So just a recap, for anyone who is new –
The pattern is the Agatha Cardigan by Andi Satterlund. I knit a size Small with no alterations – for the record, my bust/waist is 36/26.5 and the negative ease in this sweater fits perfectly. I did have to size down my needles to a 5 to get gauge. The yarn is Cascade 220, a worsted weight, and I used about 3 1/2 skeins.

Agatha

Agatha

This sweater is knit top-down, so there wasn’t any seaming to deal with when I finished. I did have to knit the sleeves in the round, which was an interesting learning experience (just don’t look at all the little mistakes I made hahaha). I blocked the shit out of it (especially the sleeves) and it definitely made a huge difference in the fit. As far as I’m concerned, the fit is perfect! Yay!

Agatha

The only change I made was to stabilize the back of the button bands with petersham ribbon. This wasn’t called for in the pattern, but those bands are stretchy as hell & I didn’t want them to get all stretched out over time (especially since I rarely wear my cardigans un-buttoned). I didn’t follow any specific instructions for this, just hand-sewed the petersham down with teeny tiny stitches & sewed around the button holes to keep it from unraveling. I also used much smaller buttons – the pattern calls for 3/4″, but I could only squeeze 1/2″ buttons in those things.

Agatha

Agatha

I learned a LOT making this sweater! Short rows, fairly intricate lace work, knitting in the round with double-pointed needles, reading a pattern, picking up stitches, different ways to cast on… I can’t even remember all of it ahah. One thing I should mention is that this sweater doesn’t have any cables – it kind of looks like it does, but that’s just lace work & ribbing. I do want to learn how to do cables, though! They look like fun!

Agatha

Agatha

Extra extra special thanks to both Mika (for knitting along with me & answering all my frantic questions!) and Sarah (for teaching me how to knit in the first place!). I couldn’t have done it without these two fine ladies!

Agatha

You know what’s really neat? According to my Ravelry notes (psst! Add me if you wanna!), I started this sweater on 1/17… and ended on 4/17. So it took me exactly 3 months! I don’t think that’s too bad, considering I mostly knitted for an hour a day on my lunch break 🙂

Agatha

Agatha

Agatha

Agatha - front

Agatha - button band
Here’s the petersham! I got a pretty good match, color-wise 🙂 I know traditionally, the ribbon goes on top of the button band, but I liked the way the ribbing looked so I sewed it to the back.

Agatha -  button band
See?

Agatha - button holes
The button holes are kind of terrible looking, sorry, but I did the best I could. They look good from the front, though!

Agatha - buttons!

Agatha - back

Agatha - side decreases
Side decreases

Agatha - lower arm shaping
Lower arm shaping

Whew! I think that’s enough knitting excitement for one day! I wish I could tell y’all that I was gearing up to tackle another big knitting project, but unfortunately I had to spend my knitting budget at the pharmacy this month (that stupid cough! ARGH.) 😦 So maybe next month! I really want to knit the Miette. Andi has the best patterns, srsly. Love her stuff.

Thanks for letting me indulge, you guys!

Agatha

Agatha
😀

Completed: Simplicity 5110 (and a Renfrew!)

12 Apr

See also: Sewing to soften a bad mood.

Khaki Shorts & Green Striped Renfrew

I made these shorts last night (well, cut the pattern & sewed the pockets down on Tuesday evening, if we’re being totally honest here), the Renfrew was thrown together over the weekend. Both of these pieces are significant in the sense that I made them when I was stressed & stewing up a terrible mood. I know lots of us prefer to knit or clean or whatever tv when we’re stressed, but personally I like to sew! I find the strict attention to detail – even on something totally quick’n’dirty like a pair of shorts & a knit tshirt – to be very calming & it definitely puts me in a ~zen~ state. Being able to focus all my energy on something that is completely unrelated to whatever may be stressing me out is really beneficial in getting me to take a step back and drop my bad mood. Always works like a charm, too!

I will point out that sewing when you’re in a bad mood really isn’t a good idea if you’re working on something that tends to stress you out even in the best situations – hence, why my Bombshell dress is still sulkingsitting on my dress form. Actually, the Bombshell dress is a big contributor to my stress (the other big one is that I’m STILL SICK – although now I sound less like a man and more like a boy in the middle of puberty – and still carrying around a hacking cough that sounds suspiciously like the dreaded Smoker’s Cough). I chose to put it aside for a few days & focus on something that I know is going to be easy & fit the way I like it without a lot of fuss. It’s good to have a few TNT patterns just for this reason! And in the meantime – I filled a gap in my summer wardrobe! Double win!

Khaki Shorts & Green Striped Renfrew
These are my TNT patterns – Simplicity 5110 (shorts!) and the Renfrew top. Both are pretty quick to sew up and have already been fitted to my liking. I made the shorts up last year in red and they get a LOT of wear – so comfy, and I think they’re flattering 🙂 I made them in the same manner this time, except in khaki, which is something I’ve been meaning to do for about a year now. The green stripey knit for my Renfrew has been in my knit stash for god knows how long – I think I bought the original yardage at Walmart actually. It’s nice & slinky and feels good against the skin. I decided to keep the stripes on the neck & arm bands, although I did not sew on the hem band because I wanted this shirt to tuck in without a lot of bulk. The hem is stitched with a double needle on my sewing machine, and I did a terrible job & no I’m not going to show you a picture. Sorry.

Khaki Shorts & Green Striped Renfrew
It’s actually not warm enough to even wear this outfit – we got another cold snap, ew!, and I was FREEZING in these pictures. The things I do for y’all!

Khaki Shorts & Green Striped Renfrew

Khaki Shorts & Green Striped Renfrew
The pockets are lined with that mystery polka dot fabric – I love a fun lining!

Khaki Shorts & Green Striped Renfrew

Khaki Shorts
The only thing I’m not happy about is how weird the waistband is sitting – what’s up with that little pucker at the top of my zipper? Also, I need to push the closures over closer to the edge of the waistband, so it doesn’t stick out like that.

Khaki Shorts
Other than that, the zipper went in without a single hitch! I have always had issues with my front-fly zippers going in wonky (or backwards, or sewn completely shut lol), until I sat down & sewed a bunch up & figured out the most efficient way to get them in the pants. Here is my tutorial on front-fly zippers, if you want to benefit as well 🙂

Green Stripey Renfrew
I love how the green stripes look with the khaki. Such a nice color combination!

Khaki Shorts

Khaki Shorts
The zipper is just something I had in my stash… as was the fabric and everything else. Free shorts, yo!

Renfrew

Renfrew - yellow twill tape :)
Here is my favorite part about the Renfrew – the twill tape on the shoulders is yellow! NEON yellow!

I think I’m ready to re-asses that Bombshell dress – just needed a few days to step back & think about something else (something easy!). In the meantime, I have cut out the pieces for my next Renfrew –
next Renfrew - red & grey stripes!
You know, in case I hit another stumbling block 🙂

Khaki Shorts & Green Striped Renfrew

What about you? Do you find it relaxing to sew when you’re stressed, or does it drive you completely mad? What do you like to do to calm yourself when it’s desperately needed?

Completed: Floral Minidress

5 Apr

sundress

I know I have this labeled as a “sundress,” but we’re just gonna go with minidress because… this shit is itty-bitty.

I used McCall’s 2185 to make this up. The fabric is some class of sheer cotton that has the appearance of printed cheesecloth… it’s really interesting. It was actually given to me by the same friend who provided me with that awesome slinky cheetah print – I know you are all totally jealous of this friendship right now (did I mention she is also my Life Partner? Truth.), I’m kind of jealous of myself tbh ;). Anyway, the fabric is super duper see-through so I had to underline the whole thing to keep things (somewhat)modest. I used batiste, and I’m actually kind of pissed right now because I’m not 100% thrilled with the finished dress and woe is me, that was most of what was left of my batiste 😦 BOO.

Floral Minidress

Anyway, the pattern was fairly easy to work with. It’s a size bigger than what I have been using lately (34 bust instead of my usual 32 bust), so I did pull in the seams an extra 1/2″ or so at the waist because the original look was pretty sack-like and extremely unflattering. Interestingly, the seams at the hip were WAY too tight – despite the fact that this is supposed to be an A-line dress! – and I had to skimp by on 1/4″ seams to make room for my legs. So weird. It’s still not flared enough, but ehh can’t do anything about that.

I also ran out of batiste on the length-wise so the hem is pretty fiddly. I had a good 4″ or so of dress fabric that was not underlined and it looked really awful. I ended up putting a facing of sorts at the hem, using bleached muslin (because I’m not wasting anymore batiste on this dress!), and then flipped it up to meet where the underlining ends. I had to hem the dress twice, but it works I guess. I considered adding a line of ribbon around the bottom of the dress to cover the seams, but they’re not terribly noticeable and I honestly don’t care about this dress anymore anyway. It’ll be good for puttering around the house on weekends – nice and cool for summer – but that’s about it. It’s so short!!

Floral Minidress

There was supposed to be a self-fabric belt, which I planned on making, but I was having major problems turning it right-side out – the flimsy fabric kept pulling past the sew-in interfacing & I ended up ripping a giant hole in it, ahem, mostly on purpose because I was angry and I wanted to destroy something. Whatever, belt, no one wanted you anyway! I like this turquoise belt better anyway. Isn’t it awesome? God, this belt is so awesome.

Floral Minidress
You may notice that I did not photoshop my roots in these pictures. Today I just can’t be arsed to care. Any they kind of look like shitty highlights, anyway lol.

Floral Minidress
I did photoshop a piece of trash out of the background though. Photoshop is awesome!

Floral Minidress

Floral Minidress

Floral Minidress
I know the facing isn’t even at the top of the zipper… NO CARE.

Floral Minidress
Underlining! And check out the zipper –

Floral Minidress
Have you ever seen a metal invisible zipper? I hadn’t!
It’s a little too thick for my invisible zipper foot, though, so as you can see, it’s not exactly invisible. Still kinda cool, though 🙂

Oh, here it is without the belt
Floral Minidress
Boooooo

Floral Minidress
I guess I can muster up a smile, though.

Kinda bummed that I’m not OMGWTFBBQ about this dress, but ehh life goes on. I think it looks better in the pictures than it does in real life, to be honest 🙂 I still had a metric shit ton of this fabric (the original length I was given was over 7 yards and I’d be shocked if I used 1.5 yards on this dress), so I definitely want to make something else with it. I’m thinking the Chantilly. Thoughts?

Floral Minidress

I also just realized my birthday is in like a month and a half. Ack! Better get started on my Bombshell Birthday Dress 😀

Completed: The Tacky Shirtwaist Dress

2 Apr

shirtdress
I actually don’t think this dress is tacky at all – I think it’s kind of kitschy & cute! Landon however, hates the fabric – “that looks like a set of curtains my mother had” – which means that I’ll be wearing this dress a lot around him, just because. I’m a terrible person.

ANYWHO let’s talk about this pattern for a minute. This is Simplicity 2458, a sweet little 1958 shirtwaist pattern that includes a few different options. I went with option 2, but I cut the sleeves & hem significantly shorter than indicated by the pattern – the original hem came down to my ankles. Total frumpsville! I tried to take a picture for lols, but I couldn’t get the tripod far enough away to capture the true essence… so just trust me on this one. Anyway, the pattern was lovely to work with, although some of the instructions were a little dicey. A dress like this uses a LOT of fabric – I think I used close to 5 yards! Fortunately for meeee, this fabric was part of one of my ‘fill several giant bags full of fabric and pay $5 for all of it’ flea market finds, so this dress ended up being cheap 🙂 I’m actually surprised at how well the pattern fit straight out of the envelope – the only sizing adjustment I made was to add about 1/2″ at the side seam under the bust dart. Everything else fits great! There are 10 darts in just the top of this dress – 4 vertical bust darts, 2 horizontal bust darts, and 2 vertical neck darts in the back. There are actually 2 darts in the skirt as well, but you can’t see them for all the ~soft pleats~ hovering at the waistline. Also, I think this dress really needs pockets. I’m not the kind of girl who things pockets belong in all dresses or anything like that, but I feel like this dress would have benefited from some deep side seam pockets. Maybe next time!

I actually really hate the buttons on this thing – I think they are tacky as hell & they make the dress look really cheap. I really need to find some nice turquoise buttons, but these’ll do for now – they were what I had in my stash (and I actually went to the store in search of buttons but WTF why are buttons so expensive?! It was like $3 for two buttons – and now I’m seriously regretting that I passed up all those pretty antique Czech glass buttons at the flea market last month. Dude wanted $1 a piece & I thought that was way too high, but looks like I was wrong. Ok enough with the button tangent.) The off-white belt is my attempt to pretend like the buttons were on purpose. That is all.

Dress with belt:
Shirtwaist Dress
Oh, do you see where the button placket on the skirt is kind of sinking into the folds? I clearly used much too heavy of an interfacing down there, and it is weighed down as a result. It’s a fairly sturdy, mediumweight sew-in interfacing – worked beautifully on the collar (so crisp!) – but it really doesn’t belong on the skirt. Especially since I’ll probably never unbutton those buttons.

Shirtwaist Dress

Shirtwaist Dress

Shirtwaist Dress

Dress without belt:
Shirtwaist Dress - no belt

Shirtwaist Dress

Shirtwaist Dress

this is me running back into my house to lock the door
This is me running back into my house because I realized it might be a good idea to lock the door.

Shirtwaist Dress - with petticoat
Came back with a petticoat!

Shirtwaist Dress - with petticoat
The skirt looked a lot more full in real life, argh.

Look, I made a new friend :)
Also, I found a caterpillar 😀
(sidenote: someone made a snide comment about my septum ring a couple of posts ago… good for you, lady, I hope this picture grosses you out lol)

Shirtwaist Dress

Shirtwaist Dress
Instead of a button at the waistline, there are hooks & eyes. This keeps everything nice & flat without gaping! Sorry about the yellow smudges – I tried to edit them out best I could. This is my tip for getting hooks & eyes positioned so they actually latch closed – sew on the eye, and then rub chalk all over it until it has a layer of powder covering it. Close the garment and press down slightly where the hook should go… when you pull the garment open, there should be a little dot of powder that is exactly where you need to sew the hook. So helpful!

Shirtwaist Dress
Lace at the hem 🙂

That’ll be all, folks! 🙂

Shirtwaist Dress - no belt

Completed: Colette Parfait

27 Mar

sundress

Damn, y’all. I know I was all pumped about getting my Spring & Summer wardrobe‘s ass whipped into shape, but I didn’t realize I was going to rip through it so fast. WOE IS ME, WHAT IF I RUN OUT OF FABRIC.

Anyway, I made a Parfait! And this fabric… it might even be more delicious than it’s namesake (I know!). I bought 2 yards of this stuff… 4 years ago, I think? I had plans for some shitty sundress, but thankfully went into hoarder mode & it’s sat on my shelf since. It is the most amazing, soft, silky cotton voile I have EVER put my hands on… seriously wish I could cut a little swatch to mail to all of you. It feels sooooo good! And I’m not even a “purple” person (although, for some reason, everyone else seems to think I am. Must be my dark hair?), but I just love the purples & greys in this fabric. Love love love.

Parfait

I’ve actually made this pattern up before – here’s the Craftster link. This time ’round, I size down to a 2 and omitted the pockets and facings. The top & midriff are lined with a lovely white batiste. I was afraid the skirt was going to be too sheer to wear without a slip (or underlining), but guess what – I have on TURQUOISE underwear in these pictures and ho ho ho I don’t see them at all! I will, however, approach direct sunlight with many precautions.

I don’t have much else to say about this pattern except pay attention to that cutting layout! The majority of those pieces are cut on the fold. I think the fabric requirements are pretty generous, though – I still have nearly 3/4 yard of this voile left. Although I didn’t cut the facings, I don’t think they really take up that much fabric, you know? 🙂

Parfait
Check out this picture of me – I look pissed lololololol. Honestly, I was just testing the camera to make sure everything was centered and the light was good. But I crack up every time I look at it so I’m going to share my mean mug with the rest of the world. THERE YA GO.

Parfait

Parfait

Parfait
If the left side of my back looks weird, it’s because I photoshopped my (turquoise)bra strap out. Photoshop is so magical, y’all.

Parfait

Parfait
I love the button straps, but now I’m wondering if I should have sewn the buttons on with black thread instead.

Parfait

Parfait - buttons
The under-buttons are clear – why waste a pretty button that won’t be seen??

Parfait - lining
Bastiste lining 🙂

On a side note, does anyone know how to determine if a fabric is lining fabric or not?
Polka dot fabric
I bought this stuff at an antique mall over the weekend – dots! So fun! But this fabric is totally stumping me! It’s not super slippery like traditional lining fabric, although the sheerness makes me pause (seems too sheer to be apparel fabric). The part that confuses me is that it’s textured. Does lining fabric ever have texture?
FWIW, the fabric is 100% poly. I bought it because it was $1 and, eh, I can use it either or. I guess it doesn’t really matter, but I just think it looks really obvious and kind of tacky when people use lining fabric as apparel fabric. So I don’t want to make that mistake! Thoughts?

Parfait
Anyway, enough of that blabber. Summmmmmmmer!

Completed: Simplicity 8345; the Daisy Sundress

20 Mar

Hi everyone! Apologies for my bout of silence all week – I found myself feeling ill early in the week, and regulated myself to crafts that involved sitting on the couch with little to no concentration (paint-by-numbers, if you’re curious. HOLY SHIT I love those things!). Despite my best efforts, I spent the entire weekend sick 😦 I did drag myself out of bed long enough to catch as estate sale on the other side of town:
Estate sale finds!
$5.50 for the whole box! There’s about 2 yards of fabric in there (it’s very sheer – almost like cheesecloth – so it’ll need to be underlined), plus the book has lots of sewing-related newspaper clippings 🙂 The house was totally awesome – unchanged since 1961. Beautiful pink bathroom, original kitchen appliances, knotty pine dining room, and orange & green shag carpet!

Anyway, THAT took all my energy – seriously! I got home, crawled into bed, and slept for the rest of the weekend. Being sick sucks, yo.

Then I woke up on Monday morning with a migraine. LOVELY. So I called out of work, slept the migraine off, and tried to make some use of my day later in the afternoon.

So here’s my meager project after a weekend of sick – the daisy sundress!
sundress
Also totally approps for the first day of spring, amirite? 🙂

Daisy Sundress
I used Simplicity 8345, a simple sundress with princess seams & a scalloped neckline. This dress was seriously easy to sew up, albeit with a strange order of assembly – you put in the zipper first, then sew the shoulder seams, then insert the neckline facing, then sew the side seams together, then put the sleeves on the side seams, then sew that whole mess to the front/back mess. Kind of interesting!

I did make a few small changes – my first princess-seamed FBA, which was sort of a disaster. Oops. Blame it on poor ol’ sick me 😦 Everything fits fine, but I should have divided my addition of width to both the front & side front panels, not just the side front. My seams are WAY too front & center, and I feel this dress now has the magical ability to make me look both flat-chested & wide on top. Oh well, live & learn I guess. lol.

Daisy Sundress

I also sewed my sleeves up a little differently – they are supposed to be faced. LOLWUT. Who faces sleeves in a sundress? Well, I’m sure people do, but not me! I just hemmed them as normal and omitted the facings. Boring facings! The sleeves are a little tight, I might add. Not a lot of room for movement there, oh well.

I also cut like 6″ off the hem. Knee-length, my ass!

Daisy Sundress

Daisy Sundress
I do like the scalloped neckline. So pretty!

Daisy Sundress

Daisy Sundress

Wanna know the best part about this dress?

troll
The fabric was a BEDSHEET! trololololol

Daisy Sundress - scallops

Daisy Sundress - zipper

Daisy Sundress - unzipped!
I didn’t have a matching zipper, so I used dark green. Again – stash-bustin’ 😀

Daisy Sundress

I guess there’s not much else to say about this. It’s a sundress. I’ll wear it in the sun. Or something.

Spring :)
And look – spring is already making an early start here in Tennessee 🙂 SO GREEN. SO BLOOMY.

Daisy Sundress
Happy first day of spring, y’all!

Completed: Cheetah (mock)Wrap Dress

13 Mar

TIME FOR A CONFESSION.

wrap dress

The Leopard Wrap Dress? Well, first of all – it’s cheetah, not leopard. Oops! I still like the fabric, though! 🙂 Secondly, it would appear that my wrap dress is actually a mock wrap dress – double oops! And wouldn’t you know, I didn’t even realize it until I got about halfway through the directions and saw that there was a zipper in there. Yep, even with cutting the pattern, I did not figure out that this wasn’t a true wrap dress! Oh well, I find wrap dresses kind of hard to keep closed, especially with slinky fabric like this – so let’s consider this a blessing in disguise 🙂

That being said, check out my cheetah print mock wrap dress, guys!

Cheetah Wrap Dress

I used Simplicity 6268, which I can’t seem to find anywhere on the internet, sry2say. I picked this up a couple of years ago at the flea market – in a bag full of sewing supplies for something like $5. The fabric was given to me by my best friend – her grandmother was cleaning out her sewing room so I ended up with a LOT of this fabric (5 1/4 yards, if you’re curious. And yes, I have leftovers! Lots of leftovers!). It’s not something I would typically buy for myself, as it’s some class of poly and pretty drapey, but I LOVE how the finished dress turned out and it seriously does not wrinkle at ALL. I think this dress would be great for traveling – very wash & wear!

Since my pattern is for a 33.5″ bust, I was afraid I’d have to do some adjusting, but a quick tissue fit showed that everything fit fairly well. I’ve noticed a lot of patterns put extra (excess) ease in their garments – which is awesome for me, because that means I get to snap up all those cute little 32″ bust patterns and they fit fine! HA HA! Like I said, this one fit with no alterations, other than the length. See how short the skirt is? This is after I added 1.5″ to the hem & I used a 5/8″ hem (instead of the suggested 1.5″ hem). This baby was supposed to be SHORT! I don’t mind short, usually, but not with a flowy dress. Especially not a dress I plan on wearing to work. So, if you get this pattern, consider the length.

On a side note, I just have to share this because I felt pretty freaking brilliant:
Cheetah Wrap Dress
I ran out of tape, so I sewed the tissue pieces together! I got the idea from Liz haha. And no, I still haven’t bought more tape. Need to get on that.

Cheetah Wrap Dress

The tie belt is actually supposed to be sewn to the sides & tie at the back – I ended up sewing my pieces together to make a long belt, and it is not attached to the dress. I think tying it in the front makes it look more like a wrap dress, plus now I can wear different belts if I feel so inclined 🙂 I think cheetah (and leopard!) go with all kinds of colors, so it makes the dress much more versatile.

And can I just point out that I took these pictures after I got home from work – at 5:30! Daylight Savings, I looove you! Plz to stay with me forever, thnx.

Cheetah Wrap Dress

Cheetah Wrap Dress
I just love the shape… I think it is super flattering. I want to make more of these!

Cheetah Wrap Dress
See? The zipper 🙂

Cheetah Wrap Dress

Cheetah Wrap Dress

Cheetah Wrap Dress
The zipper also came from my stash – I think I ripped it out of something I used for the fabric. So basically, this dress was free. Yay free dresses!

Cheetah Wrap Dress
I love the little tulip sleeves.

Cheetah Wrap Dress
I did end up putting a small snap at the overlap on the bodice, for a little extra modesty. The dress is not immodest by any means – I don’t think the lack of snap would cause a wardrobe malfunction or anything – but the extra security is nice. You know, so I can splay myself across the couch & eat Italian Ice & not worry about the girls getting a sneak peak. Not that I was doing that last night or anything.

Cheetah Wrap Dress
Also, it was WINDY outside yesterday! See? WINDY!

So happy with my new dress, even if it’s not really cheetah or a wrap 🙂

Cheetah Wrap Dress

Completed: Colette Pastille

12 Mar

Well you guys, I defeated the Pastille pattern! Wheeeee me!

I actually feel pretty good about this dress – I wasn’t totally crazy about it when I saw the pictures in the book (I think the coral color of the fabric – while lovely, just looks waay too much like the model’s skin. It would have been better suited for a lady with a darker complexion), but I think that the overall shape, if properly fitted, is actually quite flattering. And while it really lends itself well to a print, I think it would make a sweet little basic black dress, since the shape is unique enough in itself 🙂

Pastille

Fitting… fitting this thing was weird. I already glossed over the process in my last Pastille post, but to summarize – while I pretty much *always* need a FBA, this pattern did not require one (didn’t figure that out until after I’d cut & taped all over the tissue though, arhghhghh!!). Actually, the finished measurements were just wrong – I cut a size 2 and the bust measurement was much closer to 36″, not the 34.5″ the book says. Consider yourselves warned!
The next fitting problem I had was with that damn back… I didn’t take any pictures of my muslin, but it billowed out all over the place across the upper back. I mean, it plain made me look like I had a hunchback. I eventually concluded that the upper back was longer than the front, so I did a 3/4″ swayback adjustment at the lengthen line that tapered to nothing at the side seams. That pretty much fixed it!

Pastille

The rest of the dress fit fine with no other adjustments.

I actually tried to make this dress without the facings for my first go-round, but those sleeves are way too curved to handle bias tape. So back to facings (although mine are interfaced with cotton muslin, not fusible interfacing). I tacked them down as best I could since they like to pop out; sewing the trim at the neckline also helped. Rather than do fancy finishing work on the inside, I opted to finish the raw edges with a simple serged seam. I wanted the making of this dress to be quick & painless!

Pastille
There *are* pleats at the bottom of the dress… I think doing those took the longest! I followed the handbook directions & thread traced all the lines, using different colors of thread for the various fold lines. It worked beautifully, but pulling out aaaaaall those threads was a pain in the ASS. No tips for making it go smoother (I don’t regret thread-tracing; it really did make lining up those pleats a breeze), just be prepared to spend some quality time with your seam ripper 🙂

You can’t tell due to my super duper busy printed fabric, but all the darts & seams actually line up perfectly. Just trust me on this one 🙂

Pastille
I also would like to point out that my hair needs a dye job something fierce (I actually had a hairstylist examine my roots the other day & declare that I’m naturally dishwater blonde – which blew my fucking mind. I’ve always been a brunette, wtf?!). If you’re thinking, “Whatever, your roots don’t look bad!” that’s because I ‘shopped the shit out of them teehee 🙂

Pastille
The dress looks best with a belt, in my opinion. Wish I had a yellow belt, but the one I have on hand is too neon yellow for this print & the thrift gods have been ignoring me lately in the belt department.

Pastille

Pastille

Pastille - neckline

Pastille - pleats at hem
The hem ended up being way too long for me, and I’d already sewn in the pleats, so I just flipped up the bottom of the hem & sewed it to the inside. This is why my pleats are at the very bottom of my dress. I think it worked out fine!

Pastille - zipper
I am really proud of how my zipper turned out! Basically perfect!

This whole dress was a great/cheap stash bust. Feels good to cull that shit down! I didn’t have *quite* a long enough zipper (I think mine was 20″ instead of 24″ or something), so I have to pull the dress over my head to get it on hahaha. Oh well!

Pastille
So what do you think? Pastille – yay or nay?

Completed: Colette Clovers – The Denim Version

2 Mar

Ok, ok – ONE more jab at this pattern! Who is sick of looking at my butt in Clovers yet? 🙂 Technically, I guess, these are the finished version of my polyester wearable muslin, so do they really count?

I bought this denim right before I swore off new fabric purchases until further notice. It’s a great denim – a nice dark wash, a good sturdy weight, and it has a slight stretch factor which makes them perfect for these jeans. I originally intended on make another pair of wide legged trousers with this fabric, but after lurking the shit out of Sallieoh’s Clover makeover, I decided to go with Clover jeans, with little flare legs. Hence, the polyester muslin.

So here’s the real deal!
(I’m sorry these pictures are bad – we are expecting lots of tornadoes today & it was straight up HAILING last night so I’m actually surprised I was able to catch enough sunlight to shoot these this morning)

Clover Jeans

I’m not going to hash out every single change I made to the pattern – you can check out my other version if you are just dying for the nitty-gritty, but I will share some additional changes I made with this pair. Here’s a list.
– I cut extra seam allowances on all the pieces since my denim wasn’t as stretchy as my poly. This was a MISTAKE. The pants ended up being way too big & I had to cut out all my seam allowances (and then some!) to get a nice fit. Whoops.
– I wanted to try out flat fell seams on the inside legs, but I cut too much SA off (this was after taking out something insane like 1″ of excess, see above), so I didn’t have enough denim to fold over. What you see are mock flat fell seams. Sorry!
– I stabilized the pockets with this awesome trim I found at the flea market – it’s measuring tape! Eeeheheee! I thought they might need some help to keep from stretching out, plus, it looks fun on the inside! The front pocket piece is red cotton, just to keep things from getting too bulky.
– I’m not terribly happy with the waistband – it digs kind of weird, there is some strange twisting going on on one side, and it was kind of tight so the button was pushed way over to the side (instead of in the center, where it belongs). And there is some kind of weird gap thing over the center back – does anyone know what that’s all about? I guess I needed to taper the waistband with a seam, idk. I don’t get plumber’s crack when I bend over, but I think it looks pretty bad. I may end up ripping out the waistband and starting over.
– There is a lot of topstitching on these pants! I used jeans topstitching thread with a more lightweight blue denim thread in the bobbin. My sewing machine was PISSED during some of those layers, gawd. I was able to struggle through, but now I’m wondering how some people with those little cheap hobby machines manage to churn out jeans. My machine is pretty heavy-duty and even with a denim needle it had some trouble, especially on the belt loops. Lots of cranking the handwheel on my end.
– I like how my belt loops turned out. I do not like that they aren’t evenly spaced at all! Haha! Oh well!

I think that’s it. Let’s look at some pictures instead!

Clover Jeans
Sorry you can’t see the hem in these!

Clover Jeans

Clover Jeans
I decided against doing the traditional topstitching in the back since I was not adding back pockets or a yoke. I know jeans are supposed to have the crotch seam flat felled & topstitched, but the idea of having a line of gold stitching running straight up the middle of my butt (with no other stitching going on back there) weirded me out way too much. So they’re simple from the behind!

Clover Jeans

Clover Jeans

Clover Jeans

Clover Jeans

Clover Jeans - Fly
See what I mean about the button? Haha I’m so embarrassed! I really should re-do that waistband… but honestly, I probably won’t. I mean, let’s keep it real here.

Clover Jeans - Pocket
Pockets!

Clover Jeans - Hem & Flare
All that topstiching paid off – I think they look good!

Oh, and I finished my coffee cozy last night! It ended up being a really easy/quick knit, so I stayed up a little later than I should have, just so I could put it on my to-go cup this morning 🙂
Coffee Cozy
(before you say anything… yep, that’s a Hello Kitty toaster. I got it for Christmas like 10 years ago hahah)
If you want to see the pattern/details, it’s all on my Ravelry page!

Ughff I think I’m finally done with this pattern. Seven Clovers (including a few failed muslins) is enough for anyone, I’d say!

Clover Jeans
Still… I made jeans!