Archive | completed projects – new RSS feed for this section

Completed: Red Cashmerino Cowl, mmm

27 Feb

It’s been a couple weeks since my big knitting fail (which wasn’t a huge fail after all, since I got loads of great advice for future knits, not to mention ~*someone has a new sweater to love forever 🙂 I LOVE WHEN THESE THINGS WORK OUT), and what have I done since then??

Red Cashmerino Cowl
DUH, I KNIT ANOTHER SWEATER.

Red Cashmerino Cowl
Ok ok, confession – I wasn’t expecting this to knit up quite so fast. I mean, holy shit – 2 weeks. That’s all it took. And you can disagree with me all you want, but I am not a super fast knitter, nor do I knit for super long periods of time every day – a little under an hour on my lunch break, and an extra hour on Mondays and occasionally Thursdays when I meet up with other knitters. I don’t knit on weekends, and I rarely knit when I’m lounging on the couch (Landon has this weird hang-up about me knitting while we watch TV – he thinks it means I’m not paying attention. FREAK, you know I still have ears and can listen!!). This was just a really really quick knit. I love it!

Red Cashmerino Cowl
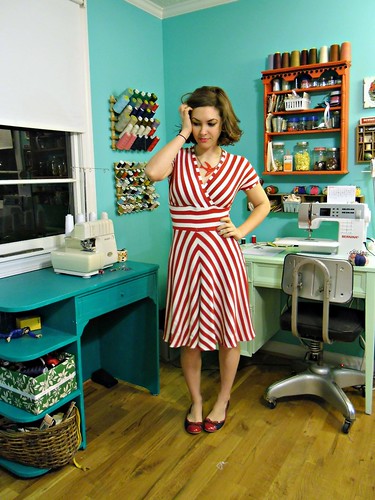
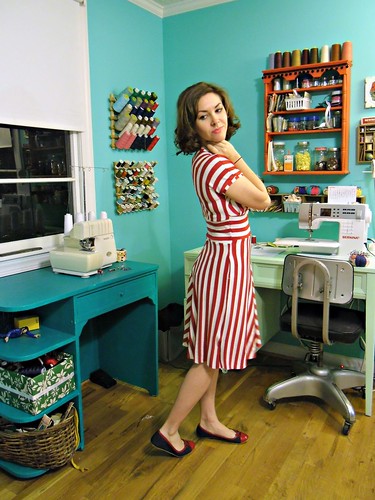
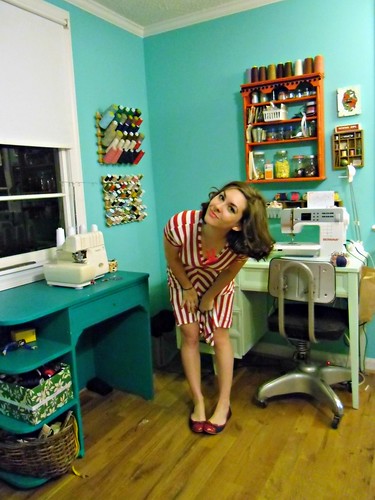
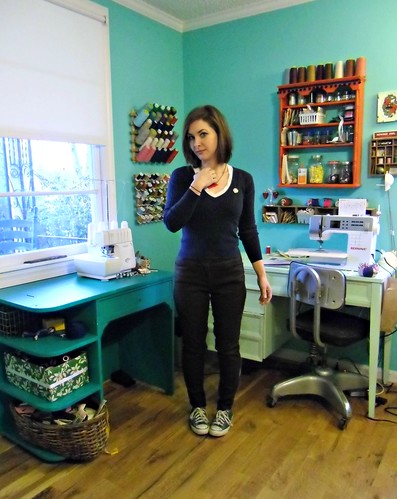
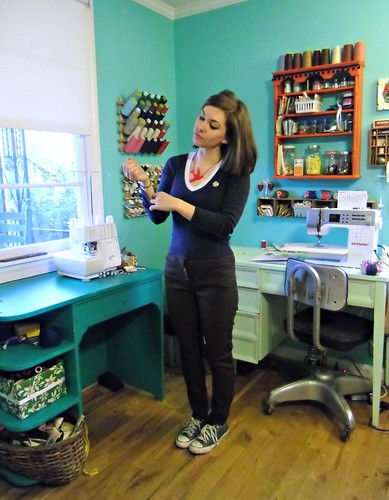
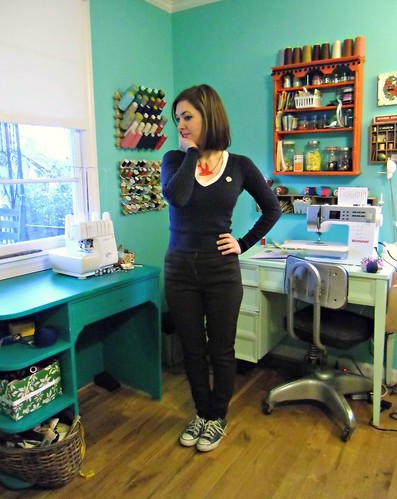
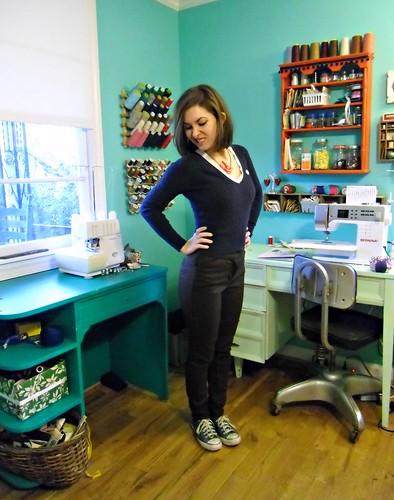
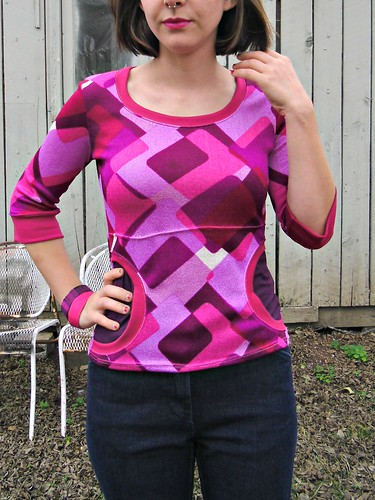
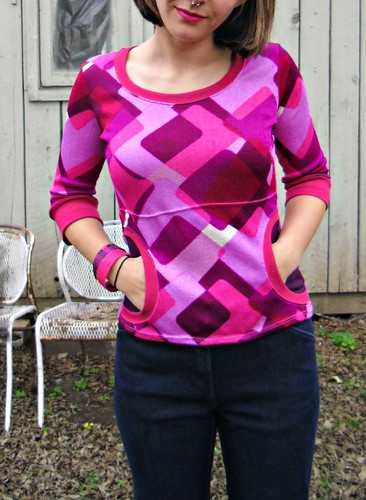
The pattern I used is Francis, Revisited, which is a freebie on Ravelry (yay!). You’ll notice that the original pattern is actually pretty shapeless and loose-fitting – which looks pretty on the model, but I’ve learned that it is not a flattering style on me. I need waist-shaping!
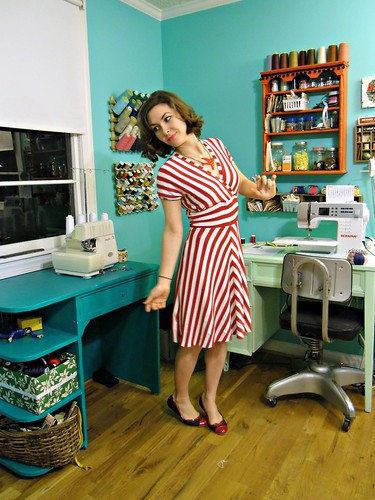
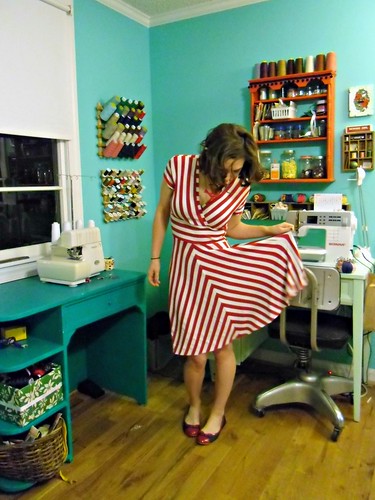
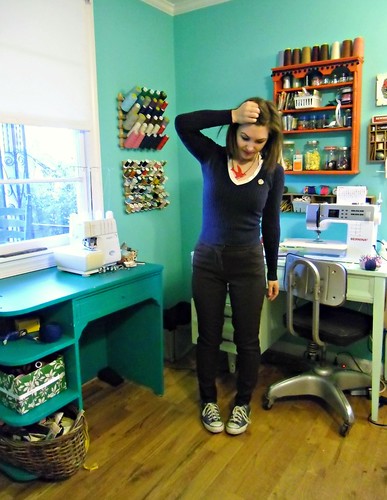
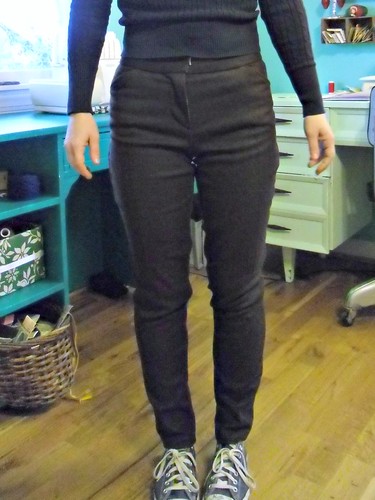
Also, I just realized that my skirt basically blends into the background here, rendering me a strange floating legless lady. Sorry about that.

Red Cashmerino Cowl
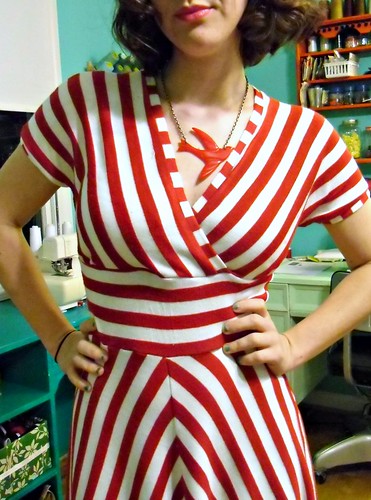
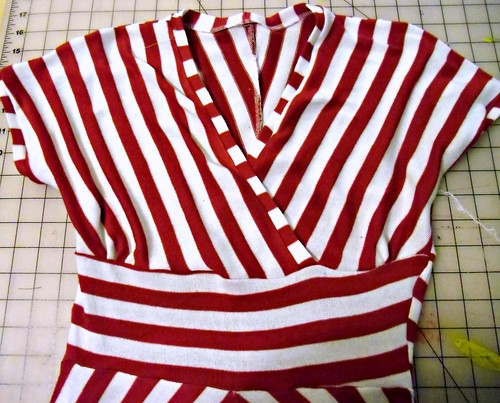
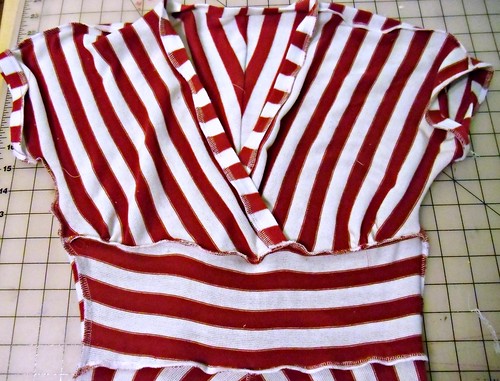
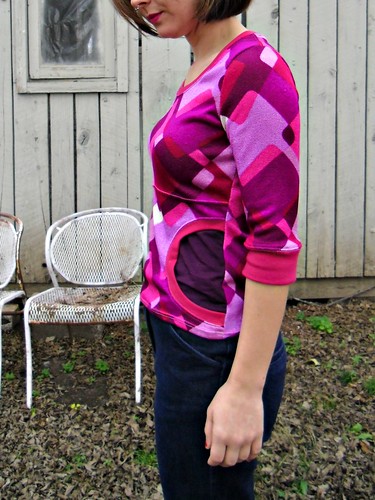
Jo has a lovely fitted version of this sweater, which I was DYING over (and, truth, she’s how I discovered the pattern in the first place), so I consulted her on decreasing deets and she was very very encouraging and helpful. I did some maths, cast on for a 33″ bust, and started knitting. Since the sweater is knit in one piece, top-down (my favorite!), it was easy to check the fit by threading a length of yarn through the live stitches and pulling it on. This can definitely get to be a pain in the ass, but I think the end effect is worth it.

Red Cashmerino Cowl
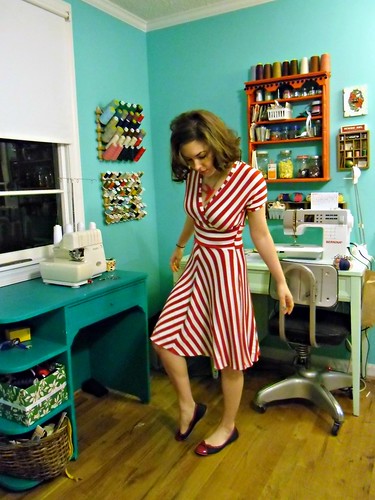
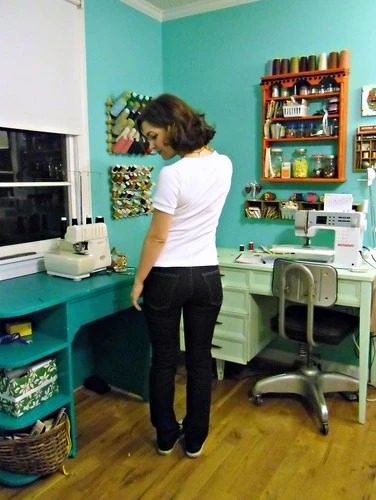
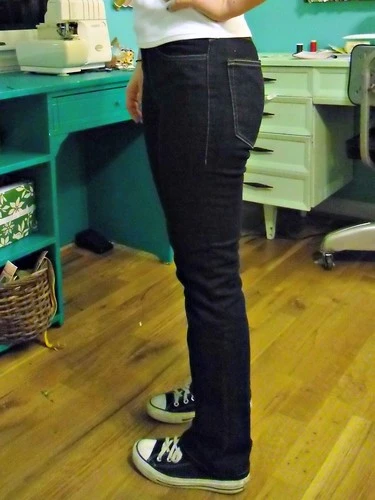
I mean, check out that shaping! Yeah!

Red Cashmerino Cowl
In addition to the waist shaping, I also lengthened the sleeves to full-length – I guess I just don’t see the point in short sleeves on a cashmere sweater (with a cowl neck, no less). That being said, I have a tendency to roll the sleeves up, like, always, so maybe it was a moot point. Also, I wish I had added like two more rows of knitting, because they’re the tiiiiinest bit short. Maybe I can pull that out with another block, idk.

Red Cashmerino Cowl
The yarn I used for this was Debbie Bliss Cashmerino – merino and cashmere, and SO FREAKING SOFT. I picked it up at Haus of Yarn‘s after-Christmas sale (which, sidenote, this yarn store is like 2 miles from my house YES MA’AM INDEED). Actually, another lady grabbed it first and I followed her around, sulking, for about 2 minutes, then she put it back in the bin and I pounced on that shit like a cat on a can of tuna fish. VICTORY. It was half off, too – meaning this sweater cost me about $35 to knit. Yep. Even with cashmere blend yarn.

Red Cashmerino Cowl
Cashmere is such a dreamy way to make yourself feel better after a knitting fail, fyi.

Red Cashmerino Cowl
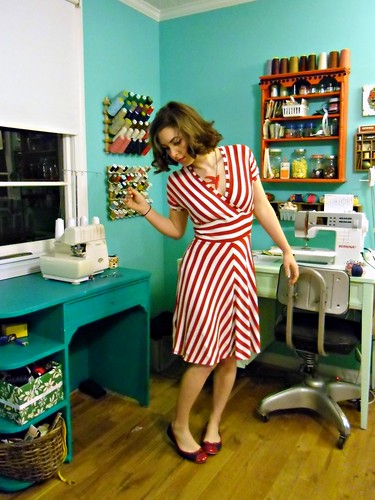
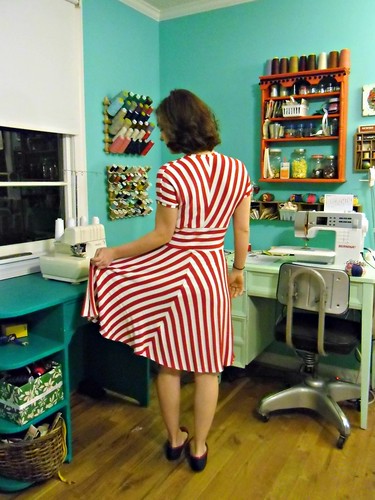
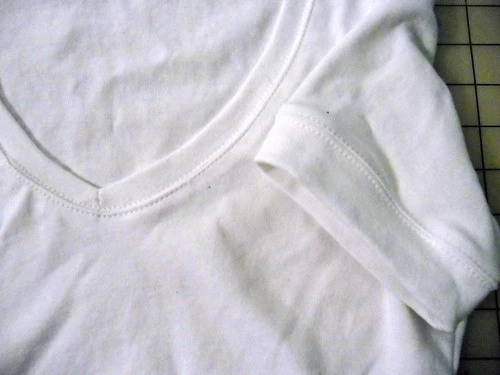
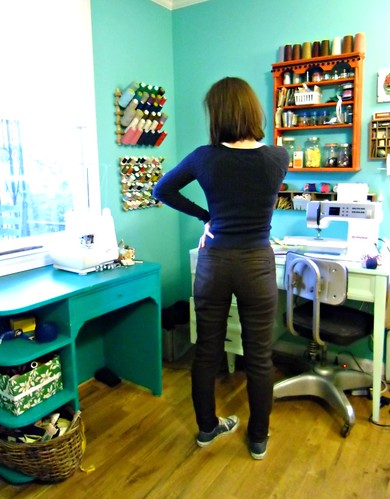
Crummy color shot, but here you can see the seed stitching at the sleeves and hem. I like this has a nice alternative to ribbing, and it’s very easy to do – just knit 1, purl 1, and stagger each row.

Red Cashmerino Cowl
More specific notes about my adjustments can be found on my Ravelry page (as not to bore the non-knitters here).

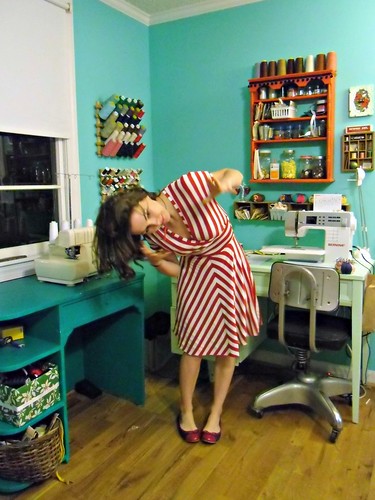
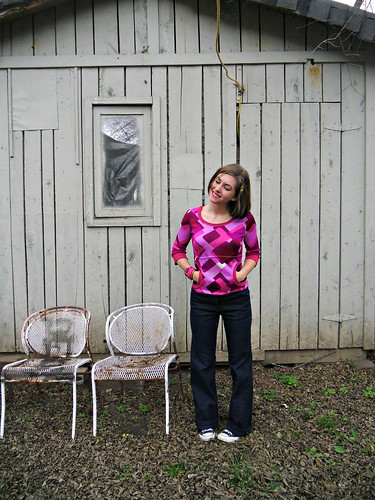
I love my finished sweater! It’s so cozy and warm and soft – and RED. Yeah!!

Completed: The Minoru Jacket, Round 2

25 Feb

Hey, look, I made another Minoru Jacket! And it’s even better the second time around, yeah? 🙂

Orange Minoru

Ever since I made this my first go-round as a pattern tester, I’ve been dying to revisit this pattern and improve on my finished version. Not that the pattern written as-is needs improvement – it’s pretty wonderful! But there were definitely a few things I wanted to change from my original white version.

Orange Minoru
First and foremost – the size. I don’t know why I did it to begin with, but I definitely cut the wrong size on my first incarnation. It was just toooo big! I cut this one in a straight size 0, with no alterations, and I think the fit is superior.
(As a side note – I know a few of y’all use me as your ~size double~, so I think it’s important to point out that I am not the same size anymore. I don’t know if you can tell from the pictures, but I have lost quite a bit of weight over the last few months and my measurements decreased by a couple of inches. I am now 34-26-35 – just FYI! So with that in mind… the 0 fit me perfectly, and did not need a FBA.)

Orange Minoru
Second necessary change to this pattern – the FABRIC. Oh godddd, the fabric! While I really really loved the idea of white corduroy in theory, the reality was a sad floppy, blindingly white mess on me. While I have seen a few versions that do beautifully with a softer drape to the fabric, I think that in general, this jacket needs a bit of structure. As well as color 🙂

Orange Minoru
For this jacket, I used a fairly thick cotton twill that I picked up at Vogue while I was in Chicago. I knew I wanted something orange or yellow, for visibility. What I didn’t consider was how difficult it would be to pair up colors with this shade of orange, without looking like I was rooting for some shitty sports team. I’m pretty sure I had buyer’s remorse over this fabric almost the instant I bought it, hence why it sat on my sewing shelf for, oh… six months or so.

Orange Minoru
In the end, it was the lining that saved me. That, and a VERY unlikely fashion inspiration.

Orange Minoru
I will tell you who it is, but you have to promise you won’t make fun of me.

Orange Minoru
Orange Minoru
PROMISE?

andy2
That would be ol’ Andy Bernard from the US version of The Office.
I told you it was weird (and the ~punk rock~ 15 year old in me is weeping right now), but for real – he wears some of the most amazing preppy color combinations! Pink, navy, orange, red, yellow – it’s all sooo good. I don’t know, maybe I’m crazy, but I want my whole wardrobe to mimic his, at least as far as the colors go.

Orange Minoru
Which is exactly why my Minoru turned out awesome. Navy polka dots fix EVERYTHING.

Orange Minoru
And check it out: It matches this sweet silk scarf my mom bought me (now I need to find a way to wear it so it doesn’t look so much like a tie, hmm)

Orange Minoru
Anyway, enough about Andy & Co, back to meeeee

Orange Minoru
I only made a few changes to the pattern – the most noticeable being that I lined the hood. I think the lining is so bright and fun, I wanted it to show when I had the hood out!

Orange Minoru
I omitted the elastic cuffs at the bottom of the sleeves – I found that the original length of the sleeve was long enough without an added cuff. And anyway, I don’t care much for elastic cuffs. As a bonus, I can flip the hem of the sleeves up and show off that fun lining 🙂

Orange Minoru
Oh, yeah, and I added side seam pockets!
This was EASY: I used the pocket piece from my Tiramisu patttern (you can use whatev, but I love the size of this one – it’s perfect for what I need to carry) and inserted the pockets about 1.5″ below the waist markings, understitched, and then sewed up the sides as normal (no topstitching, though, I didn’t want to sew those pockets closed!). Note – when hemming, make sure you don’t grab those pockets before you topstitch the hem 🙂 Depending on their size, they may hang low enough.

CIMG0051
The final change I made was to add lining to both pieces of the collar – the pattern only has you line the side where the zipper is inserted (for a clean finish all the way around, and yeah it’s pretty brilliant). However, when you open up the zipper and pull out the hood – you can see the “wrong side” of the collar fabric. I just basted another piece of lining on top of that; now you can see the lining when I pull the hood out.

Orange Minoru
Orange Minoru
I love the hood – it makes me feel all fancy.

Orange Minoru
I have NO IDEA what I’m doing in this picture, but I thought it was too hilarious not to share!

Orange Minoru

Orange Minoru

Orange Minoru

Orange Minoru
My only beef with this jacket is that the material is quite thick, which means the collar is all kinds of crazy huge when the hood is stuffed into it. See what I mean? This wouldn’t be nearly an issue with a lighter weight fabric. The collar isn’t even interfaced – the fabric is just, well, ~robust.

Orange Minoru
But, you know… I think it looks pretty good 🙂

One more secret and then I’ll stop – I couldn’t find 2″ white elastic for the life of me. I ended up having to this stuff:
Orange Minoru
Underwear elastic. So yeah, anytime you see me in this coat… that’s underwear elastic in the back.

One last thing, assuming you’re not experiencing a Lauren Overload right now (sorry sorry!)- I wanted to give a head’s up that I’m participating in Marie’s Watch This Lace group project, and my make just got posted up yesterday! Yeah!

Lace Cinnamon Slip

If you want to read more about it (and see more pictures!), hop on over and take a lurk!

Orange Minoru
Ok, that’ll be all.

Completed: Red Thurlows & McCall’s 4488

22 Feb

I know it’s only February, but try telling that to my spring fever! GAH can it go ahead and get warm here already!? Since I can’t control the weather (something I’m still waiting patiently for, as well as for my own Hoverboard and Jaws 19), I can at least get a head start on pulling my warm-weather wardrobe together, yeah?

Red & Seafoam
I said I wanted red pants… and I got my red pants! This is my second incarnation of the Thinlows, btw. Those are totally Thurlows hiding within those skinny legs.

Red & Seafoam
Since the red cotton twill I used does not have any stretch, I was very careful about how much I tapered down these legs. As much as I love the super-duper skinny legs, I think I’d need a little bit of stretch to get my foot in there!

Red & Seafoam
Thinning these down was… interesting. I scrapped my original pattern mash-up and properly retraced each pattern piece. Then, I straightened the line of the flare with a long ruler. I made a quick muslin using some thick denim I had lurking in my stash – I wanted to make sure these would be wearable, as I’ve only made Thurlows with fabric that had some give. I was also able to pin out a little more excess from the sides, and transfer that to my pattern pieces. Sewed them up, and everything fits. Yay!

Red & Seafoam
There’s a bit of pulling at the crotch, as you can see – the pants themselves feel fine (not too tight, not too loose), so I’m not sure if many this has something to do with the lack of stretch? Hm.

Red & Seafoam
The only other pattern adjustment I made was to shift the pockets about 1″ toward the side seams. I noticed in my muslin that I needed to sew inside the back extension line to prevent gappage, and this was making the pockets come close to touching. Now they sit in the right place, however, I think next time I need to shorten them. The proportions look a little off. Not that you can tell from this picture at all, but eh.

Red & Seafoam
I’ve also got a little wrinkling under the butt. Not too bad, but it’s there.

Red & Seafoam
To complete my ~come hither spring~ outfit, I used this amazing seafoam rayon jersey to make McCall’s 4488 (a pattern from the 70s). It’s hard to capture this exact color in my photos (look at the picture Mood has on the site, it’s much more accurate), but I LOVE IT. Pretty sure this shade of seafoam goes with every color I own.
Also, that top was a bitch to make. I have no idea why – I made the crop top before and it turned out fine (and BEFORE YOU SAY ANYTHING, they use the same pattern pieces up top, ok!) – but this lil shit was out to get me from the get-go. After a lot of cutting and cussing, I think I fixed it. I just have to be careful about those gathers over the boobs. If I’m not careful, things can get a bit… nipply.

Red Thurlows

Red Thurlows
Check out that floral cotton print lining! Oooh, fancy!

Red Thurlows
God, I just want to take my pants off and show everyone. The lining, I mean.

Red Thurlows
This is only slightly related, but check out the gorgeous button hole my machine makes! FUCK.

Red Thurlows
I think this might be the best-looking welt pocket I’ve ever made.

Seafoam top

Seafoam top
I really love that I got to dig into my stash of weird colors when it came time for serging everything. True happiness is having seafoam green thread, guys.

Red & Seafoam

Come on, spring!

Completed: A Striped Hoodie (by way of sacrifice)

18 Feb

Man, I love me some hoodies. I wear them year-round – even in the summer (because some people like to crank their a/c up to “frigid,” eep). I love how a well-fitted, soft hoodie can be the most comfortable piece of clothing in my closet. Here’s my sacred secret, though: my go-to hoodie was a ratty pile of SHAME. I really did wear it for everything – from cleaning the bathroom to keeping warm on a drafty airplane – and it showed. It showed in the form of faded, pilled black, bleach spots, paint stains, ratty edges, and a giant hole at the neckline (that was from a fight. Also, that’s all I’m going to say about that). I loved the way it fit, which is why I kept it long after it’s sad sorry state should have sent it to Hoodie Heaven (that’s my other sacred secret: I don’t repair my ratty clothing. That hole stayed in the neckline for OVER 6 YEARS. Yeah!!).

Sooo I ripped it up and made me a new hoodie, using the old one as a pattern!
Striped Hoodie
HA!

Striped Hoodie
It has a pocket!

Striped Hoodie
Scratch that, two pockets!!

Striped Hoodie
I’m afraid I don’t have a pattern to share, as I literally ripped up my ratty-ass hoodie and traced each piece onto paper, adding 3/8″ seam allowance. I didn’t make any changes to the pattern as I liked the way the hoodie fit pre-rip. And boy, did that hoodie want to be ripped up – the pieces were falling apart in my hands. Damn!

Striped Hoodie
You’ll notice my stripes don’t *exactly* match up – on one side, and also at the top of the zipper. That’s ok, I’m not totally heartbroken over it. This is what happens when you push yourself to finish a project long after the mojo has dried up – you get sloppy. Usually, I put everything away and try to revisit the next day with a fresh outlook. I was cold, though, and since my hoodie was laying in pieces on the cutting table… I soldiered on. At the expense of a little stripe-matching, but hey, shit happens.

Striped Hoodie
Sorry about the wayward stripe over my rear – it’s straight, promise!

Striped Hoodie
Figuring out the order of construction required a little forethought, since the length of certain areas (the neckline where the hood fits, the front where the zipper goes) need to be pretty precise. In case you are thinking about traveling down the same path of hoodie rebirth, here’s the direction I took:
1. Sew band to pockets, attach pockets to front
2. Sew front to back at shoulders
3. Insert sleeves
4. Sew up side seams
5. Sew hood seam, attach band to front
6. Sew hood to neckline
7. Attach bottom band
8. Insert zipper
9. Attach sleeve cuffs

Not too hard! It’s just like sewing a tshirt (in fact, I bet one could use the Renfrew pattern as a jumping off point, although you’d have to raise the neckline), just with an added zipper and hood 🙂 If you are adding a hood, make sure the measurement of the bottom of the hood (where it attaches to the neckline) is the same as the measurement of the entire circumference of the neckline, minus the zipper. Otherwise, it won’t sit right!

Oh yeah, mine does have a hood!
Striped Hoodie
Striped Hoodie

Striped Hoodie
Man, you can really see my mismatched stripes here. I’m sorry.

Striped Hoodie

Striped Hoodie
The pockets have the usual knit band at the top (cut slightly shorter than the measurement, then stretched to fit), topstitched with a twin needle. I sewed the zipper in using the twin needle because I liked the way it looks – we’ll see how well that holds up, since it’s not usually the strongest seam 🙂 Surprisingly, the zipper went in quite easily and I didn’t have to stabilize the seam like I thought I would. My knit was pretty stable, it might not work as well with really stretchy fabrics. If you are having trouble getting your zipper lump-free, sewing on a piece of ribbon or even fusing a stripe of interfacing really helps, fyi!

Striped Hoodie
Oh yeah, I reused the zipper from the old hoodie! What’s old is new again, or some shit.

Striped Hoodie
Just for fun – I stabilized the shoulders seams with neon yellow twill tape, and added a little cycling tag. Aw I miss my bike! Summer, where are youuuuu

Ok, now I’m going to show you some shots of my sorry old hoodie. Don’t you dare judge me.

Striped Hoodie
Bleach, paint, and weakened seams. You can’t tell too well in this picture, but the sleeve band was so ratty it was all split and frayed.

Striped Hoodie
The rip I never repaired. And look at how dull that black is! Yeech!

Striped Hoodie
This is so, so much better ♥

NOTE: Today is the last day for the Drape Drape Giveaway! I will be closing the entries at midnight, so get yer comment in!

Completed: A Stripey Tiramisu

8 Feb

It’s no secret that I love knits – I love sewing them and I love wearing them. Sometimes when life throws you a big shit sack full of bummer, the only way to get back on the horse is with a good ol’ TNT. All knits are TNT as far as I’m concerned (so. freaking. forgiving!), but I especially love my purple Tira, because it goes the extra step of actually looking pulled together. Which is nice, especially when you just wanna feel like you’re wearing comfy pajamas.

As much as I love purple, though, it’s pretty winter and no duh I need a stripey summer Tiramisu now, right? No shame, I totally ripped off both Steph AND Penelope, because I am shameless and awesome and secretly hoping we can be twins(triplets?). Ladies, pls.

Stripey Tiramisu
Anyway, who doesn’t love stripes?! It’s like wearing a circus ON MY BODY.

Stripey Tiramisu
This fabric is from the giant sale at my local fabric store, where I totally cleaned up last month. I actually have this stuff in black/white stripes too (and I think I bought some crazy amount, like 4 yards of it haha). It’s so stripey and soft and awesome. It’s also kind of not really suitable for this kind of dress; it’s VERY stretchy, 4 ways, and super drapey. I had to make a few changes to the pattern to get it to work – which ended up ok in the end, but please heed my warning: you need something more stable for this dress, unless you want to futz with the fit all night like I did.

Stripey Tiramisu
Still, it turned out pretty cute, if I do say so myself! And it looks so good with my new shoes 😀

Stripey Tiramisu
Anyway, let’s talk about the changes I made:
– I reduced the size of the bust to a C on the pattern tissue, but once I basted the top together to test the fit, it was still a bit low (as the fabric was pulling under it’s own weight. And this was before the skirt was attached!). I removed another 3/4″ from the underbust, although looking at these pictures, I could’ve stood to remove a little more.
– I reduced the waist by 3/4″ before sewing; once sewn up I had to take in the side seams another 1/2″ or so. I’m telling you – this fabric is soo stretchy!
– I shortened the neck and arm bands and stretched them to fit when I sewed them on; without stretching, they would have ended up floppy.
– I shortened the hem twice – first hacked about 3.5″ off the pattern tissue, then another 2″ when the dress was sewn up as the skirt had stretched under it’s own weight.
– I left out the pockets – I feel like they add a lot of bulk with fabric like this.

Stripey Tiramisu
I tried to match up the stripes, but I didn’t do the best job. They match up on this side…

Stripey Tiramisu
… but not the other side. This is partially because the fabric was a PAIN IN THE ASS to cut (so shifty!), and partially because I had to keep sucking in the side seams after the dress was finished, to get it to fit. Also, please note that the waistband is not cut straight. Again, shifty fuckin fabric.

Stripey Tiramisu
The shoulder seams also do not completely match up. Oh well!

Despite my problems with the fabric, the gape factor is pretty non-existent:
Stripey Tiramisu
Stripey Tiramisu
I think the key to this is shortening the bands and stretching them to fit the neckline. It kind of sucks everything in, and allows it to curve to your body.

Stripey Tiramisu
If you have your heart set on sewing this pattern with a very drapey fabric, make sure you are vigilant about pressing every seam. It really makes a huge difference, especially on the bands.

Stripey Tiramisu
Stripey Tiramisu
Sorry about all the loose threads; I had literally just finished the dress before I took the pictures 🙂

Stripey Tiramisu
Now then, let’s have a bit of Spring up in here, pls?

Completed: White Tshirts. Yes, Tshirts.

1 Feb

At the risk of really beating this dead horse to the ground- I like making solid, every day basics. Boring shit like plain pants, tshirts, solid knit dresses, and I’ve got my eye on making underwear as well. I mean, making a bunch of party dresses is super fun, don’t get me wrong – but there are only so many frilly/froofy dresses I can fill my closet with before I start pulling my hair out on Saturday morning whining that I don’t have anything to weeeear. And I, too, have read Overdressed, which basically punched me in the face the same way that Fast Food Nation punched the rest of the world in the stomach. I can’t even walk in the mall anymore now without yelling about polyester and stitch lengths. It’s insane and no one wants to go shopping with me these days… not that I do much “shopping” as it is.

So, I’m ok with sewing my own basics. I like that I make a tshirt for roughly the same cost as something from the mall, except I can control the fit as I like it and I also know the hem stitches aren’t going to fall out the first time I throw it in the wash. Maybe making tshirts is simple and the exact opposite of exciting, but sometimes I’m having a bad day and I just want to make something without thinking to much about it – and for me, that perfect something is the tshirt. Some people bake when they’re in a bad mood. I make tshirts.

A couple of weeks ago, I was contacted by Organic Cotton Plus and asked if I would like to sample some of their organic fabrics. Yeah! I chose the white interlock knit and set to work making some basics. In organic because, yeah, I be fancy.

Organic Renfrew- V-Neck
I used my beloved Renfew pattern and made two tops. Here’s the v-neck -probably could have stood to make that v a little more, uh, v-like, but it ain’t too bad for a first attempt. The secret, I’ve learned, is to sew the neck band on a regular sewing machine first, and then serge the edges after. Otherwise, the blades of the serger will chop a big ol’ hole in the middle of your tshirt when you try to pivot (and disabling the blades just makes a huge mess, oh god). I know this because I actually tried to do the v-neck version several months ago, and it failed. Also, I realize I just lied to y’all about this being a first attempt. I’m sorry, I’ll never lie to you again~.

Organic Renfrew- V-Neck
I made no changes to the pattern (other than my initial fitting changes), except I did not add the hem band. I just hemmed the bottom with a double needle and used my walking foot.

Organic Renfrew- V-Neck

Organic Renfrew- V-Neck

Organic Renfrew - Scoop Neck
I also made a scoop neck!

Organic Renfrew - Scoop Neck
Making tshirts is FUN!

Organic Renfrew - Scoop Neck
I actually really really love this fabric. It is the *perfect* weight for a basic Renfrew – super soft, a bit of stretch (but not all slinky like jersey – which I love, but there is a time and a place for slinky jersey) with a good hefty weight. Even though it’s white, it’s actually quite opaque – the scoop-neck top has neon yellow twill tape on the shoulders. Can you see it? NOPE. I’m pretty sure I could get away with wearing a neon bra under these and on one would be the wiser.

Organic Renfrew
Plus, the fabric is less than $9 a yard. So yes, a teeny bit more expensive than F21 – but it’s also light years nicer, as well as ethically-sourced. Which I’m totally willing to pay extra for.

Organic Renfrew

Organic Renfrew

Organic Renfrew

And while we’re on the subject of paying extra for ethical fashion… didja see my new jeans?

Imogene Stretch
WELL LOOK AT THEM.
Before you get all excited and start freaking out, I didn’t make these. As much as I wish I was a jean-making-master like Taylor Tailor, I can’t make a good pair of jeans to save my life. I don’t even think it’s a matter of fit anymore – I just don’t like the denim that is currently available. As much as I love love love my Thurlow jeans, I rarely wear them because the fabric just sucks. They stretch out so much over the course of the day, they are huge and baggy by the time I take them off – and I’ve sized them down twice now. Ugh. So I give up. Jeans, you win. I will buy you from now on.

Imogene Stretch
So here’s the deal – like, I dunno, every single woman I know, standard jeans just don’t fit me right. They are too big in the waist, too tight in the thighs, and the length is always much too long (and I’m too lazy to hem my own jeans, let’s be real here). I guess I could fix the waist issue by wearing a belt, but I hate wearing belts with pants, not to mention I don’t even own any belts that fit around my hips. Plus, the denim is just shitty. I bought some GAP jeans a couple of years ago and they’re already getting holes – and I barely even wear them! So I recently got rid of all my jeans – I had almost a dozen pairs – and bought one pair. I only own one pair of jeans now, and here they are.

Imogene Stretch
These are made by Imogene and Willie, and they are the Imogene Stretch. I’m not going to sugar coat – they were fucking expensive. Actually, these jeans are the most expensive piece of clothing I have ever owned. This is also the first piece of new/non-sale clothing I’ve bought in several years (and yes, I bought them with my own money. Ha, I WISH I+W would give me free jeans!). So, why would I spend $200+ on one pair of jeans, you might ask?
– They are made here in Nashville, TN, by a small business. I like supporting small businesses. I like knowing my money is going back into my community.
– The materials are amazing. The denim is high-quality and wears beautifully (and it’s woven in the USA! Yeah!). I also get 3 free repairs, should I happen to gouge a hole in them or some shit.
– The fit is better than any pair of pants I’ve ever owned. I dunno about you, but I’d rather own one pair of well-fitting pants than a dozen pairs of ill-fitting pants. I have no waist gap, the legs fit perfectly, and the length was hemmed to my exact measurements when I bought them.
– THEY LOOK DAMN GOOD ON ME.

Also, the workmanship is just beautiful-
Imogene Stretch
The topstitching is three different colors. Can you see it?

Imogene Stretch

Imogene Stretch

Imogene Stretch

I’m not posting this because I secretly want everyone to stop shopping at fast fashion places (ok, I kinda do – in a perfect world. But that’s not really attainable right now, and not everyone has that kind of budget! ;)). I mean, I just bought a pair of Keds the other day. Whatever. But… know when to pick your battles. Know what matters to you, and what you can let slide. And personally for me – I’ll make what I can, and buy local when I can find and afford it, and not feel bad if I occasionally have to buy shoes at Macy’s. Small changes eventually equal big changes.

Organic Renfrew

Organic Renfrew

~*~Disclosure: I was not financially compensated for this post, although I did receive a fabric sample from Organic Cotton Plus to review & keep. All opinions on this product are my own.

Completed: More Thurlows, With A Side Of Skinny

28 Jan

Fair warning #1: I almost resorted to calling these the Thinlows, but I refrained. You guys are welcome.
Fair warning #2: These pictures are really really terrible and I am sorry for that. I was saving to buy a new camera because mine sucks, and then I accidentally spent the money on something else that I decided I wanted more. Actually, I’m not sorry about that part.

Skinny Thurlows
Check out my new Thurlows! We are up to six pair at this point, so I understand if you are sick of this pattern now, but y’all gotta understand that I am just in love and we’re still honeymoonin’ strong over here. My TNT! My one true love! The Thurlow!

Skinny Thurlows
You’ll notice these are a bit different, in fact they went on a bit of a diet! As much as I loved those nice flared legs in the original pattern – I’m a skinny girl at heart, at least as far as my pants are concerned 😉 I’ve hemmed and hawwed for a few months now on how to properly execute the slim-down. I probably should have hemmed and hawwed just a little bit more because honestly, these aren’t exactly my best attempt! Blame it on a combination of bad pattern, er, combinations (which I’ll get to in just a second, so put your hands down!), as well as a tricky fabric choice. It was a learning curve, that’s for sure!

Skinny Thurlows
To get the legs skinny, I ended up merging the top of the Thurlow pattern with the legs of the Clover pattern. One issue I noticed right away with my tracing – and you probably notice this right away in these pictures – was that the grainlines for each pattern were TOTALLY different. Just skewing in completely different directions. So which grainline was I supposed to choose? I took a wild guess and stuck with the Thurlow grainline. Also, SPOILER: I picked wrong; look at those crazy wrinkles and folds and off-grain madness going on – the side seams are trying to so hard to wrap around my legs! WAH! First lesson learned here: pay attention to those grainlines. They need to go straight up and down the middle of the legs, which is why each pattern was so different.

Skinny Thurlows
Mistake #2 came from my fabric choice. I really like this fabric – it’s a very soft, wool-blend felt that I picked up at the Vogue store while I was in Chicago last year. It was super cheap, feels great against the skin, and I love the color/fuzzy soft texture. However, it has waaaaay too much stretch for this pattern. I don’t know if that saved the grainline fiasco or made it worse than ever, but the massive amounts of stretch definitely contribute to how these pants hang off my legs. Also, the sizing was horribly off, due to the stretch. I kept basting and taking in the sides – I took over 1″ off each side seam. The welt pockets are now too close together as a result; and the pants are still a little loose. Didn’t think that one through, I’m afraid! Second lesson learned: no stretch on these pants, at least not without sizing down first.

Skinny Thurlows
Here’s a better picture of my fails. Wrinkles all up and down the backs of the legs, and the welt pockets are sitting in a weird spot. Oh well!

Skinny Thurlows
I don’t think they’re all bad, though. They’re quite comfortable, thanks to the stretch and how soft the fabric is. And honestly – is the fit that much worse than RTW? I dunno.

Skinny Thurlows
NOPE, NEVERMIND, THAT’S PRETTY BAD. HAHAHA!

Skinny Thurlows

Skinny Thurlows

Skinny Thurlows

I plan on revisiting these again, as I have not yet satisfied my need for skinny pants. I think I’ve got a better grasp on the grainline issue, but if anyone has words of wisdom they’d like to share – let’s hear it!

Skinny Thurlows

And yes, I still plan on wearing these. In all their wrinkly, off-grain glory.

Completed: The Charlotte Skirt

21 Jan

I always keep an on-going list of wardrobe staples (Cake, if you will) that I would like to get my sew on with. Knit dresses, a lightweight denim skirt, that cycling jacket, red straight-leg trousers (Sunni, I love you but I REALLY love your pants and I’m going to copy you aaand I hope that’s ok!), white tshirts… to name a few. One of the pieces that’s been on the list for the very longest was a red pencil skirt. I dunno why I’ve put this off for so long – red is basically a neutral as far as I’m concerned, and my wardrobe is quite lacking in pencil skirts these days. Sewing boring clothes can be, well, boring – but ain’t nothing boring about a handmade staple that gets the hell worn out of it all the time, amirite.

Charlotte Skirt
I did finally make that red pencil skirt, though.

CIMG0035
This is the Charlotte skirt I was telling y’all about last week. It’s generously sized through the hips, so those of us whose hips don’t lie can still rock our pencil skirts with minimal size futzing and fretting. It’s like, living the dream. Oh yeah.

Charlotte Skirt
I went with the plain jane, no frills view as I really just wanted a plain ol’ red pencil skirt. I based my sizing experience off the Elisalex dress and cut a 6/10, which ended up being quite a bit too big and needed some shaving down the sides. Now that I’m looking at the pictures, I might need to adjust the darts for future skirts are there is definitely some slack chilling at the front. DAMMIT. It really doesn’t look that obvious in real life.

CIMG0044
This is a very simple pattern to construct – there are only 3 pieces! I did make a few changes – shortened the hem by several inches (I think around 4″? Ladies, watch your petite selves – this skirt is long!), added a 4″ slit for walkability, and dropped in a full lining. Adding the lining was SUPER easy, by the way – I just cut out an extra front and back piece from the lining, sewed the darts and side seams as normal, and then dropped it in the shell of the skirt before attaching the waistband. As the skirt is wool (from the flea market, yeah!), it’s limited to winter wear which means tights – which means lining is a necessity.

Charlotte Skirt
I did have a little snafu with the sizing, once I put the waistband in. And by “little snafu,” I mean the skirt was too damn small and it measured out to like 2″ smaller than my actual waist measurement. WTF?! Fortunately, my zipper had giant seam allowances just hiding beneath the lining – as well as the waistband having a nice generous overlap for snaps – so 15 minutes of quality time with my seam ripper meant the skirt was saved. !!!

Charlotte Skirt
It does have a nice rear view.
Shit, I hope I don’t attract the Flickr weirdos with this picture.

Charlotte Skirt
It seems I have run out of things to say. Here is an artsy photograph for your consideration.

What’s on your staples-to-sew list?

Tutorial: The Paulie Pocket Top

18 Jan

stretch yourself header
This post is part of the Stretch Yourself Series hosted by Miriam of Mad Mim and Miranda of One Little Minute. This two week series is ALL ABOUT the love of knits, so go check it out!
I’ll be showing y’all some embellishment twist on a classic, along with Jessica of A Little Gray

Here she is – the Paulie Pocket Top!
Paulie Pocket Top
I KNOW. The name of this top is totally ridiculous & tacky – but what part about my life isn’t? 🙂

Paulie Pocket Top
You will need 3 different kinds of fabric to make this – something for the majority of the shirt (in whatever yardage you need to make your top), something to line the back of the pocket with (half a yard or so should be enough), and scraps for the pocket binding. For the binding, you don’t want to use anything that is too thin/floppy, or it’s not going to sit right – try something with a bit more body, like ribbing or a cotton knit.

Don’t forget your pattern! You can download it here. The edges of the paper are part of the band pieces; the lines just didn’t transfer over during the scan.
Be sure the test square prints out to 4″x4″ (or 10cmx10cm, if you fancy). The stretch guide is there for the binding fabric – you just want to make sure the 4″ piece stretches up to the length provided (or else your binding will not fit in the cut-outs). If it stretches more or less, that is fine, but you will need to adjust your pattern pieces accordingly.

Paulie Pocket Top
Cut all your pattern pieces from the main fabric as normal. For this tutorial, I am using the Renfrew pattern. Sew the shoulder seams as instructed (you don’t *have* to sew the shoulder seams first, but I like to because it helps with pocket placement – you can pull the shirt over your head and double-check in the mirror).

Now push the back of the shirt out of your way. We won’t be touching it for the rest of this tutorial.

Paulie Pocket Top
On the shirt front, measure on both sides the distance from where you want the bottom of your pockets to hit, keeping seam allowance in mind. I usually go with 1 3/4″. Mark this with a pin.

Paulie Pocket Top
Align the bottom of the pocket template with the pin and cut from the front of the shirt only.
(pst! I know my template has different wording – while putting together this tutorial, I hadn’t decided on a ~name~ for my pattern embellishment yet ;))

Paulie Pocket Top
Give the pocket piece to your cat to play with, idk.

Paulie Pocket Top
Cut 2 pieces of pocket ribbing, using the pocket band pattern piece.

Paulie Pocket Top
Fold in half lengthwise, wrong sides together, and press.

Paulie Pocket Top
Pin the pocket band to the pocket opening on the outside of the shirt, matching raw edges, notches, and ends. The pocket band will be smaller than the pocket opening – this is good, we are going to stretch that band to fit and give our pockets a nice curve. Do not overpin this – 3 pins is plenty.

Paulie Pocket Top
Start by anchoring one end of the pocket band to the pocket edge, and stop with the needle in the down position.

Paulie Pocket Top
Sew the band to the edge, stretching the band to fit as you go (don’t stretch the raw edge of the pocket- just the band! It’s much easier if you position it so the band is on top). Sew slowly and take your time. We ain’t in a hurry here.

Paulie Pocket Top
Once the band is sewn down, you can topstitch it on your sewing machine – using a twin needle or a regular ol’ zigzag stitch.

Paulie Pocket Top
You should end up with something like this. Ain’t that fancy! Let’s put a back to those pockets so our sides aren’t hanging out in the glory of the sun – unless you’re into that kinda stuff, eh, no judgement here.

Paulie Pocket Top
Measure from the bottom of the shirt front to about an inch above the pocket band. Mine is 9.5″, which is approximately how tall I need my pocket lining piece to be.

Paulie Pocket Top
Measure that same measurement from the bottom of your shirt front pattern piece and cut that from your pocket back fabric.

Paulie Pocket Top
Finish the top edge of your pocket back fabric – this is optional as we all know jersey doesn’t exactly unravel, but it’ll make the next step a little easier 🙂

Paulie Pocket Top
Lay the shirt front over the pocket lining piece you just cut, matching all raw edges. Pin along the pocket openings and shirt bottom to keep everything in place.

Paulie Pocket Top
Now, using your fingers to feel the edge of the top of the pocket lining underneath, carefully pin across the front of the shirt so both pieces are pinned together.

Paulie Pocket Top
Flip back periodically to make sure you catch both layers.

Paulie Pocket Top
Topstitch (again – you can use a twin needle or a zigzag) along the line you just pinned. Baste the side and bottom edges together.

And that’s it! You can go ahead and sew your shirt together as instructed by your pattern – treat the pocket-ed front as one piece.

Yay for embellished shirts!

Paulie Pocket Top

Paulie Pocket Top

Paulie Pocket Top

Special shout-out to this awkward picture:
Paulie Pocket Top
No idea why I look so emo here haha

Paulie Pocket Top
There! That’s better 😀

Completed: A Very Purple Simplicity 3178

16 Jan

Y’all. Can we talk about wool crepe for a minute? I just love this shit to tiny threadbare pieces and I wish everything I made had a wool crepe option. I love the spongy texture, the glorious drape, the magical body-temperature-regularity (yay, wool!), and the COLORS. Truly, everyone should have at least one experience rolling around in a uncut length of wool crepe. Especially if it is a jewel-toned wool crepe. Ooh la la.

For my first Mood Sewing Network project, I wanted that experience to include wool crepe. I have a beautiful 1940s Simplicity pattern that I knew would look amazing done up in such a fabric. And since we’re talking about ~my first time~, I decided to go all out with my bad self and splurge on silk crepe de chine lining and satin bias tape as well. The end result is very… purple.

Simplicity 3178
The pattern I used is Simplicity 3178, which is undated but looks to be from the late 30s/early 40s. I love vintage patterns because they always have sweet little details, like the darts on the elbows that provide gentle shaping for the sleeves and the shoulder yokes that are actually pockets (!!).

Simplicity 3178
The skirt is bias cut, so I finished the hem with 1″ horsehair braid to give it a nice flare.

Simplicity 3178
The pattern gives a couple of options for finishing the neckline – I went with the double collar (self fabric on top and ivory wool crepe at the bottom) and a giant bow!

Simplicity 3178
I didn’t have to make too many changes to the pattern to get a good fit. I took in the side seams by 1/2″, tapering up to the underarm. I also removed a whopping 9″ of length from the skirt – the original pattern pieces came all the way down to my ankles! Yeech!

Simplicity 3178
I reckon the pockets are totally unnecessary, but ughhh I love those little fuckers!

Simplicity 3178

Simplicity 3178
This baby is also lined! Wool crepe really begs for a nice lining to give it some additional structure, and although the pattern doesn’t include pieces or instructions for adding a lining, it wasn’t too difficult to figure out. Unfortunately, I didn’t correctly calculate my yardages, so I didn’t have enough lining for the entire dress – which means the sleeves are not lined. I’ve noticed a distinct lack of lining in lots of dress sleeves, so this doesn’t bug me too much. Bonus plus: now you can see the pretty bias tape at the sleeve hems!
Also: lol at this hideously unflattering photo of me. IT WAS WINDY WHEN I TOOK THESE PICTURES, OK.

Simplicity 3178
The instructions do call for the sleeve slit and hems to be finished with bias tape, and then closed with a series of snaps. After trying the dress on during one of many fittings, I decided to flip the hems back to show the bias tape since the dress really needed a bit of color breakup. I pressed the cuff (wool crepe really does press so beautifully) and tacked down each side with a couple of hand stitches to keep everything in place. The neck bow is the same bias tape, just pressed completely open.

Simplicity 3178
I think the shoulders are my favorite part of the dress! Instead of using shoulder pads, I made a small stiff rectangle with horsehair interfacing and tacked that to the armholes like a sleeve head. It keeps the pleats from dropping too much and gives the dress those badass strong shoulders that were so fashionable in the 40s.

Simplicity 3178
Here you can better see the yoke pockets. I just think they are the coolest little detail! I wish they were big enough to hold my phone, but they’re just baarely too small. Hm, what do you think I could use them for? My seam ripper seems to fit 🙂

Simplicity 3178
Simplicity 3178
I worked hard to make the inside of this dress just as pretty as the outside. The yoke pockets and neck facings are lightly interfaced with silk organza, the facings are finished with satin bias tape, and I even rolled the hem lining and used tiny hand stitches to secure it. The collar is detachable – it’s current state of attachment involves basting stitches.

Simplicity 3178
Overall, I’m very happy with my dress – I love it’s snuggly wool warmth and did I mention purple? Because purple.

IN OTHER NEWS:
– Brittany of Viva Bang Bang, one of the MANY local Nashville bloggers who I’m just obsessed with (check out my sidebar; there are tons of us! WE ARE EVERYWHERE, YO), came to my house over the weekend and took a bunch of pictures of my sewing room. If you thought it looked cool before, definitely go check it out now because she made it look fucking amazing. Yay! Thank you so much, Brittany!!
– I’m sure some of y’all are into Project Runway, yes? Even if you’re not (that would be me, haha. Guilty!), you should totally watch this season because my homegirl Amanda Valentine is one of the designers and she is super rad and you should support her. I mean, they called her a bitch in the season preview. How sweet is that?! Haha!