Archive | completed projects – new RSS feed for this section

Completed: Peacock Pullover

26 Apr

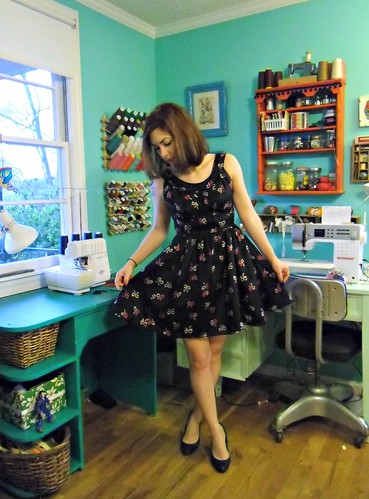
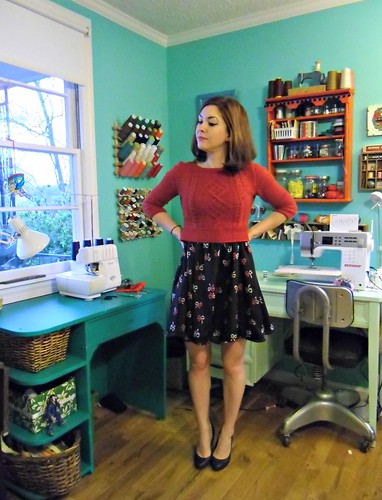
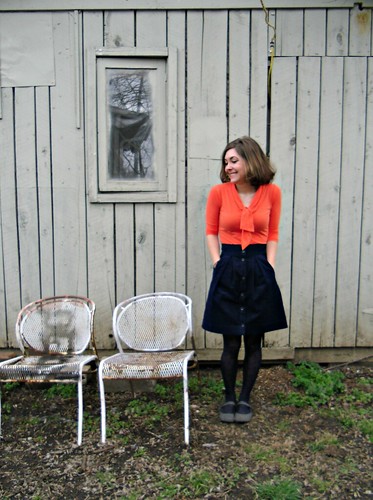
Hey look, I finished another sweater! What does this make, 8? Give me another year and I’ll have all those nasty arcylics in my closet replaced with glorious handknit wools, woohoo.

Peacock Pullover

As boring as this name is (“Peacock Pullover”? Really? Whatever, you should know by now that I’m not imaginative with my garment names), calling something a pullover will always make me think of this:

pullover-dumb-and-dumber

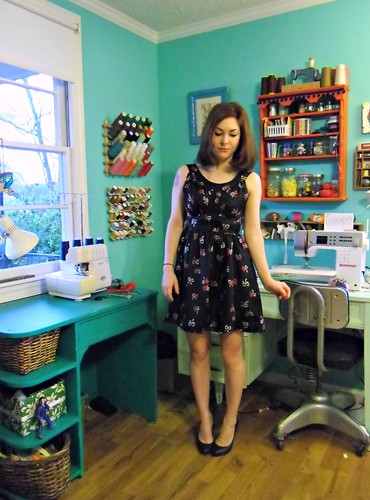
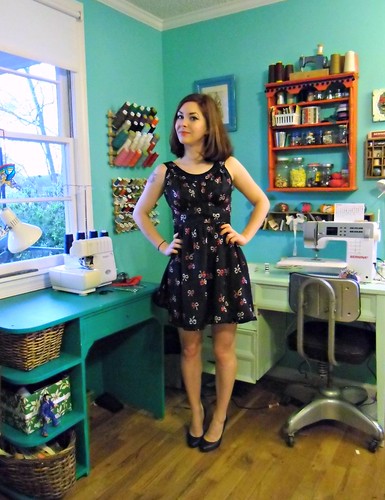
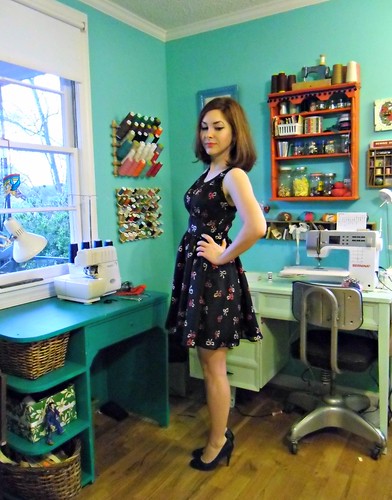
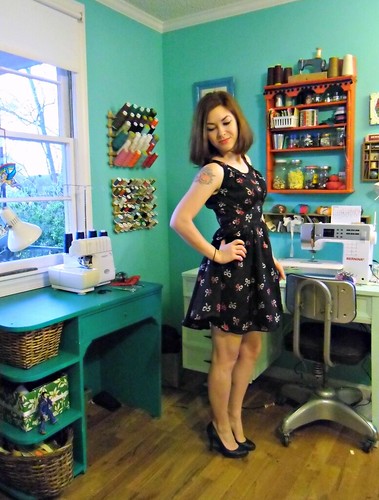
Which is pretty much one of the best things (from one of the best movies) ever, amirite? Unfortunately, this sweater isn’t very exciting. You could stop reading this post right now and still get the general gist of it. It’s a basic raglan pullover with a crew neck. Snore.

Peacock Pullover

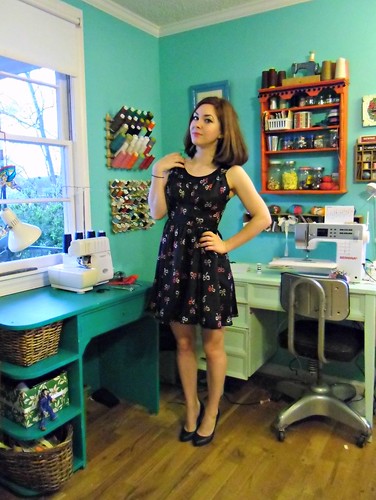
But y’all know I’m a big proponent of making ~basics~. And this is totally a basic sweater, but hey – the color is fun, yeah?

Peacock Pullover

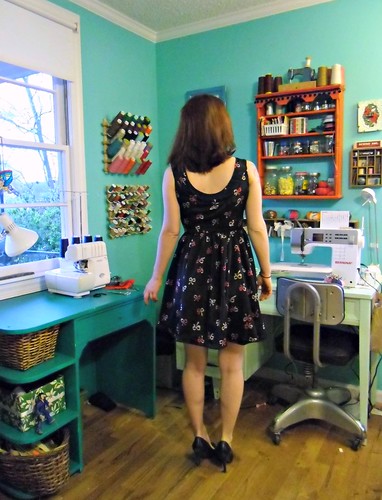
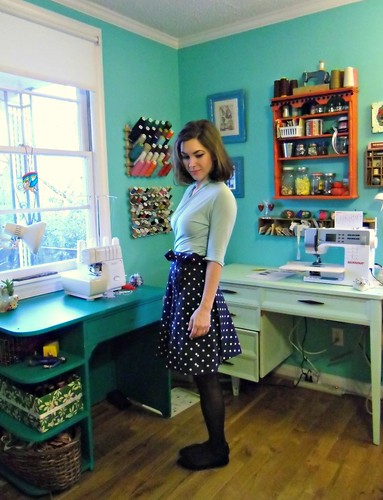
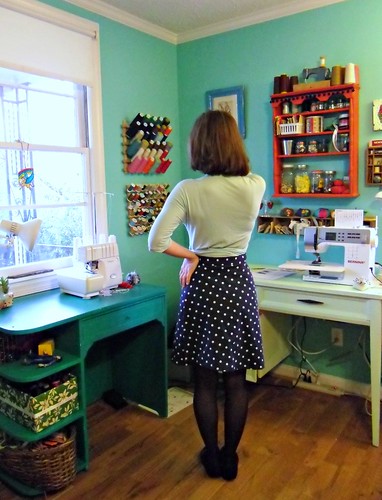
This pattern is the Ladies Classic Raglan Pullover. Obviously, mine looks a bit different than the pictures on the project page, and I’m not just referring to the color. Mine is much more fitted as I prefer to have a bit of waist definition with my sweaters. It wasn’t too hard to get the fit adjusted, although in my first go, I didn’t try the sweater on enough and after finishing the waist I realized that it was WAY too big. Ugh! I spent an entire week ripping out about 30+ rounds of stockinette. It’s still a little big – there’s some weird bagging on the sides of the chest where the ease suddenly becomes positive instead of negative – but it fits pretty well for the most part.

Peacock Pullover

If this is starting to look like deja-vu, that’s because Tasia recently(ish) knit this pattern in brown. I swear, I had it in my queue long before I saw her finished project, buuuuut I fully admit that her pictures were what moved the pattern to the top of the queue. God, she always knits the best stuff. I gotta stay out of her Ravelry or else I’m going to start looking like a total creeper, ha.

Peacock Pullover

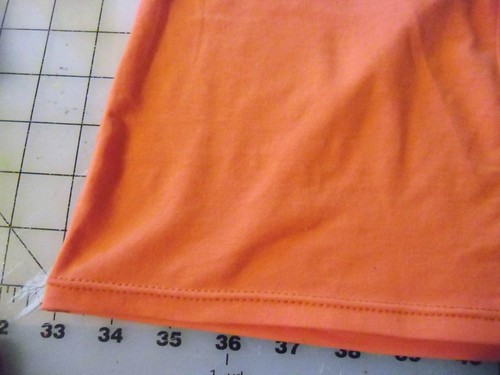
Anyway, I’m just going to glean over the basics here (if you want the full deets, check out my Ravelry notes). This is a size 33, with modifications to the waist and arm width. I used Plymouth Galway in a lovely peacock blue; it’s similar to my beloved Cascade 220 except a bit cheaper (and this was REALLY cheap, as I picked it up during the after-Christmas sale at Haus of Yarn). I started it during my flight to NYC, and finished earlier this week. It would have knitted up much faster had I not spent a week unknitting my boo-boo, but oh well 🙂

Peacock Pullover

Next time I make this, I will probably go down another size, as well as make more decreases. It’s still a little too baggy for my liking.

Peacock Pullover

At any rate, this is a great pattern – quick to knit, easy to customize (look at the other Raveler’s projects; some people have made their with STRIPES. Ooh!), and fairly mindless stockinette. I think this would make a great first-sweater pattern. Bonus – it doesn’t use a whole lot of yarn! Which means I still have like 3 skeins of that peacock blue laying in my yarn stash. Uh.

Peacock Pullover

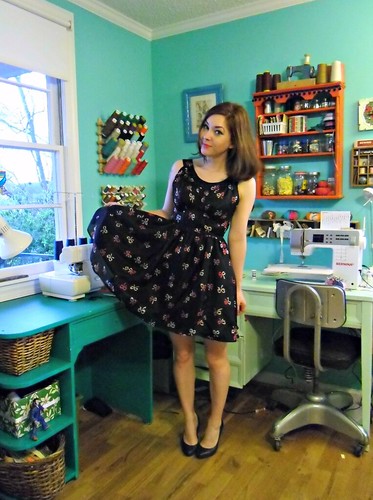
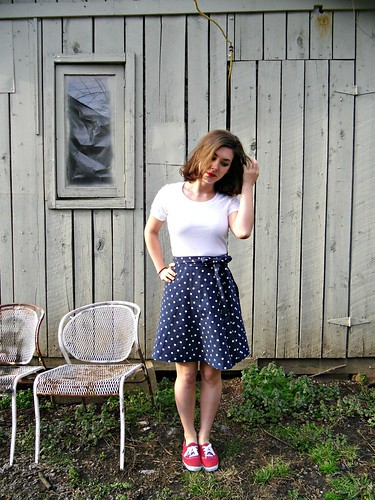
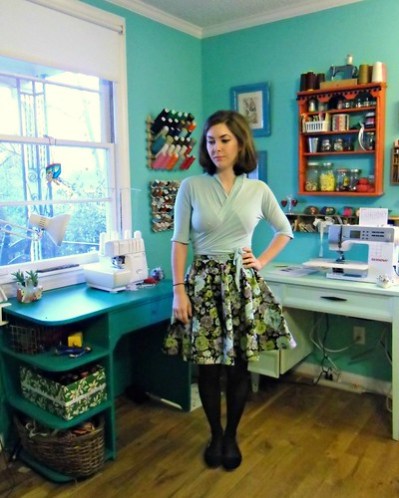
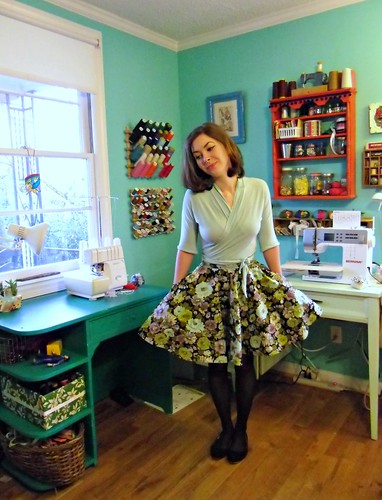
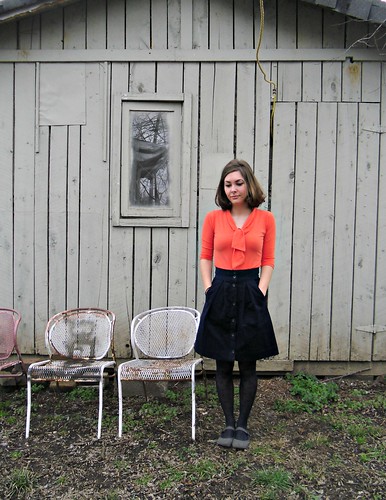
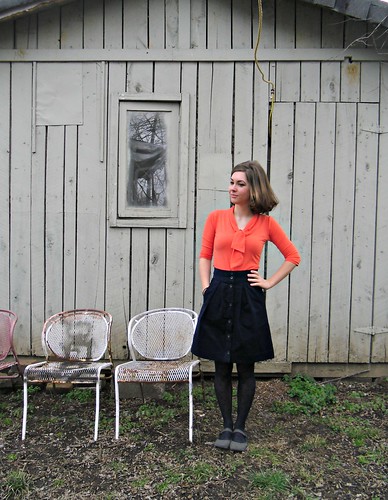
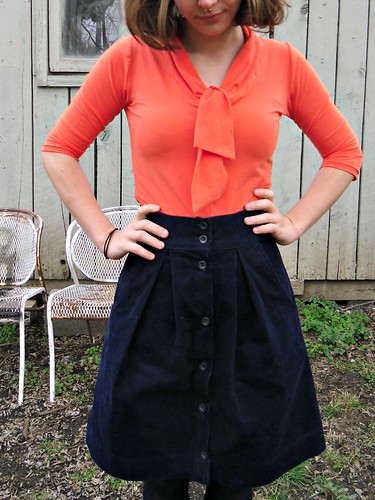
Sorry these pictures are bad, by the way! I took these yesterday as soon as I got home from work. Lesson learned – wait until the brightness of the sun goes down JUST A BIT. And yes, I am totally wearing shorts with my wool sweater. Whatever, it was like 80* outside and this is my blog and you can deal with it :B

Peacock Pullover

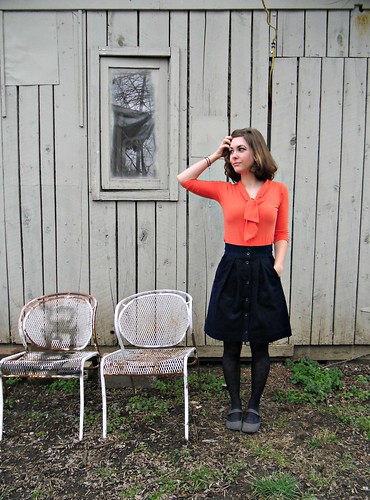
But hey, spring is totally in the air. Here I am looking at the birds fussing at each other in the tree above me.

Peacock Pullover

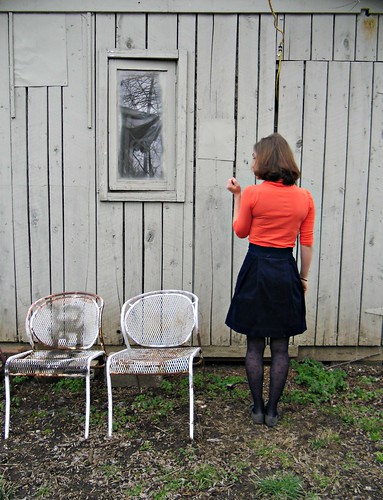
And lest you think I live in a mud pit (naw girl, that’s just the one part in front of my nasty-ass shed, ha), here is proof that the rest of the yard has exploded in green. I just realized that bush behind me is honeysuckle, and you have no idea how happy that makes me.

Completed: Another Kelly Skirt, In Denim!

15 Apr

Let me just start off by saying I LOVE this Kelly skirt pattern. It’s incredibly simple – 5 pieces, and the skirt sections are nice and rectangular (which is magical when it comes time to make flat pattern alterations, especially to the length). Easy and fun to sew, and super duper flattering. I love it and I want to make its babies.

Denim Kelly Skirt

And I love my denim version – I really really do – but DAMN GIRL we got off to a rough start 😦

Denim Kelly Skirt

I bought this denim at Mood while I was NY (I’m starting to sound like a broken record… sorry! I told you I bought a lot of shit while I was there, deeeal with it haha). While I can’t tell you exactly what it is so you can find some for yourself (although George might, he found it and squirreled it away for me because he is awesome), I can say that it is a lovely light/medium weight, dark dark denim with no stretch. The color is super rich, and it has a nice body without being super heavy and stiff. Also, I bought like 3 yards of it. Expect more denim-wear, aha 🙂

Denim Kelly Skirt

So, like I said – this is the Kelly skirt. I made this lil’ dude before in corduroy. I wanted to make this immediately after that silk near-disaster, as something easy and mindless that didn’t require a lot of focus. Plus, my wardrobe was desperately missing a denim skirt, as my faithful denim Ginger is just way too big for me to continue wearing at this point. Kill two birds with one stone? Don’t mind if I do!

Denim Kelly Skirt

Well, I don’t know what I did wrong here, but the making of this skirt was a HOT MESS from practically beginning to end! You can’t tell from the finished skirt, because it’s awesome (and I’m totally tooting my own horn here, dgaf. toot, toot), but there was lots of screaming and cussing during the process. I know, I cuss even when I’m thrilled with how things are going – but I’ve never cussed AT my machine until this. Sorry, Nina :\

Denim Kelly Skirt

My biggest issue was that top stitching thread. My machine was NOT having it, and kept throwing fits at me every time I tried to sew. If you think the topstitching looks good – well, that’s because I ripped out out several times. I had a lot of practice at that point! Good thing denim is forgiving when you hit it with the steam iron, because I had a big ol’ denim needle and everything. The machine just kept flipping it’s shit over the thread – I had to use all-purpose (aka, regular) thread in the bobbin, which caused the tension to freak out in a major way. I probably spent about an hour fussing over the bobbin tension, trying different threads and needles and changing the numbers and… ugh. That was the biggest issue. I was so concerned, I actually asked the Bernina store if my machine was behaving normally or if I needed to take her in for a check-up. General consensus was that the machine was being finicky due to the thread, that these things happen, and next time I should try a topstitching needle (me: oooh, those exist?!).

Denim Kelly Skirt

So, I spent foreeeeever messing with that, and ripping seams and restitching and re-ripping, and finally I had my waistband on – topstitched and everything. I put the skirt around my waist to check the fit. Uhmm… I know my last skirt was a tiny bit big, so I sliced off just the tiniest bit of size for this time… and it was TOO SMALL. Like, a good half-inch smaller than my actual waist measurement. Wtf?! I don’t know what I did, but I must’ve fucked it up somewhere. I also couldn’t let the waistband out at the seam allowances because I’d aggressively clipped the corners for when I turned them out :X

Denim Kelly Skirt

In the end, I unpicked the old one and cut a new waistband. It wasn’t too painful to do – especially with that steam press interfacing fusing masterpiece I now have. YEP. I also ripped out one of the front plackets and sewed it slightly narrower, to give the skirt a little bit of extra room up top.

Denim Kelly Skirt

I also had problems with my button holes. The machine just wasn’t having it… especially when I tried to make them vertical. I ripped out 4 button holes before I just let them be horizontal. I also had problems with top stitching the hem, but I won’t get into that. I can just be an idiot sometimes.

Denim Kelly Skirt

After seam-ripping my button holes open, I don’t really like the way the threads are hanging out there everywhere. So sloppy! Soooo, I bought myself a button hole cutter. FANCY. I can’t wait to use it!

Denim Kelly Skirt

You may notice that I didn’t have enough buttons – the pattern calls for 7, I had 6. I compensated by only putting one on the waistband, and sewing a hook and eye below it so it wouldn’t gape.

Denim Kelly Skirt

The topstitching did turn out nice in the end, after MUCH finagling. Just a little tip – when you’re topstitching, increase the stitch length slightly (for me, I go from 2.5 to 3). It makes for a prettier stitch 🙂

Denim Kelly Skirt

And hey, here’s a little surprise – polka dot in the pockets! This is the same Marc Jacobs fabric I used for my Miette wrap skirt.

Denim Kelly Skirt

One last thing – remember when I said I only had 6 buttons for this skirt? Wellllll, I was trying to jump on Landon’s back and unfortunately I broke the bottom button. Haha! I mean, split the shank and everything. So now I only have 5. If the hem stitching looks mis-matched, it’s because I pinned the skirt together at the bottom for the pictures and I didn’t do quite a good job. I promise that shit actually matches… I spent a good 45 minutes futzing with it, you know 😉 OH, and in case you were wondering… that is totally an original Stray Cats shirt, and it is totally awesome.

This will be great for Me-Made-May – I LIVED in my denim Ginger last summer. So glad we can finally be reunited, even if it’s a different pattern 🙂

Completed: My Easter Outfit

12 Apr

Remember that wool crepe I bought while I was in NYC? Remember how I was afraid it was going to be too winter-y for a climate that’s already rapidly approaching summer weather?

WELL, CHECK THIS SHIT OUT:

Easter Outfit

I made me a fancy lady flouncy pencil skirt! Totally banking on Carolyn’s reassurance that wool is a lovely fabric to wear during the summer, I decided to test that theory by making it into a skirt. I really wanted a whole ladysuit – or even a dress – but unfortunately, this kind of saturated yellow doesn’t do favors for my coloring. I went with a skirt so there would be plenty of space between my face and the yellow.

Easter Outfit

I felt pretty silly making a wool pencil skirt just as we’re creeping into 75* days – I mean, I’ve always thought of wool as a winter fabric (and I’d guess that a lot of people feel the same way). The best coats are wool – why would I wear wool in the summer heat? Isn’t that just asking for a sweaty disaster?

Easter Outfit

So here’s my little wool crepe pencil skirt for spring – in the kind of bright yellow that would almost be embarrassing if it wasn’t so awesome. But sit back down for a spell, there’s a lil’ surprise in the back…

Easter Outfit

… a circular flounce insert! I call it a party in the back, Landon calls it my tail. Either way, it’s a fun little addition to jazz up an otherwise plain pencil skirt (well, as plain as a *bright yellow* wool crepe pencil skirt can be, I suppose!).

Easter Outfit

This pattern is Vogue 8317, which I received during a sewing swap (also while I was in New York – thanks, Oona!). Just based on the envelope art, the pattern is a bit dated looking (I originally thought it was from the earlyl 90s, but the copyright date is 2006 wut), but the line art showed promise. I made a 10, although I probably should have done a smaller size as I needed to take in quite a bit at the waist. I also shortened the skirt by about 2″ before cutting into my crepe.

Easter Outfit

Easter Outfit

Easter Outfit

Easter Outfit

The skirt is fully lined with Bemberg Rayon. I originally wanted a bright yellow like the crepe, but there wasn’t any in the store when I was there (nor was there any white – at least not in rayon!), so I ended up getting a light peach that is very close to my skin tone. Surprisingly, it picks up quite a bit of the hue of the wool and almost looks like the exact yellow I was trying to obtain. Love it when that happens!

Easter Outfit

Easter Outfit

I also made my bow-neck blouse, using polka dot cotton batiste (from Mood, of course) and Simplicity 4676, a vintage pattern. The batiste is quite sheer, so I underlined the body with white batiste. I love this stuff – it’s incredibly soft and lightweight, and the black and white pin dots go with EVERYTHING. Seriously. I will probably end up wearing this top all summer, it’s so good!

Easter Outfit

Easter Outfit

Easter Outfit

I made this outfit to wear for Easter dinner with my family, but I can definitely see myself wearing it all throughout summer, as well as pairing up the individual pieces with different tops and bottoms. Oh, and to answer my own question at the beginning of the post- wool crepe gets two thumbs up from me when it comes to summer wear. Just make sure you pair it with a lightweight, breathable lining, and you can wear this amazing fabric year-round.

Easter Outfit

Do I sound like an advertisement, yet? 🙂 WOOLCREPEWOOLCREPEWOOLCREPE

Completed: A Bow-Print Silk Chantilly

11 Apr

Here you go, folks – the reason why I’ve been absent (well, completed-project-posts-wise) for like a week and a half:

Silk Chantilly

I made the mistake of sewing a silk dress. Can you say WOOF? Because… woof. So much woof.

Silk Chantilly

This is the Chantilly, by Colette Patterns. Secret time – I got this pattern as a birthday gift last year and this is the first time I’ve sewn up the dang thing. Honestly, I was a little put off by the amount of fabric needed (both fabric AND lining, mind you!), especially since this is the type of dress that really needs a floaty voile or silk to really work. As some of you may know, I was on a really really strict budget for almost all of last year, and my fabric buying options were *very* limited. So, hence, the reason this pattern sat for so long. Bc forreal – this is a gorgeous dress, and it needs to be made up a million times, y/y?

Silk Chantilly

Of course you can’t see the detail too well, because it’s black – sorry! That’s probably a good thing, because I really hacked this one up and some of the construction is a little embarrassing. Silk is hard to sew, yo – and it didn’t help that I didn’t even bother to give a muslin a chance, which would have solved some of my fitting issues before I was dealing with a fabric that floated away every time I sneezed.

Silk Chantilly

I sewed this up in a straight size 2, except the waist seam was sewn with a 3/4″ seam allowance instead of the standard 5/8″. This is version 1, without pockets. I actually started with version 2, put the neckline/shoulder yoke thing together… and realized that my silk was so sheer, you could see directly through it to the WHITE interfacing on the back of the lining. Of course, I didn’t notice this until after I’d already clipped, trimmed, graded and understitched the thing, UGH. I actually threw it in the corner of the sewing room (where the Bad pattern pieces go to sit in time-out until I can decide what to do with them) and finished the dress while I contemplated what to do. I didn’t have enough bow fabric to cut a second yoke, and the silk was so delicate, even the finest microtex needle left holes after unpicking. I ended up very very carefully unpicking all my stitching (srsly this took like an hour to do), cutting a new underlining with the seam allowances trimmed down to 1/4″ to match, and then putting everything back together.

Silk Chantilly

Fortunately, my mistake was spotted before I dealt with the midriff – since it is also interfaced, we could have had 2 disastuhs on hand. But I remembered to underline it, so yay me! I also just want to take a moment here to brag about my new interfacing revelation – I found a digital steam press at the flea market last month (similar to this one, although my model is slightly older) for $30. Did you click that link and see how much those fuckers cost? (don’t worry, I don’t have affiliate linking or anything like that, ok!) YEAH BUDDY. I bought the shit outta that thing. AND IT IS AMAZING. You just put your fabric and interfacing on the board, close it, and thirty seconds later it is PERFECTLY fused, without you fussing over it with a hot iron. Plus, the board is much bigger than an iron, so it covers much more fusing ground at once. I am in love, and I shall never go back.

Silk Chantilly

I should probably stop and talk about the fabric for a sec – this is the fancy bow print silk that I picked up from Fabrics for Less in NY. It’s Betsey Johnson! Actually, I don’t care much for her clothes – too much price for too much polyester, yeeck – but her fabric prints are always fun. And hey, since this is Betsey Johnson silk, does that mean I can now say I have a Betsey Johnson dress? Huh huh?

Silk Chantilly

Real talk, tho – this fabric was a BITCH to sew. It was exactly like what sewing butterfly wings must be like – just really really hard to get under control. It was worth it in the end, but oh god I need a silk break. My lining is a plain black rayon from Mood – it’s not Bemberg, it’s much heavier than that. Honestly, I was a little disappointed at first because I wanted the floaty bemberg to go with the floaty silk, but having dealt with the silk… I’m glad the rayon I ended up with had more body. It was MUCH easier to sew, and it gives the skirt some foof. Yay!

Silk Chantilly

Here’s another foofy skirt picture, because of reasons.

Silk Chantilly

Isn’t the bow print delightful, though? Ah, I just love it! I was rushing to finish this dress because I plan to wear it for my friend Colleen‘s wedding on Saturday, so I’m glad that’s done!

Silk Chantilly

I can’t even tell you how glad I am that I FINALLY finished this. Seriously, the agony of construction made me start to hate it toward the end. I seriously considered throwing the whole thing in The Corner and leaving it until I had my head back together, but I was too invested in the beautiful fabric. Which, by the way, going back to the yardage needed for this dress… I squeezed mine out of 3 yards of 45″ fabric. Check those layouts before you make a big silk splurge!

As a bonus – the skirt looks totally fabulous with my Chuck sweater, yeah? 🙂

Silk Chantilly

Silk Chantilly

Pattern Testing: The Miette Wrap Skirt

1 Apr

Ohhhh, I’m so excited to finally post this! Keep secrets is not exactly one of my strong points 🙂

Ladies and Gentlemen (… are you there??), may I introduce the Miette Wrap Skirt:
Miette Wrap Skirt

Our now-famous Tilly has released a new downloadable pattern – the Miette! Miette is a gently flared wraparound skirt that ties at the front in a delightful bow. The skirt has a wide back overlap (no danger of flashing!) and optional practical patch pockets. Guys, this is the perfect beginner pattern – wrap around ties (no fiddly closures!), simple to fit, and it’s actually cute and wearable… not to mention highly customizable. Can’t you see this with a contrasting waist tie, or even some embroidery or applique on the front pocket? Another bonus is that the simple shape works with a variety of fabrics – even the scary ones, like silk or plaid – and since there are only a few pieces, it’s a great pattern for testing the waters without a huge commitment. I love it!

Miette Wrap Skirt

I also love that it’s a non-flashing wrap skirt. I took these pictures on a windy day, wore it out on a windy day – even stood on the street corner and waited 15 minutes for my ride to pick me up – and things stayed exactly where they belonged. I haven’t had a chance to fully test this theory, but I very strongly suspect that this skirt will also work well for cycling.

Miette Wrap Skirt
In addition to being a simple skirt design, the instructions are also super easy for even the most amateur of beginners to comprehend – think full, in-depth tutorial, with scads of color pictures and lots of words to guide you along (there is also a set of basic instructions for those of us who don’t need quite so much hand-holding ;)). Consider it a sewing lesson with a bonus pattern!

Miette Wrap Skirt
I cut my pattern in a size 2, omitted the pocket (otherwise it would’ve gotten lost in the sea of dots) and shortened the length by about 4″. The fit turned out perfect; I couldn’t be happier!

Miette Wrap Skirt

Isn’t my fabric gorgeous!? It’s a lovely medium-weight linen by Marc Jacobs… from Mood, of course 😉 I actually chased the bolt around the store, which made me spend an extra long time cutting and thus made me late for the round-up at the end of our first shopping segment during my NY meet-up. Totally worth it, though – this stuff was a dream to sew, to wear, to just look at. And it goes with half the tops in my wardrobe! YUS.

Miette Wrap Skirt

Psst! It comes in other colorways as well… I have an entire fistful of swatches to prove it. Who wants to be twinsies with me?!

Miette Wrap Skirt

As you can see, here is an entirely different set of pictures. I didn’t like the way my first batch turned out! I was also super eager to try pairing this skirt up with a mint top, after seeing my homegirl Kaelah’s mint+navy outfit and being jealous of her color-matching skillz. This is my Pavlova Wrap top.

Miette Wrap Skirt
Since this is a wrap skirt paired with a wrap top, I will be calling this outfit the Wrapper’s Delight. Go ahead, groan.

Miette Wrap Skirt
Speaking of groaning, I know I shouldn’t be wearing black tights with this outfit. I promise I didn’t go out in public like this. Just ignore them, please and thanks.

Miette Wrap Skirt
I love my new skirt and I can’t wait to find new combinations to wear it with (as dorky as that sounds!). I also can’t wait to see all the different versions that are sure to start popping up – judging from the maker’s gallery, I think we’re all in for a treat 🙂

Want one for yourself? GET IT GET IT (you know you want it!!). And thank you, Tilly, for letting me be a pattern tester!

Completed: The Wild Side of Butterick 5078

27 Mar

Apologies in advance for the lame post title. This dress, though, is NOT lame. Unless you think leopard is lame, and if that’s the case – I’m afraid we can’t be friends at this point, so you need to GTFO, bye.

Leopard Knit Dress
This is my third (!!!) make of Butterick 5078 – and likely not my last, although it probably should be for right now. I love this pattern, although I’ve had to make a few modifications to get it exactly where I want it – shortening the skirt, eliminating the waist runching, and streamlining the sewing process. It appears to work well with a variety of fabrics, from slinky to ones with lots of body. Now that’s a versatile pattern, yeah?
(ooh I just noticed how crooked that picture is. My tripod doesn’t stand straight, so I usually have to straighten them in editing… and I guess I didn’t straighten that one enough. Sorry! I’m also not fixing it, mwahaha)

Leopard Knit Dress
My fabric is a lovely knit ponte from Mood fabrics – it has a nice heft and body to it (unlike the rayon jersey I used for my slinky 5078), as well as a good amount of stretch, even though it’s also quite stable. This fabric was a joy to work with, especially when it came time for my twin needle topstitching. Usually I have to play around with the tension and stitch length to get a good smooth stitch without that weird bump down the middle, but with this stuff the stitches just sank right in. It also presses really well – which yeah, pressing a knit seems kind of weird, but I like to press my hems before I topstitch as I find it makes it easier to sew. And while it’s nice and cozy, I also think it’ll be totally suitable for warmer months.

Leopard Knit Dress
As I mentioned before, I switched up the construction order for this to makes things easier. I basically just sewed everything flat, and then swooped up the side seams at the very end. This is what I love so much about knits – having those open side seams means it’s really easy to suck everything if you need to size it down a little. Which I ended up doing, since the super stretch of the fabric made the dress too big originally. I also narrowed the width of the midriff section, as the skirt is very heavy and the weight was pulling it down.

Leopard Knit Dress
Also, I wasn’t thinking when I bought this stuff (well I was thinking, but more along the lines of “OOH LEOPARD OOH SEXY DRESS LET ME WRAP MYSELF IN THIS HERE BOLT OF FABRIC), and I only bought a yard and a half. It would’ve been enough if the bodice wasn’t cut on the bias. Whoops! I spent foreeeeever trying different cutting layouts to get this to fit on my piece of fabric. In the end, I shortened the sleeves to elbow-length, took an additional 2” off the skirt, and now the bodice back has a seam (it’s supposed to be cut on the fold – can you see that seam tho? It kind of looks, oh, camouflaged trololol).

Leopard Knit Dress
Sewing the actual dress took barely any time at all, though. Seriously. It took me 45 minutes to stitch the thing together.

Leopard Knit Dress
Leopard Knit Dress
Here it is without the belt. You all know I’ve been on a major belt kick lately, but this looks pretty good sans belt, too!

Leopard Knit Dress
Consider me a ponte convert! Special thanks to Carolyn, she dragged me to the section I would have otherwise ignored. Now I wish I had one of everything that was in there, gah.

Leopard Knit Dress
Man, I love leopard print. It really goes with everything… expect maybe more leopard print. I probably shouldn’t wear my leopard coat with this, eh?

Completed: The Pavlova Wrap Top

25 Mar

Well, you guys. I done goofed. I put this outfit together in hopes of the emerging spring – and oh, it is indeed emerging… so much that Landon had to mow the freakin front yard a couple weekends ago because it was sooo lush and green and, like, springy – but today is heartbreakingly gray, freezing, and the windiest of windys. I don’t know why this didn’t occur to me before I left the house this morning, but a giant circle skirt is NOT appropriate for this kind of wind. I managed to learn this lesson immediately after I flashed everyone on West End Avenue. Hope someone out there was nurturing a stockings fetish! Ahhh!

Pavlova Top/Circle Skirt

Anyway, I think this skirt fabric is a pretty amazing floral for the weird transitional months – it has those pretty, bright, springy flowers, but they’re smashed up against a black background so it’s still a little srs bsnss. And it looks great with black tights (I always get all weird about what color tights to wear with my spring dresses, ok!). I got it at the flea market last year and I’ve been hoarding it ever since.

Pavlova Top/Circle Skirt

I originally cut this skirt out a couple of months ago, during an afternoon sewing date with my boo Lauren W. My fabric was large enough for me to cut a full circle, but hers wasn’t, and I wanted to be a good friend (and also get an idea of wtf I was doing before ripping into her fabric), so we pieced the pattern out so it has 4 skirt pieces, and then added pockets. You can’t see my skirt seams because my fabric is so robust and floofy, but trust me, they’re there.
Anyway, the sewing-date ended with a fully seamed skirt with pockets, and then it sat in my sewing room for… well, until last Friday. Lauren has been making progress on her own skirt at home (aw yay!!) so I decided to finish mine up, so I could wear it with my new wrap top. Don’t they match so well?! Like it was ~meant to be.

You probably guessed that the skirt is not the Pavlova circle skirt – it’s just my standard, self-drafted circle skirt pattern. It’s like a sneaky Pavlova, since it was cut into 4 pieces. Also, it’s not hemmed with anything but a very simple narrow hem. The fabric has a lot of body, so it stands up pretty well on it’s own. Which is great, because I don’t have any horsehair braid right now 😛

Pavlova Top/Circle Skirt

Anyway, let’s talk about the top! This is the wrap from the Pavlova pattern. I’m not even going to lie, I was a liiiiiittle apprehensive about sewing this pattern – something about that lapped seam on the neckline, not to mention the shoulder darts, looked intimidating! I really shouldn’t have worried, though – Steph has an incredible way of relaying instructions that makes them sooo easy to understand. The only problems I had with making this top was my topstitching – and I fault that to my fabric and lack of fusible hem tape to keep shit in place. I sewed a size 30 and made no alterations to the pattern.

Pavlova Top/Circle Skirt

My fabric is from NY – I bought it at Fabrics For Less. This was my very short, very solo return to the Garment District on Monday afternoon. Yes, after 2 full days in that madhouse, I WENT BACK. And I bought more fabric. Honestly, I was very upset about the lack of knits in my suitcase, so I got this mint cotton jersey as well as a matching red, and also the french terry for my Avocado hoodie. What? Why are you looking at me like that?

Pavlova Top/Circle Skirt

I don’t know if this jersey was the very *best* choice for this top – you can see everrrrrry single little lump under there (fyi, the line across my chest is actually from the hem of the wrap top, not my bra. Just so we’re clear ;)), as it’s super drapey and tissue thin. I just love the color though, and it goes with a huge chunk of my wardrobe! Word of warning – this is a short top. The front barely clears my waistband (which comes above my navel), and all my pants are too low to wear with it. The back is nice and long, though, which is sweet.

Pavlova Top/Circle Skirt

Also, this is one hell of a twirly skirt.

Pavlova Top/Circle Skirt

I forgot to mention – I added a thin line of mint piping between the waistband and the skirt, using a perfectly matching bias tape I had in my stash. Yes! I love it when these things work out!

Pavlova Top/Circle Skirt

Soooo… what’s next? Do I need plead a special case to the Sun God or what??

Pattern Testing: The Avocado Hoodie

18 Mar

Remember that little blurb last Thursday about the kickstarter campaign for this hoodie pattern? Well, it looks like in the time since then, Mari has 100%+ funded her goal! Yay, paper patterns! There’s still about 6 hours left until the campaign ends, so if you haven’t had an opportunity to contribute and you want to snag the pattern at a discount price, now’s your chance!

In the meantime, let’s talk about why I even brought this up today…

Avocado Hoodie
I got to test the pattern over the weekend, and now I’m the proud owner of my own Avocado hoodie! Woohoo!

Avocado Hoodie
I’m not normally a fan of pullover hoodies… which now that I think about, it’s kind of dumb since I *always* zip my hoodies up. I can’t stand that shit flapping around! But anyway, for whatever reason, I don’t normally spring for the pullovers. Maybe because they remind me too much of those oversized college hoodies, I dunno. This one is surprisingly nice, though – the princess seams give it a bit of shape, so it still looks nice even though it has way more ease than what I would normally prefer to wear. And it’s sooo comfy, forreal.

Avocado Hoodie
Confession: After I took these pictures on Saturday afternoon, I wore the hoodie for the rest of the day – to clean, cook dinner, and lounge-y LT time. I love that it’s comfortable and snuggly, but it’s not so huge I feel like I’m swimming in something that belongs to a dude 4 sizes bigger than me.

Avocado Hoodie
In addition to being a basic, princess-seamed pullover hoodie, this top has a few neat features that differentiate it from similar hoodies…

Avocado Hoodie
Thumb-holes in the cuffs!

Avocado Hoodie
Pockets in the back – so when you are walking with your arms around a loved one (or fling, or friend, or whatev. I ain’t here to judge you), they can put their hands in the pockets. GENIUS, amirite?!

Avocado Hoodie
The hood is a great size – not so big that it gets floppy and falls off (ew, I hate that), not so tight that it pushes down on the top of my head and makes it hard to move around (hate that, too). I feel like hood size is kind of a delicate balance, and this one is drafted exactly to the size that I find most comfortable.

Avocado Hoodie
As far as how the finished hoodie fits… I opted to sew it as close to the suggested measurements as possible, and I think the bottom hem ended up a bit loose. Of course, you don’t want something like this to little or negative ease, since tightness can cause the hem to ride up. I cut a 4 for the front bust/hips, tapered to a 2 at the waist, and cut the back at a 2. I think the ease in the bust, waist, and arms turned out great – yes, there is ease (more than I typically wear, even!), but I feel like it still looks pretty flattering. I may take it in just a bit around the hips, but even as it is now, I think it looks fine.

Avocado Hoodie
One thing I do think is worth mentioning is that the length was a bit too long on me after adding the hem band. Here is how it looks with the band folded up – I think it suits my proportions better this way. Keep in mind that I am petite (clocking in at about 5’2.5″ on a tall day ;)), so it should be the perfect length for an average height/torso.

Avocado Hoodie
Putting the hoodie together was quite easy – despite there being a bunch of little pieces. I did have a bit of trouble figuring out the pockets, but as I was testing the beta pattern and left lots of feedback, I think it will be much easier after Mari adds more clarification and diagrams. With that being said, after I finally trolled through the pockets and started really assembling the hoodie, that part went FAST. I think it took me maybe an hour and a half, tops. I sewed the entire thing on my serger, minus a couple areas of topstitching.

Avocado Hoodie
The fabric I used is from Mood in NY – my first completed post-NY project! It’s a cotton french terry, and the lining under the pocket is cotton jersey. I loooove this fabric, it’s so soft and warm, and I think it will feel really nice in the summer when I’m dealing with air conditioning 😉 The only downside to this stuff is that is sheds tiny terry pieces like it’s going out of style. You will definitely need to finish every single seam if you use this type of fabric… and make sure you do a thorough sweeping after!

Avocado Hoodie
Ooh just look at that lovely terry.

Avocado Hoodie
Here you can see inside the pocket on the back – the dark is my pocket lining (the cotton jersey). Wouldn’t this be fun with something super bright and contrasty, like teal with yellow polka dots?? Which I almost bought, btw. Hm maybe I should have.

Avocado Hoodie
All in all, I think this turned out pretty good! I may end up removing the band and just topstitching the bottom, to relieve some of the length, as well as shortening the sleeves – this climate doesn’t exactly dictate the need for sleeves that cover most of the hand 🙂 I’m also thinking about screen printing something on the front, since it’s so plain! What do you guys think??

Avocado Hoodie
I must say, I was a little nervous on Saturday while finishing this up, since it was 70* outside and I’d spent the whole morning doing garden and yard work (yay, Spring!), I was thinking I wouldn’t have a chance to wear this hoodie at all! But just in case you were wondering… it got all cold and rainy again. And by “cold,” I mean 50*. What can I say? I’m a delicate Southern Rose who wilts at any temperature below 65* 😉

Completed: My Valentine Dress

6 Mar

For the past couple of months, us Mood Sewing Networkers have been plotting to have a month where the entire group worked with a similar fabric. Lace was decided for March, and since I had already been lurking the lace selection and dreaming up options, I was 100% game. I was also inspired by Liz’s Macaron Lace Dress because GIRL(boy?), have you seen that shit?! so jealous. I thought it would be fun to have the dress ready for Valentine’s Day – I’m not really much of a Valentine’s person (this is like, one of maybe four Valentine’s EVER that I haven’t been single, aha), but it’s not too late to start yeah? Not to mention, if I had a fancy dress all ready to go we’d HAVE to end up doing something. Preferably something that involved gelato.

So, without further ado, I give you… my Valentine’s dress:
Lace Valentine's Dress

Lace Valentine's Dress
I bought my lace back in the very beginning of January – and then sat on it (well, not literally – that would get wrinkly) for nearly a month. I knew the minute I saw this red floral lace that it was ~the one~, but I didn’t know exactly what I wanted to do with it other than wrap my body up in it’s yardage. I couldn’t settle on an appropriate pattern – and when I finally did, the muslin was a DISASTUH (let’s not even go there), so it’s safe to say that about three weeks of that month were spent pouting and thinking I’d end up with a boring circle skirt.

Lace Valentine's Dress
I mean, I like circle skirts as much as the next gal, but I really like them when they are attached to a matching bodice, see.

Lace Valentine's Dress
In the end, I improvised and merged a few different patterns together to create my Frankenpattern Dream Dress: the bodice is McCall’s 5972, the sleeves are a vintage Butterick pattern, and the skirt is my self-drafted circle skirt. I’m actually surprised at how well everything fit together, it’s like I fulfilled some kind of pattern destiny or some shit.

Lace Valentine's Dress
I knew I wanted a substantial lace in a bright color (no whites or pastels for me, please), and while my original dream dress involved visions of navy, I knew this red lace was “the one” the second I laid eyes on it. It’s perfect for this type of dress – the pattern is large and bold, but held together with delicate netting which keeps the fabric from being too heavy. Since it’s a cotton lace, it will wear nicely in the summer as well as during the cooler months we’re in right now. The lacework is erratic enough where I didn’t have to worry too much about matching up the design at every seam line (just thinking about that is making me break out in a sweat, argh!).

Once thing I did notice with this particular lace is that the pattern runs parallel to the selvedge — so I had to adjust my pattern layout accordingly. This wasn’t difficult to do, and my lace was wide enough where I was able to get my pieces in there (including the full circle skirt) without too much fuss, but I thought I would point that out if you are thinking about working with directional lace. I’m so used to the pattern running perpendicular to the selvedge, I almost didn’t check before I started cutting

Lace Valentine's Dress
The dress is underlined with pink Bemberg Rayon – everything except the sleeves. I basted the pieces together by hand, using silk basting thread, around all edges and also along the dart lines. Then I sewed the dress up as normal, serging the seams as I went and pressing them flat.

Lace Valentine's Dress
I love that you can see a hint of tattoo through the lace sleeves 🙂

Lace Valentine's Dress
The sleeves posed a special challenge since they were unlined and I wasn’t sure how well that netting part would hold a seam. I had a small piece of pink cotton batiste in my stash that perfectly matched the underlining, so I cut long bias strips and bound the sleeve seams for extra stability. The resulting seam is very strong, and I love the little peek of pink that shows when I move my arm 🙂

I actually used that pink cotton to add a lot of special touches to an otherwise plain dress…

Lace Valentine's Dress
Facing the hem on the sleeves

Lace Valentine's Dress
Binding the armsyce seams (again for stability at an area that can get a lot of stress, and also because serging there would just be ugly)

Lace Valentine's Dress
Binding the waist seam

Lace Valentine's Dress
The neckline facing (label is from here, fyi!)

Lace Valentine's Dress
Piping the waistline (my favorite!!)

Lace Valentine's Dress
I mostly plan on wearing this with the satin bow (because I love looking like I’m wrapped up like a present), but I do like the way the dress looks with just the piping 🙂

Lace Valentine's Dress

Lace Valentine's Dress
I hemmed the skirt with 2″ white horsehair braid, since I wanted it to flare. Actually, hemming was the worst part – and not because it involved nearly 5 yards of hand-sewing. I could not decide how I wanted to treat the hem, since the lace is sheer and the braid would show through. The dress is underlined, including the skirt, but I was afraid that pulling the underlining all the way down to the bottom of the skirt would end up with some funky grain problems. In the end, I laid the skirt out VERY CAREFULLY on the floor and matched up the hems on the lining and lace, pinned everything together, and then stitched the braid on. There are a few areas where the fabric doesn’t hang *quite* right, but thankfully the giant circle skirt-ness of the whole thing kind of hides that.

Lace Valentine's Dress
Anyway, it’s TWIRLY ♥

All in all, I think it’s a pretty snazzy Valentine’s Day dress. Lookit how fancy me & Landon look!
We fancy ❤
And just for the record – my evening did involve gelato, whoop whoop!

Completed: The Kelly Skirt/Jalie 2921

4 Mar

I’m doubling up on this post – I hope y’all don’t mind. Just didn’t think either of these pieces deserved a whole post of their own 🙂 This is pretty basic cake stuff we’re working with here.

Also, this is a result of me waking up on Sunday morning and going “OMG I’M GOING TO NY NEXT WEEK AND I HAVE NOTHING TO WEEEEEAR!!”
(not literally – I mean, have you seen my closet?)

Anyway, I’d just picked up the Kelly skirt pattern and I was dying to try it out. I found this giant yardage of navy corduroy in my stash – I’m trying to stash-bust as much as I can before I overfill my sewing room with more fabric next week heh heh – I think I got it at a yard sale a few years ago?

Kelly Skirt, Jalie 2921
It works great for this pattern although it is very STIFF… you can’t see too much from these pictures, but the skirt just balloons away from my body and stays that way. Now, I like me a stiff skirt as much as any girl, but this is almost comical. Next time, I will opt for a slightly softer fabric. I may try to wash this skirt a few times in the meantime and see if I can beat down the stiffness a little as well.

Kelly Skirt, Jalie 2921
This pattern was soo easy to whip together. There are just 5 pieces, a little bit of topstitching, and a smattering of buttonholes. I had the whole thing made from start to finish in less than 3 hours. Now that’s what I call fast fashion, derp.

Kelly Skirt, Jalie 2921
The only change I made was to not interface the waistband – like I said, my corduroy is very stiff. Also, I am lazy. I think it holds up fine, though.

Kelly Skirt, Jalie 2921
I made a size XS and it’s a tiiiiny bit big at the waist, but nothing that I can’t cinch in with a belt.

Kelly Skirt, Jalie 2921
I can see this pattern working beautifully with a wide range of fabrics, from a lightweight chambray to a nice cotton twill. Ooh!

Kelly Skirt, Jalie 2921
I also made my top over the weekend, same Sunday, even! Before you get too excited – it’s a knit top, which takes me like an hour to put together. Srsly, I looove sewing knits. The pattern is Jalie 2921, and the fabric is this Coral rayon jersey from Mood. More Nard-Dog colors, sorry y’all.

Kelly Skirt, Jalie 2921
I only made a couple of changes to the pattern – had to shorten the sleeves because there were REALLY long, and I also shortened the ties because they overwhelmed the shirt. There was no scientific method to shortening the ties – I just put the shirt on and hacked away. Instead of leaving a hole in the center front seam to pull the ties though, I sewed it up all the way and just looped the ties over each other. The fabric is too heavy to make a proper bow. I feel like this look is kind of jaunty, with the ascot and preppy colors.

I did experiment with my hems on this top – I found a bunch of wooly nylon in my stash that I’d forgotten about (oops) and I wound some of that in the bobbin and then did my usual twin needle topstitching. I LOVE the result; the stitches are very uniform and there are no ridges or rippling. Worked like a charm!

Kelly Skirt

Kelly Skirt - pocket!
Since the cord was so thick, I used this fun quilting cotton to face the pockets 🙂 Isn’t it sweet? Kiddie cowboys!

Jalie 2921

Jalie 2921 - hem

Kelly Skirt, Jalie 2921

As a side note – if you didn’t see the first post announcement – I’ll be in New York this week and planning a meet-up for Saturday! If you’re in the area and want to join for some fabric shopping, send me an email and I’ll pass on the details 🙂