
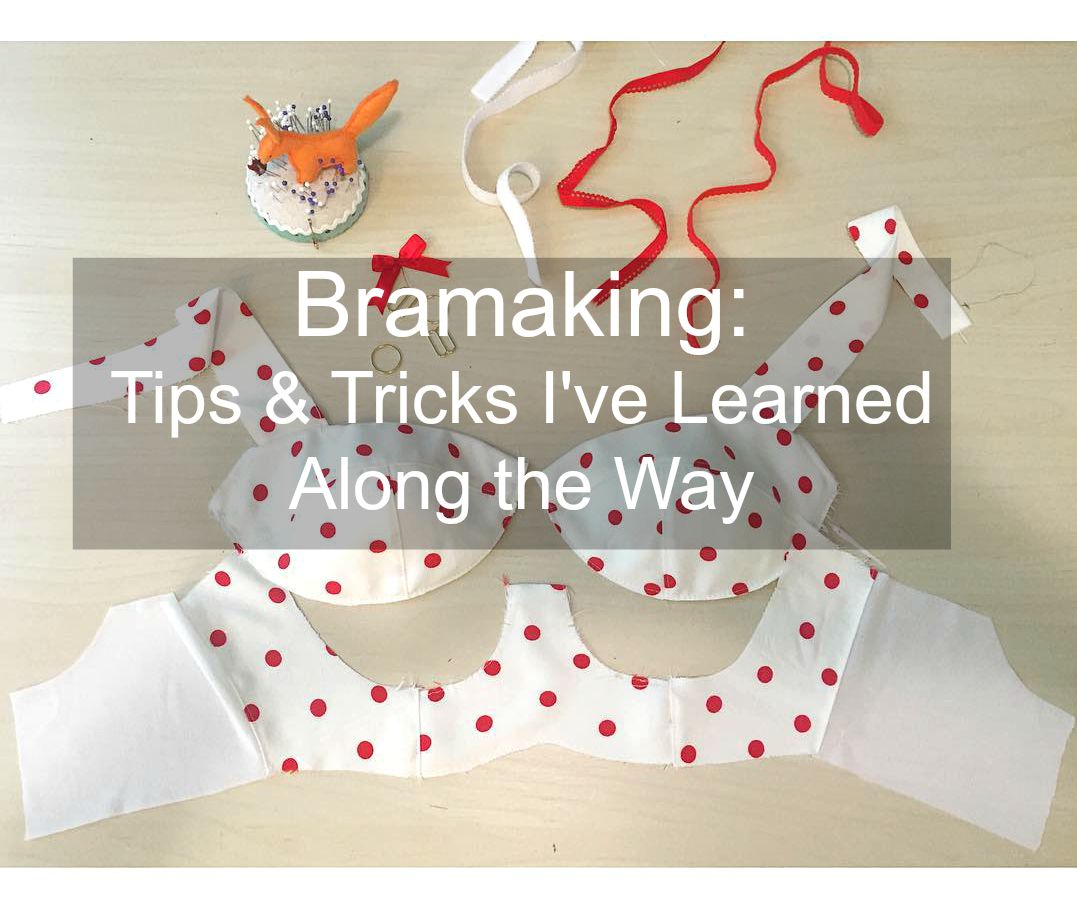
Since I started my bra making adventure nearly a year ago (woah, has it really been that long??), I’ve picked up a few tips along the way, as well as figured out a handful of shortcuts myself. This post has been a long time coming, and I’m not really sure why it’s taken me ages to get it all written out – but better late than never, yeah? 🙂 I certainly don’t claim to be an expert on lingerie making (I’ll leave that title to people like Norma, Maddie, and Amy), but I’ve made enough to figure out a general idea of what does and doesn’t work, as well as navigate the really confusing parts that can confuse a beginner (like me!). Anyway, I hope some of y’all novice and afraid-to-dive-in-just-yet bra makers find this useful!
The first thing I want to address in this post is all those weird little notions and bits that you need to collect in order to make a proper bra. There are tons of places where you can basically pay someone to source all that stuff for you (kits I’ve used and loved: Bra Makers Supply, Grey’s Fabrics, Blackbird Fabrics. Obviously there are TONS more out there, those are just the ones I’ve personally tried!), which is pretty awesome and definitely what I recommend for at least your first couple of bras. The only thing I found confusing with the kits (at first, anyway) was that they don’t really tell you which elastic is for what. Further, while the pattern will tell you what materials to buy – it can be hard to visualize how everything goes together if you haven’t actually sewn up a bra before. I know I had a hard time wrapping my head around all that info at first! So I’ve made a couple ~findings guides~ of some of the more popular bra patterns, pointing to each notion so you can get an idea of where they go on the finished bra. I know some of these labels are a bit “No shit, Sherlock” (such as where the hook & eye go – haha!), but, whatever. No finding left behind blah blah blah.
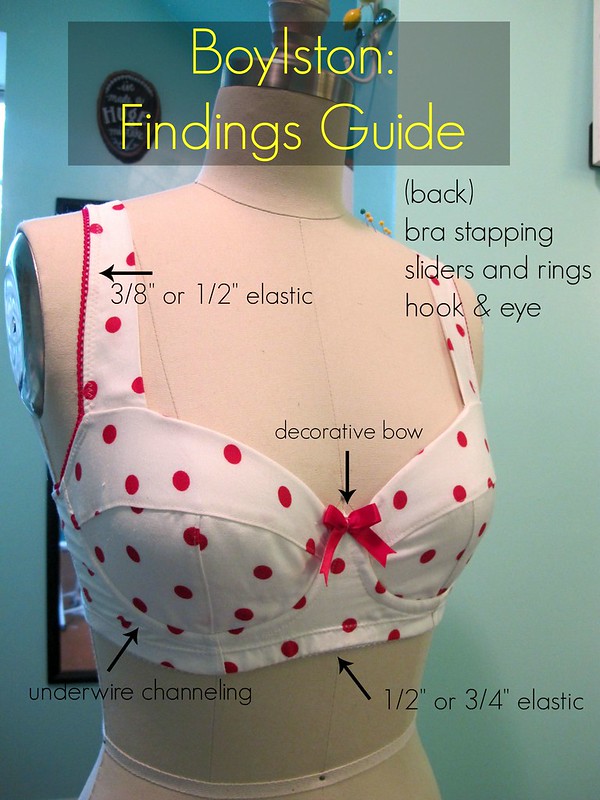
Boylston bra pattern // my polkadot Boylston bra
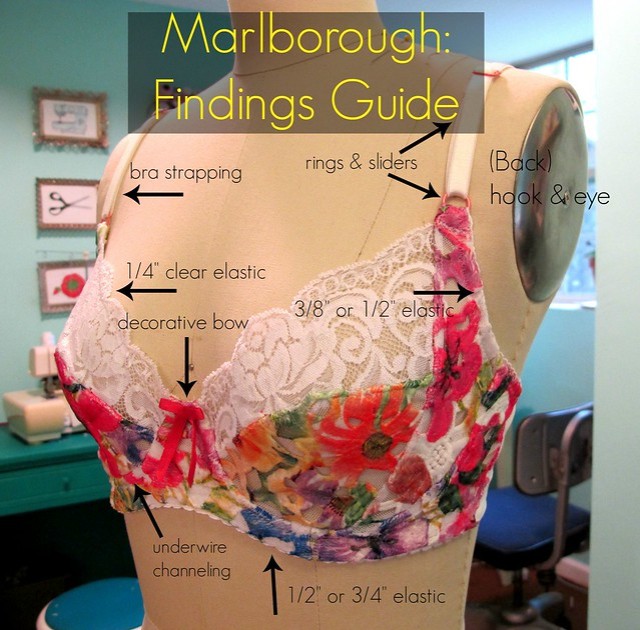
Marlborough bra pattern // my floral/lace Marlborough bra
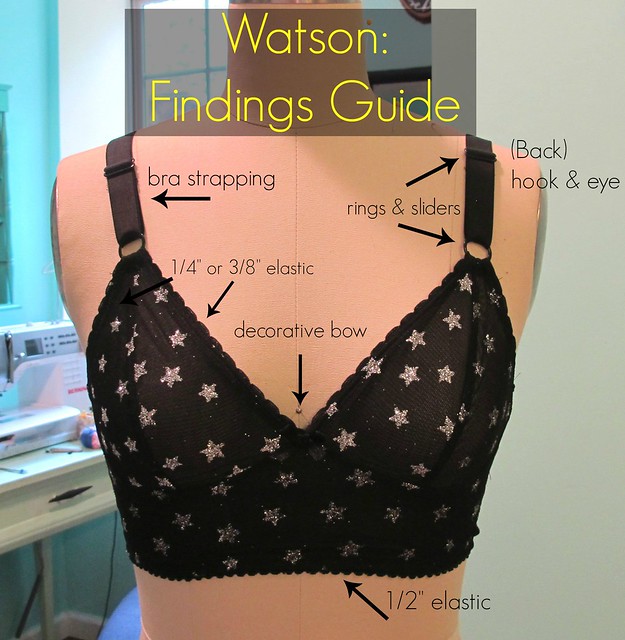
Watson soft bra & bikini pattern // my #starwatch Watson bra
Some additional notes on elastics:
- Kit sizes: You may have noticed that some kits come in sizes Small and Large. This took me a while to completely understand – but the difference in kit sizes have nothing to do with the amount of fabric included (or, maybe they do, but it’s not something I’ve noticed). It’s more so whether you need the wider elastics and 3 row hook & eye, or narrower elastics and 2 row hook & eye. *Generally* speaking, sizes D and above require the large kit, and sizes C and below use a small kit. That being said, it’s up to your personal preferences – I wear a DD, but I’m perfectly comfortable in a small kit (keep in mind that I’m a small DD, so a small kit won’t really work for the super blessed/endowed. My ~ideal kit~ has the narrower elastics, 1/2″-5/8″ strapping, and 3 row hook & eye). Some people prefer the look of the narrower elastics, and some people like the security of the wider findings. Your bra, your choice 🙂 But anyway, point being – when in doubt of kit size, choose based on your cup size!
- Elastic width: Most patterns will include this information with the fabric/elastic requirements. Generally speaking, you want the wider elastic for the bottom band (so, depending on cup size – this is usually 1/2″ to 3/4″) and the narrower elastic for the underarm and/or top of the cup (that’s the 3/8″ to 1/2″, sometimes 1/4″). Like I said, I like the narrower elastics personally for me, but feel free to play around with widths if you aren’t feeling the pattern suggestion. The pattern you sew will be drafted for that width of elastic and hook & eye, so if you change the width too much, you’ll need to adjust accordingly.
- Type of elastic: Ideally, you want to use plush-back elastic for all your lingerie sewing. This type of elastic has a wrong side that is slightly fuzzy (hence the name) and is intended to be soft against the skin. Of course, you can use any pretty lace edged elastic and/or stretch lace, but bear in mind that anything without the plush back may not be super comfortable to wear.
- Bra strapping / rings & sliders : This is going to sound really fucking obvious, but make sure you buy the right rings & sliders to correspond with your strapping! I did not even think of this when I was going crazy buying bra notions, but those suckers need to match in width or they’ll look stupid (or be too tight to slide). Same as with the elastics, strap width is determined by cup size. Wider straps will give you more support, so if you’re rockin’ the DD and up, you probably don’t want to use 3/8″ strapping.
And while we’re talking about kits, the fabric can also be a little confusing! What pattern piece gets cut out of which fabric?
- Main fabric: Totally dependent on bra pattern, of course, but generally you’ll cut the cups, bridge and frame out of the main fabric. The grainline on the pattern indicates the direction of greatest stretch on the fabric. Give the fabric a pull to figure out what that is. It might not be the same as what we consider to be the grainline when sewing normal clothes.
- Lining fabric (tricot): For most patterns, this is used the stabilize the bridge. You can also use lining fabric to line the cups, if you so desire.
- Powernet: Use this to cut your back band. You can also line with powernet, if your main fabric is a little bit too stretchy for the pattern. You can *also* use powernet to line the bridge, if you don’t have lining fabric on hand. Powernet is awesome!
- Lace: Usually just the upper cup of the pattern. If you want to cut the entire cup, you may need to line or stabilize it (with the lining or powernet) if it’s too stretchy. For any flatlining, I like to temporarily baste the pieces together with a spray adhesive
and then handle them as one (a tip I learned from Maddie).
Now I’m going to share with you my favorite PROTIPS for actually assembling the whole thing together. 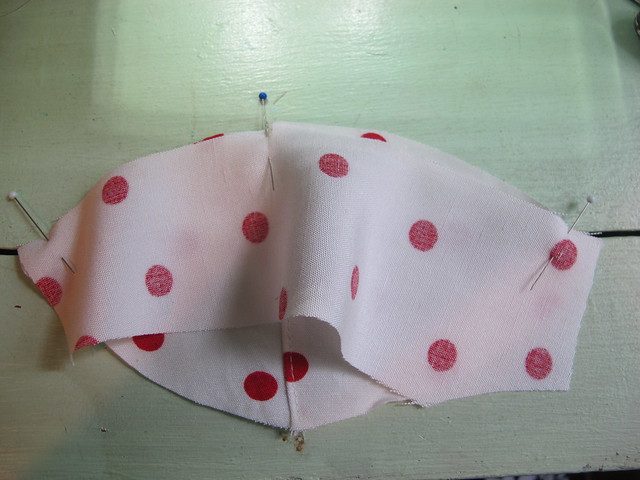 PROTIP #1: Pinning
I know, the urge to pin the everloving shit out of every single piece runs strong and true. But bramaking is a little different, and you gotta fight those urges. Especially when you are sewing a convex curve to a concave curve, it’s actually easier to do if you don’t have to navigate an army of pins along the way. I pin the beginning and end of the seam, and any notches/seamlines that need to match. Also, try sewing with the bigger piece (the convex curve) on the bottom layer. The feed dogs of your sewing machine will help ease it in to the smaller curve.
 PROTIP #2: Starting & stopping, part 1
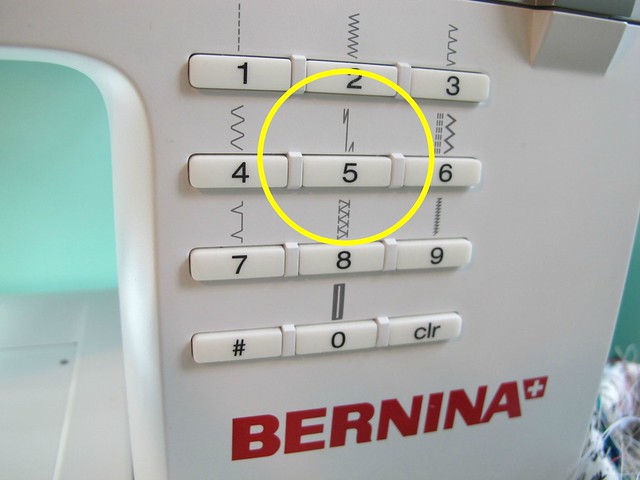
One of the things I find the most difficult about sewing lingerie is beginning and ending those teeny little pieces with their itty bitty seam allowances. It’s hard enough trying to cram everything under the foot and get it going without having the machine eat it, but then you have to worry about backtacking each end as well. And this really isn’t a step you can’t skip, because you don’t want your seams to unravel when you start handling them. My solution is to use the “securing stitch.” This might have a different name, depending on your machine (and those of y’all who are using mechanical machines – sorry! You can’t sit with us). Essentially, it automatically backtacks a few stitches at both the beginning and end of each seam. Every machine is different, so you may want to pull our your user manual for this one – but on my Bernina, to backtack the end, you just hit the reverse button and it does it automatically (the beginning starts the seam with a backtack). It’s been a total lifesaver for me and my seams are always secure as a result. 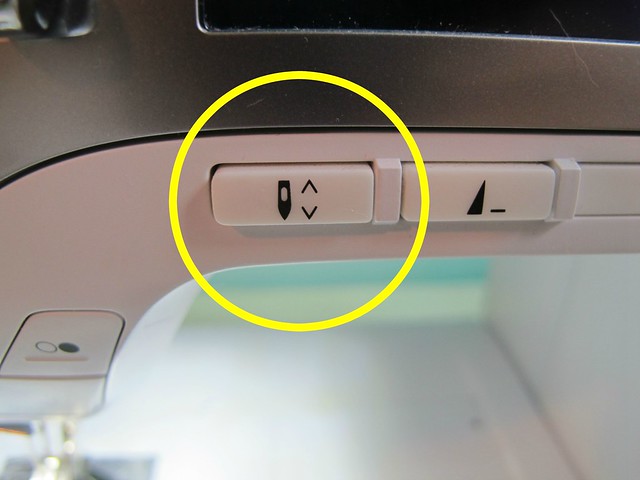 PROTIP #3: Starting & stopping, part 2
Another thing to use if your machine has the capabilities (again, those of y’all with the mechanical machines – YOU CAN’T SIT WITH US) (just kidding ilu use the handwheel for this) – the needle down button! OMG this is forreal the #1 reason why I own a computerized machine. I just hit this button before I start sewing, and every time I take my foot off the pedal, the needle automatically goes down and stays there. It’s brilliant for readjusting layers or turning corners, and you stitch line won’t go wonky from stopping in the middle. I actually use this button for most of my sewing, not just exclusively to bramaking.
 PROTIP #4: Starting & stopping, part 3
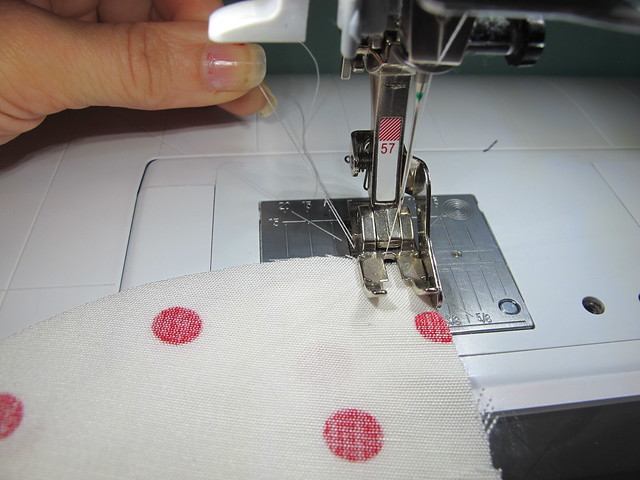
Back on the subject of tiny seam allowances and hungry feed dogs. The easiest way to keep your fabric from getting sucked down into the machine at the beginning of a seam is to grab both thread tails and *gently* pull as you start sewing the first couple of stitches. This is especially important if you’re using the securing stitch – once it’s done securing, you can let the tails go and sew on with your life. Don’t pull the tails too hard, just gently guide them to prevent the fabric from getting jammed down into the machine, and make sure you catch the tails for both the bobbin and the needle (for some reason, it looks like I’m only holding one in the above picture, wtf). This is a good tip for working with slinky fabrics, too, even if you’re not making a bra.
 PROTIP #5: Keeping 1/4″ seam allowances
Most lingerie patterns have teeny little 1/4″ seam allowances, which can be kind of hard to keep consistent. Unfortunately, you REALLY can’t fudge this one because it can drastically alter the size of the finished bra if you’re not careful. My solution to this was to buy a special foot with a 1/4″ guide. It is the best thing ever. It’s also useful for topstitching (especially jeans!) and making the most adorable and perfect little 1/4″ French seams.
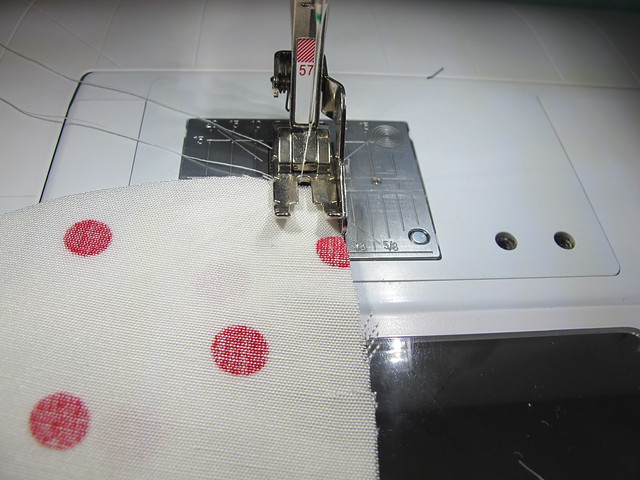 Here it is in action. The dull blade runs against the raw edge of the fabric, keeping the needle exactly 1/4″ from the edge.
 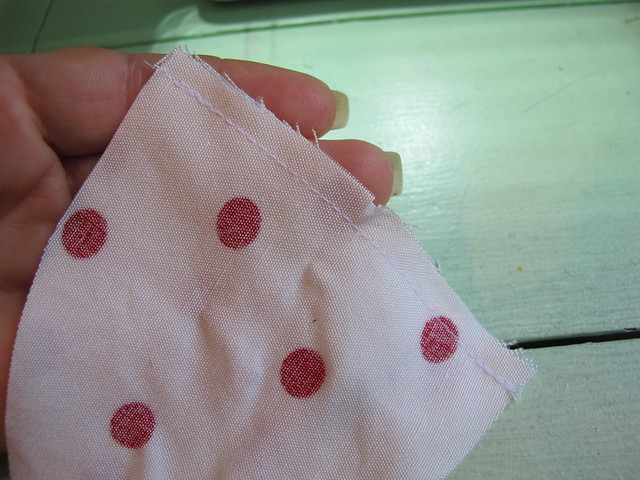 And here is my finished seam. Ah! Perfectly 1/4″ from the edge, every time. Ooh, see my backtacking, too? Thanks, securing stitch!
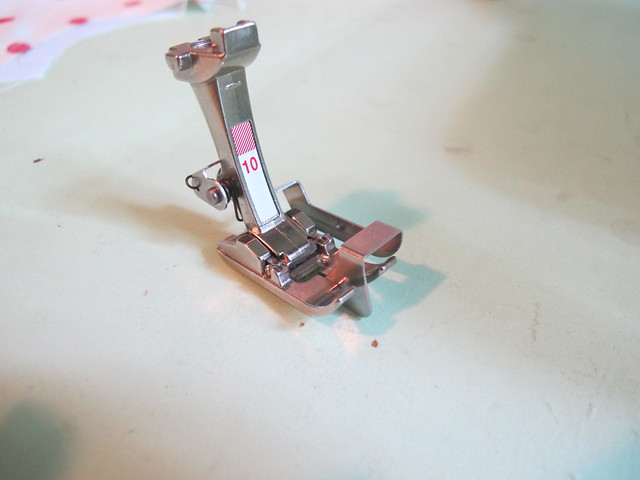 PROTIP #6: Perfect topstitching This is my secret weapon for topstitching, lingerie or not. It’s a special foot and it’s called the edgestitching foot. Besides the 1/4″ foot, it’s the best thing ever. You can also use it to understitch and stitch in the ditch, with little to no tears of frustration and/or wonky stitch lines.
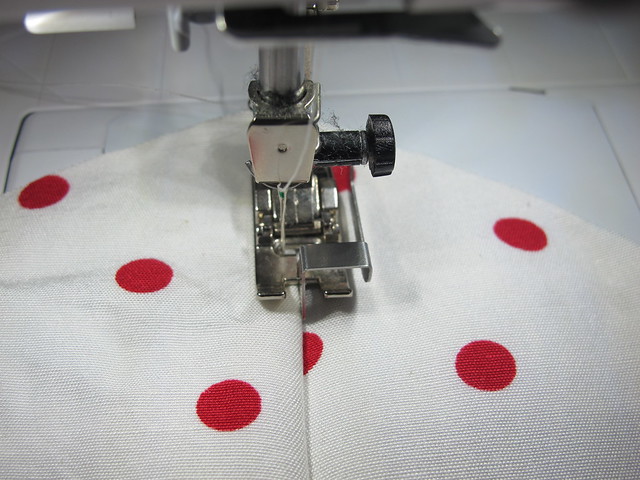 Here it is in action. The dull blade goes right in the center, and you can move the needle either right or left as needed. If you keep the blade against your seamline and move the needle all the way to one side, you’ll end up with a perfect 1/8″ topstitching line. I find this easier than trying to line up part of my foot with the seamline; for whatever reason, shit always goes wonky when I try to do that.
 Here is the finished topstitching. One thing to note – I don’t backtack my topstitching if it’s going to intersect with another piece. I only backtack construction seams (otherwise they’ll pull apart at the ends). Since I use a different stitch for each of these steps, that means I can keep my settings saved for each step and just flip between stitches. Which is super handy, because that means I don’t need to re-enter all my preferences each time I move from constructing to topstitching. I use stitch #1 for topstitching (with a slightly longer stitch length and the needle moved all the way to one side), and stitch #5 for constructing.
 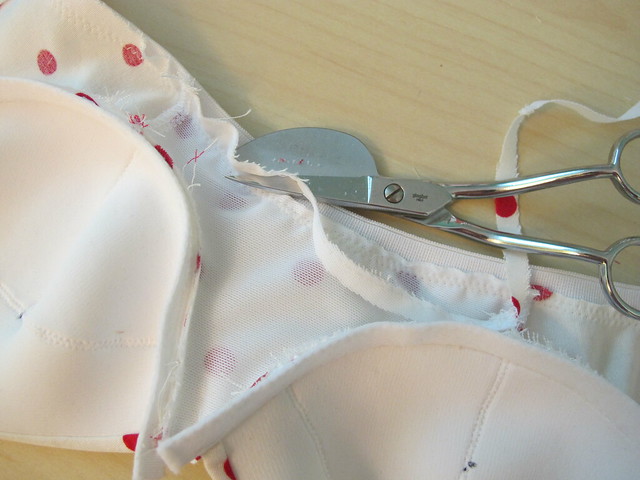 PROTIP #7: Trimming
Always trim seam allowances before flipping down elastic for the final topstitching. Some patterns tell you to do this, some don’t. I find it looks a lot cleaner (and it easier to handle in general) if the seam allowances aren’t flapping around while you’re trying to finagle a good zigzag topstitch. I also like to trim my seam allowances under the wire casing as well. You can use any ol’ scissors to do this, but I like using duckbill applique scissors. The way they are constructed makes trimming down seam allowances almost foolproof and you’re less likely to cut a hole in the seam allowance that you’re trying to avoid. These scissors are awesome for non-bra things, too (I bought them looong before I got into sewing lingerie) – coat making, grading seam allowances, applique. They also look kind of crazy and I like that a lot.
Ok, I think that’s enough for one post! I hope y’all find these tips useful and that it encourages you to start that bra making journey if you were considering it! To me, it’s one of those learning experiences that seems really intimidating until you actually start doing it – kind of like learning how to drive a standard transmission (and just like driving a standard, once you learn – it’s REALLY hard to stop doing it! Well, for me, anyway. I think it’s fun!).
I know I only just grazed the surface with these tips here, so – what are your best tips for sewing lingerie?


I never thought to use an edge stitching foot when top stitching, such a great idea!
Hell yeah it is! Straight topstitching for dayssss!! Those little edgestitching feet are pure genius 😀
I also discovered since my machine also has all these quilting functions I have a 1/4″ stitch option so as long as the edge is aligned it gives me a 1/4″ seam every time. LOVE it!
Whoa whoa whoa now. No need for mechanical hate this early in the morning. I have a perfectly functional hand crank wheel and a FANCY SCHMANCY SECURING STITCH CAM. I’m all set. Great post. Saving this for future use once I decide to start making bras. Which will happen. It’s the black hole all sewists end up in.
Haha no hate on the mechanical 🙂 I didn’t know they made a securing stitch cam!!! Now that just changes everything 😀
It may not technically be a securing stitch. But it works as well. A little bit of reverse action plus a fancy cam and we’re all sunshine and flowers.
I know it’s been 5 years but there’s a cam for that?? My machine also comes with cams. It’s a Singer Touch & Sew 603. What does your securing stitch look like on the cam, if you don’t mind?
Do the different size kits come with the same size/width wires?
If the kit comes with wires (some don’t, you’ll have to check the description), you generally get to choose the wire size.
I just want to say that this entire post is BRILLIANT! You’ve answered so many of my basic bramaking questions (and I read everything Maddie posts about it too). I always felt like maybe I missed something in the instructions or even on the websites that sell the bra kits. Thanks for the effort taken to do this!
You are so welcome! I felt the same way when I was making my first bra – the kits are helpful, but they still lack some direction for the true beginners. More resources are always good!
Is there a way to have the main (pretty!) fabric go all the way around the back, or is that impossible because it’s not stretchy enough?
I wondered this too, and I’ve studied some RTW bras to try to figure it out. Basically, you can only make the back band out of your main fabric if it’s stretchy (so the duoplex that’s in most kits, for example, would be a no-go. Actually, any woven – even if cut on the bias – won’t be stretchy enough, and you’d have to cut the band pretty huge, like with a vintage bra). Even then, most stretch fabrics (such as lace) aren’t really strong enough to keep their shape while also keeping the band tight, so you’ll want to underline those with the powernet if you want to bra to last. Does that make sense? I’m hoping to try this on a future bra and see how it works out!
It’s actually not that hard to make the band out of non stretch fabric. You just need to cut the band to fit your back exactly, or even a tiny big larger, adjust where you will attach your straps, and cut the elastic to the length that you would have if it were stretch fabric. Easy peasy!
Oh my god Lauren, you write the best tutorials! This is why I love your sew alongs – so much nerdy sewing detail.
Aw, thank you Charlotte! I’m glad you geek out over tutorials as much as I do 😀 haha!
You are the reason I wanted to try bramaking, and I just finished my first one last night, and I’m never taking this bra off, it feels so good. You’re an inspiration to boobs everywhere!!
Yay!!! I’m so excited that you finally tried bramaking! Welcome to the dark side – you’ll never ever be able to leave (aka, buy RTW) ever again heh heh heh 🙂
thanks for sharing all those tips! I was planning to start making bras, but it seems to have so many details that I kind of got insecure. But now with the guide…I might try it soon!
Yeah, there are a lot of details and they can get a little overwhelming if you don’t know where to start! Hopefully this gives you a little push 🙂 Yay bramaking!
Nice tips, those are pretty much the same ones I would give too as they make everything so much easier. The holding the threads one is SUPER IMPORTANT. I do it with all my sewing now just in case my bobbin casing hasn’t eaten enough lint yet. My vintage machine has a straight stitch plate as well, so nice for sewing chiffon.
I think I picked up most of my bra sewing tips from Clothing Engineer. She write more stream of consciousness so I feel like I’m looking over her shoulder as I read it.
Currently, the part of bramaking that I can’t get my head around is getting the elastic part of the straps to flow smoothly from the hook and eye part, along the top edge, and gracefully up to the shoulders. I always end up with a kink or pucker.
Holding the threads is probably the neatest little basic trick I’ve ever learned in sewing! It’s amazing how well it works for sewing, well, pretty much anything. But especially really finicky fabrics like chiffon!
To get the elastic on the back band unpuckered, I just sort of straighten out the curve of the band as I’m sewing the elastic on (I hope that makes sense haha). Then you don’t have to curve the elastic, just sew it straight. Since it’s cut curved, it’ll curve back into shape once you take your hands off of it 🙂
Oh!! Thank you! That makes perfect sense!
I have one more little tip regarding kits. After reading a bit about bra making on the interwebs, I felt ok about buying fabrics and elastics, the thing that confused me the most was the ring/slider/strap situation and which sizes were needed to make them all fit together. So I bought pre-assembled straps from Sew Sassy and all the other items individually (also, I wanted to make a marlborough and I don’t think there were any kits available for that pattern at the time). I can’t say enough good things about the pre-assembled straps, I think they save me a lot of fiddly sewing and they aren’t much more expensive. Plus, the white ones take dye super well!
I’ve considered the pre-assembled straps, but it’s a bit cheaper to get the pieces individually and fit them all together yourself! Generally, as long as you buy everything from one source, they should all be the same size (otherwise they might be a mm or two off, which isn’t necessarily the end of the world).
I have a lot of trouble with the the feed dogs eating my fabric. Sometimes holding the threads just isn’t enough. I have a single hole stitch plate (from quilting days) that really eliminates the problem. The only thing is that you have to switch out the plate when you are using a zig zag stitch.
That is a good tip on the stitch plate! I don’t have feed dog eating problems (other than at the very beginning of a seam, with very lightweight fabric), and I’ve wondered how people deal with that as an ongoing problem. Some machines just REALLY like to chew up fabric!
That is the best tip I’ve seen for why you’d want to use the securing stitch. Thank you for the write up! Very helpful.
You are so welcome! 🙂
Thanks for this, lots of useful stuff in there. Can I ask if you have any issues with woven fabrics unravelling in the wash? Those tiny seams, those frayey fabrics… And have you got any tips for zig zagging over seamlines? My machine comes to a halt when it hits a seamline and either sits there sewing on the spot or with gentle tugging will suddenly take a great leap. Either way, not pretty.
I can’t speak for all bra patterns, but generally speaking – the fabrics required either have minimal fraying (as is the case with the duoplex) or are cut on the bias (which also resists fraying). For stuff like silk charmeuse, you would usually want to line that anyway. I also don’t ever wash my bras in the machine – I use a no-rinse Soak wash and lay them to dry on a drying rack. Putting them in the machine – even in a garment bag – will shorten their lifespan and I want mine to last forever 🙂 So since they aren’t really getting agitated in the wash, that also cuts down on the fraying.
I haven’t had any trouble with zigzagging over seamlines! Your seamlines may make the area too bulky, so maybe try flattening it a little before you sew? (just pound on it a bit with a hammer or a mallet. No, seriously!) You can also grab both the front and back of the fabric and gently coax it along as you approach the seamline, to keep everything moving.
Thanks Lauren, for both tips. I asked about wovens because your polka dot fabric doesn’t look like duoplex and I was thinking bras would be a good way to use up some of my nice scrap fabric. I will take your advice about laundering. Never worried about it before but then I’ve never had bras I made myself before. Just finished my third muslin and it fits great – it’s a completely different size from the bra size I’ve worn for, er, decades.
I like the seam hammering tip especially – I’ve always liked to hammer things. I have a nice Estwing but I might get myself somethng smaller for bra bashing.
Oh yeah, the polka dot one is made with a particularly fray-ey rayon fabric. The cups and bridge are lined (so no fraying there), but I did have to serge where the frame meets the band. I reckon you could also cover that seam with either a binding, a boning channel, or even a piece of extra underwire casing, if you didn’t have a serger 🙂
I don’t have a 1/4″ foot but my machine does have a 1/4″ piecing stitch. Rather than use it, I just change the width of my regular straight stitch so it’s 1/4″ from the edge of my presser foot. (I do this with french seams too, because my throat plate guide makes zero sense to me)
AND it’s good to take apart old bras for notions as long as they’re still useable. I used a RTW bra that fits (aka a unicorn) to help me figure out what shape/size underwire I should get, and took apart some old bras that didn’t fit for their rings/sliders.
Do you usually get your decorative elastic locally or do you buy it somewhere online? Sweet Cups doesn’t really have a selection (plus they’re closed until the 20th) and I feel like I’ve heard weird things about Sew Sassy. I already plan on buying a shitload the next time I’m in NYC but I got stuff I wanna make until then and that’s all I’m missing!
Oh yeah, I totally forgot about recycling old bras. I do that all the time – it’s really good for getting the little notions in all those weird colors, too. Until you have to actually match them to something, anyway.
I actually get most of my elastics from the Garment District! The prices are decent, and I like that you can feel the elastic before buying it (so you don’t end up with something awful that you weren’t expecting). I have bought one kind of elastic locally, and it was a bit of a one-off (she doesn’t normally sell lingerie supplies, just happened to have it in store). You’re right that Sweet Cups doesn’t have much of a selection; their downside is that their selection is super weird. Bra Maker’s Supply is good if you can handle the shipping costs (and they do refund if you ended up paying too much to ship). Sew Sassy… ehh, I didn’t have a great experience with the quality of the stuff I ordered, but I know some people who have ordered from there who SWEAR by the site. I think my problem was that I just got a bunch of cheap stuff 🙂 I’ve also had good luck with various sites on Etsy – porcelynne and Tailor Made are both really good in terms of quality and price.
Thanks for all the great tips–I keep talking myself into and out of making a bra because it seems so complicated and fussy to put a bra together…but I have all these lingerie notions a friend gave me that I’d really love to use! But I didn’t know that there are kits available! (I apparently live under a large bra-shaped rock). Off to peruse kits–that sounds like an excellent place to start!
Oh yeah! The kits are AWESOME for starting out because it saves you the headache of trying to source all that shit the first time (and after you get comfortable with all the little pieces, you can start assembling your own kits – which is fun, too 🙂 )
Oh Lauren, wonderful tips. You know I usually don’t start on the very edge of the fabric, I start 2-3 stitches in and back stitch first. Then I go forward. Works every time and no eating of my fabric. For real light weight fabrics like chiffon I put a piece of tissue paper under the first inch or so. I took a bra making class last year. It was only one day and too many people in the class. I did not finish and have never finished it. With all your tips I think I can pick that puppy out of the doghouse and finish it. The big plus to the class we were individually measured and she made personal patterns. Big, big head start on sizing and fit.
Just gotta do it. You make the coolest bras. Karen in Illinois
I sometimes start outside the edge, too, but I’ve found that holding the thread tails is a little easier for me to handle 🙂 I’m jealous that you got to take a bra class with personal sized patterns! That is awesome!!
Great tips, Lauren. I’ve been dancing around the urge to sew a bra for awhile now, but the details were just too overwhelming. Your post might just be the Kick In the pants I need. With your guide in hand, it doesn’t seem quite as overwhelming. Thanks….
Once you get started, you’ll see that it’s really not overwhelming! Like with any project, you just have to take it one step at a time 🙂
Perfect timing! I just got a Blackbird Fabrics bra kit in the mail the other day, and was planning on sewing up my first bra (a Watson) this weekend!
Also side note: reading your blog also inspired me to break out of easy fabrics. I made a rayon viscose shirt last week and also bought fabric to make a swimsuit at some point in the future!
Woohoo!! Don’t you feel like such a boss sewing with more difficult fabircs!? And they are more fun to wear, too 😀
Thanks for the great tips! I’ve been trying to tackle the Boylston bra pattern, but I always get a little intimidated. Your posts are so helpful, though, I might actually work up the courage to do it!
Dooo it! it’s such a great pattern and you will love sewing (and wearing!) it!
My Bernina 1130 has a feature for lowering the needle with the foot pedal. If you tap the pedal with your heel (keeping your foot in the usual position), the needle goes down. I use this all the time!
Oh, I’m jealous! I wish my Bernina had that feature!
These are really helpful! I feel like I’m going to get sucked into the bra making world at some point, so I’m saving these for when the time comes. ;). At least if you get sucked into a sewing trend, you come out with knowledge unlike with fashion trends where you buy something you only love for a little while. Ha!!
True! That’s my favorite part about the sewing trends – at least we are learning something along the way! 🙂
I will be saving this post for sure!! Thank you so much for writing this!! Your bras are so pretty and professional looking!!
You are welcome, and thank YOU! 🙂
Love the diagrams! That was probably the hardest thing for me to figure out when I first started making bras. I have some serious 1/4 in foot envy now, too, that seems super useful. Now I’m all caught up with the lingerie bug again…
Oh, GURL, you’ve gotta get the 1/4″ foot. It’s sooo useful for so many sewing tasks, but particularly lingerie!
Those special little feet just blew my little mind a few times. I may be in love…the duckbills I’ll have to think about.
The duckbills are pretty cool! I use them for all sorts of things, but they’re especially handy for bra making!
I have an irrational fear of the needle down button (although I use it all the time!) that I will one day stitch over my finger and it will be stuck because the needle automatically stays down.
Ouch! I’ve never heard of that actually happening, but that doesn’t mean it couldn’t, I guess!
Hi Lauren,
I’m going to read this a couple more times and then make another one… Thanks!
You are welcome! 🙂
I think my number 1 hangup was that you have to essentially make an entire bra before you can even really test the fit. I knew I wasn’t going to be able to wear at least the first one I completed, because I had absolutely no idea about the fit. I finally buckled down, once I realized I had enough fabric to make more than one and that I could just reuse the same notions if (when) it didn’t fit. And like I expected, the first one didn’t even come close to fitting me correctly, but it was so beautiful I ended up just getting new notions, and donated that one to Goodwill. 🙂
I’d definitely say don’t start with the most expensive fabric and lace you can find, and don’t be afraid of messing up the first couple. They really get you familiar with how a bra is constructed, and you’ll shock yourself with how beautiful these things are for such relatively little work, even if they don’t fit perfectly right away. That’s what starts the spiral….haha!
Also, you really can’t go back to RTW–seriously. I tried on an old bra that used to fit wonderfully and can’t abide the stupid underwire anymore (clearly the wrong size, but I had no idea before making my own, ha!).
Yeah, making a whole bra before you can even check the fit was the #1 reason why I put off bramaking for sooo long. I’m really lucky that I fit into my first tried pattern pretty well right off the bat, because otherwise I might have given up. But on the flip side, it does give you lots of practice with the construction and topstitching, so that when the time comes to make one that actually does fit, it will all go together pretty smoothly 🙂
Thanks for the tips! I’ve already bought a lingerie pattern book, lace and elastic over a year ago, but for some reason I keep postponing all the bra-making projects. I really want to try now!
You are welcome!
My tip is that if you’re making a bra for yourself, you can skip all the strapping notions! You’re custom making the bra…why not custom make the straps?!!! Do you have any tips for sewing on underwire casing? That’s the part that I find most difficult.
This is a great post, thank you! I have never sewn a bra before and was thinking about giving it a go, so this is very useful!
Lauren this is an awesome post! This is going to be so useful thank you!
Reading this much later as I just started tackling ye olde brazziere sewing. The pin up girls patterns are super helpful and assumed at newbies. She also has a video sew along series on craftsy!
Thank you for explaining things very clear! Of all the times I’ve tried to understand anything when it comes to be making, you you the best! Do you have any toutourals at all for what you do? Also, I was wondering if you knew how to alter the cup size (2 sizes smaller to be exact) for bras already made? Thank you!
Sincerely,
Kelly
Is this a fuller cup bra pattern?