
Finally, a tour of my new sewing room! This post has been a long time coming – honestly, this room has been set-up and fully functional since the first couple of weeks after we moved (because I have priorities), but I’ve put off sharing the big reveal until I felt that the room was “finished.” As always, I’ve realized that this room will never really be finished – I still want to hang some more lights, make a new ironing board cover, get a couple more rugs, etc etc – but it’s as finished as it’ll be for now. And now it’s time to share!
Soooo – welcome to my new sewing room, the Kingston Springs edition!
 This room is funny shape, so getting photos was a little difficult. It’s basically an L shape – there are two little nooks off each end, and the corridor between is wide enough so that you can shove furniture against the wall and still be able to walk through. Here I have drawn you a shitty not-to-scale diagram to give you an idea of the layout. I used Comic Sans as my font choice to make it extra obnoxious.
  So, as you can see – two nooks with a bit of a walkway. The hallway going off the photo leads to our bedroom and bathroom, and the diagonal line off to the side of the cutting area is a doorway leading to our private living room/Landon’s office. The rectangles are windows and doors – one window in each the sewing and cutting nook, and the door is to the side of the desk. Our apartment is in the basement of the house, so the stairs lead up to the main floor. I’ll admit that when Morgan asked if I wanted to move into her BASEMENT, I was like, “lol no fucking way I ain’t your kid.” But, forreal, this is a pretty happy basement – it has windows and a door that leads outside, so it gets a good amount of light. Although it was a little scary when I first saw it, and it definitely took some TLC to get it to the point that it is now. The room is quite smaller than it looks – my rough measurements put it around 130 square feet. My old sewing room was about 200 square feet, so there was some downsizing and furniture Tetris in order to get everything to fit. It was a little brain-bending at times, but I think it turned out pretty awesome!
Before we moved in, we had to fix the basement up a little. We were really lucky that Morgan moved into the house a few weeks before we did, so we could do this at our leisure (and not live in the middle of a construction zone). The basement is finished and was fully carpeted. We tore out the carpet in the sewing room area – it was completely soaked with cat urine and was beyond saving. The carpet in the bedroom and living room, as well as the stairs, was ok, so that’s still there. Since the unfinished concrete floors were pretty beat-up looking (although thankfully not stained with pee odor! THANK GOD FOR THAT) and nobody wanted to invest in flooring right now, we simply stained them with.. um, some shit from the hardware store haha. We also installed the screen door outside; eventually I’d like to replace the door with one that has a window, but I ain’t got the budget for that now.
I painted the majority of the room by myself – the color is “Aquatic Mist” by Valspar, and the insides of the windows is some color called “Blanket” (I don’t recall the brand, but I will fully admit that I bought the color based solely on the name alone. Who names a paint color Blanket?? Michael Jackson?). Well, majority except for the long hallway leading to the back half – that stayed unpainted for like 2 months, because I wanted Landon to help me with rolling and we kept putting it off. He actually painted it for me as a surprise while I was in Peru, which might very well be the best welcome home gift I’ve ever been recipient of. Ok, I think I’ve talked enough! I’ll let the pictures tell the rest of the story 🙂 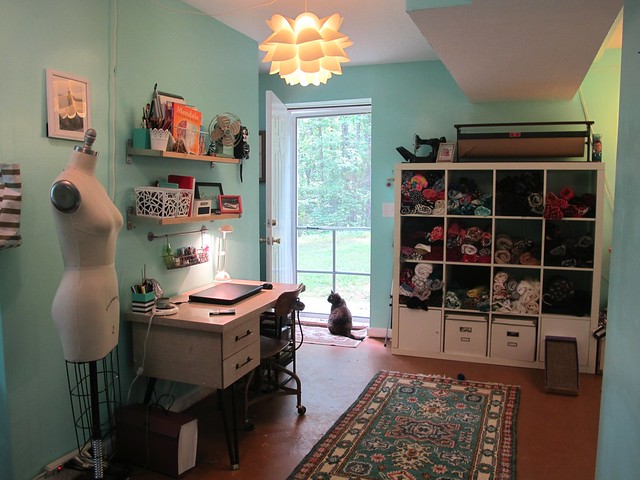
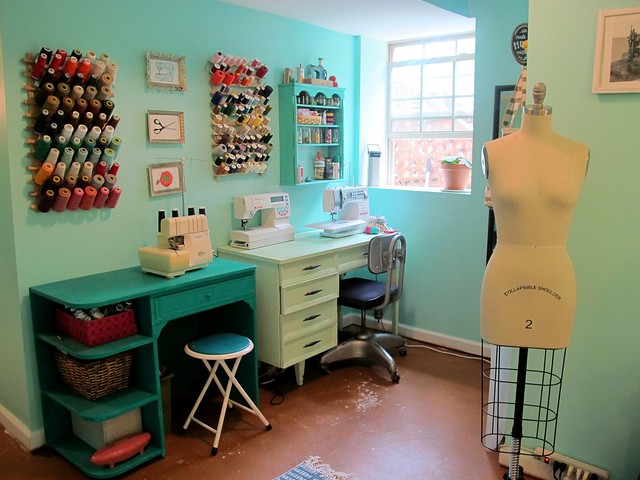
Starting with general layout photos – here’s the desk area.
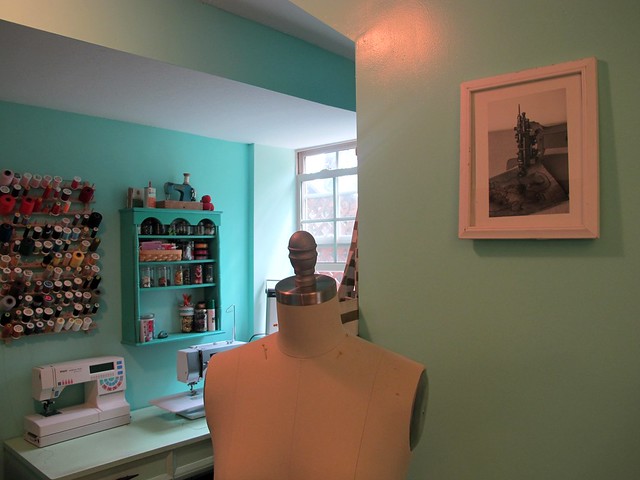
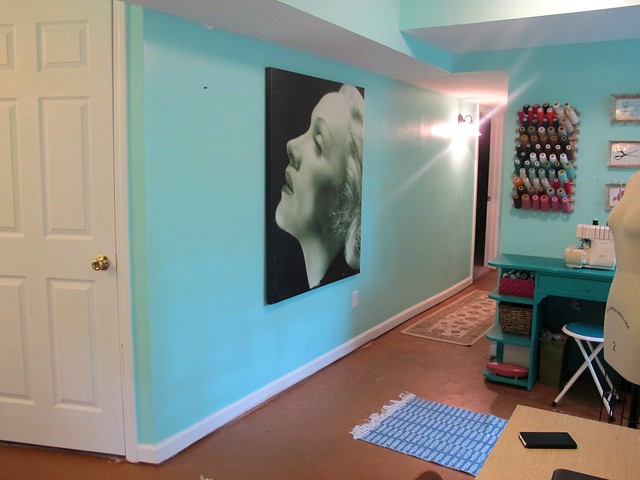 The hallway leading to the back of our living area. And that giant wall that Landon painted!
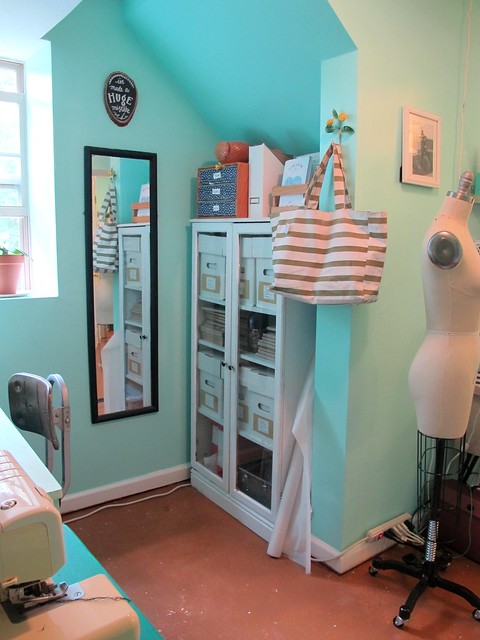
The top photo in this post is the sewing area – here’s a view of the wall behind the machines. That tiny nook under the stairs ended up being exactly the right size to fit my pattern cabinet.
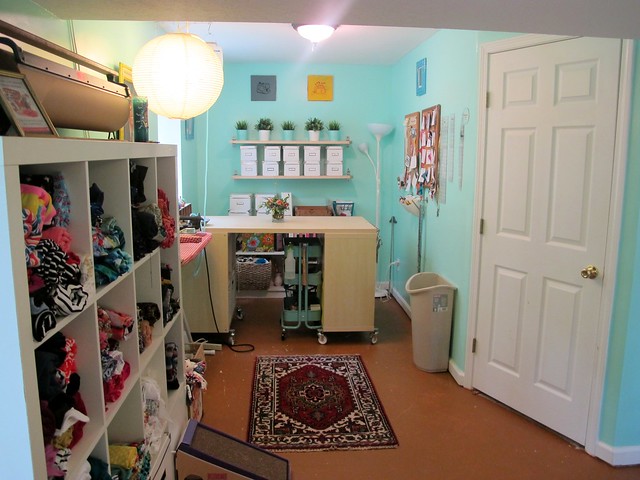 The opposite nook is the cutting and pressing area, as well as my fabric stash along the wall.
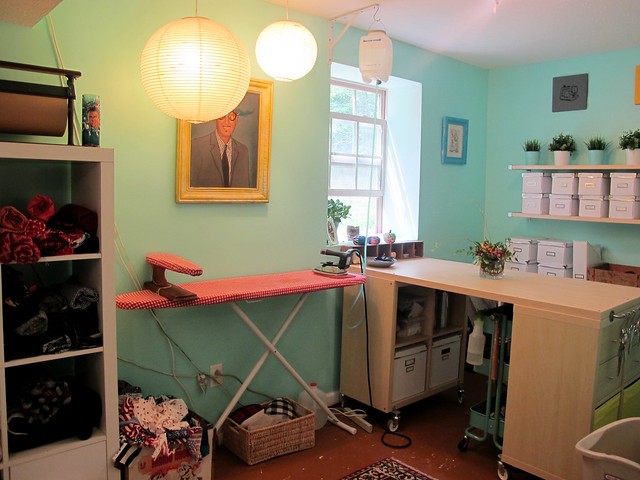
The ironing station. I REALLY wish I’d been able to find a way to keep the ironing board closer to the sewing machines, but the room layout just wouldn’t work around it (and I wanted to keep my desk in the center of the room). It’s not so bad to walk to the ironing board, I guess – I tell myself that a little exercise won’t kill me haha.
 More of the cutting area.
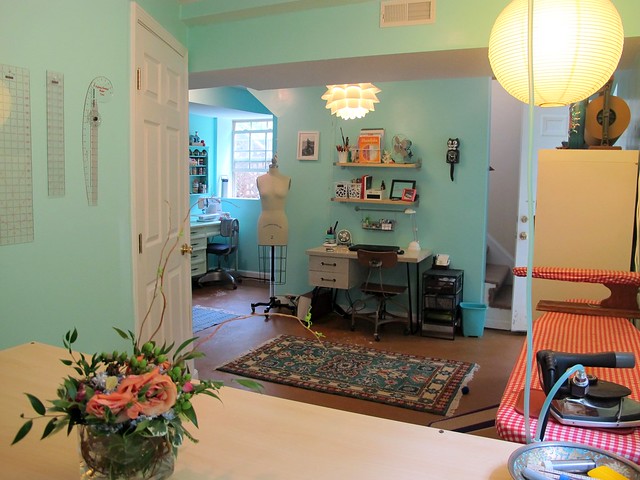
Standing behind the cutting table, looking back toward the desk.
Detail shots:
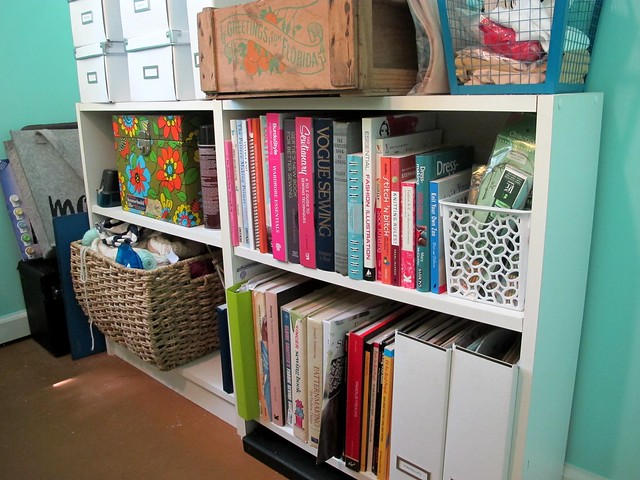 These bookshelves are below the wall shelves in the cutting area – I keep my collection of sewing books here, as well as my yarn stash (it’s ALL in that basket! I can’t keep my fabric stash under control, but I’ve managed ok with my yarn stash!) and embroidery supplies (in the 70s floral filing box). The blue metal basket up top is where I keep my lingerie sewing queue, and the wooden FL box is my regular sewing queue. I’ve found it’s easier for me to do all my cutting at once for a few projects, and then I can work through the bundles without having to stop and cut another project.
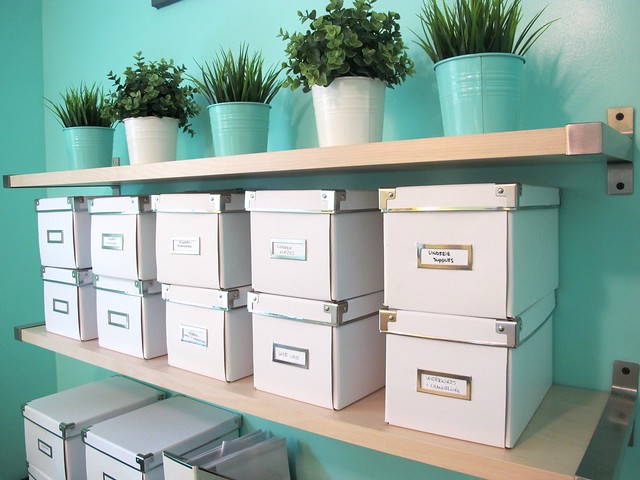
Over the bookshelf are these two wall shelves that I hung ALL BY MYSELF (like a boss). I wouldn’t normally get all riled up over hanging a wall shelf, however, these were heavy AF and I somehow even managed to get them level idk. Anyway, the boxes are for small notions/tools that I have masses of – mostly lingerie supplies and zippers. I haven’t filled all the boxes quite yet, but I figure that’ll happen in due time haha.
Oh, and the plants on top are fake. Obviously. They are the only fake plants in this room, though… for now.
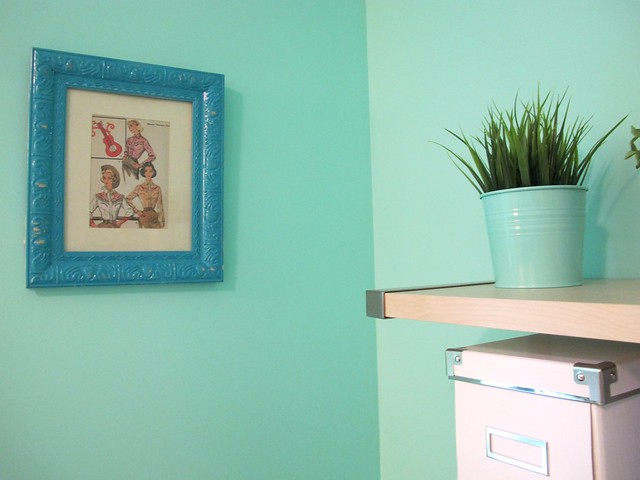 I love this pattern so much, I hung it in a frame so I could admire it all the time 🙂
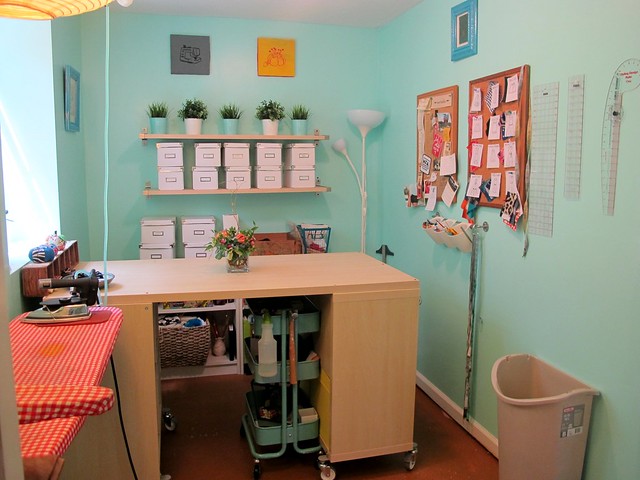
The wall at one end of my cutting table is where I have my cork boards and tools. One board is for general inspiration/love notes – just things that make me happy. The other board is my project board – I’ve found by having a visual running list with swatches and sketches out where I can actually see it (i.e., not in a book or lurking on the internet), I can more easily keep track of my make list. Sometimes I forget what patterns or fabric I have in my gigantic stashes, and this is really helpful!
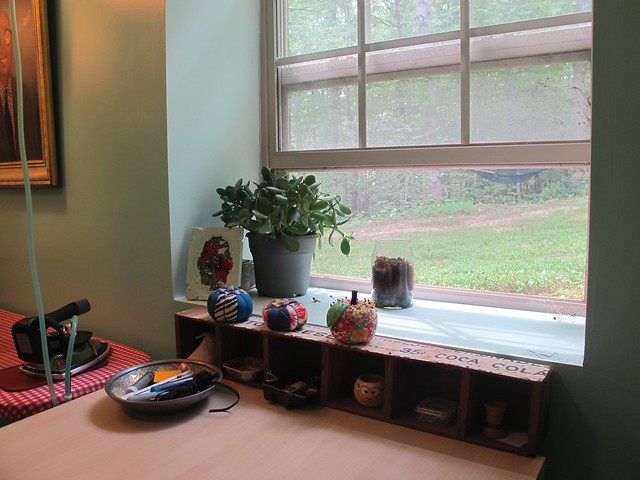 Here’s the other end of the cutting table, and one of two windows! That plant is totally alive and not fake, btw.
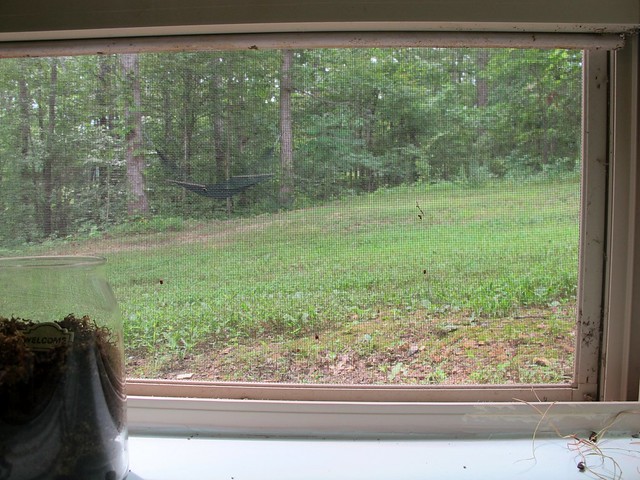
This is the view from the window. Ahh! We are totally ground-level and I look straight into the woods. Amelia loves to sit in this window and watch the birds, and sometimes Turtle (the beagle) will come sniffing around when she’s outside and it always freaks Amelia out because they are eye-level haha.
 A little more about the cutting table! I built this myself (well – I use the term “built” loosely; it’s IKEA furniture that I screwed together haha) and it’s pretty awesome! I used two Kallax shelves and a Linnmon table top (there is a whole list of links at the bottom of the post for the specific products I used), and 4 sets of Kallax casters to raise it to counter height/make it moveable. One end, I installed 2 drawers on top, and bought 2 little fabric boxes for extra storage (if you were wondering – one box holds swimsuit fabric, and the other holds a mass of vintage zippers still in their packages – too big for the cardboard boxes on the shelves). I also installed a rod to hold my scissor collection on S hooks. They do sit in front of the drawers, but it’s easy to slide them out of the way when I need to access the drawers (which isn’t terribly often). Due to the width of the rod where it screws in, I could only install it on that side.
Those of y’all who have seen previous sewing rooms of mine (we’re on #6 as of this writing… I’m a dedicated woman for sure. I also live in an area with a low cost of living. Yay!) will recall that I had a Norden Gateleg table as my old cutting table. It was ok for a cutting table – I liked the size and that it folded down to be very narrow. However, the height was always bad for me, even when raised on blocks (and, again, I’m 5’2″, so I don’t have extra height to deal with here). I also hated that I couldn’t fit anything under the table due to how the legs were arranged to raise the leaves. And the drawers were a funny shape that I never found useful. I like this table a lot better – it’s pretty much countertop-height with the casters, and I have lots of storage options with the shelves/drawers/boxes. Plus, if I ever give up on sewing (lol no), I can always disassemble it and use the pieces individually on their own. Or sell it – Nashville doesn’t have an IKEA (we have to drive 4 hours to Atlanta), so people here seem to think that shit is made of gold and will pay top dollar for it haha. Which is exactly what I did with the Norden. Bye, Felica!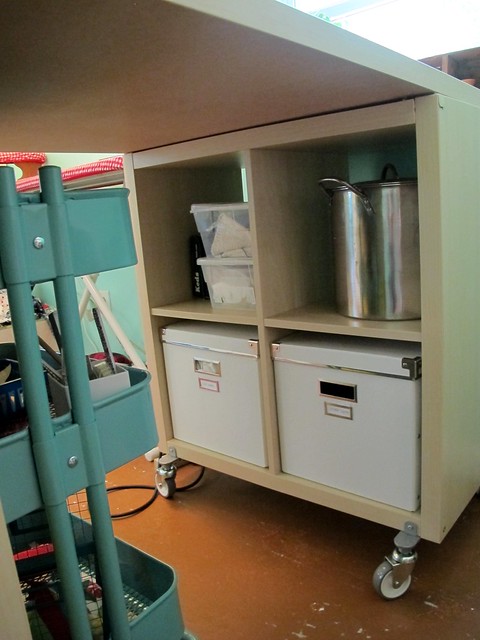
The inner side of the cutting table has more storage boxes – silk scraps, leather scraps, craft supplies, knit swatches, and my dye pot.
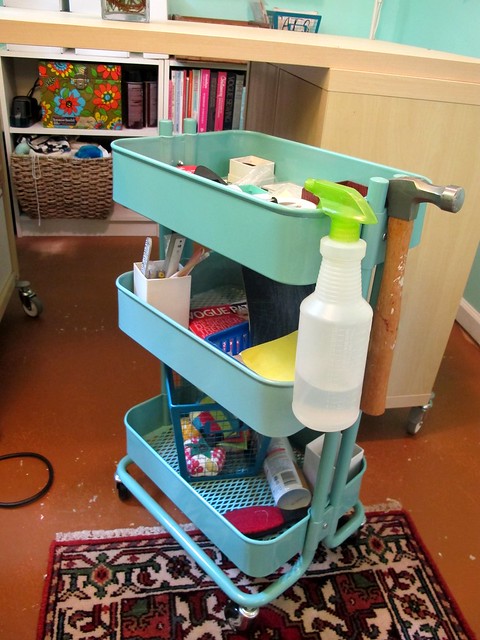 This little cart fits perfectly under the table as well. I keep a bunch of weird stuff here – cutting and marking tools, pressing supplies, extra pincushions, my hammer and a spray bottle.
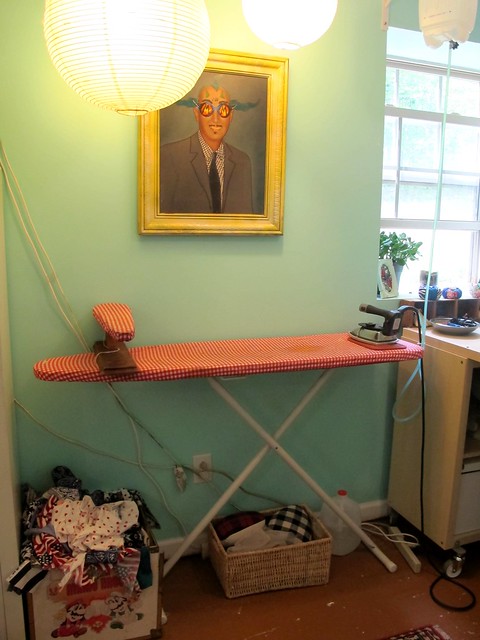
The ironing station is right next to the cutting table. My iron is a silver star ES-300, which is a gravity feed iron and it’s AWESOME. The one thing that seems to scare people the most about using a gravity feed (other than the sheer steam power behind it) is that it doesn’t have an auto shut-off, and they are afraid they’ll accidentally leave it on and burn the house down. I solved this issue by plugging my iron into a power strip that also has paper lantern lights running from it – so if the strip is on, the lights are also on (and, thus, the iron is on). It’s pretty easy to tell if the iron is on that way! That overflowing box of fabric houses all my scraps from cutting. I try to find homes for that shit as quickly as possible because the pile can quickly get overwhelming otherwise.
 Next to the ironing board is my fabric stash – organized somewhat by type/color (jerseys/knits on one side, wovens on the other). I installed little cabinet doors on the bottom, to hide unsightly stash (fabric scraps and linings) and boxes for the unfoldables (interfacings and lingerie fabrics). The roll of paper on top is super handy for pattern tracing or if I just want to make a giant doodle of something. As far as *how* I stash my fabric – I used to fold, but now I roll. Folding looks really pretty, but I could never seem to keep it neat (mostly because my attitude went somewhere along the lines of “ah, fuck it.”). Now I roll my fabric and just stack it in the little cubes. It much easier to keep everything organized this way!
As you can probably tell, this area is also Cat Central. Amelia likes to hang here – on the rug, in front of the screen, all up in my silks – so I keep her scratching pad here, and there’s always at least one toy lurking around.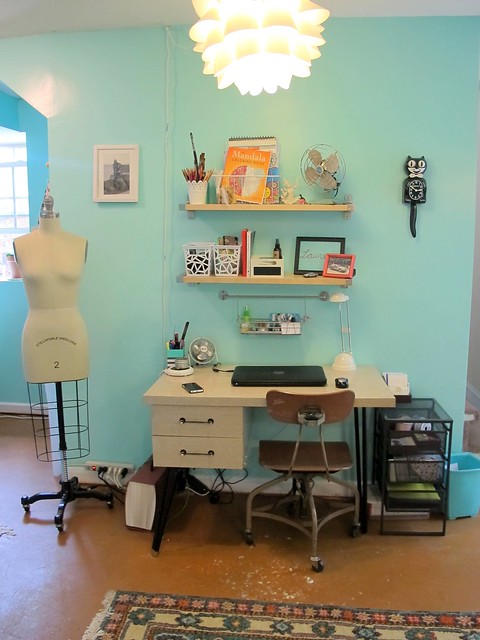
I like having my desk in the middle of the room, so I can easily hear music/videos while I’m working. It’s also close to the door (which is open 99% of the time, bc fresh air lol yay). I work from home a couple days a week, so it was important for me to have a nice workspace to sit at. I also hung those shelves above the desk, also by myself. I really love shelving. And boxes, for that matter.
 To the left of the desk is the sewing area. This is where I keep my machines, patterns, and a bunch of notions.
And here’s the view out of that window, in case you were curious 🙂
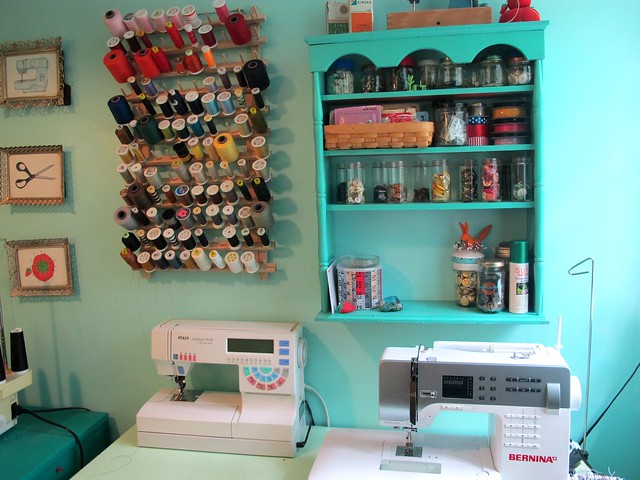 On one table, I keep both of my standard sewing machines – I have a Bernina 350PE and a Pfaff 7570. The Bernina is my main machine, but it’s really nice having 2 when you are working on a project that requires a lot of thread changes (such as jeans). For those, I use the Pfaff for construction and the Bernina for topstitching. Above the machines are buttons, notions, and thread racks.
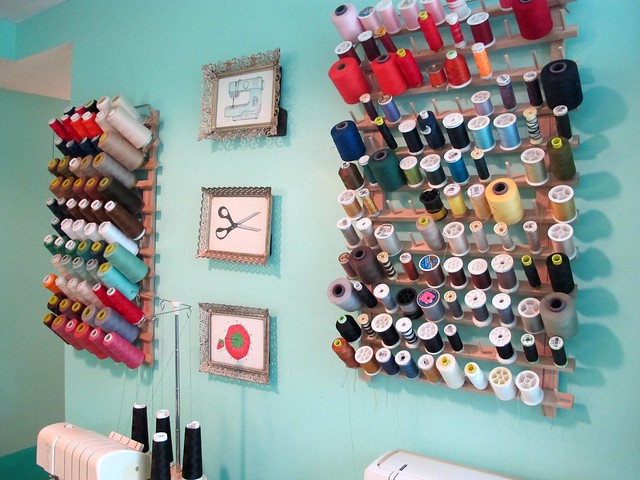
More thread racks, plus my favorite sewing room art 😀
 The dedicated serger table has additional storage, which is handy. My serger is a Babylock Imagine, FYI.
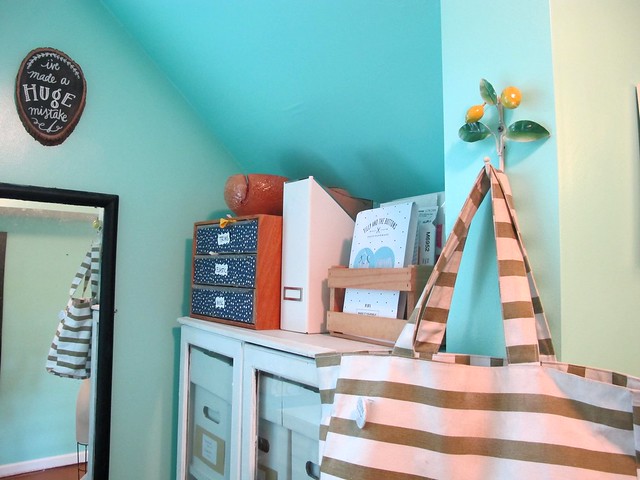
Behind the sewing machines, in the weird little nook under the stairwell, is where I keep my pattern stash. On top of the cabinet, I have storage for trims and elastics, plus a running queue of the patterns I want to make next (before I cut them and put them in the cut queue box by the cutting tables. Man! All these systems!). That bag hanging on the lemon hook is my knitting bag.
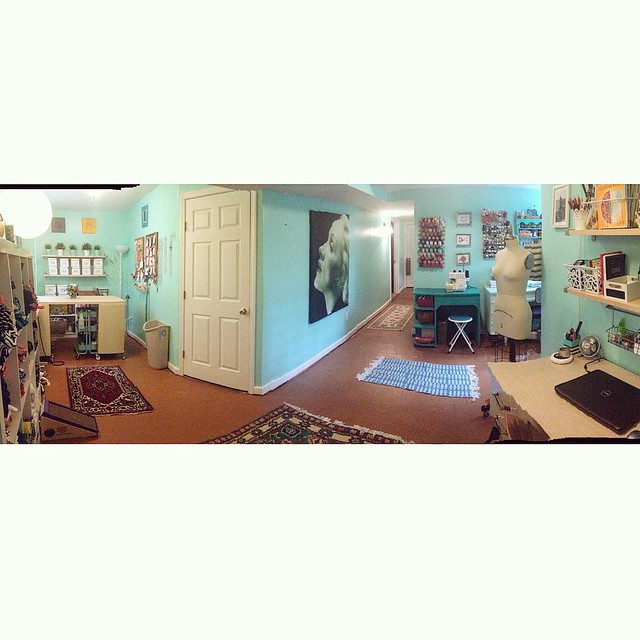
Finally, here’s an Instagram panorama of the room!
SHOPPING LIST:
Most of the stuff in this room is either thrifted or from IKEA. I’ve tried to compile everything here, but feel free to ask if you are curious as to where I got something! If it’s not on the list, chances are I bought it used (like from the thrift store or flea market). Like I said, I’ve had an on-going sewing room in every house I’ve lived in for nearly the past 10 years, so I’ve had a LOT of time to collect stuff and learn what works best for my set-up and organizational needs. Oh, and one more thing, because I’m always asked this – yes, it does always stay this clean! “Messy” for me is if there is a project on the cutting table. I never lets piles accumulate and I’m pretty good about putting stuff away when I’m done with it. I can’t stand to work in a messy room, plus, this area is the walk-through to get to the rest of our basement suite, so I have to be mindful of that for Landon’s sake.
Wall paint color: Aquatic Mist by Valspar
Sewing nook
Serger table: thrifted + painted
Sewing machine table: family hand-me-down + painted
Pattern cabinet: thrifted + painted (for info on the boxes inside the cabinet, check out this post!)
DMC thread organizer: thrifted
Thread racks: given to me by Elizabeth, but here are some similars on Amazon- thread rack + serger thread rack
Turquoise hanging shelf: thrifted + painted
Chairs: thrifted
Sewing room art: Joanna Baker, via Madalynne giveaway
“I’ve Made A Huge Mistake” chalkboard sign: Custom made by Kaelah
Rug: Old Time Pottery
Desk area
Desk: Nashville flea market
Chair: Nashville flea market
Ceiling light: KNAPPA
Wall shelves: EKBY JÄRPEN / EKBY BJÄRNUM
Mesh drawer unit: LENNART
Rail/basket (above desk): BYGEL RAIL + BYGEL BASKET
Dressform: Professional female dressform with collapsible shoulders (also: full review here!)
Rug: Nashville flea market
Sewing machine print: Madalynne
Kitty Cat clock: gift from Landon
Fabric // Cutting area
Fabric shelf: KALLAX with 2 doors
Industrial paper roll: Given to me when my old job (advertising) was downsizing and clearing out the art room!
Paper lanterns: IKEA, like 10+ years ago
Rug: Nashville flea market
Wall shelves: EKBY JÄRPEN / EKBY BJÄRNUM
Bookshelf: thrifted
Cutting table: 2 KALLAX shelves + LINNMON tabletop + 2 KALLAX drawers + 4 KALLAX casters. Scissor rail is BYGEL RAIL + s-hooks
Tool baskets (under the corkboards): BYGEL RAIL + BYGEL container
Turquoise utility cart: RÅSKOG
Yellow storage boxes: DRÖNA
Large white storage boxes: IKEA, discontinued (these are similar)
Small white storage boxes: IKEA, discontinued (these are similar)
Fake plants: FEJKA
Ok, I think that’s it! Let me know if you have any questions 🙂


Now that’s a well thought out sewing space! Nice work.
I was happy to see that our stashes are similar size (I always feel like a hoarder – but I DO de-stash and only keep stuff I really like!
I have my ironing board & machines together (also have a Bernina and back-up heavy duty Singer for sewing) however my cutting table (ummmm dining table) is down a flight of stairs… which is fine unless I’m cutting as I sew which I do sometimes… then it’s like my personal StairMaster session.
Oh man! It would suck to have to walk that much during a sewing marathon, but you’re right about the personal StairMaster session. I bet your butt looks fantastic after all those stairs 🙂 HAHA sorry that’s so creepy.
Love your sewing room, also, nice use of comic sans:)
Ha! It made me lol because I know someone is gonna look at that and get all antsy about it hahahaha
Ahh I’m so jealous! I cannot wait until I can have a sewing room. I love the pattern stash.
You will get one someday! Having a sewing room is awesome!
Really love this! I’m on a bit of an organizing kick, I’m reading “The life changing magic of tyding up” and it’s lit a fire under my ass. I have yet to tackle my sewing room, which is a weirdly shaped disaster area. I mostly need to get my vintage pattern hoarding under control ha. I also do the same trick with the irons and the lights!
Oh, man, I really loved that book! It definitely lit a fire under my ass, too – especially the parts where she gives you permission to get rid of stuff that you don’t want but feel like you need to hang onto regardless. And I really love that she doesn’t tell you to get rid of anything in specific, but just whatever works (or, rather, doesn’t work) for you.
Getting the vintage pattern stash under control was a big deal for me. It’s SO much easier to sort through now, looks much nicer, and I don’t feel like I’m destroying my patterns with the way I store them.
Great post! I am dreaming up better ways to organize my stash because my “sewing room” is still an unfinished basement room ATM. You’ve given me some good ideas and inspiration! I will def be rolling instead of folding my stash, setting up a project corkboard, and instituting a project queue area because right now I’ve got cut projects in dire risk of getting lost/messed up with nowhere to live until they get stitched.
I’m the exact opposite of you stash-wise. I’ve got crazy yarn everywhere and just a bit of fabric to wrangle. 🙂
Happy to hear that I’ve given you some ideas! And yay for being able to start from scratch – that sewing room is going to be PERFECTLY suited for you once you finish it!
I started to get hoardy with my yarn stash in the beginning (it didn’t help that I was getting free yarn left and right from people who were trying to destash, ha), but I realized that I’d never knit it all up if I kept collecting. Knitting takes sooo much longer than sewing, plus, it’s harder to fudge the amount you need for a project. So now I only get yarn when I’m ready to start a project, and I had a very ruthless destash right before I moved (and made some people VERY happy haha). It feels good only having enough to fit in a basket! That being said – my fabric stash probably needs a good wrangling down now!
Very nice! I laughed when i saw the little Ikea cart – I have one, and I think every other sewing/crafting blogger has one too, like it is the LAW! I am also totally ashamed of my sewing room. It isn’t a really a sewing room anymore, more like a ‘where the hell do I put this? I know, let’s chuck it in the sewing room while I decide’ except I’ve been deciding where things go for about six months… Fancy another trip to the UK to kick my ass about getting it into shape?
You are absolutely right, I think it is an unwritten law somewhere that craft bloggers need that cart! I’ll be 100% honest and admit that I bought it when I saw it on someone else’s sewing blog hahaha 🙂
I would totally come to the UK and get that sewing room into shape for you! How long do you think it’ll take me to get across the ocean if I start swimming now? 😉
Wow! Love your space…especially the beautiful color and copious use of Ikea (is there ANY place better?!). It’s evident a lot of thought and planning went into this…very much appreciated by someone who (tries) to be organized yet rarely succeeds!
Well done! Love the pic of Amelia sitting in front of the door. Looks very contented – the perfect accessory to your sewing room!
Enjoy!
Oh yes, Amelia *loves* the sewing room! You can tell that she’s totally in her happy place when she’s laying on the rug in front of the screen door 🙂
Love it! This is awesome 🙂 I’ve already Pinned both this and your other sewing room post for future inspiration when I have the room….. currently my cutting “table” is the living room floor 😦
Ah, I’ve cut on the floor before and know how much that sucks! Hopefully you’ll get a room – or at least space for a table – soon! After having the table, I don’t think I can ever go back to not having it haha 🙂
Thank you for sharing a tour of your wonderful sewing studio. I am looking to use some of your good ideas!
You’re welcome! Always happy to share 🙂
YES! I’ve been dying to see this post. Great space. I now see why you crank out so much stuff. I’d never wanna leave this room either.
Thank you! I admit, it’s hard to tear myself out of the room sometimes – I would probably sleep in there if my bed fit! 🙂
I started drooling. And then I couldn’t stop. Dreaming of a space like this when I move!
Yay for future sewing spaces! 😀
It’s possible you were an industrial engineer in a former life :D. And hello, dear Amelia, it is always nice to see you!
Haha, possible! The last sewing job I worked, Muna, was a former civil engineer by trade – I guess engineering and sewing can be quite similar in some ways 🙂 And Amelia says hi!
Wow, it looks great. Love the colour. And I love that shirt pattern. I made it a couple of months ago. For her 30th birthday my cousin organised a barn dance and when I stumbled across it, it was like fate. I even play the ukulele so the embroidery transfer was inspired. And obviously, being English, that’s how we think all Americans dress.
haha I WISH all Americans dressed like that! This country might have a better attitude as a whole if we were all rocking embroidered Western shirts 😉
Thanks for doing this post! I LOVE to see how other people organize their crafty space. Yours looks gorgeous!
Me too! I think it’s so interesting to see what works for other people’s creative space 🙂 and thank you!
There are many strokes of genius detailed in this post, but for me the project board and the lamps that show when the iron is on take the biscuit. I take my cap off to you – you have nailed the Ultimate Sewing Room.
Thank you! Such a high honor indeed 😀
I was going to say how jealous I am of your “small room” (HAHAHAHAH mine is like 20 sq feet!) until I saw the bit about a 4 hour drive to IKEA. :O
But seriously – amaaaaazing space!
Well I KNOW your room is tiny! 🙂 It’s pretty awesome, though! I wish I could work in a space that small but I have toooo much stufffff hahah 🙂
And yeah, 4 hour drive to IKEA sucks! We usually make a weekend trip out of it and use it as an excuse to explore Atlanta (or Chattanooga, as it’s on the way). It also keeps me from spending too much $$ there, since there’s no random impulse shopping trips!
Your sewing room is fantastic. I love the wall color & your cutting table. I have to say that I’m glad I’m not the only one who is over comic sans font! Lol
Oh, you definitely aren’t the only one 🙂 haha! Man, poor Comic Sans hahahahhaa
How do you like the 7570? I ask because there’s one in my local classified section going for $500. I have a Janome that I like, but its lack of precision drives me crazy (bight can’t be adjusted, it doesn’t stop exactly where I want to stop, etc).
Very nice sewing room, too!
Pfaffs rock. That’s a great price and if serviced will last you many years. Powerhouse for sewing and does embroidery. Mine is going strong at 20 years.
I love my 7570! I thought about selling it when I first bought the Bernina – because I didn’t think I needed 2 nice machines – but ended up backing out of the sale at the last minute (fortunately, the buyer was having second thoughts as well so we were both pretty relieved!). I HAVE NO REGRETS. It’s an amazing machine with great precision – although the one caveat is that the button holes leave a bit to be desired (I use my Bernina instead). The built-in walking foot rocks and the machine has some cool features, such as a low bobbin light. Never tried the embroidery unit, even though I have it too. If you can get it for that price, I say go for it – they tend to go for a lot more and can be hard to find, since people tend to hold onto them. The 7570 was one of the last Pfaffs made in Germany, which makes them extra special to some people 🙂
Yay, it’a teal again 😉 love that color, absolutely inspired me to paint mine teal, too 😀 love your thread art so much! You are so organized, that’s really cool!
Wow! What a fantastic space to work in! I’m drooling over your wall color choice… Pretty much my dream color (for one day I get over my hangups about painting a rental and actually do it! haha!). But basically, I just want to be a creeper and come live in your basement sewing area! haha! I’m down to a corner in the spare bedroom these days, and most of my crap (err… supplies) are shoved in a tiny closet. :p But seeing this is inspiring me to get in there and redo a few things to make it work better for me!
GIRL. One of my biggest dealbreakers when looking for a rental is whether or not I can paint – I am sooo not a white wall girl, and if I can’t paint, I look somewhere else! It’s such an easy and inexpensive way to totally change a room 🙂 And you can totally come be a creeper in my basement sewing room – if I can be a creeper in your place in GERMANY! 🙂
haha!!! DEAL! 😉 lol. As long as you don’t mind my blindingly white walls! (Darn government housing. UGH!!!!!!!!!!!)
It looks wonderful. I love all of the boxes you have in your room to keep everything together & tidy looking. I can’t wait to have a sewing room again – darn house renovations – my sewing room will probably be the last room to be completed. But don’t get me wrong, I set up a make-shift sewing room in one of the unfinished bedrooms. Can’t live without sewing. lol
I love reading about your renovations and I can’t wait to see what the house looks like when it’s done – because I know it’s gonna be awesome and super jealousy-inducing. Bet your sewing room is going to blow mine out of the water, too 🙂 And I applaud your priorities at having a makeshift sewing space even during the renos. Sewing is good for your sanity! You need that! 🙂
Thanks for the tour! I have a serious case of envy now – you are so organized! I’m aspiring to be so, and you gave me a few ideas that I’ll use. I love your stash organization. Rolling up the fabrics is clever.
I have to be organized or else I am a massive SLOB!! hahah! It’s either one extreme or the other for me 🙂 And I can’t take credit for rolling the fabrics – I got the idea from somewhere else (although I can’t remember who/where now). But thank you!:)
I love the colors!!!
Thank you!
My sewing room was painted blue on 2 walls and has blue wallpaper with teeny flowers from the woman who lived her before. I wish I had met her because I love the walls.
Now I want one of those ikea carts! Cause, if everyone else has them, it’s probably required 😉
Oh, that sounds awesome! Sounds like she had some good taste 😀
Love it! Gorgeous wall colour and it is so well laid out. I have a couple of those Ikea shelves in my studio too, not as tidy as yours!!
Those IKEA shelves are a lifesaver for the studio!
Fan Freaking Tastic!!!!! So professional and cheerful!!!
Woohoo! 🙂
What a great space I am very jealous. My own craft/sewing/knitting room could fit probably 3 or 4 times over in yours. By coincidence I paid a visit to my local IKEA today which was full of kids on school holidays (grrrrr) and saw the little trolley cart you have and immediately wanted one. I am really not sure how I could squeeze it in but I managed to resist temptation for today at least. We’ll have to see how long that lasts for.
That little trolley cart is so awesome! Good for you to resist temptation, though, and not buy it until you are sure if you have a place/need for it 🙂 It is super cute, though!
Thanks for sharing all the details! My sewing room is a hovelly crowded mess. I’m away on hols and plan to sort it out when I get back. I’m going to rearrange the power boards – even though I have an auto cut out iron I still freak that I keep leaving it on – and I happen to have a set of paper lanterns in a box that I haven’t put up yet!
You should totally do the paper lantern trick! It’ll ease your mind about whether or not the iron is on – and bonus, you get extra light while you’re using the iron 🙂 Win-win!
What a lovely post – the room looks great and already SO lived in. Ever thought about a sideline as Sewing Room Interior Designer?
That would be one hell of a fun job! Wanna be my first client? 😉 haha!
Oh my goodness, what a gorgeous space! I love it! My husband built a sewing room for me in half of the garage, I’ve completely outgrown it and now sew in the kitchen again, using the ‘sewing room’ for stash and pattern storage, which is considerable lol.
Sounds like someone needs to turn the other half of the garage into the rest of the sewing room 🙂 hehe!
What a fabulous space
Thank you!
What a pretty room! I love the color of the walls, it looks so fresh and crisp. I also have the little 3-story roller thingy from IKEA in my kitchen – I think you just inspired me to buy another one for the sewing room, why haven’t I though of this?
You write that you wish your pressing board were closer to sewing machines: have you considered putting it on rollers? I have mine on two roller boards for furniture (I don’t know the tech term in English, sorry, but here in Germany you can buy them at home imporvement stores). Because like you I have not good place for the pressing board, but with the rollers I can push it out of the way when not in use. i am considering to put my mannequin on rollers as well, she’s constantly in the way. So is my cat, but I don’t think a roller board will solve this problem 🙂
Greetings from Germany
Ingrid
Oh, that’s a really good idea for the ironing board! Unfortunately, it won’t work for my space – the one downside to a gravity feed iron is that it’s not really portable. The water reservoir is installed in the ceiling, and it’s not really easy to move it unless you want to spackle in some giant holes 🙂 But that is a really great idea to be able to roll the board around!
Oh my god that is amazing, I am so jealous!
😀 😀 😀
So what *do* you do with the scraps from cutting? Give them to quilters? Donate them somewhere?
I let my friends have a dig through them first (they use them for anything from quilts to practice scraps to baby/toddler clothes to art projects), then I offer them up on Craigslist in the free section. Someone usually takes them pretty quickly 🙂 I’ve also donated them to local art co-ops, community colleges, and schools. I think there are also textile recycling programs that will take them too, but I haven’t really looked into that because I haven’t had a problem with finding someone who will take and use the scraps 🙂
Wow! This looks like a dream come true!
It’s pretty nice!
i really enjoyed my visit to your special place.I have recently retired from nursing, so that leaves a lot of time for creating and sewing. My new place of enjoyment is an unused bedroom. it used to be an extra guest room now I simply use the motel down the road,. lots of rooms and they leave the lights on. the first thing I did was to paint the room Tantalizing Teal by Sherwin Williams. hubby built my 96 inch long sewing center, holds two sewing machines and my serger. Still working on organization, and deciding what is it that I reallly need. (that little rolling cart from Ikea). You have given so many, ideas, some of which I will incorporate. The best thing is that I have a pretty large closet that I use for stashing and storage.
Your sewing room sounds lovely! Much better use than of being a guest room, haha 🙂
I’ve always loved lurking your sewing rooms, even back when you had carpet, ha!
But I seriously cannot wrap my head around how you have windows at ground-level, but then a door that opens to the outside. Is this house built into the side of a hobbit hill or something…?
The house is built on a hill 🙂 So when you walk into the front door, it’s only a couple steps above the ground – but when you go out the back door, the deck is a full story above the ground. The window by the cutting table is at ground level because it’s on the side of the house. Then the hill goes down until it reaches the door, which is also on the side of the house, and the ground is low enough that you can use it like a regular door (there is a little bit of a wall to the left of the door, where I guess they had to level the ground to make this work – but it’s not very high, maybe 2 feet, if that). The window by the sewing machines is at the back of the house, so it’s at normal window height, not ground level.
I hope that makes sense! My parent’s house is built the same way – the very front of the basement is completely underground, but the back has French doors that lead out to a little patio 🙂 Although when you go from the front to the back of the house, it’s a very gentle slope and actually feels pretty flat.
Wow, I can’t even imagine having a partially-underground house haha!
Gulf coast means we can’t have basements, but I’ve always been intrigued by the whole working-with-the-environment sort of building. Here we mostly have pier-and-beam style houses, or houses up on stilts.
Thank you for sharing your sewing room with us. The Aquatic Mist paint makes the room pop. How long did it take you to write that post? I started reading last night then during my morning commute and finished this afternoon.
Oh man, WAY too long. I think a couple of hours, at least. Mostly because of all the links at the bottom (trying to be helpful, and also head off any questions of “where did you get that?” before they happen, ha), but also because I get pretty wordy with my posts!
I love how you didn’t forget about Amelia she has her little scratching place, she’s so cute :0)
She’s my little sewing assistant! Gotta have some space for her too down here 🙂
What a gorgeous, inspiring post! Oddly enough I’m most jealous of the hanging thread storage, that definitely beats rummaging through my see through containers. But obviously only about 5% jealousy, 95% inspirational, OMG this rocks!
Fabulous ! I have my own sewing room too, but mine is smaller than yours and not as clean as yours ! It’s almost Tchernobyl these days (I’m making a jumpsuit with an unravelling viscose :D) what a nice view… With all this space, you can make your footing between the cutting table and the sewing machines. New concept : sporty sewing, yay !
I really liked your previous house but this one seems to be very lovely !
Wow, you have an amazing sewing space, I’m very jealous 😉 I’m still working up to having at least a desk where I don’t have to pack away every time I’m done! Good inspiration 🙂
Hi ya Lauren! Thoroughly loved this post featuring your sewing room! I haven’t combed thru your blog as of late, but I’m curious as to how your sewing interest was piqued…..