
Hey everyone! This post is a little different from what I normally blog about… instead of showing y’all some (probably awesome)piece of clothing I made, today is all about the non-clothes crafty stuff! Yay!
And, before you start side-eyeing me – this isn’t in partnership or sponsorship or anything like that with anyone. I’m honestly just really excited about my upcoming trip and I wanted new ~travel accessories~ (especially since all I own is basically my old suitcase!). Except, once I started looking at the goods on Etsy (and, if we’re being honest – Amazon. And Target. Haha!), I found myself poo-pooing everything because it wasn’t cute/wasn’t exactly what I wanted/ugh I can make that myself. Rather than start doing idiot shit like buy a new suitcase (my suitcase, while definitely old – there are receipts in the pocket from when we visited Disney World as a family. In 1994, I might add. – it still perfectly functioning and absolutely does not need to be replaced unless I just suddenly run of out ways to spend my money), I figured I’d channel my energy into making these little accessories. And you know what? This kind of sewing is pretty fun – especially when there’s no fitting involved 🙂
I do want to add a small disclaimer before we dive in, though – a couple of these projects include the use of scrap leather. I know the use of leather can be a subject of hot debate, and I don’t want any of y’all to look at something you don’t want to. With that being said – none of us need to be “schooled” on the evils of leather, at least not in this post. I’ve done my research, I’m ok with leather and leather scraps (I mean, I wear leather shoes and belts), and I do not want to turn the comments here to turn into a leather debate. All right! Moving on…
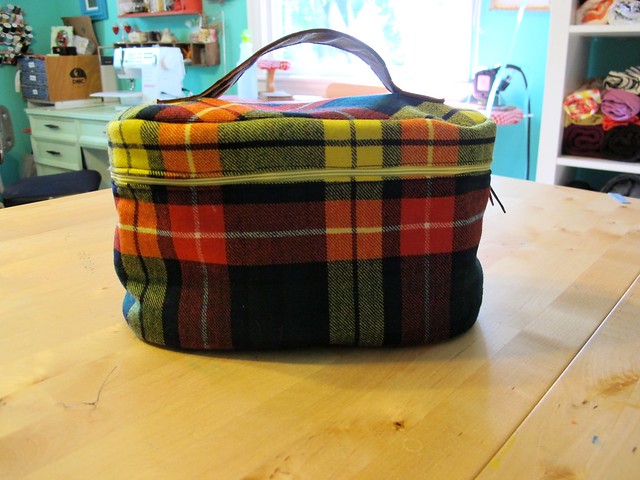
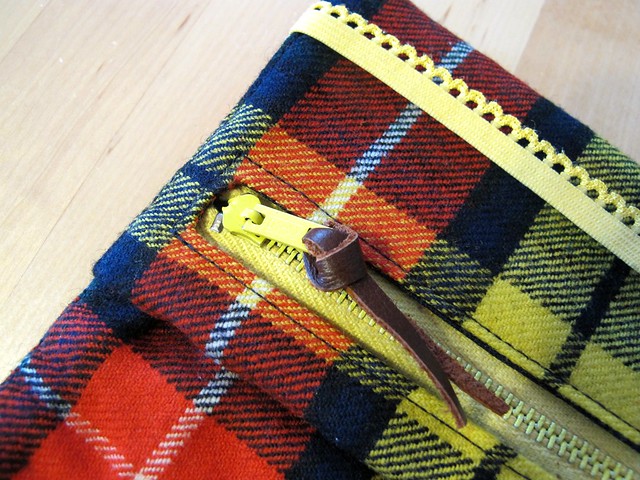
The first thing I made up was this little make up case. Isn’t she ADORABLE? Way cuter than anything I could buy, at least as far as my budget is concerned.
I used a Butterick 6072 to make the make up case. I actually got this pattern for free when I visited the McCall Pattern Company – I know, I know, I just told y’all this isn’t a collaborative post. It’s not! The pattern was in a bag of goodies that they handed to me when I walked in the door. I’m pretty sure no one is expecting me to write a review – I’m also pretty sure I looked at the pattern and thought, “Huh. Definitely never gonna make this shit.” hahaha. (I should also point out that, if I had bought this myself, I wouldn’t have paid more than $1 for it, thanks to Joann’s sales. So there’s that). At any rate, once I realized I was gonna have to make my own damn make-up bag, out came the pattern to be looked over with a set of fresh eyes. If you can get past the somewhat dowdy styling and fabrics on the pattern envelope, this is actually pretty cute. I almost made the matching jewelry case & make-up holder, until I realized that I totally don’t need or use those things. So, just this one bag! (but I still might make that jewelry case. Watch me.)
Anyway, this was REALLY easy to put together! I used a piece of beloved plaid wool blend fabric from my stash – I was a little hesitant to cut into it, because it’s sooo pretty (isn’t it?), but I ultimately decided to go for it because 1. It’s a wool blend, which I prefer to wear 100% wool; 2. It was a small yardage (maybe 1/2 yard); 3. That unbalanced plaid meant I probably couldn’t eek anything remote successful and matching out of it. Anyway, now I can enjoy it all the time 🙂 This fabric came from the flea market, by the way. I have no idea it’s origins, but it feels like a thick suiting.
The pattern is interfaced with fusible fleece (there was also some of this in my McCall bag – but honestly, it kind of sucked. I don’t remember the brand, but only about half the glue dots worked. Meh.) and then lined with some navy wool blend broadcloth from my stash (if I recall, my friend Trisha’s mom gave me that, which I believe she found at a yard sale). The zipper is from my stash.
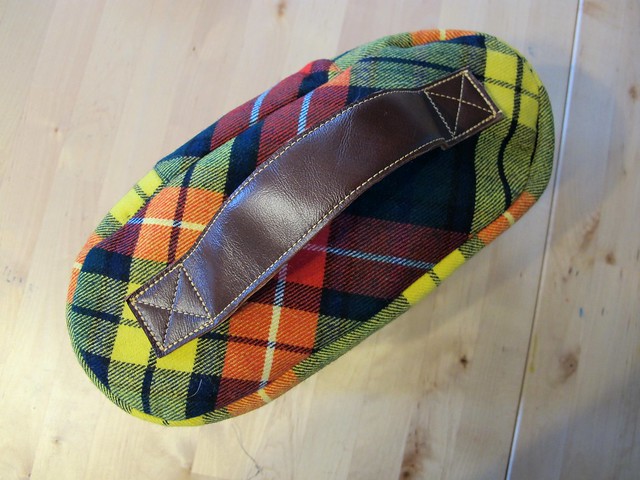
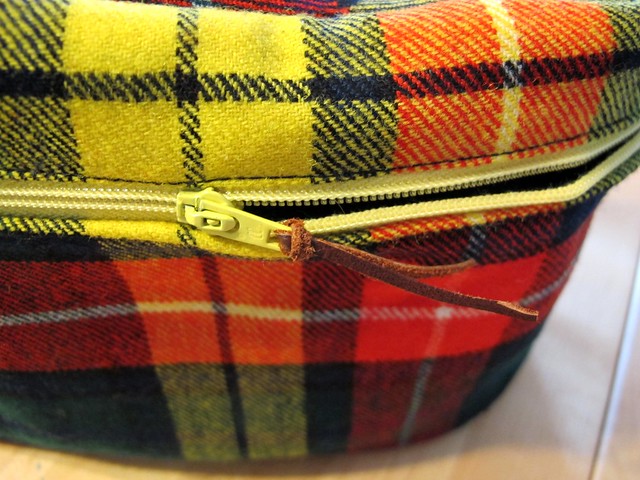
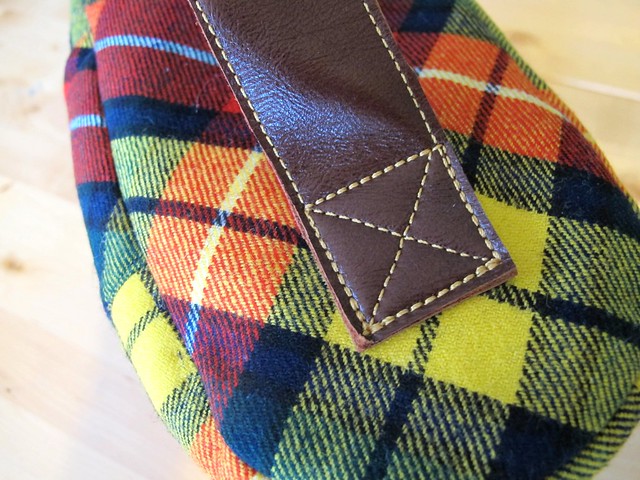
I decided to fancy things up and use a piece of leather for the handle. Ooh la la! This leather came from my last trip to Chicago – I bought a small piece at Textile Discount Outlet, having no idea what the hell I was gonna do with it. I like it as a strap, though! I sewed the two pieces wrong sides together (eliminating the seam allowances) and then topstitched onto the bag itself. The thread is just denim thread, and I used a denim needle (alas, no leather needles currently in my arsenal). I can’t speak for *every* sewing machine, but mine was ok with the leather since it’s relatively thin. I used normal thread in my bobbin and adjusted the tension until everything looked good on both sides.
I am ridiculously pleased with how good the topstitching looks 🙂
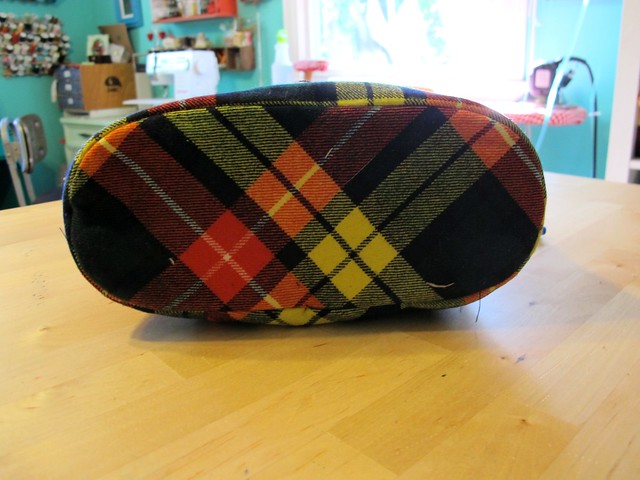
I cut the top & bottom of the case on the bias, so I wouldn’t have to deal with matching the plaid any more than necessary (I also cut the back panel on the bias, but apparently did not take a photo of that angle. Sorry!) The pattern calls for a piece of cardboard at the bottom, to give the bag some structure. I also included some heavyweight interfacing (like… it’s so stiff, it practically feels like cardboard) on the top piece, because it felt really flimsy without it. I know they make lightweight plastic specifically for this purpose, but I really just wanted to destash so I went with what I had on hand!
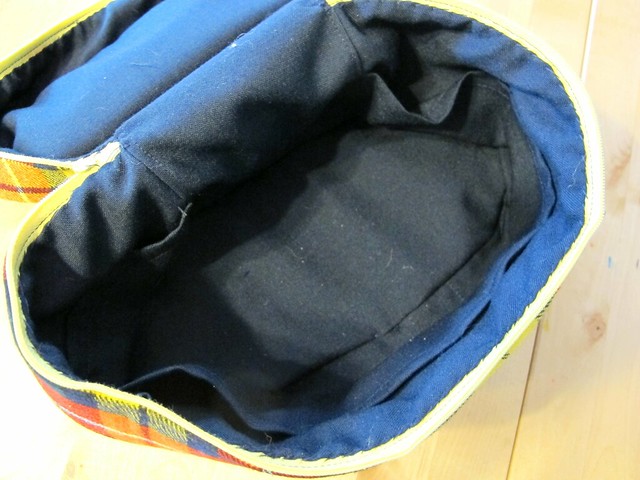
Finally, here’s the inside! There are tiny pockets all around the perimeter and it’s fucking adorable.
I love this thing. It’s tiny, it’s cute, and I am pretty sure I can fit all my make-up/personal care shit in it. Yes! Win for me!
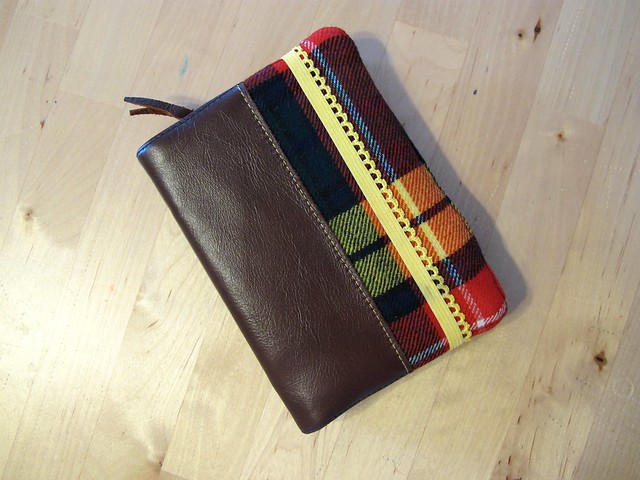
The next thing I made was this little wallet/passport case. I knew I needed something to carry my passport around it, and I also wanted it to include space for cards, cash, as well as a zippered pouch for change. I spent FOREVER looking for something on Etsy – and again, everything was just a *little* bit off from what I wanted (mostly lack of a zippered change pouch, interestingly enough. Excuse me, I need that change in case I have to pay for a toilet!). Argh!
Some more perusing of Etsy turned up this pattern – Passport Wallet from Teethy McGee Digitals. It’s a downloadable PDF with options for including card pockets and a change pouch, an elastic closure, and the whole thing costs $4.50. Perfect!

I made the option with a card holder on one side, and the change pouch on the opposite. Like I said, it is perfect! You can see my passport barely peeking out on the left side (side with my sneaky fingers). The opposite side, under the zippered pouch, can hold my cash. I know there are only 2 card holders – and I totally agonized over whether to add more, but in the end decided that I really only need 2 cards while I’m overseas – my debit card and my driver’s license (yeah, I know, the passport is ID King over there, but I feel weird without my DL!). I won’t be carrying my credit card on my person (it’s literally just for emergencies – like, actual emergencies, not “Ooh girl, are those shoes on sale?” emergencies), my health insurance card is useless over there, and…. actually, those are all the cards I have. Ha!
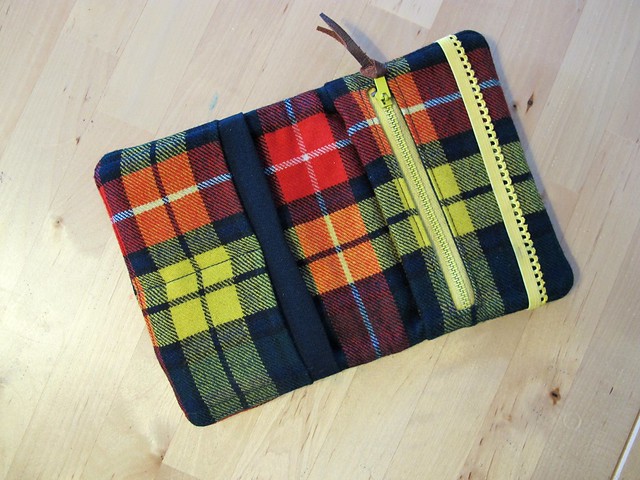
Here it is without the passport because, I dunno. Why not?
This was SO FUN to put together – even with matching the plaid! The instructions, while brief, were fairly straightforward. I decided to interface both large pieces of the plaid – the outer & the inner – so it would have some structure. Which brings me to my confession: I couldn’t find a decent medium-weight interfacing in my stash – everything I have is lightweight – so I ended up using my mega expensive Pro Weft Shirt Crisp Fusible Interfacing because, well, it was on hand and I haven’t even cut into it yet. And hey, it seemed to work all right! Ok, go ahead and stone me now 😛
Anyway, the whole thing is sewn by machine – no hand sewing required – and I added a rectangle of leather to the outside for a more ~masculine~ look. I also made a little leather pull for the zipper – just sliced off a thin piece and fed it though. The elastic is actually lingerie elastic – from when I made my second Soma Swimsuit. Again, it matched! What do you expect from me!?
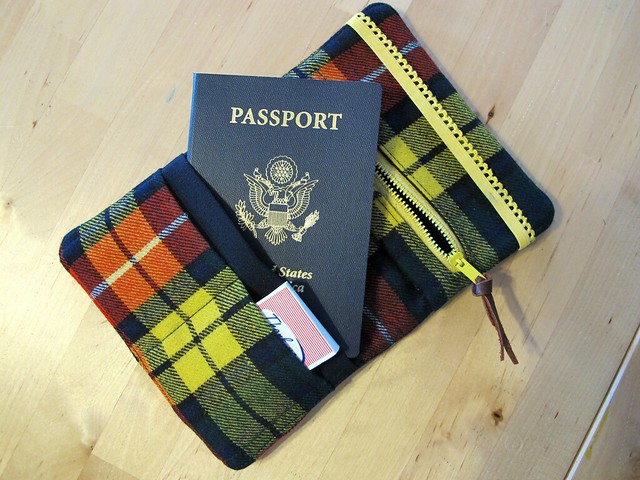
I love that it closes with elastic, so I don’t have to worry about my passport falling out. I love that there is a zippered pouch, so no paid toilets will be out of my reach (yes, I spend a lot of time thinking about toilets, and I’m not sorry about that. When you gotta go, you gotta go!). And, obviously, I love that it matches my make-up bag! Yesss!
I would have loved to show y’all a shot of this with all my cards & such tucked in, but the pockets are shallow enough that you can really get an eyeful of the numbers on them. Sooo, yeah, you get a matchbook. Sorry.
And now, prepare for a let-down because the last thing I made is admittedly pretty boring-
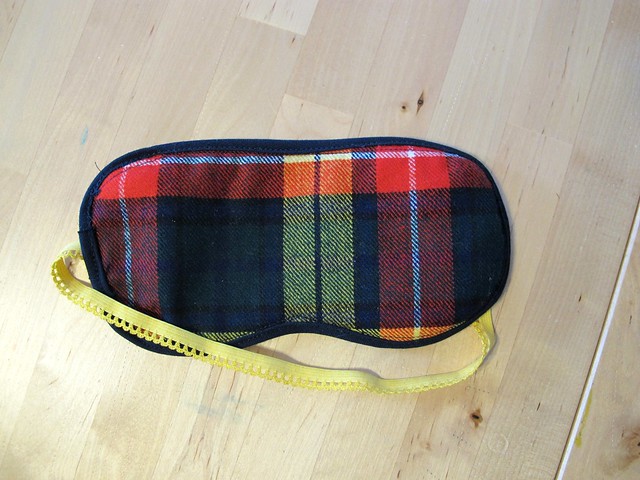
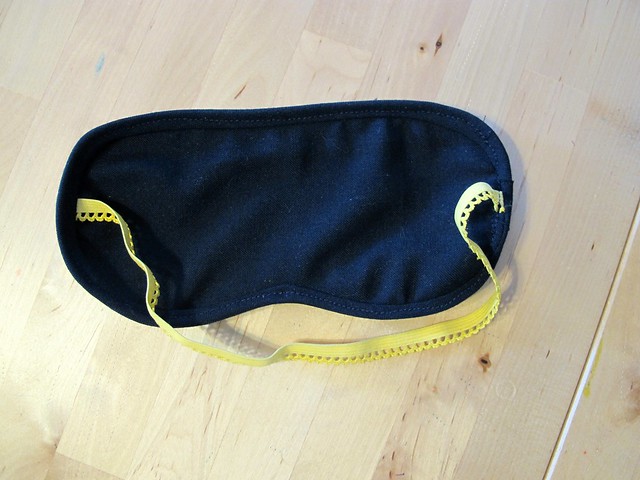
A MATCHING SLEEP MASK, HEY-O!
Seriously easy. I used this free pattern from Instructables (thank you, random Google) and the same fabrics/lingerie elastic with self-made bias tape. I don’t think this one needs much explaining. It’ll be nice for my flights, though- especially that red-eye I take arriving in.
Anyway, that’s it! Super rando post, but these are some pieces I felt I needed, and I’m so happy I didn’t have to buy them (and SO delighted that they match! Yay! It’s the little things, ha 🙂 ). I am dying to make the Portside Travel Set next, but it’ll have to wait until post-London, because I don’t think I’ll have time! Someday, though!
What about y’all? Anyone else here love whooping it up with some random hobby crafts? Don’t be shy, we won’t judge you! 🙂


