completed: colette peony, in a floral explosion

14 Nov

first off, i realize i took way too many pictures of myself making the same pose/face in this dress. i’m sorry. i tried to edit them down as much as possible. i also apologize for the crappy lighting – i think i might be the only sewing blogger who’s not married to a photographer? just me & my tripod! and don’t tell me to move away from the coral wall, or i will hit you with the empty paint can 🙂

moving on…

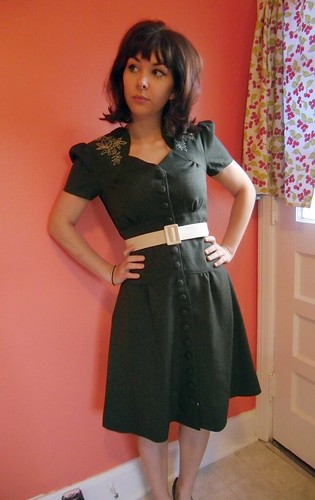
i finished my dress! so happy with the final piece – it is AMAZING! let’s talk shop – i made this using a stretch velveteen fabric. stretch fabric is NOT my choice for this dress, the neckline sits kind of weird & i had to do all kinds of alterations to get it to fit (as it stretched too big, when my woven muslin was a perfect fit). i didn’t realize the fabric was stretch until i received it in the mail… my bad for not reading the description more closely, oh well. i added piping to the neckline & waistline, and interfaced the facing with god ol’ cotton muslin. instead of using an invisible zipper (i was afraid it would bubble under that stretch fabric), i handpicked a lapped zipper, stabilized with a strip of silk organza.

as far as the actual fit of the pattern, me likey! it did require a little tweaking – MAKE A MUSLIN – i had to move my vertical darts over and my horizontal darts up, but the overall fit is good! and it doesn’t use a whole lot of fabric. win win! i cut a size 4 and added a 1/2″ FBA… i think this made the shoulders fit better than if i had cute a size 4.

floral peony

floral peony
using the pockets

floral peony - OMG POCKETZ
omg pockets!

floral peony

floral peony - back
back
the bunching on the cummerbund is due to there being no stabilization at the buttonhole (i used polyester taffeta for my cummerbund, fyi). next time, i will put some interfacing there.

floral peony

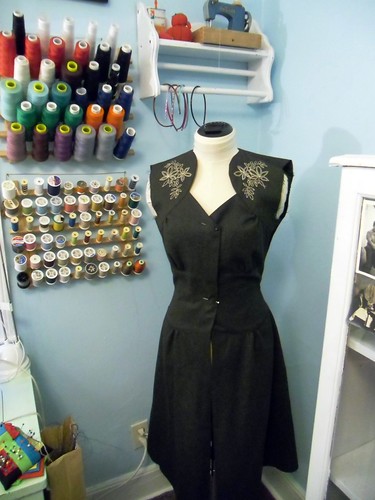
want to see the dress without the cummerbund? you got it!

floral peony - no belt

floral peony - no belt
(no idea what my face is doing here)

floral peony - flat

floral peony - piping at waistline
ooh i love piping.

floral peony - inside
per usual, i finished the edge of my facing with rayon seam binding. i actually found this in my stash – the color is called “toast,” but i think it looks more like “baby shit.” anyway, it matches my dress (should i be unhappy about this?). oh, the red lines are from my markings. they won’t wash off this fabric, awesome.

floral peony - hem
more baby shit at the hem!

floral peony - belt
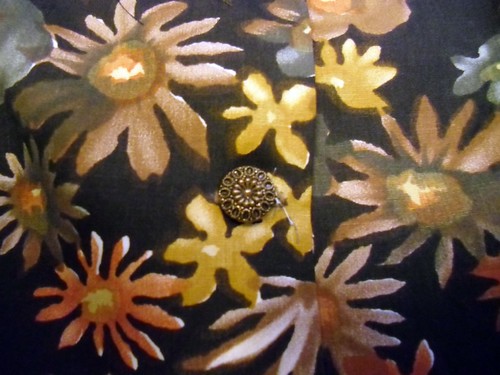
taffeta cummerbund. i love that this pattern only uses one button – awesome if you’re a button hoarder like me and have jars and jars of awesome buttons and only one of each.

floral peony
so yep! that’s my peony! i really love this dress, the pockets, the fit – everything! so much that i’ve already cut out my pieces for peony #2… and i know y’all want a little sneaky peeky, so here you go 🙂

plaid peony

😉

next up: the peony!

11 Nov

first, a sad story.

Photobucket
this is my sewing machine. it is a pfaff 7570 and it is my lifeblood. i paid more for it than some of my friends paid for their first car. i bought this machine – used – at the tail end of 2007, so we are approaching our 4 year anniversary (aw!). to say i love this machine is a serious understatement.

so you can imagine how upset i was when, during galaxy dress construction, the tension started messing up really bad & nothing i did would fix it. i had it cranked up to a 7, which is pretty unheard of for this machine. and on top of that, it was… squeaking whenever i sewed. UHM. MY MACHINE DON’T SQUEAK.

i had a minor panic attack and spent the next 2 days researching where to take it – the place i originally bought it from is sadly no longer in business, and the woman who serviced it last year (yep, i take my machines in to be serviced every year! you should too!) was nowhere to be found. i was starting to think i was going to have to drive to lousiville or atlanta to have the thing checked out – you can’t get a pfaff serviced by any ol’ dude with a tool set. then i convinced myself that i was going to need to actually replace the machine. cue more tears.

i did end up finding an authorized pfaff repair shop within 20 miles of my house (yay!). the guy looked at it and said that, while it doesn’t sound good, it doesn’t sound like i need to junk my machine or anything (double yay!). so right now it’s in the safe hands of the repair shop, and i anxiously await their call. there is some discussion that the woman who fixed it last time may have messed it up, which sucks since i paid her $89 and now i have to pay another $89+ to undo the damage she caused. ugh. anyway, fingers crossed!

in the meantime, i’m using my back-up machine:
back-up sewing machine
it’s a janome memory craft 4000 and i hate it. it is actually a decent machine, it just isn’t my pfaff. and i’m spoiled as shit and all i can think about are it’s shortcomings – like, i have to adjust the tension? ew, my pfaff does that automatically. and why isn’t there a light to show me the bobbin is running out? my pfaff could tell me when the bobbin is running out. i miss my dual-feed. this machine is ugly. i need a needle-threader. etc etc.

anyway, enough whining. let’s talk peony!

oooh u guise, this dress is EASY. easy easy! i started sewing on it last night & it’s practically finished! and it looks GOOD. i can already tell i’ll be making a few more of these 😉

i did start out with a muslin, as suggested by a few people. i’ll mimic them: make a muslin! i decided to try a different approach with this pattern – i usually cut a straight 4 for the bust, this time i cut a 2 and added a 1/2″ FBA. i also found out that i needed to move the darts around a little, as they were placed kind of weird according to my body shape. here is my altered bodice front:
peony alterations
see the ruled paper sections? that’s how far i had to move the darts. again: make a muslin! 🙂

for the 3 of you who live under a rock & don’t read good sewing blogs, jane hosted a giveaway recently for the colette sewing handbook. and i just wanted to rub in everyone’s face that i won! hehe 🙂 seriously, though, if you haven’t picked up this book – do check it out! it is full of great information & beautiful pictures. and PATTERNS. anyway, i mention the book because i used a few of the tips with working on the peony – the diagram for a FBA (a little more concise than fit for real people) and gathering stitches with 3 rows of basting. it is kind of tedious to sew three rows of basting stitches (especially on this stupid machine! ok ok, i’ll stop.), but the results are worth it. setting in the sleeves was SO easy. mine still have a few puckers, but it is mostly from my fabric choice – a thickish velveteen that i didn’t realize was stretch until it was too late. oops.

pockets
the pockets are some cheapie red lining i found in my stash… apparently they grew when i serged them, wtf.

peony progress!
and so far! there is piping at the neck & waistline, which was also found in the stash – a match made in heaven, i must say! i am headed to the fabric store to pick up cummberbund fabric – i’m thinking olive green. and a fancy button, of course. oooh buttons.

what are y’all working on this weekend?

completed: the galaxy dress, a loving ripoff

8 Nov

i know we’re all familar with the roland mouret’s galaxy dress:
galaxy dress - the original
although i did not discover it until last year, it became an instant “must-have.” lucky me, vogue 8280 it an absolute, blatant rip-off, making this dress completely obtainable for my greedy hands.

let me preface this post by saying this pattern is confusing as shit. it’s not necessarily difficult, per se, but the instructions jump around a lot and i noticed many people were complaining that they inadvertently caught themselves sewing up the wrong view. so, fair warning, y’all. i went over the instructions before sewing, circled & highlighted what i needed, and wrote things like “STOP!” and “DON’T DO THIS!!!!1″ under the ones that were unnecessary.

that was my smart moment.
my not-so-smart moment was skipping the muslin. oops. i ended up having to open up the shoulders & remove about 5/8” from each piece. this is an adjustment i ALWAYS make with vogue patterns – why i didn’t make the adjustment to the flat pattern, i have no idea. sometimes i just refuse to learn from my mistakes.

the pattern calls for lining only the bodice and self-facing the flanges with the fashion fabric. since my fabric is a super wooly, super itchy tweed, i interlined them with cotton & faced with my lining. i also lined the skirt and covered the sleeve heads as well. the whole thing is pink on the inside! yay pink! i also stitched down the flanges to the bodice, as otherwise they would have have just been flapping around, and no. the pattern calls for no interfacing or stay-stitching (right??), and i was afraid those seams around the neckline would stretch, so i stabilized them with strips of silk organza – both the bodice neckline & the curves of the flanges. nothin’ sadder than a gapey neckline, amirite?

i used the aforementioned itchy wool tweed (yard sale score – $3 for 4 yards OH YEAH) and watermelon-pink bemberg rayon (left over from my circle skirt) to line. i actually stashbusted the shit out of this project; the only things i had to buy were the seam binding and a spool of brown thread. basically, my galaxy dress cost me less than $10. take that, mouret!

galaxy dress

galaxy dress b00ty
this is a *very* fitted style, as evidenced by the booty protrusion

galaxy dress
i put a lapped zipper in the back since i was afraid an invisible zip would have trouble zipping over those layers. i like the effect, but i got a small bubble at the waistline. ugh.

galaxy dress
had to lighten this photo, but check out the sleeve detail! yeehaw!
also, i know i kind of look preggers here but i promise i’m not 😉

galaxy dress

galaxy dress - sleep cap
here’s a little progress shot – the sleeves are giant & droopy without support, so i made a sleeve cap to give them some lift. i used horsehair crinoline and stuck it between the sleeve & the sleeve lining. the instructions wanted me to put it on top of the lining… why?

galaxy dress - sleeve
happy sleeve!
i ended up tacking my down by about 1/2″ at the sides – they were super huge & too footballesque, otherwise!

galaxy dress
the lining took forever because i had to keep changing out the thread from brown to pink. i think it was worth it, though.

galaxy dress - hem
put a little seam binding at the hem

snap inside dress
the neckline also had it’s fair share of problems (something i could have dealt with if i’d bothered to make a proper muslin!) – it is wide. too wide to wear a normal bra with! i don’t do strapless and i don’t do braless, so i sewed these little snaps inside the V to hook my bra to.

bra snap
and here is the bra i sacrificed to the galaxy dress. it was the most low-cut out of any bra i own, and uhhh it’s teal blue.

so yep! there’s my galaxy dress, and another outfit down for fall/winter 2011! next up: the peony. i’m working on my muslin right now 🙂

galaxy dress

completed: ceylon v2.0

1 Nov

picking up where we left off…
green wool ceylon - progress

this turned out to be one of those “add-on” projects. you know – the kind that start out relatively simple (TNT pattern, easy fabric, no embellishment, etc) until you begin to branch with a bunch of “oooh, let’s add THAT to it!” i decided i didn’t like the way the fusible interfacing acted when i used it last time, so i used muslin as a stabilizer (basting it to the facing pieces, then trimming it out of the seam allowances). i decided to hand-embroider the yokes – this was actually really really easy, just time-consuming (done during my lunch hour over the course of a week or so. and yes, my coworkers are used to me doing this kind of stuff in the lunchroom :B). then i decided that i didn’t like the way the facings looked serged, so i trimmed all the edges in straight lace. i hand-hemmed the sleeves & skirt bottom. and i covered all 16 buttons, using the shittiest coverable buttons i could find (aka in my stash), without a tool. my fingers hurt and i should have learned my lesson from my last ceylon, but nope. at least i used all the buttons up – and i won’t be buying them again. at least, i don’t think so. ha.

i made one small adjustment to the pattern fit – tapered in the waist & hips to a size 0. i kept the bodice at a 4. i love the fit & i didn’t have to make any further modifications after cutting! yay! i also narrowed the skirt a little, to get it to fit on my piece of fabric. i had 2 3/8 yd of 44″ fabric (which is more than a yard less than the requirements on the envelope), but i managed to get everything cut, on-grain (!!), using some very creative cutting layouts & narrowing the skirt side seams.

wool ceylon

wool ceylon

wool ceylon

wool ceylon

wool ceylon

wool ceylon - tag & embroidery
i put a tag in… makes me happy 🙂

wool ceylon - buttons
OH GOD THOSE COVERED BUTTONS

wool ceylon - lace facings
lace-trimmed facing 🙂 you can see it in the sleeves, too – look closely.

green wool ceylon - embroidery detail
embroidery detail – forgot to take a close-up on the finished dress, whoops
here is the embroidery pattern i used – it’s free! i used 2 strands of cream-colored embroidery floss & outlined everything in a backstitch. there are a few french knots, those used all 6 strands.

wool ceylon - lace hem
lace hem

oh! i also made a covered belt to wear. it is the same shade of cream as the embroidery. i used muslin and a self-covered kit. i had high hopes of putting in cute eyelets & making the whole thing super jazzy & special, but i didn’t realize i needed a tool & those eyelets were shitty 1-piece eyelets anyway and now i’m pissed off. so have a slidey belt:
wool ceylon
what do you think? can’t decide if i like it or not. i wanted a green belt but i definitely did not have enough green wool left over after cutting out the pieces.

overall, i’m very pleased with my new dress. the fit is perfect & the wool is very warm – which is great for a southerner like me who thinks anything below 60*F should be against the law :P. the only thing that bothers me is the lace is white, and my embroidery is off-white. i considered tea-dying the lace, but it’s polyester & also i’m lazy.

special thanks to my kitchen wall for being such a gorgeous & colorful backdrop xoxo

wool ceylon

clover muslin #3

28 Oct

continuing my saga with the clover, here is muslin #3. yes, i made a second muslin and no, there are no pictures because i made them in brown fabric & you couldn’t see ANYTHING except the fact that i was wearing shorts (shorts muslin ftw!).

i have stopped hyperventilating about using up my stretch fabric in a thousand muslins, as i had a fabric epiphany the other morning & realized i had an entire stack of this awful polyester that i can’t seem to get rid of for some reason. there is just the right amount of stretch, and several yards of it – which, if i remember correctly, cost me something like $5 for the whole stack at a thrift store. why i have kept it for so long, i can’t tell you, except that obviously fabric hoarding *does* have it’s benefits 🙂 so anyway, i’ve got plenty of fabric to keep making muslins. yay!

to be frank, the only thing keeping me cranking these out is knowing that once i get it perfect, i can use this pattern over & over… and also as a block for other pants-fitting needs.

i don’t think i’ve quite reached the wearing point yet, but i know i’m close. what do y’all think? so far i have shorted the front crotch by 1 1/4″ (I KNOW. and it looks like i need to shorten it more!), added approx 3/8″ FBA, and lengthed the back crotch an extra 1/2″. oh, and i tapered the legs about 1/4″ down the sides. excuse the lumps at the hips – that will be smoothed out in the final pattern.

clover muslin #3 - front
i may take the waist in a smidge more as it’s the smallest bit too loose

clover muslin #3 - front
i still get a little excess when i stand a certain way… not sure if that’s something that can be adjusted out, or if it’s just the nature of wearing tight-fitting pants like these.

clover muslin #3 - side

clover muslin #3 - back
excuse the panty lines, but hey – the fit looks good back here, no? can i also add that i think it’s hilarious that i need a FBA top & bottom? hahahaha

these were originally going to be a ~wearable muslin~ but i don’t think i’m quite there yet. i do see a light at the end of the tunnel, though!

in other news, here’s a sneak peak at another project i’m working on:
green wool ceylon
ceylon in green wool. it’s been on the backburner for a week or so because i decided to hand embroider the yoke on a whim. i like the way it’s looking, though!

nashville flea market? don’t mind if i do

25 Oct

i caved into internal peer pressure this weekend & went to the flea market. at first i immediately regretted my decision – october is traditionally the busiest month for our local flea market, and this year was no exception. the place was PACKED – moving was very difficult & i kept running into little old ladies who thought it was perfectly acceptable to just straight stop in the middle of the moving aisle (forreal, who thinks this is ok? anyone?). i eventually figured out that people were staying out of the sun, so as long as i avoided the air-conditioned buildings, i avoided the crowds. yay 🙂

anyway, let’s talk loot.

first, some patterns! i got all 4 of these for $3:
Photobucket
simplicity 1799

Photobucket
vogue 5381. someone on ebay is asking $53 for their copy lolwut. also, i definitely have the 80s version of this pattern as well. what can i say, i’m a pattern hoarder.

Photobucket
advance 2540. can i say now that i’m kind of weirded out that the vintage pattern wiki has a different envelope picture for what is obviously the same pattern? uhh…

Photobucket
mccalls b-100. now this is a weird one. it’s a basic sloper pattern, except the pattern is printed on something sturdier than tissue (it feels like mediumweight interfacing, tbh) so you can try it on and make adjustments. after you have fitted the sloper to your liking, you can make view B or C, or use the sloper to adjust a different pattern.

Photobucket
Photobucket
i’m bummed that it’s missing the instructions, but meh.

Photobucket
fabrics, $4 for all. the prints are cotton, and that big dark blob is actually a deep purple speckled linen.

Photobucket
lingerie elastic, 10 yards for $1, or rather, 40 yards total for $4. can’t wait to make slips & undies!

Photobucket
serger thread, $5 for the whole set. he actually had a LOT but i limited myself to only buying groups of 3. except for that orange. i needed the orange, wouldn’t you?

non-sewing related purchases:
Photobucket
DIS SUIT & fur collar (the collar isn’t part of the original suit, but doesn’t it look nice! i bought it from the same vendor), and this shirt (that i can’t seen to get a good picture of), $7 for all

Photobucket
love my vintage suit! it is really well-made (100% wool, fully lined, bound buttonholes) and it fits me perfectly. none of my friends like it, though, trolololol

totally randumb, but i also found snes control pads for $5 apiece:
Photobucket
YES.

in other sewing news, i have yet to perfect my pants muslin. i traced the pattern & pulled a GIANT horizontal tuck (like, more than 1″ sup short crotch) and added a small FBA to the rear. muslin #2 still needs work; it’s barely passable, but sarai’s clovers on the coletterie are totally smooth so i will keep chugging along. meanwhile, my muslin pants are now muslin shorts and i am running out of stretch fabric, hey-o!

clover muslin – unflattering pictures, ahoy!

21 Oct

internet, i know we are close, but we are about to get real close with this post.

Photobucket
starting with my butt.

i just finished up my clover muslin, and i need help with the fitting! help! help!

Photobucket

there are lots of wrinkles at the crotch & sides, and the butt is straining. the waist & legs fit great, as do the hips (minus the butt area). i’m thinking i need a swayback adjustment, which is just confusing me because i’ve *never* had swayback issues with clothing – both patterns & ready to wear. huh.

here, have some more pictures.

Photobucket

Photobucket

Photobucket
this does not show in the pictures, but there is a small pool of excess fabric at my lower back.

what do y’all think? swayback or something else?
also, if it’s a swayback, how much am i supposed to add/remove? the diagrams on the coletterie are great, but all they say are slash and spread. need some guidance here, plz.

on a related note, the fabric for these pants is a mostly-decent stretch poplin i bought from fabric mart for something like $2/yard. it is kinda sorta see-through, which means future pants will be underlined – not a problem, since the pattern called for about 2x as much fabric than actually used wtf. also, no love for fabric mart – i had some problems with my post office, which resulted in the package being returned to sender (ok, i put the wrong zip code on the address because i am forgetful), and when i emailed fabric mart for a solution, it took them nearly a week to get back to me. in the meantime, the post office found the package, corrected the address, and had it shipped to me in less than 24 hours. i am not planning on ordering from fabric mart again.

enough about fabric mart, let’s talk about my pants!

completed: colette violet blouse

12 Oct

i know what you’re thinking – how the heck did i finish this blouse so freakin’ fast!? lol if by “fast” you really mean “slow.” let’s start this post with a confession: i started this blouse over a month ago, stitched up to the point of near-completion, then set it aside for other projects. for a MONTH now it’s been staring at me, one-sleeved & pathetic. i’m so glad i got this out of the way – i was beginning to think i could actually hear it whimpering!

violet blouse

so here is my second piece for my fall wardrobe! colette’s violet, made with a vintage cotton-rayon blend (that i picked up for a dollar! nyah nyah!). i interfaced the facings & collar with muslin, rather than fusible interfacing – i hate that stuff! hate hate hate! the inside seams are bound with self-bias tape, and i rearranged the buttons to include only 6, since that’s all i had and i reeeeally like these buttons a lot.

violet blouse - up close & personal

i only made a couple of changes to the fitting – for some reason, the darts were hanging out next to my underwire. lolwut. of course, i’d already sewn up/serged the blouse (aka my ~wearable muslin~), so i unpicked as best i could & repositioned them to reach the sky. they still aren’t *quite* in the proper place but i just can’t deal anymore today. i also took in the side seams a little – maybe another 1/2″ or so?

violet blouse - side

to be honest, i’m not thrilled with the fit of this blouse. i don’t like the loose fit, i’m more of it if-i-can-squeeze-into-this-then-it-fits kinda girl. i may end up redrafting the back piece to lay un-gathered & then pop a few vertical bust darts in the next version.

violet blouse - sleeve

violet blouse - back

violet blouse & ginger skirt
here’s my outfit – with my ginger skirt!
my expression in this picture cracks me up. “well hi there!”

flat violet

handmade :)
remember those handmade tags i was working on? snuck one in 🙂 i used speedball screen printing ink & muslin.

button!
awesome buttons!

bias-bound facing
self-bound in bias tape

violet - untucked :(
untucked. i don’t plan on wearing it this way – see how sad it makes me? so sad!

FUN FACT: this pictures were taken in the same room as yesterday’s pictures. it is amazing how different this wall color looks depending on the light! today is rainy & grey, meh.

aaand i’m outta here.

violet blouse & ginger skirt

completed: tweed circle skirt

11 Oct

and i’m back to sewing! betcha thought i was gone for reals, huh? too bad!

who participated in the circle skirt sew-along? i had a little issue with time – aka, life got in the way – so i wasn’t able to finish in time for the first ’round of circle skirt party 2011. i was able to finish last night, though! and i’m wearing my new circle skirt today! and lucky me – i spilled coffee all over it this morning so it even smells good! /sarcasm.

circle skirt
this was a really easy pattern to draft & put together. i was able to smoosh mine out of one piece of fabric & eliminate any side seams (well, on the shell fabric – the lining was only 45″ wide, so there are seams in there!). although i was a tiny bit ambitious with my original length, and ended up cutting about 5″ off the finished piece. yikes! longer skirts & i just don’t mix, i’m afraid.

my shell fabric is a lovely wool tweed i bought at the flea market for $3. it actually has a herringbone pattern, which you can see on the swatch. it is lined with silky bemberg rayon – my favorite! i went with a pretty pink because, well, pink lining! the zipper is a faced slash zipper, hand-picked. i ran out of my original tweed fabric (or, rather, i had already done away with the scraps because that is how i roll), so it is faced with brown cotton… which i’m thinking was probably for the best, as the tweed is a slightly loose weave & tends to unravel. dropping in the lining was easy: i slashed a zipper opening & slipstitched it to the zipper. the top was basted to the top of the skirt shell, which is covered by the waistband. the lining is hemmed with a rolled hem and the shell has 2″ horsehair braid all around the edges – i used a little over 4 yards of braid! and i hand-stitched it all because i clearly have nothing better to do with my time.

circle! skirt!

circle skirt back

obligatory twirl photo
lol ~twirl

pink lining!
lining! 😀

circle skirt
i really love the shape the horsehair braid gives the hem. it has a very nice subtle flair. i actually have a petticoat i made using sugardale’s tutorial (which is AMAZING, by the way. this is a good ‘un, people!), but i prefer the way the skirt looks with the braid. also, i made my petticoat with horsehair crinoline, so it has great body but EW ITCHY.

so there you have it! my first circle skirt!

~lol omg~

this post has nothing to do with anything

7 Oct

well well well, blogland – it’s been a while, hasn’t it? wanna see what i’ve been up to?

well, firsties… i cut my hair off. and then i dyed it black-brown (clearly, i wanted it to match my soul):
Photobucket
i must say, the partial lack of hair in my life has been awesome. it definitely has more bounce to it and my pincurls actually last all day now. and headbands are pretty much the cutest thing ever on this coif. yay short(er) hair!

my s10 pick-up bit the bullet – hard – and i had to scrap it (the timing belt broke & ripped through the engine, if you’re curious). but it’s ok, because i bought a new truck. meet ruby:
Photobucket
and she has air conditioning! my first air conditioned vehicle in over 6 years yay!

i also made a halloween costume for a friend:
Photobucket
you can read my pattern review here, although there’s not much to say. i used simplicity 2853, with minor modifications. no, i didn’t make the hat. i might have my moments of crazy, but they don’t involve making hats!

Photobucket
i also made this wreath, to put on my front door. talk about a moment of crazy.

oh, wait, i’m supposed to talk about sewing here, huh?
let’s discuss simplicity’s new pattern line. actually, the whole line is really boring & yawn-inducing, let’s talk about 1947 & 1948 instead.
Photobucket
rather, i just want to talk about the guy with the purple hair. what is going on here? he looks like he wants us to believe he is going to beat somebody up (i personally think he would run away crying if you challenged him to a fight.

Photobucket
LOL WELL OK THEN.