
I know.
I already made a travel backpack. And in all honesty – a pretty nice one at that. It has been my little tag-along for every adventure I’ve gone on since finishing it, and I get a lot of compliments on it from strangers (and a lot of boggled minds when I reply with, “Thanks, I made it!” GREAT feeling, btw! ;)).
I do love that backpack, but it’s definitely more suited to be a day backpack – it’s very small, so great for walking around and exploring a new city, not as great for a long plane ride. It’s also very light, so I’m a bit nervous to stuff it too full. Which honestly isn’t too much of a problem, since it’s too small to stuff really full in the first place 😛
So, I made another one. Two backpacks in one year! I am on a roll here, you guys.

I actually had no intention of making another backpack. Like I said – I like the little rainbow travel one, and I’ll continue to use it. I have been planning for my trip to Egypt in January (OMG IT’S SO SOON OMG), and thinking about what I might use as my carry-on for the flight. I had been lurking around at the backpacks in the stores, but not actually planning on buying anything. About this time, I got an email from niizo, asking if I wanted to try and review something from the shop. My immediately first thought was, “Naw.” Until I actually looked at the stuff that was available. The patterns available are really nice – they looked a lot like the stuff I was seeing in stores. And the fact that they also had kits that included everything needed to make the pattern – pretty tempting (sourcing all those materials can be a PITA, especially if you have to order half the shit online). Further, Amy mentioned in her original email that her instructions were super user-friendly and the patterns were professionally designed. I thought about it for a couple of days and decided to go for it.
It was hard to decide which kit to receive (like I said, I had backpacks on the mind but duuuude I love that Sunny Day bag, too!), but eventually, practicality won out and I chose the Freedom Backpack Kit in the Iron Gray colorway. My finished backpack totally looks like the products photos, but, whatever, I like the grey haha.
Once I chose my kit, I received the package within about a week. I don’t know the specific day as I was in NYC while it was delivered, but it was definitely less than 10 days. I wish I’d thought to take a picture of the packaging, because it was all packaged together quite beautifully – but I eagerly ripped that shit open the second I laid eyes on it AS I AM WONT TO DO, so, sorry. The fabrics were all neatly folded and labeled, and all the accessories were split between a couple plastic bags. If you look at the listing, you can see what the kit includes – but it’s literally everything you need, except the thread & needles (and sewing machine, obviously). They even include waxed thread & large needles for sewing on the leather pieces. The zippers already have the big leather pulls attached (with the stoppers cut off – since you’re inserting the zippers into something, you don’t need the stoppers. They are tagged in place to the zipper tape, so you accidentally yank the pull off and ruin the zipper. A very thoughtful touch!) and all the little leather pieces have the edges finished and the stitch holes pre-cut. It’s a really nice kit – and pretty close in cost to what I paid for my other backpack, except that I didn’t have to source all these materials individually!
The pattern is a PDF that you print off and tape about half the pieces together (they are individual, so you don’t end up with a giant sheet of paper that you then have to cut down). There isn’t a test print measurement square, however, the dimensions of the piece are printed on every pattern piece, so you can double check to make sure you printed the correct size. I scaled at 100% and everything was perfect. I spent the first evening taping and cutting – put on some good music, spread my fabric out on a single layer, and traced around the pieces with a big piece of wax so I could make sure they all fit on the yardage provided. I followed the cutting layout in the pattern and ended up with very little waste, and a very satisfying pile of cut pieces.


Sewing this backpack was INCREDIBLY fun. I do not consider myself a bag maker – like, I’m not super skilled at it, and also I kind of hate sewing bags (which is why I carry a purse that I actually paid money for, instead of making one. Also my wallet. Also all my tote bags. Sewing bags is borrrrrring). But I honestly, truly enjoyed nearly every moment of putting this thing together (I am sorry in advance because this review is about to get super gushy hahaha). The instructions are really good – they include photographs (not drawings) and are very simple and direct. The pieces all fit together perfectly. I had no problem deciphering or following any of the steps, and I was quite impressed with how nice the bag turned out. I had so much fun sewing this thing, it ended up being the sort of project that kept me up way past my bedtime (and also skipping dinner) because I was enjoying myself too much to stop. Having sewn another backpack just a few months prior, the finishing of this pack is much much much more professional than the other pattern. Not that the other pattern is bad – this one just definitely has better instructions and a nicer finish.

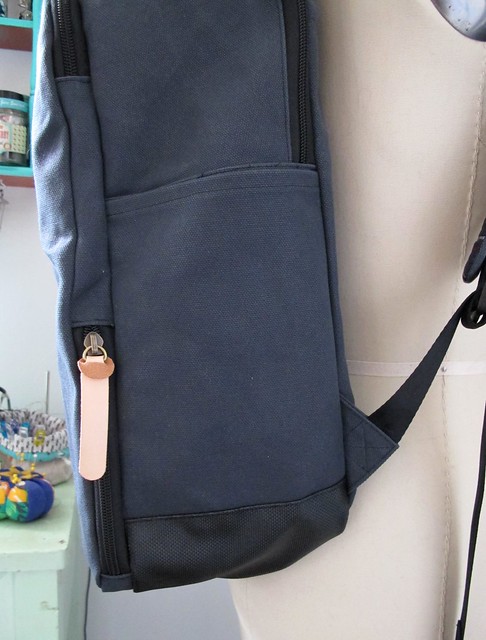
It’s a little difficult to see in the product photos, but there are a lot of nice touches that really elevate this project. The plaid lining (which is waterproof cotton – all the fabric in this bag, including the lining, is waterproof) is under the hood flap and also at the underside of the straps. There are two zippered compartments under the hood flap – the back compartment is the size of the bag, with one large pocket (sized for a laptop) and two smaller pockets. The front compartment is as wide as the backpack, but only about half as deep, with some smaller pockets inside.
The bottom half of the front compartment is also a pocket, with a little sneaky side zipper. I imagine this would be a great place to hold stuff like a change of clothes (for international flights) so you they are handy but also out of the way when you’re digging through the rest of your shit.

The straps are padded with some plastic-y foam stuff (I dunno what it is, but it’s way more comfy than quilt batting haha), and then the nylon webbing is sewn directly on top.
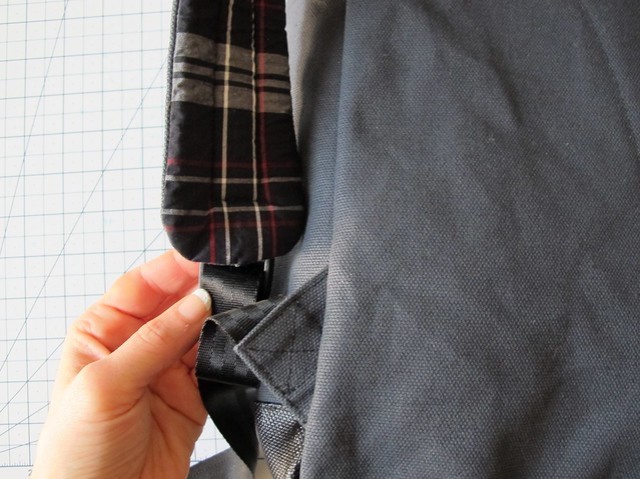
The straps are then attached to the bottom of the backpack with this little triangle tab thing, which is a nice feature.

The back is padded with the same foam stuff, and topstitched in place. You can also see the piece that covers where the straps attach at the top.
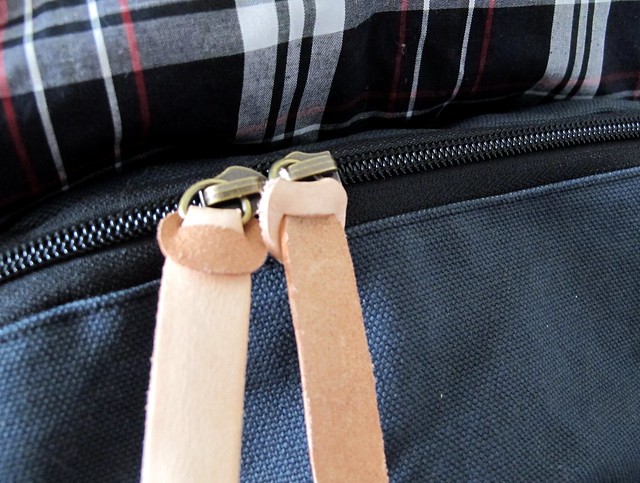

I love the little leather details. I sewed them on with the included thread & needles, using a double needle stitch – which the pattern includes a link to video instructions that you can follow along.

Finally, there are two side pockets that can hold your water bottle.

This is the inside of the back compartment – one side of pockets.

Here is the other side of the same compartment. Not sure if my backpack is drunk or just leering in this photo.

What’s awesome about this backpack is there is NO INTERFACING involved! It gets its shape from the heft of the outer fabric (which is a waterproof cotton canvas) and that back padding. I didn’t put anything in this backpack for these photos – it’s empty and standing up on it’s own just fine. The downside to this is that it was quite difficult to manipulate under the sewing machine once I got to those very final steps of putting it all together – it’s just really bulky, and hard to push down flat. I managed, just by going slow and being careful. Don’t try to rush that part! It was also a big beast to turn the thing right side out once I was finished (the bottom lining is left open and slip-stitched shut), but obviously I was able to get that eventually… it just took a bit of patience.
If you’re interested in trying this backpack – or anything similar to this – here are my tips:
– An 80/12 needle works fine, although a heavier one might be more ideal (I only had 80/12’s on hand). I only broke one needle during the making of this, and it was at the very end.
– Some of the layers get too bulky to pin together, so I bought a pack of Wonder Clips and that was immensely helpful. They’re not as flat as pins, so you’ll have to pull them off earlier than usual to get it under the machine, but it’s worth it to be able to at least hold the layers together temporarily.
– The cotton fabrics press, but that waterproof nylon lining does not. For the tops of the pockets, I marked a 3/8″ line with chalk as a guide for my first fold, and then just doubled it for the second fold.
– The pattern includes measurements in both centimeters and inches – I found it waaaay easier to just follow the cm measurements.
– The seam allowances are included in the pattern, and they are quite small. Depending on what part you’re sewing, they range from 3/8″ to a little under 1/4″. For those teensy seam allowances – especially when I got to putting the entire thing together, in all of it’s bulky glory – the 1/4″ foot on my sewing machine was a LIFESAVER. I just moved the needle closer to the edge blade, to make the seam allowance less than 1/4″.
– Some of the backpack instructions might seem kind of weird… just blindly follow them, it’ll all make sense eventually.

Overall, I have nothing but positive things to say about the backpack – both the experience putting it together, and the finished product. I was going through a little bit of a sewing slump, and this definitely revived my mojo! It was really entertaining to sew something that wasn’t garment related. I can’t wait to take this thing out and use it for my upcoming trip! It certainly feels much sturdier than my mini travel backpack, and I think it looks really professional.
As I mentioned, I did receive this backpack kit from niizo in exchange for a review post. I know this review is pretttty gushy, but I am honestly that excited about it (don’t worry, I’ve gushed about it to everyone I know irl as well haha). 10/10, would absolutely make another pattern from this shop again.
One last thing – niizo is running a winter sale through next Monday, here are the details on that:
Grateful Winter Sale on niizo Etsy shop
12/12 – 12/18 Each day we’ll release a surprise coupon code at 0:00(GMT-5)
++++ How to Get the Coupon ++++
Follow @niizocraft on instagram.
Watch the short clip to find the out the coupon code in the video!!
Each coupon code lasts for only 24hrs.
If you miss it, it’s okay, tomorrow is a new day.
Now, who’s got a hankering to make a backpack? 😉


What a wonderful backpack, Lauren! And it looks just like the pictures in the shop! They say they mail it worldwide from Taiwan, I’ll check the shpping costs to Spain. I think this is the ONLY way I am going to make mysef a bag, I do not like it neither, but the fact that you have all the small pieces in the kit (instead of shopping for every little thing) is definetly inviting!
Thank you so much! Yeah, the kit is really what sold me – and I think the price is quite reasonable (I can’t speak for the shipping charges, but even if they were $20 that’s not so terrible for everything being included). The materials are very nice and it was amazing to not have to source all that stuff by myself!
You’ve made another awesome backpack, Lauren. I’m just now putting the lining into the first backpack that I copied from you. Although it has taken me FOREVER, I’m thinking of doing another backpack copy. I’m not a purse/bag maker either, but this one looks tempting. There’ll only be one in 2016 for me, but 2017 is another year.
Oh man I hope you do copy this one! We can be backpack twins foreverrrr 🙂 also, as much as I liked making the original backpack – this one was way more fun to assemble!
This is just incredibly WONDERFUL — great job! And I would think it would be just the best travel companion (it would never want to go in a different direction than the one you’re planning…. 😉 ).
hahaha very true! The best kind of travel companion!! 🙂
Well, shit. Now *I* have a hankering to make a backpack!
Woohooo my job here is done, then! 😉 haha
THIS BACKPACK IS LIFE! Ok, that may be too intense, but I totally want one of my own. Thank you for the great post!
Not too intense, that’s exactly how I felt while I was making it haha! Seriously, I can’t remember the last time I got so sucked into a sewing project, but it was a blast!
Every time I see a cool back pack, I think, well, yes I could make that all because of you :).
Yes, I’m going to have to make one after the holidays because you have me PUMPED.
haha it’s really not to hard – and a nice little brain puzzle that’s different than the brain puzzle you get with making garments. I like it! I think you’ll really love it too 🙂
This bag is gorgeous! I actually enjoy making bags, but I don’t enjoy carrying homemade bags – they never look as professional as I want them too. I’m really intrigued by her kits. I love the look of the canvas! I’m thinking I might pick up the hobo bag kit when I get paid on Friday.
I completely understand what you’re saying – I think that can be a problem with handmade bags. With the stuff that’s intended to look handmade – like project bags, totes, things that are quilted, etc – it’s fine, but sometimes you don’t want your purse or backpack to look like you made it (which is why I gave up on my bag-making journey and just bought a leather purse haha). But I think her kits + patterns definitely don’t look handmade, and I love that. The specific materials really elevate the whole project.
Lauren, thanks so much for sharing this make! I just bought 2.5 yards of striped heavy canvas from miss matatabi and I’ve been eyeing bag patterns for travel, but it’s hard to decide what’s actually going to be practical, you know? I’ve got a carry-on suitcase so a duffle is out, and my current backpack is too small, so I think one of these might be the clear winner! Do you think this pattern is easy to follow even without buying the kit?
I found the pattern very easy to follow; the part about the kit that makes it easy is just not having to source all those materials 🙂 Otherwise, the instructions should be the same regardless!
Also, duffles are goooood to have for travel, fyi! You can stuff it in your smaller suitcase, and then if you need the extra space – boom, two bags 😛
Ah, good point about the duffle. I’ve got a HUGE, ugly one right now but maybe if I have leftover fabric, I’ll put it towards a cute one!
This is one of those times I’m thankful for blogger reviews as a marketing tool. I’ve been thinking about making a laptop backpack and this one pretty much fits the bill!
Naturally, you’ve done a great job and should be proud of your work!
Yeah, sometimes the endless reviews/marketing can get REAL aggravating (esp if they are constant “This was free! It was lovely! I recommend it!” like come on you did not even pay for that), so I try to be aware of that and only accept things I’d buy anyway. But at the same time, I think it’s a great tool for promoting really awesome products – and much more effective than, like, an ad in a sidebar. Especially when they come up at a time when you’re already on the hunt for something similar 🙂 I love that!
I love your backpack and immediately jogged over to visit Niizo to investigate. She really has the right idea with supplying everything you could possibly need to sew up a bag. What a great gift – that’s what I’m thinking about mostly – a little late for Christmas but there’s lots of birthdays coming up in the new year. Thanks for another great post Lauren 🙂
You are so welcome! I’m glad you enjoyed the review 😀
your backpack looks amazing and i have no self control whatsoever so i just went and got a purse kit. backpack will follow once they’re restocked in the grey fabric. i had no idea these guys exist and yet they’ve made a kit for EVERY BAG I WILL EVER NEED. thanks for leading me to them!!
RIGHT?! I want to make ALL of the bags they carry! The designs are so good, and now that I’ve had a good experience with my first kit, ain’t nothin gonna stop me now haha!
Wow! It looks absolutely professionally made!
This is bitching! Looks so pro. I like making bags but sourcing all the bits is a PITA, so this is very appealing, and the designs are so nice and modern. Just added one of their kits (belatedly) to my Christmas list!
Thank you for sharing this , is a fab idea to purchase in a kit, love all the details, love the sunny day bag too, very tempted