
WHO’S READY TO WATCH ME FINISH A BRA? 😀 😀 😀

Just to recap – I’m sewing the Orange Lingerie Boylston Bra on my Spiege 60609 sewing machine. If you missed the first part of this project, you can see see that post here. In this post, I’ll be going over adding all the elastics and finishing. You know, the fun part! There are a LOT more pictures in this post compared to last week, so – sorry in advance 🙂
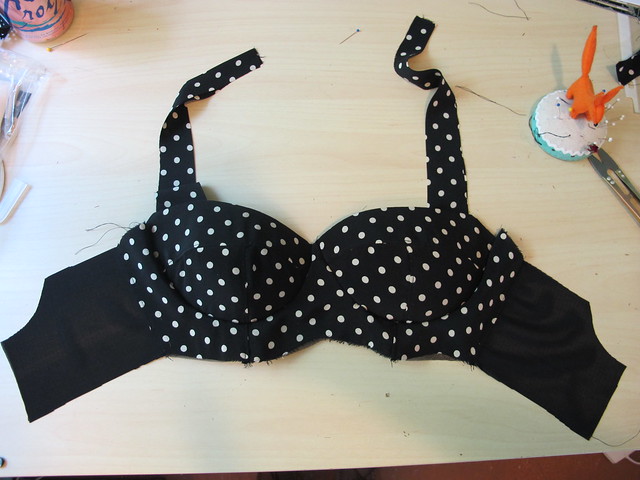
I finished last week with the main parts of the bra assembled – all the fabric pieces are accounted for, and the underwire casing has been partially attached. Now we are going to sew elastic along the bottom edge of the bra!
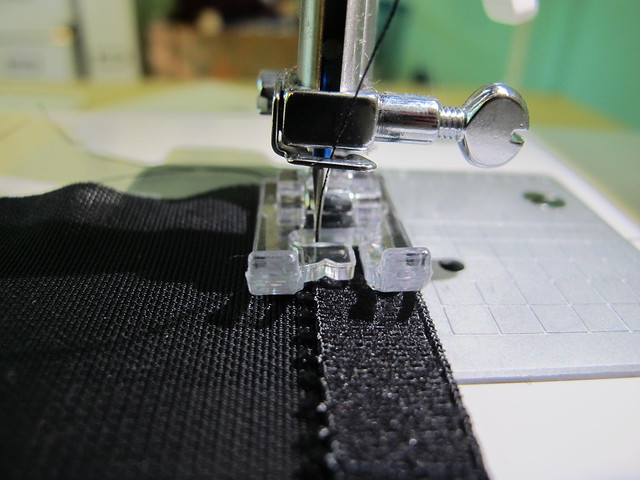
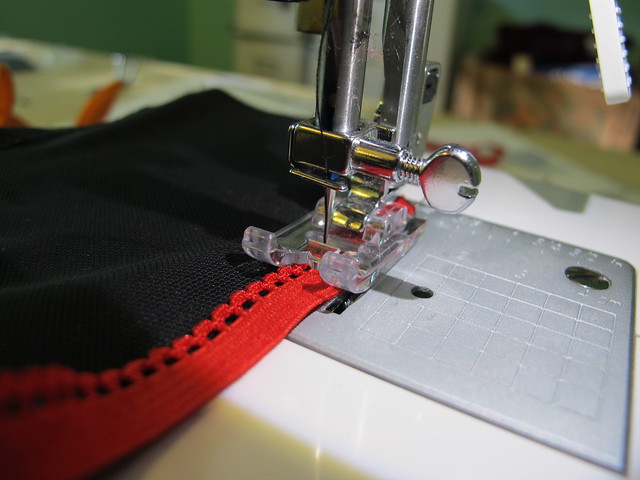
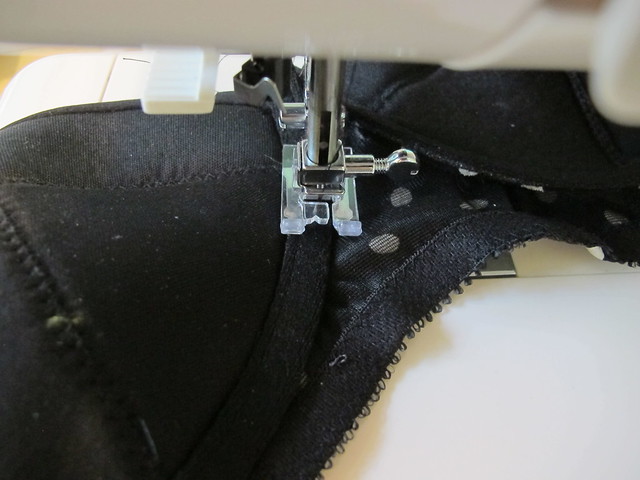
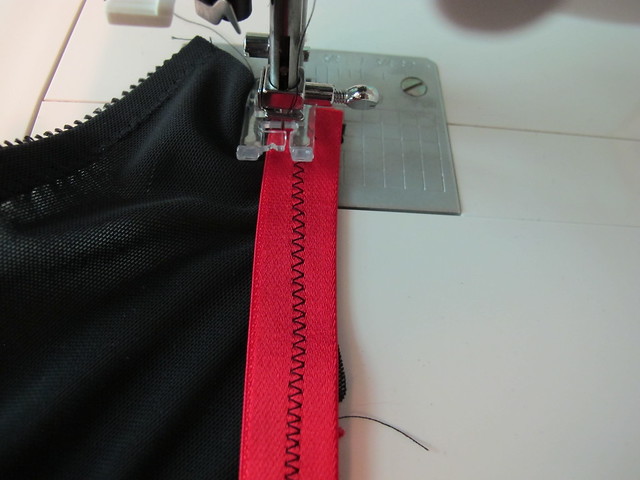
The elastic is placed on the right side of the bra, plush side facing up and the straight (not picot) edge lined up with the raw edges. For any sort of elastic that has a picot/lace edge, you want to stitch reeeeeally close to that decorative side – like practically sewing on top of it. Here is an extreme close up so you can see how close my needle gets to the picot edge. This step is sewn with a zigzag stitch. I just use a normal zigzag – #226 on the Spiegel 60609.
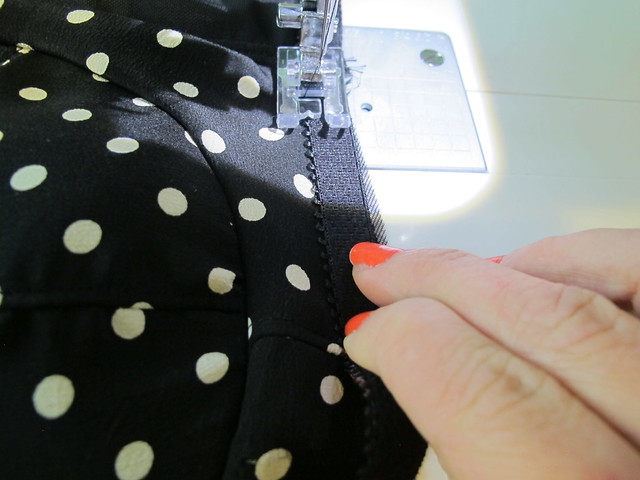
For the most part, the elastic is sewn down flat without any stretching. The only time you’ll want to stretch for this part is underneath the cups and along the curve of the bridge – and then, only stretching SLIGHTLY. If you stretch too much, the bra won’t fit right (ask me how I know). There does, however, need to be a slight amount of stretch in these areas, to help the elastic curve when it’s turned to the inside of the bra.
Here is the elastic after it’s been sewn down with the first pass.
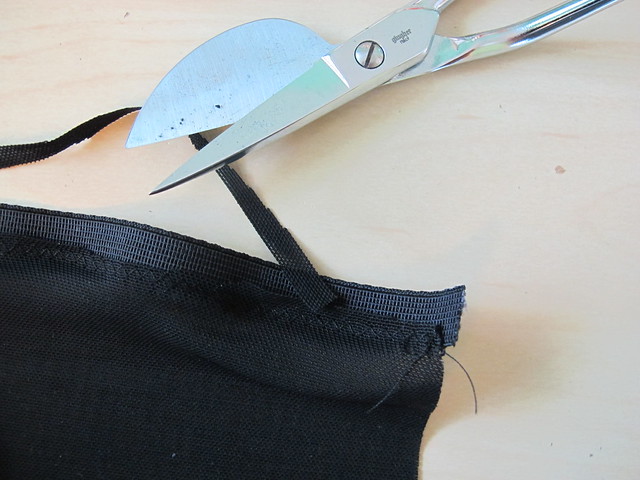
Trim down any excess fabric up to the stitching line. I like to use duck billed applique scissors because it makes things a little easier, but any scissors will work as long as you are careful not to cut a hole in your fabric!

Then you flip the elastic to the inside of the bra, and stitch again with a zigzag stitch (again, I use #226, although most instructions tell you to use a 3 step zigzag. I have never been happy with how that stitch looks on my bras, so I use a standard zigzag! Personal preference!). You want to get right along the edge of the elastic – generally, you can feel this through the fabric (or see it through the power mesh, which isn’t the case here haha). When you get to the parts that had the elastic stretched – under the cups and at the curve of the bridge – gently stretch again while you sew.
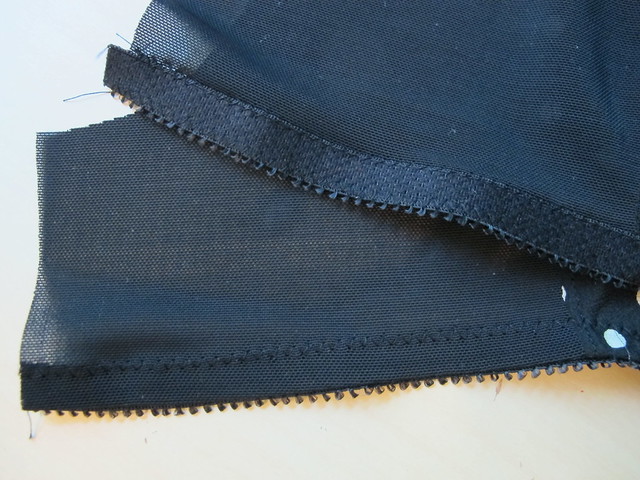
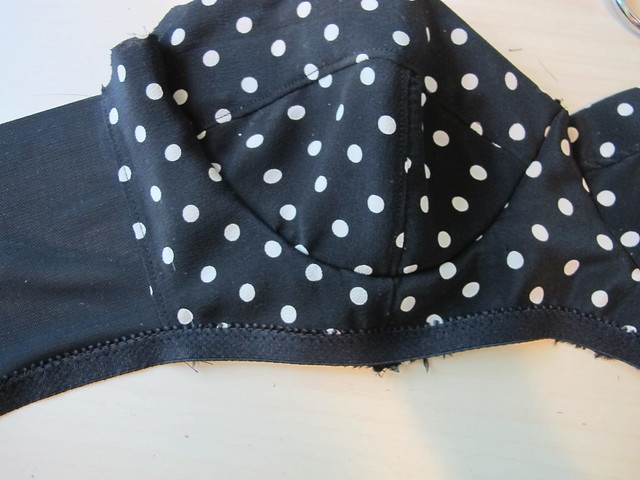
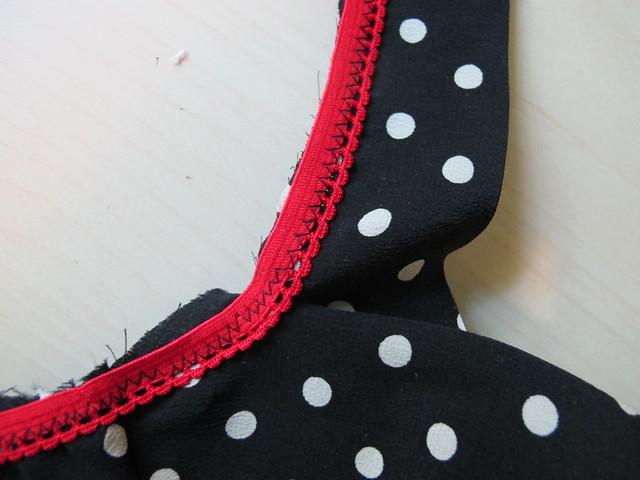
Here is that bottom band elastic once it’s been stitched down completely. Yay!
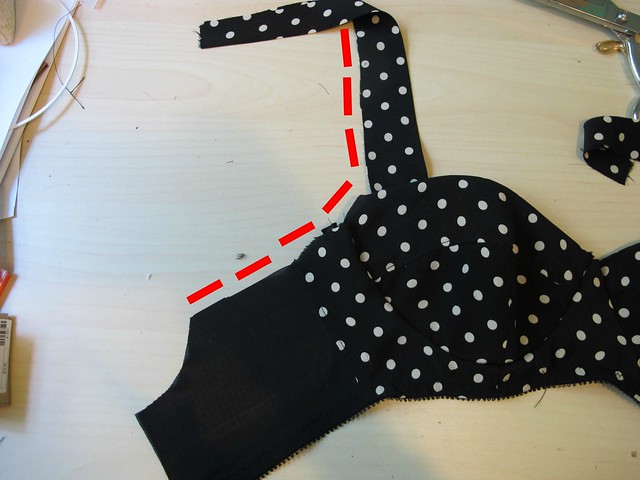
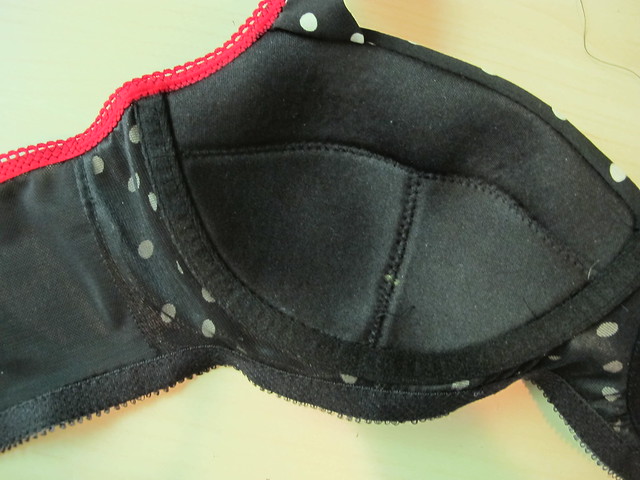
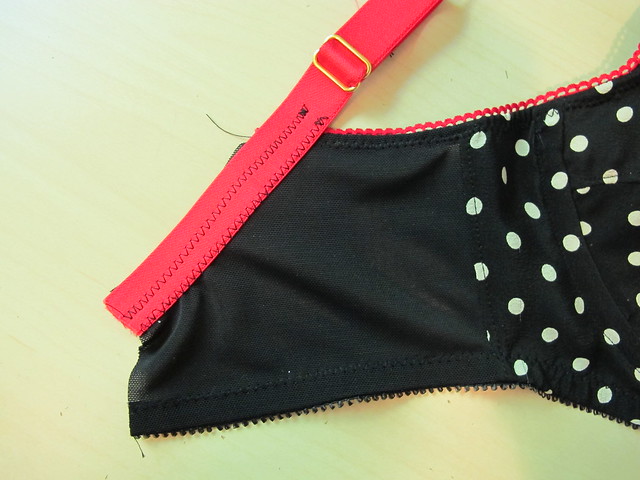
Next is attaching the underarm elastic. I have drawn on this picture to show you where it goes for this pattern – starting at the straight edge of the power mesh back band, curving up the underarm and then going all the way up to the end of the strap.
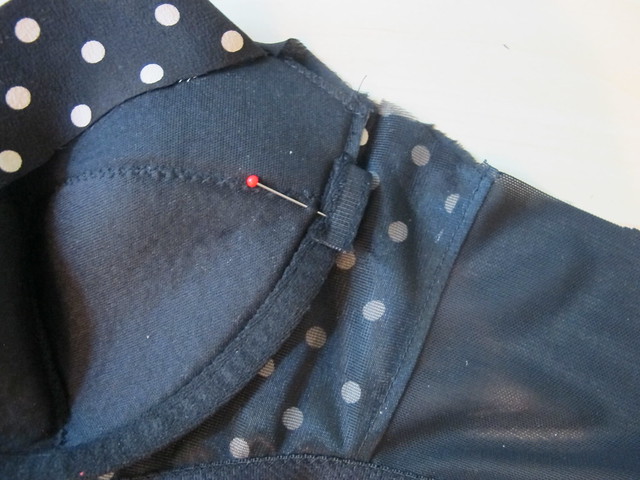
Remember those little unsewn flaps of underwire casing that we left behind? We don’t want to sew over those yet. I push them down and pin them so they are out of the way while I sew the first pass of zigzags.
The underarm elastic is attached the same way as the bottom band elastic – on the right side of the bra, plush side facing up, raw edges even with the non-picot edge. Again, you want to stitch as close as you can to the picot edge, using a zigzag stitch. Don’t stretch the elastic, except when you’re at the underarm area, and only stretch a little at that point.
Here is the elastic after first pass, so you can see how close I got to the picot edge. Not stitching close enough to the picot will result in a line of elastic showing when you flip it back – which doesn’t look very good! By getting right up on the edge, only the scallops when show when it’s flipped back. Also, it’s totally ok to take another pass if you didn’t get close enough the first time. Ain’t no one gonna judge you 😉
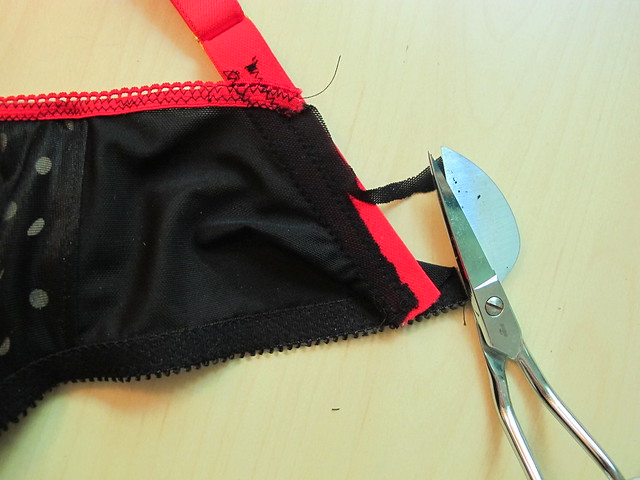
Trim down the excess fabric up to the stitching, as you did with the bottom band elastic. Now you can unpin the casing and measure how short it needs to be in order for the elastic to flip down and comfortably cover it. Chop off however much is necessary.
Flip the elastic to the inside and sew the second pass of zigzag stitching, like so!
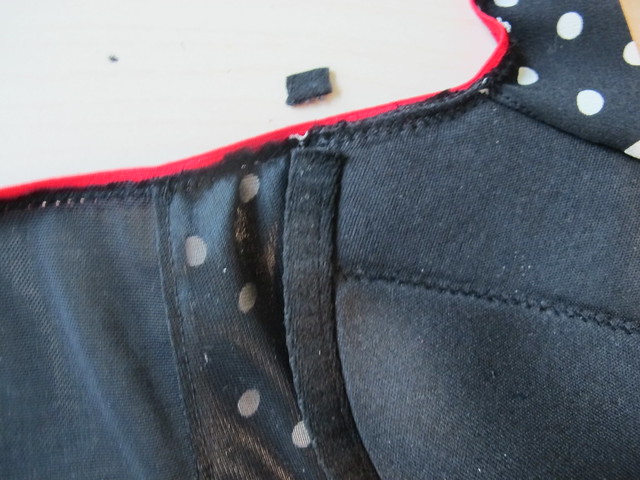
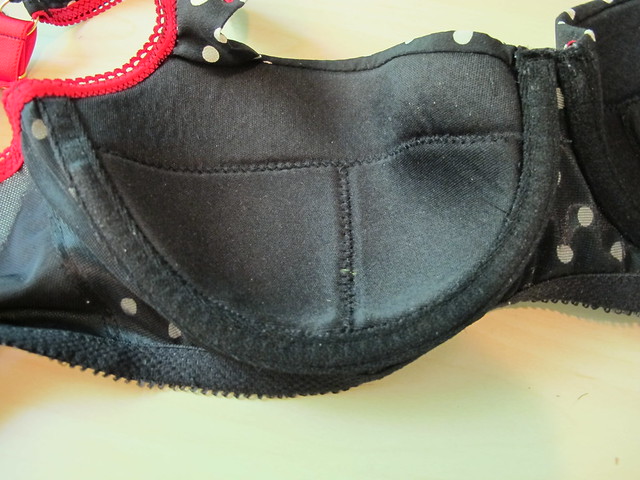
NOW you can sew that underwire casing down! Sew about 1/8″ away from the edge (ahem… using the aforementioned marking on this fabulous clear plastic foot), from one end to the other.

Here’s the finished casing and how things are looking so far! The instructions actually have you do a second line of topstitching, back on the first side of the casing that was sewn down – but I leave that off, as I don’t like the way the double topstitching looks 🙂
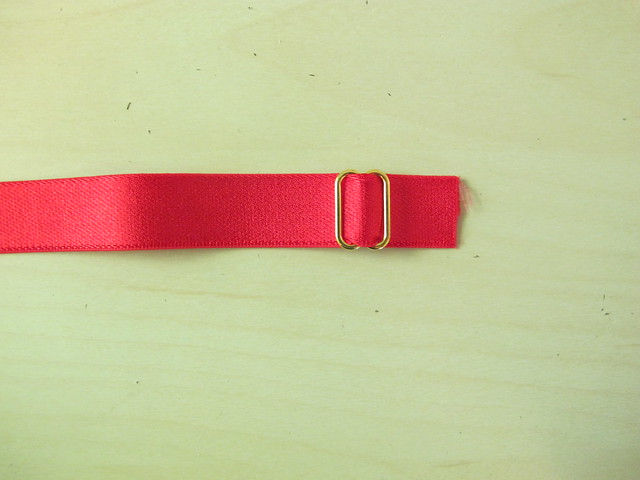
Cut the straps to length according to the pattern, and slide your little slider on like so.
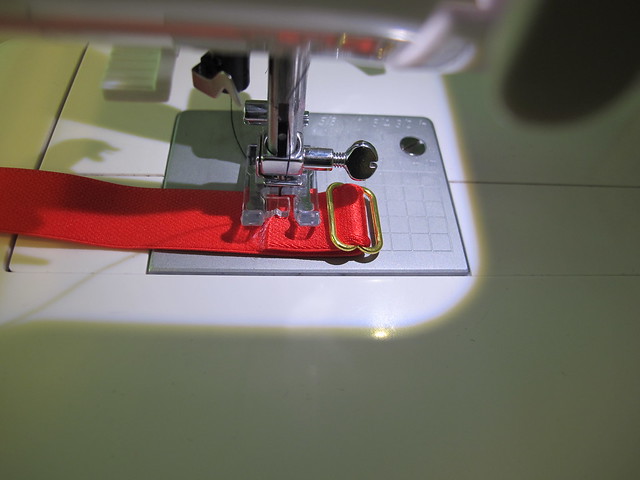
Turn the end back to the inside and stitch down. I use a straight stitch for this, but you can also do a tight zigzag.
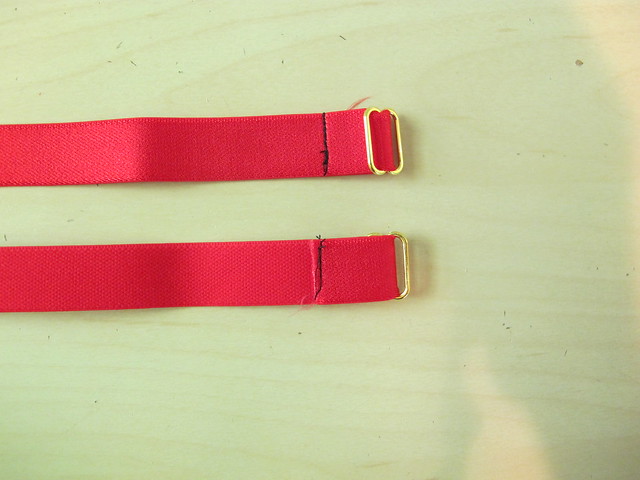
Repeat for two straps.
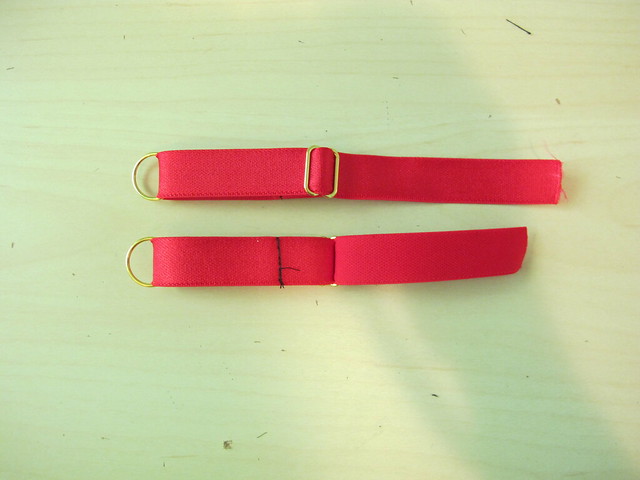
Pass the long end of the strap through the ring, and then back through the slider a second time. Straps are ready to go on the bra!
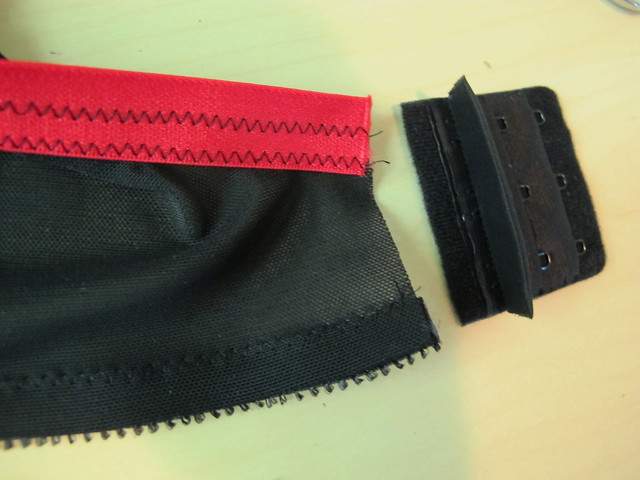
Before you attach the straps, it’s a good idea to make sure the back band is the same width as your hook and eye. Mine is a little taller, so I’ll trim it down.
You want it to be exactly as high as the hook and eye. Mark what needs to be cut, and them trim off, blending into the curve as best you can. Don’t forget to do this to both sides 🙂

The strap lays right on top of the curve, with the raw edge matching the edge of the strap, and the right side facing up. Start by sewing the strap down exactly down the middle, using a slightly narrower zigzag stitch (I’m still using #226 here, I just shortened it a little).
Then sew a second line of zigzags along the inside edge of the strapping. Since the strapping is straight and it’s getting sewn to a curve, just be careful that everything is flat and there are no puckers. Do not stretch the elastic or the mesh.
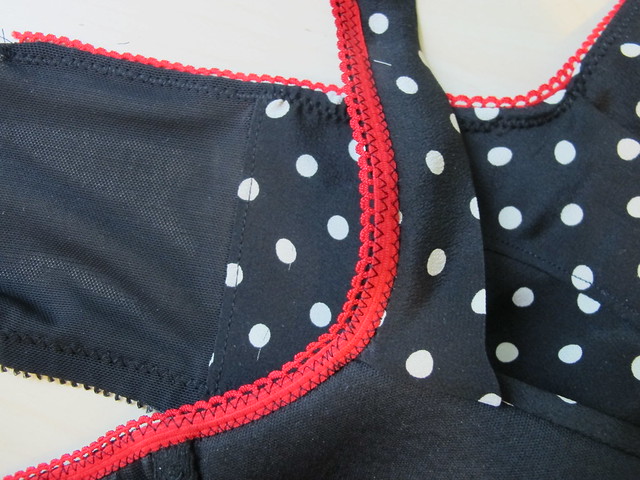
Here’s the strap after both stitching has been finished!
Again, trim your fabric down to meet the line of stitching in the middle.

Loop the end of the fabric strap through the ring, being careful not to twist the straps. Stitch this down, using either a straight stitch or a tight zigzag stitch.
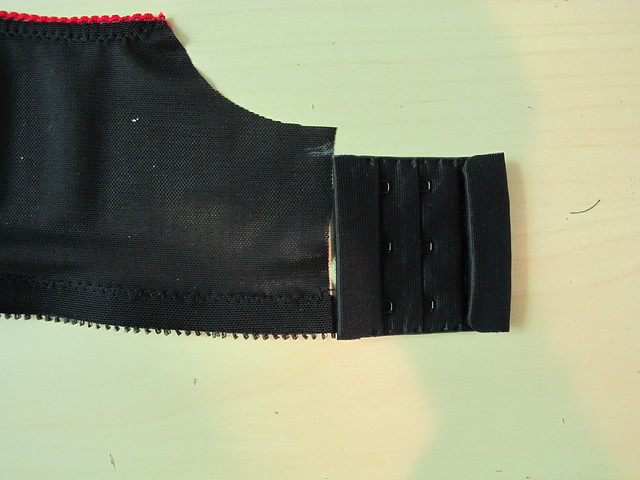
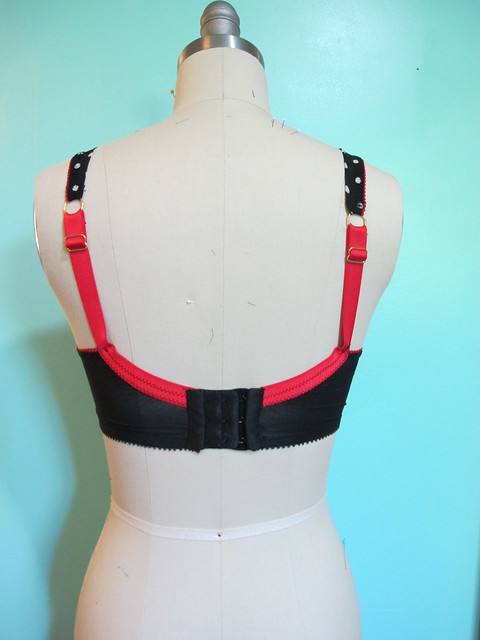
Getting close! To attach the hook and eye pieces, start by opening them up as much as they allow. I am just going to demonstrate with the eyes, but it’s the same process for the hooks.
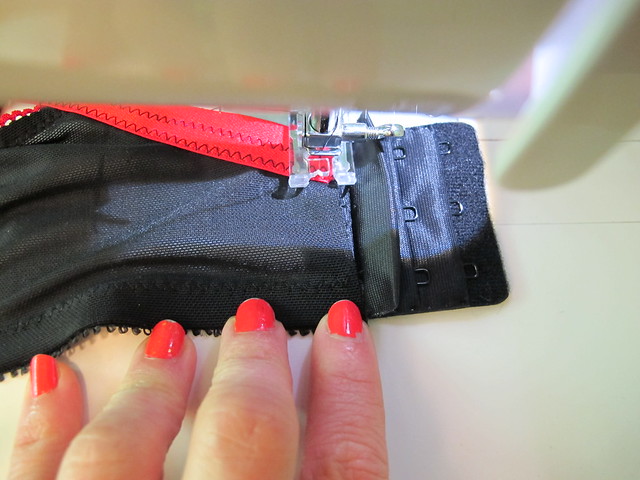
Lay the end of the bra over the bottom part of the hooks, keeping the top free. Set the machine to a long basting stitch and baste into place.

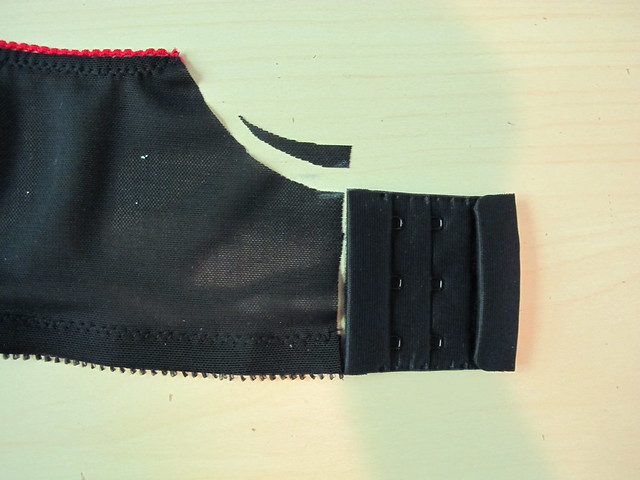
Now fold the top part down and sew down to secure, using a tight zigzag stitch. Try to keep your stitching right along the edge.
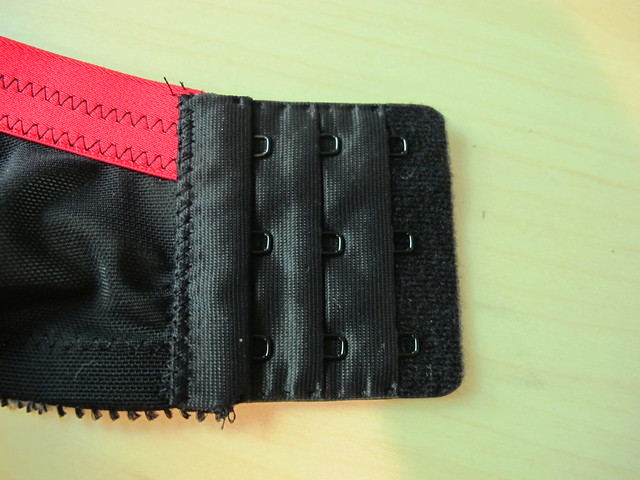
This should give you a pretty perfect application without too much fuss! For the hooks, it’s the same procedure, although you may find it easier to baste the top down first and then flip the bottom (because of the bulk of the hooks). Use a zipper foot to baste and zigzag, as it will allow you to get closer than this plastic foot will.
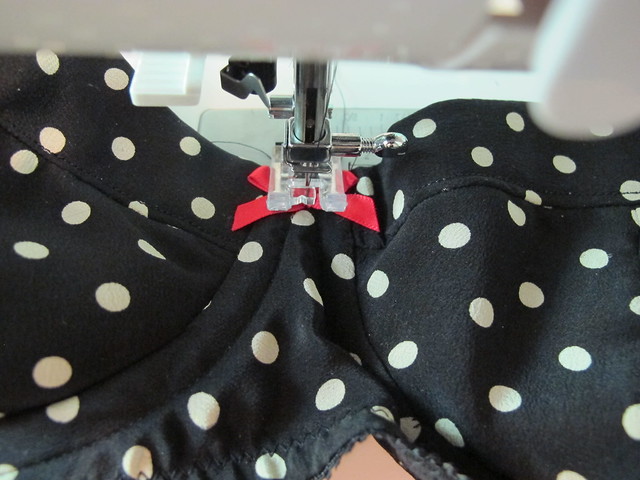
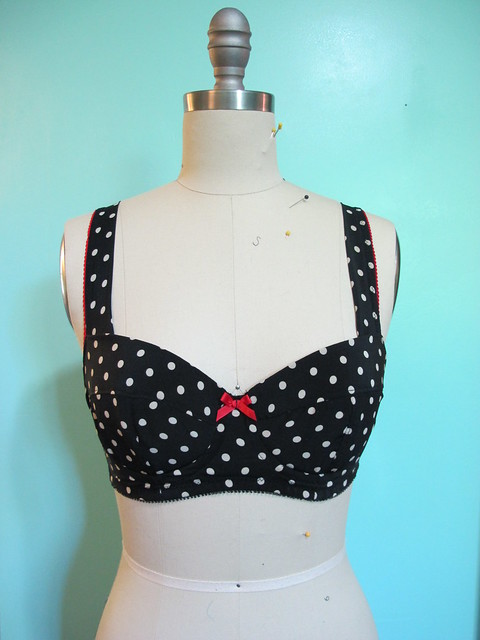
Final steps! Put the underwire in the casing (make sure it’s going in the correct way) and trim the ends of the casing so they are flush with the top of the bridge. Sew a line of stitching along the top to secure and keep the underwires in place, and finish the edges of the casing with a dab of Fray Check. Then put your bow on 🙂 I use a machine for this – just be careful that you don’t sew over the underwires! 🙂 Fi
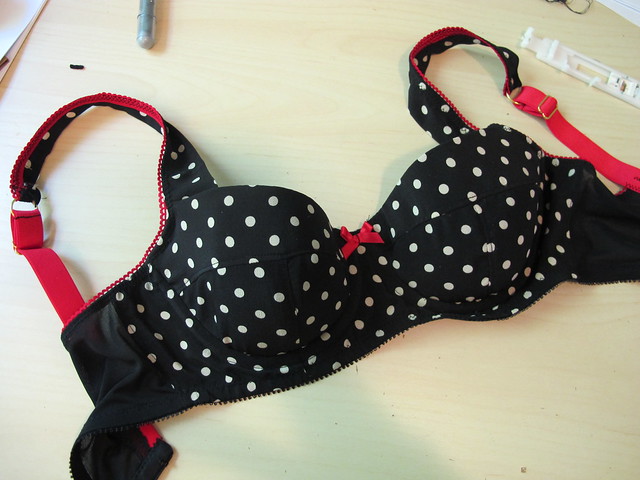
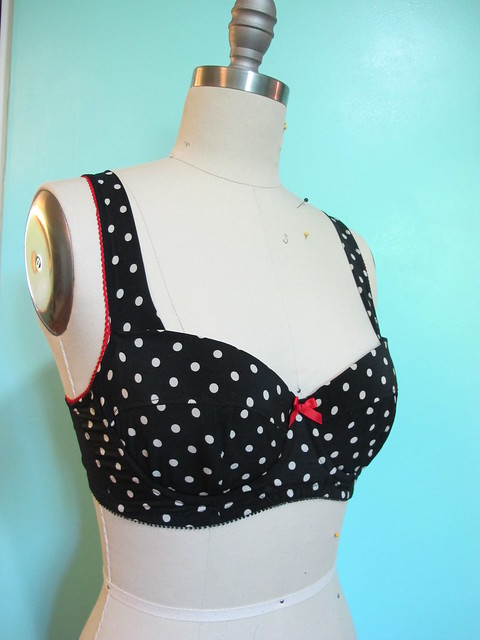
AND FINISHED!!!
This was a fun little project and I’m really impressed with how the Spiegel 60609 handled putting everything together! I think the most impressive part was how the feed dogs kept the fabric moving so it didn’t get eaten into the machine – I usually have to pull my thread tails when I start a seam to prevent this, but the 60609 didn’t require that once! I also love how the machine didn’t bounce around the table AT ALL when I was doing this – even when moving at top speeds.
I reckon I shouldn’t have questioned this machine’s ability to make great lingerie, considering Madalynne uses it for all her bra making workshops! Sometimes I just have to experience things for myself, though 😉


I have never seen tutorials as incredibly well done as yours are, Lauren! Fabulosa! I have no idea how you get such great pictures and the text is so helpful and clear. Plus the bras just get prettier and prettier. Now….if we didn’t love you, we’d have to hate you! 😉
Aw, thank you Beth! I’m really happy to hear that you find them useful 🙂
I admire your careful work. Even though I have made several swimsuits over the years, I do not have the patience or energy to make a bra. Yet I know enough to cheer your work. Bravo! Particularly enjoyed your comment “don’t forget to do this on both sides.” Sounds like the voice of experience 🙂
Oh, I bet you’d find bra making quite easy and similar to making swimwear 🙂 I reckon there’s a little more finesse/time involved with all the bra elastics, but they’re not too far off from each other 🙂 And YES, that is from experience! I make a lot of silly mistakes (don’t we all?) and always use that as an opportunity to prevent other people from making the same mistake, haha!
Great Work as per usual. Small typo on the elastic for the band and the underarm. You printed “plush side facing down” which I believe should read “plush side facing UP”.
GAH, I always mix those up! Good catch and thank you for bringing it to my attention – post has been edited 🙂
Aaaah! I’ve now spent HOURS pouring over patterns and supply lists, and pretty pictures of bras. I put in a small shipment of supplies (foam!) from Finland, and tomorrow I will finally do something with the Watson bra-kit I’ve had for ages. Thanks for your inspiring posts Lauren (these two in particular really helps demystify it all!), I’m pretty sure the Boylston will be my second attempt – after tomorrows Watson. Oooo, this will be fun! 😀 This all actually started with unpacking boxes of fabric after my recent move, and wondering why the hell I have so many 1-metre cuts of silk chiffon (I mean, really? What was I thinking I could make with 1 meter of chiffon??), and… rabbithole. At least the more slippery bits can become bras!
Yes!! Silk chiffon will be a little bugger to cut, but I think it’ll be worth it as that would make a helluva bra! Yay!
This is lovely , the contrast trim is perfect , you make it look easy , I think getting that elastic right would take a bit of practice – am tempted to give it a go and see if my Bernina can cope .
Thank you! I bet you’ll be pleased with how your Bernina handles 🙂 I’ve used a lot of machines and they all seem to handle elastic without too much of an issue!
Great tutorial and look at the machine! I really want to try this foam cup pattern because “headlights” I keep getting pulled away from my machine, hope to get more time once schools out for the kiddos. Have you tried a product called Annie’s Soft and Stable for bra cups? I first saw it for making bags but ZeeDee’s sewing studio pod cast made a reference to it for making foam cups for a swim suit.
I have not heard of that product, but now you’ve got my interest. I’ll have to check it out 😀
Thank you, thank you, thank you. This tutorial was so thoroughly put together. You are awesome for this. I do have one question. Maybe I missed it, but did you use the tablet /phone interface for your pics? Just curious if you snapped pics for each step or somehow used the sewing machine’s technology.
Nope, I just used my real camera! The camera feature on the machine is cool, but it gives you a really extreme close up that I don’t find really useful for tutorial purposes. Good for accurate topstitching, though 😛