
I’ve almost got my lingerie drawer in it’s happy place. Almost. Just a couple more bras on my list and then we are good!

I REALLY like these Watson soft bras! I think they are so pretty, and also oh-so-comfy. I’m not the sort of person who really finds bras uncomfortable – even underwired bras – as I like the feeling of support above all else. However, you can’t deny how comfy this soft bra is! It’s a good bra for lounging around the house on a lazy Sunday (which is exactly what I do most weekends) or even sick days (which is exactly the case today. Wah!). And while I have a few comfy Watson bras already in my bra drawer, I certainly don’t have one that is this pretty!
This is definitely the prettiest bra I’ve ever made. Just look at it!

Always up for learning new finishing techniques, I wanted to try a few things with this lace bra. For one, I wanted to try an all-over lace band that incorporates the beautiful scallops at the bottom edge, instead of a picot elastic edge. All the bra patterns I’ve sewn thus far have been drafted for the elastic edge, but I see so many pretty RTW lace bras that use the scalloped edge and I was determined to try it out for myself. I also used the scallops on the edge of the cups, and experimented with a different way of finishing the scalloped edge of the cups. More on that in a second, though, because I want to talk about the lace that I used first.
I mean, the lace definitely makes the bra. I received this lace from the Tailor Made Shop on Etsy, right when Ying first opened up her shop back in June. It’s taken me this long to sew it up because I really wasn’t sure what to do with it – even the flat yardage is really really pretty. It took me a couple of months to decide how to cut the lace and use the scallops, and figure out how to finish everything so that the bra wouldn’t be too flimsy and would wear well. I’m glad I took my time with this, because I’m super happy with how it turned out.
Tailor Made has a lot of beautiful laces that are all suitable for bra making, as well as a selection of elastics, rings and sliders, underwire channeling – pretty much anything you need to make a bra. There are also kits, which I haven’t tried yet, but I’m really loving the color combinations that Ying has come up with. A lot of new stuff has been added since I first looked at the shop, and it’s all pretty awesome! I can confidently say that the quality of the stuff I received is really nice, and the prices are super reasonable. BTW, there’s a discount code at this bottom of this post – so either read on, or scroll to the bottom if you’re feeling antsy 🙂

Anyway, back to my lace (and bra in general)! I used the Navy & Silver stretch lace for the entire bra – cups, cradle, band – and cut it so that the scallops ran along the bottom of the band and cradle, and the inside of the cups (as drafted, the pattern piece for the cups is a bit too curved for lace scallops, but there is a tutorial on the Cloth Habit site about modifying your pattern piece to have a straight edge). The lace is pretty flimsy on it’s own, so I underlined every single piece with soft navy powermesh (I bought this when I was in Philly at the beginning of the year. It’s a bit less firm than I like for my bands, but it’s great for underlining to add some stability! And the color match is perfect for this lace). The cradle is lined with two layers of powermesh, going in opposite directions (the pattern calls for that areas to be first with no stretch, which I usually use tricot lining for that, but I didn’t have any in navy, so I tried the powermesh. Works pretty well! There’s a small amount of give, but it’s still pretty firm). The straps are made with this lovely floral picot edge elastic (didn’t get a good picture of them, but it has a faint embroidered floral design in the center and a picot edge on both long sides. It’s really pretty!), and I have white matte enamel rings and sliders as well. The rest of the supplies came out of my personal stash. Rather than try to match the navy lace, I just used white findings for everything and I think it looks really nice.


One thing that I really like about this lace is that the topstitching I did just sinks right in. You can’t even really see it, which makes the whole bra look really clean. And I love those tiny scallops! They’re so pretty. Cutting the lace to accommodate the scallops about did my head in, but it was totally worth it.

So, here’s a little how-to on how I got the bottom scallop to work. With most bra patterns, they have you sew the elastic to the right side of the bra, then trim the fabric and turn the elastic to the inside, and topstitch (this is why you would use a picot edge; one side peeks out). This is a great finish, obviously, but turning back the elastic would mean turning back the scallops, so I lurked on some RTW bras at Victoria’s Secret and realized that they just sew the elastic directly the inside of the bra with two lines of zigzag stitching. Because my lace is underlined with powermesh, I cut the pieces to go all the way past the scallops, as shown, and then sewed the elastic to the inside of the bra with two lines of parallel zigzag stitching. I positioned the elastic so that the edge lined up with the innermost point of the scallop.

Then I used my applique scissors to trim the powermesh up to the elastic, leaving the scallops intact.

Ta da! Here it is from the inside. Really easy! As a side note, my wide non-picot elastic is from, I think, Sew Sassy. I ordered a bunch of stuff from the site a few months ago, and was a bit underwhelmed with the quality of the majority of it. I don’t remember what this particular elastic was labeled as (either strapping or band elastic, I reckon), but it’s really ugly and I figured I’d never use it. However, it is perfect for this use here that I have discovered. Yay for stash hoarding! Haha!

For the cups, the scallop edge needs to be stabilized so that it doesn’t stretch out of shape over time. Also, since I underlined the cup with the powermesh, I needed something there anyway to keep the two edges together. I’ve used clear elastic in the past, which works okay, but it doesn’t look that great from the inside and it tends to bunch up a little. So I tried something new – I used the selvage edge from my powermesh as a replacement for the clear elastic. It’s really soft – way softer than clear elastic – and it still has a good amount of stretch. It’s also a perfect color match for the mesh, obviously, so it’s almost unnoticeable. It gives stability, but it doesn’t pull or bunch at all. I LOVE how it turned out. Don’t care if this is the wrong way to make a bra – I’m doing this with all my cup scallop edges!


Here are some more inside shots. I serged all my raw edges with a 3 thread overlock, so the inside is super clean.
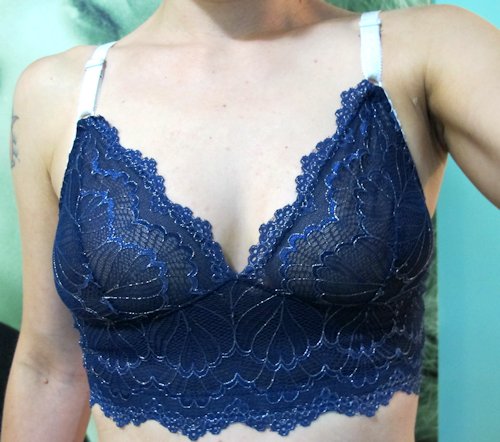
If you want to see what this bra looks like on a real person, click here for a somewhat unflattering picture angle. Again, please don’t pin this image or anything! Posting this strictly for science purposes.
Now! If you love my Watson and want to try out Tailor Made Shop, you can use the code LLADYBIRD for 10% off! This code is good through 9/30/15, so get it while you can! Yay for discounts!

One a completely unrelated note – WORKROOM SOCIAL is officially moving to a bigger space next month! Besides being exciting in itself, this also means that my Weekend Pants Making Intensive has a couple more spaces open! If you missed the chance to register when it was last announced, you still have an opportunity now. The class is November 7-8 and includes the pattern, use of machines and tools (you bring your own fabric and notions), and snacks, a catered lunch and cocktails on both days. You can read more about it on the registration page, or in this blog post. This class sells out pretty fast, so act now or forever hold your peace 🙂 There are also some spots left for our Garment District shopping trip the day before (11/6), which is a nice addition to the pants class where you can check out the Garment District, learn about fabrics that are suitable for pants, and even buy the fabric that you will use in class.
Note: The blue stretch lace, white strapping, and rings and sliders were provided to me free of charge from Tailor Made Shop, in exchange for a blog post mention. All other supplies were purchased by me, and all opinions are all mineeee!


How absolutely gorgeous! Thanks for sharing both the finished bra and your techniques. Love your blog. 🙂
Thank you! 🙂
Lauren, this is my favorite bra of yours to date! I’ve used and LOVE Ying’s lace, but agree that it needs a lot of support in order to make it work. It’s too flimsy on it’s own. I don’t mind the white findings either. It’s color blocking but for bras!
Thank you so much, Maddie!! I think this is my favorite one to date as well – the lace just really makes it extra special 🙂
I love that blue lace, the scallops are gorgeous. It looks very oceanic!
Thank you!
So beautiful! I have GOT to get on the bra-making train.
Yes, you do! 😀
Have you checked here for inspiration yet?
http://hopelesslingerie.tumblr.com/
Wow, I have not seen that! Thanks for the link!
And a glimpse of what I’ve been doing:
http://favoritissimo.tumblr.com/post/129243506796/got-tired-of-girlfriend-stealing-the-shirt-s-ive
Your posts are so inspiring and this one is no exception. It’s just gorgeous!
😀 Thank you so much!
This bra is gorgeous! I love the colour and the use of the scalloped edge is so pretty.
Thank you! I’m glad I was able to incorporate the scalloped edge, it really makes the bra!
This bra is sooo gorgeous!! I see incredible bras all over the blogs nowadays, that is why I want to make one for myself as well. But is seems really hard. Any tips for beginners? Have a nice day, Sophia
http://www.littlesewingmachine.blogspot.de
I think the best advice is to get a pattern with good instructions, and a kit with all the supplies you need included, and just go for it! I wrote a blog post about bra making tips & tricks, too, which you may find helpful 🙂
Wow! As soon as I saw this bra, I could tell you rocked the pattern placement of the lace. It’s amazing!
Thank you! 😀 It was an effort, but it was worth it!
One word… FABULOUS!
😀 😀 😀
What a gorgeous bra – looks super comfy and so pretty. Amazing job, I want one now! :p
http://www.mancunianvintage.com
This is really beautiful finished bra. I’m looking forward to your new posts.
Gorgeous! Great to use the powermesh selvedge in place of clear elastic – I’ve never really liked that stuff 😉
Thanks for the inspiration and sewing tips! Yours was so gorgeous I had to get the same material for my first bra.. 🙂 http://glitterpretzel.blogspot.com/2016/06/navy-silver-lace-watson-bra.html
Oh, I love it!!! You did an amazing job!