
More bras this week! Yay!
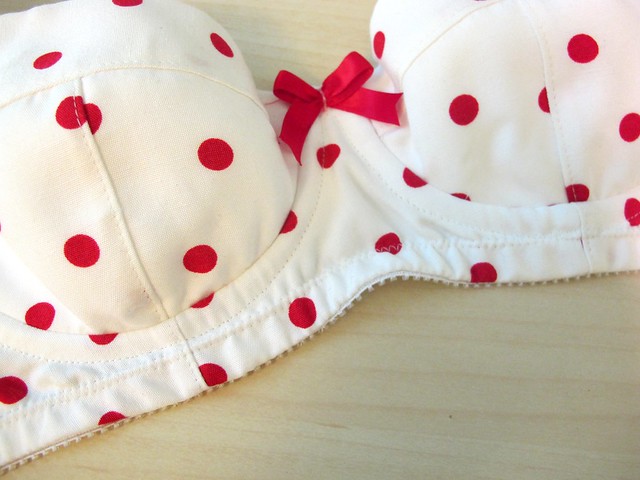
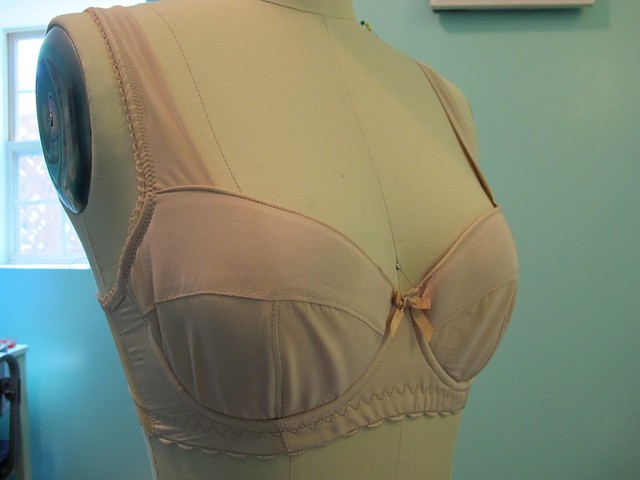
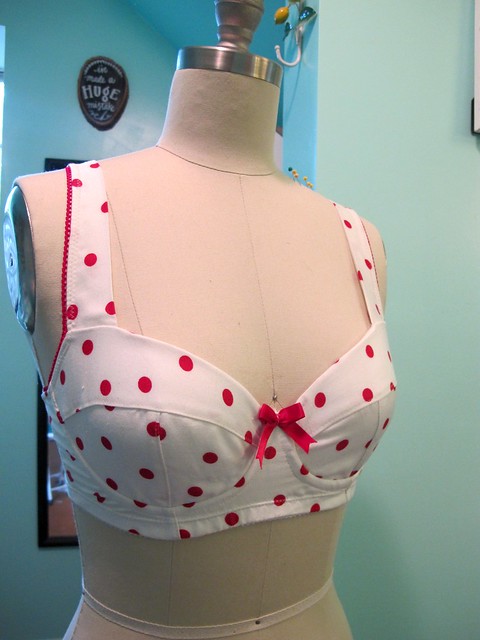
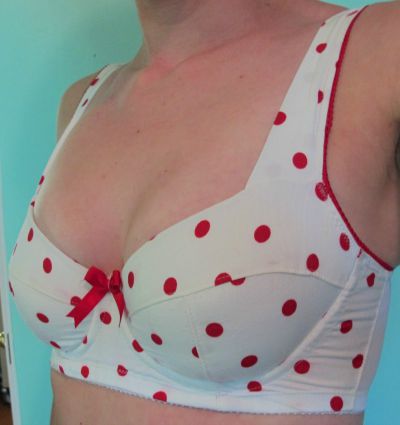
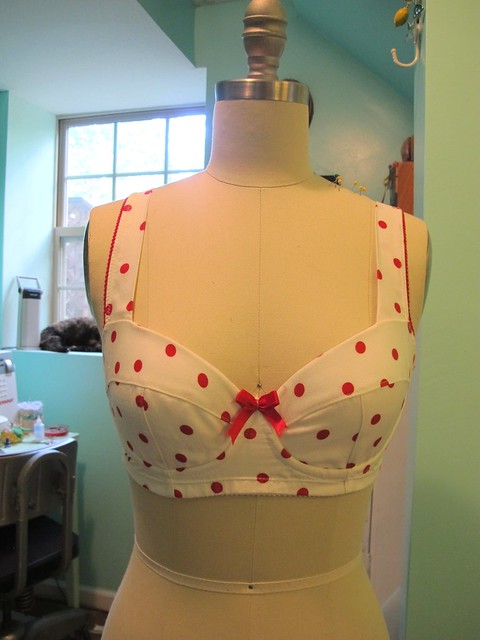 Starting with the prettier one, even though I actually made it second. For both of these bras, I used the Boylston Bra pattern. Guys, I really really love this pattern. I love how it comes together, I love the pretty details (like the fabric strap!), I love that the fabric requirements are so easy to work with (very little fabric, very stable fabric, foam cups, etc), and I just love the shape it gives! It’s a very pretty bra and the pattern is so good. This polka dot bra was the result of a pretty good stash-bust, apart from the foam. Since this pattern is designed for firm woven fabrics – especially with the addition of the foam cups – that means you can make it out of pretty much anything. Sooo I’ve been going kind of crazy with my fabric scraps! I especially thought that this sweet polka dot rayon (the same fabric I used to make my Simplicity mock-wrap dress that I posted last week) would be extra adorable as a bra.
All I had to do was order foam – I had nude and black in stash (from Bra Maker’s Supply, because their stuff is the best). Unfortunately, the Sweet Cups store (the US version of Bra Maker’s Supply) didn’t have any white (see what I mean about limited selection? Wah!), and I wanted white. I bought it from this Etsy shop, which is apparently in the process of closing now 😦 I’m not really sure what “spacer foam” is, but it works pretty well for a bra. It’s a little stretchier than the stuff at Bra Maker’s Supply, and slightly thinner as well (it’s not as cushiony). I read somewhere that you can buy this by the yard at places like Spandex House in the Garment District, so I will probably stock up when I’m there in November. But even 1/4 yard is TONS of foam, especially if you are making teeny little bra cups like what I require hahaha. Heyo, silver lining! 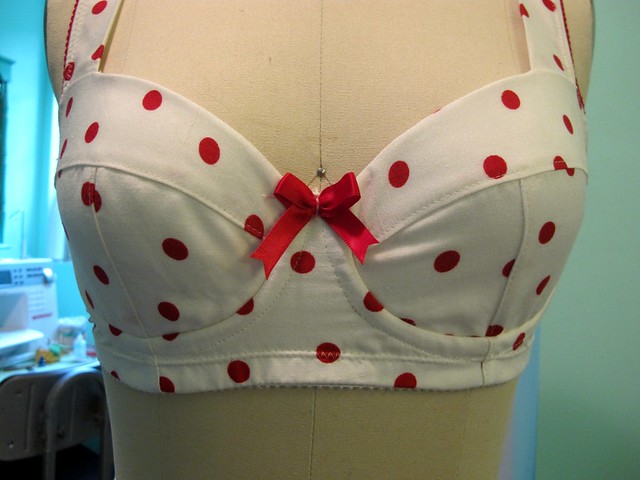
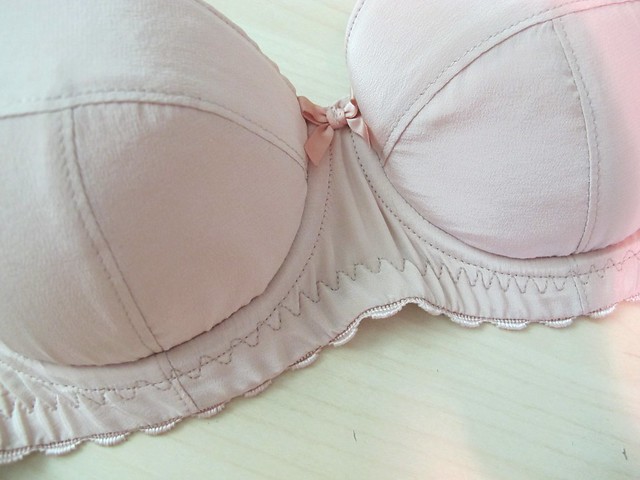
Other than the foam, this whole project was a de-stash. All the elastics and underwire channeling are from the Garment District, I think, and the strapping is leftover from my red bra kit (there wasn’t enough elastic included to make full straps when I was using it to make a red bra, so I had to buy red strapping. But that’s fine because the amount they gave me is perfect for fabric straps! Yay!). I know the pattern doesn’t call for a bow in the center, but I like the bows! This particular bow was ripped off of a retired RTW bra. Ha!
 Here’s the back. I used a firm white powermesh (also from the stash) for the back band. I like the mix of white and red elastics and trims. I’m getting better about mixing and matching my lingerie trims, I think.
Not much else to say about this one. Here are some detail shots: 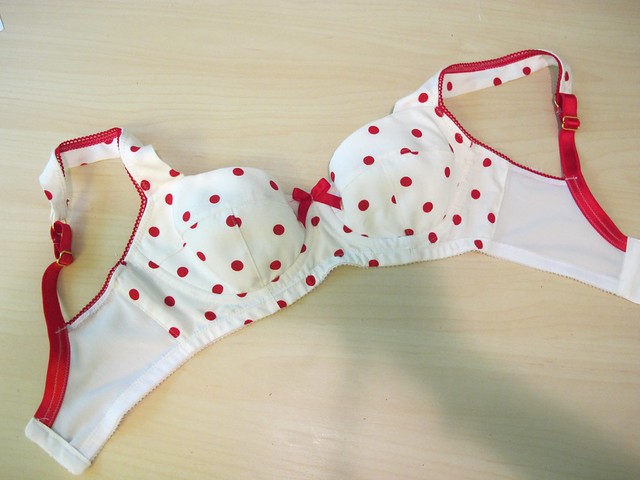
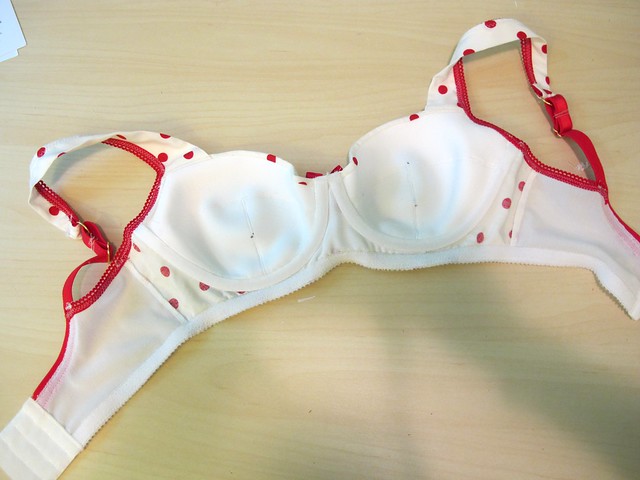
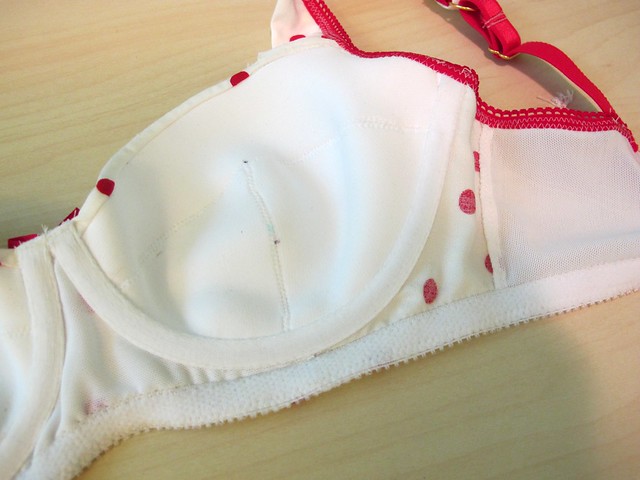 UGH at those black dots in the cups! Those are my notch markings for assembling the cups – I used a ballpoint pin (I think I got that tip from Cloth Habit) to mark the notches, since you can’t really clip the notches and my usual fabric markers and chalk don’t really write well on foam. Except, I forgot that ballpoint pin is FOREVER and I somehow managed to mark both sides. So that’s pretty lame, but, whatever. Can’t do anything about it now except acknowledge the lesson and move on with my bra making!
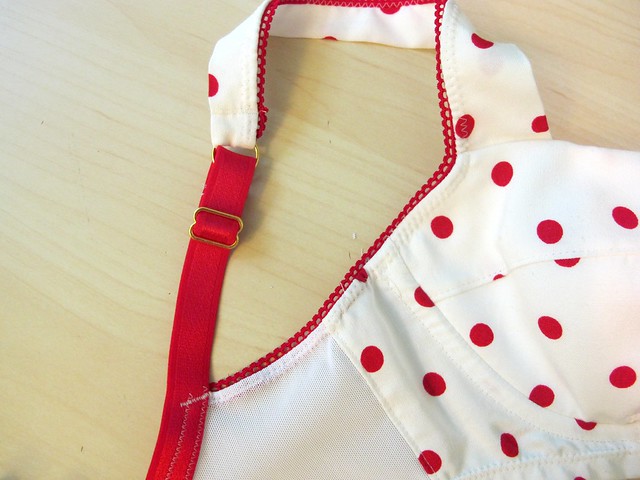
 If you’d like to see a photo of what the bra looks like on an actual person, click this link. I’m not embedding it into the post (or uploading it to Flickr for that matter, yeesh) to cut down on the number of people who see me in a bra, as well as spare any eyes that don’t want to see that sort of thing (um, hi mom! :)). But I acknowledge that it’s really hard to see how a bra fits if it’s not actually on a person – and my dressform doesn’t really fill it out correctly. And those floating ghost bra pics just don’t cut it (plus they are a pain to make haha!). So pleeease do me a solid and don’t post that photo around the internet or pin it on Pinterest or anything like that 🙂 Posting only for science purposes 🙂 Love y’all! OK, MOVING ON.
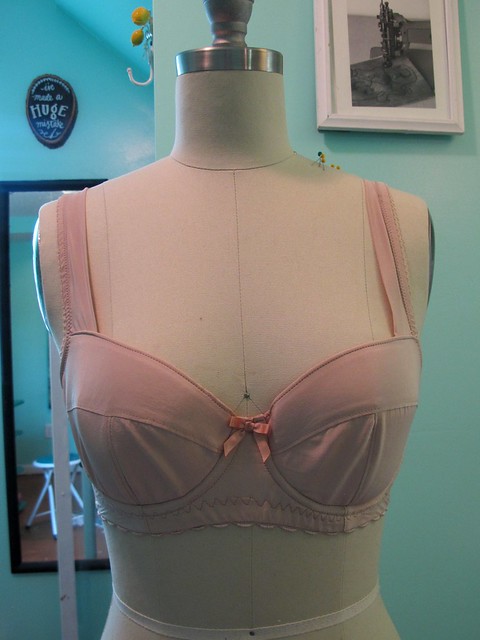
Here’s the other bra I made, using the same Boylston pattern. Nude bras are a SERIOUS hole in my summer wardrobe – er, lingerie drawer. I have a couple, but I always need more. I wear a lot of light/sheer colors in the hot weather! So I really need to make more flesh-colored bras to wear under my clothes, so I can rotate them and let them rest from time to time. This particular make is pretty boring and looks downright sickly on my dressform (don’t hold your breath about me modeling a shot of this one because, eeew), but let’s rejoice that I made it nonetheless! I know it doesn’t look very filled out on this dressform, but I promise it fits me just fine and the cups don’t wrinkle like that.
 Another stash-busting bra, I used silk crepe scraps to make up the outside, and my beloved nude bra cup foam + nude power mesh for the innards. The silk crepe is the same stuff I used for the neck binding of this SJ sweater – which was given to me as a scrap bust, so it’s like, extra extra free. And as sickly as the color looks, it’s pretty close to my skin (did you not click that picture link? I mean. No one is complimenting my ~rosy glow~ over here hahaha). So it works quite well for what I need it to do!
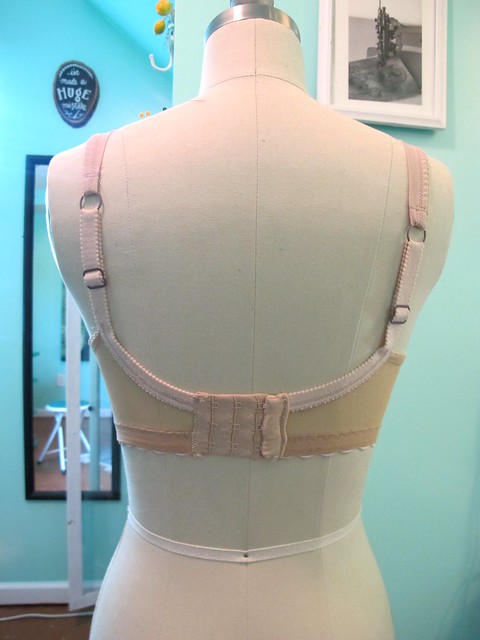
I had someone ask me about the strap assembly – the fabric straps are made with a piece of fabric folded in half and then picot elastic attached to the outside edge to finish it. There is a little bit of elastic at the back, with rings and sliders. The fabric straps are pretty stable in their own right and work quite well, although these particular straps (and not any other Boylston bra I made, for some odd reason) are a tiny bit too long for me. I shortened the elastic as much as possible and they’re still a little more than what I need, so I really need to just dissemble the strap where the ring is attached and shorten the fabric strap by an inch or so. You know, at some point in my life. Maybe tomorrow.
 Again, all the little bits and pieces that make up this bra were from my stash. The sliders and bow were taken off another retired RTW bra. The sliders don’t exactly match, but they “go” well enough.
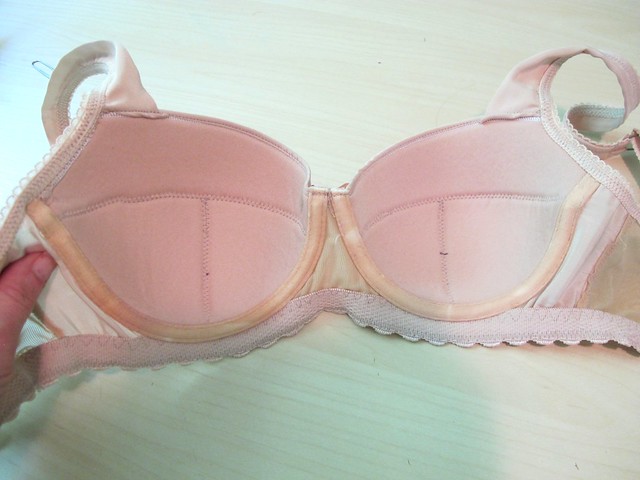
Again with the perma-ballpoint marks! Argh! I made this bra before I made the dotted one – and cut them both at the same time. This was the bra I realized the error of my ways on, unfortunately. I also dyed that channeling, all by myself. I used coffee this time, which gives a much less yellow beige than tea does. It doesn’t quite match the rest of the beige of the bra, but it’s close enough for me.
 I tried using the 3 point zigzag stitch for the bottom elastic of this bra. I don’t like the way it looks at all – it’s too busy, especially where it intersects with the underwire channeling. I much prefer a standard zigzag set a little wider (like what you see on the polka dot bra). Also, I know that the elastic is super wrinkled and bunchy looking when it’s flat, but it smooths out really nicely when I’m wearing it. That being said, I definitely pulled the elastic too taut when I was applying it – something I was able to fix with my next bra, the polka dot one. You really only need to stretch the elastic ever so slightly under the cups and at the bridge when applying it – mostly so it’ll turn to the wrong side more easily and look smooth. Not look like the hot mess I have going on here.
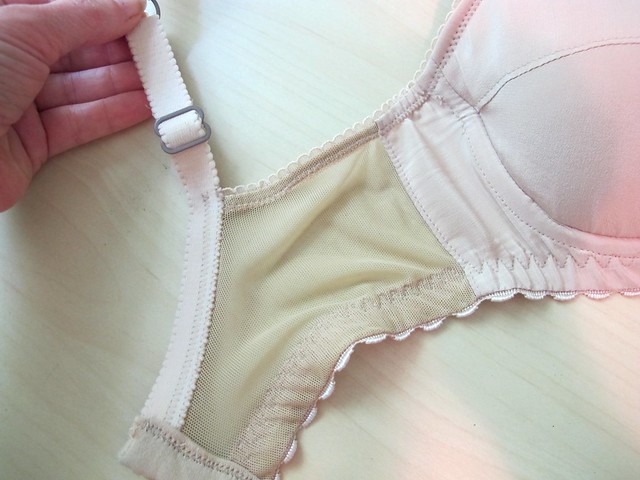
One of my favorite parts about this pattern is being able to add a cute little picot edge at the sides. I love the way it looks!
Ok, I think that’s it! I’ve got a few more ideas for this pattern, so I hope you’re not sick of seeing a million renditions of it just yet! Up next, I want to try making some lace versions – I have a couple of gorgeous pieces from the Tailor Made shop that I’ve been waaay too scared to use, but i think it’s time to bite the bullet and woman up a bit! I also want to experiment with changing the straps – maybe leaving off the fabric strap and using elastic (either removeable or sewn on) in it’s place. I wonder if this pattern would work as a strapless? Would it be as simple as smoothing down the top of the cup, adding some boning to the side seams and possibly rubber elastic at the top of the cup? What do you think?
As a side note, I wanted to share an update with my Made Up pledge. My first rendition of a swimsuit was a HOT MESS (not so much the pattern or the construction – more like, I wanted a string bikini and I absolutely hateeeee the way I look in them! Definitely should have done some sneaky try-before-you-DIY shopping for that one, it would have saved me a bit of headache), and I was all set to try pattern #2 when I realized that I don’t have enough fabric 😦 I made an emergency order for a piece of really cool swimsuit fabric, but it doesn’t appear to have shipped out yet. We leave 2 weeks from today, so hopefully it’ll get here soon!


FYI, hairspray takes ball point pen out. Spray a little on, agitate it then scrub with some soap and water. It should do the trick. 🙂
Ah, thank you for the tip! I will definitely try that 😀
Or rubbing alcohol. Dip a q-tip in it, then kind of roll it over the mark. You’re trying to lift the ink up and off the fabric, rather than rubbing it in, if you know what I mean. Works a treat.
Hi, the link for the pattern doesn’t work! Page not found error comes up 😦
I love your blog so much. I’ve been in between moving for the last three months and all my sewing things are in storage. I swear I’d have gone crazy long before now if I couldn’t read and re-read your wonderful blog. It’ll be ok though. One week and I can move and FINALLY have my own sewing room. Your bras are beautiful. I can’t even stand how cute the red and white one. I feel like it needs red power panties with a matching polka dot bow, but maybe I’m wrong. Beautiful makes. Thank you for posting and helping me maintain my sanity.
Happy to help with keeping the sanity! Although hopefully you’ll be out of storage sooner than later 🙂 And I LOVE the idea of red panties with a matching polka dot bow! I wanted to make matching panties, but wasn’t sure what to do since the base fabric is a woven, and I like my panties to be stretchy. Your suggestion is perfect!
You could do a front panel in the polka dot fabric, too. The bum and sides could be jersey or red power mesh.
Oooooh! The polkadot one is ADORABLE!
Thank you! 😀
Love both of these, even the ‘boring’ one. I’ve been loving reading about your bra-making ventures and especially love the idea of saving bits from RTW retired ones. I will get round to attempting my own one day…
You should do it! Making bras is sooo satisfying 🙂
Might have to try with a simple, non-wired one for yoga first… Have a seriously long sewing queue, but will get there eventually!
I’m new to your blog–but really enjoy it and seeing your polka dot bra — wow–I am so impressed–great result| What is an RTW bra?
Thank you for your amusing narratives–you are quite talented.
RTW is an acronym for Ready To Wear (which means purchased from a store; i.e., not custom made for you) 🙂
I like the polka dot one a lot! Very cute! So how did you do the picture link above for your modeled bra? I’ve been wanting to do something like that, but couldn’t figure out how, and I’m hoping it’s not limited to self-hosted blogs…
It’s pretty easy! You just need somewhere to host the photo (I use the free version of WordPress, so even if you don’t have a .com you can still host photos) and then embed the link into clickable text, as opposed to using the html to make it show up on the blog. It’s the same thing as embedding a clickable link, except the link goes to a photo and not another website. Hope that makes sense 🙂 And THAT’S about as technologically-savvy as I get hahahahaha 🙂
OMG you could wear the polka dot bra with the polka dot dress – that level of coordination would be beyond fabulous!
Don’t think I haven’t considered it!!! 😉
Gah! I freakin’ LOVE the polka dot one!
Thank you!
Hi Lauren! You need a frixxion pen. They are pens, Mark really well, but the ink is temperature sensitive and disappears with steam or the touch of a warm iron. So cool, I love mine. And, they come in many colors.
I gotta admit, I’m pretty leery of those “disappear with heat” pens, as I had a very bad experience with one in the past… but I’ve had a TON of suggestions for the frixxion pen specifically, so I think I’ll check it out. Thanks for the suggestion! 🙂
That polka dot bra is the prettiest bra I’ve seen in ages. You have to wear it with the mock wrap dress! x
Totally! It’ll be like… an inception of the fabric within the dress hahaha 🙂
Oh! Polka dots! I have This fabric! I made a polka dots blouse. Lovely your bra💙
Oh, I bet that’s so pretty! Love this fabric so much 🙂
I use a soft drawing pencil to mark my fabrics – it doesn’t rub off like chalk pens but washes out unlike biro pens. Love this bra pattern – I need to wet my feet making the Watson before I buy/tackle this one though
Oh, that’s a really good suggestion! I have a few soft drawing pencils, so I’ll have to try it out. And definitely try the Watson – it’s a perfect into to bra making 🙂
Love the polka dots!
Spacer foam is a knitted fabric – similar in make up to corrugated cardboard. It has a top and bottom layer with a layer of air pockets in between. These air pockets are made up of the little threads that connect the top and bottom layers. Spacer foam is super breathable and is much cooler to wear during warm weather than traditional foam cups.
Love seeing all the rad lingerie you are making. Thanks for sharing!
Aha! That makes a lot of sense with the spacer foam 🙂 Thanks for the lesson 🙂 Probably should stick with that stuff during the summer, then!
The polka dot one is to die for. Honestly, the little bow is perfect too. I’ve used ball point pens for marking too, and have lived to regret the day….But at least they’r on the inside…
Yes, that’s what I figure! At least they are on the inside where no one can really see them except me 🙂
I have to second the recommendation for a frixon pen – it seems like a regular ballpoint, but irons off again. LOVE both bras. I actually made a silk one in the same as your non-polka dot one, but it didn’t work out, I was not half careful enough with my cutting, poor me. Love yours though!
Oh, that’s a bummer! I had to recut a few pieces for the silk one, because I definitely wasn’t careful enough the first time. But it worked out 🙂 And I’m going to have to try that frixon pen – got a lot of recommendations for it!
Can you please just like – come to Australia, teach me all your amazing skillz and we can live happily ever after! Jks. But I’m super cereal.
Ha! I’d love to if it didn’t cost so much to fly out there. Every time I look at plane tickets, I die a little inside hahaha
I love the polka dot Boylston! Also, for marking the notches, maybe use the kind of tailor’s chalk that’s chalky and rubs right off?
I tried that, but it’s a little too chalky for marking foam. It barely shows and then immediately wipes right off hahaha
cutest bra. Ever!!!!
😀 😀 😀
Girl! Looking goooooooooooood!
Woohoo!! :DDD
The polka dots are so cute. It’s inspired me to make one for me. Definitely love this post! 😀
Ooh, do it! Polka dot bras for everyone!
Those are great bras!. Very nice. Have you heard of Frixion pens? Quilters use them all the time. They come in a ton of different colors and the ink disappears when you iron it. Seriously…heat…poof…gone. Your local quilting store should have them. I can’t sew without mine and I’ve used them on everything from fabric to elastic to foam.
I have not heard of them before this post, but I’ll definitely be checking them out now 🙂 Thanks for the recommendation!
Yes, spacer foam and other mysterious foams can be had by the yard at Spandex House for sure.
I guess know where all my money is going when I get back to the city in November! 😀
Morning Loren,
First and foremost, I love Love LOVE your blog! It was recommended by my Mom who is a lifelong seamstress and you make her giggle :). She never uses curse words, but I think she likes the fact that you do 🙂
I live in Durham, NC with my amazing husband and angel puppy. I work way too much and forced myself to find a hobby so I didn’t have a heart attack at 36. I started seriously sewing about 3 years ago. My Mom has been a seamstress since I can remember. As a child (and when I was allowed to be in the house) I lived in the sewing room with my Mom. She is my best friend and partner in crime. Sewing has only brought us closer.
So I know you don’t want to hear my life story so I will get to the point. :). I will also preface that I did search your blog first to make sure you had not already commented on it. I have also searched YouTube but did not find a good video (I didn’t want to waste your time). Recently I have ventured into making button down shirts for work. They are my favorite and I am too cheap to buy the expensive versions. But each time, regardless of the pattern, the front does not lay flat. I have small boobs so it isn’t a substance issue :). Do you have any recommendations?
I included a picture so you can see my body type. Also so you know I am not a psycho 🙂 I couldn’t find a recent one of my mom and I (it is normally me behind the camera), so I included a few. As you can see, I also cannot commit to a hair color…..although I am recently back to blonde and very happy….for now 🙂
Happy Sunday! Jen
Sent from my iPad
>
Hi Jen!
It’s hard to see what the problem is without a picture (nothing embedded in the comment), so you may want to send me an email instead 🙂 (lladybirdlauren AT gmail DOT com). From what it sounds like, though, you probably do need to add a little bit of boob room to get the front placket to lie flat. Even if you’re small-chested, you might have more dramatic proportions than you think, and aren’t allowing yourself enough room in the bust. Another thought is that you might not be placing the buttons in the right spot – there needs to be a button right exactly at the apex between the breasts, or else it’ll pull open when you move around (even if the shirt otherwise fits perfectly). For shirts that are already made up, this is easy to fix by just inserting a backwards/hidden button inside the placket at that point (you can see what I’m talking about in this post if that helps!). But, you can also email me some of your photos and we can try to work out that way if these tips don’t fix the problem 🙂
I am actually working on making this pattern into a strapless myself…the main issue I have is with making the cups stiff enough to not need a strap to keep the wrinkles out…and experimenting with using an extra long wire and boning… I think I will make a few more regular pattern design bras first though to cement down the cups. First one was pretty good but the second is going to be so much better! I tried the Shelley bra pattern but it just wasn’t working well with my shape and style preferences. That power bar was weird.
Hey Lauren, I love your blog so much, especially that your writing always carries your distinct “voice”—both in style and content! And as my body type is not too far away from yours, I also rrreally appreciate your pattern reviews and fitting reports 😊
When it comes to making a cut-and-sew foam Boylston, I have been going through a
lot of head scratching in the last days: How on earth do I attach the fabric straps to the neckline? If I do a flip-over neckline (sewing the cover right side down to the inside of the foam cup and flipping it to the outside), I cannot attach the strap in a clean and neat way, can I? At least, sandwiching them between foam and cover is not possible with this method… How did you do it? In your photos I cannot see this bit very clearly… Would be _so_ happy if you enlightened me 😀
Elisabeth
Hello!
I actually don’t remember the specific steps I used; it has been a couple of years since I made this pattern and I don’t have it with me right now (currently traveling). But I recall I either used the directions that are in the instructions, or possibly from the Orange Lingerie blog. It wasn’t instructions that I made up on my own. I am pretty sure the strap is sandwiched, though.
Sorry I can’t be more help!
Hej,
turns out I was not seeing the wood for the trees and it is, in fact, rather straightforward 🙈 the strap only “surfaces” in a different spot from where I expected. Maybe I shouldn’t try to sew things for the first time when it’s past midnight 😅 Still, thank you for your quick response! Have a great week, and a good journey!